
Chapter 2
Intents and Intent Filters
In This Chapter
![]() Making a match
Making a match
![]() Getting the lowdown on intents and intent filters
Getting the lowdown on intents and intent filters
![]() Practicing with intents on an emulator or device
Practicing with intents on an emulator or device
![]() Stacking up your activities and tasks
Stacking up your activities and tasks
You can judge people’s mental ages by the kinds of foods they eat. For example, one of my friends seeks out new tastes from strange and exotic lands. Mentally, he’s a mature adult. As for me, I like cheeseburgers and chocolate. Mentally, I’m 12 years old.
So here’s an experiment: Put a meal on a table and then put a bunch of people in the room. Each person has a list of foods that he is willing to eat. Now use the people’s lists to figure out who is (and who isn’t) willing to eat the meal.
Things can become complicated. I love cheeseburgers … but no toppings, please! … unless the topping is mayonnaise. Yes, I want fries with that, but not if they’re sweet potato fries. And above all, if the food’s slimy, or if you have to explain where it comes from, I’m not eating it.
How to Make a Match
Android has two kinds of intents — explicit and implicit:
- An explicit intent names an activity class whose instance is to be launched.
- An implicit intent doesn’t call for a particular activity to be launched. Instead, an implicit intent describes some work to be done. An implicit intent names an action to be taken, along with other information required to perform the action.
 I cover explicit intents in Chapter 1 of this minibook.
Android’s use of implicit intents is like the meal-in-a-room experiment in this chapter’s introduction. An intent is like a meal. An intent filter is like a person’s list of acceptable foods.
First, an activity sends an intent. Then the system compares that intent with other activities' intent filters to find out which activities have filters that match the intent (which activities can perform the desired action). See Figure 2-1.

Figure 2-1: Finding an activity (or other component) to match an intent.
In Figure 2-1, Android checks for a match between the intent and the first of Activity P’s filters. If the intent doesn’t match Activity P’s first filter, Android checks for a match between the intent and the second Activity P filter. If Android finds a match in one of Activity P’s filters, Android marks Activity P as one possible way to fulfill the intent (one possible component that may perform the work described by the intent).
Still in Figure 2-1, Android proceeds to test Activity Q’s, Activity R’s, and Activity S’s filters. Android keeps a list of all the activities that have at least one matching filter.
- If exactly one activity has a matching intent filter, that activity starts running.
- If no activities have any matching intent filters, the app throws an exception.
- If more than one activity has a matching intent filter, the system chooses among the matching activities, or the system displays a menu asking the user to choose among the matching activities.
 Android’s
 startActivity, startService, bindService, and sendBroadcast methods all take arguments of type Intent. So a component that matches an intent can be an activity, a service, or a broadcast receiver. For most of this chapter’s examples, you can safely think activity when you read the word component. Sometimes I blur the terminology and use activity as an example, even though a more complete explanation would use the word component.
In this minibook, I cover services in Chapter 3 and broadcast receivers in Chapter 4.
The parts of an intent
Figure 2-2 shows you the parts of an implicit intent. An intent has an action, data, categories, extras, and flags. Some of these things might be omitted, but Android sets stiff restrictions about what may or may not be omitted, and when.

Figure 2-2: An Android intent.
Each item in Figure 2-2 consists of one or more values. Some typical sample values are in italics.
- In Figure 2-2, the string
"android.intent.action.MAIN"is a value that an action might have. - Also in Figure 2-2, the predeclared
android.content.Intent.FLAG_ACTIVITY_NO_HISTORYJava constant is a value that a flag might have. That Java constant stands for the number 1073741824 (which is the same as hexadecimal 40000000).
 The conventions surrounding Android intents make it difficult to distinguish between strings and predeclared constants. In Figure 2-2,
 "android.intent.action.MAIN" is a string and android.content.Intent.FLAG_ACTIVITY_NO_HISTORY is a predeclared constant (a static final field named FLAG_ACTIVITY_NO_HISTORY in the android.content.Intent class). Oddly, the dots in the string "android.content.intent.MAIN" don’t mean very much. There’s no member named MAIN in any android.content.intent class.
Figure 2-2 indicates that an intent’s data parts come in two flavors — URI and MIME type. An intent may have neither of these, one of the two, or both.
Still looking at Figure 2-2, the MIME in MIME type stands for Multipurpose Internet Mail Extensions. The original MIME standard describes the kinds of data that can be encoded and sent in email messages. For example, when your email program receives a message with Content-Type: text/html, your program interprets the message as an HTML document and displays the content the way web browsers display web pages. When a program receives bits declared with MIME type audio/mp3, image/jpeg, or application/zip, the program interprets the bits as sounds, images, or ZIP files. In each case, the word before the slash is a top-level type, and the word after the slash is a subtype. Familiar top-level-type/subtype pairs include text/plain, text/html, text/xml, image/png, image/jpeg, and image/gif.
Many of the names in Android’s SDK use the shortened term type instead of the full name MIME type.
 Unlike the use of MIME types in ordinary email handling, the matching of Android’s MIME types is case-sensitive. So, for example,
 TEXT/PLAIN in an intent doesn’t match text/plain in a filter. Android’s developer guidelines recommend using only lowercase letters in the names of MIME types.
A Uniform Resource Locator (URL) is any familiar web address that you dictate when someone asks, “Where can I find that on the web?” A Uniform Resource Identifier (URI) looks like a URL, but URIs describe more than just web pages. Every URL is a URI, but a URI isn’t necessarily a URL.
In Android, a URI has from one to four parts, depending on how you count and on what you choose to omit. Figure 2-3 has some examples.

Figure 2-3: Uniform Resource Identifiers.
The kind of URI that I illustrate in Figure 2-3 is a hierarchical URI. The alternative to a hierarchical URI is an opaque URI. An opaque URI, such as tel:6502530000 or mailto:[email protected], has a single colon instead of ://. Also, in an opaque URI, what comes after the colon varies widely depending on the scheme. In fact, what comes after the colon in an opaque URI is the URI’s scheme-specific part. So, for example, in the URI mailto:[email protected], the scheme is mailto and the scheme-specific part is [email protected]. An opaque URI has neither an authority nor a path.
The parts of an intent filter
Your app creates an intent and then calls startActivity(intent). Then what happens? Android has a list of activities installed on the device, and each activity has its intent filters. Android tries to match the intent with each intent filter. If an activity has any matching intent filters, that activity goes on the list of possible responders to the startActivity method call.
An activity’s non-matching filters don’t harm the activity’s chances of going on the list. Even if only one of an activity’s filters matches, the activity still goes on the list of possible responders.
So what constitutes a match between an intent and an intent filter? Funny you should ask! The answer is far from simple.
An intent filter can have actions, data entries, and categories. (Unlike an intent, an intent filter can have more than one action and more than one data entry. Like an intent, an intent filter can have more than one category.) Intent filters don’t have extras or flags. (See Figure 2-4.)

Figure 2-4: The parts of an intent filter.
To find a match between an implicit intent and an intent filter, Android performs three tests:
- Android tests the intent’s action for a match with the filter’s actions.
- Android tests the intent’s categories for a match with the filter’s categories.
- Android tests the intent’s data for a match with the filter’s data.
Android’s rules for matching an intent’s action with a filter’s action are fairly straightforward. And the rules for matching the intent’s categories with the filter’s categories are okay. But neither of these rules is a memorable, one-sentence slogan. And the rules for matching the intent’s data with the filter’s data are quite complicated. Unfortunately, the official documentation about filter matching (http://developer.android.com/guide/topics/intents/intents-filters.html) is ambiguous and contains some errors.
So, to help you understand how intents match intent filters, I take a multifaceted approach. (That’s a fancy way to say that I explain matching a few times in a few different ways.)
Matching: The general idea using a (silly) analogy
Two kinds of people sign up to participate in a speed-dating event. On one side of the room, each participant represents a part of an Android intent. (So one person is an action, the next two people are categories, and so on. I warned you that this analogy would be silly!) On the other side of the room, each participant represents a part of a filter. (See Figure 2-5.)

Figure 2-5: Intent elements and filter elements in a speed-dating event.
Like all dating situations, the room might be imbalanced. The filter might have more actions or more categories. The intent might have more data. It’s almost never a fairy tale, one-to-one mix of people.
In this arena, some people are needier than others. For example, on the intent side, you have an action that absolutely insists on finding a match among the filters. On the filter side, you have a category that’s speed dating only to keep a friend company. This nonchalant category doesn’t need to find a match among the intent’s categories.
As a quick (and not entirely accurate) rule, the entire intent matches the entire filter if and only if each needy person finds a match. Anyone who isn’t needy doesn’t have to be matched. That is, the whole speed-dating event is successful even if no one who’s along only for the ride finds a match. Non-needy parts don’t derail the overall match between the intent and the filter.
So who’s needy and who isn’t? Figure 2-5 gives you a rough idea.
 The matching rules in Figures 2-5, 2-6, and 2-7 are general guidelines. The official rules include some important exceptions. For more info, see the next few sections.

Figure 2-6: Matching the tel scheme.

Figure 2-7: Among the parts of a URI, who needs to meet someone?
The real story
An intent filter has three parts — actions, categories, and data. Android tests each part to determine whether a particular intent matches a particular filter. Each part consists of one or more Java strings. So, roughly speaking, an intent’s part matches a filter’s part if and only if intent_part.equals(filter_part). In this situation, equals is Java’s String comparison method.
In the preceding paragraph, I write “roughly speaking” because Android’s rules for matching actions aren’t quite the same as the rules for matching categories, which in turn are different from the rules for matching data entries. How do you decide whether the one action in an intent matches the many actions in a filter? And what do you do with each part of a URI? Stay tuned, because the next several sections answer these questions.
In the next few sections, be aware of the many kinds of matching — an intent with a filter, an intent with an activity, an intent action with a filter action, a scheme with an entire URI, and several other kinds of matching.
Java methods and XML elements
An intent’s Java methods include the following:
setAction: Sets the intent’s action.addCategory: Adds a category to the intent.setData: Sets the intent’s URI and removes the intent’s MIME type (if the intent has a MIME type).setType: Sets the intent’s MIME type and removes the intent’s URI (if the intent has a URI).setDataAndType: Sets both the intent’s URI and the intent’s MIME type. According to the docs, “This method should very rarely be used.”
You can describe an intent filter in an AndroidManifest.xml document or in Java code. In an AndroidManifest.xml document, the <intent-filter> element has <action>, <category>, and <data> subelements.
<action android:name="string" />
<category android:name="string" />
<data android:scheme="string"
android:host="string"
android:port="string"
android:path="string"
android:pathPattern="string"
android:pathPrefix="string"
android:mimeType="string" />
The intent methods and the data element’s attributes aren’t parallel. For example, with an intent’s setAction method, you set an intent’s one and only action (if you want the intent to have an action). But with a filter’s <action> element, you add one of possibly many actions to the filter. With an intent’s setData method, you set an intent’s one and only URI (if you want the intent to have a URI). But with a filter’s <data> elements, you add individual pieces of a URI.
You typically set a filter’s values in the AndroidManifest.xml file. But in Java code, the android.content.IntentFilter class has lots of useful methods. I list a few here:
addAction: Adds an action to the filter.addCategory: Adds a category to the filter.addDataScheme: Adds a scheme to the filter.addDataAuthority: Adds an authority to the filter.addDataPath: Adds a path to the filter.addDataType: Adds a MIME type to the filter.
As was the case with the intent methods and the data element’s attributes, the intent methods and the filter methods aren’t parallel. An intent’s setAction method does the obvious — it sets an intent’s action (if you want the intent to have an action). A filter’s addAction method, however, lets you add one of possibly many actions to the filter. An intent’s setData method sets an intent’s URI (if you want the intent to have a URI). A filter’s addDataScheme, addDataAuthority, and addDataPath methods, on the other hand, let you separately add pieces of a URI.
Matching actions
According to Figure 2-5, an intent’s action must be matched with one of the filter’s actions. That makes sense because an intent’s action says, “I want a component that can do such-and-such.” And the filter’s action says, “I can do such-and-such.” The filter might have other actions (be able to do other things), but having additional filter actions doesn’t prevent an intent from matching with a filter.
Exactly what is an action? The simplest answer is that an action is a string. You can create your own action string "thisismyaction" or "allmycode.intent.action.DO_THIS" — Android’s docs recommend the latter form. But Android also has a bunch of standard actions — actions reserved for certain kinds of work. For example, when a developer creates an activity that can display something (a document, a web page, an image, or whatever), the developer includes "android.intent.action.VIEW" in the activity’s filter. Then, when you want someone else’s activity to display something, you put the string "android.intent.action.VIEW" (or the constant android.content.Intent.ACTION_VIEW, whose value is the string "android.intent.action.VIEW") in your intent.
Table 2-1 lists some of my favorite standard actions.
Table 2-1 Some Standard Actions for Activities
|
String Value |
Constant Name |
An Activity with This Action in One of Its Filters Can … |
|
|
|
Be the first activity in a brand-new task stack (the task’s root activity). |
|
|
|
Display something. |
|
|
|
Show the user a certain kind of data and then let the user choose an item from the displayed data. With this action, you don’t specify the source (URI) of the data. |
|
|
|
Show the user a certain kind of data and then let the user choose an item from the displayed data. With this action, you specify the source (URI) of the data. |
|
|
|
Same as |
|
|
|
Edit something. |
|
|
|
Add a new empty item to something. (You fill the item later.) |
|
|
|
Delete something. |
|
|
|
Paste something from the Clipboard. |
|
|
|
Search for something. |
|
|
|
Search for something on the Internet. |
|
|
|
Handle an incoming call. |
|
|
|
Make a phone call. |
|
|
|
Launch a dialer with a particular phone number in place, but let the user press the Dial button. |
|
|
|
Do data synchronization. |
|
|
|
Send data to a recipient (with the recipient "to be determined" after the activity is launched). |
|
|
|
Send data to a recipient (with the recipient specified as part of the intent). |
For a complete list of Android’s standard actions, visit http://developer.android.com/reference/android/content/Intent.html.
Here’s a useful experiment:
-
Create a new Android project with two activities — the main activity and a second
OtherActivity.javaactivity. For help creating an app’s second activity, see Book 1, Chapter 6. - Modify the second
activityelement in the project’sAndroidManifest.xml fileso that it reads as follows:<activity android:name=".OtherActivity"><intent-filter><actionandroid:name="com.allmycode.action.MY_ACTION" /><categoryandroid:name="android.intent.category.DEFAULT" /></intent-filter></activity> -
In the main activity, add the following code:
final String THE_ACTION ="com.allmycode.action.MY_ACTION";Intent = new Intent();intent.setAction(THE_ACTION);startActivity(intent);Add this code after the call to
setContentViewin the activity’sonCreatemethod. -
Using Android Studio’s Designer tool, change the layout of the other activity.
Any change is okay. The only reason for changing the other activity’s layout is to help you recognize which of the two activities (the main activity or the other activity) is on the emulator’s screen.
-
Run the project.
As soon as your emulator executes the code in Step 3, Android launches the other activity. The intent’s
"com.allmycode.action.MY_ACTION"matches the filter’s"com.allmycode.action.MY_ACTION", so the other activity starts running. Real Android developers use a standard action (such as the actions in Table 2-1), or they make up dotted action names, such as "com.allmycode.action.MY_ACTION". Real developers type that"com.allmycode.action.MY_ACTION"string in theAndroidManifest.xmlfile (because they must). But in the Java code, real developers create a constant value to represent the string (because it’s good programming practice). The categoryelement in Step 2 of this section’s instructions is an anomaly that I cover in the later section “The fine print.” If you don’t want to skip to that section, simply add the category"android.intent.category.DEFAULT"to each filter in yourAndroidManifest.xmlfile.Continuing the experiment …
- Comment out (or delete) the following element from your project’s
AndroidManifest.xmlfile:<actionandroid:name="com.allmycode.action.MY_ACTION" /> -
Run your project again.
When your emulator executes the Java code in Step 3, your app crashes. The filter has no action matching your intent’s
"com.allmycode.action.MY_ACTION", and (in all likelihood) no other activity on your emulator has a filter containing"com.allmycode.action.MY_ACTION". In Step 7, your app intentionally crashes. Crashes make good learning experiences, but users tend not to appreciate such learning experiences. To avoid the kind of disaster you see in Step 7, call the PackageManagerclass’squeryIntentActivitiesmethod before attempting to callstartActivity. Alternatively, you can put yourstartActivitycall in a try/catch block with theActivityNotFoundException:try {startActivity(intent);} catch (ActivityNotFoundException e) {e.printStackTrace();}Working through these particular lines of code, note that they start out by telling Java to try
startActivity— to call it, in other words. If Android can’t start an activity (that is, if Android can’t find an activity to match theintent), Java jumps to the statemente.printStackTrace(), which displays error information in Android Studio’s Logcat panel. After displaying the information, Java marches on to execute whatever code comes after the attempt to callstartActivity. Therefore, the app doesn’t crash — the error has been caught. For more on try/catch blocks, see Book II, Chapter 3. - Uncomment the element that you commented out in Step 6.
- Modify the other activity’s element in the
AndroidManifest.xmlfile as follows:<activity android:name=".OtherActivity"><intent-filter><actionandroid:name="com.allmycode.action.MY_ACTION" /><actionandroid:name="com.allmycode.action.X_ACTION" /><categoryandroid:name="android.intent.category.DEFAULT" /></intent-filter></activity> -
Run the project again.
When your emulator executes the Java code in Step 3, Android launches the other activity. The intent’s
"com.allmycode.action.MY_ACTION"matches the filter’s"com.allmycode.action.MY_ACTION", and the filter’s additional"com.allmycode.action.X_ACTION"doesn’t require a match.
Following this example’s steps for each intent and filter that you want to test can become very tedious. So to help you test matches, I’ve created a special Android app. For details, see the “Practice, Practice, Practice” section, later in this chapter.
Matching categories
According to Figure 2-5, each of an intent’s categories must be matched with one of the filter’s categories. That makes sense because an intent’s category says, “I want a component of such-and-such kind.” And the filter’s category says, “I’m a such-and-such kind of component.” The filter might have other categories, but having additional filter categories doesn’t prevent an intent from matching with a filter.
Exactly what is a category? Like an action, a category is a string. You can create your own category string "thisismycategory" or "allmycode.intent.category.THIS_KIND"; Android’s docs recommend the latter form. But Android also has a bunch of standard categories — categories reserved for certain kinds of components. Table 2-2 lists some of my favorites.
Table 2-2 Some Standard Categories
|
String Value |
Constant Name |
An Activity with This Category in One of Its Filters Is … |
|
|
|
Able to respond to user actions and to be launched by calls to the |
|
|
|
Able to work in a web browser. |
|
|
|
Displayed as an icon on the device’s app launcher screen. |
|
|
|
When the system offers the user a choice of activities to do a job, the system lists activities with filters possessing this category. |
|
|
|
Launched when the user inserts the device into the dock of an automobile dashboard. |
|
|
|
Able to run with automated software testing tools. |
|
|
|
Able to browse and download new apps. |
|
|
|
Launched when the device first boots. |
Consider the kitty-cat intent created with the following Java code:
final String THE_ACTION =
"com.allmycode.action.MY_ACTION";
final String THE_CATEGORY =
"com.allmycode.category.KITTY";
Intent intent = new Intent();
intent.setAction(THE_ACTION);
intent.addCategory(THE_CATEGORY);
startActivity(intent);
This kitty-cat intent matches a filter with the following XML code:
<activity android:name=".OtherActivity">
<intent-filter>
<action
android:name="com.allmycode.action.MY_ACTION" />
<category
android:name="com.allmycode.category.KITTY" />
<category
android:name="android.intent.category.DEFAULT" />
</intent-filter>
</activity>
The kitty-cat intent also matches the following intent because (in the language of speed dating) filter categories aren’t needy.
<activity android:name=".OtherActivity">
<intent-filter>
<action
android:name="com.allmycode.action.MY_ACTION" />
<category
android:name="com.allmycode.category.KITTY" />
<category
android:name="Otto.Schmidlap" />
<category
android:name="android.intent.category.DEFAULT" />
</intent-filter>
</activity>
The kitty-cat intent does not match the following intent because an intent’s categories are needy:
<activity android:name=".OtherActivity">
<intent-filter>
<action
android:name="com.allmycode.action.MY_ACTION" />
<category
android:name="Otto.Schmidlap" />
<category
android:name="android.intent.category.DEFAULT" />
</intent-filter>
Matching data
Figure 2-5 illustrates an interesting relationship between an intent’s data and a filter’s data:
- If an intent has a URI or if a filter has a URI, one of the filter’s URIs must match the intent’s URI.
- If an intent has a MIME type or if a filter has a MIME type, one of the filter’s MIME types must match the intent’s MIME type.
These rules have some corollaries:
- An intent without a URI cannot match a filter with a URI. A filter without a URI cannot match an intent with a URI.
- An intent without a MIME type cannot match a filter with a MIME type. A filter without a MIME type cannot match an intent with a MIME type.
How does all this stuff about URIs and MIME types make sense? The deal is, data doesn’t perform the same role as an action or a category in matching a filter with an intent. Imagine that an intent announces, “I want a component to perform android.intent.action.VIEW”, and a certain activity’s filter announces, “I can perform android.intent.action.VIEW”. The intent doesn’t care if the filter announces that it can perform other actions.
But what if an intent announces, “I want a component to handle the URI tel:6502530000"? (The URI tel:6502530000 places a call to Google’s corporate headquarters in Mountain View, California.) An appropriate filter contains the tel scheme. (See Figure 2-6.) Now, imagine another intent with no tel: URI and a filter whose only scheme is the tel scheme. (Again, see Figure 2-6.) In this case, the filter says, “I can do something useful with a telephone number, and when I’m invoked, I expect to receive a telephone number.” If the intent has no tel: URI, a match isn’t appropriate.
So the coupling between an intent’s and a filter’s data is stronger than the coupling between actions or the coupling between categories. With the URI part of the data, both the intent and the filter are needy. The same is true of the data’s MIME types.
The following intent and filter form a match:
final String THE_ACTION =
"com.allmycode.action.MY_ACTION";
Intent intent = new Intent();
intent.setAction(THE_ACTION);
intent.setData(Uri.parse("http:"));
startActivity(intent);
<intent-filter>
<action
android:name="com.allmycode.action.MY_ACTION" />
<category
android:name="android.intent.category.DEFAULT" />
<data android:scheme="http" />
<data android:scheme="mymadeupscheme" />
</intent-filter>
The same intent with a slightly modified filter does not form a match because the set of MIME types in a filter is needy:
<intent-filter>
<action
android:name="com.allmycode.action.MY_ACTION" />
<category
android:name="android.intent.category.DEFAULT" />
<data android:scheme="http" />
<data android:scheme="mymadeupscheme" />
<data android:mimeType="text/html" />
</intent-filter>
To match this modified filter, you need either of the following intents:
final String THE_ACTION =
"com.allmycode.action.MY_ACTION";
Intent intent = new Intent();
intent.setAction(THE_ACTION);
intent.setDataAndType(Uri.parse("http:"), "text/html");
startActivity(intent);
final String THE_ACTION =
"com.allmycode.action.MY_ACTION";
Intent intent = new Intent();
intent.setAction(THE_ACTION);
intent.setDataAndType
(Uri.parse("mymadeupscheme:"), "text/html");
startActivity(intent);
Finally, the following intent and filter form a match because the MIME type in the intent matches one of the MIME types in the filter:
final String THE_ACTION =
"com.allmycode.action.MY_ACTION";
Intent intent = new Intent();
intent.setAction(THE_ACTION);
intent.setType("text/html");
startActivity(intent);
<intent-filter>
<action
android:name="com.allmycode.action.MY_ACTION" />
<category
android:name="android.intent.category.DEFAULT" />
<data android:mimeType="abc/xyz" />
<data android:mimeType="text/html" />
</intent-filter>
Matching parts of the data
The section “Java methods and XML elements,” earlier in this chapter, lists methods and XML elements. With an intent’s setData method, you set an intent’s URI (if you want the intent to have a URI). With a filter’s <data> elements, you add individual pieces of a URI. The filter’s pieces don’t have to fit together. For example, the following intent and filter form a match:
final String THE_ACTION =
"com.allmycode.action.MY_ACTION";
Intent intent = new Intent();
intent.setAction(THE_ACTION);
intent.setData(Uri.parse("abc://example.com:2222"));
startActivity(intent);
<intent-filter>
<data android:scheme="xyz" android:host="example.com" />
<data android:port="2222" />
<action
android:name="com.allmycode.action.MY_ACTION" />
<category
android:name="android.intent.category.DEFAULT" />
<data android:scheme="abc" />
</intent-filter>
A filter can have schemes "abc" and "xyz", and authority "example.com". Then the filter’s data matches both intent data "abc://example.com" and intent data "xyz://example.com". This works even if you lump "xyz" and "example.com" in the same <data> element.
With a filter’s addDataScheme, addDataAuthority, and addDataPath methods, you separately add pieces of a URI. For example, the following intent and filter form a match:
final String THE_ACTION =
"com.allmycode.action.MY_ACTION";
Intent intent = new Intent();
intent.setAction(THE_ACTION);
intent.setData(Uri.parse("abc://example.com:2222"));
final IntentFilter filter = new IntentFilter();
filter.addAction(THE_ACTION);
// Constant com.content.Intent.CATEGORY_DEFAULT has
// value "android.intent.category.DEFAULT"
filter.addCategory(Intent.CATEGORY_DEFAULT);
filter.addDataScheme("abc");
filter.addDataScheme("xyz");
filter.addDataAuthority("example.com", "2222");
At this point, a few observations are in order:
- An intent has three similar methods @@
setData,setDataAndType, andsetType. You callsetDatafor an intent with a URI but no MIME type. You callsetTypefor an intent with a MIME type but no URI. You callsetDataAndTypeonly for an intent with both a URI and a MIME type. - You don’t pass a string to the
setDatamethod or to the first parameter of thesetDataAndTypemethod. Instead, you pass an instance of theandroid.net.Uriclass. You do this by applying the methodUri.parseto a string of characters. - Here’s a silly but important detail: A call to
intent.setData(Uri.parse("http:"))with a colon afterhttpmatches the filter element<data android:scheme="http" />without a colon after thehttp. Other combinations of colon/no-colon for a URI scheme fail to make a match.
Matching URIs
Figure 2-5 illustrates an imaginary speed-dating event for the parts of an intent and an intent filter. The figure doesn’t address the matching of one URI with another. So imagine that the URIs in Figure 2-5 bring their darling little children (their schemes, authorities, and paths) to the speed-dating event. As the evening begins, the kids go off to a separate room for a speed-dating event of their own. (Sure, they’re too young to date. But it’s good practice for adolescence.) Figure 2-7 illustrates the neediness situation in the kids' event.
The situation with the URI’s kids is similar to the situation with all data. Everybody’s happy as long as each thing on the intent side matches something on the filter side. For example, the following intent and filter form a match:
final String THE_ACTION =
"com.allmycode.action.MY_ACTION";
Intent intent = new Intent();
intent.setAction(THE_ACTION);
intent.setData(Uri.parse("abc://example.com:2222"));
startActivity(intent);
<intent-filter>
<action
android:name="com.allmycode.action.MY_ACTION" />
<category
android:name="android.intent.category.DEFAULT" />
<data android:scheme="abc" />
</intent-filter>
But with the same intent, the following filter isn’t a match:
<intent-filter>
<action
android:name="com.allmycode.action.MY_ACTION" />
<category
android:name="android.intent.category.DEFAULT" />
<data android:scheme="abc" />
<data android:host="example.com" />
<data android:port="2222" />
<data android:path="/some/stuff" />
</intent-filter>
The fine print
With all the fuss about filter matching in the previous sections, you’d think the issue was covered and done with. But the work is never done. Here’s a list of filter matching’s most important gotchas and exceptions:
-
Android treats activities differently from other components (such as services and broadcast receivers).
You can create an implicit intent with no actions. If you do, a call to
startActivity(intent)doesn’t find a match among any activity filters. However, calls tosendBroadcast(intent)or tobindService(intent,…)may find matches. -
With respect to categories, Android treats activities differently from other components.
When you try to start an activity, Android behaves as if the intent contains the
"android.intent.category.DEFAULT"category. (Android does this even if you don’t execute code to add that category to the intent.) Because of this, an activity filter without the"android.intent.category.DEFAULT"category never matches an intent. Broadcast receivers and services don’t suffer from this anomaly. The activity that starts when the user first presses an app’s icon is the app’s main activity. A main activity’s filter normally contains the action "android.intent.action.MAIN"and the category"android.intent.category.LAUNCHER". If you want an activity to function only as a main activity (and never be started by an app’s call tostartActivity), you can safely omit"android.intent.category.DEFAULT"from the activity’s filter. -
Flip back to Figure 2-3 to see the kinds of URIs you can create. A URI with an authority must have a scheme, and a URI with a path must have an authority and a scheme. Also, a port without a host is ignored. So the following strings are not valid URIs:
example.com: Has an authority but no scheme.http:///folder/subfolder: Has a path but no authority.
The official Android docs provide the following loophole: “ … if a host is not specified, the port is ignored.” So a URI like http://:2000/folderis strange but valid. I’ve created such URIs in captivity, but I’ve never encountered one in the wild. -
A filter URI with nothing but a scheme matches any intent URI with the same scheme. Take, for example, the intent URI to call Google’s corporate headquarters,
tel:6502530000. An appropriate filter probably contains thetelscheme but not the number6502530000. (A filter whose sole URI istel:6502530000can call only Google’s corporate headquarters. The filter would be useful only for an Unsatisfied Google Customer app.)In the same way, a filter URI with a scheme, an authority, and no path matches any intent filter with the same scheme and the same authority.
- The schemes
contentandfileget special treatment. If the intent’s URI has schemecontentor schemefile, and the intent has a MIME type, you can omit the scheme from the filter. (You must still have a match between the intent’s MIME type and one of the filter’s MIME types.) Someday this rule will make sense to me. - Certain parts of the data may contain wildcards or simplified regular expressions. Here are a few examples:
- The type
text/*matchestext/plain. The typetext/*also matchestext/htmlandtext/whatever. The typetext/*matchestext/(with a slash and no subtype) but does not matchtext(with no slash and no subtype). - The type
*/*matchestext/plain. The type*/*also matchesimage/jpeg, and so on. - The type
*(one wildcard with no slash) and*/htmldon’t seem to match anything. - The type
text/ht*doesn’t matchtext/html. (With a top-level type or a subtype, the wildcard must be “all or nothing.”) -
Paths use a simplified regular expression form. (In other words, paths can include wildcards and other funky symbols.) For example, the intent URI
http://example.com/foldermatches the filter URI with schemehttp, authorityexample.com, and path pattern/fol.*. In theAndroidManifest.xmlfile, the data element’sandroid:path,android:pathPrefix, andandroid:pathPatternattributes distinguish among the various possibilities. For more information about path expressions, visit http://developer.android.com/guide/topics/manifest/data-element.html. - With the exception of the host name, the strings in an intent and its filter are case-sensitive. So
text/htmldoesn’t matchTEXT/HTML, andHTTPdoesn’t matchhttp. Buthttp://example.commatcheshttp://EXAMPLE.com. Android’s docs recommend using mostly lowercase letters.
- The type
Practice, Practice, Practice
If I had a nickel for every time I misinterpreted something in Android’s Intent Filters documentation, I’d have enough to fill my tank with gas. (That’s pretty impressive, isn’t it?) I want to believe that this chapter’s sections on intent and filter matching are clear and unambiguous. But in my heart, I know that almost all spoken-language sentences are moving targets. Take, for example, the following sentences:
- Put Mommy in the car behind us.
- I want David Copperfield to read.
- I’ll put the bandage on myself.
- Everything shouldn’t be blue.
- Chew one tablet three times a day until finished.
- I saved everyone five dollars.
- Cars towed at owner’s expense.
- Our cream is so gentle that it never stings most people, even after shaving.
- I hope someday that you love me as much as Amy.
- If he were to learn that wild bears are related to dogs, and never hurt people, then he’d be happier.
The best test of your understanding is not the way you nod while you read this book’s paragraphs. Instead, the best test is when you try your own examples on an emulator or a device. If you can accurately predict the results much of the time, you understand the subject.
Unfortunately, testing intent and filter matching can be tedious. For every change, you have to edit Java code, then edit the AndroidManifest.xml file, and then reinstall your app. Some time ago, after many hours of such testing, I was “mad as hell and I wasn’t going to take it anymore.” I wrote an app to test filter matches one after another without modifying files or reinstalling anything. I named it the Intentsity app (because, as an author, I’m tired of worrying about things being spelled correctly). Needless to say, the app is available for your use through this book’s website — www.allmycode.com/android. (You can thank me later.)
The upper half of the app’s main screen is shown in Figure 2-8.
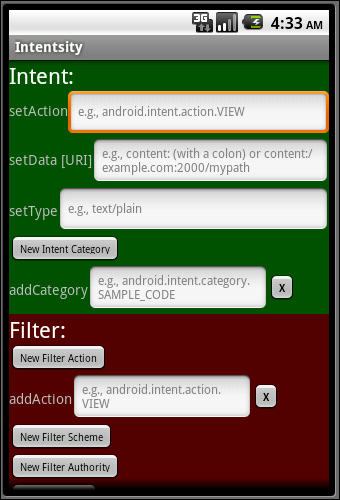
Figure 2-8: A screen for entering intent and intent filter strings.
The Intentsity app’s screen has an Intent part and a Filter part. Both parts have EditText fields for filling in String values. Each EditText field represents an Intent instance method or an IntentFilter instance method. (For a list of such methods, see the section “Java methods and XML elements,” earlier in this chapter.)
Android has no features for setting an activity’s intent filter using Java code. But you can create another component — a broadcast receiver — and set the broadcast receiver’s filter using Java code. (You use the IntentFilter method calls described in the “Java methods and XML elements” section.) Accordingly, my Intentsity app tests the values you type in the EditText fields by attempting to communicate with a broadcast receiver. The fields in the lower part of the app (the Filter fields) match with the Java methods for creating an IntentFilter object, not with the attributes in the AndroidManifest.xml document. To keep things as faithful as possible to Android’s real behavior, my app respects the fact that a broadcast receiver’s filter can do without the category "android.intent.category.DEFAULT". So, when you move from the Intentsity app to your own project, remember to add "android.intent.category.DEFAULT" to your activities' filters.
The section “Java methods and XML elements,” earlier in this chapter, lists methods like setAction and addCategory. Methods beginning with set are for things like an intent’s action because an intent can’t have more than one action. Methods beginning with add are for things like an intent’s category, because an intent can have more than one category.
Figure 2-8 shows a New Intent Category button. When you click this button, the app creates an additional addCategory row.
Figure 2-9 shows the bottom of the Intentsity app’s scrolling screen.
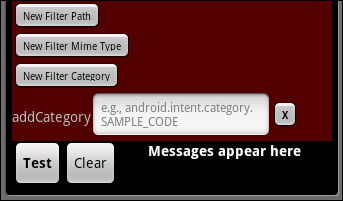
Figure 2-9: Press Test to check for a match.
After filling in some EditText fields, click the Test button, and the app does what it does best:
- The app calls the
Intentclass’s methods to compose an intent from your Intent fields' entries. - The app calls the
IntentFilterclass’s methods to compose a filter from your Filter fields' entries. - The app calls
registerReceiver(myReceiver, filter)to create a broadcast receiver with the new filter. - The app calls
sendBroadcast(intent)to shout out to all the system’s broadcast receivers.
If the receiver’s filter matches your intent, the receiver displays a screen like the one in Figure 2-10.

Figure 2-10: It’s a match!
With or without a match, the app displays toString versions of your intent and intent filter. Figure 2-11 shows the display for a failed attempt to match.
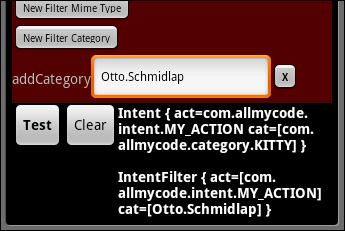
Figure 2-11: The app displays the values in an intent and a filter.
The Intentsity app doesn’t want you to type variables in the EditText fields. In your own Java code, the call setAction(Intent.ACTION_VIEW) sets the intent’s action to the string "android.intent.action.VIEW". But in the Intentsity app, typing Intent.ACTION_VIEW in the topmost field sets the intent’s action to the string "Intent.ACTION_VIEW", which is not equal to (and therefore doesn’t match) a filter string "android.intent.action.VIEW".
Activities and Stacks
The activity that starts when the user first presses an app’s icon is the app’s main activity. When the user first presses the app’s icon, this main activity becomes the root activity in a new task stack. At first, the root activity is the only activity on the task stack. (In Figure 2-12, the app is named App A, and the app’s main activity is named A1.)

Figure 2-12: The user launches an app’s main activity.
For an introduction to Android’s tasks, see Chapter 1 of this minibook.
Imagine that the main activity displays a button. When the user presses that button, Android launches another of Application A’s activities. As a task stack grows, the root activity remains at the bottom of the task stack. (See Figure 2-13.)

Figure 2-13: From an app’s main activity, the user launches another of the app’s activities.
At this point, the user sees activity A2. (Activity A1 isn’t visible. Activity A1 has been Stopped. Think of Activity A1 as being hidden beneath Activity A2.)
Now imagine that the user presses the device’s Home button. Then, on the Home screen, the user touches another app’s icon (the icon for Application B). This creates a brand new task stack (Task B in Figure 2-14).

Figure 2-14: Two tasks.
At this point, the user sees activity B1. (Task A has been placed on the back burner.) Of course, actions taken in Application B can launch other activities of Application B. Each new activity goes on top of the Task B stack. (See Figure 2-15.)

Figure 2-15: Two apps, each with its own task, each task with more than one activity.
Look again at Figure 2-15. When Activity B3 starts up, the user sees Activity B3 on the device’s screen. Activities B4 and B1 are waiting behind B3, and the whole of Task A is sitting silently somewhere in Android’s virtual holding space.
If an app has several activities, those activities don’t necessarily come in any particular order. In Figure 2-15, I emphasize this point by starting activities B1, B4, and then B3. If Application B has an activity named B2, I skip that activity entirely.
If the user presses the device’s Back button, Activity B3 pops off of the Task B stack, and Activity B4 reappears. (See Figure 2-16.)

Figure 2-16: Activity B3 has been destroyed.
But imagine that the user presses the device’s Home button followed by Application A’s icon. Task A belongs to Application A, so Android shifts its attention back to Task A. The user sees Activity A2 (the activity on top of the Task A stack) on the device’s screen. (See Figure 2-17.)

Figure 2-17: Task A is back in business (at the expense of Task B).
But here’s an interesting wrinkle. A call to startActivity in Activity A’s code can launch an activity belonging to a different app (Application B, for example). When this happens, Android launches Activity B by pushing Activity B onto Activity A’s task stack. So one task may contain activities belonging to more than one application. (See Figure 2-18.)

Figure 2-18: Each task has activities from two different apps.
How does Android keep all this straight (without driving Joe User crazy)? Here’s how: Each task stack is associated with a single application — namely, the app containing the task stack’s root activity. And, typically, that single application has an icon on the device’s Home screen or Apps screen.
The user can switch between tasks by pressing the device’s Home button (and maybe the Apps button) and then pressing the icon whose app is associated with the desired task. Alternatively, the user can find the desired app by pressing the device’s Recents button (also known as the Overview button). Look again at Figure 2-18. After pressing the A app’s icon, the user sees whatever is at the top of A’s task stack, and that might be an activity belonging to the B app.
The user has task-level control over the device’s behavior. The user doesn’t have activity-level control. (For example, the user can’t routinely return to an activity that’s in the middle [rather than the top] of a task stack.)
Fly the flag
An intent can contain six kinds of information:
- The name of a component to be invoked (making the intent an explicit intent rather than an implicit intent)
- A set of extras
- One action
- A set of categories
- Some data (one URI and/or one MIME type)
- A set of flags
I cover the first two kinds of information in Chapter 1 of this minibook, and I beat the third, fourth, and fifth kinds of information to death in this chapter’s previous sections. So this section deals with the sixth kind of information — namely, flags.
A flag tells Android how to deal with a component. In most cases, the component is an activity that you’re launching by calling startActivity or startActivityForResult. A typical programming pattern is as follows:
Intent = new Intent();
intent.setAction(someActionString);
intent.addCategory(someCategoryString);
intent.addFlags(int_value_representing_one_or_more_flags);
startActivity(intent);
Examples of Android’s standard flags include the following:
Intent.FLAG_ACTIVITY_NO_ANIMATION: When starting the new activity, don’t animate the activity’s entrance. That is, if the norm is to slide the new activity over the existing activity, don’t slide it. Just make the new activity “poof” onto the screen.Intent.FLAG_ACTIVITY_NO_HISTORY: Start the new activity, but destroy this new activity as soon as the user navigates away from it. For example, if the user presses Home and then returns to this task, restore the task as if this new activity had never been added. (See Figure 2-19.)Intent.FLAG_ACTIVITY_SINGLE_TOP: If an instance of the activity is already on top of the activity stack, don’t start another instance of that activity. Instead, use the instance that’s already on top of the stack. (See Figure 2-20.)Intent.FLAG_ACTIVITY_CLEAR_TOP: If the activity being started already has an instance somewhere on the task stack, don’t add a new instance at the top of the task stack. Instead, grab all activities above the existing instance, and pop them off the stack. (Yes, destroy them.) See Figure 2-21.Intent.FLAG_ACTIVITY_NEW_TASK: Each task is associated with an application. Imagine that you have two applications — App A and App B — and that the currently active task is associated with App A. Inside this task, you callstartActivityto launch an activity in the other app — App B. What happens?-
Without the
FLAG_ACTIVITY_NEW_TASKflag, Android pushes the newly starting activity on top of the current stack. (See Figure 2-22.) But with theFLAG_ACTIVITY_NEW_TASKflag, Android looks for a task associated with App B.- If Android finds such a task, Android pushes the newly starting activity onto that task.
- If Android doesn’t find such a task, Android creates a task associated with App B. (Refer to Figure 2-22.)
With or without a previously existing App B task, Android displays the newly started activity on the user’s screen.
-
Intent.FLAG_ACTIVITY_EXCLUDE_FROM_RECENTS: Don’t display this activity’s app when the user presses the device’s Recents button.Android creates a
"Recents"item when you create a new task. CombiningFLAG_ACTIVITY_EXCLUDE_FROM_RECENTSwithFLAG_ACTIVITY_NEW_TASKsuppresses the creation of a new"Recents"item. -
Intent.FLAG_ACTIVITY_CLEAR_TASK: When used withFLAG_ACTIVITY_NEW_TASKand the new activity is already part of a task, make the task containing the activity be the active task and obliterate all other activities currently on that task. (See Figure 2-23.) The FLAG_ACTIVITY_CLEAR_TASKfeature joined Android’s SDK with the release of Honeycomb. If your minimum SDK is older than Honeycomb, don’t try to useFLAG_ACTIVITY_CLEAR_TASK. Intent.FLAG_ACTIVITY_REORDER_TO_FRONT: If an instance of the activity being started is already part of the current task, reorder the task’s activities so that the instance is on top. (See Figure 2-24.)Intent.FLAG_EXCLUDE_STOPPED_PACKAGES: When searching for an activity to start, consider only activities that are currently active or paused.
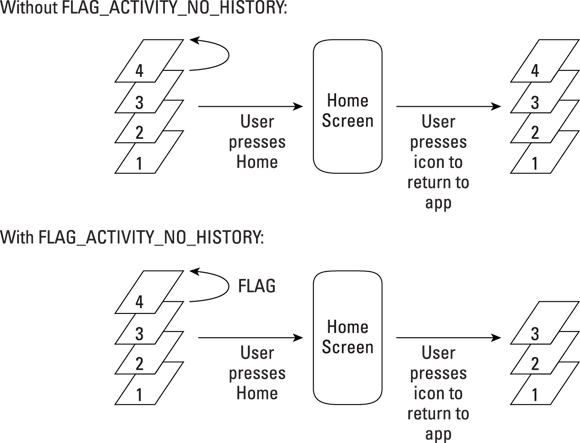
Figure 2-19: The effect of adding FLAG_ACTIVITY_NO_HISTORY.

Figure 2-20: The effect of adding FLAG_ACTIVITY_SINGLE_TOP.

Figure 2-21: The effect of adding FLAG_ACTIVITY_CLEAR_TOP.

Figure 2-22: The effect of adding FLAG_ACTIVITY_NEW_TASK.

Figure 2-23: The effect of adding FLAG_ACTIVITY_CLEAR_TASK.
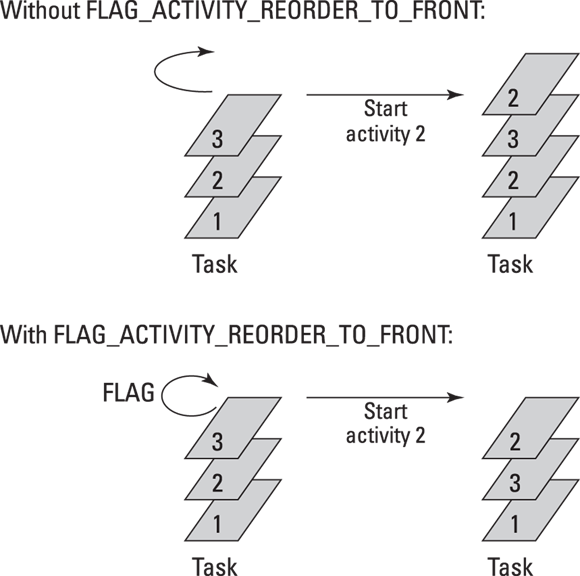
Figure 2-24: The effect of adding FLAG_ACTIVITY_REORDER_TO_FRONT.
Each of these flags has a Java int value, and you can combine two or more flags with Java’s bitwise OR operator (|). For example, you can write
intent.addFlags(FLAG_ACTIVITY_NEW_TASK |
FLAG_ACTIVITY_CLEAR_TASK);
The result is 0x10000000 | 0x00008000, which is 0x10008000.
The FLAG_ACTIVITY_CLEAR_TASK feature joined Android’s SDK with the release of Honeycomb. If you try to use this flag’s numeric value (0x00008000) on a pre-Honeycomb system, you don’t get a compile-time error. After all, the compiler thinks 0x00008000 is a perfectly good hexadecimal number, even when you pass the number to the addFlags method. But at runtime, a pre-Honeycomb system says, “I can’t do addFlags(0x00008000), so I think I’ll display a rude application has stopped unexpectedly message.” So to catch such errors before runtime, always use the constant name FLAG_ACTIVITY_CLEAR_TASK as well as other SDK constants.
Keeping an eye on activities and tasks
To test your intent flags, you must keep track of the apps, tasks, and activities as they run on your emulator or device. This isn’t always straightforward. Fortunately, Android’s dumpsys command can show you a snapshot of the current state of affairs. Here’s how:
-
In Android Studio’s main menu, choose Run ⇒ Run ‘app'.
An app starts running on an emulator or device of your choosing.
-
At the bottom of Android Studio’s main window, click the Terminal tool button.
As a result, your development computer’s Terminal or Command Prompt (MS-DOS) window appears in the lower portion of the Android Studio window.
-
In the Terminal panel, type
adb shell.As a result, you see the pound sign (
#) prompt. This prompt comes from the Android system (the emulator or the real device). Whatever command you type next goes directly to the running Android system. -
Type
dumpsys activity.A lot of text whizzes by very quickly in the Terminal panel. Fortunately, you can scroll to see text that raced off the screen.
If you do a bit of scrolling, you see something like this:
ACTIVITY MANAGER ACTIVITIES (dumpsys activity activities)
Display #0 (activities from top to bottom):
Stack #1:
Task id #268
TaskRecord{ae33feb #268 A=com.allyourcode.appb U=0 sz=1}
Intent { act=android.intent.action.MAIN
cat=[android.intent.category.LAUNCHER] flg=0x10000000
cmp=com.allyourcode.appb/.MainActivity }
Hist #0: ActivityRecord{e150d7c u0
com.allyourcode.appb/.MainActivity t268}
Intent { act=android.intent.action.MAIN
cat=[android.intent.category.LAUNCHER] flg=0x10000000
cmp=com.allyourcode.appb/.MainActivity }
ProcessRecord{28bf81bb 1447:com.allyourcode.appb/u0a89}
Task id #267
TaskRecord{3afe0148 #267 A=com.allyourcode.appa U=0 sz=2}
Intent { act=android.intent.action.MAIN
cat=[android.intent.category.LAUNCHER] flg=0x10000000
cmp=com.allyourcode.appa/.MainActivity }
Hist #1: ActivityRecord{1dc06f54 u0
com.allyourcode.appa/.Activity2A t267}
Intent { cmp=com.allyourcode.appa/.Activity2A }
ProcessRecord{4b366d8 1388:com.allyourcode.appa/u0a88}
Hist #0: ActivityRecord{2e0b1892 u0
com.allyourcode.appa/.MainActivity t267}
Intent { act=android.intent.action.MAIN
cat=[android.intent.category.LAUNCHER] flg=0x10000000
cmp=com.allyourcode.appa/.MainActivity }
ProcessRecord{4b366d8 1388:com.allyourcode.appa/u0a88}
Running activities (most recent first):
TaskRecord{ae33feb #268 A=com.allyourcode.appb U=0 sz=1}
Run #2: ActivityRecord{e150d7c u0
com.allyourcode.appb/.MainActivity t268}
TaskRecord{3afe0148 #267 A=com.allyourcode.appa U=0 sz=2}
Run #1: ActivityRecord{1dc06f54 u0
com.allyourcode.appa/.Activity2A t267}
Run #0: ActivityRecord{2e0b1892 u0
com.allyourcode.appa/.MainActivity t267}
mResumedActivity: ActivityRecord{e150d7c u0
com.allyourcode.appb/.MainActivity t268}
Stack #0:
Task id #266
TaskRecord{83aabe1 #266 A=com.android.launcher3 U=0 sz=1}
Intent { act=android.intent.action.MAIN
cat=[android.intent.category.HOME] flg=0x10000000
cmp=com.android.launcher3/.Launcher }
Hist #0: ActivityRecord{3bf784bb u0
com.android.launcher3/.Launcher t266}
Intent { act=android.intent.action.MAIN
cat=[android.intent.category.HOME] flg=0x10000000
cmp=com.android.launcher3/.Launcher }
ProcessRecord{1941462e 807:com.android.launcher3/u0a37}
Running activities (most recent first):
TaskRecord{83aabe1 #266 A=com.android.launcher3 U=0 sz=1}
Run #0: ActivityRecord{3bf784bb u0
com.android.launcher3/.Launcher t266}
With some careful experimentation, you’ll be able to decipher the output of the dumpsys activity command and to use the output to gain a deeper understanding of Android’s activities, tasks, and intent flags.
 Needless to say, I created an app to help you experiment with intent flags. My flag-testing app is very much like the Intentsity app that I describe previously in this chapter. You can download the Flagacity app and its source code from this book’s website —
 www.allmycode.com/android.