Chapter 3
An Android Potpourri
In This Chapter
![]() Programming Android to make phone calls
Programming Android to make phone calls
![]() Working with text messages and device sensors
Working with text messages and device sensors
![]() Responding to multi-touch events
Responding to multi-touch events
![]() Drawing things
Drawing things
![]() Distracting the user with a progress bar
Distracting the user with a progress bar
![]() Putting Java threads to good use
Putting Java threads to good use
A potpourri is an assortment — a little of this and a little of that. It’s a mixture of pleasant things related in one way or another, but not dependent upon one another. It’s a medley of songs or a bunch of nice-smelling dried plants. It’s a salmagundi with meats, eggs, vegetables, fruits, and nuts. It’s a pastiche such as Queen’s “Bohemian Rhapsody.” It’s a plate of gefilte fish with a mix of carp, pike, perch, salmon, mullet, whitefish, and other things whose odors form an orange haze that spreads throughout the house. But in this book, a potpourri is a collection of useful programming goodies.
Making Phone Calls
Before smartphones came along, the most techno-savvy people around carried personal digital assistants (PDAs). A PDA (a PalmPilot or an iPAQ with Windows CE) did many of the things that today’s smartphones do. But the early PDAs didn’t make phone calls. So they didn’t catch on with the general public.
An explosion in mobile device usage came when companies merged computing with telephony. In retrospect, it’s not surprising. After all, communication is a “killer app.” People need to share. People talk to friends, arrange meetings, send photos, and post recommendations. Exchanging ideas is one of humanity’s greatest strengths.
This section puts the phone in smartphone.
Two ways to initiate a call
Making a phone call requires two steps:
- Dial a phone number.
- Press the Call button.
Accordingly, Android has two intent actions — one for dialing and another for calling. This section’s code, shown in Listing 3-1 illustrates both situations.
Listing 3-1: Dialing and Calling
package com.allmycode.samples;
import android.app.Activity;
import android.app.AlertDialog;
import android.content.Context;
import android.content.DialogInterface;
import android.content.Intent;
import android.net.Uri;
import android.os.Bundle;
import android.telephony.TelephonyManager;
import android.view.View;
public class MyActivity extends Activity {
@Override
public void onCreate(Bundle savedInstanceState) {
super.onCreate(savedInstanceState);
setContentView(R.layout.main);
}
public void onButtonClick(View view) {
boolean isOk = true;
Intent intent = new Intent();
if (!deviceIsAPhone()) {
displayAlert();
isOk = false;
}
if (isOk) {
switch (view.getId()) {
case R.id.dialButton:
intent.setAction(Intent.ACTION_DIAL);
break;
case R.id.callButton:
intent.setAction(Intent.ACTION_CALL);
break;
default:
isOk = false;
}
intent.setData(Uri.parse("tel:234-555-6789"));
}
if (isOk) {
startActivity(intent);
}
}
boolean deviceIsAPhone() {
TelephonyManager manager = (TelephonyManager)
getSystemService(Context.TELEPHONY_SERVICE);
return manager.getPhoneType() !=
TelephonyManager.PHONE_TYPE_NONE;
}
void displayAlert() {
AlertDialog.Builder alertBuilder =
new AlertDialog.Builder(this);
alertBuilder
.setTitle("Not a telephone!")
.setMessage("This device can’t phone make calls!")
.setPositiveButton("OK", new MyDialogListener())
.show();
}
class MyDialogListener implements
DialogInterface.OnClickListener {
public void onClick(DialogInterface dialog,
int whichButton) {
}
}
}
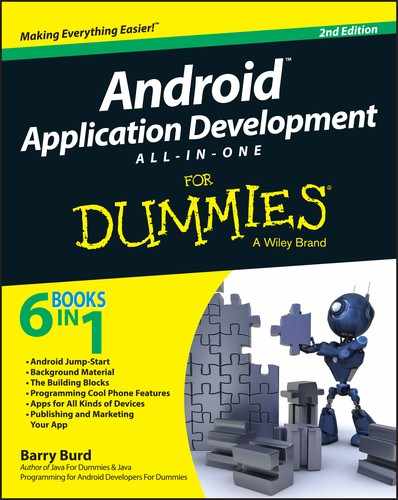
Before testing the code in Listing 3-1, I lay out the main activity’s screen, as shown in Figure 3-1.
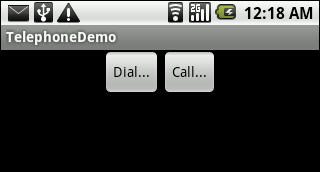
Figure 3-1: The main layout for the code in Listing 3-1.
When I run the code and press the activity’s Dial button, I see my phone’s familiar dialer. The dialer has my fake phone number 234-555-6789 at the top of the screen, just waiting for me to press the little phone icon. (See Figure 3-2.)
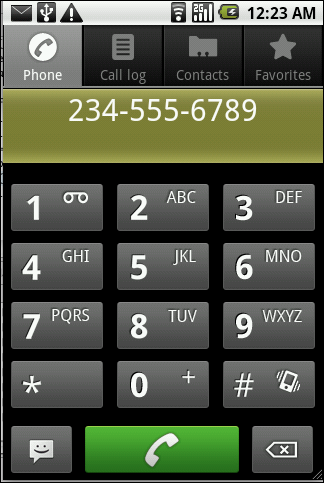
Figure 3-2: The result of clicking the Dial button.
(If your ego needs a lift, dialing a phone number with the fake 555 exchange makes you feel like an actor in a Hollywood movie.)
Pressing the activity’s Call button is another story. Pressing the Call button in Figure 3-1 takes me immediately to the calling screen in Figure 3-3.

Figure 3-3: The result of clicking the Call button.
 To start an activity with
 Intent.ACTION_CALL, your app must have the following element in its AndroidManifest.xml file:
<uses-permission
android:name="android.permission.CALL_PHONE" />
The basic strategy in Listing 3-1 isn’t complicated. You create an intent with action Intent.ACTION_DIAL (or Intent.ACTION_CALL). You add a tel URI to the intent and then call startActivity.
In Listing 3-1, you can modify the tel URI so that the URI has no scheme-specific part:
intent.setData(Uri.parse("tel:"));
 To read more than you ever wanted to know about URIs and scheme-specific parts, see Book III, Chapter 2.
intent.setData(Uri.parse("tel:"));
Modifying the tel URI in this fashion changes the way Intent.ACTION_DIAL works. Now the phone launches the dial screen with no phone number. (See Figure 3-4.) The user enters a phone number and then presses the Call button.

Figure 3-4: A blank dialer.
If you combine "tel:" with Intent.ACTION_CALL, Android tries to place a call with no phone number. (It’s a call to “nowhere” — the stuff science-fiction plots are made of.) On some phones, you get no response. On other phones, you see a dialog box warning you that something’s very wrong. (See Figure 3-5.)
Figure 3-5: Trying to dial no one in particular.
Oops! No phone
Some Android devices aren’t phones. Running the preceding section’s example on a 10-inch tablet is like trying to call Paris using a can opener. You might expect users to know this, but life is complicated, and users have other things to think about. (Doesn’t everyone?)
It’s best to anticipate the worst and to remind users when they press the wrong buttons. So, in Listing 3-1, I add code to check for “phone-ness.” I display an alert if the user tries to make a call from an Android-based dishwasher.
What kind of phone is this?
In Listing 3-1, the deviceIsAPhone method gets a TelephonyManager. Then the method uses the TelephonyManager to check the device’s phone type.
The phone type options are PHONE_TYPE_GSM, PHONE_TYPE_CDMA, PHONE_TYPE_SIP, and PHONE_TYPE_NONE.
- Global System for Mobile Communications (GSM): It’s used by most of the world’s carriers, including AT&T and T-Mobile in the United States.
- Code Division Multiple Access (CDMA): It’s used in the United States by the carriers Sprint and Verizon.
- Session Initiation Protocol (SIP): It’s a telephone standard based on Internet packets. SIP isn’t commonly used on commercial mobile phones.
- The value
PHONE_TYPE_NONEapplies to devices with no telephony capabilities. It’s the telephone standard used by tablet devices, rocks, table lamps, ham sandwiches, and other things that neither place nor receive phone calls.
I need your attention
In Listing 3-1, the displayAlert method creates the dialog box shown in Figure 3-6.

Figure 3-6: An alert dialog box.
An alert dialog box can have one, two, or three buttons. If you use the AlertDialog.Builder class to construct an alert dialog box, the buttons' names are positive, negative, and neutral. (So, for example, to create a NO button, you call alertBuilder.setNegativeButton.)
If you skip the AlertDialog.Builder class and instead call the AlertDialog class’s methods, the corresponding method calls are setButton, setButton2, and setButton3.
The displayAlert method in Listing 3-1 illustrates an interesting feature of Android’s builder classes. A builder has setter methods, and each setter method returns a newly modified builder. For example, you start with a vanilla new AlertDialog.Builder(this). You assign the new builder to your alertBuilder variable. Then you call alertBuilder.setTitle, which returns a builder whose title is "Not a telephone!" To this enhanced builder, you apply setMessage, returning a builder with the title "Not a telephone!" and the message "This device can’t make phone calls!"
The chain continues until you feed a builder to the show method. The show method displays the dialog box created by the builder.
An example in Chapter 2 of this minibook uses the Notification.Builder class. In that example, I don’t use the result returned by each of the builder’s setter methods. The choice to use (or not use) a builder’s return results is simply a matter of taste.
 In the preceding Listing 3-1, I check for the presence of telephony hardware using Android’s
 TelephonyManager. In the first draft of this section’s code, I relied on the PackageManager class as follows:
PackageManager manager = getPackageManager();
ComponentName name = intent.resolveActivity(manager);
return name != null;
As strategies go, this first draft wasn’t a bad one. An intent’s resolveActivity method tells you which activity, if any, has an intent filter matching the intent. But the plan stumbled when I learned that my device’s Contacts app matches the phone intents. When I ran the code on a tablet device, I expected to see the "Not a telephone!" dialog box. Instead, the device offered to add the new phone number to my Contacts list. Okay. No harm done.
On being a dialer
In Listing 3-1, you call startActivity to invoke the default Android dialer. You can also become a dialer by adding stuff to your activity’s intent filter. (See Listing 3-2.) A quick search on Google’s Play Store shows that many developers create alternatives to the standard system dialer. I see dialers integrated with enhanced contacts lists, dialers customized for particular businesses, old-style rotary dialers, dialers designed for sliding your fingers across the keys, dialers that play music, and many more.
Listing 3-2: Responding to a Dial Intent
<activity android:name=".DialerActivity">
<intent-filter>
<action android:name="android.intent.action.DIAL" />
<category
android:name="android.intent.category.DEFAULT" />
<data android:scheme="tel" />
</intent-filter>
</activity>
The value of the constant Intent.ACTION_DIAL (used in Listing 3-1) is the string "android.intent.action.DIAL".
In Java code, you can use either the constant Intent.ACTION_DIAL or the string "android.intent.action.DIAL". But in the AndroidManifest.xml document, you must use the string.
Listing 3-2 also contains a <data> element, and without this <data> element, the code is worthless. Any app that invokes a dialer sends dialing information (empty or not) as part of the intent. The dialing information is a URI with the tel scheme. If an intent’s data has a scheme, a matching intent filter must have the same scheme.
To read all about the matching of intents and intent filters, see Book III, Chapter 2.
Keep an eye on the phone
The android.telephony package has a useful PhoneStateListener class. With this class, you can “listen in” on a phone’s state transitions. Here’s a code snippet:
PhoneStateListener listener = new PhoneStateListener() {
private static final String CLASSNAME =
"PhoneStateListener";
@Override
public void onCallStateChanged(int state,
String incomingNumber) {
String stateString = "N/A";
switch (state) {
case TelephonyManager.CALL_STATE_IDLE:
stateString = "Idle";
break;
case TelephonyManager.CALL_STATE_OFFHOOK:
stateString = "Off Hook";
break;
case TelephonyManager.CALL_STATE_RINGING:
stateString = "Ringing";
break;
}
Log.i(CLASSNAME, stateString);
}
};
TelephonyManager manager =
(TelephonyManager) getSystemService(TELEPHONY_SERVICE);
manager.listen(listener, PhoneStateListener.LISTEN_CALL_STATE);
Android calls the listener’s onCallStateChanged method when an interesting event occurs.
To make this code snippet work, you must add <uses-permission android:name="android.permission.READ_PHONE_STATE" /> to your project’s AndroidManifest.xml file.
The listener’s other useful methods include onCellLocationChanged, onDataActivity, onDataConnectionStateChanged, and onSignalStrengthsChanged. To use any of these methods, you must add the following element to your AndroidManifest.xml document:
<uses-permission
android:name="android.permission.READ_PHONE_STATE">
</uses-permission>
Sending a Text Message
Where I come from, people send “text messages” to one another. Apparently, the rest of the world calls this SMS (Short Messaging Service). Whatever you call it, the business of sending brief, phone-to-phone messages is an important feature of today’s communications.
Listing 3-3 shows you how an Android program sends a text message.
Listing 3-3: Sending Text
SmsManager smsMgm = SmsManager.getDefault();
smsMgm.sendTextMessage("2345556789", null,
"Hello world", null, null);
The sendTextMessage method has five parameters:
- The first parameter, a Java string, is the destination’s phone number.
-
The second parameter, a Java string, is a service center address (see the nearby sidebar).
The value
nullin Listing 3-3 says, “I don’t care how the message gets to its destination. Just send it!" - The third parameter, also a Java string, is the message content.
-
The fourth and fifth parameters are pending intents.
Android uses both intents to send broadcasts. The fourth parameter’s broadcast notifies the system when the message is sent. The fifth parameter’s broadcast notifies the system when the message is received.
For an introduction to pending intents, see Chapter 2 in this minibook.
To run the code in Listing 3-3, your app must have android.permission.SEND_SMS.
Working with Device Sensors
A full-featured Android device is more than just a telephone. To emphasize this point, I include a list of constants from the android.content.PackageManager class:
FEATURE_BLUETOOTH
FEATURE_CAMERA
FEATURE_CAMERA_AUTOFOCUS
FEATURE_CAMERA_FLASH
FEATURE_CAMERA_FRONT
FEATURE_FAKETOUCH
FEATURE_FAKETOUCH_MULTITOUCH_DISTINCT
FEATURE_FAKETOUCH_MULTITOUCH_JAZZHAND
FEATURE_LIVE_WALLPAPER
FEATURE_LOCATION
FEATURE_LOCATION_GPS
FEATURE_LOCATION_NETWORK
FEATURE_MICROPHONE
FEATURE_NFC
FEATURE_SCREEN_LANDSCAPE
FEATURE_SCREEN_PORTRAIT
FEATURE_SENSOR_ACCELEROMETER
FEATURE_SENSOR_BAROMETER
FEATURE_SENSOR_COMPASS
FEATURE_SENSOR_GYROSCOPE
FEATURE_SENSOR_LIGHT
FEATURE_SENSOR_PROXIMITY
FEATURE_SIP
FEATURE_SIP_VOIP
FEATURE_TELEPHONY
FEATURE_TELEPHONY_CDMA
FEATURE_TELEPHONY_GSM
FEATURE_TOUCHSCREEN
FEATURE_TOUCHSCREEN_MULTITOUCH
FEATURE_TOUCHSCREEN_MULTITOUCH_DISTINCT
FEATURE_TOUCHSCREEN_MULTITOUCH_JAZZHAND
FEATURE_USB_ACCESSORY
FEATURE_USB_HOST
FEATURE_WIFI
Some of these constants are self-explanatory, but others need some clarification. For example, with FAKETOUCH, a device without a real touchscreen has some support for touch events. (For the FAKETOUCH_MULTITOUCH constants, DISTINCT stands for simulation of two-finger touches, and JAZZHAND stands for simulation of five-finger touches.)
A device can sense LOCATION in several ways. A crude way is to guess location using the known locations of nearby cellphone towers. Using GPS (Global Positioning System) is much more accurate.
Among all the PackageManager's FEATURE constants, my favorite is FEATURE_SENSOR_BAROMETER. I can’t imagine shopping for a phone and thinking, “That model isn’t good enough. I can’t use it to measure barometric pressure.”
Anyway, when you start programming a device’s sensors, you grapple with new kinds of problems. What’s the underlying physics of the sensor measurement? How do you handle the necessary mathematics? How do you deal with tiny adjustments in an inherently analog world? The GPS sensor notices a location change. Should my code do processing in its onLocationChanged method, or is the change so small that I should call it background noise and ignore it?
Quantifying location and orientation
You’re probably familiar with the terms latitude and longitude, but just in case:
- Latitude is 0 on the Earth’s equator, 90 degrees at the North Pole, and –90 degrees at the South Pole.
- Longitude is 0 at the Royal Observatory in Greenwich, UK. Longitude is negative to the west of Greenwich and positive to the east of Greenwich. Longitude is 180 degrees at the International Date Line in the Pacific Ocean.
In the Android world, the term orientation has two different (but closely related) meanings:
- The screen’s orientation can be either portrait or landscape.
- The device’s orientation is a measurement consisting of three numbers — yaw, pitch, and roll.
Usually, when people talk about orientation (or write about orientation), they don’t say “screen orientation” or “device orientation.” They simply say, “orientation.” Fortunately, you can distinguish the two kinds of orientation from the surrounding terminology:
- If you hold the device so that the screen’s height is greater than the screen’s width, the screen’s orientation is portrait.
-
If you hold the device so that the screen’s width is greater than the screen’s height, the screen’s orientation is landscape.
You can use most Android devices in either portrait or landscape mode. So as a developer, you must design your app’s interface with both modes in mind. True, users tend to hold phones in portrait mode and hold tablets in landscape mode. But when you define an activity’s layouts, you must consider all possibilities. Does your app look good when a user lies flat on a couch and looks up at the device? -
If you lay the device flat on the ground so that the top of the device points to the Earth’s magnetic North Pole, the device’s yaw, pitch, and roll values are all 0. (This assumes that the ground is perfectly horizontal.)
If you keep the device flat on the ground while you turn the device, you’re changing the yaw. If you lift the top of the device (while the bottom of the device still touches the ground) you’re changing the pitch. If you lift one side of the device (while the other side still touches the ground) you’re changing the roll.
Android doesn’t use degrees to measure yaw, pitch, and roll. Instead, Android’s methods return radian measure. A half turn of the device is Π radians. A full 360-degree turn is 2Π radians. The easiest way to convert between degrees and radians is as follows:
- To change degrees into radians, multiply the number of degrees by 0.01745327777777777778.
- To change radians into degrees, multiply the number of radians by 57.2958279087977743754.
Don’t fret at the number of digits in each of the conversion factors. Use fewer digits if you want. No matter how many digits you use, the numbers aren’t completely accurate.
Sending location and orientation
The program in Listing 3-4 displays a device’s location and orientation. The program’s run is shown in Figure 3-7.

Figure 3-7: Displaying orientation and location.
Listing 3-4: Sensing Device Orientation
package com.allmycode.sensor;
import static android.hardware.Sensor.TYPE_ACCELEROMETER;
import static android.hardware.Sensor.TYPE_MAGNETIC_FIELD;
import android.app.Activity;
import android.content.Context;
import android.hardware.Sensor;
import android.hardware.SensorEvent;
import android.hardware.SensorEventListener;
import android.hardware.SensorManager;
import android.location.Location;
import android.location.LocationListener;
import android.location.LocationManager;
import android.os.Bundle;
import android.widget.TextView;
import android.widget.Toast;
public class MyActivity extends Activity {
SensorManager sensorManager;
Sensor magFieldSensor, accelerometer;
SensorEventListener sensorListener;
LocationListener locationListener;
LocationManager locationManager;
TextView orientationView, locationView;
private float[] gravityValues = new float[3];
private float[] geoMagnetValues = new float[3];
private float[] orientation = new float[3];
private float[] rotationMatrix = new float[9];
@Override
protected void onCreate(Bundle savedInstanceState) {
super.onCreate(savedInstanceState);
setContentView(R.layout.main);
sensorManager = (SensorManager)
getSystemService(Context.SENSOR_SERVICE);
magFieldSensor = sensorManager
.getDefaultSensor(TYPE_MAGNETIC_FIELD);
accelerometer = sensorManager
.getDefaultSensor(TYPE_ACCELEROMETER);
sensorListener = new MySensorEventListener();
locationListener = new MyLocationListener();
locationManager = (LocationManager)
getSystemService(Context.LOCATION_SERVICE);
orientationView =
(TextView) findViewById(R.id.orientationView);
locationView =
(TextView) findViewById(R.id.locationView);
}
@Override
protected void onResume() {
super.onResume();
sensorManager.registerListener(sensorListener,
magFieldSensor, SensorManager.SENSOR_DELAY_UI);
sensorManager.registerListener(sensorListener,
accelerometer, SensorManager.SENSOR_DELAY_UI);
locationManager.requestLocationUpdates
(LocationManager.GPS_PROVIDER,
0, 0, locationListener);
}
@Override
protected void onPause() {
super.onPause();
sensorManager.unregisterListener(sensorListener);
locationManager.removeUpdates(locationListener);
}
class MySensorEventListener implements SensorEventListener {
@Override
public void onSensorChanged(SensorEvent event) {
int sensorEventType = event.sensor.getType();
if (sensorEventType == Sensor.TYPE_ACCELEROMETER) {
System.arraycopy
(event.values, 0, gravityValues, 0, 3);
} else if (sensorEventType ==
Sensor.TYPE_MAGNETIC_FIELD) {
System.arraycopy
(event.values, 0, geoMagnetValues, 0, 3);
} else {
return;
}
if (SensorManager.getRotationMatrix(rotationMatrix,
null, gravityValues, geoMagnetValues)) {
SensorManager.getOrientation(rotationMatrix,
orientation);
orientationView.setText
          ("Yaw:  " + orientation[0] + "
"
        + "Pitch: " + orientation[1] + "
"
+ "Roll: " + orientation[2]);
}
}
@Override
public void onAccuracyChanged(Sensor sensor,
int accuracy) {
if (accuracy <= 1) {
Toast.makeText(MyActivity.this, "Please shake the " +
"device in a figure eight pattern to " +
"improve sensor accuracy!", Toast.LENGTH_LONG)
.show();
}
}
}
class MyLocationListener implements LocationListener {
@Override
public void onLocationChanged(Location location) {
locationView.setText
        ("Latitude: " + location.getLatitude() + "
"
+ "Longitude: " + location.getLongitude());
}
@Override
public void onProviderDisabled(String provider) {
}
@Override
public void onProviderEnabled(String provider) {
}
@Override
public void onStatusChanged(String provider,
int status, Bundle extras) {
}
}
}
Listing 3-4 illustrates a bunch of sensor features — some that are specific to location and orientation, and others that apply to sensors in general. One way or another, most sensors use the same programming constructs:
- Instances of the
Managerclasses connect your code to the device’s hardware sensors.In Listing 3-4, calling
getSystemServiceprovides access to sensor managers. The managers belong toandroid.hardware.SensorManagerandandroid.location.LocationManager. The LocationManagerisn’t in theandroid.hardwarepackage because sensing location is abstracted for various sensing techniques. TheLocationManagerclass represents GPS readings, cell tower usage, and other things. You can estimate a device’s location based on Wi-Fi hotspot usage, the device’s IP address, user queries, last known location, and readings borrowed from nearby mobile devices. TheLocationManagerdeals generically with places on Earth, not specifically with GPS hardware. -
Instances of
android.hardware.Sensorrepresent the sensors themselves.In Listing 3-4, calls to the
getDefaultSensormethod return values formagFieldSensorand foraccelerometer. -
Objects that implement
Listenerinterfaces receive notice of changes to sensor values.In Listing 3-4, instances of
MySensorEventListenerandMyLocationListenerfill these roles. I register the listeners in the activity’sonResumemethod and unregister the listeners in the activity’sonPausemethod. Your app should stop listening when the activity pauses. If you forget to unregister, the user’s battery might die of exhaustion.
The code to get useful values from sensor events depends on the kind of event. In Listing 3-4, getting location information means simply calling location.getLatitude() and location.getLongitude(). For orientation, the story is more complicated. One way or another, you feed values from the device’s level gravity sensor or the device’s magnetometer into the SensorManager.getRotationMatrix method.
A few miscellaneous tidbits in Listing 3-4 are worth noting:
- To sense the device’s location, your app must have
“android.permission.ACCESS_FINE_LOCATION”. Sensing orientation requires no particular permission. (Hackers rarely benefit from knowing the tilt of the user’s device.) -
When you test this section’s app, you probably tilt your device in several directions. By default, this tilting can change the display from portrait to landscape and back. Oddly enough, these display changes can be very annoying. (With most apps, your mind zones out while you’re turning the device. But with this app, the turning motion is the app’s raison d'être.)
To keep changes in screen orientation from driving you crazy, add either
android:screenOrientation="landscape"orandroid:screenOrientation="portrait"to the<activity>element in theAndroidManifest.xmldocument. - Calls to
registerListenerin Listing 3-4 have delay parameters. The delay parameter’s value tells the device how often to check the sensor’s value. The choices areSENSOR_DELAY_FASTEST,SENSOR_DELAY_GAME,SENSOR_DELAY_NORMAL, andSENSOR_DELAY_UI. TheSENSOR_DELAY_GAMEvalue is appropriate for game playing, and theSENSOR_DELAY_UIvalue is best for displaying the information. Of course, to figure out what’s best for your app, ignore the guidelines and do lots of testing. - When you implement the
SensorEventListenerinterface, you must create anonAccuracyChangedmethod. The predefined accuracy values areSENSOR_STATUS_UNRELIABLEwithintvalue0,SENSOR_STATUS_ACCURACY_LOWwithintvalue1,SENSOR_STATUS_ACCURACY_MEDIUMwithintvalue2, andSENSOR_STATUS_ACCURACY_HIGHwithintvalue3. For some reason, shaking the device in a figure-eight pattern tends to improve orientation sensitivity.
Finally, notice the austere-looking typeface in Figure 3-7. I added android:typeface="monospace" to each of the TextView start tags in the app’s AndroidManifest.xml document. A font that’s monospace reserves the same width for each character. So, for example, with a monospace font, the letter i consumes as much width as the letter m, and each blank space is as wide as the letter m.
In this section’s example, I use monospace to help align the numeric values. So in the preceding Figure 3-7, the three orientation numbers form a column, and the two location numbers form a column. Without a monospace font, the display would have the jagged look you see in Figure 3-8.
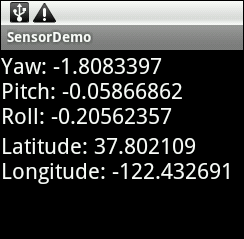
Figure 3-8: The display from this section’s app without a monospace font.
I could have aligned the numbers by creating separate text views and specifying the width of each text view. Alternatively, I could try adding tabs to my single text view:
locationView.setText
        ("Latitude:		" + location.getLatitude() + "
"
+ "Longitude: " + location.getLongitude());
The escape sequence tells Java to space to the next tab stop. If you use tabs, the display looks like the stuff in Figure 3-9.
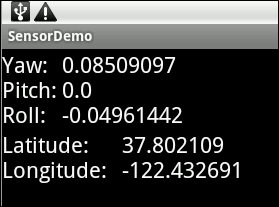
Figure 3-9: The display from this section’s app using tabs.
 When I’m tempted to use tabs, I stop and remember how flakey tabs can be. For example, in Figure 3-9, the word Latitude is narrower than the word Longitude. So my code snippet compensates by having two tabs after the word Latitude and only one tab after the word Longitude. The extra tab works fine on my test device, but with different font settings on another user’s device, the same tabs might throw the numbers out of alignment.
Drawing, Dragging, and Zooming
No doubt about it — touchscreens are cool. You press plain old glass, and the device responds! (Okay. It’s not plain old glass. But it’s still mysterious.) When you slide your finger, a drawing of some kind moves! And with multi-touch screens, you can zoom things, rotate things, and reshape things.
Android’s software supports events involving up to 256 fingers. That’s about two-and-one-half centipedes walking on the screen at the same time. Of course, humans seldom apply more than two fingers to a device’s screen.
The big picture
Listing 3-5 demonstrates the handling of touch events. A touch event is a lot like a click. The most important difference is that touch events may involve motion — the sliding of your finger (or stylus) along the screen’s surface.
Listing 3-5: Handling Touch Events
package com.allmycode.draw;
import android.app.Activity;
import android.content.Context;
import android.graphics.Canvas;
import android.graphics.Color;
import android.graphics.Paint;
import android.graphics.Rect;
import android.os.Bundle;
import android.util.DisplayMetrics;
import android.view.MotionEvent;
import android.view.View;
import android.view.View.OnTouchListener;
public class DrawStuffActivity extends Activity implements
OnTouchListener {
MyView myView;
int numberOfFingers = 0;
float oldX[] = new float[2], oldY[] = new float[2];
Rect rectangle = new Rect(0, 0, 100, 100);
DisplayMetrics metrics = new DisplayMetrics();
@Override
public void onCreate(Bundle savedInstanceState) {
super.onCreate(savedInstanceState);
myView = new MyView(this);
setContentView(myView);
myView.setOnTouchListener(this);
getWindowManager().getDefaultDisplay().
getMetrics(metrics);
}
@Override
public boolean onTouch(View view, MotionEvent event) {
switch (event.getActionMasked()) {
case MotionEvent.ACTION_DOWN:
numberOfFingers = 1;
oldX[0] = event.getX(0);
oldY[0] = event.getY(0);
break;
case MotionEvent.ACTION_POINTER_DOWN:
numberOfFingers = 2;
oldX[1] = event.getX(1);
oldY[1] = event.getY(1);
break;
case MotionEvent.ACTION_MOVE:
handleMove(event);
break;
case MotionEvent.ACTION_POINTER_UP:
case MotionEvent.ACTION_UP:
numberOfFingers--;
break;
}
view.invalidate();
return true;
}
// The handleMove method is in Listing 3-6.
class MyView extends View {
Paint whitePaint = new Paint();
MyView(Context context) {
super(context);
whitePaint.setColor(Color.WHITE);
}
@Override
public void onDraw(Canvas canvas) {
canvas.drawRect(rectangle, whitePaint);
}
}
}
The activity in Listing 3-5 isn’t complete. It has a big byte taken out of it. The remaining piece comes in Listing 3-6.
Figure 3-10 has an unexciting screen shot from a run of this section’s example.

Figure 3-10: Believe me! You can move and resize the white rectangle.
Listing 3-5 has the basic outline of most other Android activity classes. The onCreate method sets the activity’s content view and registers a listener. But unlike most of the examples scattered through this book’s various minibooks, the content view in Listing 3-5 isn’t a resource. Instead, Listing 3-5 gets its content view from an object constructed in the code.
The content view is an instance of the MyView class, which I define at the end of Listing 3-5. The MyView class isn’t fancy. The class’s primary purpose is to override the View class’s onDraw method. When Android draws a MyView instance, Android places a white rectangle on a canvas. The rectangle itself (an instance of Android’s Rect class) has four properties: left, top, right, and bottom. (See Figure 3-11.) Each property is a number of pixels.
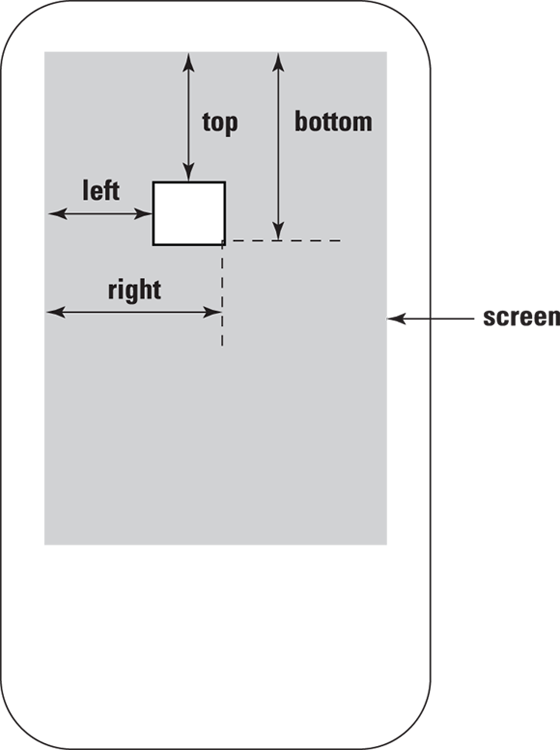
Figure 3-11: The properties of a Rect instance.
In Listing 3-5, the onTouch method responds to motion events. The motion event’s getActionMasked method returns the type of motion:
- Android fires
MotionEvent.ACTION_DOWNwhen the user places one finger on the screen. - Android fires
MotionEvent.ACTION_POINTER_DOWNwhen the user places a second finger on the screen. - Android fires
MotionEvent.ACTION_UPwhen the user lifts the first finger off the screen. - Android fires
MotionEvent.ACTION_POINTER_UPwhen the user lifts the second finger off the screen. - Android fires
MotionEvent.ACTION_MOVEwhen the user drags one or more fingers along the screen’s surface.
 Android has constants, such as
 ACTION_POINTER_2_UP and ACTION_POINTER_3_DOWN, but these names are deprecated. To distinguish among three or more fingers, look for MotionEvent. ACTION_POINTER_INDEX_MASK in Android’s SDK documentation.
The onTouch method in Listing 3-5 records the pixel coordinates where the user’s fingers land on the screen:
- The
getXmethod returns the number of pixels from the screen’s left edge. - The
getYmethod returns the number of pixels from the top of the screen. - In the calls to
getXandgetY, the0parameter represents the first finger that the user places on the screen. - The
1parameter represents the second finger that the user places on the screen.
Aside from this quick bookkeeping, the onTouch method defers to the handleMove method for most of the code’s calculations. (The handleMove method in Listing 3-6 — shown later in this chapter — computes the white rectangle’s new size and position.)
Near the end of the onTouch method, I call view.invalidate(). This tells Android that the rendering of this view on the screen is no longer valid. Thus, Android must redraw the view. That is, Android must call the view’s onDraw method.
At the end of the onTouch method, the return value true indicates that the method has handled the motion event once and for all. Any other methods that think they’re going to handle the motion event can go fly a kite.
This section’s app shouldn’t respond to a tilt of the screen. To keep the screen in landscape mode, add android:screenOrientation="landscape" to the activity’s start tag in the AndroidManifest.xml document.
The details
Moving gizmos on a screen can involve some interesting math. In fact, most graphics packages use matrix transformations to adjust items' shapes and sizes. But in this section, I compromise. Instead of using the concise mathematical tools in Android’s SDK, I do some simpler (and maybe more intuitive) measurements. Listing 3-6 has the code.
Listing 3-6: Dragging and Zooming
float newX[] = new float[2], newY[] = new float[2];
int xChange[] = new int[2], yChange[] = new int[2];
int diffX, diffY;
int newLeft = rectangle.left, newTop = rectangle.top,
newRight = rectangle.right,
newBottom = rectangle.bottom;
void handleMove(MotionEvent event) {
newX[0] = Math.round(event.getX(0));
newY[0] = Math.round(event.getY(0));
xChange[0] = Math.round(newX[0] - oldX[0]);
yChange[0] = Math.round(newY[0] - oldY[0]);
oldX[0] = newX[0];
oldY[0] = newY[0];
switch (numberOfFingers) {
case 1:
newLeft = rectangle.left + xChange[0];
newTop = rectangle.top + yChange[0];
newRight = rectangle.right + xChange[0];
newBottom = rectangle.bottom + yChange[0];
if (newLeft < 0 || newRight > metrics.widthPixels) {
newLeft = rectangle.left;
newRight = rectangle.right;
}
if (newTop < 0 || newBottom > metrics.heightPixels) {
newTop = rectangle.top;
newBottom = rectangle.bottom;
}
rectangle =
new Rect(newLeft, newTop, newRight, newBottom);
break;
case 2:
newX[1] = Math.round(event.getX(1));
newY[1] = Math.round(event.getY(1));
diffX =
Math.abs(Math.round(newX[1] - newX[0]))
- Math.abs(Math.round(oldX[1] - oldX[0]));
diffY =
Math.abs(Math.round(newY[1] - newY[0]))
- Math.abs(Math.round(oldY[1] - oldY[0]));
oldX[1] = newX[1];
oldY[1] = newY[1];
newLeft = rectangle.left - diffX / 2;
newTop = rectangle.top - diffY / 2;
newRight = rectangle.right + diffX / 2;
newBottom = rectangle.bottom + diffY / 2;
rectangle =
new Rect(newLeft, newTop, newRight, newBottom);
break;
}
}
The code in Listing 3-6 compares the most recent motion event’s coordinates with the previous event’s coordinates. With this information, the code computes the distances and directions of the user’s finger movements. The code uses these values to calculate the change in the rectangle’s position, size, and shape. With this information (and with the rectangle’s current left, top, right, and bottom properties), the code computes new values for the rectangle’s four properties.
Finally, if you do nothing to constrain the rectangle’s motion, it could happen that you slide the rectangle away from the screen’s visible area. To keep this from happening, I add a few if statements to the one-finger code. In those if statements, the metrics variable tells me the screen’s width and height in pixels. (The metrics variable gets its values in the onCreate method in Listing 3-5.)
Notice the use of float values in Listing 3-6. Android’s MotionEvent methods work with all kinds of devices, and some devices report touch-event locations as fractions of a pixel. After all, the touch-sensing hardware on a screen’s surface is different from the light-producing hardware in the screen’s guts. If the touch-sensing hardware has higher resolution than the light-producing hardware, the device can report movement in fractions of a pixel.
On the Importance of Waiting Patiently
This section deals with an important multitasking issue. Suppose your app has a feature that can take a long time to complete. For example, you create an app that displays an image on the screen. The image normally lives on a website, so your app reaches out with a URL.
While the user waits for a response from the website, your app must not appear to be frozen. The user doesn’t want an interface that’s unresponsive until the image appears on the screen.
Almost any part of your app’s code can open an HTTP connection and request an image from the web. But if you’re not careful, the request takes place in your app’s main thread (the so-called UI thread). Like any other thread, the main thread is a one-lane road. While your HTTP request waits at a stoplight, none of your app’s other features can move forward. Parts of the display don’t get updated, buttons are unresponsive, and all the while, the user dreams up nasty things to write on the Play Store’s app ratings page.
You may be familiar with the use of Java threads. A piece of code can spawn a new thread. With two threads of execution (the main thread and the newly spawned thread), your code can do two things at once. One thread waits for a web page while the other thread handles button clicks and other user-related events. The new thread is like a side road. While a big truck clogs up this side road, cars continue to flow along the main highway.
But spawning new Java threads doesn’t entirely solve the problem. Android’s threading rules dictate that no thread other than the main thread can update an application’s user interface. So, for example, your secondary thread can wait to get an image from the web. But after the image has been downloaded, the secondary thread can’t easily display the image.
To fix this problem once and for all, Android has an abstract AsyncTask class. An AsyncTask does your app’s time-consuming work in a separate thread and returns useful results to your app’s main thread. In addition, an AsyncTask has methods that structure the code in a sensible, fill-in-the-blanks way.
Of course, the kinds of work that you do with an AsyncTask come in many forms and flavors. That’s why the AsyncTask class has generic type parameters.
In spite of the naming, Android’s AsyncTask class has little in common with a stack of activities that form a task. True, I sometimes use the word task for either a stack of activities or an AsyncTask instance. But the two kinds of tasks are quite different. For a refresher course on activity stacks, see Book III, Chapters 1 and 2.
Creating an AsyncTask
The AsyncTask in Listing 3-7 fetches an image from the web. In the meantime, the code updates a progress bar that appears on the device’s screen.
Listing 3-7: Getting an Image from a Website
class MyAsyncTask extends
AsyncTask<String, Integer, Bitmap> {
int progress;
@Override
protected void onPreExecute() {
progress = 0;
button.setClickable(false);
}
@Override
protected Bitmap doInBackground(String… urlArray) {
try {
URL url = new URL(urlArray[0]);
HttpURLConnection connection =
(HttpURLConnection) url.openConnection();
connection.setDoInput(true);
connection.connect();
progress += 50;
publishProgress(progress);
InputStream input = connection.getInputStream();
Bitmap bitmap = BitmapFactory.decodeStream(input);
progress += 50;
publishProgress(progress);
return bitmap;
} catch (IOException e) {
e.printStackTrace();
return null;
}
}
@Override
protected void onProgressUpdate(Integer… progressArray) {
progressBar.setProgress(progressArray[0]);
}
@Override
protected void onPostExecute(Bitmap result) {
imageView.setImageBitmap(result);
button.setClickable(true);
}
}
The code in Listing 3-7 is an inner class; it should be nestled inside an app’s main activity (or inside some other class in your app).
When you extend AsyncTask, you must supply three generic parameters (in this example, <String, Integer, Bitmap>) and four methods:
-
The first generic parameter (
Stringin Listing3-7) describes the type of input to the task’sdoInBackgroundmethod.Think of this as the type of input that the task needs in order to do its work. In Listing 3-7, the
doInBackgroundmethod’s parameter is a variable-length array of strings. The method body uses only one string (the value stored in theurlArray's initial element). The code uses this string the way you’d use any web address — to fetch a web page (or in this example, an image). In Java, when you use three dots in a parameter list, you create a varargs parameter. (In Listing 3-7, the declaration doInBackground(String… urlArray)has a varargs parameter.) ThedoInBackgroundmethod is prepared to receive not oneStringvalue, but manyStringvalues. If you callexecutewith only oneStringvalue, thedoInBackgroundmethod treats thatStringvalue asurlArray[0]. If you callexecutewith twoStringvalues, thedoInBackgroundmethod ends up with an array containing two elements —urlArray[0]andurlArray[1]. And so on. That’s what the three dots mean in thedoInBackgroundmethod’s parameter list. -
The second generic parameter (
Integerin Listing3-7) describes the type of input to the task’sonProgressUpdatemethod.Think of this as the type of information that describes the state of the progress bar. In Listing 3-7, the
onProgressUpdatemethod’s parameter is a variable-length array ofIntegervalues. The method body uses only one integer (the value stored in theprogressArray's initial element). The code calls the progress bar’ssetProgressmethod to make the progress bar display the current status. -
The third generic parameter (
Bitmapin Listing3-7) describes the result type of the task’sdoInBackgroundmethod, which is also the type of input to the task’sonPostExecutemethod.Think of this as the type of information that’s created by a run of the task. In Listing 3-7, the
onPostExecutemethod feeds a bitmap (the bitmap obtained from a website) to the activity’simageViewobject.
When you create an AsyncTask, any or all of the three generic parameters can be Void. (Java’s Void class stores the primitive void type — the type that refers to nothing.) When a parameter is Void, the AsyncTask doesn’t use the corresponding information. For example, an AsyncTask with no progress bar has a middle parameter that’s Void.
Multithreaded code, with its threads and its callbacks, can be very complicated. The AsyncTask class is nice because it provides preinstalled plumbing code. This plumbing code relieves the developer of much of the multithreaded programming burden.
Using a progress bar
I heard a story a long time ago. I don’t know where I heard it. So, if you’re the story’s originator, please contact me via email, and I’ll give you credit in the next edition. (And whatever you do, please don’t sue me for using the story.)
Anyway, the story takes place in a tall office building with too few elevators. People would wait impatiently to go from the lobby to one of the higher floors. The building’s owner got estimates for the cost of adding more elevators, and the price was staggering.
So, to solve the problem, the owner installed wall-to-wall mirrors beside each of the elevators. As a result, people didn’t get faster service. But everyone stopped to check their appearance in the mirrors. So, from then on, no one complained about the elevators' being too slow.
Clearly, this story has an important moral. The moral is, you don’t necessarily have to speed up a process. But you must keep the user busy while the process chugs along.
That’s what progress bars are for. Figure 3-12 displays the progress bar in this section’s example.

Figure 3-12: A horizontal progress bar.
I define this example’s progress bar with the following code:
<ProgressBar android:id="@+id/progressBar1"
style="?android:attr/progressBarStyleHorizontal"
android:max="100"
android:layout_width="match_parent"
android:layout_height="wrap_content"/>
Android’s built-in android.R.attr.progressBarStyleHorizontal resource describes the progress bar in Figure 3-12. The android:max="100" attribute tells your app to display a completed progress bar when you call progressBar.setProgress(100) and to display a partially completed progress bar for values between 0 and 100.
For this section’s example, I might have done better using style="?android:attr/progressBarStyleLarge", which displays a spinning circle with no progress percentage. But I chose the horizontal style to illustrate the usage of progress updates. In Listing 3-7, I start with progress value 0 in the task’s onPreExecute method. Then, at certain points in the task’s doInBackground method, I call publishProgress. A call to publishProgress automatically triggers a call to the onProgressUpdate method. And in Listing 3-7, my onProgressUpdate method refreshes the progress bar’s display.
In Listing 3-7, I select two points in the doInBackground method to change the progress value and update the progress bar’s display. I do this to illustrate the use of a horizontal progress bar. But in truth, the progress bar in Listing 3-7 might easily annoy the user. A bar with only three values (0, 50, 100) doesn’t give the user much useful information. And besides, the timing of the work in Listing 3-7's doInBackground method probably isn’t a 50/50 split. When you create a real app, think carefully about updates to the progress bar. Try as hard as you can to make them reflect the task’s expected timing. And, if the timing is unpredictable, use progressBarStyleSmall, progressBarStyleLarge, or one of the other percentage-free types in the android.R.attr class. You can also avoid a percentage display by putting a progress bar into indeterminate mode. For more info, check the ProgressBar class’s setIndeterminate method and the android:indeterminate XML attribute.
Using an AsyncTask
Listing 3-8 contains the code to use the task in Listing 3-7. To form a complete code example, paste the task from Listing 3-7 into the MyActivity class of Listing 3-8. (That is, make MyAsyncTask be an inner class of the MyActivity class.)
Listing 3-8: The Main Activity Uses an AsyncTask
package com.allmycode.samples;
import java.io.IOException;
import java.io.InputStream;
import java.net.HttpURLConnection;
import java.net.URL;
import android.app.Activity;
import android.graphics.Bitmap;
import android.graphics.BitmapFactory;
import android.os.AsyncTask;
import android.os.Bundle;
import android.view.View;
import android.widget.Button;
import android.widget.ImageView;
import android.widget.ProgressBar;
public class MyActivity extends Activity {
Button button;
ImageView imageView;
ProgressBar progressBar;
@Override
public void onCreate(Bundle savedInstanceState) {
super.onCreate(savedInstanceState);
setContentView(R.layout.main);
button = ((Button) findViewById(R.id.button1));
imageView = (ImageView) findViewById(R.id.imageView1);
progressBar =
(ProgressBar) findViewById(R.id.progressBar1);
progressBar.setProgress(0);
}
public void onButtonClick(View view) {
new MyAsyncTask().execute
("http://allmycode.com/Java4Android/" +
"JavaProgrammingForAndroidDevelopers.jpg");
}
// The MyAsyncTask class is in Listing 3-7.
}
When the user clicks a button, the code in Listing 3-8 executes a new MyAsyncTask instance. The result (a shameless plug for one of my Java books) is shown in Figure 3-13.
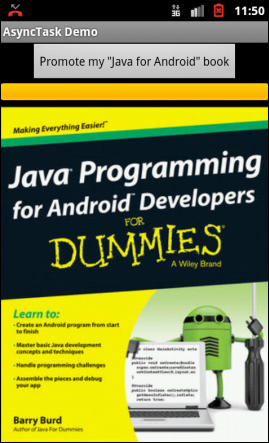
Figure 3-13: The completion of the task.
This section’s example gets a bitmap from the web. So, to run this section’s code, add <uses-permission android:name="android.permission.INTERNET"></uses-permission> to the application’s AndroidManifest.xml file.