Chapter 1
Using Android Studio
In This Chapter
![]() Making sense of all that stuff in Android Studio’s main window
Making sense of all that stuff in Android Studio’s main window
![]() Getting the most out of Android Studio
Getting the most out of Android Studio
When you develop software, you have two options:
-
Be tough and use only command-line tools.
Edit programs with plain text editors, such as UNIX vi, GNU Emacs, Windows Notepad, or Macintosh TextEdit. Issue commands to the Windows MS-DOS screen or in the Macintosh Terminal window.
-
Be wimpy and use an integrated development environment (an IDE).
Execute commands by clicking menu items. Edit programs with a full-featured editor — an editor customized for whatever programming language you use. Change object values with code-aware property sheets. Create forms by dragging widgets from a palette to a visual layout.
I admire toughness, but wimpiness is more efficient. Being wimpy makes you more productive and less prone to error. Also, being wimpy helps you to concentrate on the app that you’re creating instead of having to focus on the commands to create the app.
Don’t get me wrong. Tough command-line tools are great in a pinch. When your IDE covers up subtle (but important) details, you need command-line tools to show you what’s going on behind the scenes. But for most developers, most of the time, IDEs are great time-savers.
 With or without Android, IntelliJ IDEA (the backbone of Android Studio) is a mature platform, with tools for Java development, C/C++ development, PHP development, modeling, project management, testing, debugging, and much more.
So this chapter covers Android Studio. I (naturally enough) focus on features that help you build Android apps, but keep in mind that Android Studio has hundreds of general-purpose software development features and many ways to access each feature.
Don’t Read This Chapter
Several chapters in this book contain instructions for using Android Studio. Here are some highlights:
- In Book I, Chapter 2, you install Android Studio.
- In Book I, Chapter 3, you create and run an app using Android Studio.
- In Book I, Chapter 3, you download this book’s code examples, and open them in Android Studio.
- In Book I, Chapter 5, you create the look of your app using Android Studio’s Designer tool.
Many other chapters contain all the need-to-know Android Studio features. But some very useful things aren’t need-to-know things. You can live a full life without knowing that Android Studio can fix your code’s indentation. (You can fix the indentation yourself.) You can develop top-selling apps without knowing about the Project tool window’s Floating mode.
For information about the need-to-know Android development tasks, skip to other chapters. But for the useful-to-know items (things that aren’t absolutely required for getting the work done — the handy tricks that help you work more efficiently), check this chapter.
The Big Picture
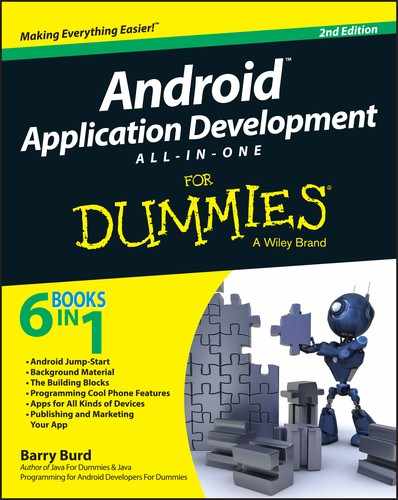
Each Android app belongs to a project. A project can contain several modules. For example, an app that runs on Android Wear (an Android-enabled wristwatch) will have at least two modules. One module contains code that runs on a watch; the other module contains supporting code that runs on the user’s smartphone. Figure 1-1 shows the structure of a project that contains two modules — a mobile module (for the smartphone) and a wear module (for the watch).
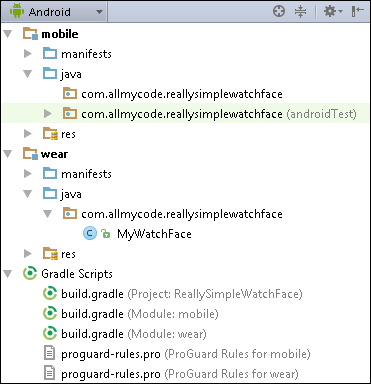
Figure 1-1: A project with two modules.
Most of this book’s examples live in simple, one-module projects.
You can have dozens of projects on your computer’s hard drive. When you run Android Studio, each of your projects is either open or closed. An open project appears in a window (its own window) on your computer screen. A closed project doesn’t appear in a window.
Several of your projects can be open at the same time. You can switch between projects by moving from window to window. Each open project uses a chunk of your computer’s precious RAM (random access memory). So, if you’re not actively working on a particular project, it’s best to close that project.
 I often refer to an open project’s window as Android Studio’s main window. This can be slightly misleading because, with several projects open at once, you have several main windows open at once. None of these windows is more “main” than the others.
If Android Studio is running, and no projects are open, Android Studio displays its Welcome screen. (See Figure 1-2.) The Welcome screen displays some recently closed projects. You can open a project by clicking its name on the Welcome screen. For an app that’s not on the Recent Projects list, you can click the Welcome screen’s Open an Existing Android Studio Project option.
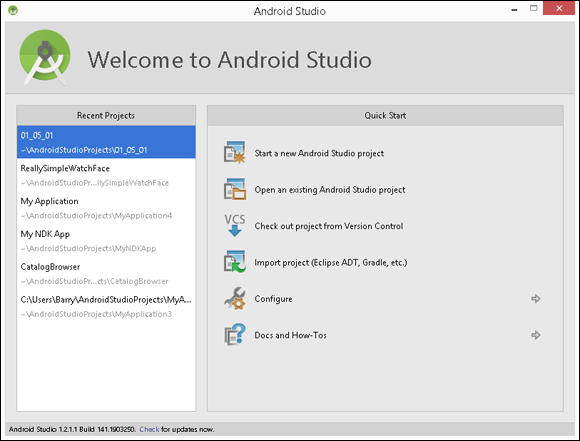
Figure 1-2: The Welcome screen.
If you have any open projects, Android Studio doesn’t display the Welcome screen. In that case, you can open another project by choosing File ⇒ Open, File ⇒ Reopen Project, or File ⇒ Open Recent in an open project’s window. To close a project, you can choose File ⇒ Close Project, or you can do whatever you normally do to close one of the windows on your computer. (On a PC, click the X in the window’s upper-right corner. On a Mac, click the little red button in the window’s upper-left corner.)
 Android Studio remembers which projects were open from one run to the next. If any projects are open when you quit Android Studio, those projects open again (with their main windows showing) the next time you launch Android Studio. You can override this behavior (so that only the Welcome screen appears each time you launch Android Studio). To do so on a Windows computer, start by choosing File ⇒ Settings ⇒ System Settings. On a Mac, choose Android Studio ⇒ Preferences ⇒ System Settings. In either case, uncheck the Reopen Last Project on Startup check box.
The main window
The main window is divided into several areas. Some of these areas can appear and disappear on your command. What comes next is a list of the areas, going from the top of the main window to the very bottom. (You can follow along in Figure 1-3.)
Figure 1-3: The main window has several areas.
- The topmost area contains the main menu and the toolbars.
- Below the main window and the toolbars you’ll see as many as three different areas:
-
The leftmost of these areas contains the Project tool window.
You use the Project tool window to navigate from one file to another within your Android app.
-
The middle area contains the editor.
The editor can have several tabs. Each tab contains a file that’s open for editing. To open a file for editing, double-click the file’s branch in the Project tool window. To close the file, click the little x next to the file’s name in the editor tab.
-
The rightmost area contains the Gradle tool window and the Maven Projects tool window.
Gradle and Maven are tools for orchestrating the building of software projects (the combining of dozens of project files into one .apkfile suitable for installation on a user’s device). Gradle instructions are written in a language called Groovy; Maven instructions are written in XML.Android Studio creates Gradle scripts for each of your projects and executes these scripts as you develop your projects. If you have special requirements for a particular project, you can specify these requirements in the Gradle or Maven Projects tool window. (None of this book’s examples require that kind of customization.)
At any given moment, the Project tool window displays one of several possible views. For example, back in Figure 1-3, the Project tool window displays its Android view. In Figure 1-4, I click the drop-down list and select the Packages view (instead of the Android view).
Figure 1-5 shows the Packages view. (The Packages view displays many of the same files as the Android view, but in the Packages view, the files are grouped differently.)
In Figure 1-3, to the left of the Project tool window, there’s a Tool Window bar. The Tool Window bar contains three Tool Window buttons labeled “1: Project,” “7: Structure,” and “Captures.” If the Project tool window is showing and you click the 1: Project tool button, the entire area consumed by the Project tool window disappears. (See Figure 1-6.) If you click the 1: Project tool button again, the area reappears with the Project tool window inside it.
You can move a tool window from one area to another by dragging the tool window’s tool button. Try it!If the Project tool window is showing and you click the 7: Structure tool button, the Structure tool window replaces the Project tool window in the rightmost area. (See Figure 1-7.)
The same kind of thing happens when you click any of the Tool buttons:
- If the clicked tool button’s window is showing, the window disappears, and its area shrinks to nothing.
- If the clicked tool button’s area isn’t showing, the area appears with the corresponding tool window inside it.
- If the clicked tool button’s area is displaying a different tool window, the clicked button’s tool window replaces whichever tool window is being displayed.
You can divide the Project tool window’s area into two smaller areas. (See Figure 1-8.) To do so, click either the Build Variants or Favorites tool button. (You’ll find these tool buttons in the main window’s lower-left corner.) The reason this works is because the Build Variants and Favorites tool windows are in split mode. For more information about split mode, see the section “Viewing modes,” later in this chapter. -

Figure 1-4: Selecting the Packages view.

Figure 1-5: The Packages view.

Figure 1-6: Look! No Project tool window!
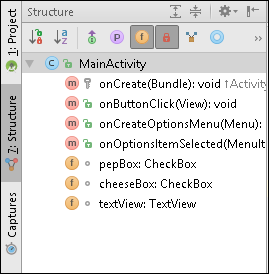
Figure 1-7: The Structure tool window.
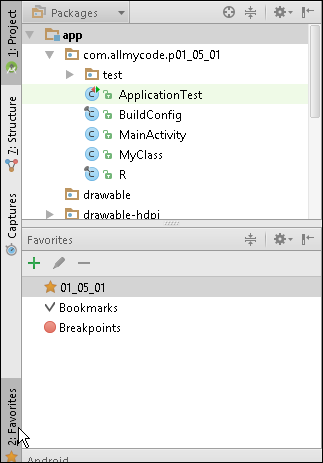
Figure 1-8: Displaying the Favorites tool window.
Let’s continue our tour of the areas in Figure 1-3:
- Below the middle three areas (that is, below the Project tool window, the editor, and the Gradle tool window) is another area that contains several tool windows.
- The Terminal tool window displays a PC’s MS-DOS command prompt, a Mac’s Terminal app, or some other text-based command screen that you specify. (See Figure 1-9.)
-
The Run tool window displays information about the launching of an Android app. (In Figure 1-10, phrases such as
Uploading filerefer to the movement of an app from your development computer to the emulator or physical device.)The Run tool window appears automatically when you tell Android Studio to launch one of your projects.
-
The Android tool window displays information about the run of an Android app. This tool window appears automatically (replacing the Run tool window) when your app starts running on an emulator or a connected physical device.
The Android tool window has several different panes — the Logcat pane, the ADB Logs pane, the Memory pane, the CPU pane, and possibly others. (Notice the tabs with these labels back in Figure 1-3.) The pane that I find most useful is the Logcat pane. In the Logcat pane, you see all the messages being logged by the running emulator or physical device. If your app isn’t running correctly, you can filter the messages that are displayed and focus on the messages that are most helpful for diagnosing the problem.
-
The Debug tool window appears in this area when you invoke Android Studio’s debugger.
 For details on the use of the Logcat panel, the Debugger, and other nice toys, see Book I, Chapter 5.
You can force any of these tool windows to appear by clicking the corresponding tool button.
A particular tool button might not appear when there’s nothing you can do with it. For example, if you’re not trying to run an Android app, you might not see the Run tool button. You can see all the tool windows' names by choosing View ⇒ Tool Windows in Android Studio’s main menu. The items whose tool buttons aren’t visible are grayed out in the menu.

Figure 1-9: The Terminal tool window on a PC.

Figure 1-10: The Run tool window.
Finishing our tour of the areas in Figure 1-3 …
-
The bottommost area contains the status bar.
The status bar tells you what’s happening now. For example, if your cursor is on the 37th character of the 11th line in the editor, you see 11:37 somewhere on the status line. When you tell Android Studio to run your app, you see
Gradle: Executing Taskson the status line. When Android Studio has finished executing Gradle tasks, you seeGradle Build Finishedon the status line. Messages like these are helpful because they confirm that Android Studio is doing what you want it to do.
In addition to the areas that I mention in this section, other areas might pop up as the need arises. You can dismiss an area by clicking the area’s Hide icon. (See Figure 1-11.)
Figure 1-11: Icons for hiding areas.
Viewing modes
The behavior that I describe in the previous section reflects tool windows in pinned, docked modes. You can change this behavior (and make other changes in the way tool windows behave) by clicking the gear icon in a tool window’s upper right corner. (See Figure 1-12.)
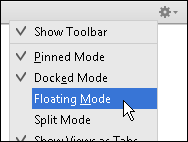
Figure 1-12: Selecting viewing modes.
There are four viewing modes — pinned mode, docked mode, floating mode, and split mode. For a particular tool window at a particular moment, each of the four modes is either on or off.
The viewing modes aren’t mutually exclusive, and they aren’t completely independent of one another. Whether one of the modes is on or off might make a difference in the way some other mode behaves. The default for many windows is pinned mode on, docked mode on, floating mode off, and split mode off.
Here’s the meaning of each mode:
-
Pinned mode: When pinned mode is off, the tool window disappears as soon as you click in a different area of the main window. To make that tool window reappear, click the corresponding tool button.
When pinned mode is on, clicking inside a different area doesn’t make the tool window’s area disappear.
-
Docked mode: When docked mode is on, a tool window fits snugly inside its area. When docked mode is off, one of the edges must still line up with this tool window’s tool window bar, but other edges of the tool window don’t have to line up with an area’s edges.
The tool window with docked mode off appears to live in a layer that’s in front of the rest of the main window. Dragging the tool window’s edges doesn’t change the size of the main window’s areas. (See Figures 1-13 and 1-14.)
- Floating mode: A tool window with floating mode on is like one with docked mode off. The difference is, with floating mode on, none of the tool window’s edges stay aligned with an area in the main window. The tool window appears to be an independent component floating above the main window. (See Figure 1-15.) You can drag the window’s edges or drag the entire tool window.
- Split mode: This mode works a bit differently from the others. A tool window with split mode on can appear in its area at the same time as a tool window with split mode off. (Both tool windows appear side by side or one above the other — see Figure 1-16.) In a particular area, at a particular time, if all of the area’s tool windows have split mode off, then only one of the tool windows appears. (Similarly, if all of the area’s tool windows have split mode on, then only one of the tool windows appears.)
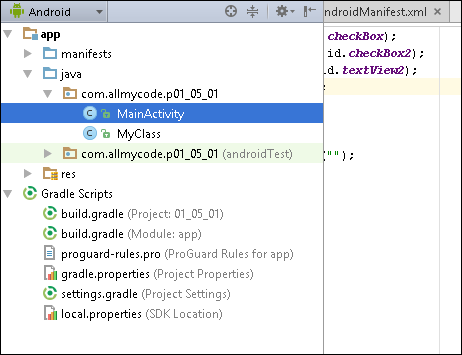
Figure 1-13: The undocked Project tool window is wide.

Figure 1-14: The undocked Project tool window is narrow.
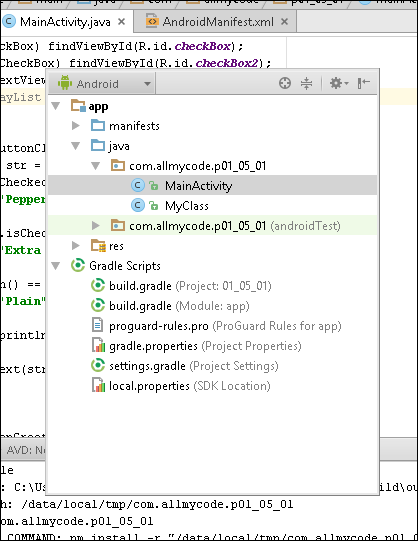
Figure 1-15: The Project tool window with floating mode on.

Figure 1-16: The Structure tool window in split mode.
The Designer tool
When you edit a layout file (for example, the activity_main.xml file in the res/layout directory), Android Studio displays its Designer tool. The Designer tool has two modes: Design mode for drag-and-drop visual editing, and Text mode for XML code editing. (See Figures 1-17 and 1-18.) So the bottom of the Designer tool has two tabs — a Design tab and a Text tab.

Figure 1-17: The Designer tool’s Design mode.

Figure 1-18: The Designer tool’s Text mode.
In Design mode, you edit the layout by dragging and dropping widgets onto the Designer tool’s Preview screen. In Text mode, you edit the same widgets by typing text in the XML file. When you use the Design mode’s Preview screen, Android Studio automatically updates the XML file. And it works both ways. When you edit the XML file, Android Studio keeps the Preview screen up to date.
In Design mode, the Designer tool has three parts:
- The Preview screen in the middle is a place to drag and drop widgets. (Refer to Figure 1-18.)
- The palette on the left is a place to get the widgets that you drop onto the Preview screen.
- The combined Component tree and Properties pane on the right display facts about your activity’s layout. You can change your layout by modifying the values that you find here.
You can hide the Preview screen or the Component tree with its Properties pane by clicking their respective Hide icons. (These icons look like the ones in Figure 1-11.) When you hide one of these parts, Android Studio creates a little tool button along the side of the Designer tool. Click the tool button to unhide one of the Designer tool’s parts.
When the Designer tool is in Text mode, Android Studio displays its Preview tool window. (Refer to Figure 1-17.) The Preview tool window (in Text mode) looks a lot like the Preview screen (in Design mode). The difference is that the Preview tool window is only a viewer. It’s not an editor. You can’t modify the layout by dragging and dropping things in the Preview tool window.
If Android Studio’s Designer tool is in Text mode, and you don’t see the Preview tool window, click the Preview tool button. You’ll find that button on the rightmost edge of the main window.
For details on using the Designer tool, see Book I, Chapter 5.
When you go to the Project tool window and double-click a file that’s not a layout file, Android Studio dismisses the Designer tool and replaces it with the plain, old editor area.
The Things You Can Do
Android Studio has thousands of useful features. A typical developer uses a small percentage of all these features. This section covers some of the features that I use every day.
Finding things
You’re probably familiar with a document editor’s Find facilities. Using Pages, Microsoft Word, or some similar software, you search through a document to find a word or a phrase. Searching through a text document is a big job, but searching an entire Android project is even bigger. After all, an Android project has many folders, and each folder contains many files. It’s a complicated bundle of data. But along with this complexity comes great opportunity. Each file has a known structure, and each word in each file has a very well-defined meaning. The potential for intelligent search is enormous.
Choosing Edit ⇒ Find in Android Studio’s main menu gives you some hints about Android Studio’s Find capabilities. (See Figure 1-19.)
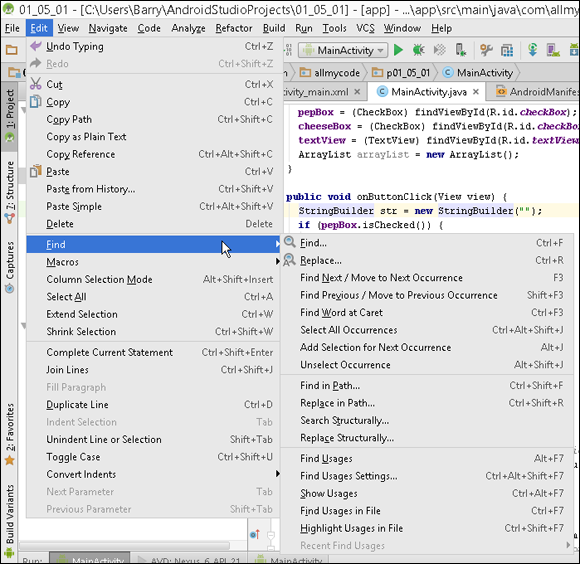
Figure 1-19: Finding a Find option.
The Find menu in Figure 1-19 has more than a dozen options. A long list describing the use of each option would be tedious for you to read. (What’s more, it would be really boring for me to write!) So, in this section, I describe a few of my favorite options. If you want, you can set aside some time to poke around and explore the other options. When you do, you’ll probably stumble on some favorites of your own.
Plain old Find
With the old Edit ⇒ Find ⇒ Find standby, you search for text in the current file (whatever file is currently visible in the editor). And, of course, when you choose Edit ⇒ Find ⇒ Replace, you replace occurrences of a word or phrase with another word or phrase.
I’m not big on memorizing keyboard shortcuts, but I always use shortcuts for this simple version of Find. It’s Ctrl+F on Windows and Cmd+F on a Mac. For the corresponding Replace action, it’s Ctrl+R on Windows and Cmd+R on a Mac.
When you select the plain, old Find option, you get a Find panel. (See Figure 1-20.) This Find panel has some nice options to help you customize your search.

Figure 1-20: The Find panel.
With the up- and down-arrow icons, you can search upward or downward from your current position. With the Match Case check box, a search for textView doesn’t find the capitalized name TextView. With the Words check box, you find whole words only (so that searching for View finds android.view.Menu but doesn’t find textView).
With the Regex check box, you search for a regular expression match. Here are some examples:
-
A character followed by an asterisk matches zero or more of those characters.
For example, if you search for
o*ps!, you findps!,ops!,oops!,ooops!, and so on. -
A character followed by a plus sign matches one or more of those characters.
For example, if you search for
o+ps!, you findops!,oops!, andooops!. But you don’t findps!. -
A dot matches any single character.
The pattern
b.tfindsbat,bet,bit,bot,but,bbt,bct,b@t,b.t, and so on. -
A backslash followed by a dot matches a single dot character.
The pattern
b.tfindsb.t, but it doesn’t findbat,but,b..torb. -
A dot followed by an asterisk matches any sequence of zero or more characters.
For example,
b.*tmatchesbt,bat,boat, and the charactersbinge watin the phrasebinge watching. -
A bunch of characters enclosed in square brackets matches any one of the characters.
For example,
b[aeiou]tfindsbat,bet,bit,bot,but. It doesn’t findbt,boat, orbbt.
 For the authoritative description of Android Studio’s regular expression syntax, visit
 www.jetbrains.com/idea/help/regular-expression-syntax-reference.html.
Searching several files at once
When you choose Edit ⇒ Find ⇒ Find in Path, you get the dialog box shown in Figure 1-21. This is useful for finding all occurrences of a particular word in a project. Imagine that the name submitButton occurs somewhere in a project containing 100 .java files. You can find all files that mention submitButton using the Find in Path dialog box.
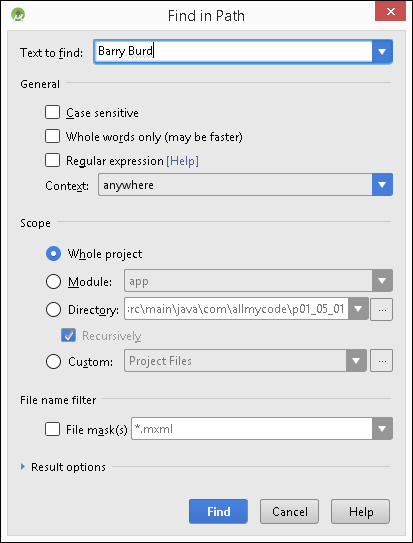
Figure 1-21: The Find in Path dialog box.
Here’s another scenario: I’ve typed my first and last name in several of my project’s files. At some point, I decide to add my middle initial. I can make the change automatically by choosing Edit ⇒ Find ⇒ Replace in Path. In a dialog box that’s similar to the one in Figure 1-21, I type Barry Burd in the Text to Find field, and type Barry A. Burd in the Replace With field.
Highlighting usages
You want to find all occurrences of a variable named button1 in your activity. You can do an ordinary Find, but there’s a better way. On a PC, choose File ⇒ Settings ⇒ Editor ⇒ General. (On a Mac, choose Android Studio ⇒ Preferences ⇒ Editor ⇒ General.) Look for the check box labeled Highlight Usages of Element at Caret. Put a check mark in that check box.
When you return to the editor, select any occurrence of the button1 variable. In response, the editor highlights all occurrences of that button1 variable. (See Figure 1-22.)
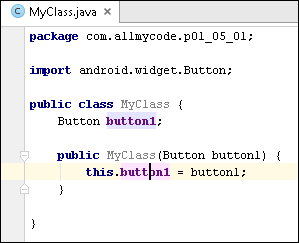
Figure 1-22: The editor highlights occurrences of the button1 field.
The Java file in Figure 1-22 is so small that highlighting a few words hardly matters. But even in this tiny example, you can see how smart the highlighting feature is. The code in Figure 1-22 has four occurrences of the text button1, so if you were to do an ordinary Find for button1, you’d get four hits. But the code really contains two different button1 variables — the button1 field and the button1 parameter. These two button1 variables play two different roles in the example’s code. (The two button1 variables are related to one another. But they’re still two different variables.)
So look again at Figure 1-22. When you select the word button1 in this.button1, Android Studio highlights both occurrences of the button1 field. But occurrences of the button1 parameter are not highlighted. If you selected the button1 parameter instead of the button1 field, only the two button1 parameter uses would be highlighted. That’s how smart the Highlight Usages feature is.
Normally, when you select a name in your code, Android Studio highlights all usages of that name in the file and removes the highlighting from previously highlighted names. You can override this behavior so that the highlighting of a name persists, even when you’re no longer selecting an occurrence of that name. To do so, select a name in the editor. Then, in Android Studio’s main menu, choose Edit ⇒ Find ⇒ Highlight Usages in File. All occurrences of that name will remain highlighted until you press Escape.
Navigating from place to place in your project
A method named computePrice gives you an answer that you don’t expect. You’re staring at the call to computePrice wondering why it gives you that answer. It would help to look at the declaration of the computePrice method. You can shuffle through your project’s files to find the method’s declaration, but it’s easier to select the method call and then choose Navigate ⇒ Declaration. Android Studio jumps instantly to the declaration of the computePrice method. This works for methods, variables, and other names in Android’s SDK, as well as for names that you declare in your own project.
The navigation trick has many variations. Consider the statement
pepBox = (CheckBox) findViewById(R.id.checkBox);
If you select pepBox and choose Navigate ⇒ Declaration, Android Studio jumps to a line of the following kind:
CheckBox pepBox;
But, if you select pepBox and choose Navigate ⇒ Type Declaration, Android Studio jumps to the declaration (in the SDK) of the CheckBox class. If you select MainActivity and choose Navigate ⇒ Super Method, you jump immediately to the declaration of the Activity method.
You can even jump quickly to the Android documentation. Select a name in your code in Android Studio’s editor. Then choose View ⇒ Quick Documentation in the main menu. When you do, a pop-up menu appears. The pop-up menu contains a summary of the Javadoc for that name. The summary contains links. So, within the pop-up menu, you can go from MainActivity to Activity to setContentView and beyond.
Fixing code
In the previous section, you look but you don’t touch. You find things in your project’s code, but you don’t make any changes. But this section is different. In this section, Android Studio helps you make changes to your code.
Intention actions
You’re minding your own business, typing code, having a good time, and suddenly you see some commotion in the Editor window. A yellow lightbulb icon appears. The icon signals the presence of intention actions — proposals to make small changes to your code. In response to the icon’s appearance, you press Alt+Enter. Doing so makes a pop-up menu appear. The pop-up menu contains a list of suggested changes. If you scroll to a list item and press Enter, Android Studio makes the change.
Figure 1-23 shows just such a pop-up menu.
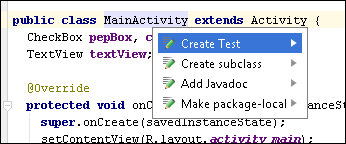
Figure 1-23: A list of intention actions.
-
If you select Create Test, Android Studio writes a JUnit test for your
MainActivityclass.The JUnit test class calls your activity’s methods and checks the result against results that you expect.
-
If you select Create Subclass, Android Studio does what the label suggests. It creates a subclass of your
MainActivityclass.public class MainActivityImpl extends MainActivity {}The new subclass has an empty body. You add statements to that empty body.
-
If you select Add Javadoc, Android Studio creates an empty Javadoc comment.
/****/public class MainActivity extends Activity {You type lines inside the Javadoc comment.
-
If you select Make Package-Local, Android Studio removes the word
publicfrom the start of the class declaration.In this case, Android Studio is just offering to change whatever it finds in your code. If your class is public, the pop-up menu offers to remove the word
public. But if your class isn’t public, the pop-up menu includes a “Make ‘public'” option.For a main activity, there’s no good reason to remove the word
public. In fact, your app won’t run if theMainActivityclass isn’t public.
Code completion
When you type code in Android Studio, the editor guesses what you’re trying to type and offers to finish typing it for you. In Figure 1-24, I type the letters Log. (ending with a dot). Android Studio reminds me that the Log class has static methods named d, e, getStackTraceString, and so on. I can select one of these by double-clicking the entry in the pop-up menu. Alternatively, I can select an entry in the pop-up menu and then press Enter or Tab.
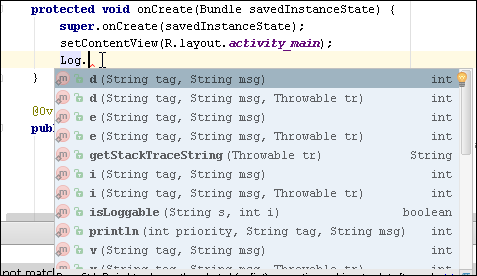
Figure 1-24: Android Studio displays the Log class’s static members.
If I press Enter, the selected item goes between the cursor and any text that comes after the cursor. For example, I start with Log.i(MYWHATEVER). I place the cursor after the letter Y and type an underscore. Now I have Log.i(MY_WHATEVER) with the suggestions MY_TAG and MY_WORDS. (See Figure 1-25.)

Figure 1-25: Android Studio suggests MY_TAG or MY_WORDS.
With the suggestion MY_TAG selected, I press Enter. Then Android Studio creates the text shown in Figure 1-26.
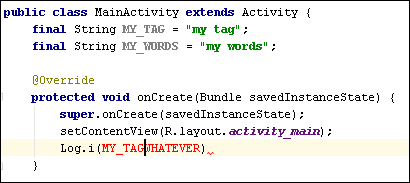
Figure 1-26: After pressing Enter.
If I press Tab instead of Enter, the selected item replaces any text that comes after the cursor. Starting with the text shown in Figure 1-25, I end up with the text shown in Figure 1-27.
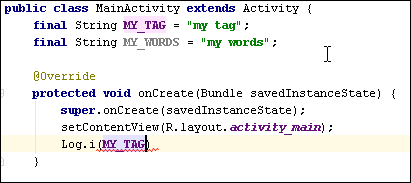
Figure 1-27: After pressing Tab.
Optimizing imports
InBook I, Chapter 5, I describe a way to make Android Studio write all your import declarations. (On a PC, you put check marks in check boxes after choosing File ⇒ Settings ⇒ Editor ⇒ General ⇒ Auto Import. On a Mac, you do the same, but you start by choosing Android Studio ⇒ Preferences.) When you follow my instructions, Android Studio automatically adds and removes import declarations as you type. That can be a good thing. But sometimes, you want a bit more control.
So what happens if you ignore my instructions from Book I, Chapter 5? You still need import declarations, so you type all the import declarations yourself. But typing import declarations is a big pain. You might not remember the package names for all the classes and methods that you use in your code. Even if you remember these names, you have better things to do with your time than to type a bunch of import declarations.
To help you generate import declarations, Android Studio has several tricks. Here are two stories to illustrate some of the tricks:
-
You type the name Toast (a name from the Android API). You haven’t typed the required import declaration at the top of the Java file, so the name Toast appears in red letters. If you hover over the name, Android Studio says Cannot resolve symbol ‘Toast'. (See Figure 1-28.)
Finally, you click your mouse on the word
Toast. When you do, Android Studio suggests a fully qualified name. (See Figure 1-29.) You press Alt+Enter to accept this fully qualified name. As a result, Android Studio adds the appropriate import declaration to your code. -
You use the name
Random, and (one way or another) you addimport java.util.Randomto your code.import java.util.Random;…Random random = new Random();Sometime later, you change your mind and decide not to create an instance of the
Randomclass. You delete the declaration ofrandom, but you don’t remove the import declaration. Android Studio changes the color of the import declaration from blue and black to a light gray.You can delete the import declaration yourself, but you might have several other declarations to delete. You can delete all the unused import declarations in one fell swoop by choosing Code ⇒ Optimize Imports in Android Studio’s main menu.
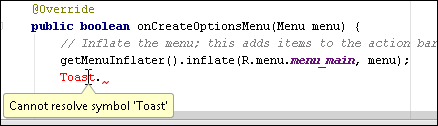
Figure 1-28: Cannot resolve symbol.
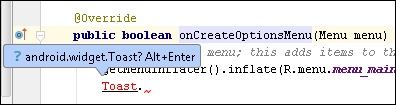
Figure 1-29: Do you mean android.widget.Toast?
Reformatting code
In these busy days, who isn’t in a hurry sometimes? You’re rushing to write code, and you type it in a sloppy fashion.
public class MyClass {
TextView textView;
public void onButtonClick(View view) {
textView.setText("Hello");
}}
You figure you’ll fix the indentation later, when you’re not so pressed for time. But “later” keeps slipping away. Eventually, you have to bottle up your code and publish it on the Google Play Store. No worries! The code’s poor formatting has no impact on its run.
But there’s a big problem. The next time you look at this code (and that time will definitely come) you’ll have trouble understanding what you wrote. Poorly formatted code is difficult to read. And code that’s difficult to read is costly to maintain. What’s even worse, hard-to-read code is annoying!
So how do you fix this quickly and easily? One solution is to avoid ever writing poorly formatted code. To some extent, Android Studio helps you in this goal. As you create new code, the editor positions your lines where they’re supposed to go. Of course, you can override this automatic positioning. (Sometimes, you override the positioning without intending to do so.)
The good news is that Android Studio has a magic bullet. Click your mouse inside the editor. Then, in the main menu, choose Code ⇒ Reformat Code. Et voilà! Android Studio fixes your code’s indentation.
public class MyClass {
TextView textView;
public void onButtonClick(View view) {
textView.setText("Hello");
}
}
Of course, you might not like the way Android Studio reformats code. I certainly don’t. I have to squeeze long lines of code onto narrow 58-character-wide printed pages. For most of my examples, I need two-character indenting instead of four-character indenting. And I need spaces instead of tab characters because, on the printed page, spaces are more predictable.
Here’s another example. Some people prefer the Allman style for positioning curly braces. In the Allman style, each brace has a line of its own:
public class MyClass
{
TextView textView;
public void onButtonClick(View view)
{
textView.setText("Hello");
}
}
Can Android Studio help you with that?
Yes, it can. On a PC, choose File ⇒ Settings ⇒ Editor ⇒ Code Style ⇒ Java. (On a Mac, do the same, but start with Android Studio ⇒ Preferences.) When you do, you see hundreds (maybe thousands) of options for adjusting the way Android Studio formats your code. Change your code’s line length, change the indentation, change the positioning of curly braces, and change so many other things.
In addition to all of its check boxes and drop-down menus, this dialog box shows you some sample Java classes. So when you make a change, you see immediately how the change affects the sample code. If you like the change, you can click Apply. If not, you can keep experimenting.
If you’re one of those people who becomes obsessed with the positioning of curly braces, visit www.riedquat.de/prog/style. On that page, you find a thorough discussion of all the brace styles that people use.
Commenting and uncommenting
I have several lines of code that I don’t particularly like. I want to experiment to find out what happens if these lines are gone. I can select these lines and press Delete, but I might not like the results of the experiment. I might want the lines back in my code. Instead of deleting these lines, I can turn them (perhaps temporarily) into comments.
Java has a few different kinds of comments, including block comments and end-of-line comments. (The language also has Javadoc comments, but you probably wouldn’t use a Javadoc comment to temporarily disable lines of code.) To turn one or more statements into a comment, start by selecting those statements. Then, in the main menu, choose Code ⇒ Comment with Line Comment or Code ⇒ Comment with Block Comment. Whichever option you choose, Android Studio obliges by commenting out the lines that you selected. This trick is a lifesaver if you want end-of-line comments on many lines. But it also helps when you want to create a block comment.
Android Studio’s commenting trick works both ways. Imagine that you’ve turned several statements into end-of-line comments, and you want to change them back to ordinary statements. (That is, you want to uncomment these lines.) First, select the lines. Then, in the main menu, choose Code ⇒ Comment with Line Comment. The name of the option is a bit misleading. (You want to uncomment, not to comment.) Nevertheless, Android Studio sees that you’ve selected commented lines and removes the comment markers as you wish.
Generating code
Consider the humble Java class that I reformat in a previous section.
public class MyClass {
TextView textView;
public void onButtonClick(View view) {
textView.setText("Hello");
}
}
With your cursor positioned somewhere inside that class, choose Code ⇒ Generate. When you do, you see the pop-up menu shown in Figure 1-30.
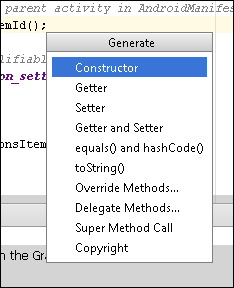
Figure 1-30: Several options for generating code.
If you select Constructor in the pop-up menu, you get another dialog box. (See Figure 1-31.) This little MyClass example has only one field — namely, the textView field. So you can either select or unselect that textView field. If you select the field, Android Studio adds this constructor to your code:
public MyClass(TextView textView) {
this.textView = textView;
}
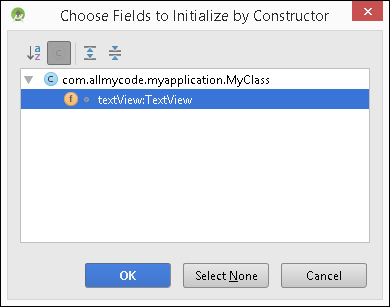
Figure 1-31: Choose fields to initialize.
If you don’t select the textView field, you get the empty constructor:
public MyClass() {
}
You can repeat the procedure to get as many constructors as you like.
Other options in Figure 1-30 include the Getter, the Setter, and the Getter and Setter options. When you select the Getter and Setter option, you see a dialog box that’s similar to the one in Figure 1-31. The dialog box lists all the fields in your class and lets you select one of these fields. For the tiny MyClass code in this section, the only field is textView. So, when you double-click the textView entry, Android Studio generates the following new Getter and Setter methods:
public TextView getTextView() {
return textView;
}
public void setTextView(TextView textView) {
this.textView = textView;
}
Refactoring
In the parlance of computer programming, refactoring means improving the internal structure of your code without changing the code’s behavior. Along with this concept come several refactoring patterns. Each pattern is a recipe for taking code that’s structured a certain way and turning it into code that’s structured differently.
For example, you’re developing a game and writing several lines of code to make a ball bounce.
void doALot(Background backgr, Sprite sprite, Ball ball) {
if (backgr.isCity()) {
int steps = getSteps();
sprite.move(steps);
if (sprite.isNear(monster)) {
sprite.changeFace(Sprite.PANIC);
sprite.release(ball);
double ballHeight = sprite.handHeight;
while (ballHeight != 0) {
double g = 9.807;
double timeToDrop =
Math.sqrt(2 * ballHeight / g);
double rebound =
ballHeight * ball.elasticity;
ball.dropTo(0);
ball.riseTo(rebound);
}
}
int seconds = getLevel() + 2;
showCar(seconds);
makeNoise();
// … Etc.
At some point, you realize that you’ll be making balls bounce in other parts of your program. So you want to create a general bounceBall method with parameters such as ball and ballHeight.
You don’t write the bounceBall method from scratch. Instead, you apply the Extract Method refactoring pattern. In the previous code sample, you select all the lines that I set in boldface. (These are the lines that make the ball bounce.) You move these lines outside of the method that currently houses them. You surround the lines with a method header and a closing brace. Then you write a method call where the lines used to live.
You can do all this work manually, but it’s easier (and less error prone) if you get Android Studio to do the work for you. Here’s how:
- Select the statements that will form the body of your new method.
-
In Android Studio’s main menu, choose Refactor ⇒ Extract ⇒ Method.
As a result, an Extract Method dialog box appears. (See Figure 1-32.)
-
In the dialog box’s Name field, type a name for your new method.
In Figure 1-32, I type bounceBall.
- Click OK.
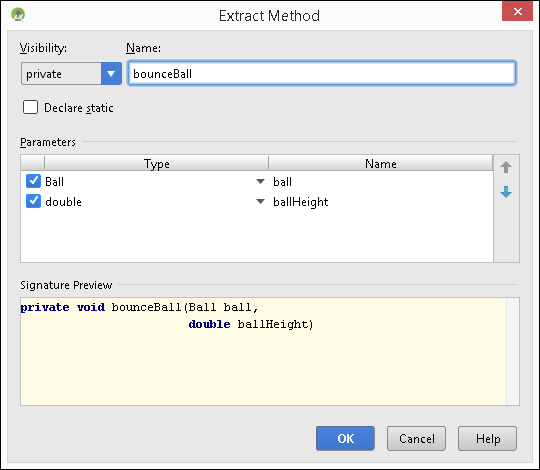
Figure 1-32: The Extract Method dialog box.
As a result, Android Studio rewrites your code. For the bouncing ball example, the new code looks like this:
void doALot(Background backgr, Sprite sprite, Ball ball) {
if (backgr.isCity()) {
int steps = getSteps();
sprite.move(steps);
if (sprite.isNear(monster))
sprite.changeFace(Sprite.PANIC);
sprite.release(ball);
double ballHeight = sprite.handHeight;
bounceBall(ball, ballHeight);
}
int seconds = getLevel() + 2;
showCar(seconds);
makeNoise();
// … Etc.
}
}
private void bounceBall(Ball ball, double ballHeight) {
while (ballHeight != 0) {
double g = 9.807;
double timeToDrop =
Math.sqrt(2 * ballHeight / g);
double rebound =
ballHeight * ball.elasticity;
ball.dropTo(0);
ball.riseTo(rebound);
}
}
Android Studio supports about 30 refactoring patterns. You can find descriptions of these patterns almost anywhere on the web, so I don’t describe all the patterns here. But I can’t end this chapter without writing about my favorite pattern — the Rename pattern. Here’s the story:
You’re working with this section’s game code and you want to change a name. It could be a variable name, a method name, or any other name in the project. For the purpose of this example, imagine replacing the method name isNear with the new name isCloseTo. To make the change manually, you have to edit the method header and then replace the name in each of the project’s isNear method calls. If there are many such method calls, the change can take a long time.
So, instead of doing it manually, you select any occurrence of the method name isNear in your project. (The occurrence that you select doesn’t have to be the one in the method header.) Then choose Refactor ⇒ Rename. A list of suggested names appears. (See Figure 1-33.)

Figure 1-33: Renaming a method.
You can accept one of the suggested names, but you can also start typing to replace the current name. As you type, every occurrence of the selected name changes throughout your project. When you press Enter, the renaming ends and all your isNear occurrences are now isCloseTo occurrences. It’s simple. It’s consistent. And it’s free from manual typing errors. It’s great!