Chapter 2
Developing for Android Wear
In This Chapter
![]() Running Android apps on wearables
Running Android apps on wearables
![]() Creating a basic wearable app
Creating a basic wearable app
![]() Creating a watch face app
Creating a watch face app
Not long ago, when I was writing an article for a technology website, I asked a Google staff member about the range of uses for the Android operating system. “Android runs phones, tablets, watches, automobiles, televisions, autos, and other things. What is it about Android that makes the platform so versatile?” The staff member sensed that I was a) feeding him an easy question and b) trying to sound “pro-Google,” so he didn’t answer the question. I should have known better. In any case, the applicability of Android to so many form factors is impressive.
Many of this book’s concepts work on all kinds of devices. But when I describe a particular feature, I usually think “smartphone or tablet.” In this chapter, I veer briefly from that path and deal exclusively with wristwatches (known formally as Android Wear devices, or wearables for short).
Setting Up Your Testing Environment
To run this chapter’s example, the only thing you need is an Android Wear AVD. Here’s how you get one:
- In Android Studio’s main menu, choose Tools ⇒ Android ⇒ SDK Manager.
-
Make sure that your SDK Tools is Version 23.0.0 or higher.
If not, install an updated SDK Tools version.
-
Make sure that your SDK is API Level 20 or higher.
If not, install an updated SDK level.
-
Close the SDK Manager.
(You were probably planning to do that anyway.)
-
In Android Studio’s main menu, choose Tools ⇒ Android ⇒ AVD Manager.
The AVD Manager opens.
-
In the AVD Manager window, click the Create Virtual Device button.
The Virtual Device Configuration dialog box appears. The left side of the dialog box contains a Category list, and the middle contains a list of hardware profiles.
-
In the Category list, select Wear.
Doing so narrows the list of hardware profiles to the ones that are specifically for Android Wear.
-
Select a hardware profile from the list and click Next.
The choices probably include square and round watches and different numbers of pixels on the faces. To run this chapter’s example, any choice will do.
 It’s true. To run this chapter’s example, any Android wear choice will do. But to run the emulator on your development computer, some choices might be better than others. Some AVDs consume too much memory. Other choices (such as x86 or armeabi in the next step) might be wrong for your computer’s configuration. If at first you don’t succeed, try some different choices.
When you click Next, another Virtual Device Configuration dialog box appears. The new dialog box lists system images. Each system image is a version of Android (5.0.2, for example) along with a target processor architecture (x86 or armeabi).
 For a reminder about what a system image is, refer to Chapter 2 in Book I.
 -
Select an item in the list and click Next.
At this point, yet another Virtual Device Configuration dialog box appears. The defaults in this dialog box are okay by me.
- Click Finish.
After following these steps, you have an emulated device that does what an Android wearable does. You can test your Android Wear code on this emulated device.
Other testing configurations
In real life, an Android Wear device seldom runs on its own. Instead, the wearable runs in concert with a phone. The phone does all the heavy lifting (networking to the Internet, for example) while the wearable does things that tiny wrist devices should do (display the time, show notifications, count your steps, and so on).
In the previous paragraph, I write “phone” when I should really write “handheld device.” You can connect a tablet device to an Android watch. But for a watch to be useful, you should connect it to something that’s with you all the time. And people are much more likely to carry phones than to haul around a tablet device.
For the full Android Wear experience, you probably want two devices — a wearable and a phone. The obvious question is, of the two devices, are one or both of them emulated? Are one or both of them real?
To help answer this question, the Android documentation provides a few scenarios:
-
Ignore the phone and use an emulated Android Wear device.
That’s the scenario that I recommend for this chapter’s example.
-
Connect a real phone to your development computer and use an emulated Android Wear device.
See my brief list of tips in this section.
-
Use a real phone and a real Android Wear device.
Again, see my brief list of tips.
Notice one combination that’s missing from this list. None of the scenarios involves an emulated phone. People have posted instructions for connecting two emulators — one for a phone and another for Android Wear. I’ve tried following the instructions, but I’ve never had time to reach the finish line. (I’ve been too busy writing Android Application Development All-in-One For Dummies, 2nd Edition.)
The Android developer training pages have detailed instructions on setting up phones for testing with Android Wear. So I don’t dwell on the details in this chapter. Instead, I point out some of the highlights. These highlights might help you see the forest for the trees while you march step-by-step through the instructions on the Android developer site’s pages.
 The Android developer site’s pages on testing with real devices are
 http://developer.android.com/training/wearables/apps/creating.html
and http://developer.android.com/training/wearables/apps/bt-debugging.html.
When you set up a phone for testing with Android Wear, you perform some or all of the following steps:
- Install the Android Wear app from the Google Play Store on your phone.
- Use the Developer options in the phone’s Settings screen to enable USB debugging on the phone.
-
(With an Android Wear emulator) Type the following command in your development computer’s command prompt window or Terminal app:
adb -d forward tcp:5601 tcp:5601This command forwards your emulator’s communications to the connected phone.
- (On a real wearable device) Use the Developer options in the device’s Settings screen to enable ADB debugging on the Wear device.
- In the Android Wear app on the phone, pair the phone with the emulator (or with the real wearable device).
For connecting a real wearable device, you have two options:
-
Connect the device to your development computer using a USB cable.
Alas! Some Android wearables don’t have USB ports.
-
Create a Bluetooth connection between the phone and the wearable.
For this option, you have to enable the Debugging over Bluetooth option on the wearable. You also have to set up Debugging over Bluetooth in the Android Wear app on the phone, and type the commands
adb forward tcp:4444 localabstract:/adb-hubadb connect localhost:4444on your development computer.
A “Hello” example
Most of the classes and methods that you use to write phone apps work on Android Wear apps as well. For evidence of this fact (but not proof of this fact), follow these steps:
- In Android Studio, start a new project.
-
In the Target Android Devices dialog box, select two form factors: the Phone and Tablet form factor, and the Wear form factor.
The real story about form factors depends on your stage of development. To publish a wearable app, you must package your app as part of a phone or tablet app. Consumers have no way of pushing apps directly to their wearables, so they must install an app on their phones and have the phone push the app onto the paired wearable. Therefore, you develop your app for both form factors.
Strangely enough, when you’re in the testing stage, the opposite is true. Yes, you choose two form factors when you create the new project. But for testing, when you push your app onto a device or an emulator, you push only the wearable part of the app.
 Why is there such a big difference between testing and publishing a wearable app? When you do testing, you don’t sign your app. That is, you don’t add an electronic certificate ensuring that your app comes from a valid source. For more information about signing apps, see Chapter 1 in Book VI.
 -
In the usual Add an Activity dialog box, select Add No Activity.
In this section’s example, you don’t need an activity for a phone or a tablet. But after selecting Add No Activity and clicking Next, you see a new Add an Activity to Wear dialog box.
-
In the Add an Activity to Wear dialog box, select Blank Wear Activity.
The blank wear activity will appear on your wearable device.
-
Click Next and Finish as often as it takes to get back to the main Android Studio window.
Your new project has two modules — one named
mobileand another namedapp. (See Figure 2-1.)- The
mobilemodule contains code for a phone or a tablet device. - The
wearmodule contains code for the wearable.
Both modules have manifests, Java files,
resfolders, and all that other stuff.In this example, you work exclusively inside the
wearmodule. - The
-
Expand the
wear/res/layoutbranch in the Project tool window.You probably see three layout files —
activity_main.xml,rect_activity_main.xml, andround_activity_main.xml. -
Double-click the layout file for your favorite Android Wear emulator.
If your emulator has a rectangular watch face, double-click the
rect_activity_main.xmlbranch. If your emulator has a round watch face, double-click theround_activity_main.xmlbranch. - Go to the Text view in the Designer tool.
-
In the layout file, add the following
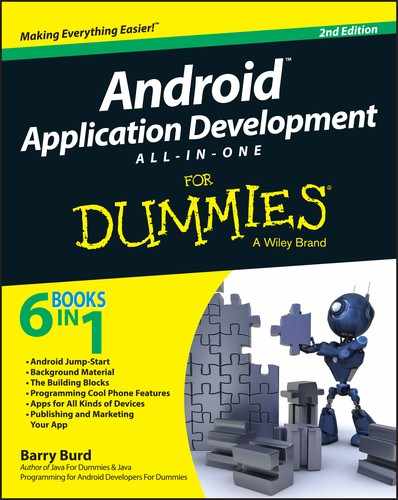
Buttonelement:<Button android:layout_width="wrap_content"android:layout_height="wrap_content"android:text="Click me"android:onClick="onButtonClick"/>It’s nothing special! That’s the whole point.
-
In the
MainActivityJava file for thewearpart of the app, add the following code:public void onButtonClick(View view) {mTextView.setText("You clicked!");}I’m assuming that Android Studio has already placed a text view in the layout and added the following lines somewhere in the
MainActivityfile:TextView mTextView;mTextView = (TextView) stub.findViewById(R.id.text);If my assumption is incorrect, add the appropriate stuff to your project.
-
With the Android Wear emulator running, choose Run ⇒ Run 'wear' in Android Studio’s main menu.
When you do, this example’s main activity (with a text field and a button) appears on the wearable emulator’s screen. If you click the button, the text inside the text view changes. It’s the same as an ordinary phone app. (See Figure 2-2.)

Figure 2-1: A mobile module and a wear module.
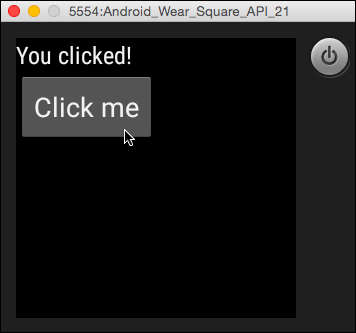
Figure 2-2: A Wear app displays an Android activity.
Wearable Apps: What’s the Big Deal?
In the previous section, I spend considerable effort to convince you that Wearable apps are very much like phone apps. But if things are so similar, why have a separate Android Wear chapter? Why not just write “Follow the steps you followed in all the other chapters” and be done with it?
The answer is, some aspects of wearable app development are different from their phone and tablet counterparts. The most obvious difference is screen size. You can’t display very much on a one-inch screen, so you have to design your app accordingly. A wearable app typically comes in two parts — one part that runs on the wearable device, and another part that runs on the user’s phone. The phone part can make use of the larger screen size, so the phone part can contain menus, setup screens, and other features. (Imagine that! I refer to a phone, and I write “larger screen size!”)
Another limitation for wearables is the number of classes in the API. The following packages don’t work with wearables:
android.webkitandroid.printandroid.app.backupandroid.appwidgetandroid.hardware.usb
Like their phone counterparts, each make and model of wearable supports its own set of features. For example, some models have built-in heart rate monitors; others don’t. You can test for the presence of a heart rate monitor with the following code:
import android.content.pm.PackageManager;
…
PackageManager = context.getPackageManager();
if (packageManager.hasSystemFeature
(PackageManager.FEATURE_SENSOR_HEART_RATE)) {
// Etc.
The PackageManager class has dozens of constants like FEATURE_SENSOR_HEART_RATE for the many features that a device may or may not have.
Another important aspect of wearable development is the device’s timeout behavior. When you wake up a phone, you see a lock screen. And when you unlock the screen, you see whatever activity was running when the phone went to sleep. But wearables are different. When you wake up a wearable, there’s no lock screen. Instead, you see either the watch face (typically, the current time) or a new notification. One way or another, activities on wearables don’t automatically stick around the way they do on phones and tablets. So if you want something that stays on the screen, you need an always-on app.
For information about always-on apps, visit developer.android.com/training/wearables/apps/always-on.html.
Case Study: A Watch Face
In any language, the meanings of words change over time. Eventually, the original meanings fade into obscurity. Only linguists and lexicographers know how words' meanings have evolved.
Take, for example, the word “telephone.” In the late 1800s, this word came from “tele” (meaning “across”) and “phone” (meaning “sound”). In the 1900s, when these devices became widely available, people shortened the word from “telephone” to “phone.”
In the 2000s, phones expanded their functionality to include texting, web surfing, game playing, and other activities not directly related to sound or to sending sound across regions of space. Way back when our grandparents were young (as early as the year 2015) phones were replacing credit cards as a primary method of making point-of-sale payments. Now, in the year 2065, we use phones to wash our clothes, mow our lawns, build our cities, and raise our children. Who among us remembers even remotely that the word “phone” came from a root word related to “sound?”
The same kind of thing is true about “watches” and “wearables.” Nowadays, people wear watches to look good and to make positive impressions on other people. But in the old days, watches were about telling time. The word “watch” originates from workers being on watch duty carrying devices to help them mark time. Even in the early 2000s, some fashion-challenged people wore watches to keep track of the current time. In fact, one author (Barry Burd, ca. 2015) included a time-display watch face program in this Android book. In addition to displaying time, the example illustrated some interesting wearable app features. For purely historical reasons, I reproduce his instructions (verbatim and in their entirety) here:
- Start a new Android project.
- When you get to the Target Android Devices dialog box, select two form factors: the Phone and Tablet form factor, and the Wear form factor.
-
When you get to the Add an Activity to Mobile dialog box, select Add No Activity and press Next.
The Add an Activity to Wear dialog box appears.
-
In this dialog box, select Watch Face.
The title of this dialog box is misleading. A Watch Face isn’t an activity. But the creators of Android Studio can’t worry about every little detail.
When you select Watch Face in this step, you’re telling Android Studio to write a lot of code for you. I explore some of this code in the next section. For now, just keep clicking.
-
Click Next.
This takes you to a Customize the Activity dialog box. In this dialog box, you specify a Service Name and a Style.
-
The Service Name is the name of the main class in your app.
The main class isn’t an Android activity. It’s an Android service.
In this example, I accept the default
MyWatchFacename. -
The Style is Analog or Digital.
Android Studio adds code to your app based on your Style choice.
In this example, I choose Digital.
-
-
Click Finish.
The dialog box disappears and you return to Android Studio’s main window. The main window contains a skeletal Android Wear app with a very basic digital watch face.
You can run the app that Android Studio has created.
-
In Android Studio’s main window, choose Run ⇒ Run 'wear'.
When you do, the wheels start churning. Eventually, the Choose Device dialog box appears.
-
Select a real wearable or an AVD that emulates a wearable device.
For help with AVDs, refer to this chapter’s “Setting Up Your Testing Environment” section. -
Click OK.
After a brief wait, you look at your emulator (or device) screen and … nothing! The emulator responds the way all Android Wear devices respond when you load a new watch face. Nothing changes. To see the fruits of your labor, you must switch to the new watch face on your wearable or emulator. Here’s how:
- In the
wearpart of the project, look for aserviceelement in theAndroidManifest.xmlfile. -
Find the value of the
serviceelement’sandroid:labelattribute.In the early 2015 version of Android Studio, this attribute’s value is
My Digital. Both the
 serviceand theapplicationelements can haveandroid:labelattributes. The attribute that you want belongs to theserviceelement. -
Tap the wearable’s (or emulator’s) screen.
A menu item appears.
- If necessary, scroll the screen until you see the Settings menu item.
-
Tap the Settings menu item.
Lo and behold! Another list of menu items appears.
- Scroll the list until the Change Watch Face item is highlighted in the center of the screen.
-
Tap the Change Watch Face menu item.
You see a preview of a watch face. The preview is an image and a name.
- Scroll leftward until you see a preview with the name that you found in Step 11 (the value of the
serviceelement’sandroid:labelattribute). -
Tap the preview.
As a result, the preview goes away. The device displays its new watch face screen with numbers ticking the time in hours, minutes, and seconds. To see the watch face that Android Studio version 1.2 creates, look at Figure 2-3.
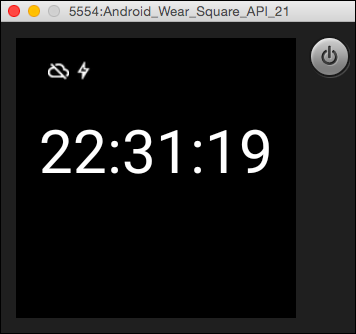
Figure 2-3: A simple digital watch face.
As you develop an app, it’s common to run the app many times, making slight changes in the app’s code each time. If your device or emulator displays a particular watch face, and you make changes in that watch face’s code, you don’t have to perform Steps 10 to 18 every time you run the app. Any changes that you make to the project’s watch face take effect as soon as you rerun the project.
Dissecting the skeletal watch face project
Many interesting things lurk inside a typical watch face project’s code. This section describes a few of them. As you read this section, you can follow along by examining the code that Android Studio created in the previous set of steps.
The manifest file
When Android Studio creates a skeletal app, you get an AndroidManifest.xml file. The AndroidManifest.xml file for the skeletal watch face app contains elements that don’t appear in skeletal phone apps.
-
The
<uses-feature>elementThe code
<uses-featureandroid:name="android.hardware.type.watch" />tells the Google Play Store that your app is for wearable devices. The Play Store won’t offer to load your app on phones, tablets, or other non-wearable gizmos.
The Google Play Store consults a manifest file’s <uses-feature>element, but an Android device does not consult that element. In other words, having auses-feature … type.watchelement in your app’s manifest file does not prevent an ordinary phone from installing your app. Using Android Studio’s Run ⇒ Run 'wear' command, you can bypass the Play Store and run a wearable app on a phone, a tablet, or an Android-enabled toaster oven. If you don’t have an entire project (but have only a project’s.apkfile), you can use Android’sadbcommand to side load the.apkfile onto a non-wearable device. I don’t promise that your wearable app will run smoothly (or run at all) on a non-wearable device, but the<uses-feature>element won’t prevent you from trying. -
The references to preview images
Android Studio’s skeletal watch face app has a
wear/res/drawablefolder. And within that folder, you’ll find a few preview images such aspreview_digital.pngandpreview_digital_circular.png. Unlike most of the items in the Project tool window’sdrawablebranch, you don’t display these images within the app itself. Instead, Android displays these images when the user scans the list of installed watch faces.To tell Android about these images, you put references to the images in the manifest file’s
<meta-data>elements:<meta-dataandroid:name="com.google.android.wearable.watchface.preview"android:resource="@drawable/preview_digital" /><meta-dataandroid:name="com.google.android.wearable.watchface.preview_circular"android:resource="@drawable/preview_digital_circular" /> -
The references to wallpaper
When you create this chapter’s watch face app, you don’t create an activity. That’s fine, but if your watch face isn’t an activity, what is it? The answer: Your watch face is a service. More specifically, your watch face is a live wallpaper service.
The live wallpaper feature appeared in Android version 2.1 to provide animated, interactive backgrounds for users. To establish your watch face as a live wallpaper, you put several elements in the
AndroidManifest.xmlfile. These include the following:- A
<meta-data>element pointing to your app’sres/xmlfolder - The
android.service.wallpaper.WallpaperServiceaction in an intent filter - A
<uses-permission>element with the namecom.google.android.permission.PROVIDE_BACKGROUND
All these elements turn your watch face into a kind of background for the display on a wearable device.
- A
The Java code
Your app’s main Java file extends CanvasWatchFaceService (a class in the android.support.wearable.watchface package). A full tour of the file is much more than you need for this first watch face app, but I want to point out a few highlights.
The heart of the code is the onDraw method. That’s not surprising because the name onDraw means “here’s what you do when you want to draw my watch face.” In Android Studio’s skeletal app, the onDraw method contains the code in Listing 2-1.
Listing 2-1: The onDraw Method
@Override
public void onDraw(Canvas canvas, Rect bounds) {
canvas.drawRect(0, 0, bounds.width(),
bounds.height(), mBackgroundPaint);
mTime.setToNow();
String text = mAmbient
? String.format("%d:%02d", mTime.hour, mTime.minute)
: String.format("%d:%02d:%02d", mTime.hour,
mTime.minute, mTime.second);
canvas.drawText(text, mXOffset, mYOffset, mTextPaint);
}
A canvas is where the things that you draw will eventually appear. You draw on a canvas with methods such as drawLine, drawArc, drawBitmap, drawRect, and drawText. The drawText method takes four parameters:
-
The first parameter (
text) is the string of characters to be drawn on the screen.In Listing 2-1, this string is either
String.format("%d:%02d", mTime.hour, mTime.minute)or
String.format("%d:%02d:%02d", mTime.hour,mTime.minute, mTime.second)depending on whether the device is in ambient mode or not. Ambient mode is the sleepy state in which a device curtails its behavior in order to conserve battery power. Several changes take place automatically when a device switches from interactive to ambient mode. One of them is that, in ambient mode, the screen doesn’t get second-by-second updates. Updates take place only minute by minute.
So, with the device in ambient mode, you don’t want to display the time in seconds. (If you do, the user sees a seconds counter that updates only once per minute. That’s not good.)
-
The second and third parameters (
mXOffsetandmYOffset) are float values.These values store measurements. One value (
mXOffset) is the number of pixels from the left of the device’s screen to the leftmost edge of the text. The other value (mYOffset) is the number of pixels from the top of the screen to the top of the text.The values of
mXOffsetandmYOffsetcome from calculations done elsewhere in the same.javafile. These calculations involve numbers in your app’sres/values/dimens.xml(dimensions) file. -
The fourth parameter (
mTextPaint) is a value of typePaint.Some of the code to create
mTextPaintlooks like this:Paint mTextPaint;mTextPaint = new Paint();mTextPaint = createTextPaint(resources.getColor(R.color.digital_text));float textSize = resources.getDimension(isRound? R.dimen.digital_text_size_round: R.dimen.digital_text_size);mTextPaint.setTextSize(textSize);The value of
R.color.digital_textis defined in the project’sres/values/colors.xmlfile:<?xml version="1.0" encoding="utf-8"?><resources><color name="digital_background">#000000</color><color name="digital_text">#ffffff</color></resources>
The color #ffffff represents the color white (the maximum amount of red, the maximum amount of green, and the maximum amount of blue). For more info, refer to Book IV, Chapter 1.
In the Android world, what’s already been drawn is either valid or invalid, with “invalid” meaning “the drawing is obsolete.” Android calls the onDraw method whenever the current drawing becomes invalid. And to make the drawing obsolete, your app’s code calls the invalidate method.
When the device is in ambient mode, your code’s onTimeTick method calls invalidate:
@Override
public void onTimeTick() {
super.onTimeTick();
invalidate();
}
When the device is in interactive mode, your code sends itself a MSG_UPDATE_TIME message at regular intervals, and the receipt of that message triggers an invalidate call:
final Handler mUpdateTimeHandler = new Handler() {
@Override
public void handleMessage(Message message) {
switch (message.what) {
case MSG_UPDATE_TIME:
invalidate();
if (shouldTimerBeRunning()) {
long timeMs = System.currentTimeMillis();
long delayMs = INTERACTIVE_UPDATE_RATE_MS
- (timeMs % INTERACTIVE_UPDATE_RATE_MS);
mUpdateTimeHandler.sendEmptyMessageDelayed
(MSG_UPDATE_TIME, delayMs);
}
break;
}
}
};
Enhancing the skeletal watch face project
Android Studio creates the skeletal app that’s described in the previous section. You get the skeletal app for free simply by clicking buttons when you create a new project. Of course, freebies have disadvantages. For one thing, they seldom do exactly what you want your app to do. For another, looking at canned code isn’t as satisfying as writing your own code.
I can’t wave a magic wand and have you write your own code. But I can give you instructions for adding some of my code to the skeletal watch face app. My code displays the date (in addition to the current time) in Android Studio’s skeletal watch face app.
-
Add the code in the upcoming Listing 2-2 to the end of the
onDrawmethod.When you add this code, Android Studio complains about your new
mDatePaintvariable. You haven’t declared that variable yet. DeclaringmDatePaintis your job in the next few steps. -
Look for the start of an inner class named
Engine.Every Android wallpaper class needs an engine. In this chapter’s example, the inner
Engineclass is a subclass of theCanvasWatchFaceService.Engineclass. In fact, this inner class makes up most of the app’s Java code. -
Add the following declaration near the start of the
Engineclass:Paint mDatePaint;Next, you have to set the
mDatePaintfield’s properties. You do this by copying the properties that are used for displaying the time of day and then shrinking the size of the text. Here goes: - Add the following statement inside the
onCreatemethod:mDatePaint = new Paint(mTextPaint); -
Add the following statement inside the
onApplyWindowInsetsmethod:mDatePaint.setTextSize(textSize / 2);The characters in the date display are half the size of the characters in the time-of-day display. Notice that the size of the text is a property of your paint. Unlike your standard house paint, Android canvas paint determines the size of the characters in your text.
Listing 2-2: Displaying the Date
String dateString = mTime.format("%m/%d/%Y");
Resources resources = MyWatchFace.this.getResources();
float textSize =
resources.getDimension(R.dimen.digital_text_size);
int width = bounds.width();
double centerX = width / 2;
int startX =
(int) (centerX - mDatePaint.measureText(dateString) / 2);
canvas.drawText(dateString, startX,
mYOffset + textSize + 10, mDatePaint);
That it! You’re done! When you run the app, you see a display like the one in Figure 2-4.
Figure 2-4: The skeletal watch face app with the date display added.
The code in Listing 2-2 does almost all the work. First, a format call creates a String using the current time. Instead of having hours, minutes, and seconds, this string has the month (%m), the day of the month (%d), and the year (%y).
The string "%m/%d/%Y" is called a pattern string, and the letters in the string (m, d, and Y) are called pattern characters. To find out what other pattern characters you can use, visit http://developer.android.com/reference/java/text/SimpleDateFormat.html.
In the skeletal app, the variable mTime belongs to the android.text.format.Time class. As I write this chapter, the Time class has been deprecated. In Java-land, the word deprecated means “made obsolete.” So, starting with Android API Level 22, Android developers aren’t supposed to use the Time class. (Instead, we’re supposed to use the java.util.GregorianCalendar class.) The trouble is, early in 2015, the skeletal code that Android Studio writes still uses the old Time class. I see a line through the call to the Time class’s constructor in Android Studio’s editor. (A line through a name means that the name has been deprecated.) By the time you follow this chapter’s instructions, the skeletal app might use the newer GregorianCalendar class. If so, the following code will create a date string:
SimpleDateFormat dateFormat =
new SimpleDateFormat("MM/dd/yyyy");
dateFormat.setCalendar(calendar);
String dateString =
dateFormat.format(calendar.getTime());
In Listing 2-2, after creating dateString, I do some math to figure out where to draw the dateString string on the screen. I want to center the date string horizontally, so I make centerX be half the width of the screen. Then I call the paint’s measureText method to find out how many pixels wide the dateString is. Finally, I put the left edge of the date string (the startX value) at centerX minus half the width of the date string. (See Figure 2-5.)
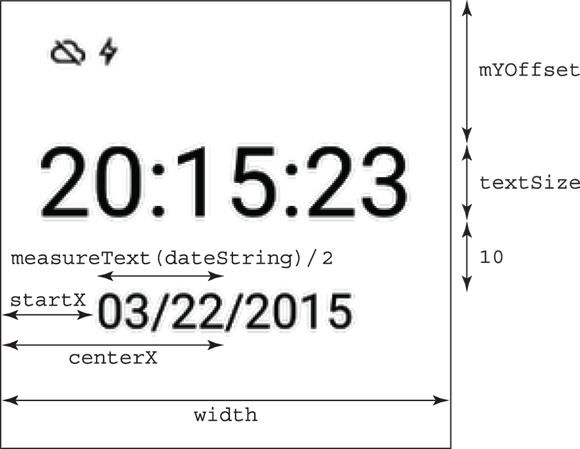
Figure 2-5: Calculating the position of the date string.
The drawText method’s third parameter is the distance (in pixels) from the top of the screen to the top of the date string. I confess. In Listing 2-2, I guess at this measurement. I start with the top of the big time of day string (mYOffset), I add the height of the time of day string (textSize), and then I add 10 pixels for good measure. (Again, refer to Figure 2-5.) You can do better than simply guessing the way I do. But there’s not much news in the more accurate code. The calculations for the date string’s height are similar to the ones I do for the horizontal position.