Chapter 1
Apps for Tablets
In This Chapter
![]() Adjusting for screen size and screen orientation
Adjusting for screen size and screen orientation
![]() Managing multipanel activities
Managing multipanel activities
![]() Writing apps that run on both phones and tablets
Writing apps that run on both phones and tablets
Don’t think about an elephant.
Okay, now that you’re thinking about an elephant, think about an elephant’s legs. The diameter of an elephant’s leg is typically about 40 centimeters (more than four-tenths of a yard).
And think about spiders of the Pholcidae family (the “daddy longlegs”) with their hair-like legs. And think about Gulliver with his Brobdingnagian friends. Each Brobdingnagian was about 72 feet tall, but a Brobdingnagian adult had the same physical proportions as Gulliver.
Gulliver’s Travels is a work of fiction. An animal whose height is 12 times a human’s height can’t have bone sizes in human proportions. In other words, if you increase an object’s size, you have to widen the object’s supports. If you don’t, the object will collapse.
This unintuitive truth about heights and widths comes from some geometric facts. An object’s bulk increases as the cube of the object’s height. But the ability to support that bulk increases only as the square of the object’s height. That’s because weight support depends on the cross-sectional area of the supporting legs, and a cross-sectional area is a square measurement, not a cubic measurement.
Anyway, the sizes of things make important qualitative differences. Take an activity designed for a touchscreen phone. Zoom that activity to a larger size without making any other changes. Then display the enlarged version on a ten-inch tablet screen. What you get on the tablet looks really bad. A tiny, crisp-looking icon turns into a big, blurry blob. An e-book page adapts in order to display longer line lengths. But, with lines that are 40 words long, the human eye suffers from terrible fatigue.
The same issue arises with Android activities. An activity contains enough information to fill a small phone screen. When the user needs more information, your app displays a different activity. The new activity replaces the old activity, resulting in a complete refresh of the screen.
If you slap this activity behavior onto a larger tablet screen, the user feels cheated. You’ve replaced everything on the screen even though there’s room for both the old and new information. The transition from one activity to the next is jarring, and both the old and new activities look barren.
No doubt about it, tablet devices require a design that’s different from phone designs. And to implement this design, Android has fragments.
What Fragments Can Do for You
A fragment is halfway between a view and an activity. Like a view, a fragment can be one of many elements on the device’s screen. But unlike a view, a fragment has its own lifecycle. Table 1-1 lists the fragment lifecycle methods.
Table 1-1 Fragment Lifecycle Methods
|
Method Name |
When Android Calls This Method |
|
|
Called when the fragment becomes part of a particular activity |
|
|
Called when the fragment is created (similar to an activity’s |
|
|
Called when Android creates the fragment’s visible interface (comparable to an activity’s |
|
|
Called after |
|
|
Called when Android finishes executing the associated activity’s |
|
|
Called when the fragment becomes visible to the user (typically, when Android executes the associated activity’s |
|
|
Called when the fragment begins interacting with the user (typically, when Android executes the associated activity’s |
|
|
Called when the fragment no longer interacts with the user (similar to an activity’s |
|
|
Called when the fragment is no longer visible to the user (similar to an activity’s |
|
|
Called when Android destroys the fragment’s visible interface |
|
|
Called when Android clobbers the fragment (similar to an activity’s |
|
|
Called when the fragment ceases to be part of a particular activity |
A fragment has a lifecycle. Your first response to this news might be “Oh, no! More on
SuchAndSuch
methods to manage!” But the reality is, components' lifecycle methods are your friends. Lifecycle methods coordinate the comings and goings of individual components. Sure, it means you’re going to have to manage your own app’s interface. But without lifecycle methods, you’d have to micromanage your own app’s interaction with other apps and with the Android operating system.
Programming with fragments
The user interface in this section’s example has three panels — a list of items, a detail panel describing whichever item is selected in the list, and a details-in-more-depth panel. On a small smartphone screen, each panel might be a separate activity. But a tablet screen in landscape mode has room for more than one panel.
Figure 1-1 shows this section’s app with two of the three panels. The panel on the left displays a list of Android SDK components. The panel on the right displays a description of whatever component is chosen in the list on the left. (The description is actually the first few sentences of the component’s SDK documentation.) This details-on-the-right pattern is part of many user interfaces.
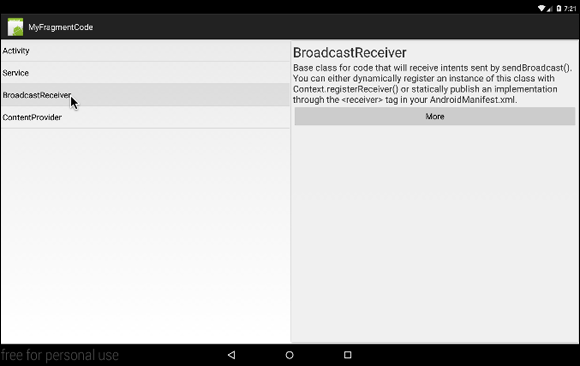
Figure 1-1: Two fragments attached to one activity.
To create the display in Figure 1-1, you build one activity. The activity has two fragments — a fragment on the left and another on the right. The left panel displays the same fragment throughout the run of the app, so you can declare that fragment in the activity’s layout file. The right panel displays one fragment at a time, but the fragment changes during the app’s run. So you declare a frame layout in the right panel. Listing 1-1 has the code.
Listing 1-1: The Main Activity’s Layout
<?xml version="1.0" encoding="utf-8"?>
<LinearLayout xmlns:android=
"http://schemas.android.com/apk/res/android"
android:orientation="horizontal"
android:layout_width="match_parent"
android:layout_height="match_parent">
<fragment class=
"com.allmycode.frag.ComponentNamesFragment"
android:id="@+id/component_names"
android:layout_height="match_parent"
android:layout_width="0px"
android:layout_weight="1" />
<FrameLayout android:id="@+id/docs"
android:layout_height="match_parent"
android:layout_width="0px"
android:layout_weight="1"
android:background=
"?android:attr/detailsElementBackground" />
</LinearLayout>
In Listing 1-1, the android:layout_whatever attributes divide the screen into two halves — one half for the fragment element and the other half for the FrameLayout element. The strategy with these attributes is to start by assigning a minimum of zero pixels for each element. Of course, zero pixels means no width at all (which is the same as being invisible). To keep the two halves of the layout from being invisible, assign equal non-zero layout_weight values to the two halves. With non-zero weight values, each half expands to fill the available space in the layout.
 In Listing 1-1, the use of the fragment’s fully qualified class name (
com.allmycode.frag.ComponentNamesFragment) is intentional. An abbreviated name (such as .ComponentNamesFragment) won’t cut the mustard.
In case you’re wondering, Android’s built-in detailsElementBackground (also in Listing 1-1) provides a uniform look for things like the right half of Figure 1-1 (things that display details about an item that the user has selected).
The app’s main activity code is impressively uninteresting. (See Listing 1-2.)
Listing 1-2: The Main Activity
package com.allmycode.frag;
import android.app.Activity;
import android.os.Bundle;
public class AllPurposeActivity extends Activity {
@Override
protected void onCreate(Bundle savedInstanceState) {
super.onCreate(savedInstanceState);
setContentView(R.layout.main);
}
}
Listing 1-3 contains the ComponentNamesFragment class. By virtue of the layout in Listing 1-1, Android plants a ComponentNamesFragment on the left side of the device’s screen (refer to Figure 1-1).
Listing 1-3: A Fragment Containing a List of Items
package com.allmycode.frag;
import android.app.FragmentManager;
import android.app.FragmentTransaction;
import android.app.ListFragment;
import android.os.Bundle;
import android.view.View;
import android.widget.ArrayAdapter;
import android.widget.ListView;
public class ComponentNamesFragment extends ListFragment {
final static String[] COMPONENTS = { "Activity",
"Service", "BroadcastReceiver", "ContentProvider" };
@Override
public void onActivityCreated
(Bundle savedInstanceState) {
super.onActivityCreated(savedInstanceState);
setListAdapter(new ArrayAdapter<>(getActivity(),
android.R.layout.simple_list_item_1, COMPONENTS));
}
@Override
public void onListItemClick(ListView l, View v,
int index, long id) {
//Create fragment with index
DocsFragment docsFragment = new DocsFragment();
Bundle args = Helper.getBundleWithIndex(index);
docsFragment.setArguments(args);
//Clear the back stack
FragmentManager fragmentManager =
getFragmentManager();
int backStackEntryCount =
fragmentManager.getBackStackEntryCount();
for (int i = 0; i < backStackEntryCount; i++) {
fragmentManager.popBackStackImmediate();
}
//Perform the transaction
FragmentTransaction fragmentTransaction =
fragmentManager.beginTransaction();
fragmentTransaction.replace(R.id.docs, docsFragment);
fragmentTransaction.addToBackStack(null);
fragmentTransaction.commit();
}
}
The class in Listing 1-3 extends Android’s ListFragment class. A ListFragment is a fragment that displays a list. Early on in the fragment’s lifecycle, the code in Listing 1-3 sets a list adapter (more specifically, an ArrayAdapter) for the fragment. So how early is “early on”?
As in the examples from Chapter 2 of Book IV, the ArrayAdapter constructor’s first parameter is a context. But wait! Unlike an activity, a fragment isn’t a context. So you can’t use the keyword this for the ArrayAdapter constructor’s first parameter.
Fortunately, a fragment has a getActivity method. A call to getActivity grabs the activity to which the fragment is attached. So, for the ArrayAdapter constructor’s first parameter, you can call getActivity. Of course, you can’t call getActivity until the fragment is attached to an existing activity. That’s why, in Listing 1-3, I override the fragment’s onActivityCreated method. Android calls onActivityCreated after attaching the fragment and calling the activity’s onCreate method. So everything works as planned.
 The
The android.app.Activity class’s great-grandparent class is android.content.Context. But the android.app.Fragment class’s parent class is plain old java.lang.Object. Therefore, in an activity’s code, the keyword this refers to a context. But in a fragment’s code, the keyword this doesn’t refer to a context.
 A
A ListFragment is like a ListActivity — except that it’s a fragment, not an activity. Many of the ListActivity class’s concepts apply as well to the ListFragment class. To read about Android’s ListActivity class, see Chapter 2 of Book IV.
In Listing 1-3, the constructor for the ArrayAdapter has three parameters.
- The first parameter is the context — that nasty parameter that forces me to put the constructor inside the
onActivityCreatedmethod. -
The second parameter is
simple_list_item_1— a standard Android layout.The
simple_list_item_ 1layout creates the look that you see on the left side in Figure 1-1. Android has lots of these standard layouts. For a roundup of the available layouts, visithttp://developer.android.com/reference/android/R.layout.html. -
The third parameter is the collection of items that will appear in the list.
In this example, those items come from the
COMPONENTSarray, which is declared in that same listing — Listing 1-3.
Like a ListActivity, a ListFragment has an onListItemClick method. In Listing 1-3, I respond to a click by working with a DocsFragment, a FragmentTransaction, and a FragmentManager:
- The
DocsFragmentinstance in Listing 1-3 represents the right side of Figure 1-1. - A fragment transaction is a bunch of things you do with fragments. For example, setting up to replace one fragment with another (as in Listing 1-3) is a transaction.
- A fragment manager does what its name suggests. It manages fragments' arrivals and departures.
The fragment
You don’t get to see the DocsFragment's code until Listing 1-4. For now, the actual fragment created when you construct a new DocsFragment is a black box. (I shouldn’t build up the suspense this way. I just don’t want you to get sidetracked.)
One way or another, the fragment on the right side in Figure 1-1 has to know which of the items the user clicks on the left side. In this chapter’s code, I call this “which item” business the index. If the user clicks the topmost item on the left (the Activity item), the index has value 0. If the user clicks the second item on the left (the Service item), the index has value 1. And so on.
When you create a new fragment, you don’t create an intent, so you can’t use an intent’s extras to pass an index to the fragment. To take the place of extras, you have arguments. In Listing 1-3, to pass the index value to the newly created DocsFragment instance, I put the index value into a Bundle and add the Bundle's info to the new fragment’s arguments.
To read about bundles, refer to Chapter 3 in Book III.
In this chapter’s examples, I move a few frequently used (and frankly, uninteresting) pieces of code to methods outside of my mainstream listings. For example, instead of manufacturing a bundle in Listing 1-3, I call a Helper class’s getBundleWithIndex method. If you can’t wait to see the puny body of the getBundleWithIndex method, jump ahead to Listing 1-9 where I show you the entire Helper class.
The fragment transaction
The term transaction comes from the world of databases. A transaction is a bunch of operations. These operations live inside an all-or-nothing bubble. That is, either all the operations in the transaction take place, or none of the operations in the transaction takes place.
In Listing 1-3, you turn a bunch of statements into a transaction. In particular, you sandwich a bunch of statements between calls to beginTransaction and commit. One of these statements, fragmentTransaction.replace (R.id.docs, docsFragment), prepares to replace whatever’s currently in the docs frame layout (in Listing 1-1) with a new fragment. The replacement occurs when Android executes the fragmentTransaction.commit method call.
I recently had an unpleasant experience when I used the wrong value for the first parameter in the replace method call. The app crashed, but the stack trace in the Logcat panel didn’t list any of my own app’s classes. I couldn’t figure out where, in my code, the error had occurred. Somewhere before the stack trace, I found an entry with the text No view found for fragment, and eventually, I located the bad method parameter. So my advice is, don’t let this error get the best of you. Always double-check your replace method parameters.
The fragment manager
An instance of the android.app.FragmentManager class takes care of your app’s fragments. For example, in Listing 1-3, the manager’s replace method changes the fragment that’s shown on the user’s screen. The manager also helps you fiddle with your activity’s back stack.
Book III, Chapter 1 describes the way activities pile up on top of one another with successive startActivity calls. When the user presses Back, Android pops an activity off the stack. The most recently added activity is the first to be popped. It’s as if Android, the boss, has an agreement with members of the Activities Union. Android fires activities in reverse order of seniority.
With the introduction of fragments in Android 3.0, an activity can have its own private stack. You can display fragment A and then call fragmentTransaction.replace and fragmentTransaction.addToBackStack. The combination of method calls makes fragment B overwrite fragment A. When the user presses Back, fragment B goes away, and fragment A returns to its place on the activity’s screen. Android doesn’t destroy an entire activity until the activity has no fragments that it can jettison.
In the Clear the back stack part of Listing 1-3, the fragment manager does some quick housekeeping of the activity’s fragment stack. To read more about this housekeeping, cast your eyes to the “Trimming the fragment stack” section.
When you call addToBackStack, you have the option of supplying a name for the entry that you’re putting on the back stack. If you supply null as the argument to the addToBackStack call (as I do in Listing 1-3), then the entry is unnamed. If you supply a string at that time, later in the code, you can retrieve the entry by calling FragmentManager.findFragmentByTag.
Fragments, more fragments, and even more fragments
The right panel in Figure 1-1 has a More button. When the user presses this More button, the app displays a more verbose description of the selected component. To find out how this happens, stare thoughtfully (but joyfully) at the code in Listing 1-4.
Listing 1-4: Code to Create the Fragment on the Right Side of Figure 1-1
package com.allmycode.frag;
import android.app.Fragment;
import android.app.FragmentTransaction;
import android.os.Bundle;
import android.view.LayoutInflater;
import android.view.View;
import android.view.View.OnClickListener;
import android.view.ViewGroup;
import android.widget.Button;
import android.widget.LinearLayout;
import android.widget.TextView;
public class DocsFragment extends Fragment
implements OnClickListener {
TextView textView1;
@Override
public View onCreateView(LayoutInflater inflater,
ViewGroup container,
Bundle savedInstanceState) {
return myLayout();
}
@Override
public void onClick(View view) {
int index = getArguments().getInt("index");
//Create fragment with index
DocsFragmentVerbose docsFragmentVerbose =
new DocsFragmentVerbose();
Bundle args = Helper.getBundleWithIndex(index);
docsFragmentVerbose.setArguments(args);
//Perform the transaction
FragmentTransaction fragmentTransaction =
getFragmentManager().beginTransaction();
fragmentTransaction.replace(R.id.docs,
docsFragmentVerbose);
fragmentTransaction.addToBackStack(null);
fragmentTransaction.commit();
}
final static int[] DOCS = {
R.string.doc_activity,
R.string.doc_service,
R.string.doc_broadcast_receiver,
R.string.content_provider
};
private LinearLayout myLayout() {
LinearLayout layout = new LinearLayout(getActivity());
layout.setOrientation(LinearLayout.VERTICAL);
int index = getArguments().getInt("index");
textView1 = new TextView(getActivity());
textView1.setTextSize(30);
textView1
.setText(ComponentNamesFragment.COMPONENTS[index]);
layout.addView(textView1);
TextView textView2 = new TextView(getActivity());
textView2.setTextSize(20);
textView2.setText(DOCS[index]);
layout.addView(textView2);
Button button = new Button(getActivity());
button.setText(R.string.more);
button.setOnClickListener(this);
layout.addView(button);
return layout;
}
}
In Listing 1-4, the onCreateView and myLayout methods use Java code to compose a layout — the layout on the right side in Figure 1-1. The listing’s onCreateView method returns a linear layout, which is a view group, which is a view. And that view becomes the fragment’s visible presence on the tablet screen.
In Listing 1-4, I define a fragment’s layout using Java code instead of a res/layout XML document. Book IV, Chapter 1 goes into more detail on using Java code to define views and layouts.
The DOCS array near the bottom of Listing 1-4 is interesting. I use this array in the middle of the listing to set the text in a text view. This array is an array of int values — an array of code numbers for strings defined in the project’s res/values/strings.xml file. The lines in the file are very long, so I don’t paste the entire strings.xml file onto this page. But here’s a chopped-off version of the file:
<?xml version="1.0" encoding="utf-8"?>
<resources>
<string name="app_name">MyFragmentCode</string>
<string name="more">More</string>
<string name="doc_activity">An activity is a single, focused thing that <string name="doc_service">A Service is an application component representing
<string name="doc_broadcast_receiver">Base class for code that will receive
<string name="content_provider">Content providers are one of the primary
</resources>
The text in each string is a few sentences copied from the Android SDK documentation. (Just for fun, try turning this printed page so that you’re reading it in landscape mode. Maybe then you’ll see the chopped-off portion of the strings.xml file.)
In the description of a broadcast receiver, the documentation contains the phrase the <receiver> tag, with angle brackets and all. (Refer to Figure 1-1.) You can’t just plop the text the <receiver> tag inside your strings.xml file because the angle brackets in
<string name="…">Base class…<
receiver
>
…
</string>
would confuse an XML parser. You have to tell the XML parser that the angle brackets surrounding the word receiver are plain old text — not official parts of the XML code. Fortunately, XML provides a standard way of doing this. You enclose the angle brackets in CDATA sections:
the <![CDATA[<]]>receiver<![CDATA[>]]> tag
Building the fragment stack
In Listing 1-4, the onClick method replaces the right side of Figure 1-1 with a brand-new fragment — an instance of my DocsFragmentVerbose class. And clever guy that I am, I programmed the DocsFragmentVerbose class to display a page from the official Android documentation website. Listing 1-5 contains the code.
Listing 1-5: A Fragment Containing a Web View
package com.allmycode.frag;
import android.app.Fragment;
import android.os.Bundle;
import android.view.LayoutInflater;
import android.view.View;
import android.view.ViewGroup;
import android.webkit.WebView;
public class DocsFragmentVerbose extends Fragment {
@Override
public View onCreateView(LayoutInflater inflater,
ViewGroup container,
Bundle savedInstanceState) {
WebView webView = new WebView(getActivity());
int index = getArguments().getInt("index");
webView.loadUrl(
"http://developer.android.com/reference/android/"
+ ((index < 2) ? "app/" : "content/")
+ ComponentNamesFragment.COMPONENTS[index]
+ ".html");
return webView;
}
}
At this point, I can describe the whole storyboard for this section’s grand example:
- The user sees a list — namely, the list of component names in the left fragment in Figure 1-1.
-
The user selects an item in the list.
In response, the app displays a brief description of the selected item. In Figure 1-1, the description is the first few sentences of Android’s
BroadcastReceiverdocumentation.To display the description, the code in Listing 1-3 calls
replace(R.id.docs, docsFragment). That is, the code places a fragment into theR.id.docsview. -
The newly displayed fragment contains a brief description and a button. (Refer to Figure 1-1.) If the user clicks the button, the app covers this fragment with an even newer fragment.
In Figure 1-2, the new fragment displays the
BroadcastReceiver's online documentation page.

Figure 1-2: A fragment contains a web view.
 To load a page from the Internet, your app’s
 AndroidManifest.xml document must have a <uses-permission android:name="android.permission.INTERNET" /> element.
Trimming the fragment stack
When I created the first draft of the code in Listing 1-3, I didn’t include anything about getBackStackEntryCount or popBackStackImmediate. “Whew! I’m done!” I said to myself. But then I tested the code. What I discovered in testing was that a user’s attention shifts abruptly with the selection of a new list item.
Imagine selecting BroadcastReceiver and then clicking the More button. After a look at the BroadcastReceiver's documentation page (refer to Figure 1-2), you turn your attention leftward to the list of components. As soon as you select a different component, you tend to forget all about broadcast receivers. If you click the Back button, you probably don’t want to rummage back through your old selections. In other words, selecting an item in the list of components represents a fresh start. When you select an item in the list of components, the app should clear whatever fragment stack you created previously.
The Clear the back stack part of Listing 1-3 does the desired stack cleanup. The code calls the fragment manager’s getBackStackEntryCount method to find out how many fragments you have on the stack. Then the for loop uses the entry count to decide how many fragments to pop off the stack. When the loop finishes its work, the stack of fragments is empty; now you can safely call the current transaction’s addToBackStack method. The strategy works very nicely.
Getting the Best of Both Worlds
The previous sections in this chapter describe an app that uses fragments. The app works very nicely but has one tiny limitation. You must not let the user turn the tablet sideways. If the tablet device is in portrait mode, the app looks silly. (Yes, I’m being sarcastic if I call this problem a “tiny limitation.”)
Figure 1-3 shows the app on a display that’s taller than it is wide. You have lots of wasted space on the left side, and you have no room for the page heading (BroadcastReceiver) on the right side.

Figure 1-3: Screen orientation matters a lot!
The problem isn’t limited to portrait mode on tablets. The same nastiness happens if you run the app on a small screen device. Landscape or portrait — you can’t run the previous section’s code on any phone that has less-than-stunning resolution. If you do the app looks awful.
I’m the first to admit that this book’s examples vary from plain-looking to ugly. But with other examples, the fault is with my lack of artistic flair. In this chapter’s example, the fault is in the code. (“The fault, dear Brutus, is not in our arts, But in our code… .”)
To remedy the visual faux pas in Figure 1-3, you can make four enhancements to your code:
-
You create an additional activity.
The new
DocsActivityVerboseactivity has only one view — namely, a view to display the web page fragment from Listing 1-5. Unlike the narrow fragment in Figure 1-3, the new activity consumes the entire screen. (See Figure 1-4.) - You tweak the code in Listing 1-4 to display either the
DocsFragmentVerboseor the newDocsActivityVerbose, depending on the screen’s orientation. - You tweak the app’s main activity in a similar fashion.
-
You create an additional layout for portrait mode and for small screen densities.
In the new layout, the
DocsFragmentdoesn’t appear beside the list of component names. Instead, theDocsFragmentappears below the list of component names (instead of beside the list of names). See Figure 1-5.
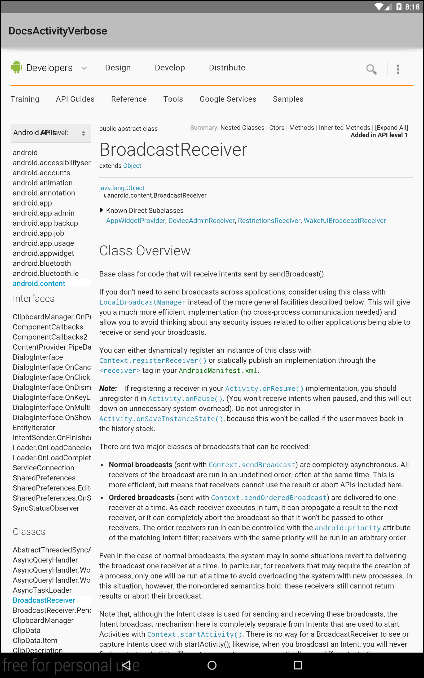
Figure 1-4: The web page fragment takes up the entire screen.
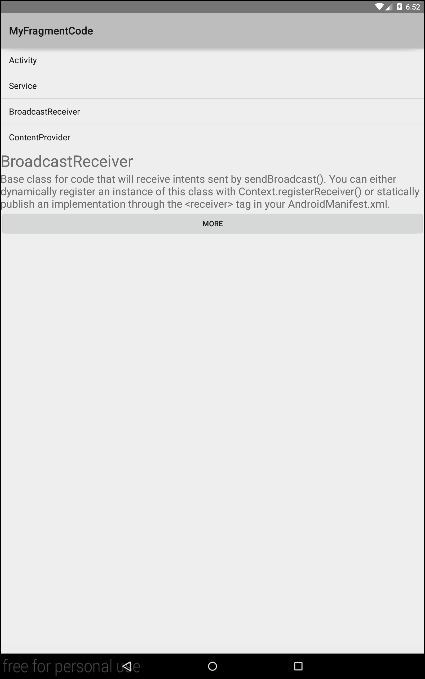
Figure 1-5: A layout for narrow screens and small screens.
In what follows, I call these enhancements Change 1, Change 2, Change 3, and Change 4.
Change 1: Create an additional activity
Listing 1-6 contains the new DocsActivityVerbose activity.
Listing 1-6: An Activity That’s a Wrapper for a Fragment
package com.allmycode.frag;
import android.app.Activity;
import android.app.FragmentManager;
import android.app.FragmentTransaction;
import android.os.Bundle;
public class DocsActivityVerbose extends Activity {
@Override
public void onCreate(Bundle bundle) {
super.onCreate(bundle);
setContentView(R.layout.docs_verbose);
int index = getIntent().getIntExtra("index", 0);
//Create fragment with index
DocsFragmentVerbose docsFragmentVerbose =
new DocsFragmentVerbose();
Bundle args = Helper.getBundleWithIndex(index);
docsFragmentVerbose.setArguments(args);
//Perform the transaction
FragmentManager fragmentManager =
getFragmentManager();
FragmentTransaction fragmentTransaction =
fragmentManager.beginTransaction();
fragmentTransaction.replace(R.id.docs_verbose_frame,
docsFragmentVerbose);
fragmentTransaction.commit();
}
}
The new DocsActivityVerbose class performs the same fragment transaction that’s performed by the onClick method in Listing 1-4.
Notice that the code in Listing 1-6 doesn’t call the addToBackStack method. If you were to call addToBackStack in Listing 1-6, Android would push the web page fragment on top of an initially empty fragment. Then, if the user were to press the Back button, Android would pop the web page fragment off the stack. The user would see an empty fragment that consumes the entire screen.
When you add an activity to a project (such as the activity in Listing 1-6), you must add an <activity> element to the project’s AndroidManifest.xml document. For the code in Listing 1-6, the new <activity> element looks like this:
<activity android:name=
"com.allmycode.frag.DocsActivityVerbose" />
If you create the new activity using Android Studio’s tools, the <activity> element is added automatically. But if you create a new Java class and then turn the class into an activity, you must add the <activity> element manually.
Like many activity classes, the new DocsActivityVerbose class uses its own layout resource. And sure enough, the onCreate method in Listing 1-6 refers to an R.layout.docs_verbose resource. Listing 1-7 contains my docs_verbose.xml file.
Listing 1-7: A Layout for the New DocsActivityVerbose Class
<?xml version="1.0" encoding="utf-8"?>
<LinearLayout xmlns:android=
"http://schemas.android.com/apk/res/android"
android:layout_width="match_parent"
android:layout_height="match_parent">
<FrameLayout android:id="@+id/docs_verbose_frame"
android:layout_height="match_parent"
android:layout_width="match_parent"
android:layout_weight="1" />
</LinearLayout>
The layout for the DocsActivityVerbose class contains only one element — namely, the fragment that displays an Android documentation web page.
Change 2: Tweak the DocsFragment code
Having created the new DocsActivityVerbose class and its required layout resource, you’re ready to integrate these files into the rest of the app’s code. To do this, consider two situations:
- When the user presses the More button, you either replace the existing fragment or start your new
DocsActivityVerbose, depending on the screen’s orientation. - When the user turns the device sideways, you check whether the new orientation will cause the awkward crunch shown back in Figure 1-3. If so, you need to back away from displaying the web page fragment.
To handle the first situation, replace the DocsFragment code’s onClick method (see Listing 1-8).
Listing 1-8: Deciding What to Do When the User Clicks a Button
@Override
public void onClick(View view) {
int index = getArguments().getInt("index");
if (Helper.isDenseWideScreen(getActivity())) {
//Create fragment with index
DocsFragmentVerbose docsFragmentVerbose =
new DocsFragmentVerbose();
Bundle args = Helper.getBundleWithIndex(index);
docsFragmentVerbose.setArguments(args);
//Perform the transaction
FragmentTransaction fragmentTransaction =
getFragmentManager().beginTransaction();
fragmentTransaction.replace(R.id.docs,
docsFragmentVerbose);
fragmentTransaction.addToBackStack(null);
fragmentTransaction.commit();
} else {
Intent intent = new Intent();
intent.setClass(getActivity(),
DocsActivityVerbose.class);
intent.putExtra("index", index);
startActivity(intent);
}
}
The original DocsFragment class in Listing 1-4 doesn’t check the screen’s size or orientation. But the code in Listing 1-8 responds in different ways, depending on the result of the isDenseWideScreen method call. On a dense, wide screen, the code in Listing 1-8 mimics the code in Listing 1-4. But on a lesser screen, Listing 1-8 starts an instance of the new DocsActivityVerbose class.
The code for the isDenseWideScreen method is in Listing 1-9, along with the rest of this chapter’s Helper class.
Listing 1-9: The Helper Method
package com.allmycode.frag;
import android.app.Activity;
import android.content.res.Configuration;
import android.os.Bundle;
import android.util.DisplayMetrics;
public class Helper {
static Bundle getBundleWithIndex(int index) {
Bundle bundle = new Bundle();
bundle.putInt("index", index);
return bundle;
}
static boolean isDenseWideScreen(Activity activity) {
DisplayMetrics metrics = new DisplayMetrics();
activity.getWindowManager().
getDefaultDisplay().getMetrics(metrics);
boolean isDenseScreen =
metrics.densityDpi >= DisplayMetrics.DENSITY_XHIGH;
boolean isWideScreen =
activity.getResources().
getConfiguration().orientation ==
Configuration.ORIENTATION_LANDSCAPE;
return isDenseScreen && isWideScreen;
}
}
Change 3: Tweak the app’s main activity
When the user turns the device sideways, Android destroys the current activity and creates the activity anew. If the turn is from landscape to portrait mode, you don’t want a fragment that displays a web page to hang around awkwardly on the right side of the screen. So, when Android calls your main activity’s onCreate method, you need to test for a dense, wide screen. If the user’s screen doesn’t pass this test, then remove any web pages from the fragment’s back stack.
Listing 1-10 contains the enhanced AllPurposeActivity code.
Listing 1-10: Your New, Improved Main Activity
package com.allmycode.frag;
import android.app.Activity;
import android.app.FragmentManager;
import android.os.Bundle;
public class AllPurposeActivity extends Activity {
@Override
protected void onCreate(Bundle savedInstanceState) {
super.onCreate(savedInstanceState);
setContentView(R.layout.main);
//Clear the back stack if necessary
if (!Helper.isDenseWideScreen(this)) {
FragmentManager fragmentManager =
getFragmentManager();
if (fragmentManager.getBackStackEntryCount() > 1) {
fragmentManager.popBackStackImmediate();
}
}
}
}
The code in Listing 1-10 asks how many fragments are currently on the activity’s stack of fragments. If the count is more than one, the most recently created fragment is the dreaded web page fragment. To eliminate the danger, the code pops the web page fragment off the stack.
Change 4: Create an additional layout
With or without a web page, you don’t want any side-by-side fragments when the screen is small. In this section’s example, a “small screen” means a screen whose width is less than 320 dp or (whatever the width) a screen in portrait mode. To make these requirements stick, I put the layout in Listing 1-11 in the app’s res/layout-w320dp-port folder.
Using the dp measurement, 160 dp represents one inch. So 320 dp is two inches. Indeed, a screen whose width is less than two inches is a very small screen.
To read more about the dp measurement, refer to Chapter 1 in Book IV.
Listing 1-11: A Layout for Small (or Narrow) Screens
<?xml version="1.0" encoding="utf-8"?>
<LinearLayout xmlns:android=
"http://schemas.android.com/apk/res/android"
android:orientation="vertical"
android:layout_width="match_parent"
android:layout_height="match_parent">
<fragment class=
"com.allmycode.frag.ComponentNamesFragment"
android:id="@+id/component_names"
android:layout_height="wrap_content"
android:layout_width="match_parent"
android:layout_weight="0" />
<FrameLayout
android:id="@+id/docs"
android:layout_height="0px"
android:layout_width="match_parent"
android:layout_weight="1"
android:background=
"?android:attr/detailsElementBackground" />
</LinearLayout>
The file in Listing 1-11 must have the same name as the main activity’s layout file. (If you’re working directly with Listing 1-10, the file in Listing 1-11 is named main.xml.)
Listing 1-11 is very much like the code in Listing 1-1, but there are a few differences:
-
In Listing 1-1, the overall layout’s orientation is
horizontal; in Listing 1-11, the orientation isvertical.In Figure 1-1, the two fragments in the activity are side-by-side. But in Figure 1-5, one fragment is underneath the other.
-
In Listing 1-1, both fragments have
layout_weightset to1. But in Listing 1-11, theComponentNamesFragmenthas thelayout_weightvalue set to0.In Figure 1-1, both fragments expand to fill the screen. But in Figure 1-5, the
ComponentNamesFragmentdoesn’t expand. (The lower fragment expands in Figure 1-5, but you don’t see the expansion because most of that lower fragment is blank.) -
After changing the
layout_weightfor theComponentNamesFragment, you have to adjust the fragment’slayout_heightvalues.In Listing 1-1, the fragments' layout sizes are
match_parentand0px. But in Listing 1-11, theComponentNamesFragmenthas thelayout_weightvalue set to0. Accordingly, theComponentNamesFragmenttakes up no more space than it requires on the screen. If you don’t describe this space requirement, theComponentNamesFragmentshrinks to nothing. To specify the space requirement, you make thelayout_heightof theComponentNamesFragmentbewrap_content.
With the changes that you make in this section’s steps, the user can turn the device sideways, upside-down, or whatever. When the user wants to see a web page, the app displays the page in a fragment or in an entire activity, whichever is best.