3. Shapes, Masks, and Paint
When creating illustrations, backgrounds, or other design elements, the shape, paint, and mask tools achieve diverse goals: produce filled shapes for use as graphical elements, create elements by using a continuous painting-like movement, and make masks to create transparent areas. Although these three Motion tools perform different functions, they all use control points to create closed or open shapes.

Creating Simple Shapes
You can create common shapes in Motion using the Rectangle, Circle, and Line tools.
- From the Toolbar, choose the Rectangle, Circle, or Line tool, depending on which object you want to create.
- In the Layers tab of the Project pane, select the destination group, if desired.
- Drag in the Canvas to create the shape.
- Press Esc to exit the tool.
Note
To modify these shapes, see “Modifying the Control Points of a Shape, Mask, or Paint Stroke” in this chapter.
Tip
The Rectangle and Circle tools share two features via modifier keys. While dragging with either tool, hold the Shift key to create a symmetrical shape (square versus rectangle or circle versus oval). Also, pressing the Option key during creation will expand the shape from the center out rather than from the insertion point. The Line tool will create straight lines when pressing Shift.
Note
Motion includes 16 shape presets—including a quote bubble and a variety of polygons—in the Library tab’s Shapes category.
Creating Custom Shapes
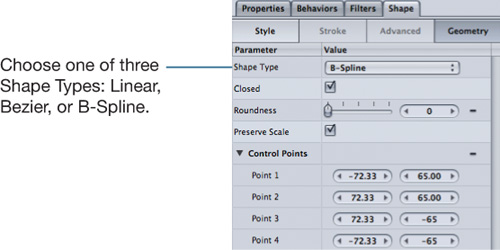
The Bezier and B-Spline tools enable more freeform shape creation, helping you create custom shapes with linear edges or smooth curves.
To create a Bezier shape:
- From the Toolbar, choose the Bezier tool.
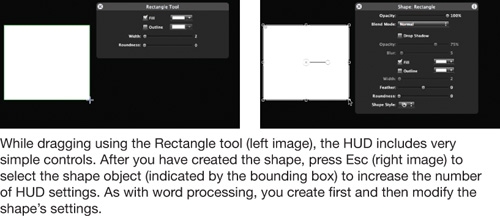
- Click in the Canvas to create a control point.
- To create additional consecutive control points, you can click to create a single linear point or drag to create a Bezier curve.
Tip
You can adjust a control point’s setting by Control-clicking (or right-clicking) the point and choosing an option from the shortcut menu.

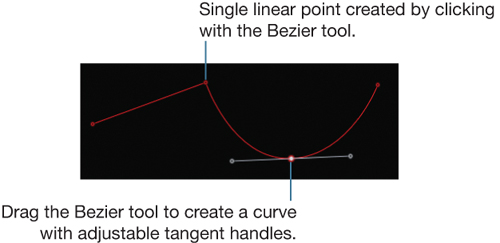
The last control point you create determines whether the shape is open or closed.
- To leave the shape open (outlined only), double-click in the Canvas, or press Return. To close the shape, click the first control point you created, or press C.
When creating a closed shape, the pointer displays a pen point with a circle when the pointer is placed over the first control point.

Tip
An open shape becomes a paint stroke—an outlined shape with no fill—which is also what the Line tool creates.
B-Spline shapes differ from Bezier curves because their control points do not lie on the shape. The points are “tractor beams” pulling at portions of the shape, resulting in very smooth curves.

Modifying a Closed Shape
You can modify closed shapes to change their fill, outline, and geometric parameters. These controls are found in two panes of the Inspector’s Shape tab.
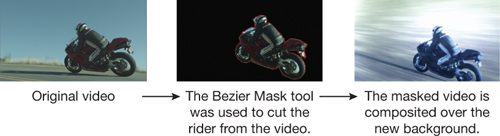
Creating Masks
Mask creation is similar to shape creation. Because masks must be closed shapes, the Line and Paint Stroke tools are not available. However, Motion does provide a Freehand Mask tool—similar to the Paint Stroke tool—that allows you to create masks in a continuous motion.
- Select the layer or group to be masked.
- From the Toolbar, choose the desired mask tool.
- Click in the Canvas to create control points that define the mask’s shape.
• Drag the Rectangle or Circle Mask tool to create a shape. Press Option to expand the mask from the center point; press Shift to expand the mask symmetrically.
• Use the Freehand Mask tool like a paintbrush. Drag the tool around the Canvas to create the mask shape. Release the mouse button to close the mask.
The Bezier and B-Spline mask tools are similar to their shape counterparts. The exception is that masks must be closed; therefore, the mask will automatically close if you double-click the last point.
Note
Mask tools cannot be applied to text layers; however, they can be applied to groups containing text.
Modifying Masks
When you’re adjusting masks, the HUD has you covered. To complement the mask control points that you can adjust in the Canvas, the HUD includes all of the parameters necessary to tweak masks.

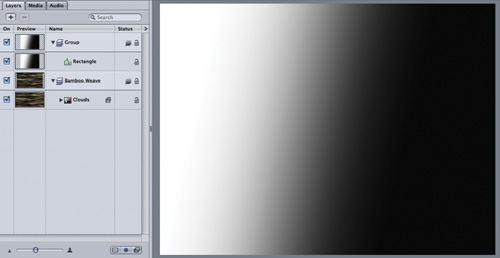
Adding an Image Mask
Image masks allow any object to define transparency. They are excellent for creating transitions between clips or for creating interactions between the image mask’s source object and the target object.
To add an image mask:
- Select the object to receive the image mask.
- Choose Object > Add Image Mask.
- Create or add the object to be used as the mask source for the image mask and trim to where it will start and finish.
- In the Layers tab, drag the mask source to the Image Mask layer.
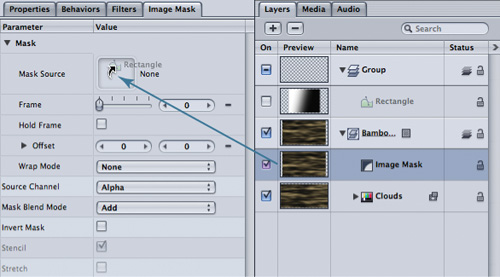
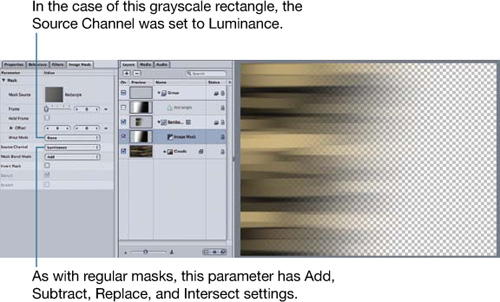
- Adjust the image mask parameters.
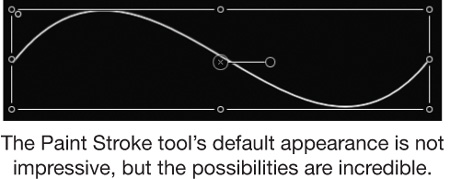
Using the Paint Stroke Tool
Any shape can be converted into a paint stroke by activating the shape’s Outline parameters and deactivating its Fill parameters. However, when you wish to create a paintbrush effect using a continuous movement in the Canvas, you should use the Paint Stroke tool.
- From the Toolbar, choose the Paint Stroke tool.
- In the Layers tab, select the destination group.
- In the Canvas, drag the pointer to create a brush stroke.
- Press Esc to exit the tool and select the paint stroke.
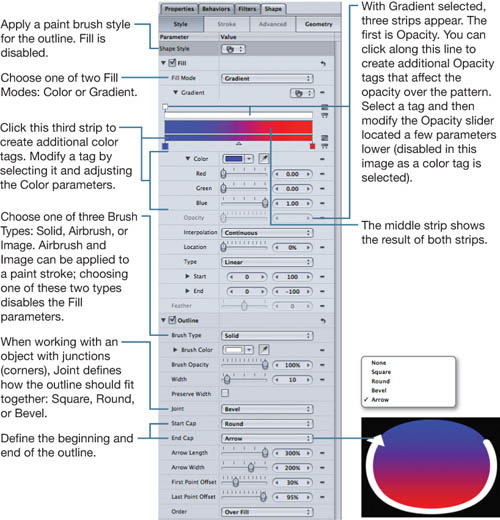
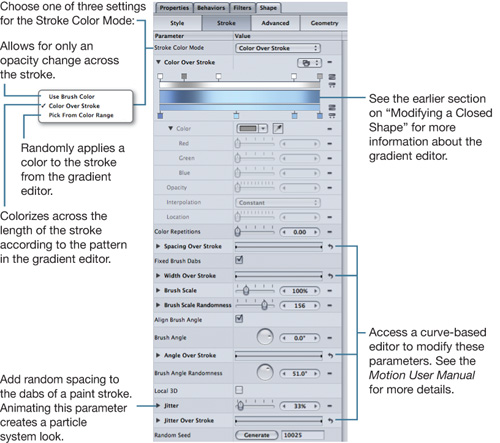
Modifying a Paint Stroke
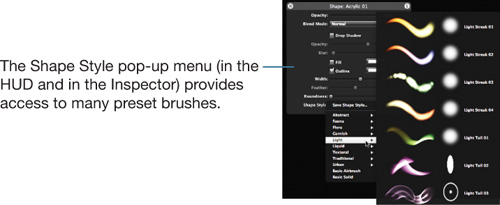
The magic of the Paint Stroke tool is in its available parameters. Motion includes many preset brush styles to get you started. And like other elements in Motion, you can customize presets to make them your own.
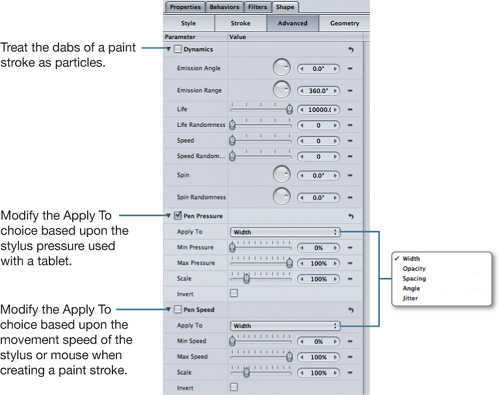
With a paint stroke selected, the Stroke and Advanced panes of the Shape tab become active.
Modifying the Control Points of a Shape, Mask, or Paint Stroke
After creating a common or custom shape, mask, or paint stroke, you can modify its control points to modify the object.
- In the Layers tab or the Canvas, select the object you want to modify.
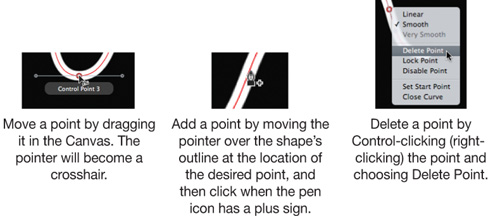
- From the Toolbar, choose the Adjust Control Points tool.
- Adjust, add, or delete points in the Canvas.
Using Shape Behaviors
A few behaviors are specific to shapes. (See Chapter 7 for more information on applying behaviors.)
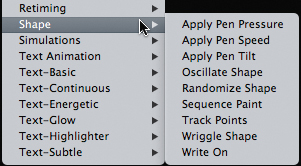
The first three behaviors work with information gleaned when creating a paint stroke with a graphics tablet. That information is then used with the associated parameters found in the Advanced pane of the Shape tab to modify the paint stroke. One application of this could be making a stroke wider when more pen pressure is used.
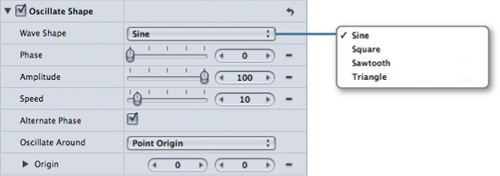
Oscillate Shape animates the control points by varying the points’ positions within a range. This can result in very fluid motion.
Randomize Shape creates a frenetic shape as the control points’ positions randomly jump (offset) from their original locations.

Sequence Paint is the only behavior that animates the individual dabs of a stroke. The functionality is very similar to the Sequence Text and Sequence Replicator behaviors.
- Apply the Sequence Paint behavior to the paint stroke.
- From the Parameter Add pop-up menu, choose the parameter you want to animate.
- Modify the parameter’s value as desired.
- Change the controls as desired.

Track Points allows you to lock the control points of a shape or mask to the movement within video content or to another animated object. See the Motion User Manual for more information.
Wriggle Shape animates the control points in a way similar to randomize, but without the caffeine. Control-click (or right-click) a control point to disable it from modification by this behavior.
Write On is a quick way to reveal a paint stroke or outline over time and stroke rather than applying the basic Fade In/Fade Out behavior.
