12. Working with Other Applications
This chapter explores the most common workflows you may use when working with Motion and other applications: roundtripping with Final Cut Pro, importing and applying Motion templates in Final Cut Pro, and using Adobe Photoshop and Illustrator documents.
Roundtripping with Final Cut Pro
Final Cut Pro is the application that uses Motion projects most often and for a good reason. Final Cut Pro and Motion are designed to work together to quickly create motion graphics elements for video sequences. Whether adding a title sequence, animating graphical elements, or creating dynamic lower thirds, Motion goes well beyond the graphics capabilities of Final Cut Pro while seamlessly integrating with Final Cut Pro projects.
Three Final Cut Pro parameters should be considered when working with embedded Motion project files.
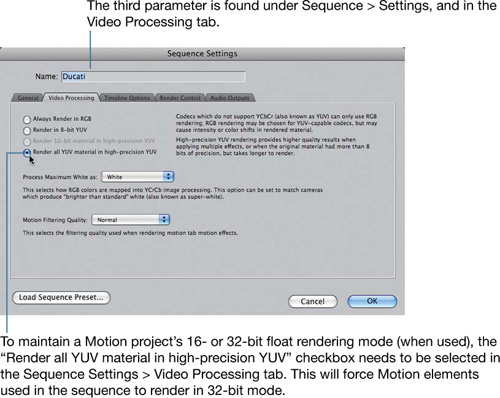
Importing and Roundtripping Motion Projects
The most basic integration of Motion into Final Cut Pro is to import and add a native Motion project file to a sequence. Motion projects imported into the Browser are used like any other asset in a project but can be changed in Motion at any time.
- Import a Motion project file (.motn) into a Final Cut Pro project.
- From the Browser, edit the .motn clip into the sequence.
- To change the content of the Motion project, Control-click (or right-click) the Motion project file in the Timeline, and choose “Open in Editor” from the shortcut menu.

- In Motion, make and save the desired changes to the Motion project.
- Return to Final Cut Pro to find the .motn file in the Timeline automatically refreshed to reflect the changes.
- If further changes are needed, repeat steps 3 through 5.
Sending Clips to Motion
You can also create a Motion project file within Final Cut Pro. The new project file may be based on clips in a sequence and may even replace those clips with the new Motion project file.
- Select one or more sequence clips.
- Control-click the selected content and choose Send To > Motion Project from the shortcut menu.

- Name the new Motion project, choose a save location, and choose any other options you desire.
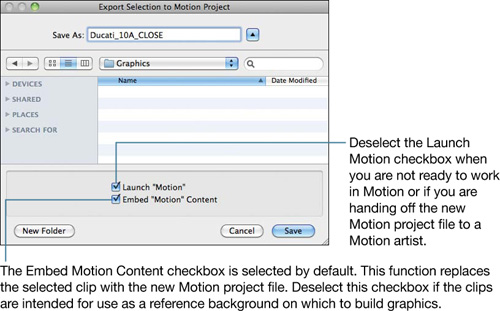
- In Motion, build and save the Motion project.
- Return to Final Cut Pro. An embedded project will automatically replace the selected clip(s) in the Final Cut Pro sequence.
Sending Sequences to Motion
Rather than sending a clip or two, Final Cut Pro allows you to create a new Motion project file from a sequence.
- Select the sequence in the Browser.
- Control-click the sequence and choose Send To > Motion Project from the shortcut menu.
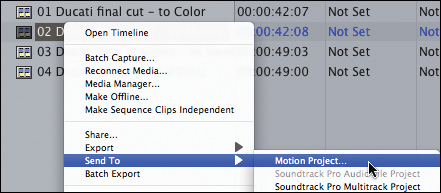
- Name the new Motion project and choose a save location.
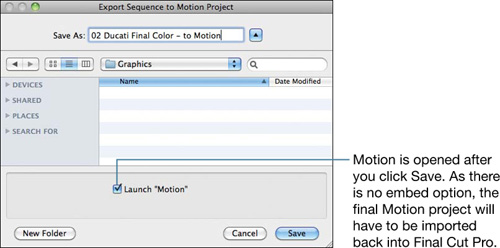
- In Motion, build and save the Motion project.
- Return to Final Cut Pro and import the saved Motion project into the Final Cut Pro project.
Using Motion Templates in Final Cut Pro
Applying and working with templates in Final Cut Pro is slightly different from importing a Motion project and adding it to a sequence. Motion templates can be updated dynamically in Final Cut Pro, which allows you to change the media used in drop zones and the text used in the template.
- In a Final Cut Pro sequence, cue the playhead to the location where you want to add the master template.
- In Final Cut Pro, choose Sequence > Add Master Template.
- In the Master Template Browser, select the Master Template.
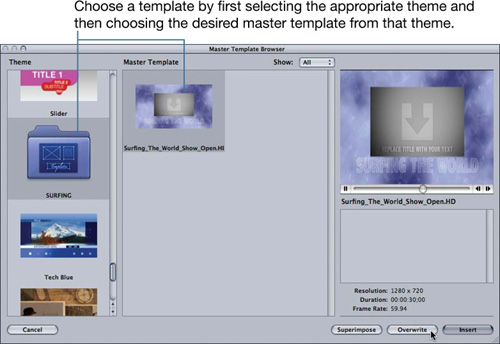
- At the lower right of the Master Template Browser, choose a Superimpose, Overwrite, or Insert edit.
- Use the controls in the Viewer to add media to drop zones and to change text.

Working with Adobe Photoshop Documents
Adobe Photoshop is the standard design tool for many graphics professionals. Luckily, Motion has great support for layered Photoshop documents and even retains the opacity and the majority of blending modes that are applied to the image.
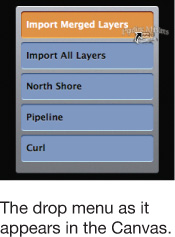
- In the File Browser of Motion, select a .psd file.
- Drag the file to the Canvas, Layers tab, or Timeline.
- Wait for the drop menu to appear and choose whether to import a merged version of the .psd file, all layers from the .psd file, or an individual layer.
- Apply behaviors and/or filters, and animate them as you would any other object in Motion.
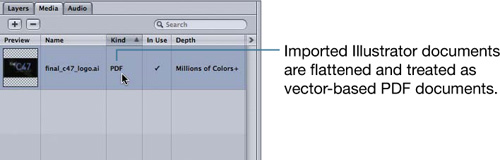
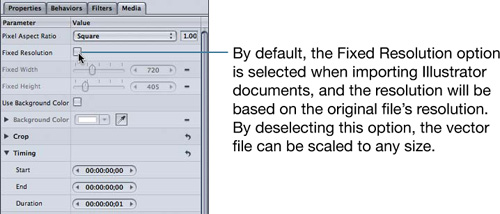
Working with Adobe Illustrator Documents
Adobe Illustrator files can be imported into Motion. To ensure compatibility, make sure the Create PDF Compatible File checkbox is selected when saving an Illustrator file.