5. Timelines
Motion has two timelines: the mini-Timeline at the bottom of the Canvas and the Timeline tab in the Timing pane. The mini-Timeline displays only the duration and time position of a selected object. The Timeline allows you to manipulate many components of your project at once. While applications such as After Effects use their timelines extensively, the Motion Timeline is used primarily to make global changes and perform simple project edits.
Working in the Mini-Timeline
The mini-Timeline is always visible at the bottom of the Canvas. Here you can add and adjust the timing/duration of a selected object, filter, or behavior.
Adding Single Objects
Single objects can be dragged directly from the utility window to the mini-Timeline. When you drag a new object to the mini-Timeline, a tooltip appears to indicate where the object will be placed in the project.
Adding Multiple Objects
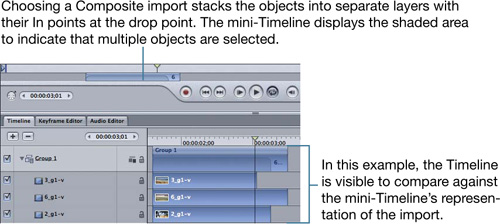
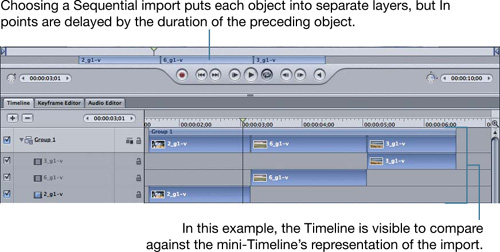
You can select multiple objects and add them to the mini-Timeline. You have two options when adding multiple objects: Composite and Sequential.
- From the File Browser tab or Library tab, select multiple objects.
- Drag the selected objects to the mini-Timeline, but don’t release the mouse button. After a pause, the drop menu appears.
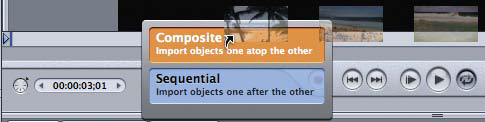
- Position the pointer over the desired import option and release the mouse button.
Note
The order in which your objects are placed into your project is based on the order that you selected them in the File Browser or Library.
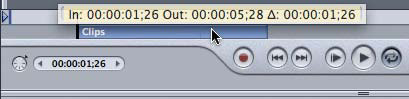
Moving Objects
Moving clips in the mini-Timeline is as simple as dragging them to a new location. When dragging clips, a tooltip appears to indicate the In point, the Out point, and the delta value (length of the change).
Trimming Objects
Trimming applies to groups and layers (anything selected in your project that has a timebar). You have two main ways to trim an object:
• Place the playhead at the desired location for the selected object and press I to trim the In point or O to trim the Out point to the playhead.

• Place the pointer at the beginning or end of the selected object. When the pointer changes to the trim pointer, drag to trim the object.

Tip
By pressing Command when trimming a group or layer, you will not change any effects that have been applied.
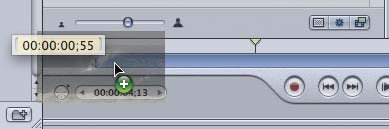
Retiming Clips
You can easily retime clips in the mini-Timeline.
- Place the mouse pointer at the end of a clip and hold down the Option key.
- Drag the clip’s Out point left or right to the desired speed/duration value, and then release the mouse button.

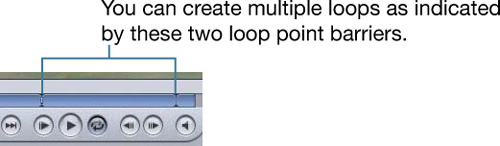
Looping Clips
Looping is best used on video objects that have been designed to return seamlessly from the last frame to first frame. But, you can loop any clip in Motion.
- Place the mouse pointer over a clip’s Out point.
- Option-Shift-drag the Out point to the right to create the loop, and then release the mouse button.

A loop point barrier indicates where the loop begins.
Working in the Timeline
The Timeline tab is located in the Timing pane. You can open the Timing pane by pressing F6, or go directly to the Timeline tab by pressing Command-7. You can resize the open Timing pane by dragging the divider bar between it and the mini-Timeline.
Adding Objects
Depending on where you drag objects on the Timeline, you have up to four choices for adding objects. All choices will create a new Timeline track.
Also, the pointer location when you release the mouse button determines the placement of an object added to the Timeline (horizontally and vertically).

Note
If you drag multiple objects, you will be able to choose Composite or Sequential from the drop menu (as in the mini-Timeline).
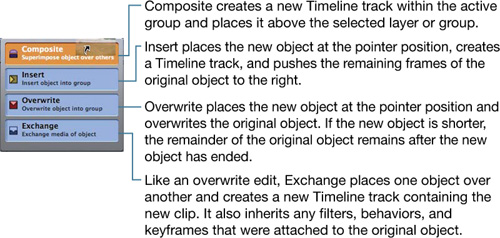
You may have these four import options in the Timeline (depending on vertical placement) when adding an object:
Note
Exchange works only with similar media. For example, you can’t exchange a QuickTime movie with a generator.
Moving an Object to the Playhead
You can easily move the In or Out point of a selection to your current playhead position.
Note
This function moves an object’s time position. It does not trim the object’s duration. See “Trimming Objects” in this chapter.
- Move the playhead to the desired location.
- Press Shift-[ (Left Bracket) to move the start of the selected objects to the playhead position.

Tip
Optionally, press Shift-] (Right Bracket) to move the end of the selection to the playhead position and essentially backtime the objects.
Splitting Clips
Splitting a clip is like using the Blade tool in Final Cut Pro. It cuts a clip into two separate objects. In Motion, however, a new Timeline track is created when you split the clip.
- Select one or more objects.
- Place the playhead where you want to perform the split.

- From the menu bar, choose Edit > Split.

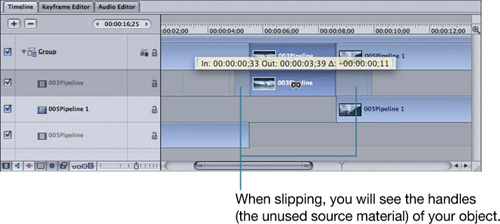
Slipping Clips
In the process of trimming, you may have removed material you want to play within the new clip duration. Motion has a Slip tool that reveals all of the source material and allows you to modify both the In and Out points simultaneously.
- Place the pointer over the middle of a clip.
- Option-drag to the left or right until the desired footage is visible within the clip’s duration.
Tip
When slipping objects, place the playhead at the beginning or end of your object so that you can see the new In or Out point in the Canvas.
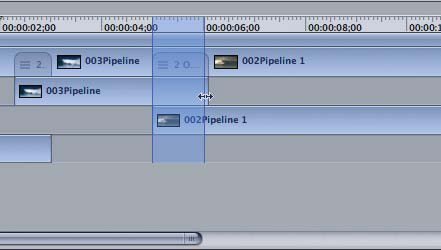
Creating Time Regions
Time regions allow you to select a range of your project in the Timeline ruler or in an individual Timeline track. They function much like the Range Selection tool in Final Cut Pro. In Motion, however, you can select one or more tracks depending on where you create the region.
- Command-Option-drag to create a time region.
- After creating a time region, place the pointer over its left or right side to modify the region.
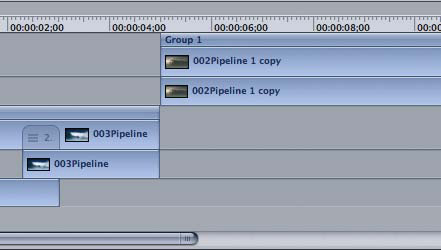
- When you have selected an object in the Timeline or created a time region, you can delete that content by pressing Delete.
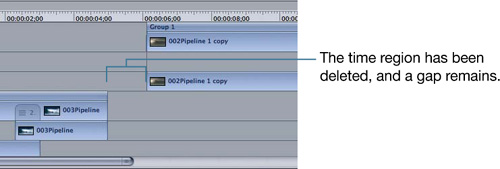
To avoid leaving a gap, you can press Shift-Delete to perform a ripple delete. This will delete the selection and ripple the subsequent content to the left, thereby removing the gap.
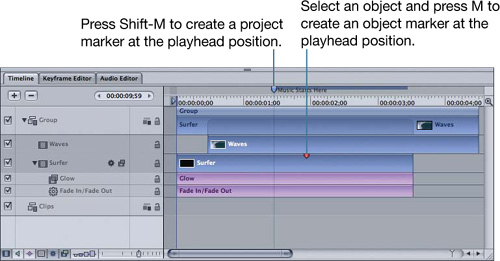
Working with Markers
Markers allow you to add visual references and notes to your entire project or to specific objects. Project markers can also perform specific tasks when flagged properly.
Project and Object Markers
Project markers are visible in the Timeline ruler, and unlike object markers, they are also displayed in the mini-Timeline as green vertical lines.
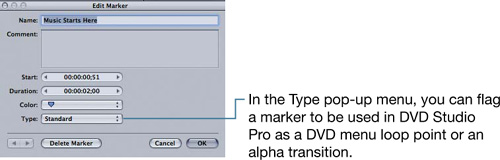
Editing Marker Information
The Edit Marker dialog allows you to add specific information to your markers and to flag them for special use.
- Double-click a marker to open the Edit Marker dialog.
- In the dialog, edit information about your marker and choose a visual duration that is displayed in the Timeline.