Transcode video formats
Resize and retime video from one format to another
Frame Controls let you augment the encoding process by implementing more advanced technology when converting from one video format to another. Frame Controls function as separate tasks during encoding, apart from the target’s codec. You can control this added layer of processing by implementing the job chaining tactics discussed in Lesson 3.
Frame Controls employ optical flow technology (also used in Apple’s Shake, Motion, and Final Cut Pro), which calculates motion tracking for every pixel vector as it goes from one movie frame to the next. When that calculation is completed for a given frame rate and frame size, Compressor can intelligently place those pixels in different frame rates and sizes during a conversion. Compared to inferior conversion techniques like blending and scaling, optical flow produces amazing results, but the massive increases in quality come at the expense of longer encoding times.
Frame controls are most useful when you are converting from one video format (standard) to another and requires a change in frame size and/or rate, such as converting NTSC footage (720 × 480 at 25 fps) to PAL (720 × 546 at 29.97 fps) or downconverting high definition video to standard definition. Additionally, Frame Controls can greatly improve conversions between interlaced and progressive video along with removing film to video pulldown, also known as reverse telecine. You can achieve broadcast-level transcoding in Compressor, but as a general rule, when working with Frame Controls, you have to choose between higher quality and faster encoding.
Tip
Frame Controls cannot be viewed in the Preview window. Use the Test Clip workflows (described in Lesson 6) to see the output of Frame Controls.
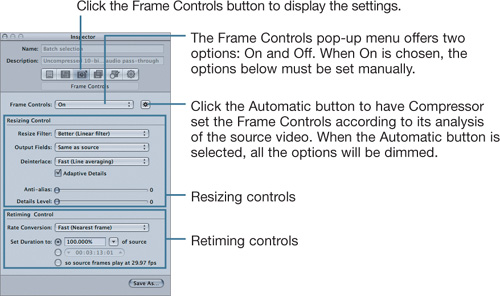
You access Frame Controls in the Inspector window by selecting a custom setting from the Settings window or a target from the Batch window.
Note
The automatic option works in only two instances: when downconverting HD content to SD MPEG-2, and when encoding in H.264 for Apple devices. For all other instances you will need to create custom settings. Deselect the Automatic button, and from the Frame Controls pop-up menu, choose On.
When source media is transformed from one frame size to another—in converting HD footage to SD, for example—the resizing controls can significantly increase the conversion quality.
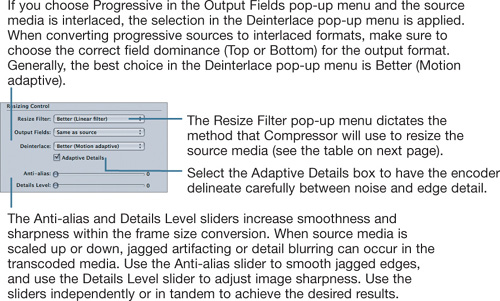
The Output Fields and Deinterlace pop-up menus work together to control conversions between interlaced and progressive footage. If you choose “Same as source” in the Output Fields pop-up menu, no conversion will occur, and Compressor will ignore the Deinterlace option.
Tip
Deselect the Adaptive Details box when encoding video for iPods, iPhones, computer monitors, or any other devices with progressive scan displays. Deselecting this box allows Compressor to utilize the same deinterlacing algorithms used by Apple’s DVD Player. The resulting encoding times will be significantly shorter with the box deselected.
Resize Filter Choice | |
|---|---|
Fastest encoding | Fast (Nearest pixel). Encoding calculations are based on a blending of relative pixel positions from frame to frame. |
Balance between | Better (Linear filter). This option adds a weighted-speed and quality average calculation to the Fast method that produces much smoother results at the cost of increased encoding time. Use this option if motion artifacting is present when Fast is used. |
Best quality | Best (Statistical Prediction). This option kicks optical flow into high gear, as it analyzes each frame pixel by pixel and reconstitutes frames mathematically by repositioning each pixel relative to the new frame size. |
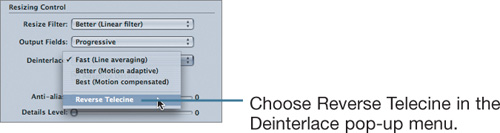
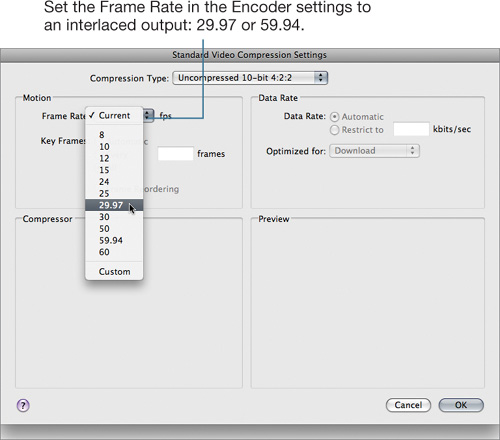
When 24 fps film is transferred to video, it undergoes a process called telecine. During that process, extra frames are added to conform the 24 fps progressive footage into 29.97 fps interlaced video for playback in the NTSC format. This process is commonly referred to as a 3:2 pulldown. Compressor automatically detects the pulldown pattern of sources that have either constant or broken cadences and adjusts the processing as necessary. You can use Frame Controls to reverse that process (reverse telecine) and output 23.97-frame media from NTSC sources for editing in Final Cut Pro.
Compressor can also add a 3:2 pulldown to progressive sources, thereby creating 29.97 interlaced media.
To add the proper cadence you must define three settings:
Note
If you are using Apple ProRes, make sure to enable the Interlaced option and set the proper output field order.


When changes in frame rate are introduced into a conversion—such as in converting 29.97 fps NTSC to 25 fps PAL—the retiming controls can be used to increase the output quality significantly.
Quality vs. Encoding Time | Rate Conversion Choice |
|---|---|
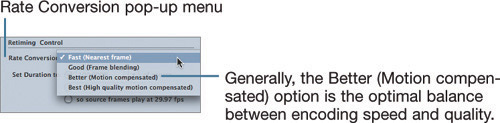
Fastest encoding | Fast (Nearest frame). Depending on the format conversion, Compressor removes or adds frames by copying the neighboring frames on either side. This setting will introduce choppy playback (frame judder) except when used with mostly static content, such as interview footage. Use it only when encoding speed is paramount and the source media can bear the compromise. |
Good quality with average faster conversion time | Good (Frame blending). Compressor blends the picture data of neighboring frames to smooth the removal of frames or to cover the addition of frames to the frame-rate conversion. |
Better quality with slower conversion time | Better (Motion compensated). Compressor uses optical flow to determine the vector path of each pixel from frame to frame and completely reinterprets the source media in the new frame rate. |
Best quality | Best (High quality motion compensated). This setting increases the detail value of the optical flow motion calculations, placing each pixel more precisely in the reconstructed frame rate. Consider this option only when you are increasing the frame rate (adding frames). The significant increase in encoding time is not offset by greater quality when you use this option for frame-rate reductions. |
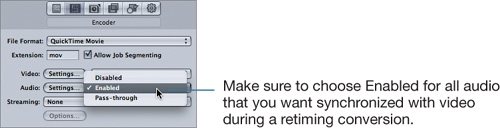
In all instances, when audio accompanies video in source media, it will be retimed to match the new frame rate (or speed) of the output video. This ensures that the output audio and video remain in sync. Compressor will also pitch correct the audio so that it sounds the same as the original soundtrack.
QuickTime container-based targets allow you to “Pass-through” the audio in the Encoder settings.
By default, the “Set Duration to” field in the retiming controls is set to 100.000% of source. With that setting, no changes in speed will occur even if the frame rate changes from one rate to another—for example, 29.97 fps NTSC to 25 fps PAL.
Note
When applying speed changes to media that contains audio, or audio-only media, the pitch will not shift because Compressor will automatically use Mac OS X’s Core Audio technology during the conversion.
You can use Frame Controls in one of three ways to make constant speed changes to the output media:
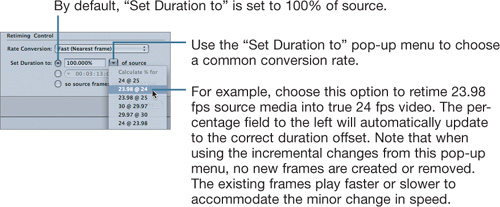
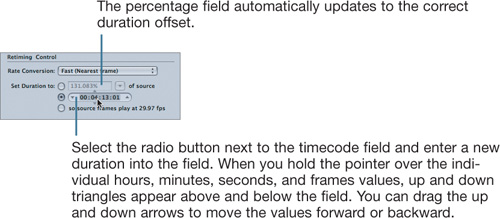
You can input a custom percentage directly in the “Set Duration to” field. Values greater than 100.000% will cause the output content to slow down, and values less than 100.000% will speed up the output. This behavior is the opposite of Final Cut Pro’s Speed Tools in which lower percentages slow down clips and higher percentages speed up clips.
Using timecode to determine the speed change is very similar to a fit to fill edit in Final Cut Pro, whereby you set an edit duration and the source clip either speeds up or slows down to fill into the edit.
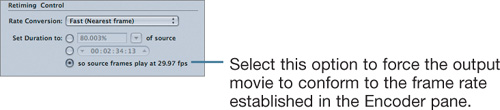
Selecting the last “Set Duration to” option is similar to the way Cinema Tools retimes media by conforming the source frame rate into the target frame rate. With this option selected, Compressor will not employ optical flow in the conversion.
The results of settings made in the Frame Controls pane do not appear in the Preview window, so a real-time preview of their impact is not available. However, because of the potentially lengthy encoding times when frame controls are applied, you will want to use a test-clip workflow (see Lesson 5) on small sections of the source media to audition the settings. This carries a twofold benefit: You will not waste time encoding the entire media with an unsatisfactory setting, and you can estimate encoding times for the entire media based on the test times. For example, if one minute of footage is encoded in five minutes, it will take roughly five hours to encode one hour of footage with the same settings.
To evaluate your understanding of the concepts covered in this lesson and to prepare for the Apple Pro Certification Exam, download the online quiz at www.peachpit.com/apts.compressor.