
Media | Logic 8_Files > Media > Additional Media |
Logic 8_Files > Media > Car Commercial | |
Time | This lesson takes approximately 60 minutes to complete. |
Goals | Import a movie file into a project |
Choose synchronization settings | |
Detect scene cuts | |
Start a musical cue on a downbeat | |
Export a project’s audio to a video file |
Scoring movies is an exciting creative process. Many composers make a highly successful living writing scores in a variety of music genres, not only for feature films but also for documentaries, cartoons, commercials, and video games.
Writing music to picture can present a number of challenges. You have to be ready to address last-minute changes in the movie’s editing. Movie directors generally start by giving you a precise idea of the soundtrack they want from the style of music to the exact position of musical cues or sound effects, often related to scene cuts. Those ideas may change even as your writing progresses, and you’ll need to rework your score to incorporate that changing feedback under harsh time constraints. This constant creative flux requires that you and your tools be prepared for a highly flexible and efficient workflow.
Logic offers many features that will facilitate the scoring process. In this lesson you will import a car commercial movie to a project, adjust the synchronization settings, compose a score to the picture, start a musical cue on a scene cut, and finally export your music to a new movie file.
Logic uses the QuickTime engine to play movies in synchronization with a project. Any movie formats supported by QuickTime can be played in a Logic project.
More Info
Logic streams the movie file from the hard disk while it streams all the audio files used in the project. High-definition movie files can put a lot of strain on your hard drive, so it is recommended that you use a compressed copy of the movie file when working in Logic. You can use QuickTime Pro to export a movie file in a compressed format such as MP4.
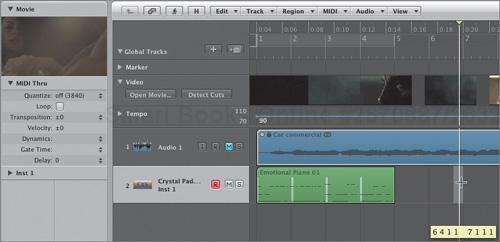
When working with movies, you can use the global Video track to display frames of the QuickTime movie as thumbnails. The Video track also offers a quick way to open a movie, which you will use in this exercise.
Choose File > New (or press Command-N) and choose the Empty Project template.
In the New Tracks dialog, choose a stereo audio track and open the Library.
Let’s open the Video track and import the movie.
At the top of the track list, Control-click the Global Tracks header and choose Configure Global Tracks (or press Option-G).
The Configure Global Tracks dialog opens. In the following exercises, you will use the global Marker, Tempo, and Video tracks.
Deselect Signature, select Video (keep Marker and Tempo selected), and click Done (or press Enter).
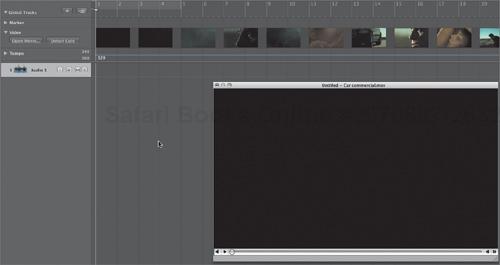
In the Video track header, click the disclosure triangle.
The Video track expands and two buttons appear in the header.
Click Open Movie.
A file selector box opens.
Navigate to Logic 8_Files > Media > Additional Media and double-click Car commercial.mov.
A Movie window opens, and the Video track displays movie frames as thumbnail images selected at regular intervals. Each thumbnail is left aligned, meaning that the thumbnail shows the movie frame displayed in the movie window when the playhead is positioned at the left edge of the thumbnail. The number of thumbnails shown depends upon the height of the Video track and the horizontal zoom level of the Arrange area.
Press the Spacebar.
Playback starts, and the movie plays in synchronization with the playhead in the project. By default, the movie’s sound is muted.
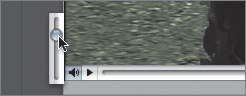
You can use the QuickTime controls to navigate the movie and adjust its volume (if you need to hear the original soundtrack for reference).
At the lower left of the Movie window, hold down the mouse button with the pointer positioned over the speaker icon. When the volume slider appears, drag the slider to change the playback volume.
You should hear the movie’s sound. The sound is routed by QuickTime, not Logic, so in the right Arrange channel strip, the Out 1-2 meters don’t move. The movie’s sound will be reproduced in the outputs selected in your Sound preferences (in the Apple menu).
Press the Spacebar to stop playback.
At the bottom of the Movie window, drag the position slider toward the right.
The movie scrolls forward, and in the Arrange area the playhead updates its position in the project, staying in perfect synchronization with the movie.
In the Arrange area, click the lower half of the Bar ruler to reposition the playhead to another location.
In the Movie window, the display updates to show the movie frame at the new playhead position, still maintaining sync with the project.
Drag the lower-right corner of the Movie window to resize it, and then drag the window aside so you can see the Arrange area.
Even when you resize the movie and drag it aside, it still hides a portion of the Arrange window, so you can close it for now.
Close the Movie window.
At the top of the Inspector, the Movie area automatically opens and displays the movie.
Choose File > Save (or press Command-S).
Name your project and save it to the desktop. Don’t forget to save your project at regular intervals throughout this lesson.


You can import only a single movie file into a project, and you can’t edit the movie or change its playback speed in Logic. When you import a movie into a project, the movie is always synchronized with the project.
When you’re working with movies, time is expressed in SMPTE time code format. The SMPTE time code takes its name from the Society of Motion Picture and Television Engineers, the association that developed a time code format for synchronizing devices used to play movies and audio. The SMPTE time code is displayed as hours, minutes, seconds, frames, and (sometimes) subframes.
QuickTime movie files do not have time code data embedded in them. Before you can work on your project, you have to choose the correct synchronization settings to ensure that the time code you are reading in Logic reflects the frame rate of your movie and that it is the same code everyone involved in the production is using.
Look at the Transport bar.
The top line of the display on the left shows the current playhead position in SMPTE units. The bottom line displays the playhead position in Logic’s familiar bar, beat, division, and tick format.
Since QuickTime movie files do not have embedded time code data, it is preferable whenever possible to use movie files that have burned-in time code (BITC), a visible time code superimposed onto each frame of the movie, or a 2-pop, which is a one-frame long 1 kHz tone recorded in the soundtrack at 00:59:58:00 (2 seconds before the start of the program) and usually accompanied by a flash-frame.
For this exercise, assume that the movie production team told you that the first frame of the video file is at 01:00:00:00, and the first visual frames start slowly fading in 4 seconds into the movie, at 01:00:04:00.
More Info
A number of devices do not support negative SMPTE time code, so it is common to use 01:00:00:00 (1 hour) or 10:00:00:00 (10 hours) as the time code for the first frame of a movie file. In so doing, SMPTE time code can still be used to allow extra material such as movie titles and credits to be added before the first frame.
Click the Stop button (or press 0, or Return on a laptop).
The playhead moves to the beginning of the project. The playhead position is 1 1 1 1 (the first beat of the first bar) and 01:00:00:00.00 (exactly one hour) in SMPTE time code.
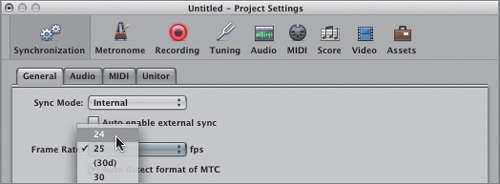
Your movie starts at the correct time code, but you still need to choose the correct frame rate to make sure Logic displays an accurate SMPTE time code. Different film and video formats have various frame rates: film is shot at 24 frames per second, the PAL video format (used in Europe) plays at 25 frames per second, and the NTSC video format plays 29.97 frames per second. The video file used in this lesson was shot on film, so it plays at 24 frames per second, the standard film frame rate.
In the Toolbar, click the Settings button and choose Synchronization.
The Synchronization Project Settings window opens.
Click the Frame Rate pop-up menu and choose 24.
You now have the correct synchronization settings, ensuring that you will see the proper SMPTE time code in your project. Keep the Project Settings window open, as you will need it throughout this exercise and the next.
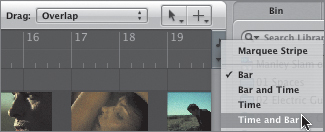
When working with SMPTE time code, you can switch between a Bar ruler, a SMPTE time ruler, or a combination of both.
At the right of the Bar ruler, click the note icon and choose Time and Bar.
Choosing Time and Bar displays both the SMPTE ruler and the Bar ruler, but displays the SMPTE ruler below the Bar ruler, and the grid in the Arrange area now shows SMPTE time positions.
Play the beginning of the project.
For the first four seconds, the movie contains only black frames, and you will start writing music at 01:00:04:00.00 (1 hour, 0 minutes, 4 seconds). Let’s adjust the synchronization settings so the first bar of the project plays at that time code, when you start seeing the first visual frames fade in. At the bottom of the Synchronization Project Settings window, two displays allow you to adjust which bar position plays at which SMPTE time code.
Leave Bar Position on 1 1 1 1, and in the “plays at SMPTE” field, drag the seconds digit to 04 so the value reads 01:00:04:00.00.
In the Video track, the movie moves toward the right.
Click the Stop button (or press 0).
The playhead moves to the beginning of the project.
In the Transport bar, the playhead position is shown as 01:00:04:00.00 in SMPTE units, and 1 1 1 1 in bars and beats.
Start playback.
The movie starts four seconds after the first frame of the movie file, and you no longer see the four seconds of black frames.
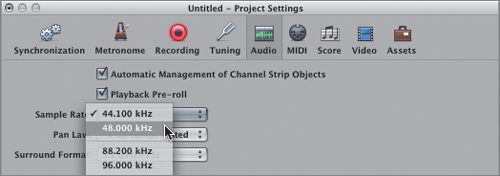
Finally, you need to set the project’s sample rate to 48 kHz, which is usually the sample rate of choice when working for picture.
At the top of the Project Settings window, click the Audio button to access your Audio project settings.
Click the Sample Rate pop-up menu and choose 48.000 kHz.
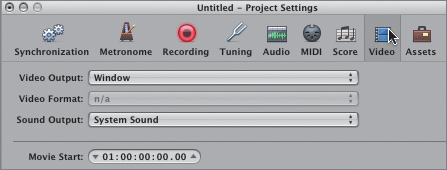
You can adjust the time code of the first frame in the video file in your Video project settings.
At the top of the Project Settings window, click the Video button to access the Video project settings.
The Movie Start field allows you to adjust the SMPTE time code of the first movie frame. In this exercise, the first movie frame is at the one hour time code, so leave it at the default 01:00:00:00.00 setting.
Keep the Video Project Settings window open, as you will need it in the next exercise.


Your project is now configured with the correct SMPTE time code, frame rate, and sample rate, and you have adjusted the position of the start of the movie to start writing music at the desired position in the movie.
In the trailer and commercial industry, you will sometimes be given movie files that contain dialog or a temporary musical soundtrack. It is often quickly assembled from preexisting materials, usually by the video editor, and often reflects the expectations of the director. Such a soundtrack is called the temp track and can serve to guide you in your choice of tempos and genre of music.
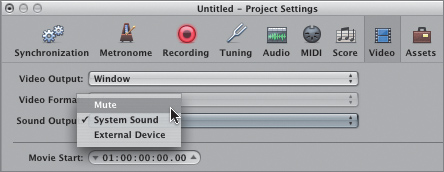
Rather than use QuickTime’s output to reproduce the temp track, you can import the track into Logic, where you can easily mute it and unmute it from the Arrange area. First, you need to mute QuickTime’s output so the temp track playback isn’t duplicated.
In the Video Project Settings window, click the Sound Output pop-up menu and choose Mute.
QuickTime sound output is now muted.
Close the Project Settings window (or press Command-W).
From the main menu bar, choose Options > Movie > Import Audio to Arrange.
A progress indicator shows that the soundtrack is being converted to an audio file. Then, a second progress indicator shows that the audio file is being converted to the project’s sample rate.
An audio region is inserted on the selected audio track at the beginning of the project. The lock icon before the region name indicates that the region is locked to SMPTE time code. When a region is locked to SMPTE, it always stays in sync with the movie. You can’t drag it, and changing the tempo of the project does not affect its SMPTE position.
Start playback.
You can hear the temp track. If the temp track contains music reflecting the expectations of the director, you can mute it as you write your score, and listen to it once in a while as a reference for your composition. If the temp track contains dialog, you can use it to ensure that the music you write does not overpower the dialog.
You will not use the temp track in this lesson, however, so let’s mute it.
Mute the Audio 1 track.
Stop playback.
Your project is now ready, and you can start writing music to the movie.
The individual pieces of music used in a movie are generally referred to as cues. When scoring longer movies, you may want to write each cue in a separate Logic project; but for short movies, trailers or commercials, it is often easier to score the whole movie in a single project.
For this score, the director asked you to write two cues. The first one should be sparse yet emotional. The second cue should start at a specific scene cut and be modern and rhythmically driving. In the following exercises, you will score the car commercial using Apple Loops.
You usually have a lot of liberty when writing the first cue, because you don’t have to worry about transitioning from the previous cue. When writing music, you need to view the time grid in bars and beats, not in SMPTE time, so you will first swap the Bar and the SMPTE rulers.
At the right of the ruler, click the note and clock icons and choose Bar and Time.
The Bar ruler is now below the SMPTE time ruler, and the Arrange area grid shows bar and beat positions.
In the Media area, click the Loops tab.
In the search field, type Emotional.
A few piano Apple Loops appear in the Loop Browser. Preview them to choose the best one.
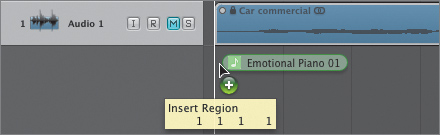
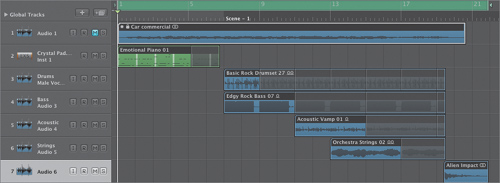
Drag Emotional Piano 01 to the Arrange area, and place it below the audio track on 1 1 1 1.
A software instrument track is created, the green loop’s channel strip setting is loaded, and the Emotional Piano 01 MIDI region is inserted at 1 1 1 1 on that track.
Click the new software instrument track header.
In the Inspector, you can see the Inst 1 channel strip with the piano instrument and a couple of processing plug-ins.
Start playback.
The cue sounds too rushed for an emotional cue. In the Loop Browser’s tempo column, you can see that the loop’s original tempo is 80 bpm. That’s a little slow.
In the Transport bar, set the tempo to 90 bpm.
That’s better.
You have the beginning of your first cue. Now you need to find the scene cut where the second cue will start so you can determine the length of the first cue.
Many directors love to accent important scene cuts with sound effects or new musical cues. In scoring movies, part of your responsibility is to locate the scene cuts and position audio elements on or near the scene cuts for the best effect.
For this movie, the director wants the second cue to start on a specific scene cut and tells you that it’s around SMPTE time code 01:00:19 (1 hour and 19 seconds). This exercise will show you how to detect the scene cut.
Start playback from the beginning of the project.
In the Inspector, watch the Movie area. The movie starts with greenish clouds, then you see the two characters introduced, and again you see the greenish clouds. Then, around 01:00:19, the scene is flooded with sunlight, and the color tones become much brighter and warmer. That scene cut, around 01:00:19, is where you will place your second cue.
To automatically detect the scene cut, you first need to indicate which portion of the movie file should be analyzed. Your Command-click tool is the Marquee tool, and you can use it to highlight the section around the scene cut.
Reposition the playhead just before the scene cut on bar 6. Start playback and try to stop playback just after you see the scene cut.
The scene cut is now close to the playhead, and you can select the area around it.
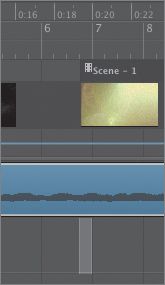
On any one of the tracks, drag the Marquee tool around the playhead.
The marquee selection is played once. Watch the Movie area. You should see the scene cut within that marquee selection. If you don’t see the scene cut, adjust the marquee selection until you do. Also make sure you don’t see the following scene cut (when the car comes in) or you will detect that scene cut, too.
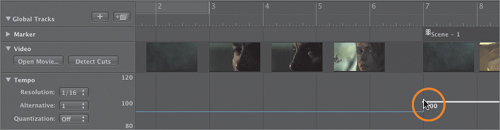
In the global Video track header, click the Detect Cuts button.
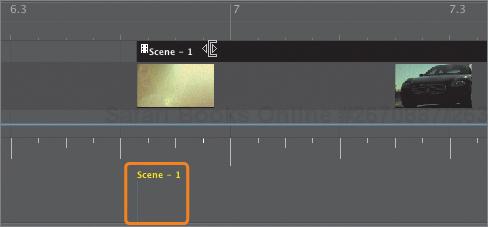
The portion of the movie corresponding to the marquee selection is analyzed and the scene cut is detected. A marker called Scene - 1 is inserted at the scene cut position in the global Marker track. The movie frame symbol in front of the marker’s name indicates that it is a scene marker. Scene markers are locked to SMPTE time code and will always stay in sync with the picture.
Now that you have a scene marker at the scene cut position, you need to align the first beat of a bar to the scene marker, so you can start writing a new cue at the beginning of a bar and use the grid to write and arrange the cue.
You will now use the global Beat Mapping track to map the first beat of a bar to the Scene - 1 marker.
Control-click the Global Tracks header area and choose Configure Global Tracks (or press Option-G).
Select Beat Mapping and click Done.
In the Beat Mapping track header, click the disclosure triangle.
The Beat Mapping track expands vertically. In the upper half of the Beat Mapping track you can see white vertical lines corresponding to the bars, beats, and divisions in the Bar ruler.
Zoom around bars 6 to 8 to see your Scene - 1 marker.
You can’t Control-Option-drag in the global tracks to zoom, so zoom on the tracks below.
You may also want to move the playhead out of the way to clearly see the Beat Mapping track.
Click the Scene - 1 marker.
The marker is selected, and a blue vertical line indicating its position appears in the lower half of the global Beat Mapping track.
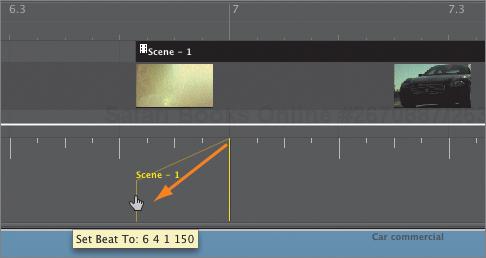
You will now map the first beat of bar 7 to the Scene - 1 marker.
When you map a beat to a new SMPTE position that is identified by a scene marker, Logic automatically adjusts the tempo of the previous section so that the beat falls precisely at that SMPTE time. Mapping the beat closest to the scene marker will result in the smallest tempo adjustment.
Since you haven’t mapped any other beat in this project, the new tempo will be calculated from the beginning of the song, and the value of the first tempo node in the global Tempo track (at 1 1 1 1) will be adjusted.
Note
If you had manually inserted tempo changes to the left of the beat you are mapping, they would automatically be deleted as the new tempo was calculated from the beginning of the project. If you had mapped beats earlier in the project, mapping a beat would insert the tempo change at the position of the mapped beat immediately to the left. Any tempo changes manually inserted between that beat and the one you are mapping would be deleted. Always map beats from left to right, and don’t manually insert tempo changes or tempo curves if you intend to map another beat at a later position in the project.
In the global Beat Mapping track, drag the white line corresponding to bar 7 over the blue line corresponding to the Scene - 1 marker.
Make sure you don’t accidentally click the white line corresponding to bar 7. Just drag it over the blue Scene - 1 line, and don’t release the mouse button until a diagonal yellow line ties the beat to the blue line.
If you make a mistake, double-click the long vertical line representing the beat that you just mapped. That will delete it, and you can start over.
When you release the mouse button, a vertical line represents the beat you mapped, and the Scene - 1 marker seems to move to 7 1 1 1. In reality, the Scene - 1 marker stays exactly at the same SMPTE position, still indicating the scene cut, but the new tempo was automatically calculated and adjusted to make bar 7 fall exactly on the marker.
The tempo is adjusted to 93.2835 bpm (you may get a slightly different value). The new tempo is a little faster, so bar 7 now falls a little earlier in the movie. This means that you can’t adjust the tempo before bar 7 without losing the alignment between bar 7 and the Scene - 1 marker. You can, however, create a tempo change on or after the first beat of bar 7 and, in fact, you will do just that when you create the second cue.
Now you can lengthen your first cue so that it transitions nicely into the second cue.
Loop the Emotional Piano 01 region so it stops a little bit before the Scene - 1 marker.
Listen to the end of the first cue and make sure it ends with softer notes. If you loop it until 7 1 1 1, you will hear loud notes just before the next cue, and the transition will not work so well.


In the previous exercise, you prepared the project for the second cue, mapping the first beat of bar 7 to the scene cut where the new cue will start. All you have left to do is choose a tempo for the new cue and start creating it on bar 7.
In the following exercise, you will add a drum loop, choose a tempo for the second cue, then add a few more Apple Loops and mix the cue.
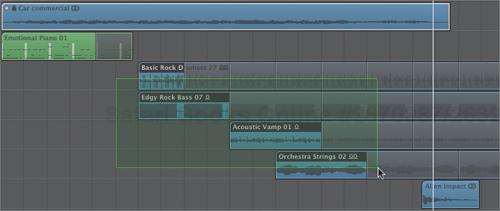
In the Loops Browser’s search field, enter Basic Rock.
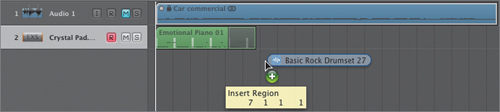
Drag Basic Rock Drumset 27 below the piano track at bar 7.
An audio track is created and the drum loop is inserted at bar 7.
In the Region Parameter box, select the Loop checkbox (or press L).
The Basic Rock Drumset 27 region is looped.
Start playback around bar 5.
Listen to the transition between the first cue and the new cue. A faster tempo for the new cue would definitely lift things up.
In the global Tempo track header, click the disclosure triangle.
The Tempo track expands vertically.
Double-click the Tempo track at bar 7, above the tempo line.
A tempo change is inserted at bar 7. The tempo of the first cue is left unchanged, and the Scene - 1 marker is still exactly on bar 7.
Listen to the transition again.
To the right of bar 7, drag the tempo line to 105 bpm.
Listen to the transition. The new tempo is more effective in creating a driving groove. Let’s add more Apple Loops to build the second cue.
You will no longer need the global tracks, so you can close them to reduce visual clutter in the Arrange area.
At the top of the track list, click the Global Tracks disclosure triangle (or press G).
The global tracks close.
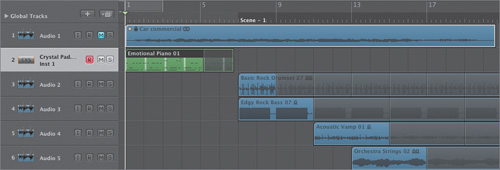
Using the Loop Browser’s search field, find the following loops. Drag each loop below the bottom track of the Arrange area into the indicated positions to create a new track for each one of them.
Drag Edgy Rock Bass 07 to bar 7.
Drag Acoustic Vamp 01 to bar 11.
Drag Orchestra Strings 02 to bar 13.
Select all three loops and press L.
The regions are looped.
You need to quickly mix the new tracks. First, name them.
Double-click the new tracks’ headers and rename them:
Change Audio 2 to Drums.
Change Audio 3 to Bass.
Change Audio 4 to Acoustic.
Change Audio 5 to Strings.
At the bottom of the Arrange area, click the Mixer button (or press X).
Start playback at bar 13 to hear all four new tracks and mix them as follows:
Bass: Set the Balance control to –10, and the volume fader to –14.
Acoustic: Set the Balance control to +22, and the volume fader to –4.6.
Strings: Set the volume fader to –15.
When you lower the track levels to avoid audio clipping, remember to raise your speaker’s volume so you are not misled into thinking the mix is now weaker.
The drums could use a little reverb to make them sound bigger.
Click the Drums channel strip to select it.
In the Media area, click the Library tab.
The Library displays audio channel strip settings for the selected channel strip.
In the Library, choose 01 Spaces > 01 Large Spaces > Male Vocal Hall.
The drums now have a nice reverberation.
Listen from the beginning of the project. The second cue doesn’t take off as it should. That’s because its level is lower than the first cue’s. Since the second cue is already mixed as loud as it can be, you need to turn down the piano in the first cue.
Drag the Inst 1 channel strip volume fader down to –12.
Listen to the transition from the first cue to the second. Now the second cue really wakes up the listener. Mission accomplished!
Close the Mixer (or press X).


You now have two cues, one with a simple yet emotional piano, and the other with a modern and driving groove, as requested by the director. You will create an ending to wrap up the score in the next exercise.
You will now place a sound effect on the last scene cut of the movie to punctuate your score. Then, you’ll trim the loops where the sound effect starts.
In the Media area, click the Loops tab.
At the top right of the Loop Browser, click the FX button.
The Loop Browser displays a variety of sound effects category buttons.
Click the Impacts button.
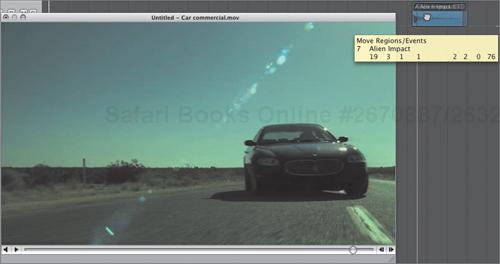
Drag Alien Impact to bar 20 below the bottom track.
Now you need to position the Alien Impact region so it falls on the last scene cut. To do so, reopen the Movie window.
In the Inspector, double-click the Movie area.
The Movie area closes and the Movie window opens.
Drag the Movie window to the left so you can see the Alien Impact region.
Start dragging the Alien Impact region toward the left to find the beginning of the scene with the car. As you drag the region, the Movie window shows you the frame of the movie at the position of the region.
Try to get as close as possible to the scene cut between the scene with the woman and the last scene with the car.
Drag the region to find the precise location of the scene cut.
In the Transport bar, watch the playhead’s SMPTE position. If you have zoomed in enough, dragging the region allows you to see every frame of the movie.
Although you can move the region exactly onto the scene cut, experiment placing the region a few frames off to the right and listen to the result. Some directors prefer having sound effects or cues that start a few frames after a scene cut, so ask your director if you should do that, or use your ears to judge what works best.
Zoom out.
The last thing to do is trim the repeats of the four Apple Loops in the second cue.
In the second cue, drag to select all four Apple Loops.
Position the mouse pointer on the upper part of one of the repeated regions until the Loop tool appears.
Drag the repeated regions until they end approximately where the Alien Impact region starts.
Go to the beginning of the project.
Now is the time to sit back and watch the movie in full screen while listening to the score.
Control-click the Movie window and choose Fullscreen.
The movie fills the screen.
Press the Spacebar.
Take advantage of the fact that Logic is hidden behind the Movie window. You have to forget about Logic, your arrangement, and your mix, and focus on the movie you are watching. If the music supports the movie, you should feel inspired and entertained. If there is an issue with the arrangement or the mix, it will most probably distract you from the movie, and you’ll have to go back and fix it.
When you are done watching the movie, close the Movie window, or Control-click it and choose Original Size.


Feel free to compare your work with the completed score in Logic 8_Files > Media > Car Commercial > 11 Car Commercial_end. When you are happy with your score, you can export it to the movie.
At the end of the project you will probably be asked to deliver a regular uncompressed PCM audio file that you can bounce, as you learned in the previous lesson. On larger projects, it is common for composers to deliver stems, submixes that contain a specific category of sounds, such as a strings stem, a percussions stem, or a sound effects stem. The engineer who mixes the movie’s soundtrack will mix your stems with the dialog and other sound effects.
However, as you make progress writing your score, you will need to share your work with the client, so that she can give you feedback and suggestions. To do that, you need to save a new copy of the movie that includes your project’s audio. You first need to adjust the cycle area to make sure the new movie doesn’t include the four seconds of black frames at the beginning, but does include the trail of the Alien Impact sound effect at the end.
Select all the regions in the Arrange area.
In the Toolbar, click Set Locators.
Cycle mode turns on and the cycle area matches the length of the whole soundtrack. You will now save a new movie matching the length and containing your soundtrack.
From the main menu bar, choose Options > Movie > Export Audio to Movie.
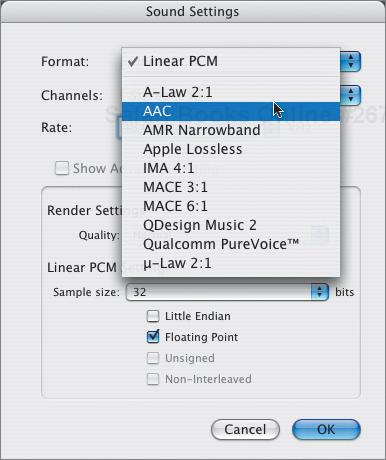
A Sound Settings dialog appears.
In the Format menu, choose AAC, and click OK.
Note
Linear PCM will give you the best sound quality, but the resulting movie file will also be much larger than a file in which you compress the sound by choosing AAC. File size can be an issue if you need to e-mail or upload the movie file. For previewing purposes, the sound quality of AAC is usually sufficient.
A Save As dialog opens. You need a name and a location to save your new movie file.
Name the movie My Car Commercial, choose the desktop as a save location, and click OK.
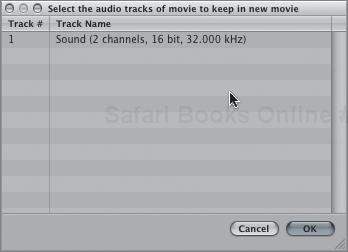
One last dialog appears, allowing you to choose the audio tracks from the original movie you want to include in the new movie. Since you don’t want to mix the original soundtrack with yours, you need to deselect it.
In the dialog, click the background to deselect the original audio track, and click OK.
A progress indicator shows that the project is being bounced as an audio file. Then, a second progress indicator shows that the audio file is being converted.
When the second progress indicator disappears, you can look for your movie on your desktop.
Press Command-Tab.
The Mac OS X application selector appears in the middle of the screen. Choose the Finder.
Press Option-Command-H.
The other applications are hidden, and you can see your desktop.
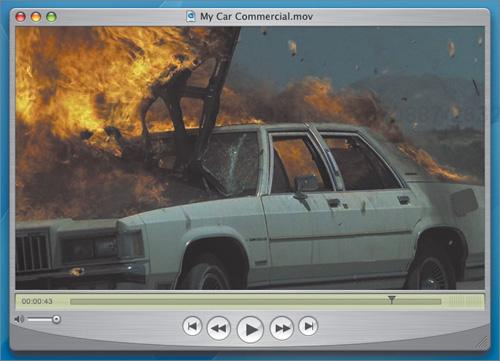
Find My Car Commercial.mov and double-click it.
The movie opens and plays in QuickTime.
And it has your soundtrack on it!
In this lesson you used many techniques to quickly build a car commercial soundtrack using Apple Loops. Using new tools and techniques, you also imported the movie, ensured that you had the correct synchronization settings, detected scene cuts, mapped a beat to a scene marker, and started a new cue on the scene cut. Ultimately, you exported your score to a new QuickTime movie file for previewing.
When you start writing music to picture, you will never watch a movie, cartoon, commercial, or trailer in the same way. Start focusing on the soundtracks, and a whole new world opens up that you didn’t realize existed.
Answers