
Lesson Files | Logic 8_Files > Lessons > 04 Funky Groove_start |
Time | This lesson takes approximately 60 minutes to complete. |
Goals | Record MIDI performances |
Quantize MIDI recordings | |
Merge a MIDI recording with an existing MIDI region | |
Record MIDI in take folders | |
Punch record a MIDI recording | |
Capture a performance as a recording | |
Record MIDI using Step Input mode | |
Filter incoming MIDI events |
MIDI (the Musical Instrument Digital Interface) was created in 1981 to standardize the way electronic musical instruments communicate. Today, MIDI is extensively used in the music industry, from cell phone ringtones to major-label albums. Most TV and film orchestra composers use MIDI to sequence large software sound libraries, getting ever closer to productions that sound like a real orchestra.
MIDI sequences can be compared to piano rolls, the perforated paper rolls once used by mechanical player pianos. Like the punched holes in piano rolls, MIDI events do not contain audio. They contain note information such as pitch and velocity. To produce sound, MIDI events need to be routed to a software instrument or to an external MIDI instrument.
There are two basic types of MIDI events: MIDI note events that trigger musical notes, and MIDI continuous controller (MIDI CC) events that control parameters such as volume, pan, or pitch bend.
For example, when you hit C3 on a MIDI controller keyboard, the keyboard sends a Note On MIDI event. The Note On event contains the pitch of the note (C3) and the velocity of the note (which indicates how fast the key was struck, measuring how hard the musician played the note).
By connecting the MIDI controller keyboard to Logic, you can use Logic to route the MIDI events to a virtual software instrument or to an external MIDI instrument. The instrument reacts to the Note On event by producing a C3 note, and the velocity determines how loud the note sounds.
More Info
To learn more about the MIDI standard specification, visit the MIDI Manufacturers Association website at http://www.midi.org/.
In Logic, the techniques used to record MIDI are very similar to the techniques you used to record audio in Lesson 2. When a MIDI controller keyboard is connected to your computer, and its driver is properly installed (some devices are class-compliant and don’t require a driver installation), you can use that keyboard to record MIDI in Logic. Logic automatically routes all incoming MIDI events to the record-enabled software instrument or external MIDI track.
Tip
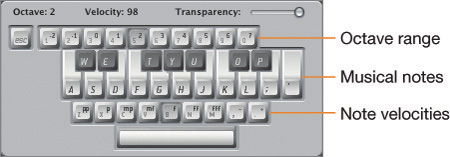
If you don’t have a MIDI controller keyboard, press the Caps Lock key on your computer keyboard to turn your Mac keyboard into a polyphonic MIDI controller keyboard. A representation of your computer keyboard is displayed, showing the letter keys assigned to musical notes. The number keys allow you to choose the octave range, and the lower row of keys lets you choose the note velocities. Keep in mind that you may need to disable the Caps Lock keyboard to access some of Logic’s key commands.
To record a MIDI performance triggering a software instrument, you need to create a software instrument track, insert an instrument plug-in or choose a channel strip setting from the Library, and click Record.
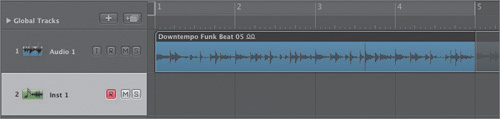
Go to Logic 8_Files > Lessons and open the 04 Funky Groove_start project.
That project has a single audio track with a drum loop, which will provide a timing reference to record your new instrument.
At the top of the track list, click the New Tracks button (+) (or press Option-Command-N).
The New Tracks dialog appears.
In the Number field, enter 1. Select Software Instrument as the Type. Select the Open Library checkbox, and click Create.
A software instrument track is created, and it is automatically record-enabled. The Library opens, displaying software instrument channel strip settings.
By default, audio tracks have a blue icon and audio regions are blue. Software instruments have a green icon and MIDI regions are green.
Choose a channel strip setting from the Library.
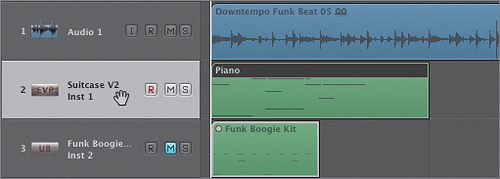
For this exercise, choose 04 Keyboards > 01 Electric Piano > Suitcase V2.
Logic Express
For this exercise, choose 04 Keyboards > 01 Electric Pianos > Tines Electric Piano, and in the following exercises, substitute Tines Electric Piano when you see Suitcase V2.
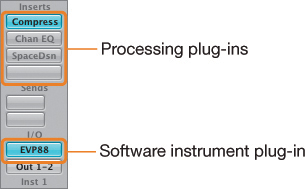
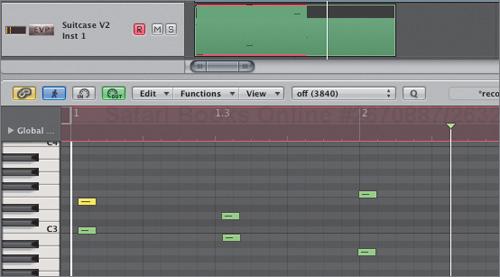
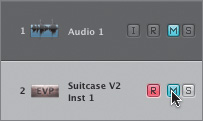
In the Inspector, the software instrument channel strip loads the necessary plug-ins. In the Arrange area, the name Suitcase V2 is displayed on the Inst 1 track header.
While audio channel strip settings contain only processing plug-ins, software instrument channel strip settings also contain the software instrument plug-in. On the channel strip, the software instrument plug-in is loaded in the Instrument slot of the I/O section.
Play some notes on your MIDI controller keyboard.
You should hear the electric piano. In the Transport bar’s MIDI In display, the incoming MIDI note events are displayed as notes are played. If you play a chord, the display shows the chord name.
You are now ready to record, but first open the Piano Roll Editor so that you can see the MIDI notes appear as you record them.
At the bottom of the Arrange area, click the Piano Roll button.
The Piano Roll Editor opens in the editing area.
Go to the beginning of the project.
In the Transport bar, click the Record button (or press * (asterisk) on the numeric keypad, or press R on a laptop).
The playhead jumps back one bar, giving you a four-beat count-in with an audible metronome click before recording starts. The Bar ruler turns red to indicate that Logic is recording.
When you can see the playhead, play some notes.
Play a simple bass line in an eight-note pattern (try a melody in the key of A minor). You will record more notes in that region later in this lesson.
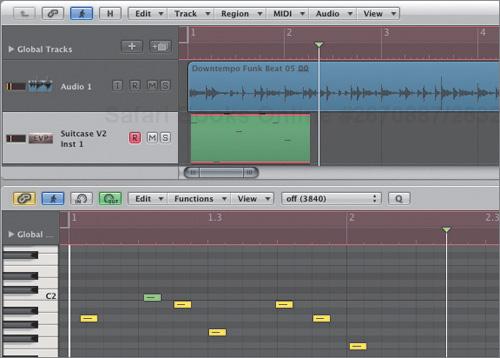
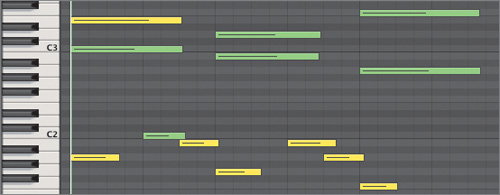
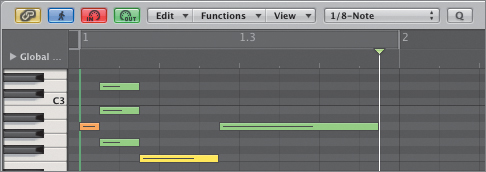
When you play the first MIDI note, a new MIDI region with a red halo is created on the record-enabled Suitcase V2 track. The region’s length constantly updates to include the most recent MIDI event played.
The MIDI notes appear in the Piano Roll Editor as you record them.
Stop recording.
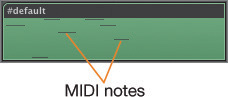
In the MIDI region, the notes are displayed as small beams. As in the Piano Roll Editor, the vertical positions of the notes indicate their pitches (with the high pitches at the top).
Go back to the beginning and listen to your MIDI recording.
If you are not happy with your performance, you can undo it (Command-Z) and try again.
If you are not happy with the timing of your MIDI performance, you can correct the timing of the notes. The time-correction process is called quantization. To quantize a MIDI region, you choose a grid resolution from the Quantize menu in the Region Parameter box. Each note inside the region will snap to the nearest position on the chosen grid.
In the following exercise, you will quantize the recording you made in the previous exercise to correct its timing, so that the piano notes are in sync with the drums.
Select the new #default MIDI region.
First, rename the region so you can easily identify it later.
In the Inspector’s Region Parameter box, click the name of the region and enter Piano.
The region is renamed Piano.
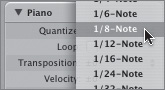
Now choose the Quantize value, which determines the resolution of the grid used to quantize the notes.
Set the Quantize parameter to 1/8-Note while looking at the notes in the Piano Roll Editor.
All the MIDI notes snap to the nearest eighth note.
Go to the beginning and start playback.
You can hear your performance, perfectly in time with the drums. Unless of course the performance timing was really poor, in which case some of the notes may not snap to the desired 1/8 note.
In Logic, quantizing is a nondestructive operation. You can always go back to the way the performance was originally recorded.
With the Piano region selected, open the Quantize parameter menu and choose “off (3840).”
The MIDI notes return to their original recording positions.
Choose Edit > Undo Parameter Change (or press Command-Z).
The region’s Quantize parameter is reset to 1/8-Note, and the notes snap to the grid.
More Info
The Quantize menu also offers Swing settings. The Swing settings delay the position of every other note in the grid to obtain a swing, or shuffle groove, common in many music genres such as blues, jazz, hip hop, or house music. The amount of delay goes from no delay (A = no swing) to a lot of delay (F = hard swing). For example, 8B Swing will subtly delay the second eighth note of each beat.

You can set a default quantization value so that any new recording will automatically be quantized to that grid resolution. This is very useful if you are not confident of your timing chops. Since the Quantize setting is nondestructive, you can always adjust it or turn it off for that region after the recording is done.
Click in the background of the Arrange area.
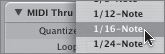
All regions are deselected, and the Region Parameter Box now displays the MIDI Thru settings. The MIDI Thru parameter settings are automatically applied to any new MIDI region that you record.
Set the Quantize parameter to 1/16-Note.
The Region Parameter Box displays the region’s name and settings. You can see the Quantize setting you applied to that region in the previous exercise: 1/8-Note.
Press Delete.
The region is deleted.
Go to the beginning of the track and click the Record button (or press * (asterisk) on the numeric keypad, or press R on a laptop).
Record a new simple bass line as you did previously.
Stop recording.
In the Piano Roll Editor, the notes immediately snap to the nearest sixteenth note. The new MIDI region is selected, and the Region Parameter box now displays its parameters: Quantize is automatically set to 1/16-Note, the MIDI Thru Quantize setting you set in step 2.
Set the Quantize parameter to “off (3840).”
The notes return to their original recorded positions.
Set the Quantize parameter back to 1/16-Note.
Sometimes you may want to record a MIDI performance in several passes. For example, when recording piano, you can record only the left hand and then record the right hand in a second pass. Or, when recording drums, you can record the kick drum in the first pass, the snare in a second pass, and the hi-hat in a third pass.
In Logic, when recording MIDI events on top of an existing MIDI region, you can merge the new events with the existing ones. You only have to select the existing MIDI region before recording, and the new notes will be recorded inside the selected region.
In the previous exercise, you recorded a simple bass line onto a piano track. Now you will play chords as you listen to the bass line and record the new chords inside the same MIDI region.
Go to the beginning and start recording.
Try to play some chords that complement the bass line you recorded previously.
Note
While you are recording, you are temporarily recording a new region on top of the existing one. The new region will be merged with the existing one as soon as you stop recording. The Piano Roll Editor displays the contents of the new region you are recording, and although the contents of the existing region are not displayed while you are recording, you can still hear the existing notes played back.
Stop recording.
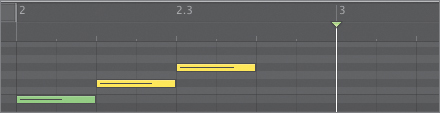
The new recording is merged with the existing region and you can see all the notes in the Piano Roll Editor. (You might have to scroll or resize the Piano Roll Editor window to see all the notes.)
Recording in Cycle mode allows you to continuously repeat the same section and only record new events when you are ready. This can be very useful to record a drum pattern, for example. While repeating a one-bar or two-bar section, you can add new elements to the pattern during each pass of the cycle, while listening to everything that you have recorded.
When you are recording in Cycle mode, notes recorded in all consecutive passes of the cycle are merged into a single MIDI region. In this exercise, you will use Cycle mode to record drums—first recording the kick, then the snare, then the hi-hat—switching in and out of record mode as the cycle repeats so you can practice each drum instrument before you record it.
In the Arrange area, mute both existing tracks.
Remember that you can click the Mute button on the first track header and drag down the mouse to mute both tracks.
At the top of the track list, click the New Tracks button (+) (or press Option-Command-N).
The New Tracks dialog appears.
In the Number field, enter 1. Make sure that Type is set to Software Instrument and Open Library is selected, and click OK.
This time you will insert the software instrument in the Inspector, on the Arrange channel strip.
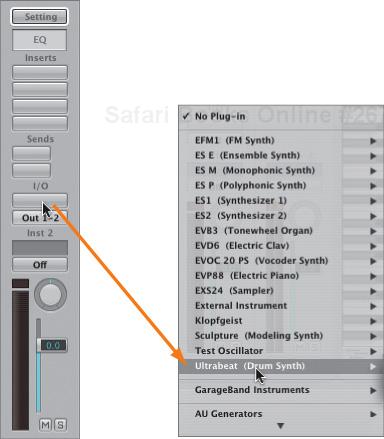
In the I/O section of the channel strip, click the Instrument slot.
A menu appears, allowing you to choose one of Logic’s software instruments.
Choose Ultrabeat (Drum Synth).
Note
When you place your mouse cursor over Ultrabeat (Drum Synth), a menu opens on the right that allows you to choose between Stereo and Multi-Outputs. For now, do not use the lower-level menu, and simply choose Ultrabeat (Drum Synth). By default, a stereo Ultrabeat will be inserted.
The Ultrabeat plug-in is inserted in the Instrument slot of the channel strip, and the Ultrabeat plug-in window opens.
Close the Ultrabeat window.
More Info
For now you will use Ultrabeat to produce drum sounds as you record MIDI in Cycle mode. In Lesson 6, “Programming Drums.” you will to use the Ultrabeat interface to program a drum pattern.
Notice the white frame around the Ultrabeat plug-in on the channel strip. A white frame indicates the selected section of the channel strip, whose settings are automatically displayed in the Library. The Library now displays Ultrabeat settings.
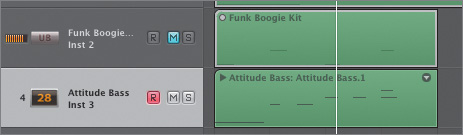
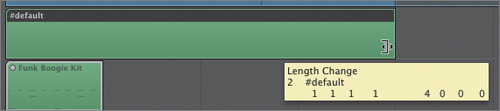
In the Library, choose 01 Drum Kits > Funk Boogie Kit.
Wait a few seconds while Ultrabeat loads the kit. When the kit is fully loaded, the drum kit name is displayed on the Inst 2 track header in the Arrange area.
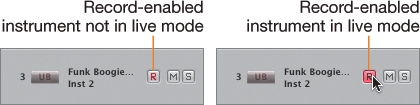
Selecting a software instrument track automatically record-enables it, but the instrument is not always in live mode. When an instrument is not in live mode, the first note you play will take about 100 ms (milliseconds) to trigger the instrument, which is then placed in live mode.
You can put an instrument in live mode by sending any MIDI event to it (playing a dummy note, moving the modulation wheel, and so on), or by clicking the Record Enable button in its track header.
First, locate the notes on your controller keyboard that trigger the kick, the snare, and the hi-hat. In Ultrabeat, you will use:
C1: kick
E1: snare
F#1: hi-hat
Play the lowest C note on your MIDI controller, while watching the MIDI Activity display in the Transport bar.
If the MIDI In display doesn’t show a C1, press your MIDI controller keyboard Octave Up and Down buttons until the lowest C plays a C1.
More Info
If you are using the Caps Lock keyboard, press 4 to set the right octave, and press A to trigger a C1 MIDI note.
When you can trigger a kick with C1, locate E1 (two white notes to the right) to play the snare, and F#1 (the next black note to the right) to play the hi-hat.
In the Bar ruler, click the cycle area.
Cycle mode turns on, and the cycle area is shown as green.
Resize the cycle area so that it spans one bar starting at the beginning of the song.
You will now record the drums, one at a time.
Click in the background of the Arrange area.
The Region Parameter box displays the MIDI Thru parameters.
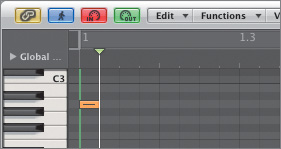
Set the Quantize parameter to 1/8-Note.
Start recording.
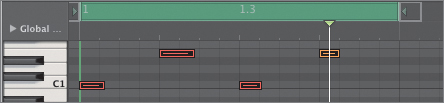
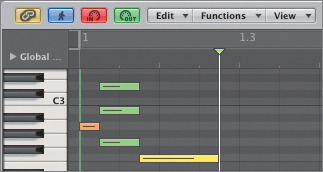
You hear a four-beat count-in before the playhead reaches the beginning of the cycle area. Play two C1 notes: one on the first beat, one on the third beat. In the Piano Roll Editor’s Bar ruler, the first beat is on 1, the third beat on 1.3 (bar 1, beat 3).
When a new cycle begins, you can hear the kick drum notes you just recorded. Notice that the notes snap to the nearest 1/8 note since you chose that grid resolution for your default MIDI Thru parameters.
You have all the time in the world before you continue to record. As long as you don’t play anything, there are no MIDI events, and Logic keeps cycling over the existing region, playing back your kick drums. If you feel the need to practice the snare before recording, you can return to play mode while cycling continues.
Click the Play button (or press Enter).
Logic is no longer in record mode (and the metronome stops clicking), but playback continues as Logic repeats the cycle area without interruption. Notice that the two C1 notes are now quantized to the grid.
On your MIDI keyboard, locate the snare (E1) and practice a snare pattern. Try to hit the snare on beats 2 and 4.
Click the Record button.
Playback continues without interruption, but Logic reenters record mode. When you feel ready, record the snare.
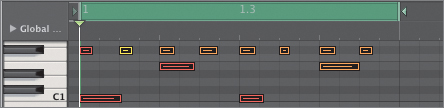
When the playhead jumps to the beginning of the cycle, you can see the two kick notes and the two snare notes in the Piano Roll Editor.
Tip
If you switched to play mode before recording the snare, the snare recording is considered a new operation. Staying in record mode, you can press Command-Z to undo the snare recording, keeping only the kick notes, and record the snare again.
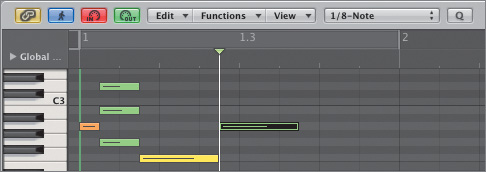
Use the same techniques to record your hi-hat (F#1) on every eighth note in the same MIDI region.
Stop recording.


The merge MIDI-recording techniques you used in the two previous exercises provide a lot of flexibility, and allow you to take your time, recording a single part of a performance. These techniques will work in many situations. For example, consider recording a violin or cello on a software instrument track; then, on a second pass, record the movements of the pitch bend wheel to add vibrato to some of the notes.
When you want to nail a performance, or experiment with various musical ideas, you can record different takes and later choose the best one. The techniques to record MIDI takes are similar to the techniques you used to record audio takes in Lesson 2. You can record over an existing MIDI region, or you can use cycle recording to record one take for each pass of the cycle.
Cycle mode should still be turned on from the previous exercise. Let’s record takes in Cycle mode and experiment using different melodies for a bass line.
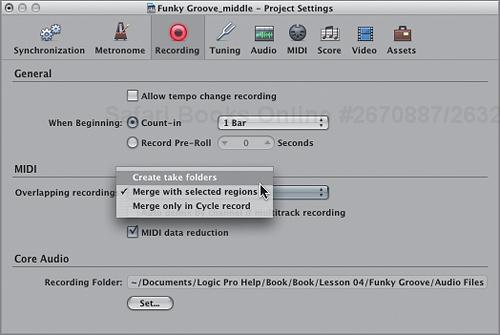
In the Transport bar, hold down the Record button and choose Recording Settings from the pop-up menu (or press Option-* (the asterisk on the numeric keypad), or press Option-R on a laptop).
The Recording Project Settings dialog opens.
In the MIDI area, from the “Overlapping recordings” pop-up menu, choose “Create take folders.”
Close the Project Settings window.
In the Arrange area, unmute track 1 (Drums/Audio 1) and mute track 3 (Funk Boogie Kit/Inst 2).
Create a new software instrument track and open the Library.
In the Library, choose 02 Bass > 02 Electric Bass > Attitude Bass.
Start recording and play a different melody for each pass of the cycle until you have 4 takes.
A MIDI take is recorded for each pass of the cycle where you play MIDI notes. If you don’t play anything for a whole cycle, no take is recorded. The takes are packed into a take folder.
When a new cycle begins, the take you just recorded is automatically muted. You can listen to it by switching to play mode.
Click the Play button (or press Enter).
You are now in play mode, and you can hear the last take you recorded.
Open the take folder menu and choose the take you want to hear.
You can also double-click the take folder to open it, and click the take you want to hear. Double-click the take folder to close it.
Stop playback and turn off Cycle mode.


When looking for musical ideas, you often simply play back the project and experiment on your MIDI keyboard. But how many times have you jammed along in play mode, only to later wish that you had recorded your performance?
In Logic, the good news is that every MIDI performance is recorded in memory, even in play mode. However, only the most recent performance is kept in memory. If you are happy with your previous performance, you can capture it as a recording right after you stop playback.
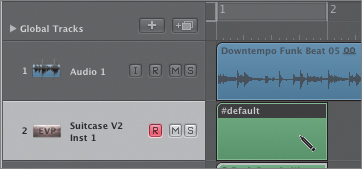
Mute the Attitude Bass track.
Select the Suitcase V2 track.
The MIDI region on the track is selected. If you have several MIDI regions on that track, all the regions are selected.
Press Delete.
All the selected MIDI regions are deleted.
Start playback.
Play your MIDI controller keyboard for four or five bars.
Stop playback.
Press Control-* (the asterisk on the numeric keypad) (or press Control-Option-Command-R on a laptop), the Capture as Recording command.
The performance you just played is captured as a recording. The MIDI region is created on the track, and the notes are displayed in the Piano Roll Editor.
Capture as Recording only works immediately after you stop playback. If you press 0 to go back to the beginning of the project, or start playback again, the performance is lost.

This technique can also be useful to fool a musician into thinking you are not recording. Some musicians perform better without the pressure of the red light!
You can use the punch-on-the-fly and autopunch techniques you learned for audio recording to punch on MIDI recordings. However, the default behavior when recording MIDI is to merge the punched-in MIDI recording with the existing region on the track. If you want to use punching techniques to correct a portion of a performance, you’ll have to turn on the Replace mode.
Let’s customize the Transport bar to display the Replace Mode button, and use the Autopunch function to punch in on the piano recording you captured in the previous exercise.
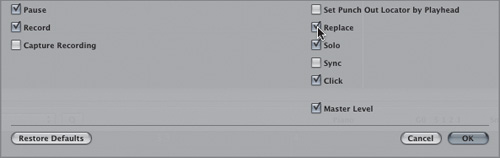
Control-click the Transport bar and choose Customize Transport bar from the shortcut menu.
The Customize dialog opens.
In the Modes and Functions column, select Replace and click OK.
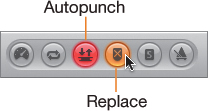
Click both the Autopunch and Replace buttons.
In order to merge the new events you are going to record over the Autopunch area with the existing region on the track, you need to change your recording settings back to the default settings.
In the Transport bar, hold down the mouse button on the Record button and choose Recording Settings from the pop-up menu.
The Recording Project Settings dialog opens.
In the MIDI area, from the “Overlapping recordings” pop-up menu, choose “Merge with selected regions.”
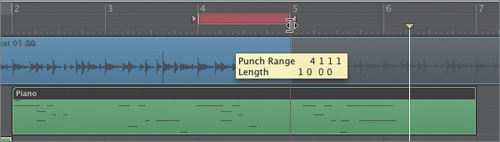
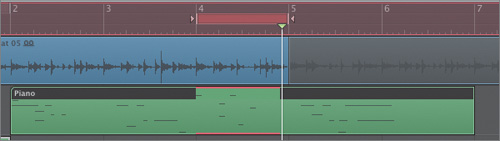
In the Bar ruler, adjust the Autopunch area around a section of the Piano you want to record over.
Make sure the Autopunch area is placed over a section of the piano performance you captured in the previous exercise.
Go to the beginning of the project and make sure the Suitcase V2 track is still record enabled.
Click the Record button and start playing right away.
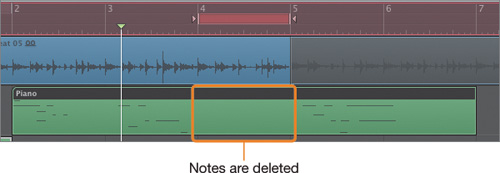
In the MIDI Piano region, the notes below the Autopunch area are deleted.
You can hear the notes you are playing, but only the notes played within the Autopunch area are recorded inside the MIDI region.
Turn off the Autopunch and Replace modes.
Instead of recording a real-time performance, you can record notes one at a time. In Step Input mode, you position the playhead and play a note or chord on your MIDI keyboard. The note(s) are recorded, and the playhead moves one step ahead, waiting for the next note(s).
This mode is very useful for recording complex musical phrases that you can’t perform in real time, such as complicated chord patterns or really fast arpeggios (a great technique for dance music).
Select the Suitcase V2 track and press Delete.
All the regions on the track are deleted.
Tip
If you don’t want to select the regions on a track when selecting the track, open Global Preferences, click the Editing tab, and deselect “Select Regions on Track selection.”
You start by creating an empty MIDI region using the Pencil tool (as the Command-click tool). You will step-record notes inside that new region.
Press Esc and Command-click the Pencil tool.
Command-click the Suitcase V2 track between bars 1 and 2.
The Pencil tool creates an empty one-bar MIDI region.
Resize the region so it is four bars long.
At the upper left of the Piano Roll Editor, click the In button.
The button turns red and MIDI Step Input Recording is turned on.
Play a single note on your MIDI keyboard.
A sixteenth note is recorded at the playhead position, and the playhead moves forward one sixteenth note. The recorded note has the pitch and velocity of the note you played.
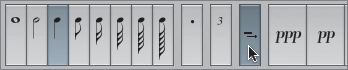
The length of a step is identified by the division setting in the Transport bar, below the time signature.
In the Transport bar, click the division setting and drag down until it reads /8.
In the Piano Roll Editor, the grid resolution is the same as the division setting. The vertical grid lines are now placed at eighth-note intervals.
Play a chord.
An eighth-note chord is recorded at the playhead position, and the playhead moves forward one eighth note.
You can also use the Step Input Keyboard to exercise more control over your step input recordings.
From the main menu bar, choose Options > Step Input Keyboard.
The floating Step Input Keyboard appears. The selected note-length button overrides the division setting in the Transport bar.
On the Step Input Keyboard, click the quarter-note button.
Play a note.
A quarter note is recorded at the playhead position, and the playhead moves forward one quarter note.
If you were recording a quarter-note pattern and wanted to record a single half note, you could click the half-note button, record your half note, and click the quarter-note button again to record the next quarter note.
An easier way is to use the Sustain Insert Note button.
Play a note and hold down the key on your MIDI keyboard.
A quarter note is recorded. You need to hold down the MIDI key for the next step, so that the note you are recording remains selected in the Piano Roll Editor.
On the Step Input Keyboard, click the Sustain Inserted Notes button.
The selected note is lengthened by a quarter note, so it is now a half note. You can click the Sustain Inserted Notes button several times to lengthen the selected notes by the current step length.
You can now release the key on your MIDI keyboard.
Now let’s record quarter notes starting on bar 2.
With the pointer positioned over the lower half of the Bar ruler on bar 2, hold down the mouse button.
The playhead snaps to bar 2.
Play three notes, one at a time.
Now you want to insert a quarter-note rest.
On the Step Input Keyboard, click the Sustain Inserted Notes button.
The playhead jumps forward one quarter note. When no notes are selected, the Sustain Inserted Notes button makes the playhead move one step ahead, and you can resume step input recording.
Try using step input recording techniques to record fast sixteenth-note arpeggios or even crazy chord patterns. With a little experimentation, you will quickly end up with cool musical phrases that couldn’t possibly be performed live.
Click the In button to turn off Step Input recording.


Sometimes your MIDI controller keyboard sends MIDI events that you may not want to record in Logic. Maybe you are using an older MIDI keyboard that generates random pitch bend events, or your keyboard is sending aftertouch MIDI events when you apply pressure to the keys, but the instrument you are recording does not react to aftertouch.
Logic allows you to filter out undesired incoming MIDI events so they are not recorded. Since input filter settings are project settings, you can adjust them to filter various types of events in different projects.
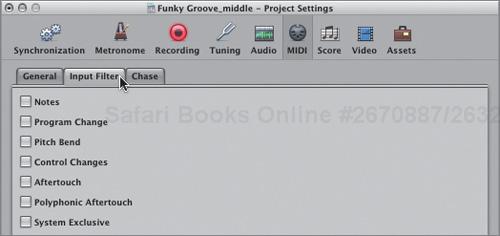
In the Toolbar, click the Settings button and choose MIDI from the pop-up menu.
Click the Input Filter tab.
In this tab, you can select the MIDI events you want to filter.
In the Arrange area, click the Suitcase V2 track header.
The track is selected and record-enabled.
Play some notes on your MIDI controller keyboard and move the pitch bend wheel.
You can hear the note pitches change as you move the pitch bend wheel.
In the MIDI Project Settings window’s Input Filter tab, select Pitch Bend.
Play some notes on your MIDI controller keyboard and move the pitch bend wheel.
This time the pitch bend MIDI events are filtered at their input into Logic, and your pitch bend wheel movements have no effect on the pitch of the notes you play.
Separating the MIDI data from the audio signal produced by the instrument allows for very flexible recording. Throughout this lesson you quantized your notes to a grid and chose to merge new recordings into an existing MIDI region or to record separate takes in a MIDI take folder. You also used step input recording to enter notes one step at a time, without the pressure of recording a real-time performance.
After a MIDI performance is recorded, you can still change the sound of the instrument independently of the MIDI events, or edit the MIDI events independently of the instrument’s sound. Those vast sound- and performance-editing possibilities take you to a new realm of experimentation. Enjoy it!
More Info
To learn how to use external MIDI instruments with Logic, read the Appendix, “Using External MIDI Devices.”
Answers