
Lesson Files | Logic 8_Files > Lessons > 03 New Day_start |
Media | Logic 8_Files > Media > New Day > Audio Files |
Logic 8_Files > Media > Additional Media | |
Time | This lesson takes approximately 60 minutes to complete. |
Goals | Create a composite take from multiple takes |
Assign left-click and Command-click tools | |
Edit regions in the Arrange area | |
Apply fades and crossfades | |
Import audio files | |
Edit audio destructively in the Sample Editor | |
Position audio regions in the Arrange area |
Audio engineers have always looked for ways to edit recordings. In the days of magnetic tape, they used razor blades to cut pieces of a recording, then connected the pieces with special tape. They could create a smooth transition (or crossfade) between two pieces of magnetic tape by cutting them at an angle.
Digital audio workstations revolutionized audio editing the same way word processors revolutionized text editing. A waveform on the screen gives you a visual representation of the digital audio recordings stored on the hard disk. The ability to read the waveform and master the editing tools is the key to precise and flexible audio editing.
In this lesson, you will develop waveform reading skills, identify musical notes in the waveform, and perform edits just before the attack of a note. You will also create a single composite take using the multiple takes you recorded in the previous lesson, and create a drum loop from a drum recording you will import into the project.
As your ability to read waveforms and use Logic’s editing tools develops, never forget to use your ears and trust them as the final judge of your work.
In the previous lesson, you recorded several takes of acoustic guitar and packed them into a take folder. Now you will learn how to preview the individual takes and assemble a composite take by choosing sections from different takes, a process called comping.
Comping techniques are really useful when you have recorded several takes of the same musical phrase and each take has its good and bad qualities. Maybe in the first take the musician messed up the beginning but got the ending perfectly, while in the following take he nailed the beginning and made a mistake at the end. You can create a comp using the beginning of the second take and the ending of the first take.
The same technique can also be used to create a composite musical phrase by comping performances of different musical ideas. In the following exercises, you will create a new melody by comping takes of two different acoustic guitar melodies.
Before you start comping, you need to get familiar with the takes you are going to comp.
Go to Logic 8_Files > Lessons and open 03 New Day_start.
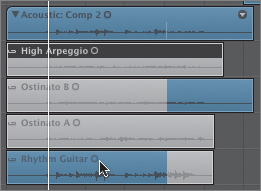
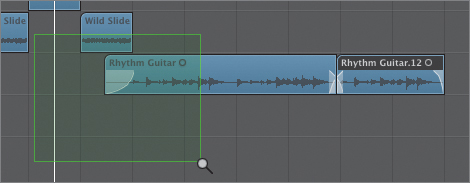
A take folder is present on the Acoustic Guitar track.
Double-click the take folder.
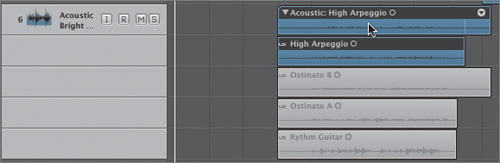
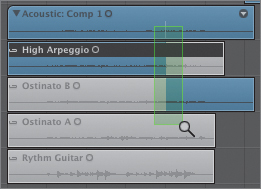
The take folder opens. The take folder is still displayed on the Acoustic track (track 6), with a disclosure triangle before its name, and a take folder menu at the top right. The individual takes are displayed on lanes below the acoustic track, with a take symbol before their name.
You can see that the High Arpeggio take at the top is selected (it is blue and has a black title bar). That’s the one currently playing (the other takes are dimmed to indicate that they are muted).
Notice the name of the take folder: Acoustic: High Arpeggio. It’s the name of the track and the name of the selected take.
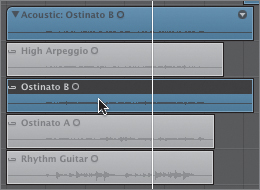
In the Bar ruler, drag a cycle area from bar 5 to bar 9.
Press the Spacebar.
Playback starts on bar 5, and you can hear the first take, High Arpeggio. Note the names of the takes. They describe the musical ideas that they contain.
Stop playback.
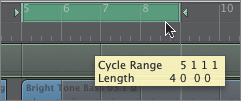
Click the Ostinato B take.
The Ostinato B take is selected, and the name of the take folder is now Acoustic: Ostinato B.
Press the Spacebar.
You are now listening to the second take, Ostinato B.
Stop playback.
Repeat these steps to listen to each of the other takes. High Arpeggio is a nice musical phrase and you will use it for this section. Ostinato A and Ostinato B are the same phrase, but Ostinato A is the weaker performance. Rhythm Guitar is interesting, but you will not use it for this section of the song.
While listening to High Arpeggio, notice that it’s repeating the same two-bar phrase twice. The end of that two-bar phrase, going up in pitch, works well the first time, as it leads back into the arpeggio. However, it doesn’t work so well the second time, just before the strings, because it doesn’t sound as though it concludes the phrase.
In the following exercise, you will comp High Arpeggio with the end of Ostinato B, to provide a nice conclusion for the musical phrase.
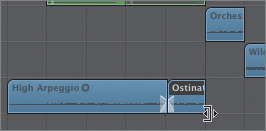
Select the High Arpeggio take.
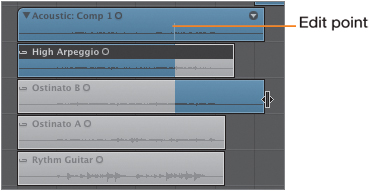
Click Ostinato B around bar 8 and drag to the right to select the ending of that take.
The comp is created. High Arpeggio will play until bar 8, and then Ostinato B will play. The name of the take folder is now Acoustic: Comp 1.
Listen to the comp.
The edit point is represented on the take folder as a white vertical line at bar 8. It shows the position where the comp stops playing High Arpeggio and starts playing Ostinato B. Unless you were very lucky, the edit probably sounds awkward. You will fine-tune the edit later in this lesson, but right now, let’s get it in the ballpark.
On the takes lanes, zoom in on the edit point.
In this case, the fastest way to zoom in on the area is to press Control-Option to choose the Zoom tool, and drag over the area you want to zoom in on.
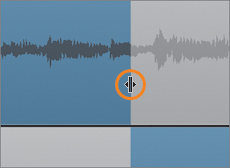
In one of the takes, place the mouse cursor over the edge of the blue selection.
The mouse cursor changes into a length-change tool pictured here:
This tool allows you adjust the edit point between the two takes.
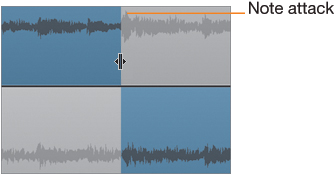
Drag the edit point to just before the attack of the note on bar 8.
Don’t spend too much time finding the perfect edit point position. At this stage, you are making musical choices. You will fine-tune the edit point later.
In the Arrange area, Control-Option-click anywhere.
The area zooms out and you can once more see the whole song.
Listen to your new edit point.
It should sound better.
Once you have determined where to transition between takes, you can click sections of the other takes and experiment further to find the best takes for the sections on each side of the edit point.
Before you begin experimenting, you need to make sure you can easily return to the comp you just created.
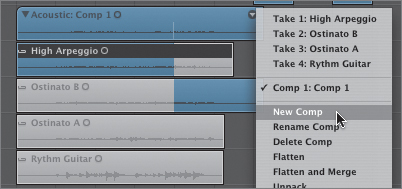
At the upper-right corner of the take folder, click the arrow.
The Take Folder menu opens, and you can see your four takes, the comp you just created (Comp 1: Comp 1), and a few commands you can apply to the take folder.
Choose New Comp.
The take folder is now named Acoustic: Comp 2. From now on, you are editing Comp 2. If you are not happy with the results, you can revert to Comp 1 by choosing it from the Take Folder menu.
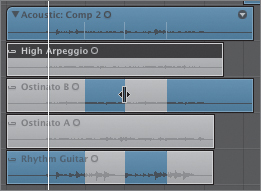
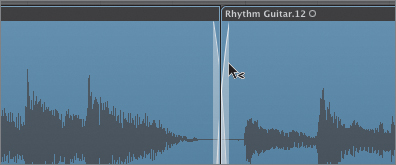
To the left of the edit point, click the Rhythm Guitar take.
Comp 2 is now composed of the Rhythm Guitar section before the edit point, and the Ostinato B section after. The edit point maintains the same position.
In Ostinato B, drag to select a one-bar section from approximately bar 6 to bar 7.
The section you dragged is selected (highlighted in blue), and Comp 2 is updated to play the blue sections of each take. Let’s move that new section to the previous bar When you position the mouse cursor in the middle of a blue area, it turns into a two-headed arrow, and you can drag the blue area horizontally.
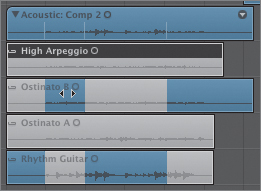
Drag the first blue area in the Ostinato B take to bar 5.
The selections in the Rhythm Guitar take are updated so that all the blue sections remain connected.
Take a moment to experiment further, creating a comp out of the four takes. Drag as many new sections as you want, slide them around, move the edit points, and click different sections of takes to select them, listening to your results.
Now let’s go back to our original Comp 1.
From the Take Folder menu, choose Comp 1: Comp 1.
The take folder reverts to the comp created in the previous exercise. Now close the take folder.
Double-click the take folder.
The take folder closes.
You will flatten the take folder, replacing it with the audio regions that compose the current comp, Comp 1. Once you have audio regions instead of a take folder, you can refine the edit point and apply fades to the regions.
From the Take Folder menu, choose Flatten.
The take folder is replaced by the current comp: the selected sections of the takes in the take folder are now replaced by audio regions, and a crossfade is displayed at the edit point.
In the Bar ruler, click the cycle area to turn off Cycle mode.

Until now you have worked exclusively with the default tools. You also used keyboard modifiers such as Control-Option to choose the Zoom tool, and you used features that change the mouse cursor to tools such as the Resize tool or Loop tool, depending on its position.
When editing audio in the Arrange area, you will need to access more tools.
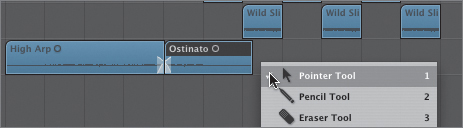
Two Tool menus are located at the upper right of the Arrange area. The left menu assigns the left-click tool and the right menu assigns the Command-click tool, which you access by pressing the Command key while clicking.

Position the mouse cursor over the Arrange area, and press Command.
The mouse cursor changes to the Command-click tool: the Marquee tool in this case. Let’s assign the Text tool to the Command-click tool
From the Command-click Tool menu, choose the Text tool.
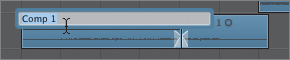
The Command-click Tool menu now displays the Text tool. The two Comp 1 regions are still selected, and you need to deselect them to rename them individually.
Click the background of the Arrange area with the Pointer tool.
Both Comp 1 regions are deselected.
On the Acoustic track, Command-click the first Comp 1 audio region.
A text field appears in which you can rename the region.
Type High Arpeggio and press Enter.
The region is renamed “High Arpeggio.”
Rename the second region Ostinato and press Enter.
You can also press the Esc (Escape) key to open a Tool menu at the current mouse cursor position.
Make sure the mouse cursor is positioned over the Arrange area, and press Esc.
A Tool menu appears at the mouse cursor position. This key command will save you a lot of trips to the Tool menus.
Choose the Solo tool.
The left-click tool switches to the Solo tool. You can quickly reset the left-click tool to the Pointer tool by pressing Esc twice.
Hold down the mouse button over the beginning of the High Arpeggio region.
The region is outlined in yellow, and Solo mode is temporarily turned on. Playback starts and you can hear only the High Arpeggio region until you release the mouse button.
Let’s switch the left-click tool back to the Pointer tool. You can quickly reset the left-click tool to the Pointer tool by pressing Esc twice.
Press Esc twice.
The left-click tool switches to the Pointer tool.
Now let’s assign the Solo tool to the Command-click tool.
Press Esc.
The Tool menu appears. You can Command-click a tool to assign it to the Command-click tool.
Press Command as you choose the Solo tool.
The Solo tool is the Command-click tool. Now you can perform edits with the Pointer tool, and you can Command-click any region to hear it in Solo mode.
Tip
If you have a two-button mouse, you can also assign a third tool to the right mouse button by choosing Logic Pro > Preferences > Global and clicking the Editing tab. Choose “Is Assignable to a Tool” from the Right Mouse Button pop-up menu. The Right-click Tool menu will appear to the right of the two existing Tool menus.


Editing audio regions in the Arrange area is nondestructive. Regions are merely pointers to an audio file that identify parts of the audio file. When cutting and resizing regions, or adding fades and crossfades in the Arrange area, no processing is applied to the original audio files, which remain unaltered on your hard disk. You can always adjust your edits later. As a result, editing in the Arrange area provides a lot of flexibility and room for experimentation.
When editing audio, you want to avoid abrupt transitions on edit points—the region boundaries and the junctions between regions. You can use nondestructive fades in the Arrange area to create smooth transitions.
Click Play from Selection (or press Shift-Enter).
Listen to the transition from the guitar part to the orchestra strings part in measure 9. The last acoustic guitar note is sustained too long and clashes with the melody of the strings.
Drag the lower-right corner of the Ostinato region toward the left to shorten it so it stops approximately on bar 9, just when the strings come in.
Click Play from Selection (or press Shift-Enter).
The transition works better, but the guitar dies abruptly on bar 9. Let’s add a fade-out at the end of the Ostinato region. You might need to zoom in to apply the fade.
Press Esc and choose the Crossfade tool (or press Esc-0).
The left-click tool switches to the Crossfade tool.
Drag the Crossfade tool over the boundary of the region. Start dragging in the background to the right of the region, and drag toward the left, covering the end of the region with the blue shaded rectangle.
Make sure that you drag over the boundary of the region, or nothing will happen. You can create fades only over region boundaries.
A fade-out is created. The length of the drag area determines the length of the fade.
Listen to the fade-out.
It probably sounds unnatural. Let’s lengthen the region so the note sustains a little longer. You will need the Crossfade tool to adjust the fade later, so make the Pointer tool the Command-click tool.
Press Esc and Command-click the Pointer tool.
Press Command as you drag the lower-right corner of the region a little further to the right to sustain the last note a little longer.
Now let’s curve the fade.
Press Control-Shift as you drag up the Crossfade tool on the fade.
Control-Shift-dragging the Crossfade tool vertically on a fade changes the mouse cursor to a broken arrow, which allows you to change the fade’s curve.
The fade sounds more natural, but with the new curve a longer fade would sound even better.
Drag the Crossfade tool over the boundary of the region again, this time drawing a longer fade. As long as the blue shaded rectangle covers the boundary of the region it doesn’t matter whether you drag the Crossfade tool from left to right or from right to left.
The fade lengthens while retaining its curve shape.


Feel free to continue adjusting the curve and length of the fade until it sounds just right. There are no rules as to what the perfect curve and shape of a fade should be, so experiment and trust your ears.
It is usually a good idea to crossfade audio regions that are back to back. The first region will fade out as the next fades in, ensuring a smooth transition without audible clicks.
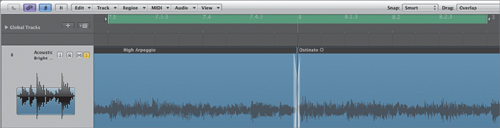
When you previously comped the acoustic guitar in the take folder, a crossfade was automatically added. The crossfade was displayed when the comp was flattened. In the next exercise, you will delete that crossfade, fine-tune the position of the edit and add a new crossfade.
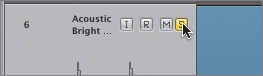
On the Acoustic track header, click the Solo button.
From now on, you will hear only that track. You may need to zoom in horizontally around bar 8 so that the Bar ruler displays the third beat of each bar (7.3, 8.3, and so on).
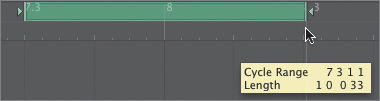
Drag a one-bar cycle area over the crossfade that overlaps bar 8 (from 7.3 to 8.3).
You can now play that section and listen to your edit without repositioning the playhead every time you start playback.
Control-Option-drag to zoom in on the crossfade between High Arpeggio and Ostinato.
Zoom just enough so you can still see the whole cycle in the Bar ruler.
With the Crossfade tool chosen, Option-click the crossfade.
Option-clicking a fade with the Crossfade tool deletes the fade. You may need to zoom in closer to be able to delete the fade.
Let’s assign the Pointer tool to the left-click tool so you don’t have to press Command to edit the regions.
Press Esc twice.
The left-click tool is reset to the Pointer tool.
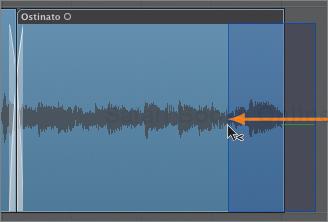
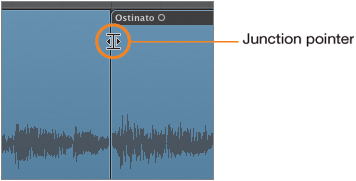
Position the mouse cursor over the edit point in the upper half of the waveform.
The cursor changes into the Junction pointer. Dragging the Junction pointer horizontally changes the position of the junction between the regions while keeping both regions connected and not overlapping.
Make sure the mouse cursor is positioned on the upper half of the waveform. When the mouse cursor is on the lower half, it switches to the Resize tool, and you will resize one of the regions, creating gaps or overlaps between the regions.
Drag the Junction pointer slightly to the right.
The Junction pointer jumps in rough increments. Logic snaps to a virtual grid that has a resolution dependent on the current zoom level. You can hold down Control to gain a little more precision, and hold down Control-Shift to get tick precision (there are 240 ticks in a sixteenth note).
While dragging the Junction pointer, press Control-Shift to disable snapping, and position the edit point close to bar 8.
Holding Control-Shift allows you to smoothly adjust the position of the edit point.
Press the Spacebar to listen to the junction, and adjust its position if necessary. You may hear a click at the junction of the regions. You will fix that with a crossfade. For now, you are only trying to find the best position to transition from High Arpeggio to Ostinato B.
Zoom in on the junction.
Press Esc and choose the Crossfade tool (or press Esc-0).
Drag the Crossfade tool over the junction of the regions.
A crossfade is created. Again, use your ears to adjust the crossfade. A short crossfade works best here. You can redraw the crossfade to adjust its length and position.
Control-Shift-drag the Crossfade tool up or down on the crossfade.
Unsolo the Acoustic track, turn off the Cycle mode, and listen to the whole acoustic guitar section.
Reset the left-click tool for the next exercises.
Press Esc twice.
The left-click tool is the Pointer tool.

Don’t spend too much time perfecting the crossfade. Crossfades between two performances sometimes sound a little odd when the track is soloed. If you can get the crossfade close, the result will usually be satisfying in the whole mix.
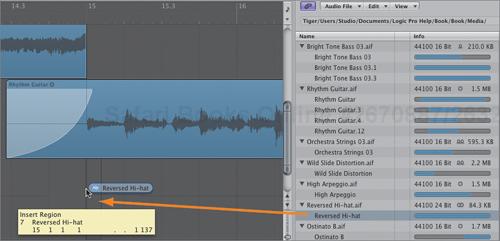
The Audio Bin lists all the audio files that were imported or recorded in the project, even if they are no longer used in the Arrange area. In the Lesson 2, you used the Audio Bin to keep track of the audio files recorded in the project. You will now use it to preview and add an audio file to the project.

The Info column displays the audio file’s information: sample rate, bit depth, status, and file size. The status icon indicates whether the file is mono or stereo, and whether it’s an Apple Loops, a regular or compressed audio file. In front of each region, the dark gray bar represents the length of the audio file, and the colored section represents the region.
Let’s import and add the Rhythm Guitar take that you chose not to use earlier when comping takes.
More Info
You can also open the full-featured Audio Bin window from the main Window menu. The Audio Bin window displays the region’s waveforms and also allows you to edit the regions.
In the Audio Bin, choose Audio File > Add Audio File.
The Audio Bin file selector box opens. When you comped the acoustic guitar takes earlier in this lesson, the unused takes’ audio files were deleted from the Audio Bin, but they are still in the Audio Files folder inside the project folder.
Navigate to Logic 8_Files > Media > New Day > Audio Files and select Rhythm Guitar.aif.
Think of the Audio Bin file selector box as a shopping experience. At the top, the Browser represents the shelves of a store where you look for audio files that you can preview by clicking the Play button. At the bottom, the file view area is your shopping cart.
You can double-click files in the Browser to add them to your file view area. When you click Done, all the files in the file view area are added to the Audio Bin.
Click the Play button.
You are previewing Rhythm Guitar.aif.
Click the Stop button.
Click the Add button (or double-click Rhythm Guitar.aif).
Rhythm Guitar.aif is added to the file view area.
At the bottom of the Audio Bin file selector box, click Done.
Rhythm Guitar.aif is added to the Audio Bin.
At the lower left of the Audio Bin, click the speaker button.
The selected region starts playing.
In the Arrange area, zoom out so you can see the whole arrangement.
From the Audio bin, drag the Rhythm Guitar region onto bar 14 of the Acoustic track.
The Rhythm Guitar region is inserted in the Arrange area where you dragged it.
Listen to the section where you just dragged the Rhythm Guitar region.
Since the region was recorded with a one bar count-in, the musical phrase starts on bar 15, right at the beginning of the last section. The region fits rather well, except that it’s too short for the section. You will resolve that in the next exercise.


Since the Rhythm Guitar region is too short for the last section, you can cut a portion of the region and repeat it so that it covers the whole section.
In the next exercise, you will use the Marquee tool to select a portion of a region and drag it to the end of the song. You will use No Overlap mode to make sure that the regions don’t overlap.
At the upper right of the Arrange area, click the Drag menu and choose No Overlap.
When No Overlap is chosen, dragging one region over another automatically trims the region underneath to make space for the new one, avoiding region overlaps.
Press Esc to open the Tool menu, then Command-click the Marquee tool.
The Command-click tool is now the Marquee tool, and the left-click tool is the Pointer tool. This is a very powerful tool combination when editing audio in the Arrange area. You can select a portion of an audio region with the Marquee tool, and move or copy that selection with the Pointer tool.
Zoom in on the Acoustic track for the whole last section (bars 15 to 21).
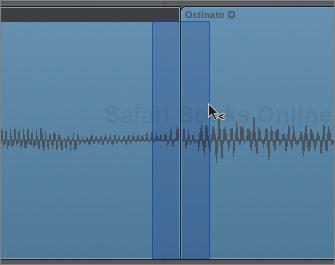
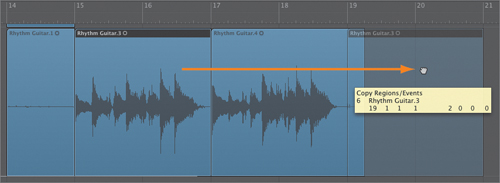
Command-drag in the Rhythm Guitar region from bar 15 to bar 17.
The Marquee tool selects that portion of the Rhythm Guitar region, which is now highlighted.
Press the Spacebar.
The playhead jumps to bar 15 and plays the marquee selection. It corresponds exactly to a two-bar pattern of the guitar, what you need to add at the end to complete the rhythm guitar part.
Option-drag the marquee selection to bar 19.
Option-dragging a marquee selection will automatically divide, copy, and paste the selection to a new location regardless of region boundaries. When the mouse button is released, the original region is automatically restored.
Here the two-bar guitar pattern is copied and pasted at bar 19. The end of the original region is trimmed at bar 19 so that it does not overlap with the region you just pasted.
Now that the rhythm guitar part is complete, you can fine-tune the junction between the two regions, and add a crossfade to avoid any clicks at that junction.
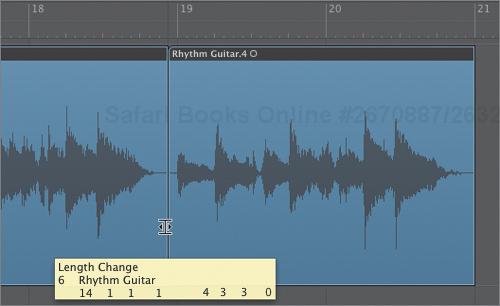
Zoom in on the junction between the two Rhythm Guitar regions.
It looks as though the edit point is in the middle of the note attack. It would be better if placed a little further to the left, in the silence.
Position the mouse cursor over the junction on the upper half of the waveform.
The mouse cursor switches to the Junction pointer.
Drag the Junction pointer to the left.
Tip
When using the Junction pointer, the help tag can sometimes get in the way, hiding part of the waveforms in the audio regions. To get the help tag out of the way, position the mouse cursor in the upper part of the junction to get the Junction pointer, hold down the mouse button and drag the Junction pointer down in the lower part of the regions, then drag horizontally to adjust the position of the edit.
Now the junction of the two regions occurs in the silence.
Press Esc and choose the Crossfade tool.
Drag the Crossfade tool over the junction.
Make sure the crossfade is placed on the silence, not over any of the guitar notes.

Now that you know how to apply fades, take a minute to create a fade-in at the beginning of the first Rhythm Guitar region, and a fade-out at the end of the last Rhythm Guitar region. If you decide to resize the beginning of the first region to eliminate the noise in the guitar recording during the first bar of count-in, make sure that you first deselect the second region or you will be resizing both regions at the same time.
When recording audio in Logic, storage space appears unlimited at first. When you are not totally happy with a recording, you usually keep it “just in case” and record another take. And another. . . You focus on recording the best performance, delaying the process of sorting out the good takes from the bad for the editing stage.
Once in the editing stage, you choose the best takes and comp them, or you edit the regions you need in the Arrange area. The leftover regions sit unused in the Audio Bin and can quickly pile up, crowding your hard disk space.
In the next exercise, you will delete unused audio files from your hard disk to reduce the size of the project folder.
In the Audio’s Bin local menu bar, choose Edit > Select Unused (or press Shift-U).
All the audio files and regions that are not in use in the Arrange area are selected.
If you need to make sure you won’t need the unused files again, you can select them one by one and listen to them by clicking the speaker button at the lower left of the Audio Bin. If you are sure you want to delete them all, press Shift-U again to select all the unused audio files and regions.
You have two choices: You can delete the unused audio files from the Audio Bin but keep them on your hard disk (if you think you might still need them later), or you can permanently delete them from the hard disk.
First, try deleting them from the Audio Bin, but keep them on your hard disk.
From the Audio Bin local menu bar, choose Edit > Delete (or press Delete).
The selected audio files and regions are deleted from the Audio Bin but not from your hard disk. This will not reduce the size of your project folder, but it will clean up your Audio Bin.
Since the operation is nondestructive, you can undo it and see the files again.
Press Command-Z.
All the audio files are once again displayed in the Audio Bin.
This time, you will delete the files from your hard disk. Be very careful whenever you permanently delete audio files: the operation is destructive, and you will not be able to recover those deleted files.
Choose Edit > Select Unused (or press Shift-U).
The unused audio files and regions are selected.
Choose Audio File > Delete File(s).
After a few seconds, an alert appears. Read it carefully! If you are sure you want to delete the audio files forever, click Delete.
Click Delete.
The files are permanently deleted from the Audio Bin and from the hard disk.


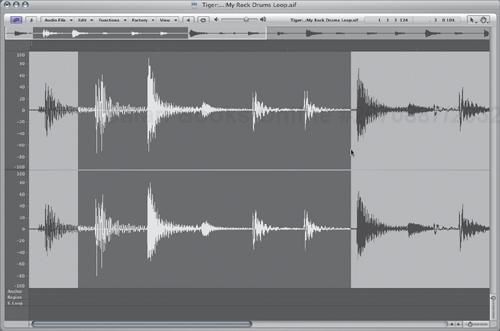
You will now perform destructive editing on an audio file. Starting with a rock drum recording, you will select a two-bar pattern from the recording and edit it so that it loops perfectly.
Note
In Lesson 7, “Manipulating Tempo and Time Stretching,” you will adjust the tempo of that loop to match the song.
Earlier in this lesson, you added audio files to the Audio Bin. You can also drag audio files from the Audio Bin directly to the Arrange area. But, instead of opening the Audio Bin, you can browse your hard disk within the Logic interface.
In the Media area, the Browser tab allows you to look for files without leaving your project.
First, create a new audio track, and then use the Browser to find the rock drum recording and import it into the project. Remember that the new track will be created below the selected track, so in the track list, select the last track header if you want the new track to appear below the last track in the Arrange area.
At the top of the track list in the Arrange area, click the New Tracks button (+) (or press Option-Command-N).
Create one stereo audio track and deselect Record Enable.
In the Media area, click the Browser tab.
The Browser opens.
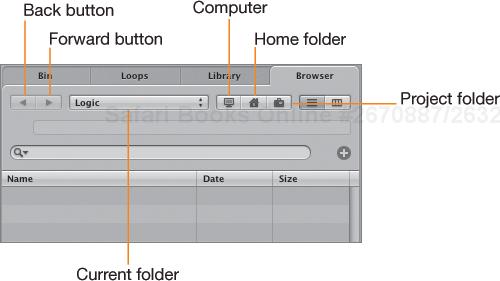
The Browser is like a mini Finder window inside Logic. At the top, you can see Back and Forward navigation buttons to step through your navigation history. The Path menu displays the current folder and allows you to move up in the Finder hierarchy. Three bookmark buttons provide quick access to the volumes on your computer, your home folder, or the project folder.
Click the Home button.
The contents of your Home folder are displayed in the search results.
You can choose the way the search results are displayed using the List View and Browser View buttons. The Browser view displays columns, allowing you to see the folder hierarchy.
Click the Browser View button.
The search results are now displayed in two columns.
Click the Desktop folder.
The contents of your Desktop folder are displayed in the right column.
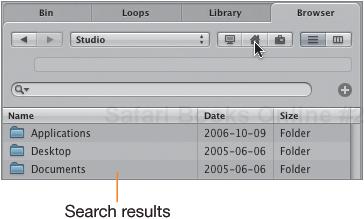
Navigate to Logic 8_Files > Media > Additional Media and select Rock Drums.aif.
The file’s information is displayed at the top of the Browser.
At the lower left of the Browser, click the speaker button.
The selected file starts playing. That’s the rock drum recording you are going to use to create a drum loop. You will add the rock drum recording to the playhead position on the selected track, so make sure the new Audio 5 track is selected and the playhead is at the beginning of the song, on 1 1 1 1.
Double-click Rock Drums.aif.
A new Rock Drums audio region is inserted in the Arrange area at the playhead position on the selected Audio 5 track.
In the Media area, click the Bin tab.
You can see the Rock Drums.aif audio file in the Audio Bin.


In this exercise, you will cut a two-bar portion of the drum recording that will later be used as a drum loop.
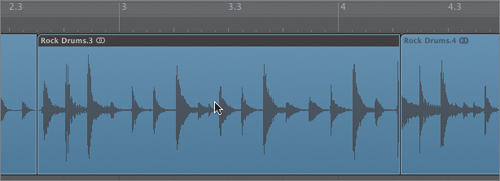
In the Arrange area, click the Rock Drums region with the Pointer tool to select it.
Press Control-Option-Z.
The region fills the Arrange area.
In the Audio 5 track header, click the Solo button.
Start playback.
Keep in mind that the audio region’s tempo does not match the tempo of the project. The bars in the Bar ruler don’t correspond to the bars of the audio region. You will have to use your waveform-reading skills to resolve this.
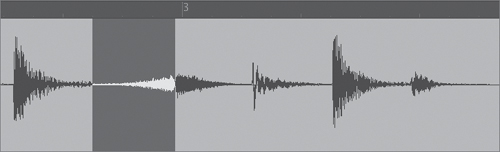
Listen to the drum pattern while paying close attention to the waveform. The groove is six bars long, composed of three two-bar patterns. Each two-bar pattern starts with two hits of the tom-toms. You want to cut the second two-bar pattern that starts on the third bar, where the drums really kick in. Listen to the tom-toms, and locate them on the waveform.
You will first select that section with the Marquee tool. You don’t need to be very precise, as you will fine-tune the loop later. It is better to include a little more rather than a little less of the desired section.
Make sure the Marquee tool is the Command-click tool.
Command-drag the Marquee tool from the first tom-tom hit of the second two-bar pattern to the first tom-tom hit of the third two-bar pattern.
While selecting, look at your help tag. The marquee selection should start on 2 3 3 1 and end on 4 2 1 121.
If you get the marquee selection wrong the first time, you can adjust it by Shift-dragging outside the selection with the Marquee tool. But remember that the Marquee tool is your Command-click tool, so in this case, you’ll have to Shift-Command-drag. You may need to zoom in further to adjust the marquee selection with more precision.
Shift-Command-drag the Marquee tool to adjust one of the boundaries of the marquee selection.
Make sure you first click outside the marquee selection, then drag left or right. If you click inside the marquee selection, the selection is lost.
Continue to adjust the selection until the help tag reads 2 3 3 1 on the left and 4 2 1 121 on the right.
Press the Spacebar.
The playhead plays the marquee selection once. You should hear the two-bar loop you’re going to work on, with just the attack of the crash cymbal.
Click the marquee selection.
The Rock Drums region is divided at the borders of the marquee selection. You will now open that region in the Sample Editor to adjust its length and clean it up.

The Sample Editor allows you to perform destructive audio editing. Although performing nondestructive editing on audio regions in the Arrange area keeps the parent audio file intact, processing an audio region in the Sample Editor actually modifies the audio file associated with that region.
Instead of performing destructive audio editing on the original audio file, you can save the selection (which still corresponds to your marquee selection from the previous exercise) as a new audio file, and work on that new audio file while leaving the original audio file intact.
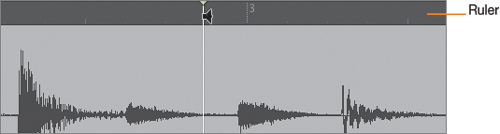
In the Arrange area, double-click the region you divided in the previous exercise.
The region opens in the Sample Editor and appears in the editing area. You may need to resize your screen or scroll down to see the editing area. Notice that the Sample Editor displays the whole audio file. The region you double-clicked is selected (white waveform over dark gray background), and displayed as a region marker in the region area below the waveforms. The region marker has the same color and name as the region in the Arrange area or the Audio Bin.
Let’s save a copy of the selection, which corresponds to the region you double-clicked.
From the Sample Editor’s local menu bar, choose Audio File > Save Selection As (or press Option-Command-S).
The Save Selection As dialog appears. The location is automatically set to the Audio Files folder inside the project folder.
Name the new audio file My Rock Drums Loop.
Leave the “File conversion settings” menu options unchanged, but make sure “Add resulting files to Bin” is selected.
Click Save (or press Enter).
A new audio file is created and added to the Audio Bin.
Since you are going to work in the Sample Editor, open the new audio file in a Sample Editor window.
In the Audio Bin, select My Rock Drums Loop.aif.
From the main menu bar, choose Window > Sample Editor.
A Sample Editor window opens, displaying My Rock Drums Loop.
At the upper left of the Sample Editor, click the zoom button (the rightmost button of the three window controls).
The Sample Editor fills the screen, and the waveforms are displayed nice and big. You are ready to do some serious destructive audio editing!


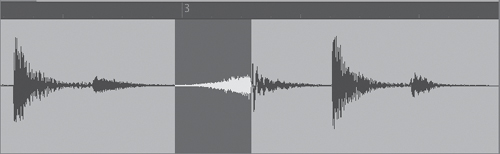
First, you need to adjust the start and end points of the audio file to create a file that will loop perfectly in time later in the Arrange area. The file should start exactly on a downbeat and end exactly on a downbeat.
Use the Sample Editor to trim the drum loop.
Click the speaker button (or press the Spacebar).
The audio file plays once.
Drag over the waveform to select a portion of the audio file.
The selection is displayed as a white waveform over a dark gray background.
Press the Spacebar.
The selected portion plays.
Click the Cycle button, and press the Spacebar.
The selected portion plays and loops repeatedly. You can choose to keep the selection looping as you adjust it.
Choose Edit > Select All (or press Command-A).
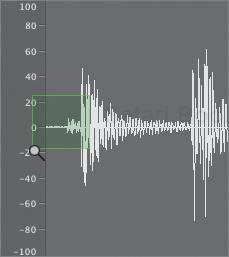
Now the whole two-bar pattern is looping, and you can fine-tune the boundaries of the selection, listening to make sure the timing is good. You need to adjust the selection to start just before the first transient, and end just before the first transient of the first note in the next pattern, the crash cymbal.
Zoom in on the beginning of the waveform to see the attack of the first downbeat.
You can adjust the start of the selection by Shift-clicking (or Shift-dragging) on the waveform. There is a little bit of noise before the first hit, and you want to start the selection after the noise, just before the first transient (attack).
Shift-drag the selection start to the right, stopping just before the first transient.
When you release the mouse button, the selection start automatically snaps to the nearest point where the waveform crosses the zero line. Since abrupt transitions in a waveform result in audible clicks, working with a selection that starts and ends on zero crossings avoids clicks.
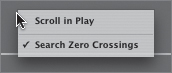
However, in this case you want to trim the loop precisely on the attack of the first drum hit, so let’s turn off this feature. In the next exercise, you will apply fades to the audio file’s beginning and end borders to make sure the loop doesn’t click.
Control-click (or right-click) the waveform.
A shortcut menu appears.
Choose Search Zero Crossings to deselect it.
Search Zero Crossings is turned off.
Shift-drag the selection start to the first transient.
This time the selection start does not snap to the nearest zero crossing, and you can adjust it precisely where you want it.
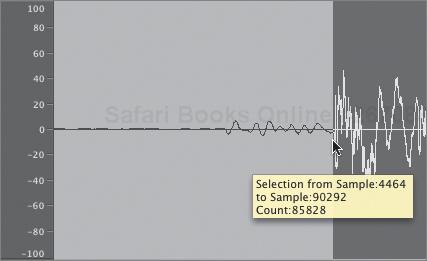
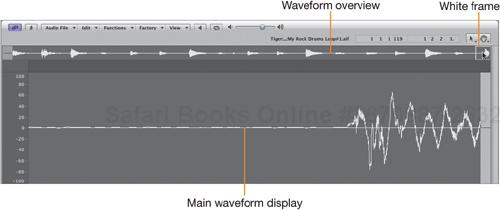
Now you need to adjust the end of the selection. You will use the waveform overview at the top of the Sample Editor to navigate your audio file.
At the top of the Sample Editor, click the end of the waveform overview.
The waveform overview shows the whole audio file, and the white frame represents the section visible in the main waveform display.
The white frame moves where you clicked, and in the main waveform display, you can see the end of the audio file. At the very end, you can see the beginning of the crash cymbal.
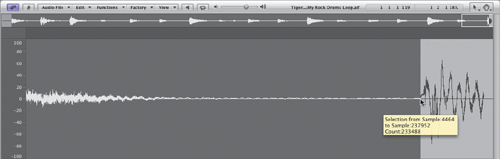
Shift-click just before the transient of the crash cymbal.
Look at the selection in the waveform overview. It starts on the transient of the first note, and ends on the transient of the attack of the cymbal.
Listen to your loop.
It now loops perfectly in time.
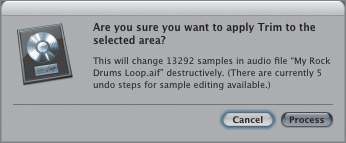
An alert message appears asking if you are sure that you want to trim the selection. When you are about to perform a destructive edit such as trimming, Logic requires a confirmation.
Click Process.
The audio file is trimmed so that only the selection remains.
Now that the audio file is trimmed, you can apply destructive fades at its beginning and end. The waveform will then start and end on zero crossings, and you won’t hear any clicks when looping the file.
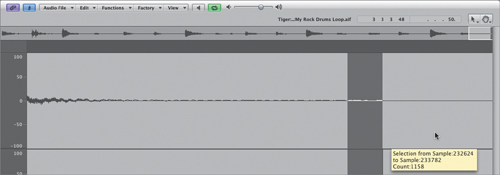
At the end of the waveform, drag a small selection toward the right, dragging all the way to the end of the audio file.
Choose Functions > Fade Out.
A confirmation dialog appears.
Click Process.
A destructive fade-out is applied to the selection. Since this selection is almost silence, you barely see any difference.
Click at the very beginning of the waveform overview.
The beginning of the audio file is displayed in the main waveform display.
Zoom in closely on the beginning of the waveform.
Don’t hesitate to zoom in twice if you have to.
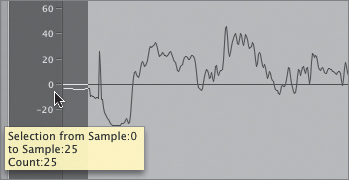
Drag a small selection around the beginning of the waveform.
This time, drag from right to left to make sure you select the beginning.
You don’t want to fade the attack of the first drum hit, so make sure your selection is really short (the help tag counts only about 25 samples). You can clearly see the waveform does not start on a zero crossing.
Choose Functions > Fade In, and click Process.
A destructive fade-in is applied to the selection.
The waveform now starts on a zero crossing.
The loop is trimmed, it starts and ends on a zero crossing, and it is ready to be used. But let’s have a little fun with this drum loop. In this exercise, you will reverse one of the hi-hat hits.
At the top of the Sample Editor, press and hold down the mouse button in the middle of the waveform overview.
The mouse cursor turns into a speaker icon and you can preview the audio file from the point where you clicked the waveform.
Using the waveform display to navigate, along with your favorite zoom techniques (the Zoom tool, zoom control and sliders, or key commands) make sure you can see at least the last six drum notes in the main waveform display.
In the ruler, drag the mouse cursor left or right.
The mouse cursor turns into a speaker icon, and you can use it to drag the playhead left and right, scrubbing the audio file.
From the last six notes, select the first hi-hat after the first snare.
Start the selection just before the attack, and end the selection just before the attack of the next note.
Choose Functions > Reverse, and click Process.
The selection is reversed.
Choose Edit > Select All (or press Command-A).
Press the Spacebar.
The whole loop plays and you can hear the reversed hi-hat.
The effect is interesting, but it would sound even better if you reversed the next hi-hat note instead of that one.
Choose Edit > Undo Change Selection (or press Command-Z).
The same hi-hat note is selected again.
Choose Edit > Undo Reverse (or press Command-Z).
The hi-hat is returned to normal.
Although editing in the Sample Editor is destructive, note that you can undo the five most recent destructive edits.
Drag over the next hi-hat note to select it.
From the Sample Editor’s local menu bar, choose Functions > Reverse, and click Process.
Save the reverse hi-hat so you can use it in the next exercise.
Choose Audio File > Save Selection As (or press Option-Command-S), name the file Reversed Hi-hat, and save it.
The file is saved in the default location—the Audio Files folder in your project folder—and it is added to the Audio Bin.
Press Command-A and listen to the whole loop.
Now the reverse hi-hat sounds great. It gives a little bounce to the groove.
Close the Sample Editor window.


Audio regions have an anchor, which is used to position the region in the Arrange area. When you drag a region in the Arrange area, the anchor position is the position displayed in the help tag, and the anchor is used to snap the region to the grid.
By default, the anchor is located at the start point of an audio region. While this makes sense for most audio regions, sometimes the attack of a sound is not at the beginning of a region. If you want to line up the attack with the grid, you need to position the anchor right on the attack. That is the case with reversed sound, where the attack is near the end of the region.
In the following exercise, you will move the anchor to the amplitude peak of the reversed hi-hat that you saved in the previous exercise. Then, you will line up the amplitude peak of the reversed hi-hat with the first downbeat of the ending section of the song.
In the Arrange area, zoom out so you can see the whole song.
Zoom in on the beginning of the last section, at bar 15.
Make sure that you can see the bottom track, Audio 5.
From the Audio Bin, drag Reversed Hi-hat.aif to bar 15 of the Audio 5 track.
Position the playhead before the Reversed Hi-hat region and start playback.
By default, the audio region’s anchor is at its start point, so the reversed hi-hat swell starts on bar 15. For the reversed effect to work, the region needs to start earlier and reach its maximum amplitude peak exactly on bar 15.
To do that, you will need to move the anchor in the Reversed Hi-hat region. At the lower left of the Sample Editor, you can see the anchor, represented by an orange indicator below the waveform.
Drag the anchor to the maximum amplitude on the waveform, almost at the end of the Reversed Hi-hat region.
Notice that the Reversed Hi-hat region moves in the Arrange area and the anchor stays on bar 15.
In the Arrange area, zoom in on the Reversed Hi-hat region.
The position of the anchor is represented by a white vertical line, and you can see it lined up with bar 15. You can try adjusting the position of the anchor in the Sample Editor and see the region’s position change in the Arrange area.
In the Audio 5 track header, click the Solo button to turn it off.
Zoom out and start playback around bar 14.
Listen to the effect of the reversed hi-hat: it sounds great! Now the reversed hi-hat really sucks you into that final section of the song.


You now know how to read a waveform, as well as identify notes and their attacks to perform precise and clean edits. You acquired skills with a number of editing tools—such as the Marquee tool, Crossfade tool, Junction pointer, and take folders—that you will continue using as you edit recordings and arrange projects. You can now increase your workflow by choosing the appropriate left-click and Command-click tools for the job. As you produce more music in Logic, you will continue sharpening those skills, making you a proficient audio engineer.
Answers