Although Logic comes with a wide array of software instruments and supports third-party Audio Unit software instruments, sometimes you may want to use Logic to trigger a hardware synthesizer or sampler, or even a software instrument in another software application.
In the following exercises, you will set up hardware instruments so you can access them from Logic, and use external MIDI tracks to route the MIDI events to an MIDI instrument outside Logic. You can then record on external MIDI tracks with the same techniques you used to record on software instrument tracks. An external MIDI track can be routed to a hardware MIDI device, a ReWire application (such as Ableton Live or Propellerhead Software’s Reason), or to any other MIDI-compatible application on your computer or network.
Logic can access any device configured in Audio MIDI Setup, a Mac OS X configuration tool. Audio MIDI Setup automatically detects USB or FireWire MIDI devices connected directly to the computer, provided the necessary drivers have been properly installed. The MIDI synthesizers connected to that MIDI interface would not be detected, however. Setting up those synths in Audio MIDI Setup will allow you to access them by name in Logic, so you don’t have to remember which device is connected to which port on the MIDI interface.
For the purpose of this exercise, you will set up two external synthesizers in Audio MIDI Setup, a Korg Triton and a Yamaha Motif.
Open a Finder window.
The Finder is the active application, and its name is displayed to the right of the Apple in the main menu bar.
Choose Go > Utilities (or press Command-Shift-U).
The Utilities folder opens.
Double-click Audio MIDI Setup.
The Audio MIDI Setup utility opens.
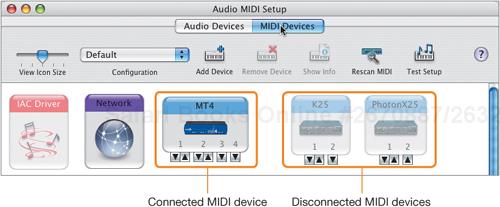
At the top of the Audio MIDI Setup window, click the MIDI Devices button.
You should see an IAC Driver button, a Network button, and buttons for MIDI devices connected directly to your computer.
Note
If a device is connected to your computer but does not appear in Audio MIDI Setup, make sure you properly install the most recent driver for that device.
Note
You can double-click the Network button to create network MIDI ports. Network MIDI ports are virtual MIDI cables that allow you to connect applications over a wired or wireless network. Existing network MIDI ports are displayed in Logic’s Library when an external MIDI track is selected.
You can double-click the IAC Driver button to create Inter-Application Communication buses. IAC buses are virtual MIDI cables that allow you to connect applications on your computer. Existing IAC buses are displayed in Logic’s Library when an external MIDI track is selected.
Click the Add Device button.
A new external device is created.
Click the Add Device button again.
A second new external device is created.
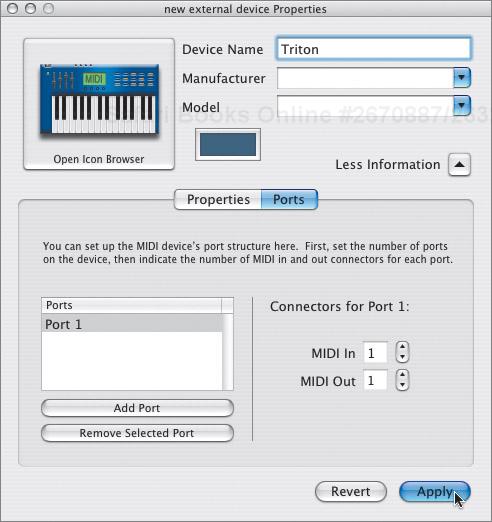
Double-click the first new device.
A Properties floating window appears.
Click Apply.
The device is renamed.
In the Audio MIDI Setup window, click the second device.
The Properties window displays the properties of the selected device.
In the Device Name field, enter Motif.
Click Apply and close the Properties window.
Now you need to identify the physical connections between the MIDI interface and the synthesizers in Audio MIDI Setup. Since Logic routes all incoming MIDI events to the record-enabled track, you only need to route outgoing MIDI events. For this exercise, let’s assume you have an MT4 MIDI interface with the following physical MIDI connections:
MT4 MIDI Out port 1 connects to the Triton MIDI In port.
MT4 MIDI Out port 2 connects to the Motif MIDI In port.
You will now enter these connections in Audio MIDI Setup.
Click the MIDI Out 1 port of the MT4 interface and drag the cable to the MIDI In port of the Triton.
Click the MIDI Out 2 port of the MT4 interface and connect it to the MIDI In port of the Motif.
Choose Audio MIDI Setup > Quit Audio MIDI Setup (or press Command-Q).


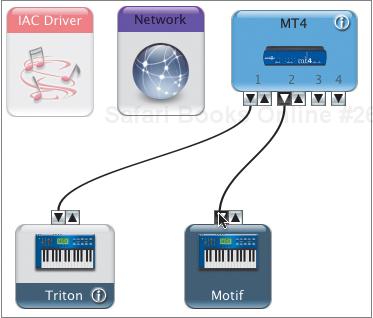
Now Audio MIDI Setup knows which MIDI Out port is connected to which device, and Logic’s Library will display Triton and Motif instead of MT4 Port 1 and MT4 Port 2.
More Info
If you want to record or monitor the audio outputs from the hardware synthesizers in Logic, you also need to connect the synthesizers’ audio outputs to audio inputs on your audio inteIrface. In Logic, record-enable an audio track to record or monitor those audio inputs (make sure you have chosen the desired setting in the input slot of the I/O section on the audio track’s channel strip).
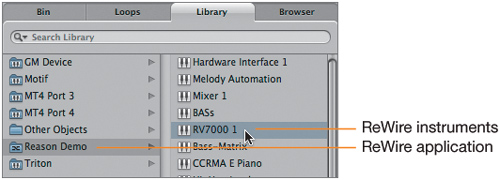
When using external MIDI tracks, you use the Library to route the MIDI events on the track. All the devices set up in Audio MIDI Setup are displayed in the Library (including IAC buses and network MIDI ports). All the ReWire applications installed on your computer are also displayed in the Library.
In the next exercise, you will use the Library to choose a destination for an external MIDI track.
Open a new Empty Project template, and in the New Tracks dialog, leave 1 in the Number field, select External MIDI as the Type, select the Open Library checkbox and click Create.
A new external MIDI track is created.
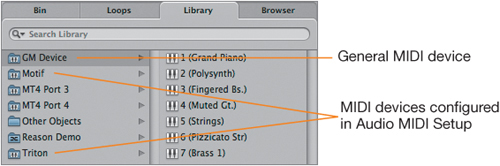
The Library opens and displays available MIDI destinations for the external MIDI track (the available destinations depend on your studio setup).
The GM (General MIDI) device is a multi-timbral instrument that always sends to all existing MIDI Out ports. A multi-timbral instrument is one that can respond to more than one MIDI channel at a time to play several sounds (more commonly called patches or program) simultaneously. A single MIDI port can transmit 16 MIDI channels simultaneously, and each MIDI channel can play one program. The 16 MIDI channels of the GM device are displayed in the right column.
The Motif and Triton MIDI synthesizers you configured in Audio MIDI Setup are displayed in the list of available MIDI destinations.
All ReWire applications on your computer are displayed in the Library. You can double-click a ReWire application in the left column to open it, and all available ReWire instruments will be displayed in the right column.
You will now assign the selected track to MIDI channel 1 of the Motif synthesizer.
In the Library, click Motif.
In the right column, click Channel 1.

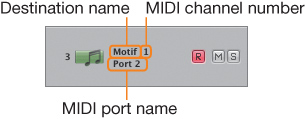
The track is assigned to MIDI channel 1 of the Motif. Any MIDI events on that track will be routed to that destination. While the track is record-enabled, any incoming MIDI events will be routed to the track, and from the track to MIDI channel 1 of the Motif.
The track header displays the name of the instrument, the MIDI channel number, and the interface’s MIDI port name. You may need to zoom vertically to see all that information.
In the Inspector, the Arrange channel strip appears unlike the audio and software instrument channel strips. Since the external MIDI channel strip generates MIDI events, it does not have processing plug-in inserts or audio routing settings.

The volume fader and the knobs on the external MIDI channel strip send MIDI continuous controller events to the external MIDI instrument, allowing you to remotely control the external instrument’s volume, pan position, reverberation, and chorus of the program on that MIDI channel.
Logic allows you to remotely choose a program or patch on your external MIDI device. This avoids interrupting your workflow to choose the program on the MIDI device itself and also allows you to save the programs used on each track in your project.
On the track header, double-click the track name.
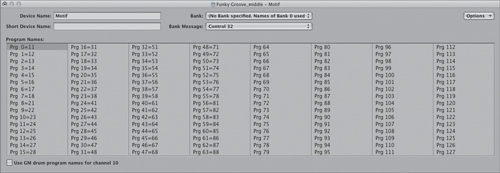
The Motif’s Multi Instrument window appears.
Click a program name.
The corresponding program-change MIDI event is sent to the external MIDI instrument. (You can see the program-change event on the Transport bar’s MIDI Out display.) When you play your MIDI keyboard, you can hear the new sound.
Most instruments have more than 128 programs. To access additional programs, you need to switch to another bank of programs.
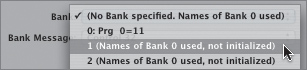
Click the Bank menu, and choose 1.
An alert message appears asking if you want to initialize the bank.
Click Initialize.
Choosing a bank in the Bank menu sends a bank select MIDI event to the external MIDI instrument, instructing it to switch to the new bank. If your instrument does not react to the bank select event, try choosing another type of bank select event for that instrument in the Bank Message menu (right below the Bank menu).
You can name all the programs for your instruments and save the project as a template so that you can choose programs by name, rather than by number.
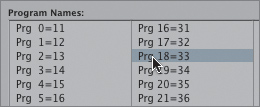
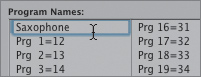
Double-click the first program number.
A text field appears.
Type a name for the first program, and press Enter.
The text field focus moves to the second program, ready to be renamed.
Tip
You could repeat this process until you’ve named all the programs in all the banks, but that could take a while! To save time, search a website devoted to Logic users for a Logic template where the desired hardware instruments have already been configured.
If you can’t find a Logic template, look online for an electronic voice list, usually in PDF format (sometimes part of the electronic manual). Start your search by searching the instrument manufacturer’s website. Copy and paste the list of program names for your MIDI device into a text editor (such as Apple TextEdit) and edit it so that you have a list of 128 names, one name per line. Select all 128 names and choose Edit > Copy. In Logic, at the upper right of the Multi Instrument window, click Options and choose Paste All Names. Repeat the process for each program bank.
When you are done entering program names for all the instruments, save that project as a template. Program names are saved in the project file, not as a general preference; so, unless you save the project, all your program names will be lost.
Choose File > Save As Template.
A Save As dialog appears and the location is already set to the Project Templates folder. All you need to do is name your template.
Name and save your template.
Your new template is available in the Templates dialog that appears when choosing File > New, in the My Templates collection folder.