
In this part, we are going to program the Arduino board to remotely control the relay and LED that are connected to the board by sending an SMS to the FONA shield. As most of the code is similar to the code that we saw in the previous section, I'll only detail the new elements of code here.
We need to define the pins on which the relay and the LED are connected:
#define RELAY_PIN 7
#define LED_PIN 8
Then, we'll define a set of variables for a counter for the relay/lock. This is needed because after we open a lock, for example, we will want it to close automatically after a given amount of time for the purpose of safety. Here, we use a delay of 5 seconds:
bool lock_state = false;
int init_counter = 0;
int lock_counter = 0;
int lock_delay = 5000;
Then, we will define variables to count the number of SMS stored in the card:
int8_t smsnum = 0;
int8_t smsnum_old = 0;
We will also set two "passwords" to activate or deactivate the relay. I used very simple passphrases here; however, you can use the one that you want:
String password_on = "open";
String password_off = "close";
Then, in the setup() function of the sketch, we will set the relay and LED pins as output:
pinMode(RELAY_PIN, OUTPUT);
pinMode(LED_PIN, OUTPUT);
In the loop() function of the sketch, we will get the total number of SMS stored in the SIM card:
smsnum = fona.getNumSMS();
Basically, what we want is to check whether a new SMS has been received by the shield. To do that, we will compare this new reading to the old number of SMS stored in the SIM card:
if (smsnum > smsnum_old) {If that's the case, we store the message in a String object so that we can conduct some operations on it:
String message = String(replybuffer);
Then, if the received message matches with the "On" password that we set earlier, we will activate the relay and LED, and also start the counter:
if (message.indexOf(password_on) > -1) {
  Serial.println("Lock OPEN");
  digitalWrite(RELAY_PIN, HIGH);
  digitalWrite(LED_PIN, HIGH);
  lock_state = true;
  init_counter = millis();
}
We would do something similar if we received an "Off" message:
if (message.indexOf(password_off) > -1) {
    Serial.println("Lock CLOSE");
    digitalWrite(RELAY_PIN, LOW);
    digitalWrite(LED_PIN, LOW);
    lock_state = false;
  }
After that, we will update the counter:
lock_counter = millis();
Then, we check whether the delay has already passed since the last time the relay/lock was activated. If that's the case, we will deactivate the relay/close the lock automatically:
if (lock_state == true andand (lock_counter - init_counter) > lock_delay) {
  Serial.println("Lock CLOSE");
  digitalWrite(RELAY_PIN, LOW);
  digitalWrite(LED_PIN, LOW);
  lock_state = false;
}
Finally, we will store the current number of received text messages in the smsnum_old variable:
smsnum_old = smsnum;
Note that the complete code can be found in the GitHub repository of the project at https://github.com/marcoschwartz/arduino-secret-agents.
It's time to test the project. Grab all the code and paste it in the Arduino IDE. Make sure that you change the on/off passwords in the code as well.
Then, upload the code to the board and open the serial monitor. You should see the shield being initialized and then waiting for a new text message. Now, send a text message to the shield with the message corresponding to the "On" password that you defined earlier. The following screenshot is what you should see:
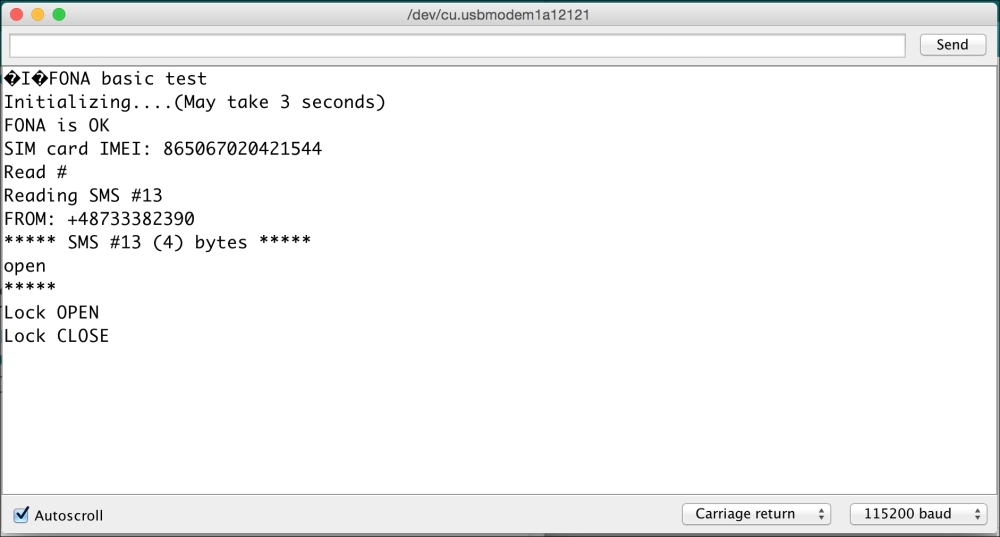
You should also see the LED turn on and the relay being activated. You can either wait until the system deactivates itself or you can simply send the "Off" passphrase again.