Throughout the book, we have learned what macros are and how we can use them to make our content more engaging and alive. Most macros we have used so far are either bundled with Confluence, or part of an add-on we have installed. But there is another possibility to add macros: via user macros.
User macros are short pieces of code that make it easier to perform often-used functions or add custom formatting to your page. This could, for example, be a preconfigured panel macro with different styling than the defaults. We will create this example ourselves later in this chapter.
System Administrators can add user macros via the Confluence Administration Console.
To manage user macros, you need to have System Administrator permissions. Be careful when installing user macros from an unknown source; macros could potentially affect the stability and security of your Confluence installation.
Perform the following steps for adding a user macro:
- Browse to the Administration Console (Administration | Confluence Admin).
- Select User Macros from the left-hand side menu.
- Click on Create a User Macro at the bottom of the list of macros.
- Enter the macro details as explained in the Writing user macros section.
- Click on Save.
Perform the following steps for editing a user macro:
Perform the following steps for removing a user macro:
- Browse to the Administration Console (Administration | Confluence Admin).
- Select User Macros from the left-hand side menu.
- Click on Remove next to the relevant macro.
If you remove a user macro that is being used on a Confluence page, you will need to remove the macro from the page manually.
Tip
You can use the Confluence search to find pages that are using a user macro. More information on searching for macros can be found in the Searching labels section in Chapter 4, Managing Content.
Writing a user macro is done via a form in the Administration Console. We'll go over the input fields to help you create your first user macro:
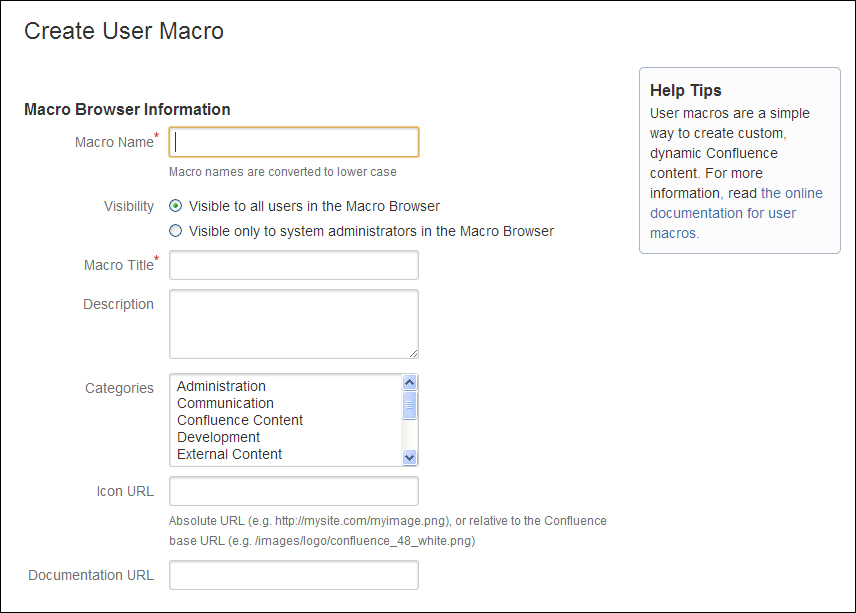
Input form for creating a new user macro
- Macro Name: This is the name of the macro and can only contain letters, numbers, and hyphens (-); for example: teaser-panel.
- Visibility: Here you can set the visibility in the macro browser; this can be all users or only system administrators. Hiding the macro for all users will still allow them to use the macro, but it avoids cluttering the Macro Browser and autocomplete.
Choosing Visible only to system administrators in the Macro Browser means that:
- Only system administrators will see this macro in the Macro Browser or autocomplete. For other users, the macro will not show up, even while searching the macro.
- The macro output will be visible to all users who have permissions to see the page.
- Any user with edit permissions will see the macro on the page if it is already on it. Your users are also allowed to edit or remove the macro.
- Macro Title: The macro title is the name that will appear in the Macro Browser and autocomplete. Choose a descriptive title to make it easier for your users to find the macro.
- Description: The description text shows next to the macro in the Macro Browser. The search in the Macro Browser will also use the description text to search in.
- Categories: Select one or more categories to place your user macro in. These categories relate to the categories a user sees in the Macro Browser. To select multiple categories, hold down the Ctrl key while selecting.
- Icon URL: The Macro Browser can display an icon for your macro if you provide a URL. This can either be an absolute URL, or a path relative to the Confluence's base URL; for example:
http://example.com/images/no-print-icon.pngor/images/icons/macrobrowser/no-print-icon.png. - Documentation URL: If you have online documentation, enter the URL of this documentation here. The link will appear in the macro properties dialog. In some cases, a Confluence page documenting your user macro is very useful for your users.
- Macro Body Processing: You can specify that your macro can have a body, allowing your users to enter content in your macro. An example of a macro with a body is the panel macro.
If your macro has a body, this body will be available in your macro template with the
$bodyvariable. The content of your body depends on how the processing is done.Processing option
Description
No macro body
Select this option if your macro doesn't need a body.
Escaped
If your macro has a body and you make use of the body in your template, Confluence will escape any HTML in the body.
So, if the body is:
<b>Example HTML</b>Then the value of $body is:
<b>ExampleHTML</b>This will be rendered as:
<b>Example HTML</b>Unrendered
Use this option if you want the
$bodyvariable to be exactly like the user entered it. You should process the body within the template to make sure HTML is outputted by the template.Rendered
The body will be rendered, so most HTML will be passed to the template unmodified; but Confluencespecific markup, such as macro definitions, will be processed and rendered.
So, if the body is:
<b>Example HTML</b>Then the value of
$body: is<b>Example HTML</b>This will be rendered as: Example HTML
- Template: This is where the magic happens: the macro template. Here you should write the code that specifies what your macro will do. We will go into detail on how to write a user macro template soon, but here is a quick guide up front:
- Use HTML and Confluence-specific XML elements in your macro template. Use the Storage Format tool to find the specific XML.
- It is possible to use Apache Velocity in the template.
- If your macro has a body, the content is available in the
$bodyvariable. - Each parameter for your macro should have matching metadata definitions. Use
@paramto define that metadata. - Use
@noparamsif your macro does not access any parameters.
Note
Apache Velocity is a template engine that provides a template language to reference objects defined in the backend of Confluence. Velocity is the main template engine in Confluence and is used for displaying almost every page. Velocity can be used in your macro to add some logic (if-else) or to get information from the backend, that is, the current page title and other page properties.
A user macro template is a piece of code that specifies what your macro does. It is written in a combination of HTML, XML, and Velocity. We will build a user macro together to give you some insight into what the possibilities are.
I assume you have filled in the other text fields of the macro based on the previous paragraph. Make sure that the Macro Body Processing option is set to Rendered.
It is a good practice to have a descriptive header at the top of every template. The header tells what the macro does and what kind of parameters it expects.
Our header would look something like this:
## Macro title: Teaser Panel
## Macro has a body: Y
## Body processing: Rendered
##
## Developed by: Stefan Kohler
## Date created: 04/02/2013

## The Teaser panel is a predefined panel used as teaser
It is possible to use parameters in your user macro, so that users can pass extra information for you to render. If you define your parameters, Confluence will display the corresponding fields in the Macro properties dialog and browser.
A parameter definition in the template consists of three parts:
@param– to let Confluence know we are defining a parameter- Name – to access the parameter's value in your template
- Extra attributes – to further describe your parameter
Parameters are generally defined at the top of the template, just below the header. The order in which you specify the parameters is also the order in which they are displayed in the parameter section (the right-hand side) in the Macro Browser.
## @paramTitle:title=Title|type=string|desc=What is the title for the Teaser
As you may have noticed, there are quite a few extra attributes you can use to describe your parameter. The more you specify, the better Confluence can help your users with the Macro Browser and properties editor. Let's go over the available attributes:
|
Attribute name |
Description |
Required? |
|---|---|---|
|
[unnamed first attribute] |
The parameter name is the first attribute, and doesn't require a name.
## @param example
Will define the parameter |
Required |
|
|
The parameter title that will appear in the Macro Browser. If no title is specified, the parameter name is used. |
Recommended |
|
|
The field type of the parameters. Learn about types in the next pages. |
Recommended |
|
|
The description of the parameter shown in the Macro Browser. |
Optional |
|
required |
Specify if the parameter is required; default is false. |
Optional |
|
multiple |
Specify if the parameters allows multiple values; default is false. |
Optional |
|
default |
The default value of the parameter. |
Optional |
If you don't specify the type of the parameter, it will default to a string. But there are many more types available from which you can choose. Confluence will render the input field of your parameter based on the type you specify.
|
Type |
Description |
|---|---|
|
|
Displays a checkbox to the user and passes the value true or false to the macro as a string.
## @param hide:title=Should hide?|type=boolean
|
|
|
Offers a list of values for selection. You can specify the values to appear in the dropdown yourself. The variable will be passed on the to macro as it is, including capitalization.
## @param color:title=Color|type=enum|enumValues=Grey,Red,Green
|
|
|
Shows a text field; this is the default if no other type is specified.
## @param title:title=Title|type=string
|
|
|
Shows a quick search where the user can search for a page or blog post in Confluence.
## @param page:title=Page|type=confluence-content|required=true
|
|
|
Shows a quick search for users.
## @param user:title=Username|type=username
|
|
|
Shows a list of spaces for selection; the space key is passed on to the macro.
## @param space:title=Space|type=spacekey
|
|
|
Currently threated as a normal string. Users can type a date in any format; be sure to check the date in your template.
## @paramfromDate:title=From Date|type=date
|
|
|
Type is accepted, but currently treated as a normal string.
## @param numItems:title=Number of items|type=int
|
|
|
Type is accepted, but currently treated as a normal string.
## @param pcent:title=Percentage|type=percentage
|
The parameters are available in your template as, for example, $paramtitle and $paramcolor for parameters called title and color respectively.
Normally, if a parameter like $paramtitle is missing, it will appear as $paramtitle in the output. To output nothing when a parameter is not set, use an exclamation mark after the dollar sign: $!paramtitle.
When your macro doesn't have any parameters, you should use @noparams in your template. This will let Confluence know that it doesn't need to display a parameter input field. If your macro doesn't contain parameters and does not specify @noparams, the macro browser will display a free-format textbox allowing users to enter undefined parameters. You should use @noparams in your template as follows:
## @noparams
Now that we have a good descriptive header and parameter declarations for our macro, it is time to write to the macro template code.
When writing your macro, the following objects are available to you to use:
|
Variable |
Description |
|---|---|
|
|
The body of the macro, if your macro has one. |
|
|
Named parameters as described in your macro template. |
|
|
The |
|
|
The space object where this page or blog post is located. This object can be used to retrieve information as the space name, description, and URL. More information is available at http://docs.atlassian.com/atlassian-confluence/latest/com/atlassian/confluence/spaces/Space.html. |
|
|
The current |
Using these objects it is possible to get access to certain extra information that is otherwise not available on a Confluence page; this makes user macros really powerful.
For our user macro we want to include a predefined version of the panel macro, bundled with Confluence. This means we need to find out what the Confluence-specific XML is that defines the panel.
The easiest way to do this is consulting the Storage Format tool. To get the storage format for the panel macro:
- Create and save a new page containing the panel macro, including all the parameters we want to have predefined.
- Select Tools | View Storage format. This option is only available for Confluence Administrators, and shows the XML source for the page, exactly what we need.
- A Confluence macro starts with
<ac:macroac:name…. - A macro parameter starts with
<ac parameter ac:name….
- A Confluence macro starts with
For our panel, the XML we want to use in our template looks like this:
<ac:macro ac:name="panel">
<ac:parameter ac:name="titleBGColor">#00a8e1</ac:parameter>
<ac:parameter ac:name="title">$!paramTitle</ac:parameter>
<ac:parameter ac:name="borderStyle">dashed</ac:parameter>
<ac:parameter ac:name="borderColor">#00a8e1</ac:parameter>
<ac:parameter ac:name="titleColor">#ffffff</ac:parameter>
<ac:rich-text-body>$body</ac:rich-text-body>
</ac:macro>
As you might have noticed, I have already included the title parameter and @body in the XML. I did this by using the value in the panel attribute I created on the page, so that I know I put the variables on the right spot.
If we put all the pieces of code together, we have our own teaser macro.
## Macro title: Teaser Panel
## Macro has a body: Y
## Body processing: Rendered
##
## Developed by: Stefan Kohler
## Date created: 04/02/2013

## The Teaser panel is a predefined panel used as teaser

## @param Title:title=Title|type=string|desc=What is the title for the Teaser

<ac:macro ac:name="panel">
<ac:parameter ac:name="titleBGColor">#00a8e1</ac:parameter>
<ac:parameter ac:name="title">$!paramTitle</ac:parameter>
<ac:parameter ac:name="borderStyle">dashed</ac:parameter>
<ac:parameter ac:name="borderColor">#00a8e1</ac:parameter>
<ac:parameter ac:name="titleColor">#ffffff</ac:parameter>
<ac:rich-text-body>$body</ac:rich-text-body>
</ac:macro>
If you want to read more about writing user macros, take a look at some online examples at https://confluence.atlassian.com/x/V4lYDQ.
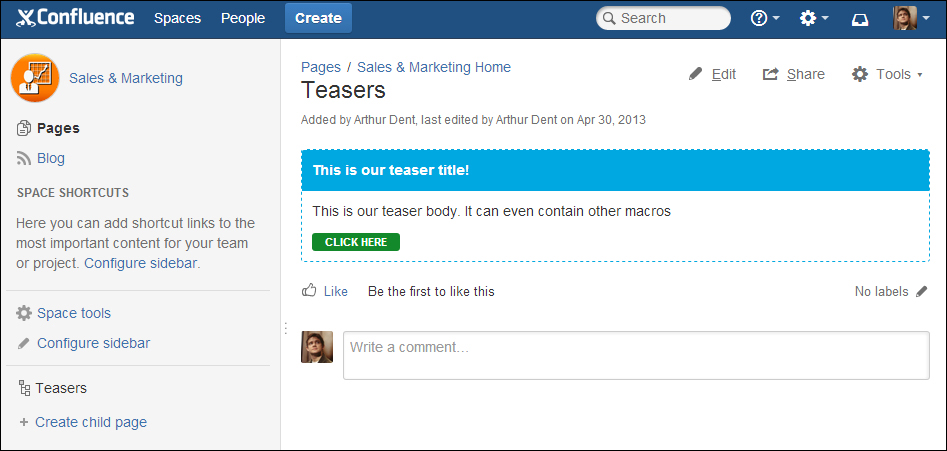
The end result of our user macro looks like this: