
When you have installed the Atlassian SDK, you can start building your first plugin. We will be building a new Confluence macro, which can be used to format content.
We will take a look at:
We will be building a macro that displays links as buttons.
First, we have to create our plugin skeleton using the Atlassian SDK and load our new project into Eclipse.
- Open a command prompt and navigate to the location for you new plugin.
- Enter the following command to create a new Confluence plugin:
atlas-create-confluence-plugin - When prompted, enter the following information to identify your plugin:
groupIdcom.example.confluenceartifactIdbutton-macroversion1.0-snapshotpackagecom.example.confluence.button - Confirm your entries when prompted.
- Start Eclipse.
- Select File | Import... from the Eclipse menu.
- Type
Mavenin the filter text field and select Existing Maven Projects: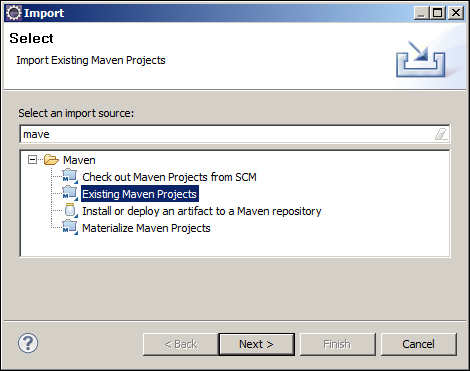
- Click on Browse and browse to the location where you created the plugin.
- Select the
pom.xmlfile and click on Finish. Eclipse will now import your project and download all dependencies if needed. This can take a while. - Sometimes an error will occur during this process, if so:
- Right-click on the imported project (in the project explorer).
- Select Maven | Update Project Configuration.
When you have just generated a new plugin skeleton, you have to make sure all the details, like the plugin name or description, are correct. In this section, we'll check the Confluence version value and tweak some settings. Open your plugin project in Eclipse and follow along.
The metadata in your POM file will be used when your plugin is built. This would be the place to add your company details and description of the plugin.
- Edit the
pom.xmlfile in the root of your plugin. - Add your company or organization details to the
<organization>element:<organization> <name>Stefan Kohler</name> <url>http://www.stefankohler.nl/</url> </organization>
- Update the
<name>and<description>elements:<name>Confluence Button Macro</name> <description>Display a link using a nicely formatted button.</description>
- Save the file.
When you generated a new plugin skeleton, a default Confluence version was included in your pom.xml file. Before you start building your plugin, make sure this version is up-to-date.
- Open the
pom.xmlfile in Eclipse. - Scroll to the bottom of the file.
- Find the
<properties>element. This section lists the version of Confluence and other properties of your plugin. - Change the Confluence version to
5.1.2, or a more recent one if available. - Save the
pom.xmlfile. Eclipse will automatically download the new dependencies for you.
We are building a new macro, and most of the generated code is for a different component. Therefore, we have no use for the generated code. Before we start, let's clean up first.
- Open
src/main/resources/atlassian-plugin.xmlin Eclipse. - Remove the
<web-resource>,<component-import>, and<component>sections. - Also remove the corresponding files:
MyPluginComponent.javaMyPluginComponentImpl.javaMyComponentWiredTest.javaMyComponentUnitTest.java
With our plugin skeleton ready for development, we will be adding some new modules to our plugin descriptor.
- Open your
atlassian-plugin.xmlfile in Eclipse. - Add the
xhtml-macrocomponent to the file:<xhtml-macroname="link-button" class="com.example.confluence.button.LinkButton" key="link-button"> <parameters/> </xhtml-macro>
- The
Classargument is pointing to an implementation of our macro.
The macro module we just defined will call the execute method of our Java class com.example.confluence.button.LinkButton. That class doesn't exist yet, so let's create it.
- Right-click on the
com.example.confluence.buttonpackage (folder) in your project. - Select New | Class and enter the following details:
- Package –
com.example.confluence.button - Name –
LinkButton - Interfaces – Add
com.atlassian.confluence.macro.Macro
- Package –
- Click on Finish.
Your new Java class will be generated, and you might notice we have to implement three methods.
These two methods specify whether the macro has a body (and the type of body if it does have one) and the output type, be it block or inline. The macro we implement will have a body and will have the block output type.
@Override
publicBodyTypegetBodyType() {
  returnBodyType.RICH_TEXT;
}

@Override
publicOutputTypegetOutputType() {
  returnOutputType.BLOCK;
}
The execute method will determine what the output of our macro will be. I have included an easy template with some HTML to style our button. We will be using the body of our macro and use that as input for our button.
  @Override
  public String execute(Map<String, String> parameters,
      String body, ConversionContext context) throws MacroExecutionException {

    String template = "<div class="aui-button aui-button-primary link-button">%s</div>";

    returnString.format(template, body);
  }
The template we are using makes use of the Atlassian User Interface (AUI), a library with JavaScript, stylesheets, and templates that is included in all Atlassian products. If you use the AUI in your plugin, it will have the same look and feel as Confluence.
More information about the AUI can be found online at https://developer.atlassian.com/display/AUI/.
When we have the basics set for our plugin, it is time to build and run the plugin in Confluence.
- Save all the changes to your code.
- Open a command prompt and navigate to the location of your plugin.
- Run the following command:
atlas-runThis command will build your plugin, start a Confluence installation, and install your plugin in that Confluence installation. This may take a while. When the process is completed, the last lines of the output should look as follows:
[INFO] confluence started successfully in 225s at http://localhost:1990/confluence
[INFO] Type Ctrl-D to shutdown gracefully
[INFO] Type Ctrl-C to exit
If Confluence couldn't use port 1990 because another application is using it, Confluence will start on a different port and will mention it in these lines.
- Open your browser at
http://localhost:1990/confluence. - At the Confluence login, enter a username
adminwith the passwordadmin. - Create a new page with your new macro.
- Click on Create in the navigation bar.
- Select Insert | Other macros.
- Search for
Link Button. - Insert your macro.
- Add a link in the body of your macro as you would normally do in Confluence.
- Save the page.
- Watch how your new macro has formatted your link:
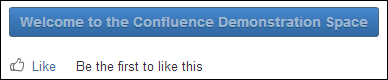
What the preceding screenshot displays is not very user-readable; it would be better if the link itself is white. For this we have to add resources, a CSS file, to our plugin.
In the atlassian-plugin.xml file, add the <web-resources> element to the file:
<web-resource key="link-button-resources"
name="Link Button Resources">

<resource type="download" name="button-macro.css"
location="css/button-macro.css" />

<context>atl.general</context>

</web-resource>
The <resource> element determines which file will be included with our plugin. The location is relative to the src/main/resources folder.
The <context> element will tell Confluence when to load these extra resources. In our case, the resources are loaded on every page except for administrative screens.
The following CSS has to be added to our button-macro.css class:
.aui-button.link-button a {
  color: #ffffff !important;
}
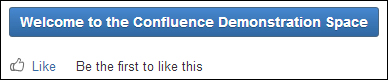
After reloading our plugin, the button should now look like this:
Tip
Reloading your plugin with FastDev
FastDev is a feature of Atlassian SDK that speeds up plugin development. FastDev will scan your plugin directory for changes, and is able to package and reinstall your plugin directly from Confluence. More information on FastDev at https://developer.atlassian.com/display/DOCS/Automatic+Plugin+Reinstallation+with+FastDev.
At a certain point, you are done developing your plugin and you want to deliver the end result to your company or maybe even to the rest of world. The first thing we have to do is release your plugin.
The release process relies heavily on you to have a revision control system for your plugin, like Subversion or GIT. If you don't have such a system in place, you could consider taking a look at http://bitbucket.org, which is an online Atlassian tool that offers free source hosting.
Before we can release our plugin, we have to make sure that our pom.xml file has all the requirements to do so.
To set the SCM properties, perform the following steps:
- Open the
pom.xmlfile in your plugin. - Add the following lines to the file with your SCM information:
<scm>
<connection>
scm:git:[email protected]:stefankohler/plugin-example-button.git
</connection>
<developerConnection>
scm:git:file:///${basedir}
</developerConnection>
url>
https://bitbucket.org/stefankohler/plugin-example-button
</url>
</scm>
- Save the
pom.xmlfile.
The connection and developerConnection tell Maven how to connect to your repository. While connection requires read access for Maven to be able to find the source code (for example, an update), developerConnection requires a connection that will give write access.
The url element is not required, but can be used for a publicly accessible URL to your repository.
The release process will upload your plugin to a specified location defined by the distributionManagement section in your pom.xml file. This location can be anything from a remote server to your local filesystem. For now, we will set this location to a temp directory on your local machine, as the process requires this setting.
- Open the
pom.xmlfile in your plugin. - Add the following lines to the file:
<distributionManagement> <repository> <id>local-repository</id> <url>file:///${basedir}/target</url> </repository> </distributionManagement> - The variable will be replaced with your own local settings.
- Save the file.
The next step is to release your plugin:
- Make sure all changes have been committed.
- Open a command prompt and navigate to the location of your plugin and run the following command:
atlas-mvn release:prepare - This command will update your
pom.xmlfile with the required version and will make a new tag for the release. During the process you will be asked the release version and the next development version. - After the command has finished run the following command:
atlas-mvn release:performThis command will:
- Check out the just created tag.
- Run all tests.
- Compile the code and package it.
- Upload your binary to a defined location.
- After the command is finished, you can find your released plugin in the target directory in your plugin folder. This should be a
.jarfile, named for your plugin and version, that isbutton-macro-1.0.jar.
If you don't have any revision control, the release process of your plugin involves some manual steps.
- Open the
pom.xmlfile in your plugin. - Change the
<version></version>parameter to your release version, that is1.1. - Save the file.
- Open a command prompt and go to your plugin location.
- Run the
atlas-packagecommand. This command will compile, test, and build your plugin. - After the command is finished, you can find your released plugin in the target directory in your plugin folder. This should be a
.jarfile, named for your plugin and version, that isbutton-macro-1.1.jar.