
This chapter contains several expert systems demonstrations , all of which have been run on a Raspberry 3 standalone desktop configuration. The first demonstration, Demo 3-1, is a very simple one—designed to show you how to get started using Prolog on the Raspberry Pi. I have included some discussion on how to use both the command line and GUI trace functions that are very useful in debugging a Prolog program. The second demonstration, Demo 3-2, is somewhat more complex, in which the program asks the user some questions about an unknown animal and then tries to reach a conclusion based on the answers to the questions.
The complexity rises with the next expert program, Demo 3-3, which implements a tic-tac-toe game. I provide some detailed discussion on how the tic-tac-toe program functions in order to provide some insight into predicates and how they are used in a Prolog program. The next demonstration, Demo 3-4, should help diagnosis whether you are suffering with a cold or the flu. It is only a demonstration; it should not be substituted for a visit to the doctor’s office. Demo 3-5 couples the results from the Prolog expert system to the actual activation of Raspberry Pi GPIO pins. I show you how to install and use a library named PySWIP, which allows Prolog commands to be called and executed within a Python program.
All of these demonstrations should also run on earlier Raspberry models , but at a somewhat slower pace. For Demo 3-5, you need some additional parts, which are described in Table 3-1.
Table 3-1. Parts Lists
Description | Quantity | Remarks |
|---|---|---|
Pi Cobbler | 1 | 40-pin version, either T or DIP form factor acceptable |
solderless breadboard | 1 | 860 insertion points with power supply strips |
jumper wires | 1 package | |
LED | 2 | |
220Ω resistor | 2 | 1/4 watt |
These parts are readily available from a number of online sources, including Adafruit Industries, MCM Electronics, RS Components, Digikey, and Mouser.
I start the expert system demonstrations with a simple database, in which I use the trace command to illustrate how Prolog resolves user goals or queries.
Demo 3-1: Office Database
The following program and discussion are based largely on a very clear tutorial from the MultiWingSpan website on tracing with Prolog. The following listing is the Prolog database, which is aptly named office.pl.
/*office program */adminWorker(black).admnWorker(white).officeJunior(green).manager(brown).manager(grey).supervises(X,Y) :- manager(X), adminWorker(Y).supervises(X,Y) :- adminWorker(X), officeJunior(Y).supervises(X,Y) :- manager(X), officeJunior(Y).
The database is quite simple: only five facts regarding office roles and three rules regarding who supervises whom. Figure 3-1 shows an interactive Prolog session where I have queried Prolog regarding various office members’ roles and who they supervise. The queries are very straightforward, but not very revealing about how Prolog reaches conclusions.
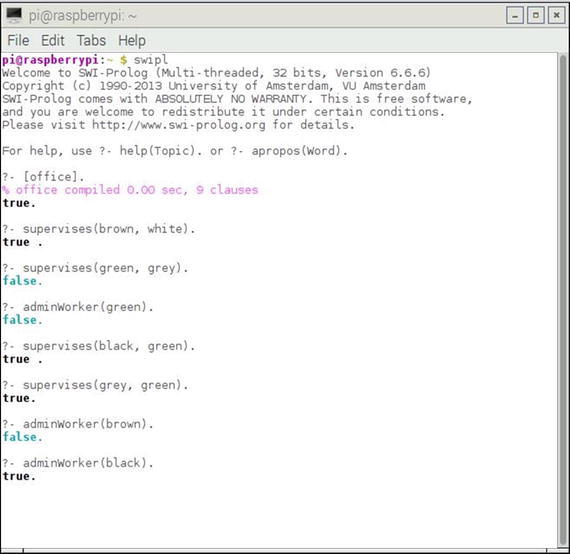
Figure 3-1. Interactive Prolog session
An important debugging tool available in Prolog is the trace command . Trace allows you to view all the goals as they are executed in a sequence in a Prolog query. You can also view any “backtracking” that happens when a goal fails. Tracing is turned on by this command:
?- trace.Prolog will respond with:true.
When finished with tracing, you turn it off using this command:
?- notrace.Prolog will respond with:true.
The trace command is among more than 20 debugging commands that are implemented in SWI Prolog. Covering all the various ways of using the Prolog debugging tools would likely take a separate book by itself. My intention is only to illustrate some straightforward debugging measures that should help you understand how Prolog functions with a database.
The following is a command-line trace session using the office database that I just presented. Figure 3-2 is a complete screenshot of the tracing session.
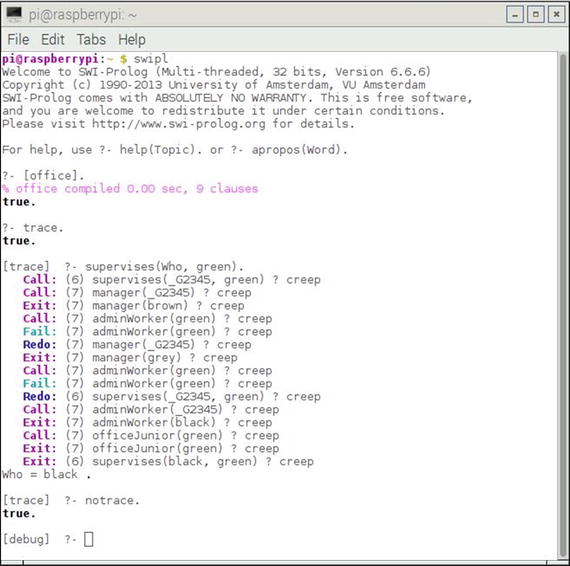
Figure 3-2. Office database tracing session
Table 3-2 is a line-by-line commentary on the tracing session shown in Figure 3-2. You should note that the SWI Prolog debugger supports six standard ports, which are named Call, Exit, Redo, Fail, Exception, and Unify. You see some of these ports in the following commentary, as they represent which actions the Prolog interpreter is taking with regard to the database facts and rules. You also see a number in parenthesis following the port name. This is the current clause line number that is being processed from the database.
Table 3-2. Line-by-Line Trace Session Commentary
Prolog dialog/trace output | Commentary |
|---|---|
swipl | Start SWI-Prolog |
[office]. | Load the office database. This form is shorthand for the consult function. |
trace. | Start the tracing. |
supervises(Who, green). | The user input query to determine who supervises employee green. |
Call: (6) supervises(_G2345, green) ? creep | Prolog finds the first rule for supervises(X,Y) and instantiates Y to match green, as stated in the query. The word creep appears when you press Enter. It means that Prolog has been instructed to move to the next instruction. Prolog memory reference _G2345 is for the X argument, which is henceforth named Who. |
Call: (7) manager(_G2345) ? creep | Prolog tries to satisfy the first subgoal of the rule. It tries manager(X). |
Exit: (7) manager(brown) ? creep | brown is found as a manager. Prolog next tests whether this leads to a solution. The word Exit reflects the fact that Prolog has found a solution to its last call. It sets X to brown. |
Call: (7) adminWorker(green) ? creep | If brown manages green, green must be an adminWorker. |
Fail: (7) adminWorker(green) ? creep | Since green is not an adminWorker, the second subgoal of the rule cannot be satisfied. |
Redo: (7) manager(_G2345) ? creep | Prolog backtracks to the first subgoal and resumes where it left off with manager(X). |
Exit: (7) manager(grey) ? creep | Prolog finds grey and instantiates X to this new value. |
Call: (7) adminWorker(green) ? creep | Prolog again tests whether or not green is an adminWorker. |
Fail: (7) adminWorker(green) ? creep | Once again, it fails. This means the rule cannot provide a solution. |
Redo: (6) supervises(_G2345, green) ? creep | Prolog backtracks to the initial rule and proceeds with processing the top-level goal. |
Call: (7) adminWorker(_G2345) ? creep | This time, Prolog looks for an adminWorker as the supervisor. (The second rule.) |
Exit: (7) adminWorker(black) ? creep | Prolog finds black and instantiates X to this new value. |
Call: (7) officeJunior(green) ? creep | Prolog checks if the second subgoal is now satisfied. |
Exit: (7) officeJunior(green) ? creep | green is an officeJunior, and consequently, the second subgoal is satisfied. |
Exit: (6) supervises(black, green) ? creep | The top-level goal is satisfied. |
The statement Who = black. in the figure is not part of the trace but is the Prolog response that is displayed in response to the initial query, supervises(Who, green).
The word creep that is shown on all of the trace lines appears after you press the Enter key. It just indicates that Prolog is proceeding to the next line of the trace. There is a lot of additional information available regarding the trace command. Simply type the following to find out more about trace and its capabilities:
?- help(trace).You should also note that trace does not work on Prolog’s built-in functions. You have to rely on Prolog’s extensive documentation to learn about those functions.
SWI Prolog also provides a debugging graphical user interface (GUI) in addition to the command-line version that I just demonstrated. Figure 3-3 shows the command-line session used to invoke the GUI using the same database and query in the previous example.

Figure 3-3. Invoking the GUI tracer
The only difference between the command line and GUI invocations is that the guitracer. command is entered right after the consult command. Prolog returns this statement:
% The graphical front-end will be used for subsequent tracingtrue.
However, no GUI is displayed until you actually enter the trace. command and then enter a goal, which in this example is supervises(Who, green). From this point on, all the user tracing and debugging actions take place in the GUI dialog screen, which is shown in Figure 3-4.
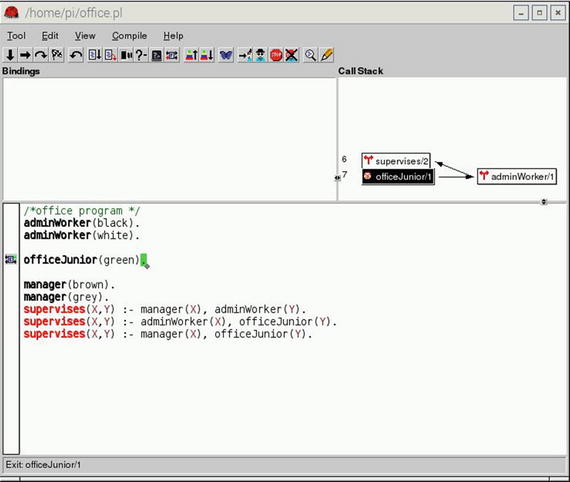
Figure 3-4. GUI trace dialog display
You must repeatedly click the right-facing arrow located in the upper left-hand portion of the toolbar in order to step through all the Prolog operations detailed in Table 3-2. Figure 3-4 actually shows the state of the Prolog sequence at the following step, excerpted from Table 3-2.
Call: (7) officeJunior(green) ? creep | Prolog checks if the second subgoal is now satisfied. |
A graphical representation of the call stack is also shown in the upper right-hand pane of the GUI display. Many Prolog users prefer the GUI representation to the command-line version, but you can be assured that either version does precisely the same tracing actions.
You can stop the GUI trace by using a command similar to the command-line version :
?- noguitracer.The next expert system demonstration is a classic game that is presented to most beginning AI students.
Demo 3-2: Animal Identification
This expert system is an animal identification game that is the Prolog version of a Lisp program originally presented in The Handbook of Artificial Intelligence Vol 4, a book edited by Barr, Cohen and Feigenbaum (Addison-Wesley, 1990). It is a relatively simple program that tries to identify the animal that you are thinking about from a choice of seven:
cheetah
tiger
giraffe
zebra
ostrich
penguin
albatross
The program is set up to ask a series of questions in an endeavor to determine the animal. I suggest you try the program before I discuss how it works. You need only enter a yes or no to answer the questions. Your responses can even be shortened to y or n. Enter the following
?- go.after you load the program.
The following is a listing of the Prolog animal script.
/* animal.planimal identification game.start with ?- go. */go :- hypothesize(Animal),write('I guess that the animal is: '),write(Animal),nl,undo./* hypotheses to be tested */hypothesize(cheetah) :- cheetah, !.hypothesize(tiger) :- tiger, !.hypothesize(giraffe) :- giraffe, !.hypothesize(zebra) :- zebra, !.hypothesize(ostrich) :- ostrich, !.hypothesize(penguin) :- penguin, !.hypothesize(albatross) :- albatross, !.hypothesize(unknown). /* no diagnosis *//* animal identification rules */cheetah :- mammal,carnivore,verify(has_tawny_color),verify(has_dark_spots).tiger :- mammal,carnivore,verify(has_tawny_color),verify(has_black_stripes).giraffe :- ungulate,verify(has_long_neck),verify(has_long_legs).zebra :- ungulate,verify(has_black_stripes).ostrich :- bird,verify(does_not_fly),verify(has_long_neck).penguin :- bird,verify(does_not_fly),verify(swims),verify(is_black_and_white).albatross :- bird,verify(appears_in_story_Ancient_Mariner),verify(flys_well)./* classification rules */mammal :- verify(has_hair), !.mammal :- verify(gives_milk).bird :- verify(has_feathers), !.bird :- verify(flys),verify(lays_eggs).carnivore :- verify(eats_meat), !.carnivore :- verify(has_pointed_teeth),verify(has_claws),verify(has_forward_eyes).ungulate :- mammal,verify(has_hooves), !.ungulate :- mammal,verify(chews_cud)./* how to ask questions */ask(Question) :-write('Does the animal have the following attribute: '),write(Question),write('? '),read(Response),nl,( (Response == yes ; Response == y)->assert(yes(Question)) ;assert(no(Question)), fail).:- dynamic yes/1,no/1./* How to verify something */verify(S) :-(yes(S)->true ;(no(S)->fail ;ask(S)))./* undo all yes/no assertions */undo :- retract(yes(_)),fail.undo :- retract(no(_)),fail.undo.
This program is interesting because it tries to verify properties to draw conclusions. The answers to the questions are also briefly stored for future reference. When a question is asked and answered with a yes, then the answer is recorded by asserting the clause yes(question) and succeeding; otherwise, the answer is recorded by asserting the clause no(question) and failing. The yes answers are recorded because a later no answer to a different question while trying to verify the same hypothesis could cause the entire hypothesis to fail; whereas the same yes answer could have led to a successful verification of a different hypothesis later in the process. Recording answers is the way the program avoids asking the same question twice. Conditions specified in a question are verified by checking if the yes(question) is in the memory and has succeeded or the no(question) is stored and has failed. If neither check is true, then ask(question) is done.
Figure 3-5 shows a sample interactive session with this program, in which I went through several question-and-answer runs.
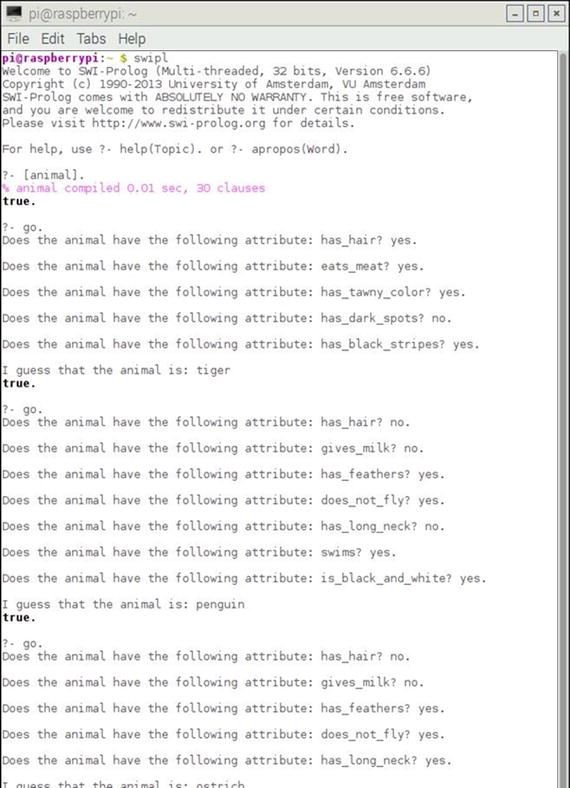
Figure 3-5. Interactive animal program session
I did determine that the program will draw an erroneous conclusion regarding carnivores based on the addition of a rule that classifies carnivores solely on having pointed teeth, claws, and forward-facing eyes. Figure 3-6 shows the interactive session in which I answered no to the question asking if the animal eats meat and yes to the questions on teeth, claws, and eyes.
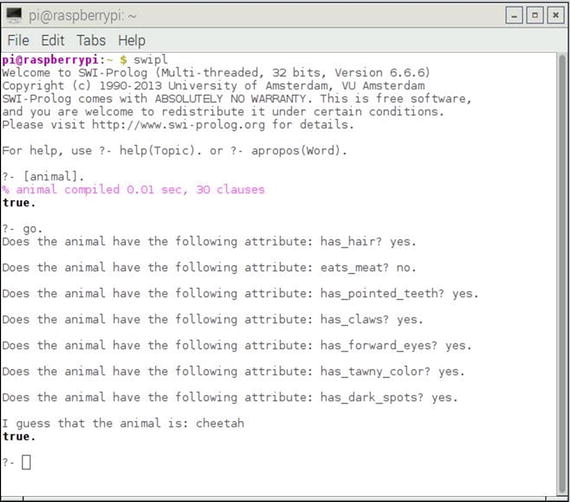
Figure 3-6. Incorrect conclusion animal session
This behavior in this particular expert system simply points out that incorrect results can be reached if the rules are not consistent with the real-world models on which they are based. By definition, carnivores are meat eaters, even though I deliberately answered no to that question. In the next demonstration, I get away from big cats and birds to a much more benign, yet interesting expert system.
Demo 3-3: tic-tac-toe
Tic-tac-toe , as it’s known in the United States, or noughts and crosses in other lands, is a delightful game often played quite effectively by very young children. It may also be implemented by an expert system. The following listing is a straightforward tic-tac-toe program named tictactoe.pl, which may be played against the computer by entering the following:
?- playo.There is also a self-play option in which the computer plays against itself. That option always ends with X winning. To initiate self-play enter this:
?- selfgame.The tictactoe.pl listing follows:% A tic-tac-toe program in Prolog. S. Tanimoto, May 11, 2003.% Additional comments D. J. Norris, Jan, 2017.% To play a game with the computer, type% playo.% To watch the computer play a game with itself, type% selfgame.% Predicates that define the winning conditions:win(Board, Player) :- rowwin(Board, Player).win(Board, Player) :- colwin(Board, Player).win(Board, Player) :- diagwin(Board, Player).rowwin(Board, Player) :- Board = [Player,Player,Player,_,_,_,_,_,_].rowwin(Board, Player) :- Board = [_,_,_,Player,Player,Player,_,_,_].rowwin(Board, Player) :- Board = [_,_,_,_,_,_,Player,Player,Player].colwin(Board, Player) :- Board = [Player,_,_,Player,_,_,Player,_,_].colwin(Board, Player) :- Board = [_,Player,_,_,Player,_,_,Player,_].colwin(Board, Player) :- Board = [_,_,Player,_,_,Player,_,_,Player].diagwin(Board, Player) :- Board = [Player,_,_,_,Player,_,_,_,Player].diagwin(Board, Player) :- Board = [_,_,Player,_,Player,_,Player,_,_].% Helping predicate for alternating play in a "self" game:other(x,o).other(o,x).game(Board, Player) :- win(Board, Player), !, write([player, Player, wins]).game(Board, Player) :-other(Player,Otherplayer),move(Board,Player,Newboard),!,display(Newboard),game(Newboard,Otherplayer).% These move predicates control how a move is mademove([b,B,C,D,E,F,G,H,I], Player, [Player,B,C,D,E,F,G,H,I]).move([A,b,C,D,E,F,G,H,I], Player, [A,Player,C,D,E,F,G,H,I]).move([A,B,b,D,E,F,G,H,I], Player, [A,B,Player,D,E,F,G,H,I]).move([A,B,C,b,E,F,G,H,I], Player, [A,B,C,Player,E,F,G,H,I]).move([A,B,C,D,b,F,G,H,I], Player, [A,B,C,D,Player,F,G,H,I]).move([A,B,C,D,E,b,G,H,I], Player, [A,B,C,D,E,Player,G,H,I]).move([A,B,C,D,E,F,b,H,I], Player, [A,B,C,D,E,F,Player,H,I]).move([A,B,C,D,E,F,G,b,I], Player, [A,B,C,D,E,F,G,Player,I]).move([A,B,C,D,E,F,G,H,b], Player, [A,B,C,D,E,F,G,H,Player]).display([A,B,C,D,E,F,G,H,I]) :- write([A,B,C]),nl,write([D,E,F]),nl,write([G,H,I]),nl,nl.selfgame :- game([b,b,b,b,b,b,b,b,b],x).% Predicates to support playing a game with the user:x_can_win_in_one(Board) :- move(Board, x, Newboard), win(Newboard, x).% The predicate orespond generates the computer's (playing o) reponse% from the current Board.orespond(Board,Newboard) :-move(Board, o, Newboard),win(Newboard, o),!.orespond(Board,Newboard) :-move(Board, o, Newboard),not(x_can_win_in_one(Newboard)).orespond(Board,Newboard) :-move(Board, o, Newboard).orespond(Board,Newboard) :-not(member(b,Board)),!,write('Cats game!'), nl,Newboard = Board.% The following translates from an integer description% of x's move to a board transformation.xmove([b,B,C,D,E,F,G,H,I], 1, [x,B,C,D,E,F,G,H,I]).xmove([A,b,C,D,E,F,G,H,I], 2, [A,x,C,D,E,F,G,H,I]).xmove([A,B,b,D,E,F,G,H,I], 3, [A,B,x,D,E,F,G,H,I]).xmove([A,B,C,b,E,F,G,H,I], 4, [A,B,C,x,E,F,G,H,I]).xmove([A,B,C,D,b,F,G,H,I], 5, [A,B,C,D,x,F,G,H,I]).xmove([A,B,C,D,E,b,G,H,I], 6, [A,B,C,D,E,x,G,H,I]).xmove([A,B,C,D,E,F,b,H,I], 7, [A,B,C,D,E,F,x,H,I]).xmove([A,B,C,D,E,F,G,b,I], 8, [A,B,C,D,E,F,G,x,I]).xmove([A,B,C,D,E,F,G,H,b], 9, [A,B,C,D,E,F,G,H,x]).xmove(Board, N, Board) :- write('Illegal move.'), nl.% The 0-place predicate playo starts a game with the user.playo :- explain, playfrom([b,b,b,b,b,b,b,b,b]).explain :-write('You play X by entering integer positions followed by a period.'),nl,display([1,2,3,4,5,6,7,8,9]).playfrom(Board) :- win(Board, x), write('You win!').playfrom(Board) :- win(Board, o), write('I win!').playfrom(Board) :- read(N),xmove(Board, N, Newboard),display(Newboard),orespond(Newboard, Newnewboard),display(Newnewboard),playfrom(Newnewboard).
Figure 3-7 shows one of the games that I played against the computer .
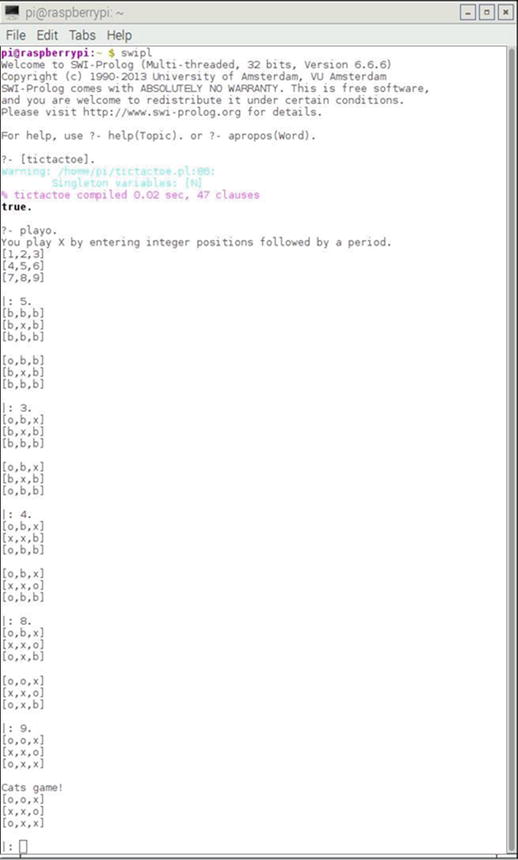
Figure 3-7. Game played against the computer
You should notice that the program displayed Cats game! at the end of rounds, which is tic-tac-toe terminology for a tie game.
I also initiated a self-game in which the computer played against itself. Figure 3-8 shows that result. It always ends with X winning, as I mentioned earlier.
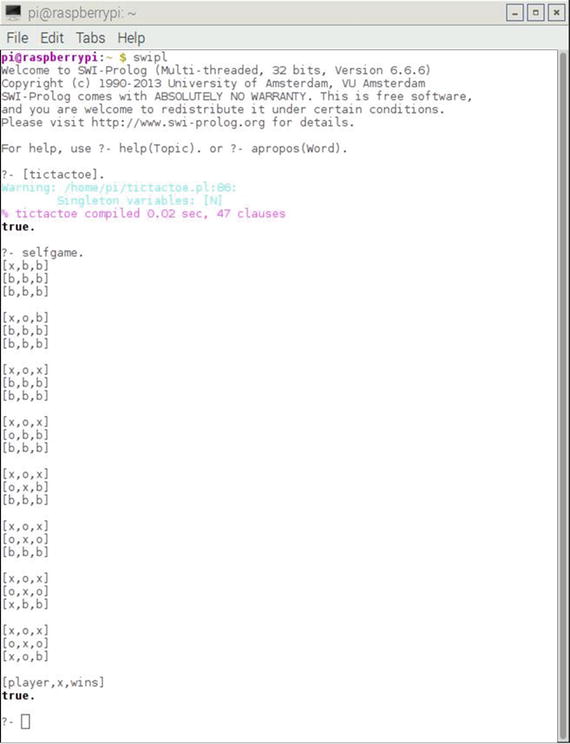
Figure 3-8. Self-game
At this point, I discuss the inner workings of the tic-tac-toe program, now that you have seen how it runs. There are three rules or predicates that define winning: by row, by column, or by diagonal. The following is one of the generalized win predicates:
win(Board, Player) :- rowwin(Board, Player).Next, there are three ways of winning: by row or by column, and two by diagonal. The following predicate is one way of winning by completing the top row:
rowwin(Board, Player) :- Board = [Player,Player,Player,_,_,_,_,_,_].Similar predicates are generated for the other rows, columns, and diagonals, as you can see by reviewing the code.
There are nine move predicates that control how a move is made, which corresponds to each of the nine board positions.
The predicate, as follows, controls how the human player interacts with the game:
x_can_win_in_one(Board) :- move(Board, x, Newboard), win(Newboard, x).Similarly, the series of orespond predicates control how the computer interacts with the game.
Finally, there are nine predicates named xmove that ensure only legal moves can be made. They also translate the internal game position representations from A, B, C, … to the corresponding displayed positions 1, 2, 3, … .
The next expert system demonstration deals with a situation that we all occasionally encounter: determining whether we have a cold or the flu.
Demo 3-4: Cold or Flu Diagnosis
This example is a very basic medical-diagnosis expert system in which you answer a few questions and the system tries to determine whether you are suffering from the flu or a much more benign cold.
Caution
This expert system is in no way a substitute for a real doctor’s advice and consultation. If you are really sick, please go to your doctor. Do not rely on this program for a trusted diagnosis.
The following program is named flu_cold.pl.
% flu_cold.pl% Flu or cold identification example% Start with ?- go.go:- hypothesis(Disease),write('I believe you have: '),write(Disease),nl,undo.% Hypothesis to be testedhypothesis(cold):- cold, !.hypothesis(flu):- flu, !.% Hypothesis Identification Rulescold :-verify(headache),verify(runny_nose),verify(sneezing),verify(sore_throat).flu :-verify(fever),verify(headache),verify(chills),verify(body_ache).% Ask a questionask(Question) :-write('Do you have the following symptom: '),write(Question),write('? '),read(Response),nl,( (Response == yes ; Response == y)->assert(yes(Question)) ;assert(no(Question)), fail).:- dynamic yes/1,no/1.% Verify somethingverify(S) :- (yes(S) -> true ;(no(S) -> fail ;ask(S))).% Undo all yes/no assertionsundo :- retract(yes(_)),fail.undo :- retract(no(_)),fail.undo.
As noted in the comments, you start the program with this:
?- go.The symptoms are then presented one after the other. Just answer with either a yes. or no. (alternatively, you can use the single letters y. or n.). Do not forget to enter the period at the end of the response; otherwise, Prolog will not recognize your entry. If you select a combination of symptoms that are not inclusive to either one of the hypotheses, then Prolog will simply show a fail because it cannot match your entries with the known facts.
Figure 3-9 shows a sample session that I conducted with this expert system . I selected symptoms for the flu, a cold, and finally, some for the no-match case.
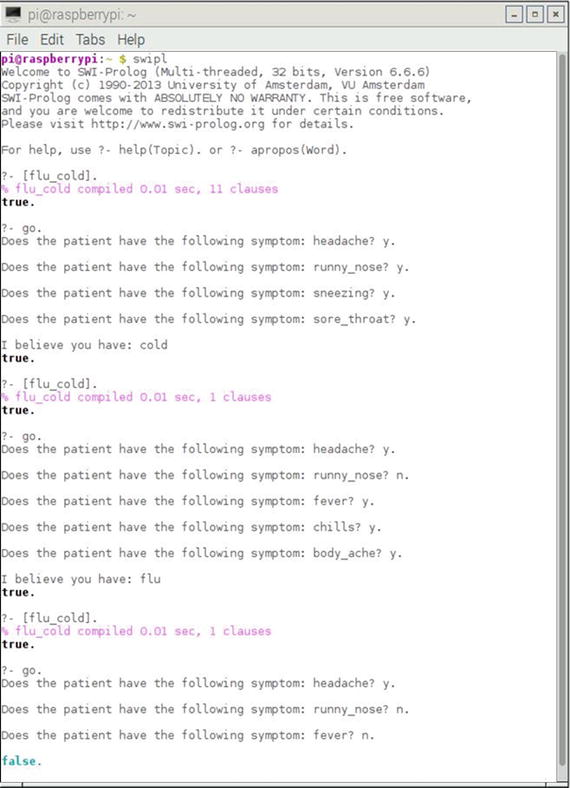
Figure 3-9. Cold and flu expert system session
The next demonstration is the last one in the chapter. It involves another simple expert system—but with a twist, because the system controls several Raspberry Pi GPIO outputs.
Demo 3-5: Expert System with Raspberry Pi GPIO Control
Until now, I have shown you expert systems that could be run on any PC or Mac with a compatible version of Prolog. This demonstration differs because I show you how to directly control some general-purpose input/out (GPIO) pins with Prolog—something that is not generally possible on a regular PC.
To be totally honest, it is simply not possible to directly control a GPIO pin using a Prolog command; but it is possible if you combine Prolog with the Python language. This combination is made possible by a great program named PySWIP, which allows Prolog commands to be called and executed within a Python program. There is also a great Python application program interface (API) named RPi.GPIO, which easily facilitates GPIO pin control. Next, I describe how to install the PySWIP application and set up the RPi.GPIO API, which are both prerequisites for this expert system demonstration.
Installing PySWIP
PySWIP was created by Yuce Tekol as a bridge program between Prolog and Python. He provided it to the community as GPL open source software. The program is not part of the Raspian repositories and therefore cannot be installed using the apt package manager. To install it, you must use the pip program. If you do not have pip already installed on your Raspberry Pi, use the following command to install it:
sudo apt-get install python-pipOnce pip is installed, you can then use it to install PySWIP with this command:
sudo pip install pyswipThere is one additional step that must be done for Python to recognize Prolog, and that is to create a symlink between the original shared library name and the latest one. Just enter this next command to create the link:
sudo ln -s libswipl.so /usr/lib/libpl.soYou should next enter the following Python commands in an interactive Python session to test if the PySWIP installation was successful:
>>> from pyswip import Prolog>>> prolog = Prolog()>>> prolog.assertz("father(michael,john)")>>> prolog.assertz("father(michael,gina)")>>> list(prolog.query("father(michael,X)"))
The following line is the Prolog response to the preceding command:
[{'X': 'john'}, {'X': 'gina'}]>>> for soln in prolog.query("father(X,Y)"):
Ensure that you indent the next line. I used four spaces.
... print soln["X"], "is the father of", soln["Y"]...
Press the Backspace and Enter keys to execute the for statement. The Python interpreter should then display the following:
michael is the father of johnmichael is the father of gina
If you see these two lines, you can be assured that Python and Prolog are working fine together, courtesy of the PySWIP bridge program. Figure 3-10 shows this test done with a Raspberry Pi.
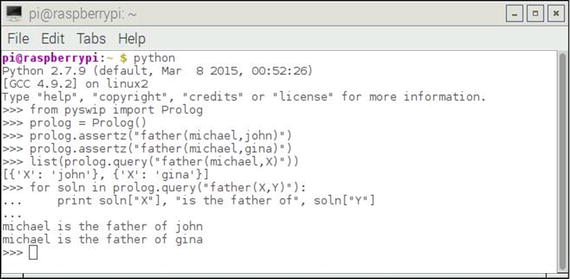
Figure 3-10. Prolog and Python compatibility test
It is now time to discuss the hardware setup, which uses the Python/Prolog expert system.
Hardware Setup
I used a T-form Pi Cobbler accessory to extend the Raspberry Pi GPIO pins so that they can be easily used with a solderless breadboard in this setup. Figure 3-11 is a Fritzing diagram, which shows the setup with two LEDs and two current-limiting resistors.
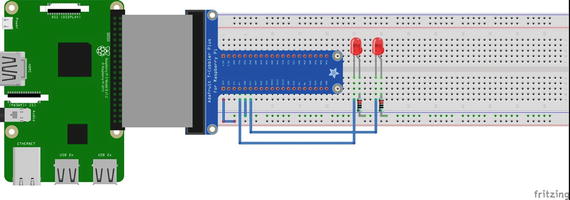
Figure 3-11. Fritzing diagram
The LEDs are connected to GPIO pins #4 and #17, with the 220Ω current-limiting resistors connected to ground. Thus, the LEDs light when the pins are set to a high value, which is 3.3V for the Raspberry Pi. The LED series resistor sets the maximum current flow to approximately 12 ma, which is well within the 25 ma current limit for any given Raspberry Pi GPIO pin.
Figure 3-12 shows the Raspberry Pi physical setup with the T Pi Cobbler, solderless breadboard, LEDs, and other components.
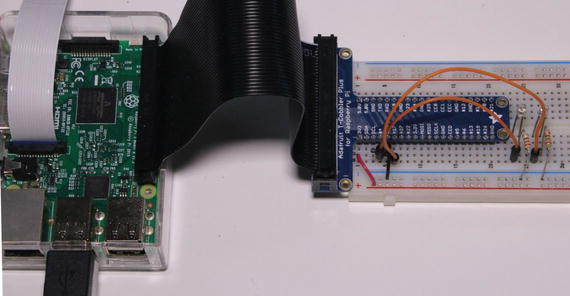
Figure 3-12. Raspberry Pi physical setup
You should next set up the RPi.GPIO API to control the LEDs with Python.
Rpi.GPIO Setup
This discussion focuses on how the RPi.GPIO API is used in a Python program. These setup steps must be included in every Python program that needs to control GPIO pins. I demonstrate the setup in an interactive session, but you should realize that the same statements must be included in a regular program script.
The RPi.GPIO API is now included with all standard Raspian Linux distributions. You should be all set if you are using the latest Jessie Raspian distribution. The first step is to import the API, as follows:
>>> import RPi.GPIO as GPIOFrom this point on, all references to the API simply use the GPIO name. Next, you have to select the appropriate pin-numbering scheme. There are two variations in the Raspberry Pi pin-numbering scheme:
GPIO.BOARD: The board numbers that follow the physical pin numbers on the P1 header, which contains all the GPIO pins.
GPIO.BCM: The numbering scheme used by the chip manufacturer, BROADCOM, or BCM.
The pin numbers on the Pi Cobbler follow the BCM scheme, so that is what I used. You establish which numbering scheme to use with this statement:
>>> GPIO.setmode(GPIO.BCM)Next, the two selected pins must be set from the default input mode to the output mode, which is done using these two statements:
>>> GPIO.setup(4, GPIO.OUT)
>>> GPIO.setup(17, GPIO.OUT)
Now, everything should be established to switch the pins high or low. By default, they are set to a low state upon boot-up. These next two statements should turn on the two LEDs:
>>> GPIO.output(4, GPIO.HIGH)
>>> GPIO.output(17, GPIO.HIGH)
If the LEDs did not light up, you should double-check the orientation of the LEDs in the breadboard. Every standard LED has two “legs,” one of which is slightly shorter than the other. The shorter leg is connected to one lead of the resistor, whose other lead is connected to ground. Try switching the orientation of the LED and see if it turns on. You will not harm the LED by switching the orientation. Also, double-check that you are connected to pins 4 and 17, and that you have selected the correct numbering scheme. I have found that when something does not work as expected, it is usually a connection issue or a simple mistake in the setup.
Turning off the LEDs is accomplished using these statements:
>>> GPIO.output(4, GPIO.LOW)>>> GPIO.output(17, GPIO.LOW)
An expert system is now ready to be created to control the LEDs.
Expert System with LED Control
I decided to essentially use the same simple Prolog script that was used to verify the PySWIP installation. However, the program was restructured a bit to take advantage of the Python way of using functions. That is the reason for using the PySWIP Functor function near the start of the program. This program is named LEDtest.py, which is run by entering the following:
python LEDtest.pyThe LEDtest.py listing follows.
# LEDtest.py by D. J. Norris Jan, 2017# Uses Prolog with Python type functionsimport timeimport RPi.GPIO as GPIOfrom pyswip import Functor, Variable, Query, call# Setup GPIO pinsGPIO.setmode(GPIO.BCM)GPIO.setup(4, GPIO.output)GPIO.setup(17, GPIO.output)# Setup Python like functions for Prolog statementsassertz = Functor("assertz", 1)father = Functor("father", 2)# Add facts to a dynamic databasecall(assertz(father("michael","john")))call(assertz(father("michael", "gina")))# Setup an iterative query sessionX = Variable()q = Query(father("michael",X))while q.nextSolution():print "Hello, ", X.valueif str(X.value) == "john": # LED #4 on if john is michael's childGPIO.output(4,GPIO.HIGH)time.sleep(5)GPIO.output(4,GPIO.LOW)if str(X.value) == "gina": # LED #17 on if gina is michael's childGPIO.output(17,GPIO.HIGH)time.sleep(5)GPIO.output(17,GPIO.LOW)
Figure 3-13 shows the program output. What cannot be shown is that LEDs were lit for five seconds each, indicating that the two queries were successfully run.
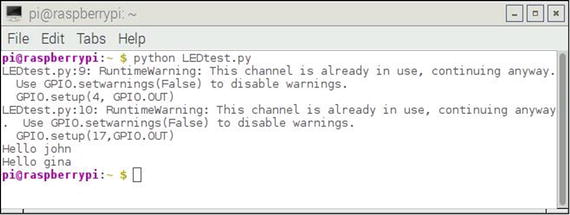
Figure 3-13. Program output
At this point, you are probably wondering how this demonstration can be put to a practical use with a Raspberry Pi. That answer will have to be deferred for several chapters until I cover a fuzzy logic project, which uses an embedded expert system with some GPIO pins controlling a heating and cooling system (HVAC).
Summary
There were five expert systems demonstrated in this chapter. They ranged from an extremely simple one with only a few facts and rules, to a much more complicated one that implemented the tic-toe-toe game.
The final demonstration showed you how to combine Python with Prolog so that Raspberry Pi GPIO pins could be controlled.