
This chapter is all about games. But the games I discuss are not the multi-million-dollar video blockbusters that are currently saturating the marketplace. Instead, they are the much simpler games that have been around for a very long time; some for thousands of years. But even in these simple games, AI has had an impact. The games discussed in this chapter traditionally involve two human opponents, but the modern varieties involve one human playing against a computer. That’s where the AI comes in: to provide some randomness and competition to the human player such that playing the game does not quickly become boring and trivial.
Each demonstration presents several iterations for which you will need some additional parts, as detailed in the Table 4-1.
Table 4-1. Parts Lists
Description | Quantity | Remarks |
|---|---|---|
Pi Cobbler | 1 | 40-pin version, either T or DIP form factor acceptable |
solderless breadboard | 1 | 860 insertion points with power supply strips |
jumper wires | 1 package | |
LED | 3 | |
220Ω resistor | 3 | 1/4 watt |
16 × 4 LCD display | 1 | Adafruit p/n 198 or equivalent You can also use a 16 × 2 LCD |
10k Ω potentiometer | 1 | Included with LCD display |
push button switches | 4 | Tactile, suitable for use with a solderless breadboard |
The first game to be demonstrated is that old-time favorite we all have played: rock-paper-scissors.
Demo 4-1: Rock-Paper-Scissors
Here are the rules for the human-to-human rock-paper-scissors game , in case you have not played it for a while. Each opponent clenches his or her fist, counts to three, and then displays one of the following hand signals:
Flat hand: paper
Fist: rock
Two fingers in a V: scissors
Winning is determined as follows:
The same signal from each opponent is a tie.
Rock dulls a scissor, so the rock sign wins.
Paper covers a rock, so the paper sign wins.
Scissors cut paper, so the scissor sign wins.
There are only nine possible combinations, including three ways to tie. Each opponent has three ways to win, as described, which leads to the nine possible combinations.
The following Python program named prs.py is a straightforward implementation of the rock-paper-scissors game. This program does not use any Prolog statements demonstrated in the previous chapter, but instead relies on standard Python if ... else statements . These statements have the same effect as the if <condition> then <conclusion> discussed in the section on inference.
prs.py listing
# prs.pyfrom random import randint# List the input optionsinputList = ["paper", "rock", "scissors"]# Random computer pickcomputer = inputList[randint(0,2)]# Initially set player = Falseplayer = Falsewhile player == False:player = raw_input("paper, rock, scissors?")if player == computer:print("Tie!")elif player == "rock":if computer == "paper":print("You lose ", computer, "covers", player)else:print("You win ", player, "dulls", computer)elif player == "paper":if computer == "scissors":print("You lose ", computer, "cuts", player)else:print("You win ", player, "covers", computer)elif player == "scissors":if computer == "rock":print("You lose ", computer, "dulls", player)else:print("You win ", player, "cuts", computer)else:print("Invalid input. Please reenter")# Reset player = False to continue loopingplayer = Falsecomputer = inputList[randint(0,2)]
Figure 4-1 shows several rounds that I conducted with the Raspberry Pi .
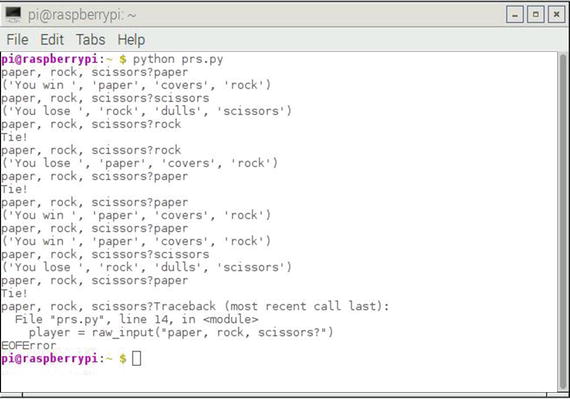
Figure 4-1. Rock-paper-scissors game play
I do want to comment on one aspect of this program, which is especially directed to those readers who are not too comfortable with writing Python programs. The elif command is a contraction of the words else if and is used as part of a nested if ... else structure, which implements the game logic. The game logic can also be portrayed in a tree diagram, as shown in Figure 4-2.
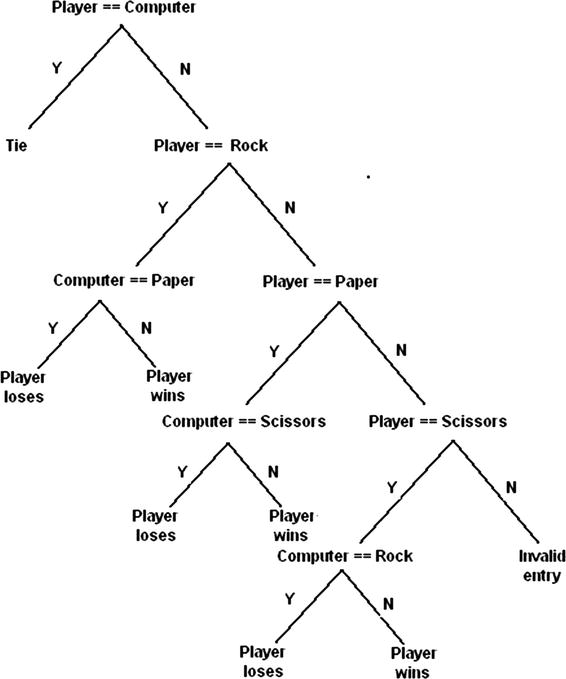
Figure 4-2. Tree diagram for rock-paper-scissors game
I think you can appreciate the symmetry of the logic as depicted in the figure. Note that there are six leafs or end points, which show where the player either wins or loses. This matches exactly with the six win/loss combinations I mentioned earlier.
Believe or not, there is some underlying strategy, which can be invoked when playing this game against a human opponent. To understand the competitive strategy, I must first assign some values to the game outcomes. Let’s assume the following reasonable point assignment for each outcome:
Win = 2 points
Tie = 1 point
Loss = 0 points
Table 4-2 shows, on average, what the expected player values should be for a long run of consecutive play.
Table 4-2. Averaged Player Outcomes
Opponents’ Move | Averaged Player Score | ||||
|---|---|---|---|---|---|
paper | rock | scissors | |||
Player’s Move | paper | 1 | 2 | 0 | 1 |
rock | 0 | 1 | 2 | 1 | |
scissors | 2 | 0 | 1 | 1 | |
The averaged player score should not surprise you, as over the long run (assuming random choices by each opponent), the expected scores or values should be equally divided over all the possible outcomes. But now, let’s add a twist to the normal approach and take advantage of a human trait. This trait or behavior involves random number selection. If you asked someone to select three random numbers from 1 to 10, odds would favor that they might answer 7, 4, and 8, or some similar variation. They could easily answer 5, 5, and 5, which would have satisfied the request, but using the word random obviously biases behavior. Let’s assume now that your opponent selected rock in the last round. It is more likely than not that he will not select rock again for the next round. The averaged expected values table can now be modified, as shown in Table 4-3.
Table 4-3. Modified Averaged Expected Values
Opponent’s Move | Averaged Player Score | ||||
|---|---|---|---|---|---|
paper | rock | scissors | |||
Player’s Move | paper | 1 | - | 0 | 0.5 |
rock | 0 | - | 2 | 1 | |
scissors | 2 | - | 1 | 1.5 | |
Clearly, there is a best move on the player’s part based on the opponent’s previous move, which is based on normal human behaviors. However, it is not too hard to program in a check routine to avoid providing the human player a competitive advantage. The code would be something like the following; but note that I just used the index integer values and not the equivalent string values .
if computer == lastMove & won == 0:computer = player + 1if computer > 3:computer = 1
lastMove and won are new integer variables representing the computer’s previous selection and whether it won, respectively. I did not incorporate this code into the current program because I just wanted to demonstrate the classic game design.
My next iteration of the rock-paper-scissors game eliminates keyboard entry and the screen display, and replaces them with push buttons and LEDs.
Rock-Paper-Scissors Game with Switches and LEDs
I thought it would both be fun and interesting to change the game play on the Raspberry Pi to use push button switches to select the sign and have LEDs indicate a win, lose, or tie for the game. In this project, I also introduce how the Raspberry Pi handles interrupts using the Python language. There is one caveat to this program. It must be started using the following command-line entry:
python prs_with_LEDs_and_Switches.pyThe Raspberry Pi system now needs to be set up. The Fritzing diagram is shown in Figure 4-3.

Figure 4-3. Fritzing diagram for rock-paper-scissors game machine
Figure 4-3 is an extension of Figure 3-11, which was used in an expert system demonstration. I added one additional LED and four push button switches to the circuit. The additional LED was connected to pin 27, while the push buttons were connected to pins 12, 16, 20, and 21.
The physical Raspberry Pi setup is shown in Figure 4-4. Notice that I put labels near the LEDs and push buttons to help the user determine what the LEDs indicate and which sign a particular push button enables. The fourth push button exits the program when pushed.
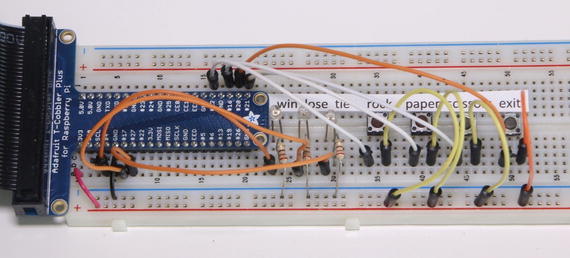
Figure 4-4. Physical Raspberry Pi setup
The push buttons act as inputs that momentarily provide a high level of 3.3V to the pin when pushed. Each of the input pins is also set up to be in a pull-down mode, where an internal resistor at the pin input is connected to ground. This prevents an indeterminate floating state from being applied to the pin. In such a state, a floating pin could “see” voltages ranging from tens of millivolts to as high as two volts, which could trigger a false high on the pin. The actual float voltage is highly variable and dependent on the local potential field surrounding the pin. Connecting a pull-down resistor avoids all that nasty trouble. And the good news is that the pull-down resistor is actually configured via a software command, which I discuss after I show you the following code listing.
prs_with_LEDs_and_Switches.py
import RPi.GPIO as GPIOimport timefrom random import randint# Setup GPIO pins# Set the BCM modeGPIO.setmode(GPIO.BCM)# OutputsGPIO.setup( 4, GPIO.OUT)GPIO.setup(17, GPIO.OUT)GPIO.setup(27, GPIO.OUT)# Ensure all LEDs are off to startGPIO.output( 4, GPIO.LOW)GPIO.output(17, GPIO.LOW)GPIO.output(27, GPIO.LOW)# InputsGPIO.setup(12, GPIO.IN, pull_up_down = GPIO.PUD_DOWN)GPIO.setup(16, GPIO.IN, pull_up_down = GPIO.PUD_DOWN)GPIO.setup(21, GPIO.IN, pull_up_down = GPIO.PUD_DOWN)GPIO.setup(20, GPIO.IN, pull_up_down = GPIO.PUD_DOWN)global playerplayer = 0# Setup the callback functionsdef rock(channel):global playerplayer = 1 # magic number 1 = rock, pin 12def paper(channel):global playerplayer = 2 # magic number 2 = paper pin 16def scissors(channel):global playerplayer = 3 # magic number 3 = scissors pin 21def quit(channel):exit() # pin 20, immediate exit from the game# Add event detection and callback assignmentsGPIO.add_event_detect(12, GPIO.RISING, callback=rock)GPIO.add_event_detect(16, GPIO.RISING, callback=paper)GPIO.add_event_detect(21, GPIO.RISING, callback=scissors)GPIO.add_event_detect(20, GPIO.RISING, callback=quit)# computer random pickcomputer = randint(1,3)while True:if player == computer:# This is a tie conditionGPIO.output(27,GPIO.HIGH)time.sleep(5)GPIO.output(27, GPIO.LOW)player = 0elif player == 1:if computer == 2:# Player loses, paper covers rockGPIO.output(17,GPIO.HIGH)time.sleep(5)GPIO.output(17, GPIO.LOW)player = 0else:# Player wins, rock dulls scissorsGPIO.output(4,GPIO.HIGH)time.sleep(5)GPIO.output(4, GPIO.LOW)player = 0elif player == 2:if computer == 3:# Player loses, scissors cuts paperGPIO.output(17,GPIO.HIGH)time.sleep(5)GPIO.output(17, GPIO.LOW)player = 0else:# Player wins, paper covers rockGPIO.output(4,GPIO.HIGH)time.sleep(5)GPIO.output(4, GPIO.LOW)player = 0elif player == 3:if computer == 1:# Player loses, rock dulls scissorsGPIO.output(17,GPIO.HIGH)time.sleep(5)GPIO.output(17, GPIO.LOW)player = 0else:# Player wins, scissors cuts paperGPIO.output(4,GPIO.HIGH)time.sleep(5)GPIO.output(4, GPIO.LOW)player = 0# another random pick for the computercomputer = randint(1,3)
One thing that you should immediately notice is that I only used numbers to represent the signs in this game version. There is no need for actual string names because the LEDs show the result of the round and the push buttons are already clearly labeled. However, I did identify what these “magic” numbers represent by using comments with the code listing. I use the magic to represent any number that is used to represent something else. Without a comment or other identifying means, it does become a magic trick to figure what an isolated number in a program is supposed to represent. Unfortunately, more than a few developers still resort to using magic numbers in their programs—a practice I highly suggest you avoid unless you comment them, but then they are no longer magic.
The logic in the preceding program is exactly the same as what was presented in the first version of the program. Yet, there are big differences in the input and outputs, which now use push buttons and LEDs. I will discuss the LED output first since you have already seen it in the expert system demonstration. The pin number scheme is first selected, which is still going to BCM because it matches the T Pi Cobbler pin designations. The pins selected to be outputs are set up next. Those pins are 4, 17, and 27, which represent win, lose, and tie, respectively. That’s all that’s needed to preconfigure the outputs. Turning on an output is done using this command:
GPIO.output(n, GPIO.HIGH) # where n = pin numberYou should also notice that I followed each LED output command with this command:
time.sleep(5)This forces the Python interpreter to pause for five seconds, which allows the user to easily recognize which LED is lit. Without a pause, the LED will light and extinguish so quickly that you could never see it. That condition would likely puzzle a lot of new programmers who expect to see a lit LED, but never do. The program was probably functioning as desired but the new programmer neglected the reality of a real-time clock cycle, such that the LED stayed on for only microseconds—far too brief a time to detect with the human eye.
Now on to the input pins and the interrupt discussion.
Interrupts
There are two principal ways to handle pin inputs: polling and interrupts. Polling, as the name suggests, simply periodically checks on a pin state. It must be implemented in a loop to work. The following code snippet shows a way to check on a pin status:
if GPIO.input(n): # where n = pin numberprint('Input was HIGH')else:print('Input was LOW')
Polling is much slower than using interrupts, because all the code in a loop must be executed. It is possible to miss a button press if the program takes a relatively long time to complete each loop, especially if there are any pause statements in the loop.
Interrupts, on the other hand, are practically immediate, independent of what is going on in the main program, looping or not. Interrupts take advantage of a hardware subsystem contained within the ARM microprocessor called the interrupt controller. Figure 4-5 is a very simplified diagram of an interrupt controller that has three interrupt sources: a push button, a serial input, and a clock input. The push button interrupt source is pertinent in this project.
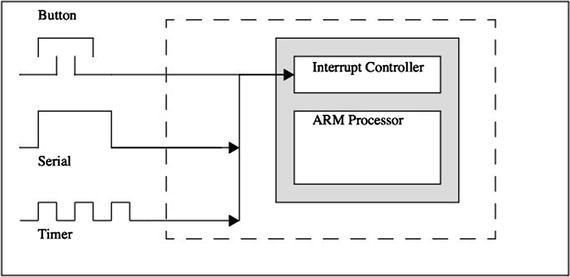
Figure 4-5. Interrupt controller
Figure 4-6 is a logic flow diagram that clearly shows the sequence of actions when an interrupt occurs.
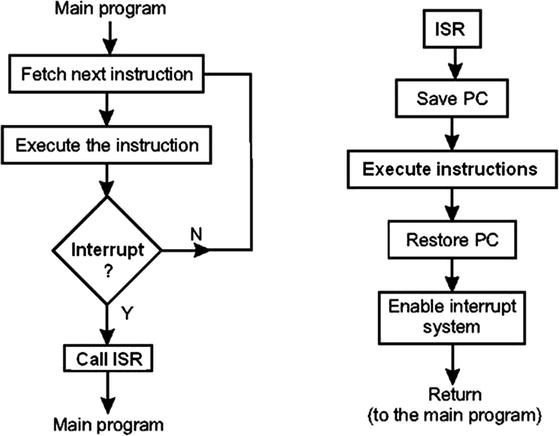
Figure 4-6. Interrupt logic flow diagram
Normally, the microprocessor fetches and executes one instruction after another while running the main program. When an interrupt occurs, which I will now call an event to conform to the Python language terminology, a jump is made to an interrupt service routine (ISR) , as shown in Figure 4-6. And just to further confuse you, ISRs are known as callback functions in Python. The interrupt controller automatically saves the address of the next executable instruction, as well as several other parameters, which is known as saving the processor state. The callback function is run next, and when that is completed, the interrupt controller reloads the processor state and resumes exactly from the point it was when interrupted. All of this action only takes microseconds to complete and is much faster than polling.
There are several steps that must be done in Python to set up interrupts. First, the appropriate pin to receive the interrupt must be set up. I will use the rock push button as an example. This next statement sets pin 12 as an input with a pull-down resistor configured for the reasons I discussed earlier:
GPIO.setup(12, GPIO.IN, pull_up_down = GPIO.PUD_DOWN)Next, the interrupt source must be identified and linked to a callback function. The following statement does it for the rock-signal push button:
GPIO.add_event_detect(12, GPIO.RISING, callback=rock)Finally, the callback function must be defined. For the rock signal, this function is
def rock(channel):global playerplayer = 1 # magic number 1 = rock, pin 12
Notice, that the word channel must be used as an argument in the function definition. This is just a peculiarity of the Python language.
Also notice that I used the word global in the function definition, which specifies that the player variable was global or available to all portions of the program, whether or not it was in the function or the main program. I normally do not like to use globals because they break the object-oriented principle of encapsulation, but in this case, it seemed appropriate to minimize code duplication and to increase program efficiency. You also need to identify player as a global in the main program.
The last new program feature is the exit push button, which causes it to immediately quit the Python interpreter. This is the callback function:
def quit(channel):exit() # pin 20, immediate exit from the game
Everything else in the program is straightforward or was discussed previously.
There is no screenshot that I can show of this program running because the inputs are manual push button activations and the outputs are LEDs being lit. I can just assure you that everything functioned as anticipated.
The next game that I discuss is Nim.
Demo 4-2: Nim
Nim is game of mathematical strategy in which two players take turns removing items from a common heap. In each turn, a player may remove one, two, or three items. The objective of the game is to avoid being the player removing the last item, although there are Nim variants in which you win by removing the last item.
Various Nim-style games have been played since ancient times, often using pebbles as the heap. Nim has also been called pebble pickup, last pebble, and in recent times, sticks, or pick-up sticks. Although not really known as a fact, Nim is thought to have originated in China because it closely resembles the game Tsyan-shizi, or “picking stones.” In European history, Nim dates back to the beginning of the 16th century. The actual name of Nim name is attributed to Harvard University Professor Charles Bouton, who is recognized as the creator game theory during the early 1900s.
I will first demonstrate a Python version of Nim in a two-person game. I simply describe it as “naive Nim,” in which there is no AI but simply innate player intelligence.
naive_nim.py listing
sticks = 21max_picks = 3while (sticks != 0):pick1 = 0pick2 = 0pick1 = int(raw_input("Player 1 pick: "))while pick1 > max_picks or (sticks - pick1) <= 0:print "You cannot pick more than 3 or reduce sticks to zero or less"pick1 = int(raw_input("Player 1 pick: "))sticks = sticks - pick1print "remaining sticks = ", sticksif sticks == 1:print 'Player 1 Wins!'exit()pick2 = int(raw_input("Player 2 pick: "))while pick2 > max_picks or (sticks - pick2) <= 0:print "You cannot pick more than 3 or reduce sticks to zero or less"pick2 = int(raw_input("Player2 pick: "))sticks = sticks - pick2print "remaining sticks = ", sticksif sticks == 1:print 'Player 2 Wins!'exit()
Figure 4-7 shows two rounds that I played: pick1 and pick2. Notice that I added some validation checks , which ensured that no more than three sticks were picked and that any pick did not reduce the stick total to zero or less.
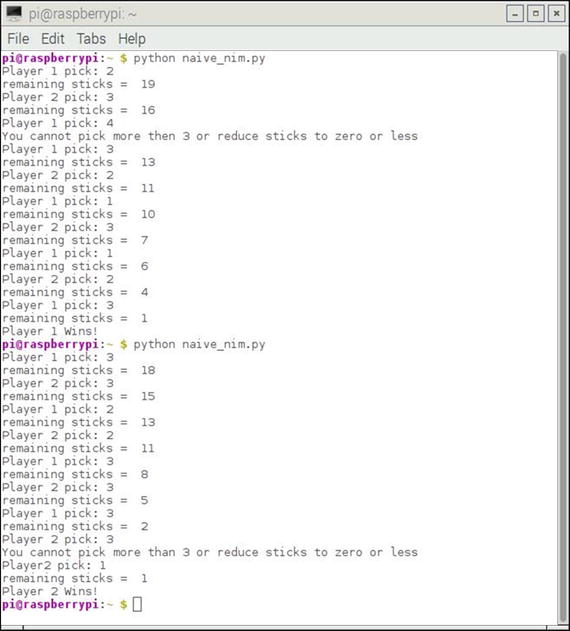
Figure 4-7. Two rounds of Nim play
Now it is time to add some AI to the Nim game by implementing a computer opponent.
nim_computer.py listing
import randomprint "NIM GAME"player1 = raw_input("Enter your name: ")player2 = "Computer"howMany = 0gameover=Falseglobal stickNumberstickNumber = 21def moveComputer():removedNumber = random.randint(1,3)global stickNumberwhile (removedNumber < stickNumber) or (stickNumber <= 4):if stickNumber >= 5:stickNumber -= removedNumberreturn stickNumberelif (stickNumber == 4) or (stickNumber == 3) or (stickNumber == 2):stickNumber = 1return stickNumberdef moveHuman():global stickNumberglobal howManystickNumber -= howManyreturn stickNumberdef humanLegalMove():global howManyglobal stickNumberlegalMove=Falsewhile not legalMove:print("It's your turn, ",player1)howMany=int(input("How many sticks do you want to remove?(from 1 to 3) "))if howMany>3 or howMany<1:print("Enter a number between 1 and 3.")else:legalMove=Truewhile (howMany >= stickNumber):print("The entered number is greater than or equal to the number of sticks remaining.")howMany=int(input("How many sticks do you want to remove?"))return howManydef checkWinner(player):global stickNumberif stickNumber == 1:print(player," wins.")global gameovergameover = Truereturn gameoverdef resetGameover():global gameoverglobal stickNumbergameover = FalsestickNumber = 21howMany = 0return gameoverdef game():while gameover == False:print("It's ",player2,"turn. The number of sticks left: ", moveComputer())checkWinner(player2)if gameover == True:playAgain()humanLegalMove()print("The number of sticks left: ", moveHuman())checkWinner(player1)if gameover == True:playAgain()def playAgain():answer = raw_input("Do you want to play again?(y/n)")resetGameover()if answer=="y":game()else:print("Thanks for playing the game")exit()game()playAgain()
Figure 4-8 shows two rounds of Nim played against the computer.
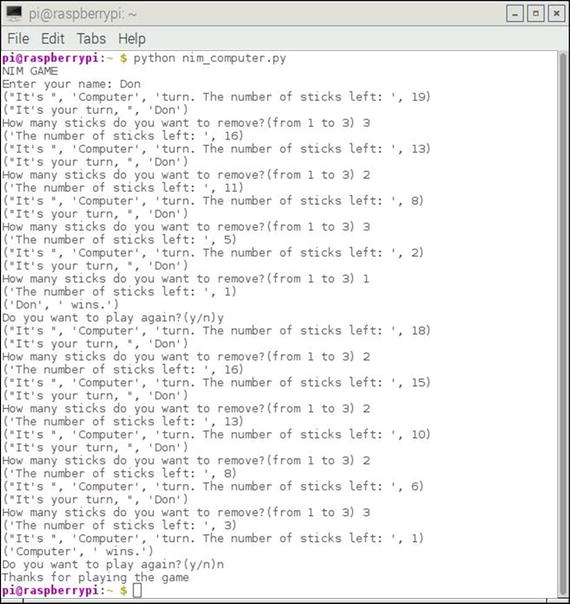
Figure 4-8. Two rounds of computer vs. human play
Figure 4-8 demonstrates that the program functions as designed when each opponent enters a valid stick number. While it is impossible for the computer to enter an invalid number, the same is not true for a human. In addition, the program must guard against an entry that would reduce the number of sticks to zero or less. Figure 4-9 shows these safeguards in action when I attempted to enter a number greater than three, or to reduce the stick total to zero.
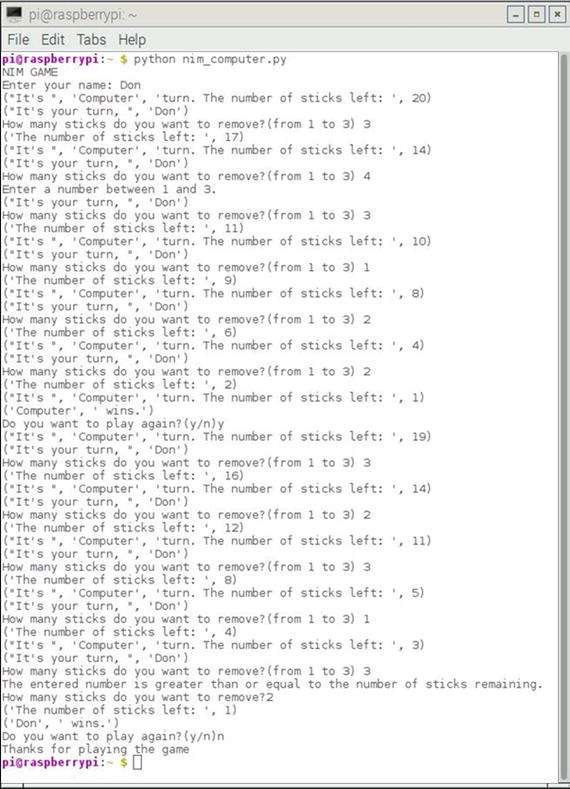
Figure 4-9. Validation or “sanity” checks
What is not evident in Figures 4-8 and 4-9 is my addition of a small amount of AI to the program. Normally, the computer entry for each turn is determined by the following statement:
removedNumber = random.randint(1,3)This statement generates a random number between one and three, inclusively. Normally, this is OK for a naive approach; however, I did not wish to give too much of an unfair advantage to the human player when the stick count was four or lower. Therefore, I added the following code to the moveComputer function :
elif (stickNumber == 4) or (stickNumber == 3) or (stickNumber == 2):stickNumber = 1return stickNumber
This ensures that the computer wins the round as it emulates the exact human behavior expected if a human player was presented with two, three, or four remaining sticks.
There is more to the Nim game competitive strategy that you should know. Let’s assume that six sticks are left and it is your turn. According to game theory, your best option would be to remove the exact number of sticks that satisfies the following equation :
![]() where n is the remaining sticks number after your turn.
where n is the remaining sticks number after your turn.
The mod operator in the equation represents integer remaindering division. For instance, 8 mod 3 would equal 2 because 3 divides twice into 8 with a remainder of 2. So basically, you discard the dividend and keep the remainder for integer division. Table 4-4 shows all of your possible moves with six sticks still in the heap.
Table 4-4. Competitive Strategy for Six Sticks in the Heap
Possible Move | Remaining Sticks (n) | n mod 4 |
|---|---|---|
1 | 5 | 1 |
2 | 4 | 0 |
3 | 3 | 3 |
Thus, according to game theory, your optimal move is to remove one stick. You don’t have to be a gaming expert to understand this choice. Remember your opponent can only remove one, two, or three sticks. Therefore, after the opponent removes the sticks, there can only be two, three, or four sticks remaining. You are then guaranteed a win because you can remove the appropriate amount to have one remaining.
The human player has a distinct advantage in this particular game because the computer always randomly selects a stick removal number until there are four or less sticks remaining in the heap. Therefore, you should always try to have the computer’s second-to-last move be with six sticks. I have removed this advantage in the next demonstrated Nim version in the following section.
Nim with LCD and Switches
This Nim version uses push button switches to enter the number of sticks to be removed. It uses an LCD to display when the human player should press a push button and to show the number of remaining sticks. The push buttons are connected to Python callback functions, as was done with the automated rock-paper-scissors (rps) game version. In fact, I used a very similar push button circuitry in the prs game. I did have to change the pins used with the push buttons to accommodate the LCD display interconnections. The LEDs in the prs game are no longer needed because they are replaced by the 16 × 2 LCD display.
The Fritzing diagram for the automated Nim setup is shown in Figure 4-10.
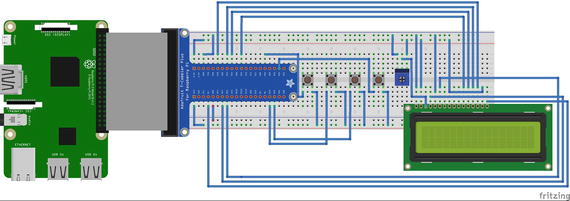
Figure 4-10. Fritzing diagram for the automated Nim game
There are obviously too many wiring connections in this setup than can be properly shown in a Fritzing diagram. Therefore, I have provided both a schematic showing the LCD-to–Pi Cobbler interconnections and a pin list showing all the system interconnections. Figure 4-11 is the LCD module–to–Pi Cobbler schematic.

Figure 4-11. Schematic of Pi Cobbler–to–LCD module
Table 4-5 is the pin list detailing all the board interconnections. Note that the LCD pin designations start at 1 at the left and go to 16 at the far right for the LCD orientation, as shown in the Fritzing diagram. The potentiometer is oriented “upside-down,” which places the pins on top. The left pin connects to ground, the middle pin to LCD pin 3, and the right pin connects to 5V.
Table 4-5. Pin List for Wiring Interconnections
From | To | Remarks |
|---|---|---|
LCD pin 1 | ground | |
LCD pin 2 | 5V | Vcc |
LCD pin 3 | middle lead - potentiometer | Contrast adjustment Vo |
LCD pin 4 | RasPi pin 27 | Register select |
LCD pin 5 | ground | Read/Write (R/W) |
LCD pin 6 | RasPi pin 22 | Enable (Clock) |
LCD pin 7 | - | no connection (Bit 0) |
LCD pin 8 | - | no connection (Bit 1) |
LCD pin 9 | - | no connection (Bit 2) |
LCD pin 10 | - | no connection (Bit 3) |
LCD pin 11 | RasPi pin 25 | Bit 4 |
LCD pin 12 | RasPi pin 24 | Bit 5 |
LCD pin 13 | RasPi pin 23 | Bit 6 |
LCD pin 14 | RasPi pin 18 | Bit 7 |
LCD pin 15 | 5V | Backlight LED anode |
LCD pin 16 | RasPi pin 4 | Backlight LED cathode |
left lead potentiometer | ground | |
middle lead potentiometer | LCD pin 3 | |
right lead potentiometer | 5V | |
stick button 1, left side | RasPi pin 12 | |
stick button 1, right side | 3.3V | |
stick button 2, left side | RasPi pin 13 | |
stick button 2, right side | 3.3V | |
stick button 3, left side | RasPi pin 19 | |
stick button 3, right side | 3.3V | |
exit button, left side | RasPi pin 20 | |
exit button, right side | 3.3V |
There are a lot of jumpers to connect in this setup, so be especially carefully when wiring the solderless breadboard. I recommend that you use a separate power rail for the 5V supply that should be located on the top of the breadboard if you are using a horizontal orientation for the board. Pay particular attention that you do not connect any 5V source to a Raspberry Pi input because it will surely destroy that input pin. The GPIO inputs are strictly limited to a maximum level of 3.3V, anything higher will burn out that input pin and likely cause further damage to the Raspberry Pi core.
Figure 4-12 shows the complete physical setup with each of the push buttons’ functions labeled.
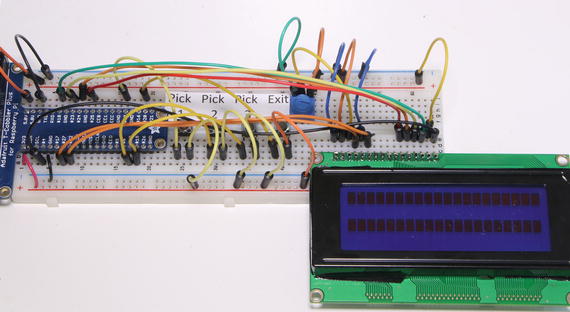
Figure 4-12. Physical setup for the automated Nim game
The program that controls this hardware is named automated_nim.py. It is based on the previous program, except all the inputs are now accomplished with callback functions and an LCD display is used to show the game status. I felt it was appropriate to first discuss how the LCD display functions with the Raspberry Pi before actually getting into the main program.
LCD Display
I will first acknowledge that most of the material in this section is based on a very good Adafruit tutorial by Tony DiCola available at https://learn.adafruit.com/character-lcd-with-raspberry-pi-or-beaglebone-black/overview .
Inexpensive 16 × 2 or 16 × 4 LCDs with 16 connector pins are most likely using a Hitachi HD44780 controller or a generic equivalent. The LCD uses a parallel interface, meaning that you need multiple wires from the Raspberry Pi to control it. This setup uses only four data pins and two control pins. This configuration is known as the LCD nibble input mode. The other mode is where a full byte, or eight bits, is transferred each time there is a new character input to the LCD. Obviously, the nibble mode is slower than the byte mode, but for this application, the speed difference is not apparent. The Raspberry Pi is only sending data to the display; it is not reading any data. This means that that you do not have to be concerned about any 5V pulses being sent to the more sensitive Raspberry Pi input pins that only have a 3.3V maximum voltage input, as I mentioned earlier.
The register select pin #4 on the 16-pin LCD header has two uses. When pulled low, the Raspberry Pi can send control commands to the LCD, such as change to a designated character position or clear the screen. This is mode is referred to as writing to the instruction or command register. When the register select pin is set high, the LCD controller goes into a data mode and accepts data to display on the screen.
The read/write pin #5 is grounded, because only data is to be written to the LCD for this setup.
The enable pin #6 is toggled as necessary to write data to the input registers that eventually display on the screen.
After you wire the LCD, push button switches, and potentiometer, you need to load a special Python library that allows the LCD display to work with the Raspberry Pi. This library was created by the clever folks at Adafruit, who have a lot of libraries to support all sorts of devices and sensors. The procedure I go through next is also applicable to loading most other specialty Adafruit libraries.
Loading the Adafruit LCD Library
You need the Git application to load the library because Adafruit uses github.com to store all of its libraries. Enter the following commands to install Git:
sudo apt-get updatesudo apt-get install git
Once Git is installed, you can now download the LCD library. This download process is called cloning. It results in new directory named Adafruit_Python_CharLCD created in your home directory. Enter this command:
sudo git clone git://github.com/adafruit/Adafruit_Python_CharLCDThe newly created directory contains all the required files for the next step, which is to set up the library. The setup process is long and involved; however, there is a simple setup script provided to automate the whole process. Enter the following commands to set up the library:
cd Adafruit_Python_CharLCDsudo python setup.py install
Figure 4-13 shows the beginning and ending of the install process. Overall, there are more than 70 separate actions taking place in the installation, including downloading and building multiple dependencies.
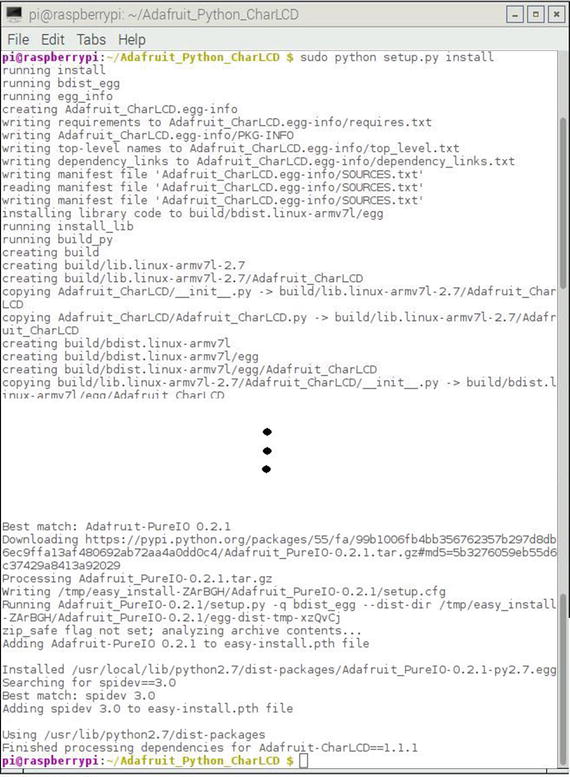
Figure 4-13. LCD library installation script execution
Now, you should test the both the hardware and the software installations to verify that everything is working properly.
LCD Test
The test program named char_lcd.py should be located in the examples subdirectory of the Adafruit_Python_CharLCD directory that was created after the Git clone operation completed. Go to the examples directory and enter this command:
python char_lcd.pyIf everything is wired correctly, and all the libraries are installed properly, you should see the display as shown in Figure 4-14.

Figure 4-14. Result of running the char_lcd.py program
If you do not see this display, please recheck all the wiring because it is pretty easy to misplace a jumper insertion point or connect to the wrong pin on the Pi Cobbler or LCD module. As I mentioned earlier, most faults are normally wiring or interconnection mistakes.
Assuming that the LCD test was successful, it is now time to consider the main Nim program.
automated_nim.py
This program has been substantially changed from the previous Nim program because of the need to incorporate callback functions and LCD display routines. I have also incorporated some AI logic into the program: the computer opponent now uses the game theory n mod 4 = 1 equation to help in its stick selection, in addition to using the random number generator when the optimal pick is not achievable.
automated_nim.py listing
!/usr/bin/python# import statementsimport randomimport timeimport Adafruit_CharLCD as LCDimport RPi.GPIO as GPIO# Start Raspberry Pi configuration# Raspberry Pi pin designationslcd_rs = 27lcd_en = 22lcd_d4 = 25lcd_d5 = 24lcd_d6 = 23lcd_d7 = 18lcd_backlight = 4# Define LCD column and row size for a 16x4 LCD.lcd_columns = 16lcd_rows = 4# Instantiate an LCD objectlcd = LCD.Adafruit_CharLCD(lcd_rs, lcd_en, lcd_d4, lcd_d5, lcd_d6, lcd_d7, lcd_columns, lcd_rows, lcd_backlight)# Print a two line welcoming messagelcd.message('Lets play nim computer vs human')# Wait 5 secondstime.sleep(5.0)# Clear the screenlcd.clear()# Setup GPIO pins# Set the BCM modeGPIO.setmode(GPIO.BCM)# InputsGPIO.setup(12, GPIO.IN, pull_up_down = GPIO.PUD_DOWN)GPIO.setup(13, GPIO.IN, pull_up_down = GPIO.PUD_DOWN)GPIO.setup(19, GPIO.IN, pull_up_down = GPIO.PUD_DOWN)GPIO.setup(20, GPIO.IN, pull_up_down = GPIO.PUD_DOWN)# Create the global variablesglobal playerplayer = ""global humanTurnhumanTurn = Falseglobal stickNumberstickNumber = 21global humanPickhumanPick = 0global gameovergameover = False# Set up the callback functionsdef pickOne(channel):global humanTurnglobal humanPickhumanPick = 1humanTurn = Truedef pickTwo(channel):global humanTurnglobal humanPickhumanPick = 2humanTurn = Truedef pickThree(channel):global humanTurnglobal humanPickhumanPick = 3humanTurn = Truedef quit(channel):lcd.clear()exit() # pin 20, immediate exit from the game# Add event detection and callback assignmentsGPIO.add_event_detect(12, GPIO.RISING, callback=pickOne)GPIO.add_event_detect(13, GPIO.RISING, callback=pickTwo)GPIO.add_event_detect(19, GPIO.RISING, callback=pickThree)GPIO.add_event_detect(20, GPIO.RISING, callback=quit)# random selection for the playersplayerSelect = random.randint(0,1)if playerSelect:humanTurn = Truelcd.message('Human goes first')time.sleep(2)lcd.clear()else:humanTurn = Falselcd.message('Computer goes first')time.sleep(2)lcd.clear()# The AI portiondef computerMove():global stickNumberglobal humanTurnif (stickNumber-1) % 4 == 1:computerPick = 1elif (stickNumber-2) % 4 == 1:computerPick = 2elif (stickNumber-3) % 4 == 1:computerPick = 3else:computerPick = random.randint(1,3)if stickNumber >= 4:stickNumber -= computerPickelif (stickNumber==4) or (stickNumber==3) or (stickNumber==2):stickNumber = 1humanTurn = True# The human portiondef humanMove():global humanPickglobal humanTurnglobal stickNumberwhile not humanPick:passwhile (humanPick >= stickNumber):lcd.message('Number selected ')lcd.message('is >= remaining ')lcd.message('sticks')stickNumber -= humanPickhumanTurn = FalsehumanPick = 0lcd.clear()def checkWinner():global gameoverglobal playerglobal stickNumberif stickNumber == 1:msg = player + ' wins!'lcd.message(msg)time.sleep(5)gameover = Truedef resetGameover():global gameoverglobal stickNumbergameover = FalsestickNumber = 21return gameover# This module controls the overall game playdef game():global playerglobal humanTurnglobal gameoverglobal stickNumberwhile gameover == False:if humanTurn == True:lcd.message('human turn ')msg = 'sticks left: ' + str(stickNumber) + ' 'lcd.message(msg)humanMove()msg = 'sticks left: ' + str(stickNumber)lcd.message(msg)time.sleep(2)checkWinner()lcd.clear()else:lcd.message('computer turn ')computerMove()msg = 'sticks left: ' + str(stickNumber)lcd.message(msg)time.sleep(2)checkWinner()lcd.clear()if gameover == True:lcd.clear()playAgain()# As the name suggests; play again?def playAgain():global humanPicklcd.message('Play again? ')lcd.message('1 = y, 2 = n')# This loop is needed to idle while waiting for a button presswhile humanPick == 0:passif humanPick == 1:lcd.clear()resetGameover()game()elif humanPick == 2:lcd.clear()lcd.message('Thanks for ')lcd.message('playing the game')time.sleep(5)lcd.clear()exit()# This function call kicks off the game playgame()
I believe you will find that defeating the computer in this program is quite difficult, which differs sharply from the earlier, more naive Nim program. Figure 4-15 is a photograph of the LCD screen captured while I was playing a round with the computer.
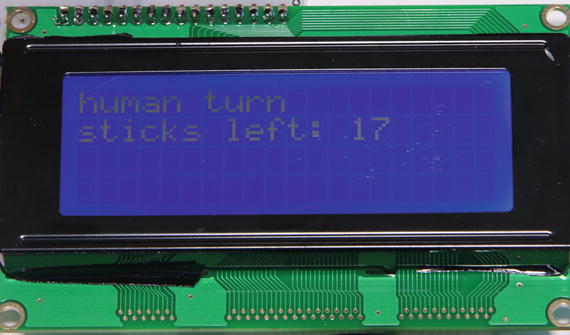
Figure 4-15. LCD display during round play
This automated Nim program is the final project in this chapter. There are more Python games readily available in the Jessie Linux distribution that you may wish to investigate. They can be found in the main X window GUI that is shown in Figure 4-16.
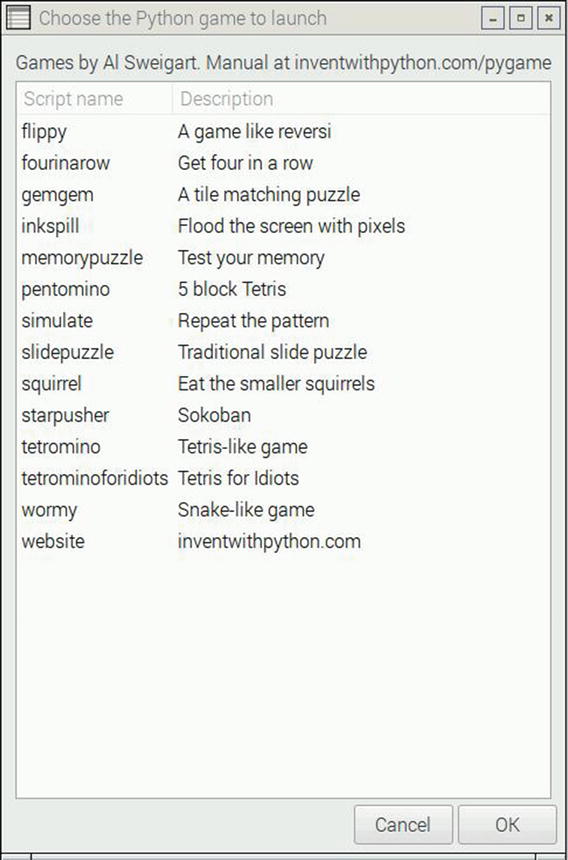
Figure 4-16. Additional Python games
These games are curtesy of Al Sweigert, whose website is at www.inventwithpython.com . At this website, you may freely download a 347-page e-book entitled Making Games with Python & Pygame, in which Al describes, in detail, how the games listed in Figure 4-16 function. It is highly recommended for those readers interested in taking the next step in Python game development beyond what I have discussed in this chapter.
Summary
Fairly simple game programs written in the Python language were the focus of this chapter. I presented several versions of two games—rock-paper-scissors and Nim—that progressed from relatively naive versions to more sophisticated versions incorporating AI into the computer opponent.
One of goals of this chapter was to show how fairly straightforward AI concepts can be implemented into classic game play where a human player opposes a computer program.
Another incidental goal was to demonstrate some hardware and software technology that included Python interrupts and to show how to use an LCD display with the Raspberry Pi.