In Chapter 2, you learned some basic GIMP operations for improving photographs: the cropping, rescaling, and brightness/contrast tools.
But what if you have a photograph that needs more help than that? I know I sometimes take a photo that comes out just as I'd hoped...except for the lamppost growing out of someone's head, or the overflowing garbage can right behind the subject. Or maybe that photo of the Grand Canyon would look so much nicer without the guy in Bermuda shorts talking on his cell phone.
In an ideal world, we'd notice these things before taking the picture. We'd be able to move a little and re-frame the photo to eliminate any distractions. But in practice, we all take at least some photos like that. Fortunately, GIMP can help!
This chapter will introduce you to the following concepts:
Darkroom work with Dodge and Burn
Smudging blemishes away
Using the Clone tool for more difficult jobs
Copying small regions
The Heal tool
Perspective cloning
Sharpening specific regions using the Convolve tool
Blurring backgrounds with Gaussian Blur
I don't know about you, but I take a lot of bad shots of people. Casual "models" like to stand with their backs to the sun, or wear a hat with a visor to keep the glare out of their eyes. I fire away, thinking it'll be a good portrait. But when I look at it later, it's a shot of someone whose face fades into darkness (Figure 6-1).
The answer, as any book on portrait photography will tell you, is to use fill flash: turn on the flash even though it's daylight. It illuminates the face even if the sun is in the wrong place. I've read those books—and I still forget to do it. Do you?

Fortunately, GIMP has the perfect tool to fix that, along with a host of other exposure errors: the Dodge/Burn tool. Typically, it's used when some small part of the image is too dark or too light.
Dodge and burn are terms from film photography. When making a print from a negative, some areas may come out too bright, others too dark. Photographic film can record wider exposure latitude than can be easily seen by viewing either the negative or the print directly.
The developer turning that negative into a photographic print gets to choose whether to use a long exposure (which will show detail in the light areas, but leave the dark areas too dark) or a shorter exposure (which will make the light areas solid white, but show more detail in the shadows).
That's not always good enough. When professionals make prints, they correct light and dark areas by hand. They place masks over small parts of the image to keep bright areas from becoming too white (burning), and to make sure dark areas get a little lighter (dodging).
The great photographer Ansel Adams often said that the photographic negative was like a musical score but the print was the performance. The time he spent making his prints perfect was a big part of what made his photographs so famous.
A digital camera can record exposure latitude roughly comparable to film. Your photographs contain a lot more information than you can see just by looking at them. GIMP's Dodge/Burn tool lets you adjust your digital photographs in much the same way that professional film photographers adjust their prints. And unlike Ansel Adams' technique, it doesn't require years of experience to learn! Or cost a bunch if you mess up.
The Dodge/Burn tool starts in Dodge mode by default. It uses a brush, like the drawing tools you used in Chapter 4—try a fairly large one to begin with.
The Dodge tool lets you choose between three modes: Shadows, Midtones, and Highlights. By default, it's set to Midtones, and that will work for many dodge or burn problems.
However, if you're trying to brighten a very dark shadow area, you may be better off choosing Shadows. Then the Dodge tool will selectively brighten the dark zones much more than other areas. That lets you be slightly sloppier with your brush technique: if you slide a little outside of the shadow, it won't be very noticeable.
Try that with Midtones and you'll see some of the area that's not in shadow also get brightened. However, Midtones may sometimes bring out a little more detail than Shadows.
Take a look at the Dodge tool's options, as shown in Figure 6-2.

Opacity makes the tool's effect more subtle—as if the brush were more transparent (the default setting is 100%).
The Pressure sensitivity options control how the tool can respond to pressure if you're using a drawing tablet. Mouse users can ignore them.
Fade out makes the stroke end after a certain distance. That's one way to ensure that you use short strokes!
Apply jitter is a new option in GIMP 2.4 that makes the effect less regular. On some images it may give a more natural effect.
The Dodge tool normally makes the edges of the brush slightly fuzzy, even if you're using a hard brush. Hard edge turns this off.
Finally, an Exposure slider controls the strength of the effect.
Time to get started! Choose Shadows or Midtones depending on how dark the area is, and then start scribbling.
The trick to dodging? Hold the mouse button down and try to cover a contiguous area all in one sweep. The Dodge tool is smart: it won't brighten the same area twice, so if you cross back over an area you've already covered, it won't get too bright. However, if you use separate strokes, you can brighten the same area more with each stroke.
Dodging can turn a failed portrait into a better one. It still won't look as good as if you'd used fill flash or the correct lighting, but it can make the difference between seeing someone's face and not seeing it.
But wait—can't you do all of this by making a feathered selection that covers the shadowed area, then using one of the brightness/contrast tools to make the area brighter?
Sure! In fact, by selecting and using brightness tools you'll have more control: you can use a tool such as Curves or Levels to brighten just the way you want. And if you use the Quic-Mask to define the selection, you can have full control over how much brightening happens and where, by making the selection more transparent in areas where you want the effect to be less pronounced.
But all that takes time. Dodging is a shortcut—a quick way to brighten small dark areas, especially areas that are hard to select. It can be a lot quicker—and often it's good enough.
Burning is the opposite of dodging—it makes light areas darker. Unfortunately, it's more difficult to use. The problem? In digital photographs, bright areas are often so "blown out" that there really isn't any detail left. The camera's electronics have reached their saturation point, and all they can do is record white.
When you use the Burn tool on areas that are completely white, all it can do is turn them gray, since it has no way to tell what colors or textures should be there.
That means that the Burn tool is best used on fairly small areas, or on areas that are only a little too bright rather than completely white. If you use it on a large white area, you'll end up with a large gray area, which will be surprisingly noticeable. But if you burn small spots of brightness, you can make them detract less from the subject of the photo.
For instance, in Figure 6-3 the glints off the water aren't adding anything to the image. All they do is distract from the subject and lead the eye away from the geese. The Burn tool can help.

When using Burn, it's especially helpful to open a second view, like you did in Chapter 4 when you were drawing: View
Note
When burning completely white areas, the mode makes a greater difference than it did when dodging shadow areas. You must choose Highlights; the other two settings will have no effect on the white areas. (Try it and see!)
Now use the Burn tool in the zoomed window to burn in the bright areas (Figure 6-4). It's hard to watch both versions at once, but fortunately there's no need: only the zoomed view will be changed while you're dragging. When you release the mouse button to finish the burn, then the other view will change. You can see the full effect of one burn operation. If it isn't what you want, undo and try again.

Notice that the edges of the burned area in Figure 6-4, burned with the largest hard-edged brush, don't blend in very well with their surroundings. Sometimes this doesn't matter, while other times it does—it depends on the image.
If you burn with a large hard-edged brush and the edges are too harsh in the final image, try using a fuzzy brush and being more careful with your brushstrokes. It takes longer, but you'll get a better end result.
Don't forget that you can burn the same area twice if it's still too bright after one burn. Of course, you can also change the tool's Exposure setting if you want a stronger effect everywhere. Be cautious of too much burning, though: it can create flat gray areas that become quite conspicuous in the final image.
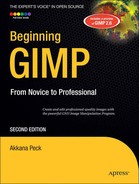
Many images only need a bit of easy correction. For instance, consider Figure 6-5. The power pylon on the right spoils the tranquil image.

One way to get rid of simple problems like this is by using the Smudge tool. Its icon in the Toolbox is a finger smudging, and that's exactly what it looks like when you drag the Smudge tool across an image (Figure 6-6). If you ever made finger paintings in kindergarten, the Smudge tool should seem familiar.
Notice that the Smudge tool picks up color underneath it, and distributes those colors as you continue to drag.
For this reason, most of the time you'll want to use short strokes when you smudge. Work from the color you want to keep (in this case, the sky) and gradually replace the colors you don't want (the power tower). Drag the sky color in on top of the power tower, and when it starts to turn dark, stop dragging, go back, and start again in the sky. Usually a large brush works best on photographs, because it takes too long to smudge with a small brush. Sometimes you can start with a large hard-edged brush, and then clean up any problems with a smaller fuzzy brush.
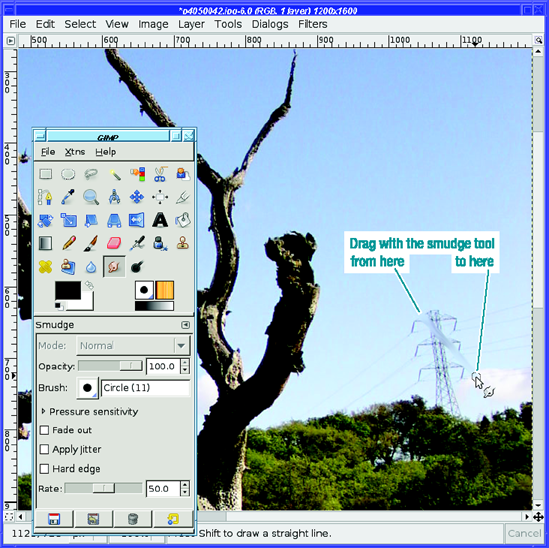
Eventually, after many short strokes, the unwanted object is gone (Figure 6-7).

After smudging an object out of a photograph, you may have residual color that you can't seem to get right. If you look closely at Figure 6-7, you may notice a faint darker area in the sky where the power tower used to be. It's difficult to end up with completely smooth color using the Smudge tool. Often, it's "good enough," and the tool is simple and fun to use. But if you want cleaner results, fear not! You'll learn several more accurate ways to paint out images.
Smudge is useful in drawing as well as image touch-up. For instance, if you draw a white blob (by filling a rectangle or an oval with white) and then smudge in small arcs, you can make new clouds (Figure 6-8). Smudging outward from the white area expands the size of the cloud; smudging inward from the sky into the growing cloud adds some darker "shadow" highlights that can make a cloud look more realistic.
The Smudge tool has the same Opacity, Pressure sensitivity, Fade out, and Hard edge options as the Dodge tool. In addition, it has a special option of its own: Rate.
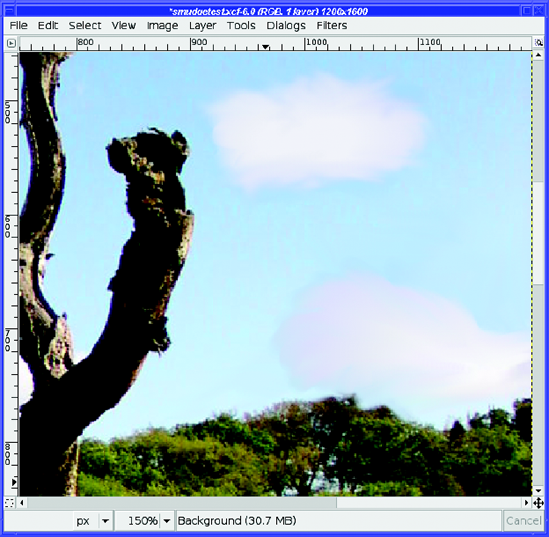
Rate controls the strength of the smudge effect. The default setting of 50% is good for most touch-up work. But you can get some interesting effects by increasing the rate. The 100% setting isn't very useful for image touch-ups, but it gives a strong smudge with a hard edge and no transparency that can be useful for drawing cables, shoelaces, caterpillars, or other stringy subjects (Figure 6-9).
The Smudge tool is fun and easy, but if you've used it you've probably already hit its limitations. It's hard to keep control of colors when you're smudging. More important, smudging smoothes out any textures that should be in the original. It's okay for clear blue skies and other evenly colored areas, but it wouldn't work to remove an object on a more complicated background, like the cars in Figure 6-10.

If you try to smudge objects out of areas like this, you'll just make a mess, like in Figure 6-11 (and give yourself a repetitive stress injury from pressing the mouse button too much). This inaccuracy is why finger painting never caught on in professional art circles, even though it was lots of fun to do in kindergarten.
The answer is the Clone tool. The Clone tool lets you duplicate a small area over and over, to paint an object out of a picture.
The first time you try to use it, you'll probably be frustrated. You click and drag, expecting patterns from nearby areas to be copied—just like with Smudge, only smarter. But nothing happens! The cursor shows a crossed-circle (Figure 6-12) saying "No"! Why won't it let you paint?

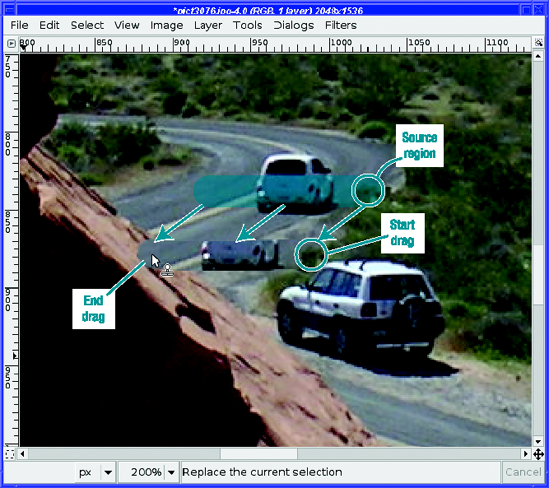
The key to the Clone tool is that it copies bits of image from one place to another. Before you can start replacing anything, you have to choose a place from which GIMP will copy—the "clone source."
Choose the clone source by clicking while holding the Ctrl key down. GIMP will mark the spot with a small cross. The source doesn't have to be near the area you're trying to cover; in fact, you can even clone from a different image, or a different layer in the same image.
The size of the brush isn't important when specifying the source—you're only choosing a starting point. Each time you begin a cloning stroke, GIMP will start copying from the clone source. Then as you drag in one direction or another, GIMP will clone whatever's in that direction from the source...until you release the mouse button. Then when you start the next stroke (by pressing the mouse button again), you'll start from the source again. (But see the discussion of alignment modes under "Clone Tool Options" later in this chapter to learn the various ways you can change that.)
Tip
As you paint with the Clone tool, keep an eye on the source region: GIMP will show you (with a subtle crosshair that moves) exactly which region is currently being cloned, which can be helpful if you're ever surprised at what's being painted.
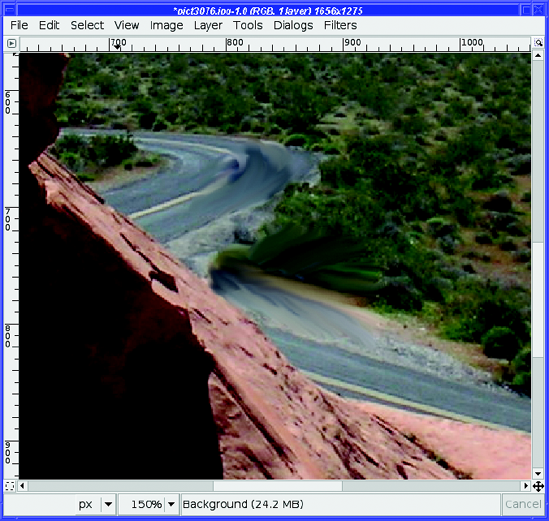
For instance, suppose that you Ctrl-click to choose a source region in the bushes just to the right of the lead car. Then move down a bit and drag along a line from right to left (Figure 6-13).
Getting the bush at the beginning of the dragged line was great, but you can see the drag got carried away. It went too far left in the original source region, grabbing the car, the centerline, and a lot of road.
For that reason, try to choose a source region that has a fairly large chunk of the pattern you're trying to clone (though that's not always possible), and use short strokes. Be careful not to drag too far, or you'll find the Clone tool paints something you didn't want, like the way it cloned part of the car in Figure 6-13. Also, if you're trying to paint a specific object out of the picture, use direction to your advantage. For instance, if you clone from below the car, painting with downward strokes (starting at the top of the car and dragging down) will pick up more road, while if you drag upward you'll just copy the car onto itself.
In the case of the lead car, this technique doesn't work so well: the road ahead of the car is curving, while the road behind it is straight. There's no source region that would curve just the right amount at the right place. The best bet is to find a source region somewhere else in the road (for instance, the empty road behind the car) and use lots of short strokes, being careful about the placement of the road's centerline.
As with most touch-up techniques, a fuzzy brush usually works best, unless you're cloning near a sharp boundary like the edge of a rock or tree trunk against the sky.
Tip
When covering an area, particularly a long thin area like this one, using Shift-click is helpful. Remember drawing lines in Chapter 4? Click on a point, and then hold down the Shift key while clicking to draw a line to your next point.
Change the source region whenever you need to. You'll probably need to grab from several different source areas (in this case, road, centerline, gray dirt, red dirt, and bushes, as in Figure 6-14).
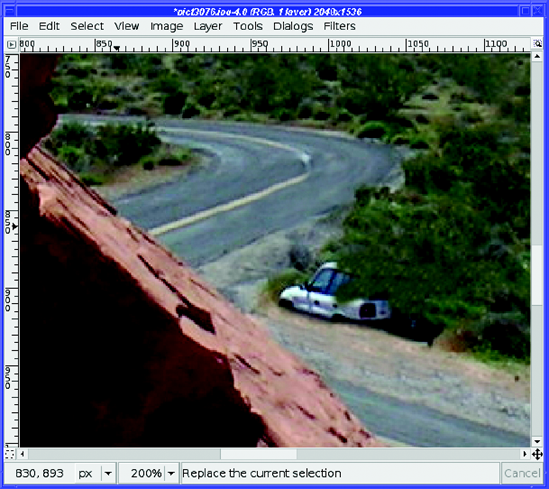
Finally, it's as cloned as it's going to get. But, as usual, it's not perfect.
You may have noticed in Figure 6-14 that the centerline doesn't go around the bend. That's because the Clone tool copies regions at least as large as the brush. With a large brush, it will always copy a centerline that's pointing in the wrong direction. How can you fix that?
One way is to switch to a much smaller brush, Ctrl-click on the centerline to use it as the source region, and then click repeatedly around the corner, making dots of centerline color (Figure 6-15).
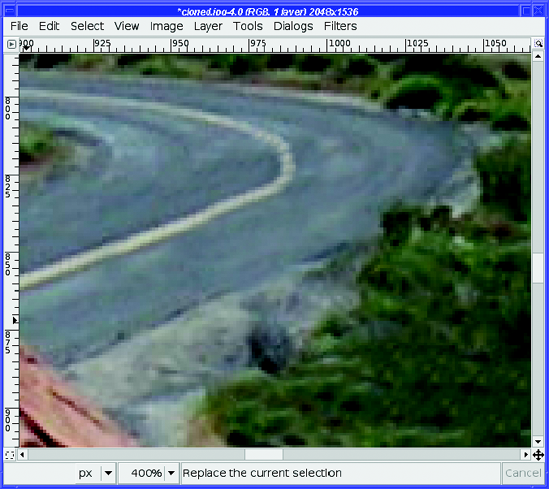
Use enough dots to fill in the line completely. Or, if you start feeling too dotty, use the Smudge tool (still with a small brush) to close the gaps between the dots.
Voilà! I don't know why I kept waiting for a gap between cars to take that photo. Getting rid of cars is easy (Figure 6-16)!
I haven't said much about the Clone tool's options. That's because most of the time, you won't need to change anything.
The collection of settings should be familiar from other tools you've already used: Mode, Opacity, Pressure sensitivity, Fade out, and Hard edge.
In addition, you can clone from one of GIMP's built-in patterns instead of from an image by changing the Source.
The only complicated option is Alignment (Figure 6-17). The default is None: for each stroke you make, the pattern GIMP will paint begins at the source origin (the place where you Ctrl-clicked) and proceeds from there.

In Aligned mode, the first stroke you make after setting the source will begin from the source origin, just as in None mode. But for subsequent strokes, GIMP will make each stroke relative to the last, so you can paint an exact copy of the source region as you keep making strokes.
In Registered mode, painting will clone from wherever you are painting, rather than from where you chose the source image. This is primarily useful for painting parts of one layer into another layer at the same position, or for copying parts of an image into a different image.
Finally, Fixed mode works a lot like the clipboard brush (described in Chapters 4 and 9): it uses only what's inside the brush outline, over and over.
Cloning works great for filling in small areas, or for painting patterns. But there are times when it's easier to copy a pattern all at once, in a single block.
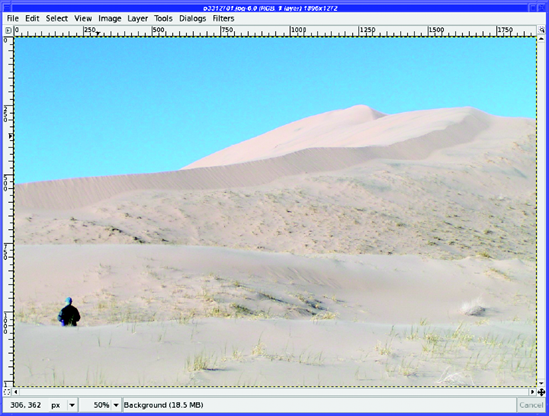
For instance, the dune view in Figure 6-18 would look better without the figure standing at the lower-left corner.
You could use the Clone tool to get rid of the person, but there's a faster way: copy a region shaped like the object you want to remove, and then paste it over the object.
Start by making a selection around the object. The selection doesn't have to be perfect—just make sure it's big enough to cover the unwanted object completely. With some feathering, the Lasso tool is usually fine for this job.
Now move the selection boundary to the area you want to copy. You can use Alt-drag to move the selection boundary (use Shift-Alt-drag if your system uses Alt-drag for something else). Or use the Move tool with Affect set to Transform Selection, and then just drag from inside the selection.
With the selection boundary in the right place (Figure 6-19), you can copy and then paste. Move the pasted selection back on top of the object you're trying to remove, and then fine-tune its position with the arrow keys until everything meshes (Figure 6-20).


Figure 6-20. Move the pasted selection back over the unwanted object. The selection and layer boundaries are shown.
You will probably want to turn off both the selection boundary (View
That's all there is to it! Quick and easy. If you need to clean up any details around the edges, the Smudge and Clone tools are good for making small corrections.
Tip
This technique also works well with "finger-in-front-of-the-lens" mistakes. Not that you'd ever do that!
The Heal tool (new in 2.4) is similar to the Clone tool, but with a difference: it combines the texture from the source layer with the color and lighting of the destination layer.
Confused? An example makes it a lot clearer.
Suppose you wanted to erase some of the petroglyphs in Figure 6-21. How would you do it?
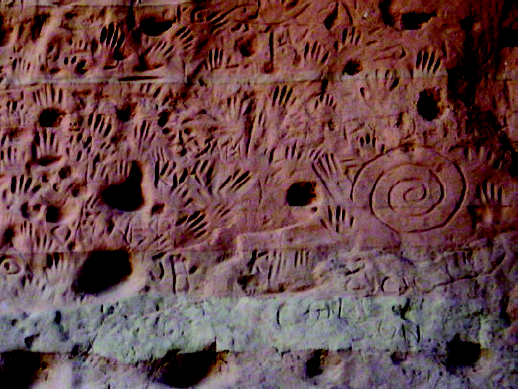
You could use the Clone tool—but from where? The petroglyphs cover almost the whole wall. There's a relatively unmarked area down near the bottom, but it doesn't match the color of the rest of the rock (Figure 6-22).
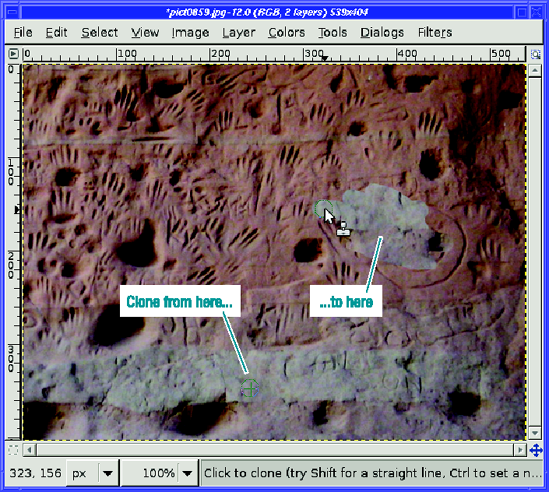
The Heal tool is perfect for a case like this. It can take the texture from the bare rock source area and let you paint it on top of the texture you want to erase. Just as with the regular Clone tool, you need to choose a source region by clicking somewhere with the Ctrl key held down. Then paint onto a destination region. Heal will take the color from the destination area where you're painting, so your new petroglyph-free rock will match the rock around it (Figure 6-23). Like the regular Clone tool, Heal will draw a moving crosshair on the part of the source region being used.

Heal's options are almost the same as those of the regular Clone tool, including the Alignment options explained earlier in this chapter. You may find that experimenting with different Alignment settings is useful, more so than with regular cloning.
The Heal tool is quite new in GIMP, and it isn't always as smart as you might hope. In particular, it can be difficult to cover large areas with it. On the other hand, it excels at small areas like skin blemishes or spot flaws such as dust marks. But whenever you need to clone an area to somewhere that's a different color or brightness, it's definitely worth trying Heal. After a while you'll get a feel for the sorts of images where it works well. It might even become your favorite touch-up tool.
There's another new cloning tool introduced in GIMP 2.4: Perspective Clone. Its specialty is images with perspective—images of scenes or objects that extend away or up from the viewer, as in Figure 6-24.

Figure 6-24. Using the regular Clone tool to copy one of the existing windows to the bottom of the tower results in a window that's way too small.
Perspective Clone comes to the rescue. It needs an extra step before starting a cloning operation: setting the perspective. Make sure the Mode option is set to Modify Perspective; then drag inward from each corner of the image, one by one, to make the perspective box line up with something in the image (Figure 6-25).

Figure 6-25. Make sure the perspective box lines up with something in your image. In this case, I've used the right edges of the windows rather than the tower itself only because that keeps the lower-right corner inside the image.
Warning
You may have noticed that Perspective Clone has two options named Mode. In addition to the Mode option discussed here, you can also set the drawing Mode option to the usual set of drawing tool options, as discussed in Chapter 4.
Once your perspective is set, change Mode to Perspective Clone and proceed as with a standard clone (Figure 6-26). Whatever you clone will be modified appropriately based on the perspective you've set. You can clone anywhere in the image—no need to stay inside the perspective outlines you defined. You can even choose a small object (such as a single window in this photo) to define your perspective, and the tool will still apply it to the whole image.

Your source region can be inside the same image and layer, as in this case where I cloned from the last row of windows to make windows lower down. But you're not limited to that: you can clone from another image that shows no perspective. You can even clone from one of GIMP's built-in patterns by choosing that pattern in Tool Options—but (at least as of GIMP 2.4.5) the pattern isn't modified to fit the perspective, so it's not clear how useful this is.
Like the Heal tool, Perspective Clone is new and doesn't always work as you might expect. But for certain types of photos, it can be a real time-saver.
Don't you hate it when you take a picture of something, and it turns out the focus was on the wrong place in the photo (Figure 6-27)?

You already know about Sharpen and Unsharp Mask from Chapter 2. But if you used those tools on an image like this, the parts that are already sharp would turn grainy. What you really need is something that can sharpen just the newt's face.
That's a job for the Blur/Sharpen tool (Figure 6-28), the tool formerly known as Convolve (and you may still see this term used in places, like the official GIMP manual).

The Blur/Sharpen tool lets you change small regions of an image just by dragging over them. The more you go over an area, the more it will blur or sharpen.
The tool's options include the usual drawing and touch-up choices, plus a switch for Convolve Type (this is where you choose between Blur and Sharpen). There's also a Rate slider to let you choose the strength of the effect. Since you can drag over the same area repeatedly, Rate doesn't matter as much as it does in some tools.
Dragging the Sharpen tool around the newt's head produces Figure 6-29.

You may notice that the area around the head, and especially the eye, has become a bit grainy. That's what happens when you sharpen something too much (as you may remember from Chapter 2, with Unsharp Mask). If necessary, you can zoom way in and clean up some of that with the Smudge or Clone tools and a very fine brush.
By the way, why was it called "Convolve"?
The name comes from convolution, the mathematical operation used to blur or sharpen an image.
The flip side of the Convolve tool is Blur. Why would you ever want to make something more blurry?
One good reason to blur is to de-emphasize a distracting background, like the second meerkat in Figure 6-30.
A little judicious use of the Blur tool on the rear meerkat's face, and suddenly the front one stands out much more (Figure 6-31). As with Sharpen, you can drag back and forth over the area you want to blur until it's as blurry as you like. (This technique also works well for hiding license plates or other incriminating details.)


DEPTH OF FIELD
The visual property that makes closer objects stand out is related to an effect photographers call depth of field.
Some cameras let you control the aperture of the lens, or how wide open it is. The f-stop is related to the aperture: the bigger the f-stop, the smaller the aperture. At an f-stop of F/2.8, a lens is fairly wide open, whereas at F/11, most of the opening has been closed off, as shown in the figure.

The curious "division" notation used, F/number, is actually somewhat descriptive. It's the result of dividing the focal distance of the lens by the current aperture diameter.
A wide open lens lets in a lot of light, so you can take photos in dimly lit rooms or with fast shutter speeds, but the larger the aperture of the lens, the smaller its depth of field.
Depth of field is the range of distances that are in focus. If your subject is a person five feet away from the camera, the photo might actually have good focus for everything from three feet away to the mountains in the distance ("infinity")—a large depth of field. Alternately, if the depth of field is very small, perhaps only the range from 4′11″ to 5′3″ away will be in focus—the person's nose may be in focus while his ears might not be!
Wouldn't having everything in focus be a good thing? In fact, it's often useful to have a shallow depth of field. If your subject is the only object in focus, then the eye is naturally drawn to that subject and away from the rest of the photograph.
Looking back at the meerkats, the original Figure 6-30 shows a large depth of field: both meerkats are in sharp focus. The modified Figure 6-31 simulates the effect of a shallow depth of field: only one meerkat is in focus, and the other one is blurry.
One problem: the photo now looks somewhat strange, because the background meerkat is fuzzy while the wall behind him is sharp. In the next section you'll see a better way of simulating a shallow depth of field over a wider area.
The Blur mode of the Convolve tool was an easy way to make part of a subject stand out. But what if too much of the background is busy and confusing, as in Figure 6-32? You could run the Blur tool over and over the background, but that gets tiresome. There's an easier way.

First, select the background (everything but the butterfly) using any combination of the techniques from Chapter 5, such as Paths, QuickMask, Foreground Select, or Intelligent Scissors. Then bring up the Blur filter: Filters
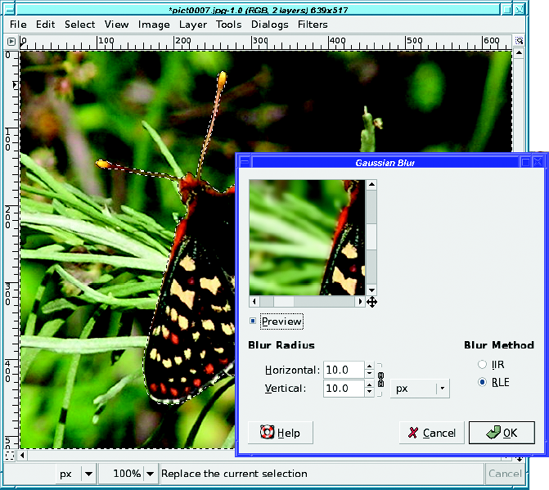
Gaussian Blur can use either of two Blur methods: IIR and RLE. It doesn't matter which one you use. They produce the same results, but switching to RLE may be slightly faster for images that are computer-generated or have large areas that are all the same color. IIR is a little faster for photographs.
Adjust the Blur Radius (which controls the amount of blur) while watching the preview. Make sure the Preview button is checked (it should be, by default). You can scroll around in the preview window if you need to.
As with most effects, the right amount of blur depends on how large (in pixels) your image is, as well as how strong you want the effect to be. Sometimes blurring too much can create an unrealistic, dreamy effect. This could be either good or bad, depending on your goal.
Usually you'll want to keep the Horizontal and Vertical numbers the same (they're linked together by default), but if you ever need them to be different, you can unlink them.
Tip
Sometimes that tiny preview window is annoying and you want a bigger one. With Blur it's particularly obvious, since it's hard to tell the overall effect of blurring the background from viewing only a small piece of an image. With most GIMP filters like Gaussian Blur, resizing the plug-in's dialog larger will also increase the preview area. To increase it permanently, see the section "Changing Preview Sizes with gtkrc" in Chapter 12.
When you're happy with the blur amount, click OK (Figure 6-34). You'll probably want to toggle the selection off temporarily (View
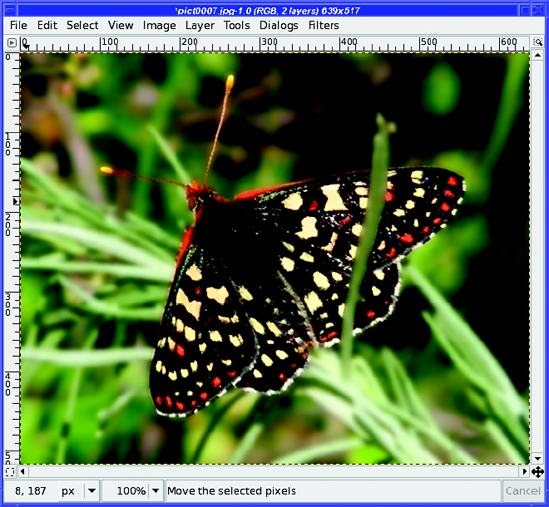
But you can overdo this effect, too. Figure 6-34 doesn't look quite right, because there's a lot of grass that's the same distance from the camera as the butterfly is (it's at the same "depth"), which wouldn't be so blurry in a real photograph. To make your blur effects more subtle and more realistic, try deselecting a little of the nearby background, as shown in Figure 6-35.
By now you should have a fairly good collection of tools for touching up any problems you might see in your photos.
You can dim bright highlights, and enhance areas that are too dark. You can sharpen or blur specific points, or large regions of an image. You know quite a few ways to paint unwanted objects out of a photograph or copy patterns or textures from another part of the image (or even from a different image)
These techniques can keep you busy for quite a while, especially if you have a large collection of photographs that could use some minor touch-up work of one sort or another.
But this is only a tiny sample of what GIMP has to offer! In the next chapter, let's explore some of the other filters, plug-ins, and tools buried within GIMP's menus.