Welcome to the GNU Image Manipulation Program—more commonly known as GIMP.
GIMP is the premiere open source image-editing program. It's powerful and fun to use...but it's also easy to get lost in when you're just starting out. This chapter will introduce you to the program, and offer some tips on how to get the most out of GIMP.
You'll become familiar with GIMP's interface—its most important windows, dialogs, and menus, plus some handy tricks and shortcuts. If you've already used GIMP a bit, a lot of the chapter may be review, but you may find some helpful tips you haven't seen before.
Along the way, I'll cover
GIMP, sometimes called the GIMP, is the GNU Image Manipulation Program.
It's a computer program for creating and editing digital images. In particular, it's designed for editing digital photographs and typical web graphics. You can also use it to make some pretty amazing drawings.
GIMP is a complex program suitable for professional artwork, but it's also just plain fun—a place to play with pretty pictures and let your imagination run wild. As you read this book, please keep that in mind. Make a point of "fooling around" and having fun with your image-editing projects.
GIMP is also free open source software. It's written and maintained by volunteers and distributed without cost. In fact, you're encouraged to make copies of it to share with friends, and you can even contribute to it yourself.
GIMP arose out of a 1995 computer science class project by Spencer Kimball and Peter Mattis. Within a year, it had grown into a popular open source image editor, with users and contributors from around the world. It's been growing and improving ever since.
Today, GIMP is used by countless people worldwide. It runs on most Windows systems, Mac OS X, Linux, and most versions of UNIX, as well as a few more obscure systems. The program is free software in both senses of the word "free": you don't have to pay anything to use it, and GIMP's inner workings ("source code") are available for anyone to examine, contribute to, distribute, or learn from. The latest is always available from http://www.gimp.org.
GIMP stands as a shining example of the power of free, open source software. It's written and maintained by volunteers who keep in touch by means of internet relay chat (IRC) and mailing lists, despite time zone and language differences. GIMP users who want to get more involved can participate in the GIMP project's mailing lists, contribute bug fixes or new features, design new brushes or patterns, or write their own plug-ins and scripts to share with the world. Or they can just enter goofy photo contests to show what cool things can be done with GIMP!
A note about terminology: you'll often see GIMP referred to as the GIMP."The GIMP" was the program's official name until the 2.4 release, when the name was officially changed to just "GIMP." You'll still see lots of references to "the GIMP" in tutorials and other articles (and even, sometimes, on the gimp.org website). In the second edition of Beginning GIMP I'll mostly avoid the "the" and call it just plain GIMP, but I hope you'll bear with me if I slip from time to time.
One of the first things you'll probably notice about GIMP is that it likes to use lots of windows. Instead of having one big window that contains the various images you're using, the GIMP model lets you control your toolbox, layer controls, and each image separately. You can choose which windows are visible at any given time.
The main windows you need to know about are the Toolbox with its Tool Options, image windows (one for each image you have open), and the Layers dialog.
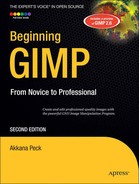
The Toolbox window (Figure 1-1) is GIMP's main window. It appears when you run GIMP without any images, and closing it exits the GIMP application. It has a menu bar where you can find GIMP functions that aren't tied to any particular image (though in GIMP 2.6, the Toolbox no longer has a menu and these functions will move to the image window menus—see Appendix D for more details). It also has a collection of tool buttons and a couple of helpful controls.
The tool buttons are the heart of the Toolbox window. GIMP has tools for selection (like Rectangular Select, the first tool in the Toolbox), tools for painting (like the Paintbrush, the tool that's active in Figure 1-1), and tools for changing images in a variety of ways. GIMP always has one active tool; if the active tool corresponds to one of the tool buttons, that button will appear "pressed," as with the Paintbrush tool in Figure 1-1.
You can resize the Toolbox to taste, and the tool buttons will adjust their positions. As GIMP comes out with new versions, the tool buttons sometimes change position, so it's best not to rely on a button being in any particular place. Each tool has a tooltip to help you remember its function, which you can see by hovering your mouse over a button and pausing for a second or two.
There are a couple of other ways to activate a GIMP tool besides clicking a Toolbox button. There's the Tools dialog, accessed from the Toolbox as File
You can also activate tools through the Tools top-level menu in every image window. Finally, most tools also have a keyboard shortcut associated with them; these shortcuts are listed in the image window's Tools menu.
Below the tool buttons, the Toolbox shows two color "swatches," initially black and white. These represent GIMP's current foreground and background colors, used in all sorts of operations. Clicking on either swatch brings up a color chooser. You'll use the color swatches a lot in Chapters 3 and 4.
Tip
GIMP supports drag-and-drop in many places throughout the application. You can open images by dragging them from your desktop or file manager window to the GIMP Toolbox—just drop the image on top of the buttons. (Unfortunately, this doesn't currently work on Mac OS X due to limitations in Apple's X11 package.)
You can configure GIMP to show some other useful selectors next to the color swatches; see the section "A Few GIMP Settings You Can Customize," later in this chapter, to learn which settings you can customize.
Below the color swatches is typically an area called Tool Options, which shows settings affecting the operation of the active tool. In Figure 1-1, the active tool is the Paintbrush, so the options showing are the ones for that tool. You can make Tool Options a separate dialog if you like (see the section "The Layers Dialog and Dialog Docking"), but most people prefer to leave it in its standard position, docked underneath the Toolbox. The buttons at the bottom of the dialog let you save or restore settings for the tool, or reset the options to their default values.
A toolbox is fine, but an image-editing program isn't any fun without images! GIMP uses a separate window for each image you open. That way, you can have big windows for big images, and small windows for small ones.
A fun and easy way to create an image window is to run one of the Logo scripts. There are lots of them (you'll see a complete list in Chapter 7), but for now, you just need one. Go to the Toolbox's Xtns menu (in GIMP 2.6, look under File
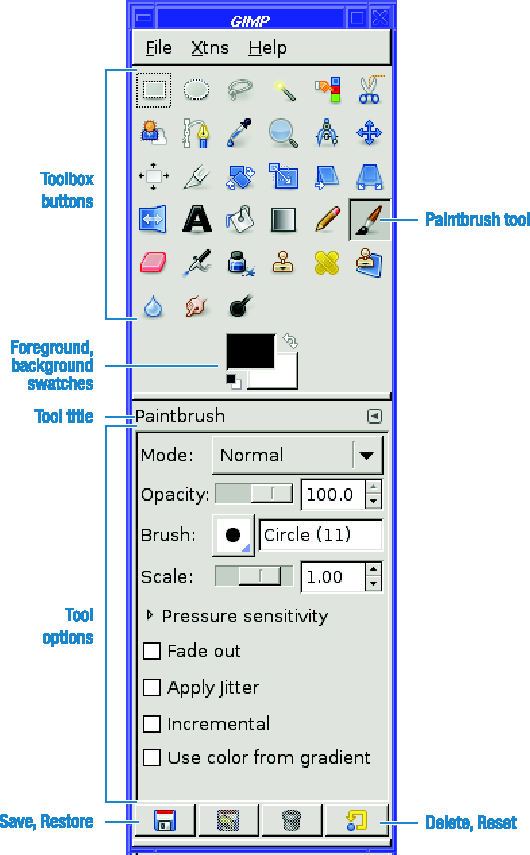
Let's start at the top. The image window's title bar gives information about the image: its file name and "view number," whether it's in full color (denoted RGB, for Red, Green, and Blue), the number of layers, and the current size of the image in pixels. You can change the information GIMP shows here; see the "GIMP Preferences" section in Chapter 12.
The window also has a menu bar, which offers a collection of operations for working on the image. You can hide the menu bar to offer more space for the image (Preferences again); in that case, use the menu button at the upper left of the window to show the menu, or right-click on the image to open the context menu.
The rulers at the top and left sides of the image window show the position of your mouse in the image. You can also use the rulers to set up "guides," gridlines on the image to help you draw exactly where you want (you'll meet guides in Chapter 4).
Moving down to the bottom-left corner, the QuickMask button helps with defining selections. See Chapter 5 for details.
The location area below the QuickMask button gives a precise readout of the current mouse position if your mouse is in the window (otherwise it's blank); the menu button next to it lets you display the mouse position in any unit you find most comfortable, such as pixels, inches, or points (most of the time, I recommend sticking with pixels).
The scale menu, or zoom control, shows whether the image is currently being displayed at actual size (100%), shrunk to a smaller size, or magnified to a larger size. There are lots of other ways to zoom, too. You can use the View
The status bar along the bottom of the window shows more information about the image: specifically, which layer is selected and how much memory the image is using. It also shows a progress bar when GIMP is performing a time-consuming operation, with a Cancel button right next to it.
The navigation control at the bottom right lets you "pan" around the image instead of using the scrollbars (click on it to see how it works). For images that are too big to fit on the screen, panning can be quicker than scrolling. You can also pan by dragging anywhere in the image window while holding down the middle mouse button, or by holding down the spacebar while dragging in the image with the left button. (You can configure the spacebar to call up the Move tool rather than panning: see the section "A Few GIMP Settings You Can Customize," later in this chapter).
GIMP has a lot of useful dialogs—you can see the whole list from File
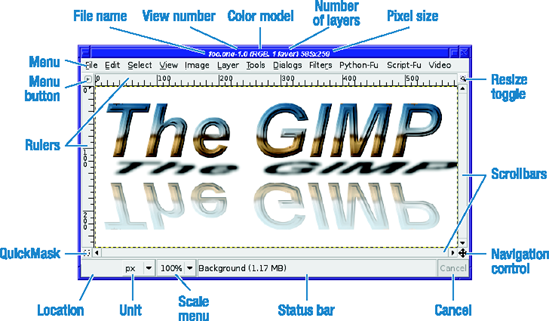
Each separate dialog window is called a dock, and can hold quite a few dialogs inside it. Aside from the Toolbox, GIMP 2.4 initially makes one dock visible (Figure 1-3).
Figure 1-3. The Layers (top) and Color (bottom) dialogs docked together, along with many other dialogs also docked (see the tabs above "Layers" and above "FG/BG Color")
Initially you can see two dialogs in this dock: the Layers dialog (the top half) and the FG/BG Color dialog (the bottom). But there are many more dialogs docked here, visible only through tabs. The Layers half of the dock also includes tabs for Channels, Paths, and History (Undo), while the Color half includes tabs for the Brush, Patterns, and Gradients dialogs. Select any tab to make that dialog visible.
But you're not stuck with this layout: you can group dialogs together any way you like, using docking (Figure 1-4). Press and hold the left mouse button in the drag handle area—the title area or tab, highlighted as "Drag from" in Figure 1-4—and drag to where you want the dialog to be. You can drag to the drag handle or tab area of another dock, and the dialog will be added as a new tab; or you can drag to the docking bar at the bottom of an existing dock to create a new dialog area below what's already there. Take care to drop exactly where you want the dialog to end up: if you drop between two tabs of an existing dock, that's where the dragged dialog's tab will end up.
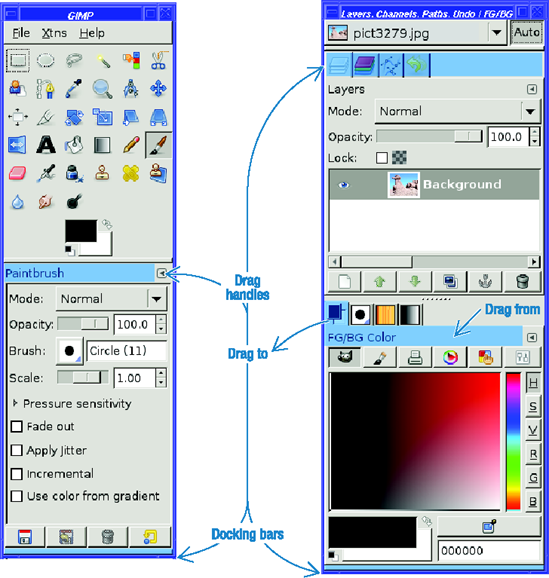
You can also drag a dialog to your desktop, which gives you a new dock window containing only that dialog. Finally, from the Toolbox File
Warning
When you close a dock containing several dialogs, GIMP 2.4 will forget how they were docked— even if it was just GIMP's default initial configuration. There are two ways to get the default configuration back: you can build them up from the combinations in File
I'll refer to dialogs by their individual names throughout this book. In particular, you'll be using the Layers dialog quite a lot starting with Chapter 3, and I'll just call it the Layers dialog—it doesn't matter whether you keep it by itself or docked with seven other dialogs.
You'll learn all about the functions in GIMP's menus as you explore later chapters, but here's a quick tour of which menu does what.
The Toolbox menu bar offers operations that don't apply to a specific image. This includes File operations such as New and Open, the Dialogs menu, a Help menu for online help, and a menu labeled Xtns (short for "Extensions").
Of particular interest is the Xtns menu. This menu gives you access to a menagerie of extensions that can create new images. Included are submenus offering a collection of scripts to create various styles of text logos, buttons (for use on web pages), shapes such as a sphere, interesting patterns and brushes, and themes you can use for web pages.
The Xtns menu also contains GIMP's Plug-in Browser. Many of GIMP's functions are implemented as plug-ins, and it can sometimes be difficult to find a specific function in the menus. The Plug-in Browser lets you search for plug-ins by name, and then tells you where in the menus you can find them. See Chapter 11 for more details.
Note
Don't get too attached to the Toolbox menus. In GIMP 2.6, the Toolbox will no longer have a menu bar, and all those functions will move to image window menus. This will include a new top-level Windows menu you can use to access any dialog or any currently open image—it also includes a helpful Recently Closed Docks category—and a menu under File
The Toolbox menus also offer another very handy feature: tear-offs.
GIMP has a lot of features, and exploring can get frustrating when you want to try out lots of different options that are buried in the same deep menu. Tear-offs can help: they let you grab any menu and turn it into a window of its own.
For instance, suppose you want to explore GIMP's long list of Logo scripts, available from the Toolbox's Xtns
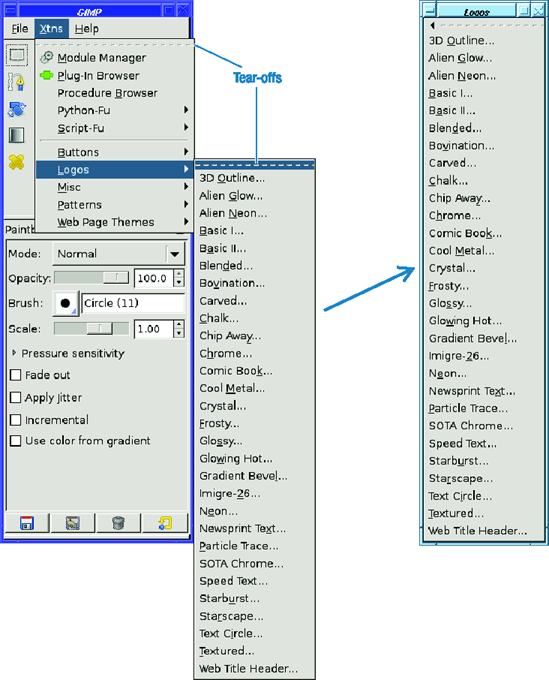
Tear-offs can save you a lot of time and frustration. So when you start exploring the image window menus, you might be disappointed not to find them there as well.
GIMP can tear off image window menus, but there's a trick. Every item available through the image window's menu bar is also available as a context (right-click) menu. In fact, some GIMP users prefer not to show the image window menu bar at all, and use that extra space to show more of the image they're working on (you can show or hide the menu bar with View
Context menus are useful even if you don't use tear-offs. Some dialogs, like the Layers dialog, don't have a menu bar at all, so you perform most Layers operations by right-clicking on a layer to get a context menu.
The image window's menus, when combined with the tools in the Toolbox, make up the heart of GIMP. Everything you'll need to do to modify an image should be accessible here.
The File menu contains familiar file operations: New, Open, Save, Save As.... Don't neglect the Open Recent submenu: you can use it to get back quickly to images you've edited in the past few days.
Edit includes the usual Cut, Copy, and Paste operations, which you will use frequently to move information between images and layers. Other useful items in this menu are Clear (which erases the contents of the current selection) and three variants of Fill with. Most of the items in the Edit menu have keyboard equivalents. You may find it useful to learn the shortcuts for these items since they're used so often.
The Select menu controls actions that modify the current selection. You can select All or None, Invert the selection (select everything not currently selected, and vice versa), make the selection smaller (Shrink) or larger (Grow), or make its edges fuzzier (Feather) or sharper (Sharpen). You'll work with these operations in Chapter 5.
The View menu controls how you see the image. Items in this menu don't change what will be saved to disk, merely the way you see it on screen as you edit it. The menu includes a Zoom submenu that lets you zoom in or out on the image (this does not make the image any bigger or smaller when you save it; it merely changes your view of it), a Shrink Wrap option that fits the window to the image being displayed, and a Fullscreen option, as well as toggles to select whether various attributes such as the selection, guides, rulers, layer boundaries, grids, and the menu bar are visible. If you want to change any of those attributes permanently, you can do so in the Preferences for Image Windows
Tip
An easy item to overlook in the View menu is the very first one: New View. It lets you have more than one view of the same image. For example, you might have one window showing the image zoomed in so you can change individual pixels, and another showing the image at normal size to see what the image will look like when you've finished. They're both still the same image as far as GIMP is concerned: any changes you make in one view will be reflected in the other.
The Image menu contains functions that apply to the current image as a whole, while the Layer menu contains functions that operate only on the current layer. In some cases they look like copies of each other: for instance, Transform, Scale, and Autocrop appear in both menus. But they're different in whether they affect a single layer or the whole image. This distinction will become much clearer in Chapter 3 when you start to use layers.
The Colors menu contains functions related to (you guessed it) the colors of the image. GIMP versions 2.2 and earlier located this menu inside the Layer menu.
The Tools menu gives you another way to access the stuff in the Toolbox window. Most of the time you'll probably keep the Toolbox open and access tools through Toolbox buttons, but the menu does offer access to tools that aren't showing in the Toolbox.
The Dialogs menu gives you access to any dialog, whether or not it's currently visible; it's the same as the File
Filters provides access to the plethora of image filters and plug-ins available in GIMP. Most external plug-ins you install will also show up under Filters. (In earlier versions of GIMP, some of these functions appeared in additional menus such as Script-Fu and Python-Fu.)
First: you don't need to change any of these preferences. GIMP should work fine out of the box. But there are a few options here that can make a big difference to your GIMP experience. I'll mention some of my favorites; if you want more details on GIMP's preferences, you'll find them in Chapter 12.
You'll find all of these options in the Preferences window, Edit
In the Toolbox category, you can choose Show active brush, pattern & gradient as well as an option to show the foreground/background color swatches. I recommend enabling both: it doesn't make the Toolbox much larger, and if you have the pattern and gradient in the Toolbox you can drag them into the image, a really easy way to fill areas. You can also choose Show active image here, but that's less useful.
Under Tool Options, look at Scaling: Default interpolation and make sure it's Cubic or Sinc (Lanczos). Either of those settings is fine (the difference is subtle). Some GIMP versions defaulted this to Linear, which will give you far worse quality, especially if you ever scale images larger.
Default Image lets you set the size for images you create with File
Image Windows offers Resize window on zoom and Resize window on image size change. Both of these options are helpful if you get tired of resizing your window every time you zoom or scale.
Window Management is a tricky section. But it nevertheless can make a big difference in usability, with several key choices:
Window Manager Hints for the Toolbox and for other docks controls whether these windows are considered as top-level windows or as transient dialogs. On Windows you may prefer Utility window here, since it reduces the number of entries that show up in your taskbar. Linux users may prefer the extra flexibility that goes with Normal window. Keep above is a compromise between the two.
Activate the focused image is on by default, but Linux users who use "pointer focus" ("focus follows mouse") will want to disable it. Otherwise the active image—the one reflected in the Layers dialog—will change every time you move the mouse across the screen. If you do disable it and need a way to activate a particular image, move the mouse into the window and press the spacebar or a modifier key like Shift or Ctrl.
Save window positions on exit is something most users will probably want, so GIMP remembers where its toolbox and docked dialogs are.
Of course, GIMP has a lot more preferences. You can explore as much as you want, or take a look at Chapter 12, where they'll be covered in much more detail.
In the Interface category, Use dynamic keyboard shortcuts is a great feature you won't find in most programs. If there's some GIMP operation you do all the time, you can put it on a key, even if it didn't have a shortcut assigned by the developers.
For instance, let's say you do a lot of screenshots and you find yourself going to the Toolbox File
Why Shift+S—why not assign it to just S? Single-key shortcuts without any modifier key like Shift or Ctrl can conflict with menu "mnemonics," or "access keys." To assign a bare key to a function, you may need to turn off mnemonics (using the Preferences checkbox just above the one for dynamic keyboard shortcuts)—or use Edit
Now navigate through the menus to where Screenshot is: click File
I mentioned the Edit
Enough exposition. The only way to learn GIMP is to edit images, so let's get started!
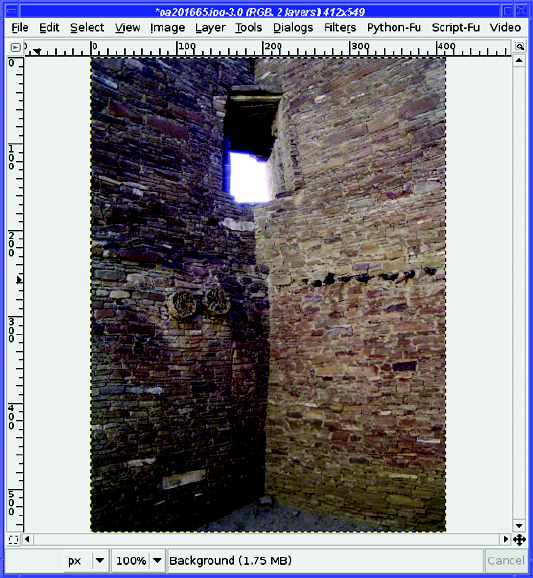
Begin with any photo you like. I'll start with a vacation photo: some Anasazi ruins from Chaco Canyon in New Mexico.
You can use an image you already have in a file on your hard disk, and use GIMP's File
Tip
What if you don't have any images of your own yet? See "Where to Find Freely Available Images" in Chapter 12, or under "Outside Links" on this book's website, http://gimpbook.com.
When you drop the image (release the mouse button) over the Toolbox window, a new image window appears (Figure 1-6). At this point, you don't yet have a copy of the image on disk; that won't happen until you save it and give it a file name.
To jazz up the image, it's time to introduce a new character: Wilber (Figure 1-7). Wilber is GIMP's mascot, drawn by GIMP contributor Tuomas Kuosmanen ("Tigert").
Images of Wilber can be found on GIMP's website, http://www.gimp.org, if you hunt around, or on the website for this book under "Photos from the book." Of course, feel free to substitute your own favorite character.
Tip
When you're inserting a character like Wilber into another image, you'll usually want the Wilber image to have a transparent background so you don't end up with a white square around the image you inserted. You'll learn more about image formats in Chapter 2, and about ways to separate a foreground object from its background in Chapter 5. For now, look for an image in GIF or PNG format that already has a transparent background. In Google image search, the image format is listed next to the size, for example, "300 × 225 - 92k – png."
Once you've found the image you want, whether online or on your local disk, drag it from the browser window into the GIMP image window you already opened. GIMP will add the image to the current window as a separate layer (Figure 1-8).
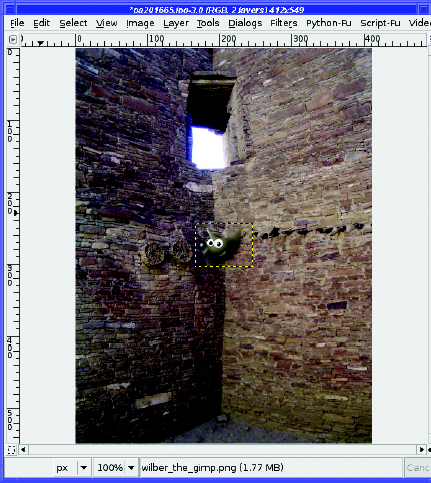
If you have your Layers dialog open, you may notice a new layer has appeared. If not, don't worry about it; you'll learn about layers in Chapter 3. The yellow and black outline around Wilber is the layer boundary: it shows the size of the layer. It's not really part of the image, and will not be visible when you save the image.
Wilber appears in the middle of the image, which probably isn't where you want him. In my Chaco image, I want Wilber's head to appear in the window. To move a layer, click on the Move tool in the Toolbox window (Figure 1-9).

With the Move tool active, you can drag the layer around with your mouse to position it exactly where you want it. Then save the image: choose File
Figure 1-10 shows the final image.
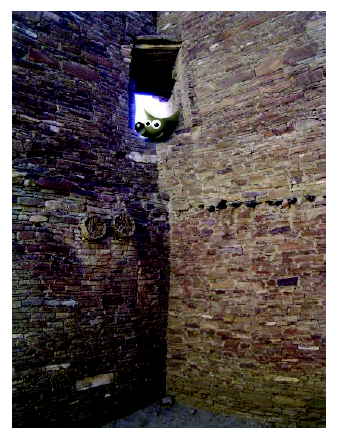
That's all there is to it! Now you can invite Wilber (or any other character you like) along on your next vacation.
At this point, you should have a basic understanding of GIMP's windows, menus, and preferences. You've seen how to create text logos using the built-in Logo scripts, and how to combine two images in a simple GIMP project. Perhaps you've spent some time playing with some of GIMP's built-in filters and plug-ins and getting comfortable with its interface.
Now let's move on to the details of image editing. Chapter 2 will cover photographs: how to work with them, and a collection of ways GIMP can improve a flaky photo.