You've already worked a little with GIMP's simplest selection tools: Rectangle, Ellipse, and Free (Lasso) Select.
So far, you've used selections primarily for drawing. But selections are more commonly used to choose one part of an image and ignore the rest.
It comes up in all kinds of situations. Perhaps you have a photo of a person against a complicated background, and you want to make the person stand out more, or paste a portrait onto a simpler background. Or you might want the opposite of that: to erase someone or something from a photo.
You may want to change or enhance part of an image—remember how the Bucket Fill tool could change the sky but not the rest of the photo in Chapter 4?
Sometimes it's just a simple touch up. For instance, you might need to take black text on a white background and change it to green text on a yellow background.
These are all selection issues.
If you've ever tried to use the Free Select (Lasso) tool to cut out parts of an existing image, you probably reached its limitations quickly. It takes a very steady hand, and if you make a mistake you have to start all over again.
Never fear! GIMP has quite a few tools for selecting shapes in existing images, in as much or as little detail as you need.
In this chapter, you'll learn about
Working with selections
Select by Color and Fuzzy Select
Bezier paths
The Intelligent Scissors tool
Modifying selections with selection modes
The QuickMask
Highlighting foreground objects
Using channels to save a selection
Layer masks
Extracting foreground objects with SIOX
You know you can copy a selection and paste it somewhere else—like selecting Mars and pasting it into the poodle image in Chapter 3. But what else can you do with a selection, and how can you tell when something is selected?
When you have a selection in an image, be aware of the selection boundary. It's a black-and-white dashed outline around whatever is currently selected. The dashes along this line move, making the selection outline seem to shimmer. This changing outline is dubbed the marching ants, and you'll see the term used a lot.
The marching ants are helpful for telling you when you have a selection and where it is. But they can also get in the way, particularly when you're trying to blend in an object pasted from somewhere else, as you'll see. For this reason, it's very helpful to be able to hide the marching ants using View
Squashing ants like that is so often useful that you may want to learn its keyboard shortcut, Ctrl+T (T stands for toggle selection boundaries). Another Ctrl+T will bring the ants back.
As useful as this is, though, it's also a major source of confusion. Once you've hidden the marching ants, you have no way of knowing whether anything is selected. (If you want another way of keeping track of what's selected, try the Selection Editor dialog, available in the Dialogs menu. You can even add it to one of your existing docks.) If you try a GIMP operation that works only on the selection—which means most GIMP operations—you may be surprised when nothing happens.
Warning
When you hide the selection boundary, try to remember to show it again as soon as possible. If you forget, you may regret it.
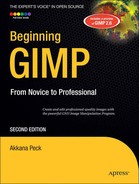
Take a quick look through the Select menu (Figure 5-1), which contains a number of operations affecting the current selection.
All and None select the whole image, or make sure nothing is selected. You'll use these operations a lot, and it may be worth learning the keyboard shortcuts for them (Ctrl+A and Ctrl+Shift+A, respectively).
Invert reverses the selection: whatever is selected becomes deselected, and vice versa. You'll see why this is useful later in this chapter.
Float cuts out the selected area (leaving white or transparent behind) and pastes it as a new floating layer. (Ctrl+Alt-dragging a selection can also float it, but only under certain conditions—see the "'Confirming' Rectangle and Ellipse Selections" sidebar in the next section.) Float may seem very similar to Cut followed by Paste. So why use it? One reason: Float keeps the selected area in the same location in the image. Paste usually centers whatever you're pasting, losing any information about where the selection was.
By Color switches to the Select by Color tool, discussed later in this chapter.
From Path converts the current path to a selection.
Selection Editor brings up a dialog with a few options that mostly duplicate other functions.
Feather makes the edges of the selection fuzzy.
Sharpen does the reverse, making a fuzzy selection sharper. However, if your selection is fuzzy because you've just feathered it, you're best off undoing that feathering step to get back exactly what you had before.
Shrink and Grow make the selection larger or smaller.
Border replaces a selection with a new one that follows the border of the old selection (Figure 5-2). You can fill this with a color or pattern using the Bucket Fill tool to create an effect much like stroking the selection; or you can use it to blur the edges of a pasted selection that wasn't feathered; or you may find other uses for it.
Rounded Rectangle rounds the edges of a rectangular selection. Making a rectangle with feathering is another way of rounding a rectangular selection; but Rounded Rectangle gives you nice rounded edges that are still sharp, while feathering will make the edges fuzzy. (You could sharpen the edges afterward, but that's more work.) You'll learn about the QuickMask and channels later in this chapter.
To Path converts a selection to a path. Then you can edit it using the Bezier Paths tool (explained later in this chapter), stroke it, or save it in a vector-graphics format.
In GIMP 2.4, dragging a selected rectangle or ellipse moves the boundaries of the selection, not the part of the image inside it. If you've used earlier versions, this may seem like a big change.
The important distinction is between moving the boundaries of the selection and moving the contents of the selection. Here's how it works in GIMP 2.4: in the Rectangle and Ellipse Select tools, starting a drag from the middle of the selection will move the selection boundaries, without changing the image at all. It just means a different part of the image will be selected. Dragging near the edge of the selection (in the areas called drag handles) lets you change the size of the rectangle or ellipse. This makes it easy to make a selection exactly where you need it.
Dragging with the Ctrl and Alt keys pressed from inside a selection will automatically float the selection and then move it along with the mouse, leaving a hole behind...but only once the selection is "confirmed" (see the sidebar). It's the same as doing a Select
Some other selection tools, such as Lasso (Free) Select and Select by Color, don't need confirmation—they always behave like a confirmed selection. With these tools, starting a drag inside an existing selection will cancel the old selection and start a new one, while Ctrl+Alt-drag will float the selection contents and move them.
Some modifier keys also have an effect on the current selection mode (see the "Modifying selections with selection modes" section later in the chapter). Keep an eye on the tool options area when you first press a modifier key—if a modifier has an effect on the mode, the tool options will change to reflect that. The cursor, too, will change to give you hints on what mode you're in and what you can do.
Tip
If you ever start dragging a selection and wish you hadn't, GIMP has a fancy way to cancel a mouse operation. Press the right mouse button while you're still dragging with the left button. Keep holding the right button down as you release the left. Whatever you were dragging should pop back to where it started. (You can release the right button now, too.) Hitting Esc while dragging may also work in some versions of GIMP. Of course, if you forget these, undoing always works.
In versions of GIMP before 2.4, dragging from inside a selection moved the selection contents, leaving a hole behind, while Alt-drag moved the selection boundary. If your computer uses Alt-drag for something else, you can sometimes use Alt+Shift-drag for the same purpose.
If all these modifier keys are too confusing to remember, you can always move a selection boundary by using the Move tool with its mode set to Transform Selection.
Select by Color is a very valuable tool in your selection arsenal. You can use it on images where you want to separate a foreground from a simple background.
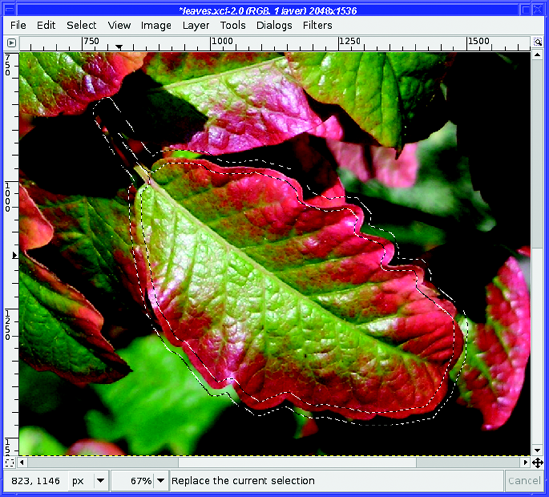
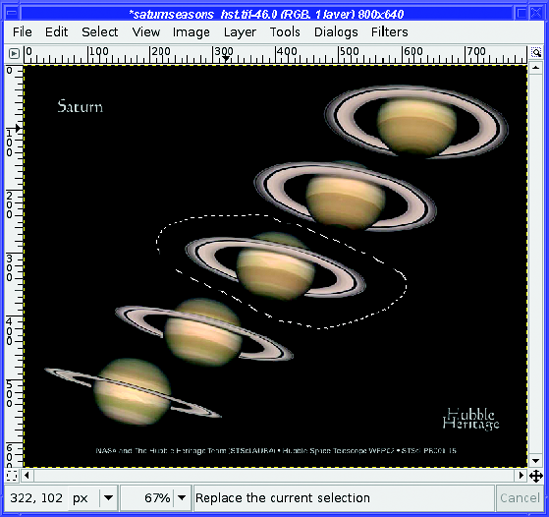
For instance, the Hubble Space Telescope folks offer a poster showing several views of Saturn (Figure 5-3). I'd like to cut out the central image to make a Saturn that I can paste anywhere.
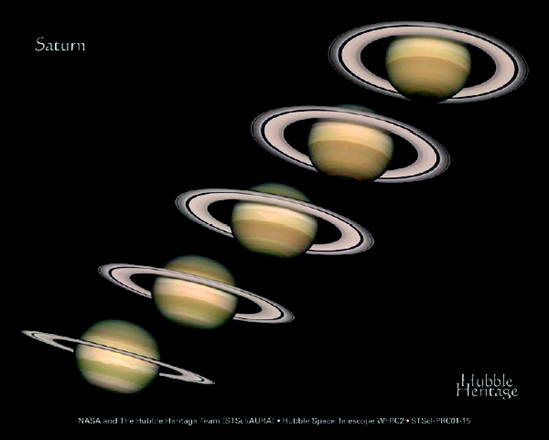
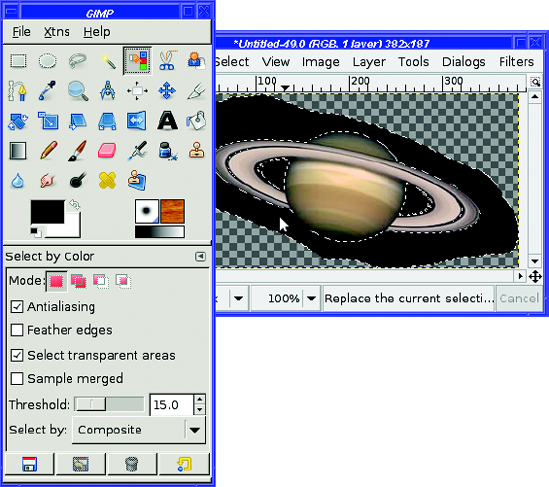
The first step is to single out just one of the Saturns. Since that doesn't involve any fine detail, I'll use the Lasso (Free Select) tool (Figure 5-4), and then use Copy and Paste as New.
Now it's time to use Select by Color. There's a button for it in the Toolbox (Figure 5-5), or you can use the Select
Click in the image, on the color you want to select. In this case, I'll select the black sky: I'm trying to select everything that isn't Saturn. Why? Because that's easier than selecting Saturn. The sky is all one color; Saturn isn't.
Notice the tool options.
The Finding Similar Colors options work the same way as they did for Bucket Fill in Chapter 4. With Threshold at 0, only colors exactly the same as the one you click will be selected. With a higher threshold, GIMP will include colors that are similar but slightly different.
The marching ants appear as soon as you press the mouse button down in the image. If you don't like the threshold when you first click, don't let up on the mouse button: you can change the threshold by dragging. Drag down or right to include more in the selection, and drag up or left to include less. (In GIMP 2.2, Select by Color didn't offer this option.)
If you aren't happy with what you're getting, you can always release the mouse button and click somewhere else. (If you undo first, the operation won't clutter up your undo stack, but it's not mandatory.) When you're trying to select an area that isn't all exactly the same color, like a sky, where you click in the image can make a big difference in what gets selected. Try clicking in different places with the same threshold to see how that changes the selection.
Select by Color offers the usual selection tool options you used in Chapter 4, Antialiasing and Feather edges. It also offers the option Select transparent areas—which allows the tool to include transparent parts of the image (they don't match the color you've chosen, of course, but they might be included if you've turned on feathering). Sample merged means that GIMP will look at the color that you see displayed, even if it comes from a layer that's not the active one.
Finally, new for 2.4, there's a menu that lets you select the method GIMP will use to decide which colors are similar. Composite is the default, and looks for colors that are similar in all respects. Hue, Saturation, and Value come in handy for many different tasks: they can help you separate a blue sky from green grass (Hue) even if there are lots of shades of blue and green, or to separate a bright sky from a dark tree (Value), or even to choose clouds out of a blue sky (Saturation). Red, Green, and Blue are not quite as useful: they let you restrict the comparison to only one hue.
But we don't need any of those options to select the simple black background from Saturn. Now that everything that isn't the planet is selected, you can make a transparent Saturn image by clearing with Edit
Besides selecting solid-color backgrounds, Select by Color is particularly useful for extracting text or other single-colored elements out of logos, screenshots, or other computer-generated images.
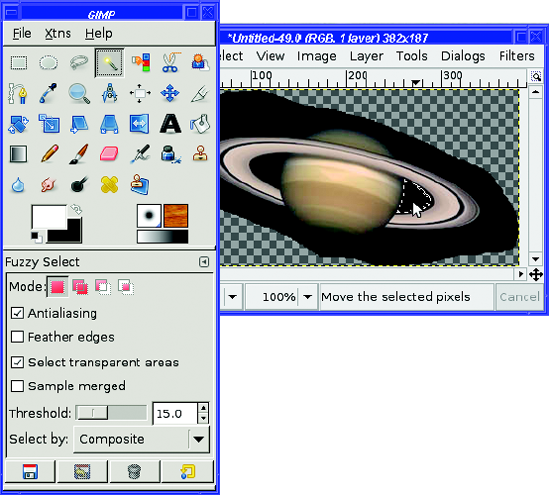
Select Contiguous Regions, also known as Fuzzy Select or the Magic Wand tool (from its Toolbox icon) is very similar to Select by Color, and its tool options are basically the same. The main difference is that it only selects areas that touch each other (Figure 5-6).
In GIMP versions before 2.4, there were two other very important differences between Fuzzy Select and Select by Color. First, in Fuzzy Select, if you got the threshold wrong and wanted to try again, you had to cancel the previous selection (with Undo or Select
The other difference was that Select by Color didn't let you fine-tune the selection by dragging with the mouse (as described in the previous section), while Fuzzy Select did.
Like Select by Color, Fuzzy Select is quite useful for text, especially when you need to select a single letter.
The Bezier Paths tool lets you define control points (also called anchor points or nodes) outlining your object. Then it "connects the dots" to create a path. You can even bend the lines between the dots to create a smooth curve.
Note
Bezier curves, pronounced BEZ-ee-ay, are named after Pierre Bezier, a French engineer who developed the concept while working on computer systems for automotive design.
A Bezier path isn't a selection by itself. But once you have a path, it's easy to tell GIMP to select everything inside.
You can also use paths for other purposes. You can stroke a path, just as you can a selection. You can even export it to a vector-graphics format such as SVG.
However, for the purposes of this chapter, you'll mostly use paths to define the outlines of a selection.
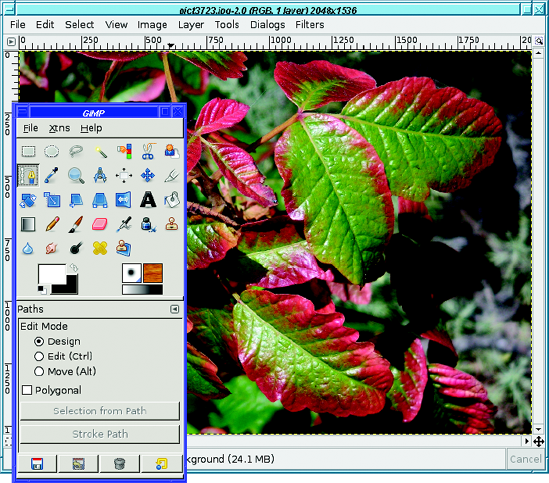
The easiest way to understand Bezier paths is to see them in action. So open a photo and choose something you want to cut out of it. Then select the Bezier Paths tool in the Toolbox (Figure 5-7).
I'm going to cut a single leaf from this photo so that I can paste it into other images. (It's poison oak! Picking a leaf and taking it home was not an option.)
Rule 1 for making a good path is zoom in. Zoom way in. You probably want a zoom factor of 200% or more, depending on hand steadiness and how good your close vision is. Zooming in lets you place your control points exactly on the edges of the object you're choosing.
It doesn't matter if the object you're trying to select becomes larger than the window. The biggest advantage of Bezier paths versus a simpler tool like Lasso Select is that you can stop between points. That means you can rest for a while (making a complicated selection can be a tiring and time-consuming operation). You can also scroll the image or resize the window as much as you need to see exactly what you're selecting. Best of all, if you don't get it perfect the first time, you'll be able to go back and edit it later.
Time to get started!
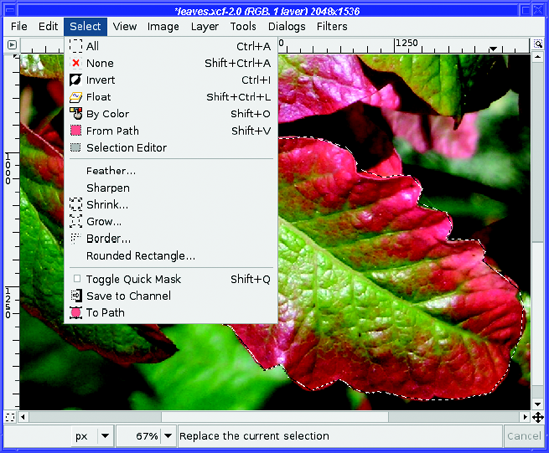
Just click in the image window, selecting points you want to connect (Figure 5-8). Use as many or as few control points as you need, depending on how precise you want your selection to be.
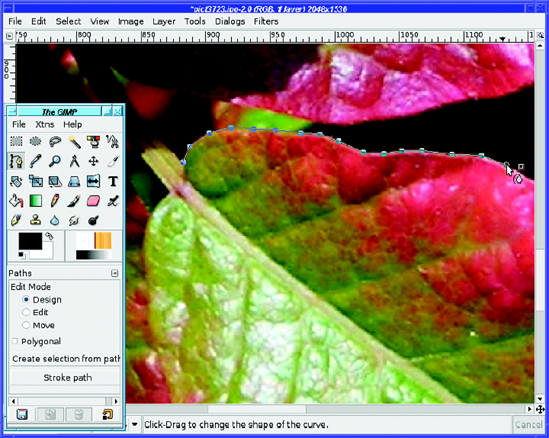
Keep clicking to place points around the outline of the image until you get back to the starting point. You can zoom and scroll as much as you need between points.
If you place a control point in the wrong place, you can click on the point again and drag it to the right place. You can even go back and click on points you added earlier, and drag them to new positions. As always, watch the cursor carefully as you move your mouse near the point. When it changes to show crossed arrows, similar to the Move tool, that's your cue that you're over an existing control point and can drag it. (However, it can be difficult to tell the crossed arrows cursor from the simple cross cursor you see when you're adding a new point. If you look closely enough, you'll see the difference.) Undo (Ctrl+Z) also works to remove the last point you added, and further undos will remove earlier points.
When you have gone all the way around, Ctrl-click on the starting point (hold the Ctrl key while clicking on it) to close the path.
You don't actually need to Ctrl-click if you're just making a selection. Converting a path to a selection will usually work fine if you just click normally on the original point. But for other path operations such as stroking, it makes a difference whether your paths are open or closed—so remember that Ctrl-click is the way to close a path.
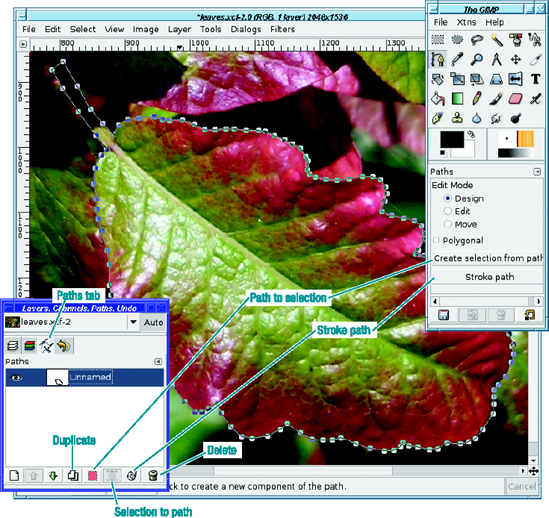
In addition to being visible in the image, your path appears in the Paths dialog. That dialog is usually docked as a separate tab in the same window as the Layers dialog (Figure 5-9).
Most of the components of the Paths dialog should be familiar to you from working with layers. You can manage multiple paths just as you would manage layers in the Layers dialog.
Each path has the following:
A small preview showing the general shape of the path
A visibility icon (the "eyeball")
Space for a "chain link" between the eyeball and the preview, so you can link several paths and move them together
Most of the time, you probably won't need to use more than one path at one time, but it's good to know you can link them if the need should sneak up on you.
Paths are preserved when you save to GIMP's native file type, XCF. So if you spend a long time creating a path, it's a good idea to save the image as XCF.
You can Duplicate a path (make a copy of it) in case you accidentally destroy what you spent so much work creating. Of course, there's a Delete button for paths you no longer need.
Selection to Path converts an existing selection to a path. This is useful if you want to edit the path further, or use the shape for some other purpose, such as saving to a vector-graphics format like SVG. Stroke Path does much the same as Stroke Selection, which you used in Chapter 4.
But our immediate interest in the Paths dialog is Path to Selection.
There are several ways to create a selection from a path.
The easiest way is to hit Enter. Voilà! You can also use the Selection from Path button in the Paths tool options, the Path to Selection button at the bottom of the Paths dialog (it has a pink square on it), the Path to Selection menu item in the context menu you get when right-clicking on a path in the dialog, or the Select
Try it! Once you've defined your path, convert it to a selection. At this point, you'll see both the path and the selection. If you find that distracting, you can hide the path by clicking the visibility eyeball button in the Paths dialog. Or simply switch to any other tool in the Toolbox (paths are only visible when the Paths tool is active, unless you turn on the visibility eye).
To see what you've created, copy the selection and (from the image window menus) open Edit
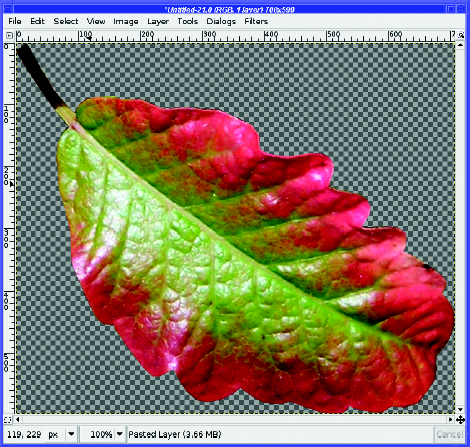
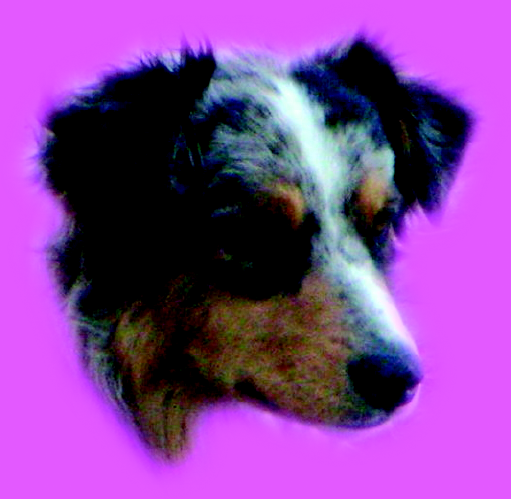
Of course, you can also paste the selection into another image, or anywhere you want (Figure 5-11).

The boundaries of the leaf are sharply defined, and it looks okay pasted into other images. But often the boundaries don't work out quite so well, and the selection looks odd when pasted somewhere else. Other times, there is no sharp edge—imagine trying to select a photo of a shadow, or a cloud, or a furry dog.
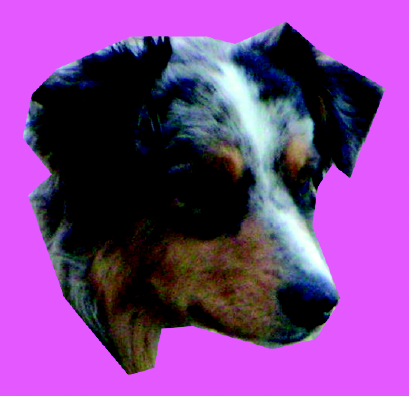
You can also have problems if you make a relatively sloppy path. For instance, the path in Figure 5-12 doesn't follow the contours of the dog's fur very well.

If you make that path into a selection and paste it somewhere, the sharp edges show up and the result looks artificial (Figure 5-13).
You can make a sloppy selection look better by feathering it to make its edges softer. It's not a complete solution—but sometimes it's the best bet.
Most of the selection tools (such as Rectangle, Ellipse, and Lasso) offer feathering as a tool option. But the Paths tool doesn't, so you'll have to feather the selection after the fact, using Select
This brings up the Feather dialog (Figure 5-14), which lets you choose the amount of feathering, specified in pixels.
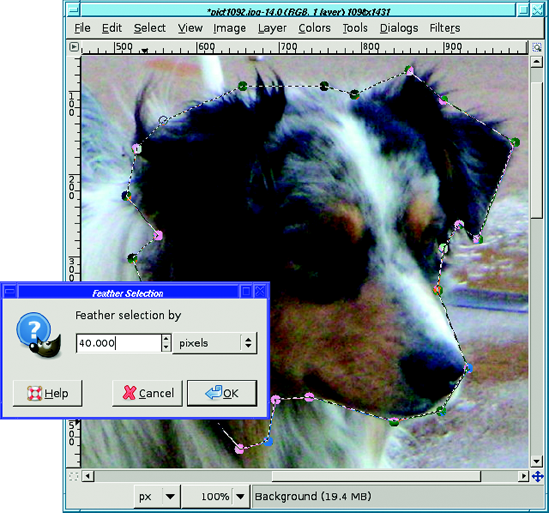
The amount of feathering you need depends on how large your selection is, how ragged it is, and where you're pasting it. You will probably have to experiment and try several different settings to find the perfect value, undoing each feather before trying something different.
In this case, the selection was so far off that a large feather of 40 pixels was needed to make it look better (Figure 5-15). You can still see that the selection isn't perfect, but now it looks more like a furry edge, or artistic soft focus, than an image-editing artifact.
So far, you've only used straight lines between path nodes. But a Bezier path can include curves as well. The easiest way is to drag from the middle of a line segment—the line bows into a curve, and you can adjust the shape of the curve by dragging it.
You can get somewhat finer control over the shape of the curve with the drag handles (Figure 5-16). Each control point on a Bezier path can have two handles that control the curvature of the lines on either side. These handles will appear automatically if you drag a straight line segment to make it curve.
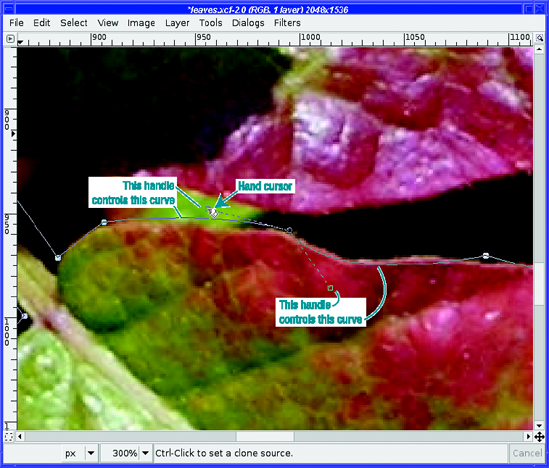
GIMP changes the cursor to a "pointing hand" when you're over a handle (although not all GIMP versions use the same cursors for editing paths, so watch what your own GIMP installation does). Drag the handle in the direction you want the curve to go. Experiment and get a feel for the sorts of curves you can make.
Basically, making the handle longer will add more curvature, while rotating the handle around its axis (the control point) will move the apex of the curve.
You can use paths that are composed of all straight lines, all curved lines, or any combination of the two. Experts in Bezier paths use mostly curved lines, adjusting the handles as they go. But when starting with paths, it's usually easiest to use straight lines for most of the path, and curve only the few segments that follow tricky outlines. (Or you can just use more points for the tricky sections, and never use handles or curved segments at all.)
Tip
A path consisting only of straight lines is called polygonal. You can prevent handles from appearing on new points by checking the Polygonal box in the Paths tool options. (If you have any curved segments already, checking Polygonal won't remove their handles.)
You can also add new control points in between two existing ones, or remove points you don't need. The key is the three edit modes in the tool options: Design, Edit, and Move. By default, you're in Design mode, which is best for adding points at the end of a path or for moving existing points. Switch to Edit mode to add or delete control points.
Tip
Pressing the Ctrl key while clicking between two control points will switch to Edit mode and let you create a new point; Ctrl+Shift lets you delete points. As always, watch the mouse cursor when you press the Ctrl key with the mouse over the control point. GIMP will tell you, via the cursor, which mode you're in. To add a new control point between two existing points, just click along the path (make sure the cursor is a "+") wherever you want the new point.
This can be slightly confusing, because Edit mode assumes you want handles, so the new point will be created with two handles already visible. If you don't intend to use handles, you can avoid this confusion by checking the Polygonal box in the Paths tool options. Even if you do intend to use handles, you can still use this trick. Check Polygonal first, lay out your path, and then uncheck Polygonal and make handles for any control points you wish to use for curves.
To remove a point, Shift-click on it while in Edit mode.
You can also make a path that includes several disconnected path segments. Pay attention to which points are drawn with a closed circle versus an open or dotted circle. Any point that's open or dotted is selected.
Most of the time when you're creating paths, only one node, the last one created, will be selected. Creating a new point draws a line from the selected point to the new one.
But you can deselect a node by Shift-clicking on it, or select more than one node by Shift-clicking on each new point you want to select. If there are no nodes selected, or more than one, or a node that isn't the end of a path, then clicking in a new location will begin a new disconnected path segment.
Disconnected paths are useful mostly for making discontinuous selections or figures. They can be a time-saver since you can stroke or fill several areas at once. They're not generally used for making selections, but they can be handy if you want to select several disconnected areas—like both eyes.
If you have multiple points selected, dragging any one of them will also move other selected nodes by the same amount.
The Paths tool has a third mode: Move mode. This allows you to move the entire path (not just one point, as in Design mode). Just click anywhere on the path and drag it to a new location. If you have more than one path segment, only the segment you drag will move. If you want all path segments to move, using Shift-drag will move them all at once.
If you change windows or choose another tool after working with a path, when you go back to the window the path is no longer visible. How do you go on working with an existing path?
First, make sure that the right path is selected in the Paths dialog, and that its visibility icon (the eyeball) is on. This will show the path, but not its control points, in the image window.
Now, with the Paths tool selected in the Toolbox, click on the path in the image. The control points should appear, and you're ready to continue editing it.
The Intelligent Scissors tool (Figure 5-17), or "I-Scissors" for short, works somewhat like Bezier paths, but with a twist: it tries to follow the boundaries of an object. Use it the same way you would the Paths tool: click near where you want your selection boundary to be, and in theory, GIMP will make a more complicated path that follows the edges it can detect in the image. The result will be a selection, not a path.
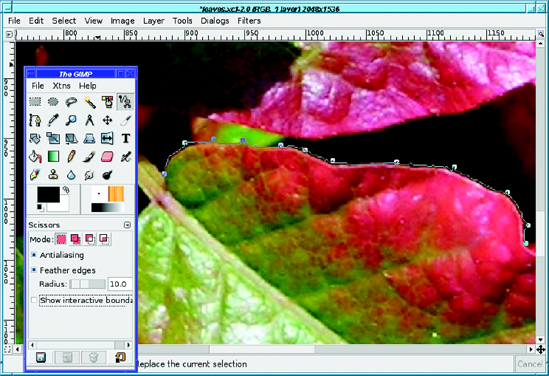
When you've finished defining the outline of your selection, click on the first point to close the path (the cursor changes to show a circle-slash, meaning "no more points"), and then click inside the path (or hit Enter) to select.
Warning
With Intelligent Scissors, you must close your selection by clicking on the first point; that's not optional like it is with the path tool.
When it works, Intelligent Scissors can make a selection that's more accurate and detailed than you would likely make yourself using the Paths tool. But unfortunately, it doesn't always get it right. Do try the tool, but most people find the regular Paths tool more useful. If you find that the cursor sometimes "jumps" to put a point somewhere where you didn't want it to be, Shift-clicking might help that.
If the Intelligent Scissors tool isn't quite on, don't give up! You can go back and move existing points (any point except the last one) or add extra control points to fine-tune your work—at least until you click inside the selection to finish it. Even after you finish the selection, you can still rework it by converting it to a path, or through other means such as the QuickMask (which will be discussed later in this chapter).
Intelligent Scissors only makes selections. You can't use it to make paths for other uses. Therefore, it has the normal selection tool options: Mode, Antialiasing, and Feather.
It also has an additional option: Interactive boundary. With this enabled, you can see as you mouse down where the tool would put the boundaries, then drag the mouse left, right, up, and down before you release the button to get the selection exactly where you want it. On anything except a very slow machine, you'll probably find this option helps a great deal.
It often happens that you use one of the selection tools and it gets it almost right—but there's a little bit that's wrong. If you could just add a little to the selection, or subtract a little, it would be perfect.
For example, I used Fuzzy Select on the sky in this image of the observatory domes on Mauna Kea (Figure 5-18).
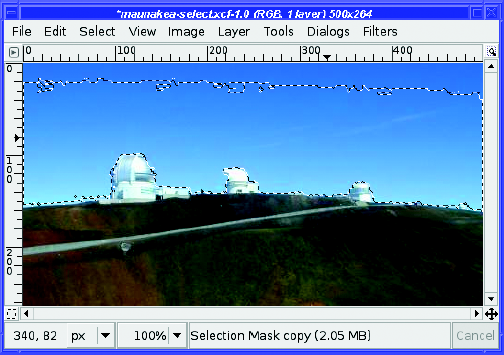
The hard part—the selection around the domes and near the ground—is fine. But the very top of the sky isn't included. (Changing Fuzzy Select's Threshold doesn't help—it just selects the domes and the road in addition to the sky.) If I could just add the top part of the sky to the existing selection, everything would be perfect.
Modes come to the rescue. Every selection tool has four modes (Figure 5-19) represented by buttons at the top of the tool options area.
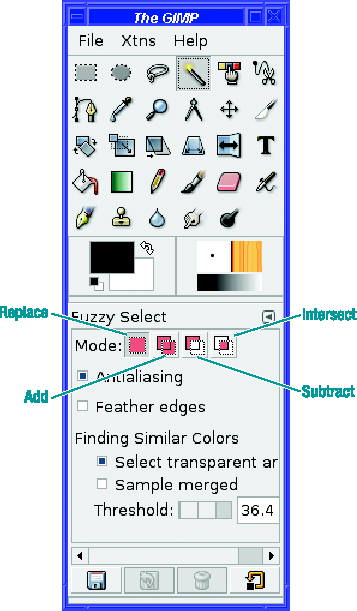
The default mode, on the far left, is Replace. Making a selection in Replace mode removes the current selection and replaces it with the new one.
STARTING SELECTIONS
In GIMP 2.2, with most selection tools, clicking inside an existing selection moved the selection contents rather than beginning a new selection. So Replace mode only replaces in 2.2 if you start the new selection outside the boundaries of the old one. The same holds for the other selection modes: any new selection must usually be started outside the boundaries of the existing one. In 2.4, that distinction no longer exists: you can start inside an existing selection to add to, subtract from, or intersect with it.
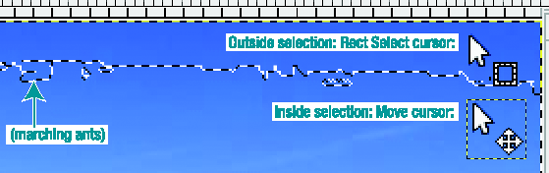
In 2.2, watch the cursor carefully whenever you start a selection, if there's already a selection active. The "Move" component of the cursor will tell you when you're still inside a selection. If you're outside, the cursor will show the icon for the selection tool you're using (Figure 5-20). You can't depend on the marching ants to tell you: if the selection is feathered, it may extend beyond the marching-ants boundary.
Add mode adds the new selection to the existing one. In the Mauna Kea example, that's what I want: to keep the existing selection, but to add the sky at the top of the frame.
The easiest way to do this is to choose the Rectangle Select tool, and set the mode to Add. Then make a rectangular selection that includes everything from the top of the frame down into the existing selection (Figure 5-20). A fast way to do this is in GIMP 2.4 is to start inside the existing selection and drag upward and over to one corner, and then adjust the other side of the rectangle so that it covers the other corner. With earlier GIMP versions, you can't do that because starting a new selection inside an existing one, even in Add mode, moves the contents of the existing selection; and you can't adjust the size of a rectangular selection once it's made.
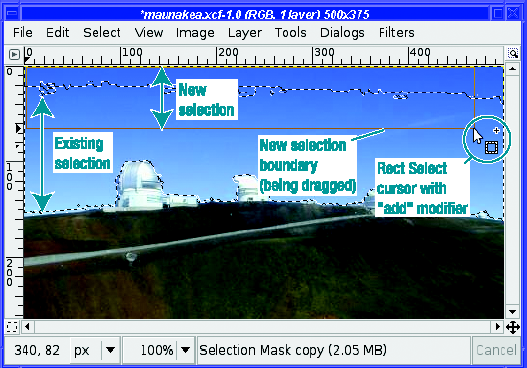
Figure 5-20. Use the Rectangle Select tool to add a selection at the top of the sky to the existing selection.
The two selections are added together. Consequently, the entire sky is selected.
Now you can do operations such as Clear to remove the sky. Or you can make the sky a separate layer (with Float, or just cut and paste it), put it at the bottom of the layer stack, and interpose another object between the foreground and the sky (Figure 5-21).
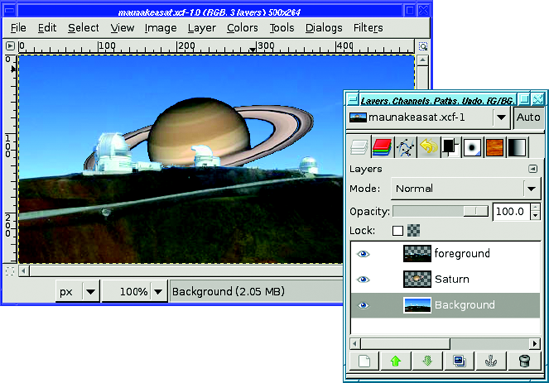
One way to obtain this effect is to invert the selection (Select
Subtract mode is the inverse of Add mode: it subtracts from the selection. This is particularly handy when you're confronted with the opposite of your previous problem: an automated tool has selected just a little bit too much.
Intersect mode selects only the area where your new selection overlaps with the existing one.
Sometimes, outlining just isn't the best way to select an object. You may catch yourself wondering, "Isn't there a more direct way to say that I want to select here and here but not there?"
GIMP has an answer: the QuickMask.
The QuickMask lets you see the selection visually superimposed on the image instead of the usual "marching ants" view. Everything selected will look normal; everything not selected will have a translucent red mask over it.
You can paint on the mask with all the normal drawing tools, like the Pencil and Paintbrush. Everywhere you paint in white will be selected; paint black to deselect. Painting in gray, or with the edge of a fuzzy brush, will partially select.
The QuickMask is one of those mind-bogglingly useful features that lots of people don't know about. It's easy to miss. I used GIMP for years before I stumbled onto it. Don't make that mistake, because the QuickMask can make complex selections easy. Just remember that red means not selected.
Flip to QuickMask mode by pressing the small square button at the bottom-left corner of the image window (Figure 5-22). You can flip back and forth between QuickMask mode and normal (marching ants) mode at any time with that button.
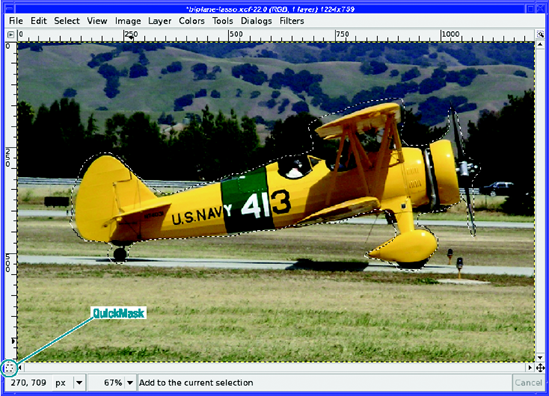
Figure 5-22. The QuickMask button. A rough selection of the biplane has already been made with Free Select.
Note
Areas that are partially selected (such as the edges of a feathered selection) will have some red, but the mask will be more transparent than usual. This is not always easy to see, particularly on color images which themselves have red; but it still gives you a better idea than the marching ants would. You can make the QuickMask use a different color by right-clicking on the QuickMask button and choosing Configure Color and Opacity.
So how do you use the QuickMask?
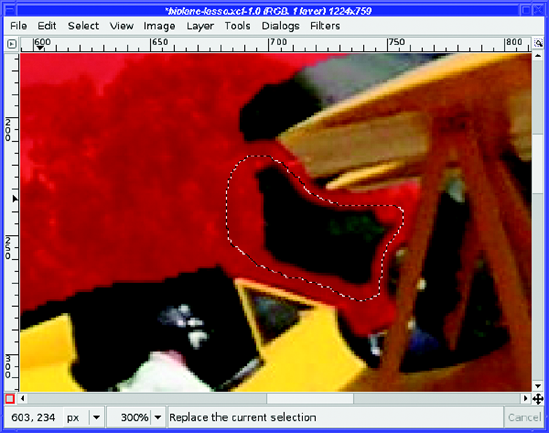
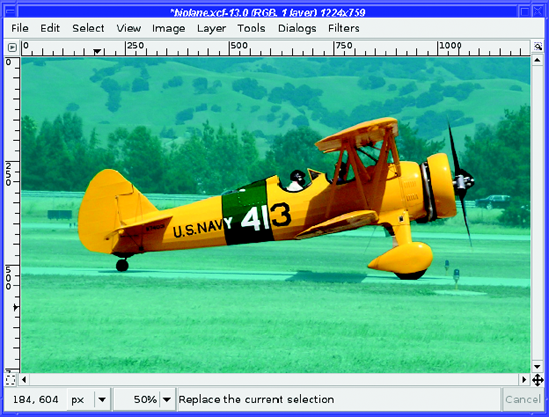
It's often best to use some other tool to make an approximate selection, and then use the QuickMask to clean it up. For instance, remember the biplane from the animation back in Chapter 3? I made it by using the QuickMask to select from a photograph (Figure 5-22).
I'll begin by making a quick outline with the Free Select tool, as Figure 5-22 shows. My selection isn't very accurate; I just want something close.
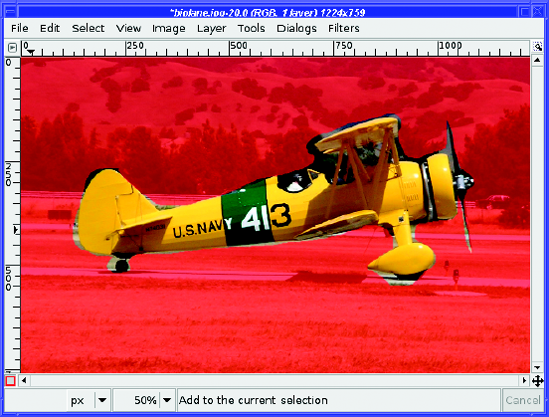
Now press the QuickMask button. The marching ants disappear, and everything that wasn't selected before is overlain with a translucent red mask (Figure 5-23). Notice that the appearance of the button has changed, to show you that you're in QuickMask mode. Press the button again, and you'll go back to seeing the marching ants.
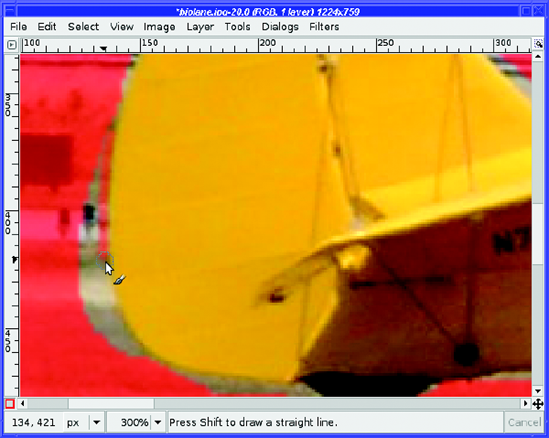
When it's time to draw on the QuickMask, Rule 1 is the same as for paths: Zoom in! You want to be able to see individual pixels, so you can paint precisely even if your hand isn't that steady.
If you want a feathered selection (which is usually best for selecting an object out of a photograph), use a fuzzy brush. For a sharp-edged selection, stick to a sharp-edged brush. The size of the brush you choose will depend on the size of your image and the complexity of your subject.
Then start painting! (See Figure 5-24.) Shift-clicking to draw straight lines will come in handy here.
Use short strokes. That way, if you draw somewhere you didn't intend to, Undo will correct the mistake without losing much.
Remember, when you paint on the QuickMask, use black for areas you don't want selected. For areas you do want selected, use white or the eraser (assuming your background color is white). Using gray, or any other color, will only darken the QuickMask partially: the area will be partially selected.
You might think you can't select areas and fill them—after all, the QuickMask defines an existing selection! If you make a new selection, won't that destroy the one you're trying to refine?
Fortunately, GIMP lets you make "selections" and fill them while you're painting in QuickMask mode. So go ahead and use the drawing techniques you learned in Chapter 4, including making shapes to be filled with black or white (Figure 5-25).
Tip
It often helps to use a drawing tool such as the Paintbrush to outline an area, and then use Free Select to fill the remaining real estate. That way, you can fill large areas quickly using only crude Free Select strokes. Figure 5-25 shows a free selection about to be filled.
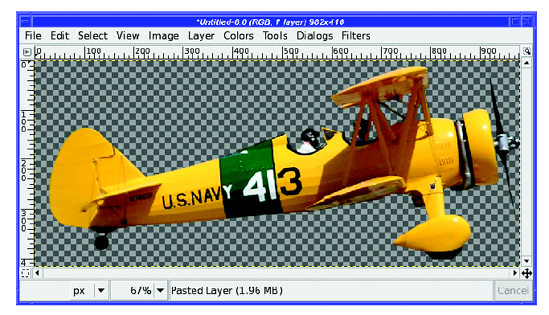
Continue painting, switching tools as needed to cover areas and fill gaps until you're happy with the result (Figure 5-26). Then click on the QuickMask button to return to the normal view.
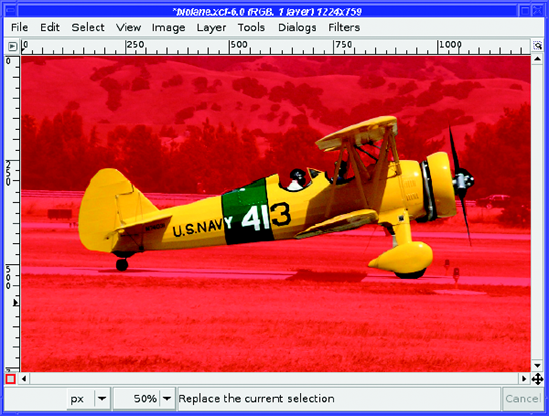
Figure 5-26. The QuickMask is finished, and ready to be turned back into a selection by pressing the QuickMask button again.
Then you can use Copy and Paste as New (Figure 5-27), or use your selection any way you choose.
What can you do with a selection, besides copying it and pasting it somewhere?
Pretty much anything, as it turns out. Nearly all of GIMP's operations will operate only on the selection, if one exists. For instance, GIMP's brightness tools, discussed in Chapter 2, will lighten or darken only the selected part of an image.
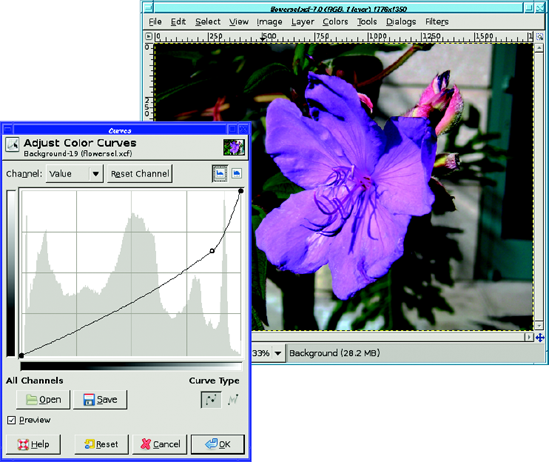
Figure 5-28 has a background that distracts from the flower in the foreground. Can GIMP de-emphasize the clutter to make the subject stand out more?
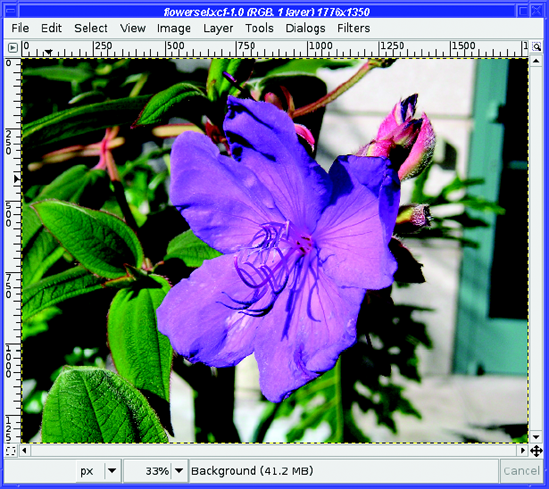
First, select the flower using any combination of the techniques already discussed. Select by Color gets most of it, and correcting with the QuickMask fills in the rest. Then invert the selection: since the goal is to change the background, you want the background selected, not the flower.
Now bring up your favorite brightness tool. In this case, Curves is particularly helpful, because it lets you reduce the brightness of the white wall with respect to the green leaves (Figure 5-29). After darkening the background, you may also want to try blurring it a bit with Gaussian Blur (see the section in Chapter 6 on Gaussian Blur for more details).
Tip
You'll probably want to make the selection invisible with View
Sometimes it would be really nice to be able to save a selection.
Perhaps you have a selection you've spent a lot of time refining, but you temporarily need to make another selection somewhere else in the image. Or maybe you've made a selection in one image, but you want to be able to use that selection in another related image.
Of course, you can convert the selection to a path, and give the path a name. But a path won't store all the information about your selection: if you've spent oodles of time feathering the edges just right, converting to a path will forfeit all that work.
The answer is to use a channel as a mask.
Channels are black-and-white images (similar to the QuickMask—in fact, the QuickMask is actually just a special channel) that represent some aspect of an image. To work with channels, you need the Channels dialog, usually docked as a tab between Layers and Paths (Figure 5-30).
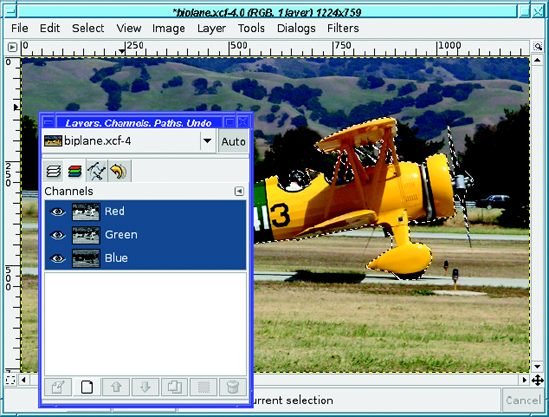
Notice that there are three channels already there, for the three colors in an RGB image: Red, Green, and Blue. If your image has transparency, there will also be a channel for Alpha. Each channel has a visibility button next to it, just like layers do. Click on the eyeballs to turn off individual colors and watch what happens to the image.
But you won't be using color channels now (for more on color manipulation, see Chapter 8). Instead, you'll be creating a special channel to hold the selection.
Note
If you view the Channels dialog when you have the QuickMask active, you'll see that the QuickMask is also a channel.
To save a selection as a channel, use Select
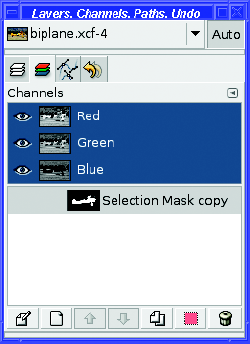
Initially the selection channel doesn't have its visibility button turned on—by default it's invisible. You can show it by clicking in the spot where the "eye" would be.
The channel will appear as a translucent overlay, like the QuickMask, except it will be dark gray, not red. (You can change the color with Channel Attributes, as you'll see.)
Like the QuickMask, you can paint on a channel using the normal drawing and filling tools, with a few caveats:
A channel must be visible (show an "eye") in order to paint on it.
If you still have a selection active, you won't be able to paint outside the selection. If you convert a selection to a channel, and then paint on it, you'll want to use Select

When you're finished painting on a selection, go back to the Layers dialog and click on the layer preview to select it. It's very easy to forget that you were editing a channel, and then wonder why none of your operations are working on the current layer.
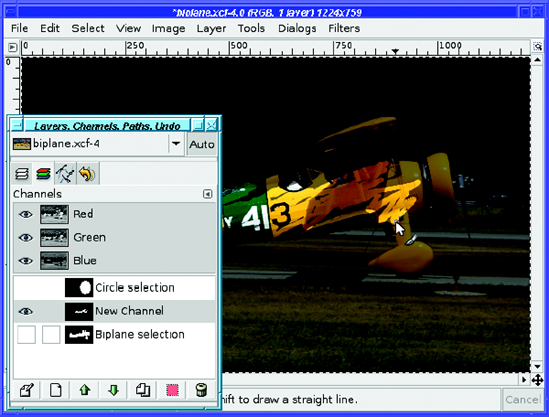
You can save as many selection channels as you wish. You can rename a channel in the same way that you rename a layer: double-click on its name in the channel dialog and type in a new one. Once you've saved a selection, you can make another selection and save that, too (Figure 5-32). The small preview in the Channels dialog will give you an idea of what each selection channel looks like.
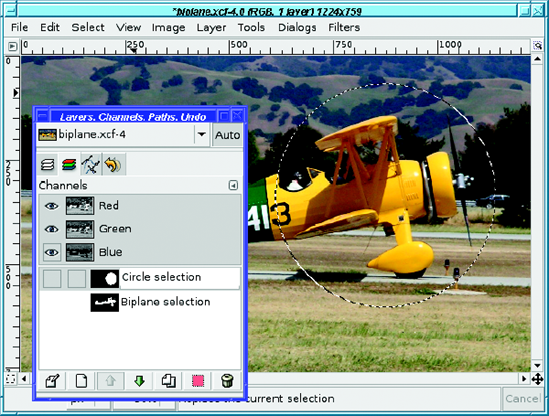
To convert a saved selection channel back to an active selection, right-click on the channel to get a context menu (Figure 5-33).
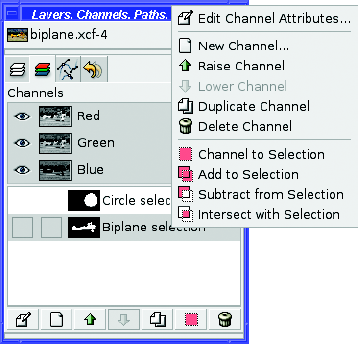
Channel to Selection is the simplest operation: just replace any existing selection with the selection saved in the channel. But you can also use the other selection modes: Add to Selection, Subtract from Selection, and Intersect with Selection. They let you combine several selections in fairly complex ways. Of course, you can also make a copy (Duplicate Channel) or Delete Channel.
You can also make a New Channel. By default, it will be all black (which will appear as a gray overlay), and then you can paint on it. In Figure 5-34, I've scribbled on the biplane's fuselage with the Paintbrush tool and a large brush.
The first item in the context menu, Edit Channel Attributes, gives you another place to change the channel's name. In addition, it lets you change the Fill Opacity(Figure 5-35).
On some images, it may be nearly impossible to see what you're doing when the image is covered by the translucent dark gray of a channel. Changing Fill Opacity can make the overlay lighter or darker.
You can also change the color by clicking on the color box. Figure 5-36 shows the result.
Channels don't get in your way because you can switch them off at any time. They won't disturb your current selection until you explicitly ask for that using the context menu.
Of course, channels are included when you save as XCF, so all your stored selections will still be there the next time you edit the image.

A layer mask defines how much, and which parts, of a layer will be visible.
Layer masks are not actually a selection tool. But you can use them in many of the same ways you'd use a selection. For some jobs, a layer mask may be easier and more intuitive than using a selection.
A layer mask is actually a black-and-white image, like a channel or the QuickMask. It represents the "alpha channel" of the layer. The whiter the mask is, the more the affected layer shows through—the less transparent it is. Wherever the channel mask is dark, the image will appear transparent.
It may help to think of the mask as a film negative placed on top of your image. Anywhere the film is black, you can't see your image; anywhere the film is clear (or in this case, white), the layer can be seen.
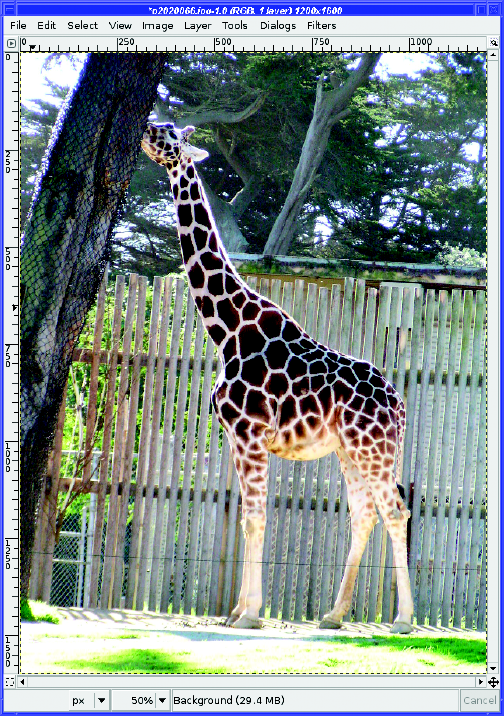
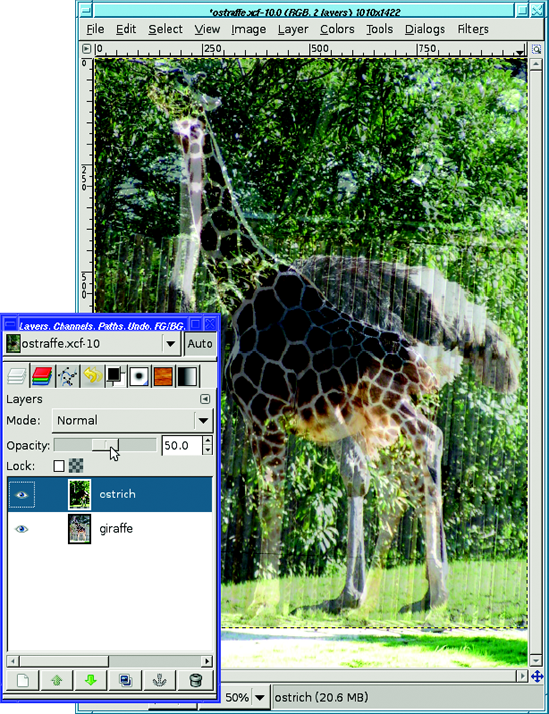
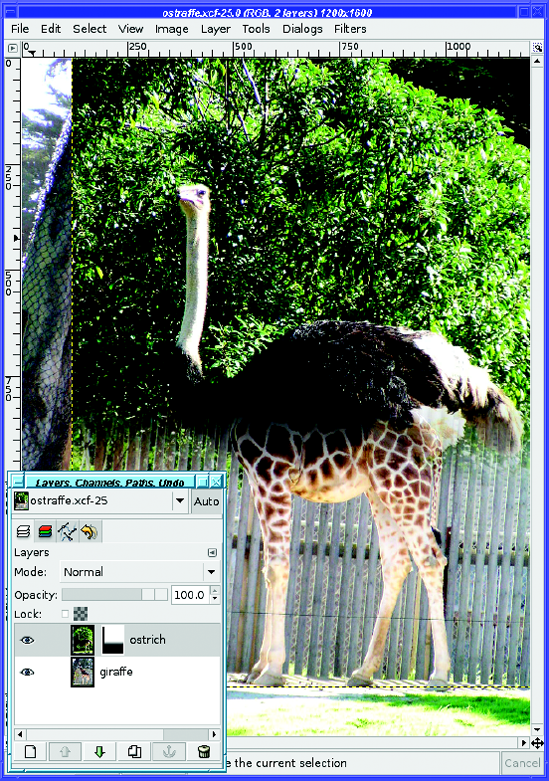
Layer masks are particularly useful when combining images. For instance, I have an ostrich (Figure 5-37) and a giraffe (Figure 5-38). What if I want to make an ostraffe?

Start by pasting the ostrich onto the giraffe image. Copy from the ostrich photo, paste over the giraffe, then go to the Layers dialog and click the New Layer button. Rename the layers so you'll remember which is which.
The next step is to line up the two images. But that's hard since you can't see the giraffe once the ostrich is on top of it. The Opacity slider in the Layers dialog saves the day. Set the opacity to about 50% (or whatever makes it easy to see both images), and it's no problem to line them up (Figure 5-39).
Now it's time for the layer mask. Right-click on the ostrich layer in the layers dialog and select Add Layer Mask... (Figure 5-40).
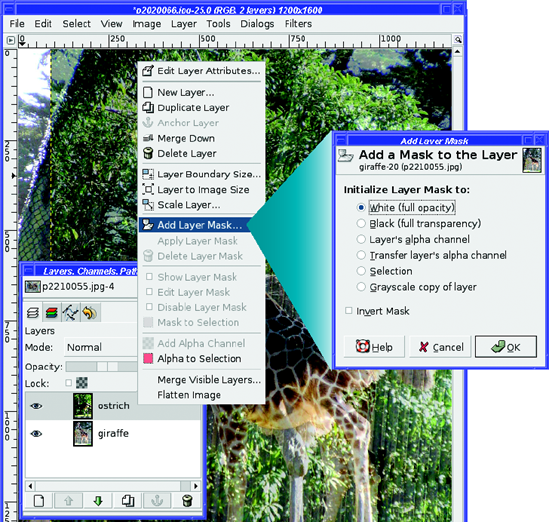
The Add Layer Mask dialog lets you specify the color of the new layer mask. The default, white, means the full layer remains visible at first (until you change that by painting some black onto the mask). White is usually the best starting place, but the other options are there if you need them.
The new layer mask shows up as a thumbnail preview in the Layers dialog (Figure 5-41). There are two important points to note about the layer mask preview.
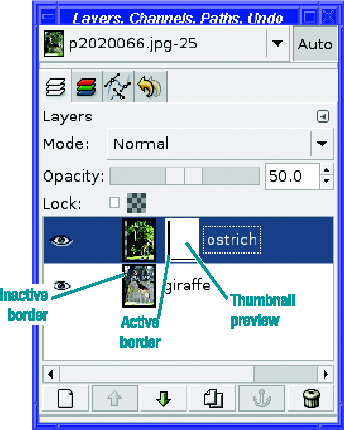
First, it shows you what the layer mask looks like. The new mask is all white, so it looks like a white rectangle. Once you start drawing in the mask, you'll see that the preview will give you an approximate idea of the mask's appearance.
Second, and more important, the border of the preview is white, indicating that it is active. That means if you draw in the image, you'll be drawing on the layer mask (just as you drew on the QuickMask or on a selection channel), not on the image itself.
This can be quite confusing. An image normally shows no visible indication of whether there's a layer mask active. When working with layer masks, it's important to keep the Layers dialog visible. Use the preview border colors to tell you whether you're working with the layer or with its mask. The one that has a white border is the one that's active.
You can activate the layer at any time by clicking on the layer preview in the Layers dialog. Click again on the mask to activate it. Or use Edit Layer Mask in the context menu to toggle between the two.
Warning
When a layer mask is active, drawing isn't the only GIMP operation that will be affected. The Move tool will move the mask, not the layer (if you had the mask lined up with the layer, it won't be lined up any more). Fortunately, Undo fixes minor mistakes like that. Also, saving to some file types will issue warnings if you try to save when you have a layer mask selected. If that happens, you can cancel the save, go back and select the layer instead of the mask, and then save again.
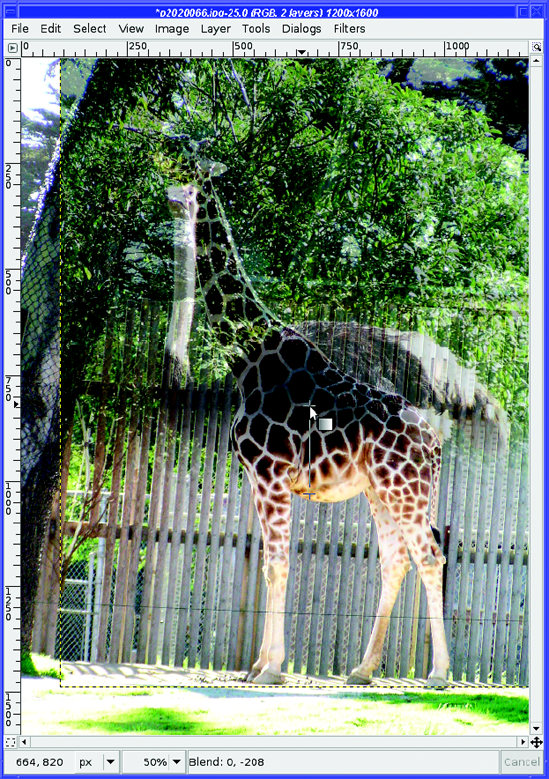
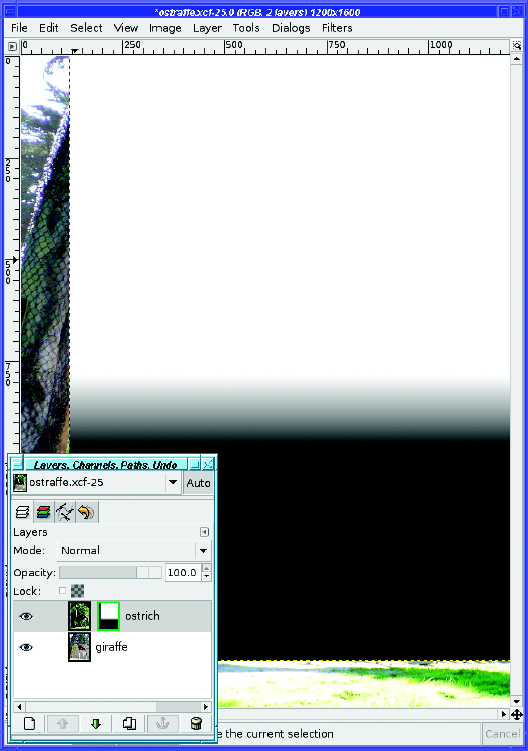
Now try drawing on the layer mask to see for yourself how it works. Gradients are particularly useful with layer masks. I'm going to keep the head, neck, and back of the ostrich, while making the legs invisible. The ostrich's upper body should blend in to the giraffe's lower body. That means I need the top of the ostrich's layer mask to be white, the bottom black, and a fade (a gradient) in between, right where I want the two images to merge.
With the layer mask still selected, I choose the Gradient tool in the Toolbox and drag a vertical line where I want the fade (Figure 5-42).
It's fairly easy to forget in which direction to draw a gradient, and end up blackening what you wanted to whiten, and vice versa. (Remember, the layer mask preview will show you a thumbnail of what the mask looks like.) Fortunately, that's easy to fix: just draw another gradient in the opposite direction.
Don't forget that holding the Ctrl key down as you drag a gradient constrains it to a multiple of 15 degrees. That's an easy way to get a gradient that's exactly vertical or exactly horizontal.
Once you've drawn on the layer mask, the image doesn't look that different, because of that translucent top layer. It's finally time to slide the opacity of the top layer back to 100%. You could have done that earlier, but without being able to see the bottom layer it would have been difficult to see where to place the gradient.
With the top layer made fully opaque again, now the image becomes Figure 5-43.
Notice the layer mask preview has become fuzzy on the bottom: this is the gradient that has been drawn on the layer mask.
Don't forget to save your work as you go along. GIMP's XCF format will save layers, layer masks, and selections, so you can save at any time and continue later from wherever you left off.
To see the layer mask at full size, use Show Layer Mask from the right-click menu in the Layers dialog (Figure 5-44). A shortcut for Show Layer Mask is to Alt-click (or Alt+Shift-click) on the layer preview; another Alt-click will show the image normally again. Notice that the layer mask's boundary changes to green in the dialog preview. Also notice that the layer mask applies only to the area where the ostrich image is; the edges, from the giraffe photo, are not affected.
Now play with the image. You may want to change the location of your gradient slightly (by drawing a new gradient higher or lower), or use the Move tool to adjust the relative positions of the two layers. (Don't forget to select the layer, not the mask, before moving.)
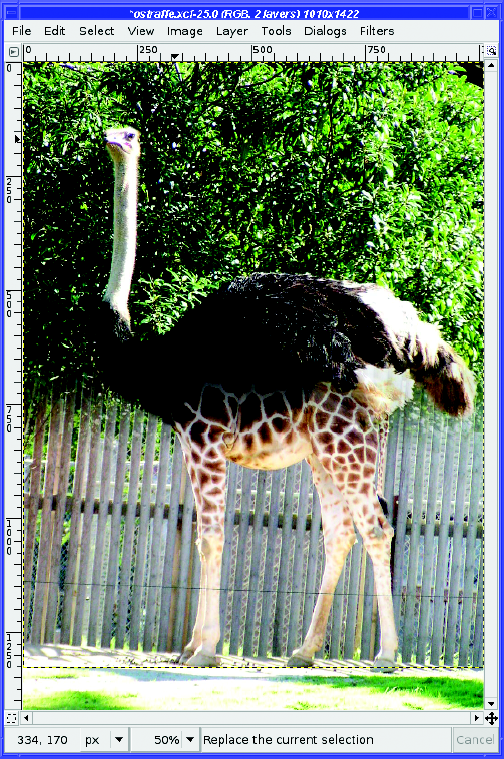
When you're satisfied that you have everything aligned just right, it's a good time to crop the image. The idea is to get rid of any overhang from either original that might be noticeable around the borders. For instance, the netting-covered tree on the left side of Figure 5-43 doesn't blend well with the bush to its right.
Now it's time to tune the mask a bit with a little hand-painting. Notice the area under the ostrich's neck where the layer is partially transparent and doesn't blend well into the giraffe's chest? Remember, a mask is just a black-and-white image. You can paint on it with paint tools, just as you painted on the QuickMask and channels earlier in this chapter. Anywhere you paint white will become opaque.
Choose a fuzzy brush with the Paintbrush tool, or use the Airbrush, and paint in the area where you want more of the upper image to show up (Figure 5-45). You may find it helpful to flip back and forth between "Show Layer Mask" mode and normal mode to see what you're painting. A quick way of doing that is by Alt-clicking on the layer mask preview (Alt+Shift-click will also work on systems that use Alt-click for other purposes). The border of the preview will go green to show that you're seeing the layer mask itself, not its effect on the image.
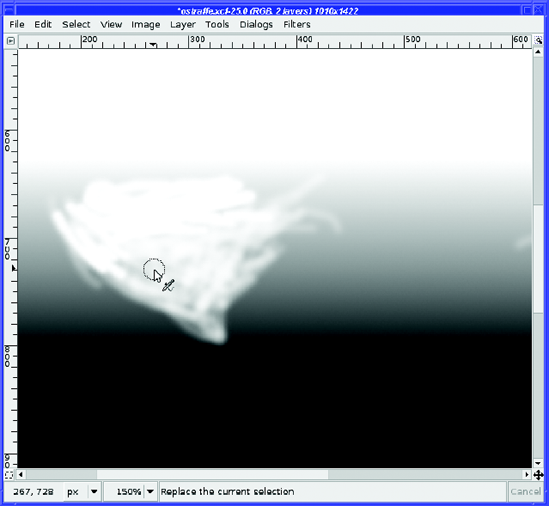
Figure 5-45. Switching to Show Layer Mask after painting. Use painting tools to touch up areas where the gradient isn't quite enough.
If you ever need to disable a layer mask temporarily, a quick way to do that is to Ctrl-click on the layer preview. The border will turn red to show the mask is disabled. Of course, you can always show, hide, enable, or disable layer masks through the context menu you access by right-clicking in the Layers dialog.
After touching up the layer mask, Figure 5-46 shows the final result.
Of course, the backgrounds from your two images may not match up. You can paint on a layer mask—much as you would on a QuickMask—to hide one background completely and use only the other. Or you can hide the backgrounds on both images with layer masks, and then add another background layer to place your creation anywhere you want. The choice is yours!
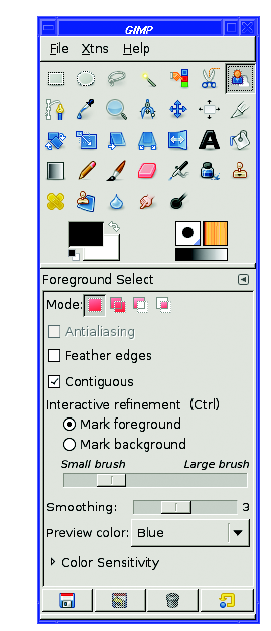
A brand-new tool in GIMP 2.4 is the Foreground Select tool (Figure 5-47). It's also called the Foreground Object Extractor, or sometimes SIOX, which stands for Simple Interactive Object Extraction.
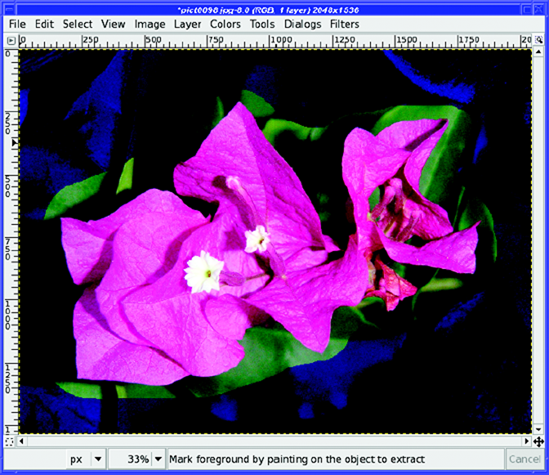
There are two steps to using SIOX. First, draw an outline around and outside the object you want to select. You have to do this in one motion, as if you were using the Free Select tool.
Don't try too hard to get close to the borders of the object. Just make sure that every bit of your object is inside the border. When you're finished, release the mouse button: everything outside the region you selected will be masked off in dark blue (Figure 5-48).
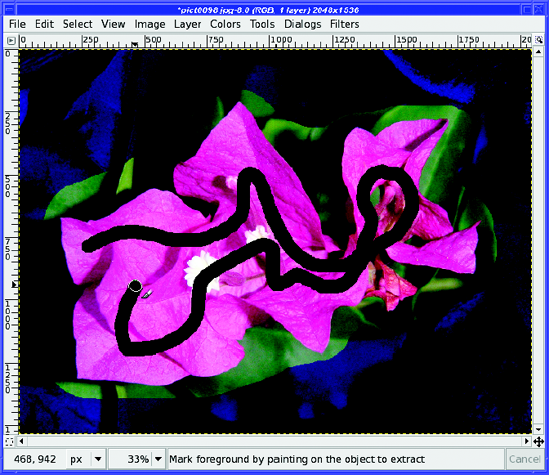
The second step is marking the foreground. Drag the mouse across the part of the image you do want to select, being careful to stay away from parts of the image you don't want. Don't try to cover the whole object, but do try to make sure you cover all the representative colors in the object. The tool will draw a black trail wherever you drag, so you can see what you've already marked (Figure 5-49).
You can drag multiple short trails or one long one. I usually find that one long trail works best—sometimes as I add new trails, I lose parts of the image that were previously marked. But each image is a little different, and you'll have to experiment. With some images, you can refine the selection by using background select (use the Mark background setting in the dialog, or hold the Ctrl key while you drag over the green leaves).
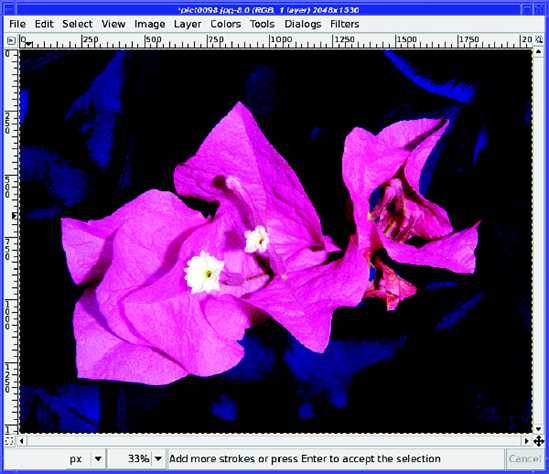
When you release the mouse button after drawing a trail, the tool goes to work finding all parts of the region that are similar to the parts you dragged (Figure 5-50).
This may take a few seconds, or longer for a large image or a long trail.
Once you're happy with the result, hit the Enter key to turn the mask into a selection.
The tool options (back in Figure 5-47) include the usual Antialiasing and Feather options, and an adjustment for the brush size (you will want to adjust this if you're trying to select very small objects, or to mark thin structures like branches). There's also a Smoothing control, which lets you adjust the coarseness of the areas selected, and a Color Sensitivity expander that lets you play with how the tool determines what's close enough to the trail you dragged.
The SIOX tool is very young, but it shows a lot of promise. Since it's new, the GIMP developers are still adjusting it, and it's likely to evolve over the next few versions. It doesn't work for everything. I find it works best when you have significant color differences (like a magenta flower against a green background), and not so well for objects that include colors similar to the background (like a brown squirrel perched in a tangle of brown branches).
Try it out. For certain types of images, the tool works very well indeed, and should be a part of your selection arsenal.
By now, you should be familiar with a wide range of selection techniques. You're familiar with the marching ants, but you know how to turn them off when they get in the way. You can make selections using color or contiguous regions, Bezier paths, the Intelligent Scissors, or the QuickMask. You can make simple selections more complex by combining several selections in Add or Subtract mode, or by editing them in the Paths tool, the QuickMask, or as a channel mask.
In addition, you've seen how you can change the appearance of an image by using tools on only a selected part of that image, and you've worked with layer masks and seen how you can use gradients in a layer mask to combine two layers smoothly. You can save a selection to a channel or path, and restore earlier selections you saved that way.
Selections are useful in every aspect of image editing, but nowhere are they more useful than when working with digital photographs—especially photos that have something wrong with them that needs correcting. In the next chapter, let's take another look at digital photographs, and explore some techniques for touching them up...or editing problematic objects out of an otherwise good photo.