![]()
Game Project: Progressive Break-it
For your first game project, you’ll be building a version of the Atari classic, Breakout. You’ll be building your game in the progressive mode, which will continuously add rows of bricks as the game progresses. A few new twists will be added to the classic to make it a bit more fun, and to fully utilize your new skills.
The graphics for the game will be fully built using EaselJS’s drawing API and Text objects. A game loop will be created, which will be used to animate the puck around the stage, and the TweenJS library will be utilized to animate some of the bonus text during gameplay. All controls will be handled by the keyboard, which will control the paddle and pause or play the game.
As usual, let’s start by describing and outlining the project by listing the features you’ll accomplish in the game.
Progressive Break-it
Progressive Break-it is a game where the player must control a game paddle that moves horizontally across the bottom of the screen. The player must prevent the puck from getting past the paddle, while busting the bricks laid out above it.
- Draw a paddle, puck, and bricks using drawing API.
- Control the paddle by using left and right arrow keys.
- Create level data for brick colors and points for each level.
- Add a new row of bricks every five hits of the paddle.
- Create one random free life brick with every new level added.
- Award bonus points for long, sequential brick hits.
- Display animated text for both free lives and combo bonuses.
- Allow player to pause/resume game by hitting the spacebar.
- End the game when the player runs out of lives or the bricks reach the bottom of the screen.
Figure 4-1 shows the game in its complete state.

Figure 4-1. The complete game, Progressive Break-it
Now that a solid understanding has been established for what you want to accomplish, let’s move right into setting up the project. Start by setting up the usual HMTL file, which should include the EaselJS and TweenJS libraries, as well as a new JavaScript file for the game code. Name this file breakit.js. Finally, add the Canvas element, giving it a width of 800, a height of 700, and a background color of black.
<!DOCTYPE html>
<html>
<head>
   <title></title>
   <script src="../lib/easeljs-0.7.1.min.js"></script>
   <script src="../lib/tweenjs-0.5.1.min.js"></script>
   <script src="breakit.js"></script>
   <style>
      canvas{
         background-color:black;
      }
   </style>
</head>

<body onload="init()">

<canvas id="canvas" width="800" height="700"></canvas>

</body>

</html>
Beginning the Game Code
Now that the HTML is set up, let’s start digging into the game code. Open up breakit.js to begin the game programming. Start by declaring all of the game variables that will be used in the game.
Declaring the Game Constants and Variables
Several constants and variables will be used throughout the game. As usual, these are declared at the the top of the script. Start by listing the game constants (see Listing 4-1). I prefer to lay these out first, as they are often the most tweaked during programming to adjust the look and feel of the game.
Listing 4-1. Game Constants
const WALL_THICKNESS = 20;
const PADDLE_WIDTH = 100;
const PADDLE_SPEED = 16;
const PUCK_SPEED = 5;
const PADDLE_HITS_FOR_NEW_LEVEL = 5;
const SCORE_BOARD_HEIGHT = 50;
const ARROW_KEY_LEFT = 37;
const ARROW_KEY_RIGHT = 39;
const SPACE_KEY = 32;
These constants represent the values that won’t change during gameplay, and they play a crucial part in building the game. As you get further into the game code, it becomes a lot easier to adjust these values at the top of your script, as opposed to chasing down hard-coded values in your game functions. Since this particular game doesn’t progressively adjust speed, you can add these values to the list of constants. Also included are some values that will be needed to draw the game assets; they will factor into calculating the graphics positions during gameplay. The final three are meant to help with the keyboard keyCodes (you saw this in a few examples in Chapter 3). Listing 4-2 lists the game variables.
Listing 4-2. Game Variables
var canvas, stage, paddle, puck, board, scoreTxt, livesTxt, messageTxt, messageInterval;
var leftWall, rightWall, ceiling, floor;

var leftKeyDown = false;
var rightKeyDown = false;

var bricks = [];
var paddleHits = 0;
var combo = 0;
var lives = 5;
var score = 0;
var level = 0;

var gameRunning = true;
The first set of variables is created for the stage and most of the visuals in the game, including messaging. Some variables are also set up that will be used to reference the bounds of the screen. The next two, leftKeyDown and rightKeyDown, are used to help with the game controls.
Next is a series of variables that are declared with initial values. These are grouped for easy reference for all values that should be reset when restarting the game.
The bricks array will start empty and eventually be used to reference all bricks created in the game. You’ll add and remove bricks to this array during gameplay. The paddleHits variable will increase in value on each hit of the paddle, and is used to determine when a new level should be added to the board. The combo value similarly gets increased during play and represents the number of bricks busted in a row before hitting the paddle. This gives the player combo bonuses. The number of remaining lives, the score, and current level are also declared with initial values.
The gameRunning variable is used for some very simple state logic. This game has a pause feature that can be triggered via the spacebar. This key is also used to replay the game after losing, so this simple Boolean value can be used to determine what state the game is in when the user hits the spacebar. When gameRunning is true, it should toggle the pause feature. When it’s false, it will simply call a function to restart the game.
Finally, the data is created to be used when creating the levels (see Listing 4-3). Each index in the levels array holds an object that determines the color of bricks and the points each one is worth when busted.
Listing 4-3. Creating the Level Data
var levels = [
   {color:'#705000', points:1},
   {color:'#743fab', points:2},
   {color:'#4f5e04', points:3},
   {color:'#1b5b97', points:4},
   {color:'#c6c43b', points:5},
   {color:'#1a6d68', points:6},
   {color:'#aa7223', points:7},
   {color:'#743fab', points:8},
   {color:'#4f5e04', points:9},
   {color:'#1b5b97', points:10},
   {color:'#c6c43b', points:11},
   {color:'#1a6d68', points:12}
];
With the game variables declared, it’s time to move on to initializing the game.
Initializing the Game
Initializing the game is usually called within some sort of init function and is often called when the document and/or game assets are completely finished loading. You’ve seen this done already in previous examples. All graphics will be created with code in this game project so you don’t need to load in any graphics or sounds. Because of this, the onload event will be used within the body of the document to call the init function. Listing 4-4 shows this function.
Listing 4-4. The init Function Is Called when the Document Has Loaded
function init() {
   canvas = document.getElementById('canvas'),
   stage = new createjs.Stage(canvas);
   newGame();
   startGame();
}
A reference to the canvas is stored and the stage object is created. This is followed by a few methods, the first being newGame, which is used to call its own series of functions used to set up the game. The final function, startGame, will kick off the game loop, which will trigger all animation and gameplay into action. Both of these functions are shown in Listing 4-5.
Listing 4-5. The newGame and startGame Functions
function newGame() {
   buildWalls();
   buildMessageBoard();
   buildPaddle();
   buildPuck();
   setControls();
   newLevel();
   newLevel();
}
function startGame() {
   createjs.Ticker.setFPS(60);
   createjs.Ticker.addEventListener("tick", function (e) {
      if (!e.paused) {
         stage.update();
      }
   });
}
You’ll be taking a close look at each function fired from the newGame function shortly, but first let’s get a broad overview of what is accomplished when they are executed. The first four functions draw the essential game elements in the game. The controls are then set up, and finally a few levels are added to the board.
After the new game is initialized, it’s started by setting up Ticker to update the stage at a frame rate of 60 frames per second. You’ll be adding much more to this game loop after the setup of the game, so you’ll be revisiting this function later. I prefer to keep this function at the bottom of my script, closer to the run game functions we will build later, but feel free to leave it where it is for now.
Let’s break down these initializing functions now. The first four are used for building and drawing the game elements.
Building the Game Elements
It’s now time to draw the elements that will be used in the game play. In this section, a series of functions are written to draw the walls, a message board, and the puck and paddle.
Creating the Walls
These first sets of graphics drawn to the board are the walls that make up the bounds of the game (see Listing 4-6). You want a wall drawn on the left, top, and right sides of the stage for the puck to bounce off of. The bottom is left alone so the puck can pass through if the player fails to hit it with the paddle.
Listing 4-6. The buildWalls Function Creates the Bounds of Your Game
function buildWalls() {
   var wall = new createjs.Shape();
   wall.graphics.beginFill('#333'),
   wall.graphics.drawRect(0, 0, WALL_THICKNESS, canvas.height);
   stage.addChild(wall);
   wall = new createjs.Shape();
   wall.graphics.beginFill('#333'),
   wall.graphics.drawRect(0, 0, WALL_THICKNESS, canvas.height);
   wall.x = canvas.width - WALL_THICKNESS;
   stage.addChild(wall);
   wall = new createjs.Shape();
   wall.graphics.beginFill('#333'),
   wall.graphics.drawRect(0, 0, canvas.width, WALL_THICKNESS);
   stage.addChild(wall);
   leftWall = WALL_THICKNESS;
   rightWall = canvas.width - WALL_THICKNESS;
   ceiling = WALL_THICKNESS;
}
A reusable wall variable is first created to build all of the shapes for the walls. The WALL_THICKNESS constant is used, along with the stage size to build the shapes and position them around the screen. The game variables leftWall and rightWall, which were previously declared for the bounds, are then given their values using some of the same values that were used to build the walls. Since the edges of the stage are not the actual walls of the playing field, you can’t simply reference the size of the stage to determine the bounds of the stage like in previous examples. These properties also prevent you from having to continuously calculate these areas on every game tick.
Creating the Message Board
An area for text will be needed to display various game messaging. This message board will be placed on the bottom of the screen, right under the floor where the paddle will rest. The buildMessageBoard sets this up and is shown in Listing 4-7.
Listing 4-7. The buildMessageBoard Function Sets Up all Game Messaging
function buildMessageBoard() {
   board = new createjs.Shape();
   board.graphics.beginFill('#333'),
   board.graphics.drawRect(0, 0, canvas.width, SCORE_BOARD_HEIGHT);
   board.y = canvas.height - SCORE_BOARD_HEIGHT;
   stage.addChild(board);
   livesTxt = new createjs.Text('lives: ' + lives, '20px Times', '#fff'),
   livesTxt.y = board.y + 10;
   livesTxt.x = WALL_THICKNESS;
   stage.addChild(livesTxt);
   scoreTxt = new createjs.Text('score: ' + score, '20px Times', '#fff'),
   scoreTxt.textAlign = "right";
   scoreTxt.y = board.y + 10;
   scoreTxt.x = canvas.width - WALL_THICKNESS;
   stage.addChild(scoreTxt);
   messageTxt = new createjs.Text('press spacebar to pause', '18px Times',
      '#fff'),
   messageTxt.textAlign = 'center';
   messageTxt.y = board.y + 10;
   messageTxt.x = canvas.width / 2;
   stage.addChild(messageTxt);
}
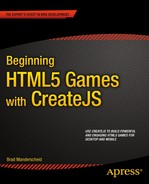
Similarly to the walls, the message board is drawn at the very bottom edge of the stage. The text objects are then drawn above this shape and positioned at the edges and center of the board. The score and lives text values will be updated during the game loop, but are initially set to help with positioning and styling. Figure 4-2 demonstrates the walls and game message board.
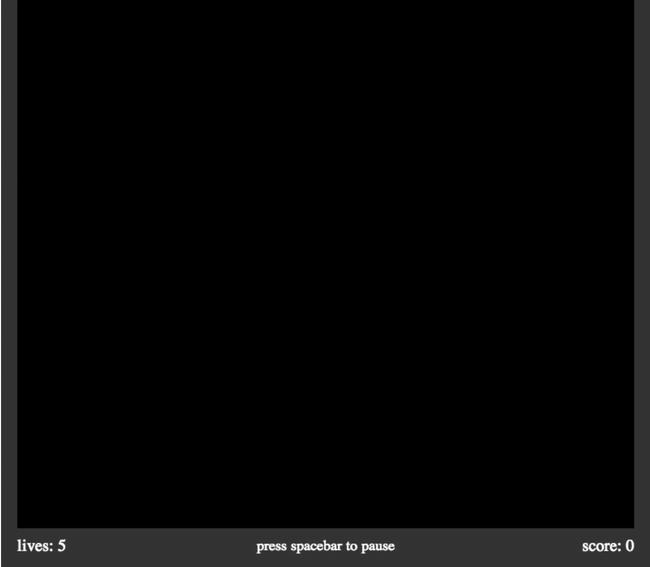
Figure 4-2. The walls and message board drawn to the stage
Creating the Paddle and Puck
Directly above the message board will be the floor for the paddle and represent the bottom bounds of the board where the puck can pass through. Let’s draw those game elements next (see Listing 4-8).
Listing 4-8. Drawing and Adding the Paddle and Puck
function buildPaddle() {
   paddle = new createjs.Shape();
   paddle.width = PADDLE_WIDTH;
   paddle.height = 20;
   paddle.graphics.beginFill('#3e6dc0').drawRect(0, 0, paddle.width, paddle.height);
   paddle.nextX = 0;
   paddle.x = 20;
   paddle.y = canvas.height - paddle.height - SCORE_BOARD_HEIGHT;
   stage.addChild(paddle);
}
function buildPuck() {
   puck = new createjs.Shape();
   puck.graphics.beginFill('#FFFFFF').drawRect(0, 0, 10, 10);
   puck.width = 10;
   puck.height = 10;
   puck.x = canvas.width - 100;
   puck.y = 160;
   puck.velX = PUCK_SPEED;
   puck.velY = PUCK_SPEED;
   puck.isAlive = true;
   stage.addChildAt(puck, 0);
}
The game paddle is drawn and positioned appropriately by using the board’s height and y position, as well as its own height. The puck is then drawn in the following function and positioned near the center of the stage. You then assign it some properties to determine its velocity, and if it is currently in play. Its velocity determines how fast it should travel and in what direction it should move. By assigning both velX and velY to positive values, it will begin to travel right and down by an increase of the PUCK_SPEED value on every game tick. Lastly, the addChildAt method is used to add it to the bottom layer of the stage. This is to ensure that the puck will travel under the scoreboard when it flies out of bounds beneath the floor.
Adding the Controls
To add interactivity to the game, you need to set up the keyboard event listeners to move the paddle, and to both pause and start the game. Listing 4-9 shows the registering and handling of these event listeners.
Listing 4-9. Setting Up the Game Controls
function setControls() {
   window.onkeydown = handleKeyDown;
   window.onkeyup = handleKeyUp;
   }
function handleKeyDown (e) {
   switch (e.keyCode) {
      case ARROW_KEY_LEFT:
         leftKeyDown = true;
         break;
      case ARROW_KEY_RIGHT:
         rightKeyDown = true;
         break;
   }
}
function handleKeyUp(e) {
   switch (e.keyCode) {
      case ARROW_KEY_LEFT:
         leftKeyDown = false;
         break;
      case ARROW_KEY_RIGHT:
         rightKeyDown = false;
         break;
      case SPACE_KEY:
         if (gameRunning) {
            createjs.Ticker.setPaused(createjs.Ticker.getPaused() ? false
               : true);
         }
         else {
            resetGame();
         }
         break;
   }
}
The setControls function adds a few keyboard listeners to the window object. These handlers are written immediately after and handle events fired when a key is pressed and when it’s released.
The rightKeyDown and leftKeyDown variables are set accordingly and used to control the paddle during the update/render cycle that will be set up shortly. The paddle control is set up exactly how it was demonstrated in Chapter 3. If you need to review this process, please refer to Listing 3-11.
If the key that was pressed is the spacebar, you want to do one of two things. If the game is currently in a running state, it should pause or un-pause the game. The game can easily be paused by pausing the Ticker, which will essentially shut down the game loop, freezing everything in its place. If the Ticker is already paused, it is un-paused to resume the game.
If the game is not in a running state (i.e., the game over state), this action will completely reset the game by calling a function that will also be examined later in the “Evaluating the Game” section.
At this point, the walls, message board, game puck, and paddle are finished and ready to review. Figure 4-3 demonstrates how the game looks in its current state.
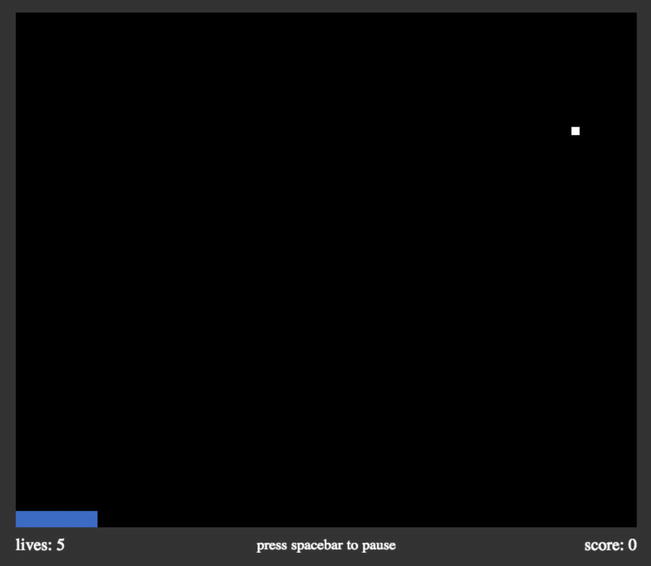
Figure 4-3. The walls, puck, paddle, and message board drawn to the stage
Creating Levels
A level in this game consists of adding a new set of bricks to the game after a predetermined amount of paddle hits. The game continues in play, and all subsequent rows of bricks move down on the screen, making it increasingly difficult to hit the puck.
Adding Levels
One more function remains in the initialization process. The newLevel function (see Listing 4-10) creates two new rows of bricks, which make up a level. The game begins with two sets of bricks, so this function is initially called twice and essentially starts the player on level 2.
Listing 4-10. Adding a New Level of Bricks to the Game
function newLevel() {
   var i, brick, freeLifeTxt;
   var data = levels[level];
   var xPos = WALL_THICKNESS;
   var yPos = WALL_THICKNESS;
   var freeLife = Math.round(Math.random() * 20);
   paddleHits = 0;
   shiftBricksDown();
   for (i = 0; i < 20; i++) {
      brick = new createjs.Shape();
      brick.graphics.beginFill(i == freeLife ? '#009900' : data.color);
      brick.graphics.drawRect(0, 0, 76, 20);
      brick.graphics.endFill();
      brick.width = 76;
      brick.height = 20;
      brick.x = xPos;
      brick.y = yPos;
      brick.points = data.points;
      brick.freeLife = false;
      bricks.push(brick);
      stage.addChild(brick);
      if (i == freeLife) {
         freeLifeTxt = new createjs.Text('1UP', '12px Times', '#fff'),
         freeLifeTxt.x = brick.x + (brick.width / 2);
         freeLifeTxt.y = brick.y + 4;
         freeLifeTxt.width = brick.width;
         freeLifeTxt.textAlign = 'center';
         brick.freeLife = freeLifeTxt;
         stage.addChild(freeLifeTxt);
      }
      xPos += 76;
      if (xPos > (brick.width * 10)) {
         xPos = WALL_THICKNESS
         yPos += brick.height;
      }
   }
   level++;
   if (level == levels.length) {
      level--;
   }
}
A few reusable variables are first declared for the loop and display objects. Next, level data is accessed by using the level value, which grabs the appropriate level object from the levels array. This data is used to assign each brick the appropriate properties.
The bricks will be laid out in a loop by incrementing the function’s xPos and yPos values, which are set to lay the first brick snug in the upper left corner of the left wall and ceiling. As you build these blocks, a random one is chosen to act as a free player bonus. Each level consists of 20 bricks, so a random number between 0 and 19 is assigned to freeLife.
The advancement of levels is determined by the amount of times the paddle hits the puck, which is declared from the game constant PADDLE_HITS_FOR_NEW_LEVEL. The number of paddle hits is reset to zero when building this new level. Before the upcoming brick-building loop, you call on the shiftBricksDown function so that that all previous rows of bricks shift down to make room for the new level. Let’s finish the new level by examining the loop.
The loop builds 20 bricks, in two rows of 10, to make up the new level. A basic shape is created and colored by referencing the level data object. When coloring the brick, you first determine if the current iteration value matches the randomly generated number for the bonus brick. If a match was found, the brick is colored green so it stands out as special.
Next, the bricks are positioned using the position values that are evaluated and incremented with each iteration. Before ultimately adding them to the stage, a set of properties is given to each brick. Remember that a display object does not inherently contain a width and height property, but they can be added dynamically by using the values that were used to draw them. These properties will be crucial when writing the collision tests. The number of points that will be given when busted is set as points, and the status of freeLife is declared and defaulted to false.
A few more things are needed to complete the function. Earlier, a random number was set to determine if the current iteration should draw a bonus brick. Along with coloring the brick green, a simple text object will be added to help indicate what the prize will be when busting it. A white text object with the value of ‘1UP’ is centered above the brick. A reference to this text object is assigned to the brick so it can be properly disposed of when the brick is hit. The text object is then added to the stage.
The last piece of code in this loop is a simple conditional to check if a new row should start in the two-row level. And finally, to end the function, the level is increased. There are only so many levels in the levels array, so you continue to use the last data object for the remainder of the game by decreasing the level by one. Figure 4-4 shows the first two levels of bricks added to the game.

Figure 4-4. The game and bonus bricks for the first two levels
Shifting the Bricks
Shifting all existing bricks makes room for the next level. This is done before adding the new level, and is shown in Listing 4-11.
Listing 4-11. The shiftBricksDown Function Moves all Bricks Down when Adding a New Level
function shiftBricksDown() {
   var i, brick;
   var shiftHeight = 80;
   var len = bricks.length;
   for (i = 0; i < len; i++) {
      brick = bricks[i];
      brick.y += shiftHeight;
      if (brick.freeLife) {
         brick.freeLife.y += shiftHeight;
      }
   }
}
Immediately before creating the new rows of bricks, the function shiftBricksDown is called to clear the way for the new level. In this function, you loop through all of the current bricks, which are stored in the bricks array. Each brick is shifted down 80 pixels, along with any free life text object that it may be tied to. Figure 4-5 shows a new row of bricks added to the game after reaching a new level.

Figure 4-5. A new level of bricks, pushing the first two rows down
With the initialization process complete, and the game graphics drawn to the stage, it’s time to start setting the game in motion. Let’s take a look at setting up the game loop.
Setting Up the Game Loop
Understanding the process of a game loop is an important concept for any game developer. A game with constant motion has a constant heartbeat, and its speed is determined by its frame rate. I briefly touched on this process in Chapter 2; it’s now time to see this cycle in full action.
To set up the game loop, return to the startGame function. If you haven’t already, move this function to the end of the script where you will set up the game loop. Add the function called runGame just before the stage is updated. Listing 4-12 shows this update and the runGame function.
Listing 4-12. Revisiting the startGame Function and Running the Game
function startGame() {
   createjs.Ticker.setFPS(60);
   createjs.Ticker.addEventListener("tick", function (e) {
      if (!e.paused) {
         runGame();
         stage.update();
      }
   });
}
function runGame() {
   update();
   render();
   evalPuck();
   evalGame();
}
As you can see, the runGame function is called on every tick of the game. This function executes the update/render cycle. It also runs a few functions that determine end level and/or end game scenarios.
Updating Game Elements in the Game Loop
The update cycle will evaluate the next position of the puck and paddle, and how they will affect the game in regards of collisions and bounds. Let’s take a quick look at update before analyzing each of the functions it calls (see Listing 4-13).
Listing 4-13. The Update Cycle
function update() {
   updatePaddle();
   updatePuck();
   checkPaddle();
   checkBricks();
}
The update function calls a series of functions used to evaluate and update display objects in motion. A series of functions is also called to check if a brick is about to be busted, or if the puck is about to hit the paddle. You want to do this before ultimately updating the stage. Let’s go over each of these functions in detail, starting with updatePaddle (see Listing 4-14)
Listing 4-14. Updating the Paddle
function updatePaddle() {
   var nextX = paddle.x;
   if (leftKeyDown) {
      nextX = paddle.x - PADDLE_SPEED;
      if (nextX < leftWall) {
         nextX = leftWall;
      }
   }
   else if (rightKeyDown) {
      nextX = paddle.x + PADDLE_SPEED;
      if (nextX > rightWall - paddle.width) {
         nextX = rightWall - paddle.width;
      }
   }
   paddle.nextX = nextX;
}
This should look familiar to you from Chapter 3. Depending on which arrow key is currently pressed down, the next position of the paddle is assigned to it, and determines where it should be drawn during the next render cycle. A quick check against the left and right walls assures that you can’t extend past them when controlling it. The next update function will move the puck. Listing 4-15 shows the updatePuck function.
Listing 4-15. Updating the Puck
function updatePuck() {
   var nextX = puck.x + puck.velX;
   var nextY = puck.y + puck.velY;
   if (nextX < leftWall) {
      nextX = leftWall;
      puck.velX *= -1;
   }
   else if (nextX > (rightWall - puck.width)) {
      nextX = rightWall - puck.width;
      puck.velX *= -1;
   }
   if (nextY < (ceiling)) {
      nextY = ceiling;
      puck.velY *= -1;
   }
   puck.nextX = nextX;
   puck.nextY = nextY;
}
Using the puck’s x and y velocity, a few temporary values are set up to determine its next location by adding to its current point values. Similar to the paddle, collisions against the walls and ceiling are considered, and values are adjusted appropriately to prevent the puck from moving out of bounds. In the case of the puck, and its constant motion, a collision with a wall should reverse its x velocity, and its y velocity is reversed when hitting the ceiling. Lastly, the puck is assigned its next x and y positions for the next render cycle.
Checking for Collisions
With the paddle controls set, and the puck in motion, some evaluations need to be made on what is about to happen with these new positions, and what they might collide with. The next function in Listing 4-16 determines if the puck is about to collide with the paddle.
Listing 4-16. Checking the Puck for a Collision with the Paddle
function checkPaddle () {
   if (puck.velY > 0 && puck.isAlive && puck.nextY > (paddle.y –
         paddle.height) && puck.nextX >= paddle.x && puck.nextX <=
         (paddle.x + paddle.width)) {
      puck.nextY = paddle.y - puck.height;
      combo = 0;
      paddleHits++;
      puck.velY *= -1;
   }
   }
The puck’s collision with the paddle is handled in the same way as the ceiling in that its y velocity is reversed when hitting. Only the paddle is a moving target, so the collision detection is a bit more complicated. You need to detect the x and y position of both the paddle and the puck to determine if they are about to intersect. This detection really only needs to run when the puck is moving downwards, so first check its velY value. The puck also has an isAlive property that is set to false when it’s beneath and beyond the reach of the paddle. This prevents you from running its brick and paddle collision calculations during the time it travels beyond and below the stage.
Continue with the conditional by comparing the position and size values of both the puck and the paddle to see if the rectangles intersect. If all conditions are met, then you know that the puck must be covering the paddle and a collision is successfully detected. Updating the puck’s nextY property to sit snuggly on top of the paddle, similar to the walls and ceiling, gives it a much more natural look when bouncing up and away.
A few of the game variables need to be updated when the paddle hits the puck. The combo variable is used to count consecutive brick hits before reaching the paddle again. This is used for the combo bonuses that are awarded to the player. When the puck hits the paddle, this value is reset back to zero to restart the consecutive brick count. The paddleHits variable is used to count the number of times the puck hit the paddle. This count is how you determine if you should add a new level of bricks to the board. Finally, the y velocity is reversed, which will set the puck flying back up towards the bricks. Figure 4-6 demonstrates the puck ricocheting off of the paddle.
Figure 4-6. The puck colliding with the paddle and bouncing away to the left
The next function (see Listing 4-17) handles the coolest part of the game, the brick busting! This function is one of the most complex functions yet and consists of one giant loop. This loop checks all bricks in the game for a puck collision, and a few conditionals are then written to factor in the bonus features.
Listing 4-17. Checking the Puck for Brick Collisions
function checkBricks() {
   if(!puck.isAlive){
      return;
   }
   var i, brick;
   for (i = 0; i < bricks.length; i++) {
      brick = bricks[i];
      if (puck.nextY >= brick.y && puck.nextY <= (brick.y + brick.height)
            && puck.nextX >= brick.x && puck.nextX <= (brick.x +
            brick.width)) {
         score += brick.points;
         combo++;
         if (brick.freeLife) {
            lives++;
            createjs.Tween.get(brick.freeLife)
               .to({alpha:0, y:brick.freeLife.y - 100}, 1000)
               .call(function () {
                  stage.removeChild(this);
               });
         }
         if (combo > 4) {
            score += (combo * 10);
            var comboTxt = new createjs.Text('COMBO X' + (combo * 10),
               '14px Times', '#FF0000'),
            comboTxt.x = brick.x;
            comboTxt.y = brick.y;
            comboTxt.regX = brick.width / 2;
            comboTxt.regY = brick.height / 2;
            comboTxt.alpha = 0;
            stage.addChild(comboTxt);
            createjs.Tween.get(comboTxt)
               .to({alpha:1, scaleX:2, scaleY:2, y:comboTxt.y - 60}, 1000)
               .call(function () {
                  stage.removeChild(this);
               });
         }
         stage.removeChild(brick);
         bricks.splice(i, 1);
         puck.velY *= -1;
         break;
      }
   }
}
The loop is set to cycle through the bricks array, which holds every brick visible on the stage. The same collision detection that was used on the paddle is used on each brick. If a hit is found, several things are then considered.
First, the score is increased by the number of points that were assigned to the brick during the building of its level, and the combo count is incremented by one. If the brick was a bonus brick, the player is awarded a new life. When this brick was created, it was assigned a reference to the ‘1UP’ text object so it could be removed later. Before doing this, it is given a classic up-and-fade animation, and is ultimately removed from the stage when the tween is complete.
The combo bonuses are next determined by checking if the combo count is over four. For every one of these hits, the current score is increased by the value of the combo count times 10. To add dramatic effect for these combo points, a text object is created on the fly, added to the stage above the brick, and then animated up while growing in size. Adding a short delay prevents too much overlapping of text as the bonus messages populate the screen. When the animation is complete, the text object is removed from the stage. Figure 4-7 shows the visuals during a combo streak.

Figure 4-7. Combo and Free Player text animations
This loop is still not quite complete. The brick needs to be removed from the stage so it will disappear when it is next updated. Setting these busted bricks to null helps keep the game clean, and invokes garbage collection on objects no longer in use. It’s also important to splice this object out of the bricks array so it’s no longer factored in this loop during the next update cycle.
At last, the puck’s y velocity is reversed and the loop is broken. You only need to detect one brick collision per update cycle, so breaking the loop prevents unnecessary code execution.
Rendering the Game Elements
The puck’s and paddle’s next positions have been calculated, and the fate of each brick has been determined. All points and lives have been properly added or subtracted from the game. Now it’s finally time to officially assign these new properties to these display objects (see Listing 4-18), which will take effect once the stage is updated.
Listing 4-18. The Render Cycle
function render() {
   paddle.x = paddle.nextX;
   puck.x = puck.nextX;
   puck.y = puck.nextY;
   livesTxt.text = "lives: " + lives;
   scoreTxt.text = "score: " + score;
}
The render function assigns the puck and paddle their new positions using the temporary values that were injected into them during the update process. The messaging is also updated by assigning their text values using the score and lives game variables that may or may not have been changed during the update cycle.
Evaluating the Game
A few functions are left to run at the end of the game loop to evaluate the game. Listing 4-19 shows the code used to determine a few key scenarios in the game, which could result in a loss of a life, a new level, or the end of the game completely.
Listing 4-19. Evaluating Game Progress
function evalPuck() {
   if (puck.y > paddle.y) {
      puck.isAlive = false;
   }
   if (puck.y > canvas.height + 200) {
      puck.y = bricks[0].y + bricks[0].height + 40;
      puck.x = canvas.width / 2;
      puck.velX *= -1;
      puck.isAlive = true;
      combo = 0;
      lives--;
   }
}
function evalGame() {
   if (lives < 0 || bricks[0].y > board.y) {
      gameOver();
   }
   if (paddleHits == PADDLE_HITS_FOR_NEW_LEVEL) {
      newLevel();
   }
}
The current position of the puck is first examined in evalPuck. If it’s below the top of the paddle, you know it has no chance of being hit in the next iterations of the game loop so its isAlive property is set to false. You also want to see if it has traveled enough distance below the stage so you can reset its position and put it back in play. This gives the player a bit of time to prepare for the puck being thrown back into the game. The position of the puck when reset is determined by the bottom row of bricks by accessing the first index in the bricks array. The first brick in this array will always be the lowest or one of the lowest positioned bricks on the screen. The puck’s x position is always set near the center of the stage to give the player a chance to get into position as the rows become lower and increasingly more difficult to reach after a puck is reset.
During this puck reset, a few more properties need to be updated. The puck’s x velocity is reversed, and its isAlive property is set back to true. The combo game variable is reset to zero, and the number of lives is decreased by one.
The game’s progress is determined by whether a new level should be added, or if the game should end completely. The evalGame will check for both. First, it checks if the game should be over by checking two scenarios. The first is when a player has completely run out of lives, and the second is when the bottom row of bricks has reached past the floor. Each of these situations should end the game immediately by executing the gameOver function.
A new level is determined by checking on the number of hits the puck has made with the paddle. It was decided that five hits should make a new level when you declared the constant PADDLE_HITS_FOR_NEW_LEVEL. Now on every fifth paddle hit, a new level of bricks is thrown into gameplay.
Ending the Game
You are now officially finished with the game loop functions. During this cycle, the game was constantly checking to see if the game should be over, and if so, to call on gameOver. Listing 4-20 shows this as one of the final three functions in the game, all of them handling the end-game scenario.
Listing 4-20. The gameOver Function
function gameOver() {
   createjs.Ticker.setPaused(true);
   gameRunning = false;
   messageTxt.text = "press spacebar to play";
   puck.visible = false;
   paddle.visible = false;
   stage.update();
   messageInterval = setInterval(function () {
      messageTxt.visible = messageTxt.visible ? false : true;
      stage.update();
   }, 1000);
}
The game should immediately be paused in the gameOver function to prevent the game loop from carrying on, and gameRunning is set to false. Then, the paddle and puck are hidden and the message below is changed to instruct the player how to restart the game. After this, the stage needs to be manually updated since the update/render cycle has been paused. To draw attention to this new message, a simple interval is set up to blink these instructions on and off, and is set to the messageInterval game variable. This is done so it can be referenced and stopped when the game is restarted.
Resetting the Game
As simple as the game state logic is in this game, it’s enough to determine if the game is in motion or if it’s waiting to be restarted. Because the gameRunning variable is now set to false, the hit of the spacebar will no longer simply pause the game, but will run a function to completely reset all game values and start it over (see Listing 4-21).
Listing 4-21. Resetting the Game Variables and Starting the Game Over
function resetGame() {
   clearInterval(messageInterval);
   level = 0;
   score = 0;
   lives = 5;
   paddleHits = 0;
   puck.y = 160;
   puck.velY = PUCK_SPEED;
   puck.visible = true;
   paddle.visible = true;
   messageTxt.visible = true;
   gameRunning = true;
   messageTxt.text = "press spacebar to pause";
   stage.update();
   removeBricks();
   newLevel();
   newLevel();
   createjs.Ticker.setPaused(false);
}
function removeBricks() {
   var i, brick;
   for (i = 0; i < bricks.length; i++) {
      brick = bricks[i];
      if (brick.freeLife) {
         stage.removeChild(brick.freeLife);
      }
      stage.removeChild(brick);
   }
   bricks = [];
}
To reset the game, several of the key game variables are reset to the values they were assigned at the beginning of the game. All remaining bricks, and their corresponding ‘1UP’ text objects are removed from the stage. Finally, two new levels are added to the game and the game loop is resumed by unpausing the Ticker.
The Progressive Break-it game is now finished. The complete game code is available in the breakit.js file that you can find with the other source code for this book. You can download it from the Source Code/Downloads tab on the book’s Apress product page (www.apress.com/9781430263401).
Summary
In this chapter, we made a complete game using nothing but code and the magic of EaselJS. All graphics and messaging were accomplished without loading in a single graphical asset, and by utilizing a game loop we were able to create a game that involves constant movement. We even took advantage of TweenJS by using it for one-off animations. Player control was made possible by listening for keyboard events, and assigning them to move the paddle and pause the game. Simple collision detection techniques were also introduced.
With some key game and drawing techniques now in your arsenal, it’s time to start adding much more polish to your games. The drawing API in EaselJS can be extremely efficient and easy to use, but your graphics really need some serious upgrading. Loading bitmaps and managing groups of graphics by using containers will be covered in the next chapter. If you’re ready, let’s start making your games look a lot more professional.