![]()
Using and Managing Bitmap Images
You’ve made it this far without loading in a single asset for the visuals in your games, but a nicely polished game is going to need some better graphics. Drawing to the canvas from loaded bitmap graphics is a breeze with EaselJS and will instantly start making your games look professional. We’ll be covering the use of bitmaps in this chapter.
We’ll also dive into the management of bitmaps, along with other display objects. As your game elements get more complex, it becomes extremely difficult to manage them all on the stage. Grouping these assets into containers will make the world of difference when managing your visual assets.
When drawing a single loaded bitmap onto the stage, you use the Bitmap class. An instance of Bitmap is a display object and will be treated the same as your shapes when altering properties and animating. For instance, you could easily update your Progressive Break-it game to use loaded bitmap graphics, instead of drawing shapes, and all of the game code would work just fine. EaselJS includes many interesting methods for manipulating bitmaps, which allows us to do many cool effects on the pixels. You’ll learn about these and other cool effects, but first, you must get the bitmap on to the stage.
Adding Bitmaps to the Stage
There are a few different ways of getting bitmaps on to the stage. The first, and simplest, approach is to simply pass the path to the image as a string into the new Bitmap instance.
var frank = new createjs.Bitmap('img/frank.png'),
With this new bitmap object, you can add it to the stage and manipulate it like any other display object. Listing 5-1 shows the bitmap positioned on the stage, with an alpha of 50 percent.
Listing 5-1. Bitmap Object Added and Faded on the Stage
var frank = new createjs.Bitmap('img/frank.png'),
stage.addChild(frank);
frank.x = 100;
frank.y = 40;
frank.alpha = .5;
stage.update();
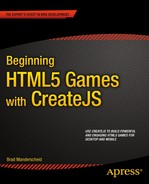
A new, semi-transparent bitmap is shown in Figure 5-1.
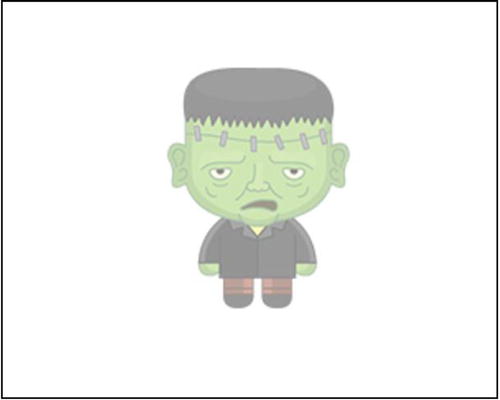
Figure 5-1. Bitmap object added to stage and faded
With this approach, EaselJS will load in the image from the path you pass into it. This approach might work in some situations, but if the image was not yet loaded, it won’t appear until the next stage update. In games, the slightest delay in graphic rendering can make your game look pretty bad. It’s better if you already know that your asset is loaded before attempting to create and add a bitmap to your game.
Let’s try another approach, where you will pass an Image JavaScript object into the constructor, as opposed to a string. Listing 5-2 shows this alternative approach.
Listing 5-2. Image Object Used to Create Bitmap Object
var img = new Image();
img.addEventListener('load', drawFrank);
img.src = 'img/frank.png';

function drawFrank(e){
   var frank = new createjs.Bitmap(e.target);
   stage.addChild(frank);
   stage.update();
}
With the bitmap loaded, you can be assured that it will show the moment you add it to the stage. However, you can do even better by using PreloadJS to load in the assets, and using their ids to pass into the new bitmap objects. Listing 5-3 loads in three bitmap assets and aligns them along the stage.
Listing 5-3. Three Bitmap Objects Created Using PreloadJS
var stage, queue;

// onload
function preload() {
   queue = new createjs.LoadQueue();
   queue.addEventListener("complete", drawCharacters);
   queue.loadManifest([
      {id:"frank", src:"img/frank.png"},
      {id:"v1", src:"img/villager1.png"},
      {id:"v2", src:"img/villager2.png"}
   ]);
}

function drawCharacters(){
   stage = new createjs.Stage('canvas'),
   var frank = new createjs.Bitmap(queue.getResult('frank'));
   var villager1 = new createjs.Bitmap(queue.getResult('v1'));
   var villager2 = new createjs.Bitmap(queue.getResult('v2'));
   frank.y = villager1.y = villager2.y = 40;
   frank.x = 20;
   villager1.x = 190;
   villager2.x = 360;
   stage.addChild(frank,villager1,villager2);
   stage.update();
}
As you can see in the previous example, the ids that were assigned to the assets when loading them via PreloadJS are accessible when creating new bitmap objects. Figure 5-2 shows this result, which lines the bitmap characters up across the stage.

Figure 5-2. Three bitmap objects added to the stage
Adding Effects
You can add some interesting effects to bitmaps using EaselJS. Although these effects are not exclusive to bitmaps, we’ll discuss how you can use them by applying them to the previously used characters. A pretty common effect is a drop shadow, which can easily be applied to bitmaps. Listing 5-4 shows the updates in bold. The result is shown in Figure 5-3.
Listing 5-4. Drop Shadow Effect on Bitmap Object
function drawCharacters() {
   var frank = new createjs.Bitmap(queue.getResult('frank'));
   var villager1 = new createjs.Bitmap(queue.getResult('v1'));
   var villager2 = new createjs.Bitmap(queue.getResult('v2'));
   frank.y = villager1.y = villager2.y = 40;
   frank.x = 20;
   villager1.x = 190;
   villager2.x = 360;
   stage.addChild(frank, villager1, villager2);
   villager1.shadow = new createjs.Shadow('#000', 5, 5, 8);
   stage.update();
}

Figure 5-3. Drop shadow effect applied to second character
Now the first villager has a nice drop shadow applied to it, which gives it a little more depth. There are a handful of other interesting effects that are bundled in with CreateJS as well. Unlike shadow, which is a direct property of display objects, these other effects are applied via the filters property. This property is an array, so you can apply more than one filter to the object. To apply a filter, you must first instantiate one of the handful of filter objects included in EaselJS. Let’s start with a blur effect on Frank (see Listing 5-5).
Listing 5-5. Blur Effect on Bitmap Object
function drawCharacters() {
   var frank = new createjs.Bitmap(queue.getResult('frank'));
   var villager1 = new createjs.Bitmap(queue.getResult('v1'));
   var villager2 = new createjs.Bitmap(queue.getResult('v2'));
   frank.y = villager1.y = villager2.y = 40;
   frank.x = 20;
   villager1.x = 190;
   villager2.x = 360;
   stage.addChild(frank, villager1, villager2);
   villager1.shadow = new createjs.Shadow('#000', 5, 5, 8);
   var w = frank.image.width;
   var h = frank.image.height;
   var blur = new createjs.BoxBlurFilter(5, 5, 1);
   frank.filters = [blur];
   frank.cache(0, 0, w, h);
   stage.update();
}
![]() Note The filter classes are not included in the single EaselJS file. They are all contained in a separate folder called filters and must be individually included in your document. This folder was included in your downloading of EaselJS.
Note The filter classes are not included in the single EaselJS file. They are all contained in a separate folder called filters and must be individually included in your document. This folder was included in your downloading of EaselJS.
An important thing to note when it comes to filtering is that the display object must be cached for the effect to take place. To use caching, you need to provide the bounds of the cache, which is supplied here by the frank bitmap image. By caching the bitmap, it is drawn into a new canvas, which will be used for its future drawing to the stage. Because of this, the caching must come after you assign the filter. If at any time you wish to update your display object, the update method must be called on cache so your updates will be seen in subsequent draws. This blur effect on Frank is shown in Figure 5-4.
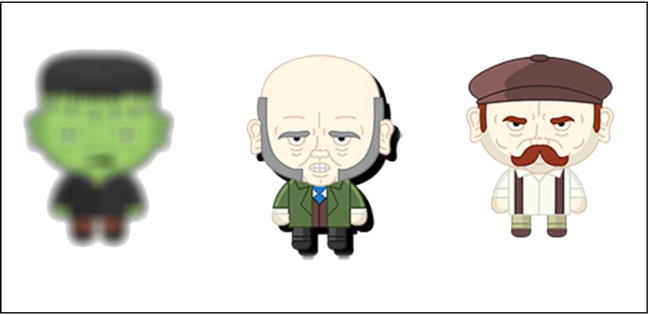
Figure 5-4. Blur effect applied to first character
![]() Note It is recommended that you never cache a simple bitmap; however, it is essential when applying filters.
Note It is recommended that you never cache a simple bitmap; however, it is essential when applying filters.
As previously mentioned, the filters property is actually an array. Even if you only apply one filter, it must be assigned as an array. When you applied the blur filter to Frank, it was built as an array that contained one filter.
frank.filters = [blur];
The final effects example will demonstrate how you can apply multiple filters to a bitmap. The same blur filter will be used to go along with a new effect using the ColorFilter class. Listing 5-6 adds some filters to the final characters.
Listing 5-6. Color and Blur Effect on Bitmap Object
function drawCharacters() {
   var frank = new createjs.Bitmap(queue.getResult('frank'));
   var villager1 = new createjs.Bitmap(queue.getResult('v1'));
   var villager2 = new createjs.Bitmap(queue.getResult('v2'));
   frank.y = villager1.y = villager2.y = 40;
   frank.x = 20;
   villager1.x = 190;
   villager2.x = 360;
   stage.addChild(frank, villager1, villager2);
   var w = frank.image.width;
   var h = frank.image.height;
   villager1.shadow = new createjs.Shadow('#000', 5, 5, 8);
   var blur = new createjs.BoxBlurFilter(5, 5, 1);
   frank.filters = [blur];
   frank.cache(0, 0, w, h);
   var color = new createjs.ColorFilter(1, 0, 0, 1, 0, 0, 0, 0);
   villager2.filters = [color, blur];
   villager2.cache(0, 0, w + 10, h + 10);
   stage.update();
}
In the color filter, the first three RGB parameters are used to build the color. Each value accepts a value between 0 and 1. By setting the red multiplier to 1, and the rest to 0, the red color is created. The fourth parameter is alpha and is set to 1, and the final three are for offset color values, which will be left at 0. Along with the blur effect, the final result is shown in Figure 5-5.
Figure 5-5. Blur and color effects applied to third character
There are more filters available, along with endless combinations and techniques that can be used for adding effects and transforming bitmaps. These can be made to fit many types of games and applications; however, be careful not to go too crazy with these effects. Filtering can be pretty taxing on the computer and could slow down performance. In games, it’s often best to render your effects in your image processor, and load those bitmaps into your game. We’ll cover these techniques when discussing sprites and sprite sheets in Chapter 6.
Masking and Clipping
Along with filters, you can also apply masking and clipping to bitmaps. To use masking, simply use a Shape object, and apply it to the display object’s mask property.
myBitmap.mask = myShape;
Listing 5-7 shows how you can apply a circle shape as the mask for a loaded photograph.
Listing 5-7. Masking a Photo Using a Shape
var bmp = new createjs.Bitmap('img/mam.png'),
var circle = new createjs.Shape(new createjs.Graphics().drawCircle(0,0,250));
circle.x = 620;
circle.y = 300;
stage.addChild(bmp);
bmp.mask = circle;
stage.update();
The shape is simply positioned and set as the mask for the photograph. You can use any shape, simple like this circle or as complex as a star, to mask display objects. Figure 5-6 shows your masked photograph.
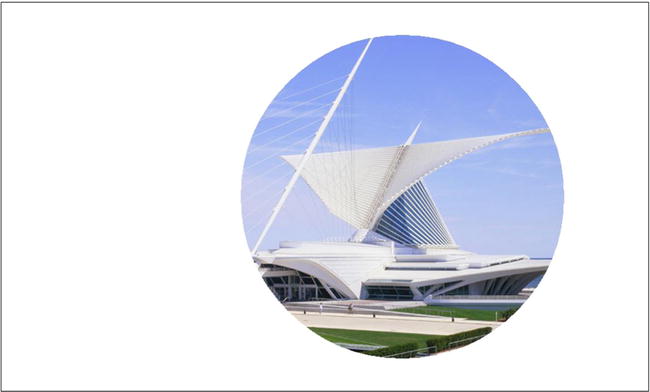
Figure 5-6. Photograph with a circular mask using a shape object
Masking can be extremely handy in a lot of situations. Take a look at a simple, yet clever example where masking is used to see the inside of a teddy bear (see Listing 5-8). Some controls will be added to the mask as well to give it some fun interaction.
Listing 5-8. Creating an Interactive Mask to Create an X-ray Effect
var stage;

// onload
function init() {
   stage = new createjs.Stage('canvas'),
   buildBears();
   startGame();
}

function buildBears() {
   var bear = new createjs.Bitmap('img/bear.png'),
   var bearUnder = new createjs.Bitmap('img/bearUnder.png'),
   var mask = new createjs.Shape(new createjs.Graphics().drawCircle(0, 0, 50));
   bearUnder.mask = mask;
   stage.addChild(mask,bear, bearUnder);
   mask.addEventListener('tick', function (e) {
      e.currentTarget.x = stage.mouseX;
      e.currentTarget.y = stage.mouseY;
   })
}

function startGame() {
   createjs.Ticker.setFPS(60);
   createjs.Ticker.addEventListener("tick", function (e) {
      stage.update();
   });
}
In this example, two bear graphics are stacked directly on top of each other. The skeleton version is laid on top so it can be masked, which will reveal a small portion and give it the illusion of an x-ray feature. The event tick can be used on any display object to tap into the game’s ticker. In this example, it is being used to update the position of the mask to match the mouse pointer. Figure 5-7 shows this feature in action.
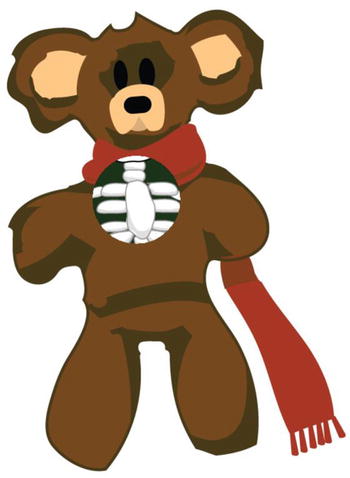
Figure 5-7. X-ray bear, using two bitmaps and a moveable mask
Clipping is another technique that can be used with bitmaps. When you create a new bitmap and add it to the stage, the entire bounds of that bitmap are used. However, you don’t need to use the entire image if you wish to only display a portion of it. This can be accomplished by using the sourceRect property, which takes a Rectangle object. The following is a sample of this technique being used:
var piece = new createjs.Bitmap('img/mam.png'),
var rect = new createjs.Rectangle(100, 100, 100, 100);
piece.sourceRect = rect;
The Rectangle object is part of the EaselJS API, and takes four parameters: x, y, width, and height. These values will be used as the area of the bitmap image that you want to display in the bitmap object. This is accomplished simply by assigning the bitmap objects sourceRect to the rectangle.
Let’s take this a bit further and create two bitmaps from the same image, and add them to the stage, shown in Listing 5-9. Figure 5-8 demonstrates the final result.
Listing 5-9. Using sourceRect to Clip Bitmap Graphics
var bmp1 = new createjs.Bitmap('img/mam.png'),
var bmp2 = new createjs.Bitmap('img/mam.png'),
var rect = new createjs.Rectangle(0, 0, 200, 200);
bmp1.sourceRect = rect;
rect = new createjs.Rectangle(200, 400, 200, 200);
bmp2.sourceRect = rect;
bmp1.x = 20;
bmp2.x = 240;
bmp1.y = bmp2.y = 20;
stage.addChild(bmp1, bmp2);
stage.update();
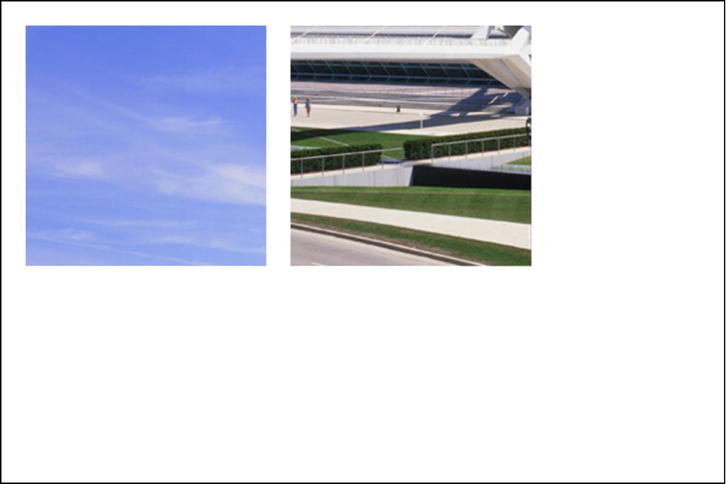
Figure 5-8. Two bitmap objects using different portions of the same source
This technique leads us to the first exercise in this chapter. It will use clipping, along with some simple filter effects, to create a puzzle game using a single photograph image.
Puzzle Swap
Puzzle Swap is a puzzle game where the player moves pieces by selecting the puzzle pieces they wish to swap. Once all pieces are in their appropriate locations, the image is revealed and the player wins.
- Load in a single bitmap image.
- Create multiple bitmap objects that contain only pieces of the full bitmap.
- Display all bitmap pieces in place for three seconds at the start of game.
- Explode pieces by shuffling them all to random places.
- Allow users to swap pieces until all pieces are in place.
- Selected puzzle pieces are indicated by a color filter that is applied when the piece is selected.
Setting up the Game Files
First, set up the HTML document that includes a canvas element and the necessary CreateJS file includes (see Listing 5-10). You will be using some color filters, so remember to include the appropriate filter scripts as well. The game code will be written in a separate file named puzzle.js. Be sure to create this file and include it in the document.
Listing 5-10. HTML File for Puzzle Swap
<!DOCTYPE html>
<html>
<head>
   <title></title>
   <script src="lib/easeljs-0.7.1.min.js"></script>
   <script src="lib/tweenjs-0.5.1.min.js"></script>
   <script src="lib/filters/ColorMatrix.js"></script>
   <script src="lib/filters/ColorMatrixFilter.js"></script>
   <script src="puzzle.js"></script>
</head>

<body onload="init()">

<canvas id="canvas" width="1000" height="600" style="border: black solid 1px"></canvas>

</body>

</html>
Initializing the Game
Moving over to the puzzle.js file, some game constants and variables are first declared. Following this, the init function is written (see Listing 5-11), which is fired on the onload body event.
Listing 5-11. puzzle.js Game Variable and init Function
const PUZZLE_COLUMNS = 5;
const PUZZLE_ROWS = 3;
const PUZZLE_SIZE = 200;

var stage;
var pieces = [];
var selectedPieces = [];

function init() {
   stage = new createjs.Stage(document.getElementById('canvas'));
   buildPuzzle();
   startGame();
   setTimeout(shufflePuzzle, 3000);
}
The constants created will be used in creating the graphics for the puzzle pieces and creating the grid to lay them out on. A couple of arrays are created to store all of the puzzle pieces, and another for the pieces that are selected to swap. The init function sets up the stage, and then calls a list of functions. The function buildPuzzle is first called to set up the puzzle pieces.
Building the Puzzle Pieces
The puzzle pieces are created by slicing out chunks of graphics from a complete bitmap file. This process is shown in Listing 5-12.
Listing 5-12. Building the Puzzle Pieces from a Loaded Bitmap Graphic
function buildPuzzle() {
   var i, piece;
   var l = PUZZLE_COLUMNS * PUZZLE_ROWS;
   var col = 0;
   var row = 0;
   for (i = 0; i < l; i++) {
      piece = new createjs.Bitmap('img/mam.png'),
      piece.sourceRect = new createjs.Rectangle(col * PUZZLE_SIZE, row * PUZZLE_SIZE,
         PUZZLE_SIZE, PUZZLE_SIZE);
      piece.homePoint = {x: col * PUZZLE_SIZE, y: row * PUZZLE_SIZE};
      piece.x = piece.homePoint.x;
      piece.y = piece.homePoint.y;
      stage.addChild(piece);
      pieces[i] =  piece;
      col ++;
      if (col === PUZZLE_COLUMNS) {
         col = 0;
         row ++;
      }
   }
}
The pieces in the puzzle are all created in a loop that has the length of the total pieces. Multiplying the number of columns by the number of rows, declared in the game constants, determines this total number. Starting with column 0 and row 0, the col and row variables are set to represent these values.
The first thing you do in the loop is create a bitmap object using the png file used for the puzzle. Since only a specific portion of the graphic is wanted for each piece, a Rectangle object is created by using the current column and row, and the size of the puzzle pieces. Using these values, the areas of the bitmap can be calculated for each piece.
piece.sourceRect = new createjs.Rectangle(col * PUZZLE_SIZE, row * PUZZLE_SIZE,  PUZZLE_SIZE,
   PUZZLE_SIZE);
Next, each piece is assigned a point object, which holds the location of each piece’s home coordinates. The x and y values are immediately assigned to each bitmap so the puzzle starts out intact. This gives the player a view of the puzzle at its complete state. They are each then added to the stage and pushed to the pieces array.
Lastly, the current column is increased by one so the start location of the bitmap is adjusted in the next iteration. If you’ve reached the end of the total columns, it’s reset back to 0, and the current row is increased by one.
The result is shown in Figure 5-9. Although it looks as though you have a single bitmap, there are actually a total of 15 bitmap objects, perfectly placed on the stage.
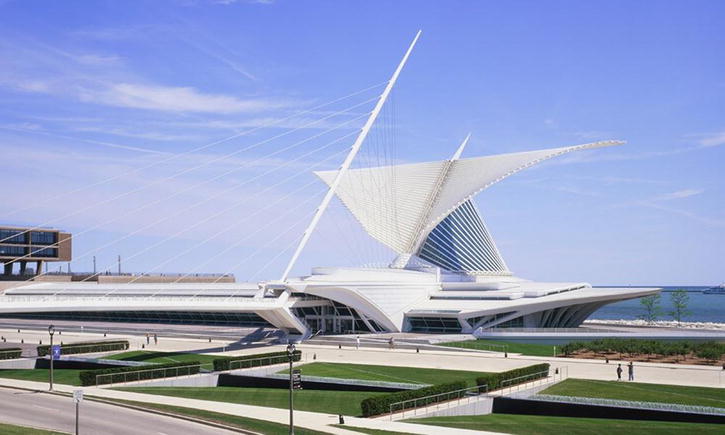
Figure 5-9. Fifteen bitmap objects perfectly placed to form a complete image
Shuffling the Puzzle Pieces
The puzzle will appear intact for three seconds before its pieces shuffle. With the three-second timeout you created in the init function, shufflePuzzle is called to shuffle the order of each puzzle piece (see Listing 5-13).
Listing 5-13. Randomly Placing the Bitmap Objects into New Locations
function shufflePuzzle() {
   var i, piece, randomIndex;
   var col = 0;
   var row = 0;
   var p = [];
   p = p.concat(pieces);
   var l = p.length;
   for (i = 0; i < l; i++) {
      randomIndex= Math.floor(Math.random() * p.length)
      piece = p[randomIndex];
      p.splice(randomIndex, 1);
      createjs.Tween.get(piece).to({x:col * PUZZLE_SIZE, y: row * PUZZLE_SIZE},200);
      piece.addEventListener('click', onPieceClick);
      col++;
      if (col === PUZZLE_COLUMNS) {
         col = 0;
         row++;
      }
   }
}
To shuffle the bitmap objects into new locations, a loop is set up, similar to the one that was used to create them. Since you want to keep the game array pieces intact for game evaluations, a clone of it is made to use for the loop.
var p = [];
p = p.concat(pieces);
You’ll be randomly grabbing and splicing out objects for the shuffling, so this cloning process is essential. The length of this array is stored away in the variable l for the loop length. This is done because of the splicing that will be taking place. A random value is generated and is used to find a puzzle piece in the array, which is immediately taken out to prevent being chosen again. The new location for each piece is then determined, using the same grid calculations used when the pieces were first created. The pieces are then tweened to this location.
Figure 5-10 demonstrates the puzzle pieces being shuffled to new locations.
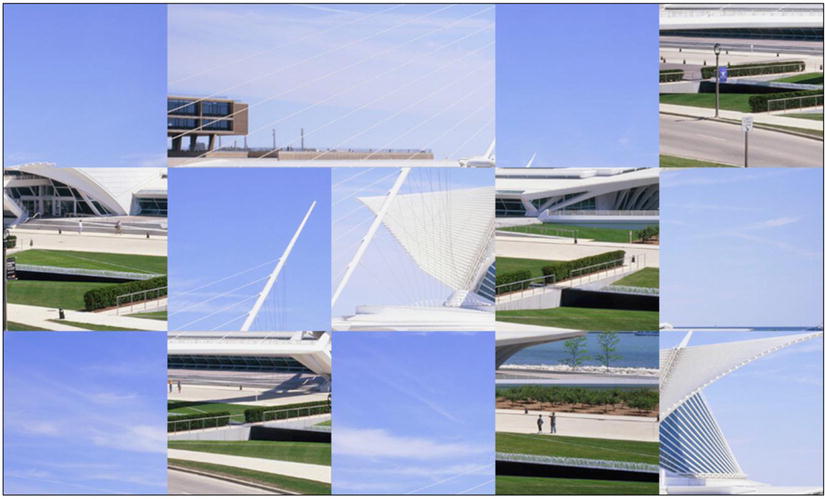
Figure 5-10. The puzzle pieces shuffled to random locations
Moving Puzzle Pieces
Before evaluating the current column in the loop, a click event listener is set, which will call the function onPieceClick and is shown in Listing 5-14.
Listing 5-14. Selecting the Puzzle Pieces
function onPieceClick(e) {
   if (selectedPieces === 2) {
      return;
   }
   var piece = e.target;
   var matrix = new createjs.ColorMatrix().adjustColor(15, 10, 100, 180);
   piece.filters = [
      new createjs.ColorMatrixFilter(matrix)
   ];
   piece.cache(0, 0, PUZZLE_SIZE, PUZZLE_SIZE);
   selectedPieces.push(piece);
   if (selectedPieces.length === 2) {
      evalSelectedPieces();
   }
}
The selected pieces are pushed to the selectedPieces array, so a quick check is written to prevent more than two pieces from being selected. If still under two, a reference to the bitmap clicked is set to the local variable piece.
For visual indication that a puzzle piece was chosen, a color filter will be created and applied to the bitmap. Using some of the techniques learned in the “Adding Effects” section, a single filter is applied to the bitmap when clicked and is pushed into the selectedPieces array.
Finally, you check if there have been two bitmaps that have been selected, and if so, the swapPieces function is called (see Listing 5-15).
Listing 5-15. Swapping the Locations of the Bitmap Objects when Two Are Selected
function swapPieces() {
   var piece1 = selectedPieces[0];
   var piece2 = selectedPieces[1];
   createjs.Tween.get(piece1).wait(300).to({x:piece2.x, y:piece2.y},200);
   createjs.Tween.get(piece2).wait(300).to({x:piece1.x, y:piece1.y},200).call(function(){
      setTimeout(evalPuzzle,200);
   });
}
A reference to each piece is first assigned to a few variables. A few tweens are then created to swap the location of each piece. The call method is used on the second tween to call on the function evalPuzzle, which will determine if the puzzle is complete (see Listing 5-16). A short timeout is set to fire this function as a safety precaution to assure that the pieces are in their new locations before evaluating them.
Listing 5-16. Evaluating the Puzzle to See Whether All Pieces Are in Place
function evalPuzzle() {
   var win = true;
   var i, piece;
   selectedPieces[0].uncache();
   selectedPieces[1].uncache();
   for (i = 0; i < pieces.length; i++) {
      piece = pieces[i];
      if (piece.x != piece.homePoint.x || piece.y != piece.homePoint.y) {
         win = false;
         break;
      }
   }
   if (win) {
      setTimeout(function () {
         alert('YOU DID IT!'),
      }, 200);
   }
   else {
      selectedPieces = [];
   }
}
Before looping through and evaluating each puzzle piece’s location, the bitmaps are uncached, which will remove the effect filter applied to them. In the loop, you simply check each piece to see if either their x or y position does not match their “home” location. If this is the case at any time during the loop, you know that the puzzle cannot be complete. The local win variable will then be set to false, and the loop is broken.
The win value is checked, and if true, a simple alert is called to award the user with a message. If not, the selectedPieces array is emptied, allowing the player to continue swapping puzzle pieces.
Lastly, the typical startGame function (shown in Listing 5-17) is used to run the stage updates.
Listing 5-17. Ticker and Stage Update Function
function startGame() {
   createjs.Ticker.addEventListener("tick", function(){
      stage.update();
   });
   createjs.Ticker.setFPS(60);
}
The Complete Puzzle Swap Code
The complete code for the puzzle game is shown in Listing 5-18.
Listing 5-18. The Complete Code for puzzle.js
const PUZZLE_COLUMNS = 5;
const PUZZLE_ROWS = 3;
const PUZZLE_SIZE = 200;

var stage;
var pieces = [];
var selectedPieces = [];

function init() {
   stage = new createjs.Stage('canvas'),
   buildPuzzle();
   startGame();
   setTimeout(shufflePuzzle, 2000);
}
function buildPuzzle() {
   var i, piece;
   var l = PUZZLE_COLUMNS * PUZZLE_ROWS;
   var col = 0;
   var row = 0;
   for (i = 0; i < l; i++) {
      piece = new createjs.Bitmap('img/mam.png'),
      piece.sourceRect = new createjs.Rectangle(col * PUZZLE_SIZE,
         row * PUZZLE_SIZE, PUZZLE_SIZE, PUZZLE_SIZE);
      piece.homePoint = {x:col * PUZZLE_SIZE, y: row * PUZZLE_SIZE};
      piece.x = piece.homePoint.x;
      piece.y = piece.homePoint.y;
      stage.addChild(piece);
      pieces[i] = piece;
      col ++;
      if (col === PUZZLE_COLUMNS) {
         col = 0;
         row ++;
      }
   }
}
function shufflePuzzle() {
   var i, piece, randomIndex;
   var col = 0;
   var row = 0;
   var p = [];
   p = p.concat(pieces);
   var l = p.length;
   for (i = 0; i < l; i++) {
      randomIndex= Math.floor(Math.random() * p.length)
      piece = p[randomIndex];
      p.splice(randomIndex, 1);
      createjs.Tween.get(piece).to({x:col * PUZZLE_SIZE, y:row * PUZZLE_SIZE},200);
      piece.addEventListener('click', onPieceClick);
      col++;
      if (col === PUZZLE_COLUMNS) {
         col = 0;
         row++;
      }
   }
}
function onPieceClick(e) {
   if (selectedPieces === 2) {
      return;
   }
   var piece = e.target;
   var matrix = new createjs.ColorMatrix().adjustColor(15, 10, 100, 180);
   piece.filters = [
      new createjs.ColorMatrixFilter(matrix)
   ];
   piece.cache(0, 0, PUZZLE_SIZE, PUZZLE_SIZE);
   selectedPieces.push(piece);
   if (selectedPieces.length === 2) {
      swapPieces();
   }
}
function swapPieces() {
   var piece1 = selectedPieces[0];
   var piece2 = selectedPieces[1];
   createjs.Tween.get(piece1).wait(300).to({x:piece2.x, y:piece2.y},200);
   createjs.Tween.get(piece2).wait(300).to({x:piece1.x, y:piece1.y},200).call(function(){
      setTimeout(evalPuzzle,200);
   });
}
function evalPuzzle() {
   var win = true;
   var i, piece;
   selectedPieces[0].uncache();
   selectedPieces[1].uncache();
   for (i = 0; i < pieces.length; i++) {
      piece = pieces[i];
      if (piece.x != piece.homePoint.x || piece.y != piece.homePoint.y) {
         win = false;
         break;
      }
   }
   if (win) {
      setTimeout(function () {
         alert('YOU DID IT!'),
      }, 200);
   }
   else {
      selectedPieces = [];
   }
}
function startGame() {
   createjs.Ticker.addEventListener("tick", function(){
      stage.update();
   });
   createjs.Ticker.setFPS(60);
}
Now that you’ve seen how to load and manipulate loaded bitmap graphics in your games, you’ll next learn how you can properly manage them using containers.
Containers
Containers are used to group multiple display objects into a single, contained group, which can be positioned and manipulated as a single display object. These containers have their own display list. In fact, Stage is actually a container itself that merely resides at the root of your application. You’ll quickly see the benefits in using containers, which are built by using the Container class.
Building Containers
The Container class is used to build container objects. Once a container is made, you can add and remove children to it exactly in the same manner as you have been with Stage. The following is an example of how to create a container, add a few shapes to it, and ultimately add it to the stage:
var group = new createjs.Container();
group.addChild(shape1);
group.addChild(shape2);
group.x = container.y = 100;
stage.addChild(group);
In this code, the new group object has two children added to it, shape1 and shape2. It is then added to the stage, which now has group as its only child. The stage is now the parent of group, and can be accessed via the group’s parent property. Likewise, group is now the parent of both shape1 and shape2.
var parent = group.parent; //Stage
parent = shape1.parent;    //group
Let’s put this into a working example, which creates two containers and is shown in Listing 5-19.
Listing 5-19. Two containers, Populated with Various Display Objects
var container1 = new createjs.Container();
var container2 = new createjs.Container();
var pepper = new createjs.Bitmap('img/pepper.png')
var circle = new createjs.Shape(new createjs.Graphics().beginFill('#FF0000')
   .drawCircle(0, 0, 50));
var square = new createjs.Shape(new createjs.Graphics().beginFill('#00FF00')
   .drawRect(0, 0, 50, 50));
var txt = new createjs.Text("Hello Containers", "20px Arial", "#000");
var bg = new createjs.Shape(new createjs.Graphics().beginStroke('#000')
   .drawRect(0, 0, 250, 250));
container1.addChild(bg);
bg = new createjs.Shape(new createjs.Graphics().beginStroke('#000')
   .drawRect(0, 0, 250, 250));
container2.addChild(bg);
txt.x = txt.y = 10;
circle.x = circle.y = 125;
container1.addChild(txt, circle);
square.x = square.y = 10;
pepper.x = pepper.y = 100;
container2.addChild(square, pepper);
container1.x = 20;
container2.x = 320;
container1.y = container2.y = 40;
stage.addChild(container1, container2);
stage.update();
Two containers are created and then populated with various display objects, including shapes, text, and bitmaps. Each container shares the same background shape, which acts as its visual bounds. The result is shown in Figure 5-11.
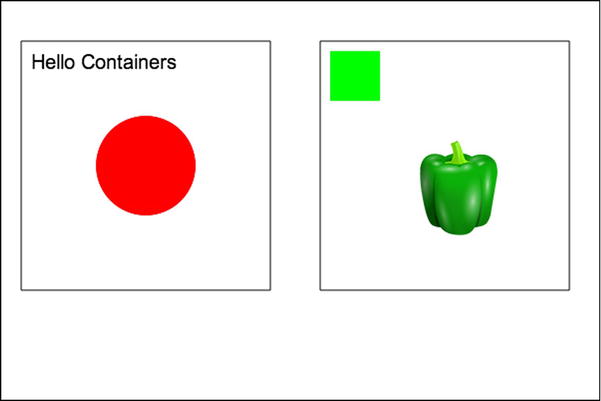
Figure 5-11. Two containers with shapes, bitmaps, and text added to their display lists
The result is two containers on the stage, each acting as one, unified group with its own display list. You can position and even animate each container as a whole, and access their children using the same methods you’ve been using on stage.
Animating and Cloning Containers
When animating containers, you treat them like any other display object. You can easily target a container when using tweens in your application. Listing 5-20 is an example of how you would accomplish this.
Listing 5-20. Rotating a Container Around its Center Axis
var container = new createjs.Container();
var pepper = new createjs.Bitmap('img/pepper.png')
var txt = new createjs.Text("Green Pepper", "20px Arial", "#000");
var bg = new createjs.Shape(new createjs.Graphics().beginStroke('#000')
   .drawRect(0, 0, 250, 250));
txt.x = txt.y = 10;
pepper.x = pepper.y = 80;
container.regX = container.regY = 125;
container.x = 300;
container.y = 200;
container.addChild(bg, txt, pepper);
stage.addChild(container);
createjs.Tween.get(container).to({rotation:360},4000);
As you can see from the previous example, you can also set the registration point on a container, which allows you to spin them around their center point. Figure 5-12 demonstrates this in action.
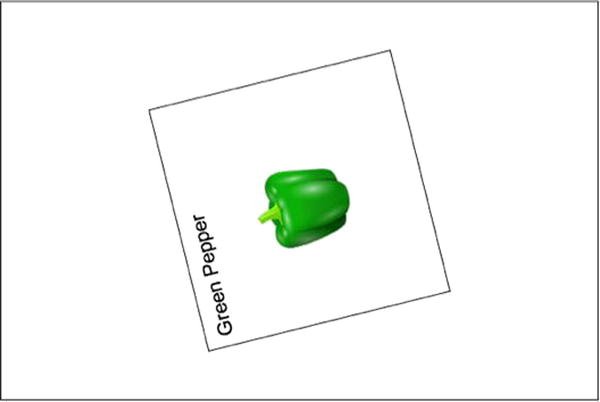
Figure 5-12. Rotating animation applied to a container
Figure 5-12 should give you an idea on how helpful containers can be in your games. In fact, they are actually pretty essential. You’ll also run into to situations where you may need several containers that that contain the same visuals. The clone method can be used to accomplish this.
If you recall, the clone method was used on a text object during the word game in Chapter 3. This was very helpful in that it prevented you from having to recreate the styles and properties needed to create the same text object. With containers, there will often times be several objects added and positioned inside it. You really only need to build this once and then take advantage of the clone method to duplicate it. Listing 5-21 shows this being done.
Listing 5-21. Cloning a Container
var container = new createjs.Container();
var pepper = new createjs.Bitmap('img/pepper.png')
var txt = new createjs.Text("Green Pepper", "20px Arial", "#000");
var bg = new createjs.Shape(new createjs.Graphics().beginStroke('#000')
   .drawRect(0, 0, 250, 250));
txt.x = txt.y = 10;
pepper.x = pepper.y = 80;
container.regX = container.regY = 125;
container.x = 150;
container.y = 200;
container.addChild(bg, txt, pepper);
container2 = container.clone(true);
container2.x = 430;
container2.y = 200;
stage.addChild(container,container2);
The first container is built by populating its display objects. A new container is then built and is created by using the clone method on the first container. Its positioning is set, and both containers are then added to the stage. Figure 5-13 shows two identical containers on the stage.
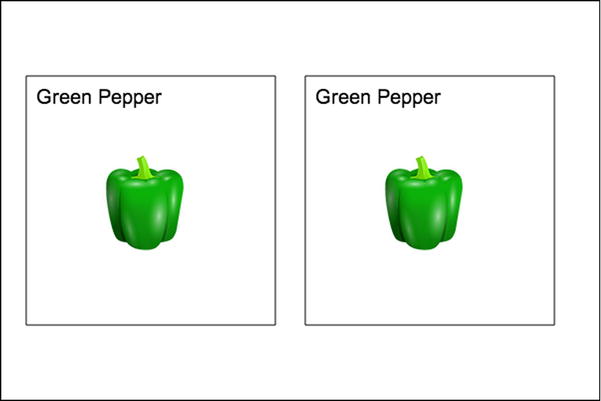
Figure 5-13. Cloning a container
One thing you’ll notice, unlike the text-cloning example, is that you pass in the value of true to the clone method. This is so it will be executed in recursive mode, which will clone all children within the container, as well as its children’s children. To duplicate all objects in your container, be sure to pass this value in when using clone.
Now that you’ve learned how to group and manipulate display objects into containers, it’s time to put them into a game. A great example for the use of containers in games is when using them for creating playing cards. Let’s do that now in the next exercise, which will demonstrate the true power in containers.
Veggie Match
Veggie Match is a simple memory game where the player tries to match cards by revealing them two at a time.
- Preload images needed to build card containers.
- Build cards using Container, and add a card shell, card back, food graphic, and a text object.
- Apply a drop shadow to each card object.
- Flip each card on click by hiding the back bitmap in the container.
- Flip back over if guessed wrong by revealing the card’s back bitmap.
- End the game when all cards are successfully flipped over.
Setting Up the Game Files
First, set up the HTML document that includes a canvas element and the necessary CreateJS file includes (see Listing 5-22). The game code will be written in a separate file and named memory.js. Be sure to create this file and include it in the document.
Listing 5-22. HTML File for Veggie Match
<!DOCTYPE html>
<html>
<head>
    <title></title>
    <script src="../../lib/easeljs-0.7.1.min.js"></script>
    <script src="../../lib/preloadjs-NEXT.min.js"></script>
    <script src="../../lib/tweenjs-0.5.1.min.js"></script>
    <script src="memory.js"></script>
</head>

<body onload="preload()">

<canvas id="canvas" width="650" height="650" style="border: black solid 1px"></canvas>

</body>

</html>
Initializing the Game
A series of game variables is first declared, and a preload function is used to load in bitmaps before initializing the game (see Listing 5-23).
Listing 5-23. Game Variables and Preload Function to Load in all Graphics
var stage, queue;

var faces = ['garlic', 'onion', 'pepper', 'potato', 'spinach', 'tomato'];
var cards = [];
var cardsFlipped = [];
var matches = 0;

function preload() {
   queue = new createjs.LoadQueue();
   queue.addEventListener("complete", init);
   queue.loadManifest([
      {id:"shell", src:"img/card.png"},
      {id:"back", src:"img/back.png"},
      {id:"garlic", src:"img/garlic.png"},
      {id:"onion", src:"img/onion.png"},
      {id:"pepper", src:"img/pepper.png"},
      {id:"potato", src:"img/potato.png"},
      {id:"spinach", src:"img/spinach.png"},
      {id:"tomato", src:"img/tomato.png"}
   ]);
}
The faces array is used for both creating ids for loaded bitmaps, and to write the label on each card. Similar to the puzzle pieces, an array is created to hold each card, and another to hold reference to the cards flipped over when a player is making their guesses.
The preload function is used to set up the loading of all of the bitmap graphics that will be used in the game. A new LoadQueue object is created and set to the game variable queue, which will give global access to the ids that were assigned to each bitmap in the manifest. When the files are successfully loaded, the game is initialized by calling init (see Listing 5-24).
Listing 5-24. The init Function Sets Up the Canvas and Calls a Series of Functions
function init() {
   stage = new createjs.Stage(document.getElementById('canvas'));
   buildCards();
   shuffleCards();
   dealCards();
   startGame();
}
The stage is created and a series of functions is then called, starting with buildCards, which is used to create the cards.
Creating the Cards
The cards are created by adding a series of display objects to containers. This process is shown in Listing 5-25.
Listing 5-25. Building and Cloning Containers for Each Card in the Game
function buildCards() {
   var i, card, card2, bmp, label, face;
   for (i = 0; i < faces.length; i++) {
      card = new createjs.Container();
      bmp = new createjs.Bitmap(queue.getResult('shell'));
      card.regX = bmp.image.width / 2;
      card.regY = bmp.image.height / 2;
      card.addChild(bmp);
      face = faces[i];
      bmp = new createjs.Bitmap(queue.getResult(face));
      bmp.regX = bmp.image.width / 2;
      bmp.regY = bmp.image.height / 2;
      bmp.x = card.regX;
      bmp.y = 70;
      card.addChild(bmp);
      label = new createjs.Text(faces[i].toUpperCase(), "20px Arial", "#FFF");
      label.textAlign = 'center';
      label.x = card.regX;
      label.y = 144;
      card.addChild(label);
      bmp = new createjs.Bitmap(queue.getResult('back'));
      bmp.name = 'back';
      card.addChild(bmp);
      card2 = card.clone(true);
      card.key = card2.key = faces[i];
      cards.push(card, card2);
      card.shadow = card2.shadow = new createjs.Shadow("#333", 3, 3, 5);
   }
}
This card-creating function consists of a single loop, which will build each container. The container is immediately created, which will hold all assets that make up the card. The base of each container will be the shell graphic. The registration point is set to be centered by using the width and height of the shell image, which is then added to the container.
Next, the food graphic is determined by using the loop count and the faces array. This bitmap is then horizontally centered, given a y value of 70, and then added to the container. The cards will also contain a text object to display the name of the food. This text value is also determined by the faces array and is assigned to a new text object, which is positioned and finally added to the card container. Figure 5-14 shows an example of a complete card container.
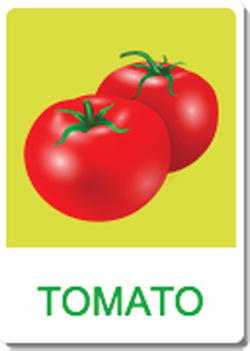
Figure 5-14. A card container using text and bitmap objects
The top-most graphic in each card is the back graphic, which will be shown or hidden to indicate the current state of the card. This bitmap will start out visible, and will be turned invisible to reveal the cards properties when it’s selected during gameplay.
Two cards of each food item are needed, so this is a perfect opportunity to utilize the clone method on the card container. Be sure to pass true into the constructor so it is recursively cloned, which will duplicate all children in the container. A key value is assigned to each card, which will be used to determine if the selected cards are matching. You can simply use the unique face value for this property. Finally, a drop shadow is assigned to the card.
Shuffling the Cards
Before adding the cards to the stage, the cards need to be shuffled. The shuffleCards function will do this next (see Listing 5-26).
Listing 5-26. Shuffling the Cards Array and Animating Them on a Grid
function shuffleCards() {
   var i, card, randomIndex;
   var l = cards.length;
   var shuffledCards = [];
   for (i = 0; i < l; i++) {
      randomIndex = Math.floor(Math.random() * cards.length);
      shuffledCards.push(cards[randomIndex]);
      cards.splice(randomIndex, 1);
   }
   cards = cards.concat(shuffledCards);
}
function dealCards() {
   var i, card;
   var xPos = 100;
   var yPos = 100;
   var count = 0;
   for (i = 0; i < cards.length; i++) {
      card = cards[i];
      card.x = -200;
      card.y = 400;
      card.rotation = Math.random() * 600;
      card.addEventListener('click', flipCard);
      stage.addChild(card);
      createjs.Tween.get(card)
         .wait(i * 100)
         .to({x:xPos, y:yPos, rotation:0}, 300);
      xPos += 150;
      count++;
      if (count === 4) {
         count = 0;
         xPos = 100;
         yPos += 220;
      }
   }
}
Similar to the puzzle pieces shuffle, the cards array is used to shuffle the deck. It’s handled a bit differently here to show an alternative way to shuffle object arrays. A local array named shuffledCards is first declared and set to empty. As you loop through the array cards, you select and splice out random card objects and push them to the local array shuffleCards. After the loop, simply give them back by concatenating the local array with the now-empty cards array.
cards = cards.concat(shuffledCards);
The result is a freshly shuffled deck of cards. Now it’s time to deal them out in a grid on the stage. A loop is set up to add each card to the stage, starting off screen and randomly rotated. Each card is then ultimately animated to the locations determined in the loop. The result is shown in Figure 5-15.
Figure 5-15. All cards after animating to their random positions
Flipping the Cards
Before adding the cards to the stage, a click event listener was added that will fire the function flipCard. When two cards are flipped, they are evaluated in the function evalCardsFlipped. These functions are shown in Listing 5-27.
Listing 5-27. Flipping the Cards and Checking for Matches
function flipCard(e) {
   if (cardsFlipped.length === 2) {
      return;
   }
   var card = e.target
   card.mouseEnabled = false;
   card.getChildByName('back').visible = false;
   cardsFlipped.push(card);
   if (cardsFlipped.length === 2) {
      evalCardsFlipped();
   }
}
function evalCardsFlipped() {
   if (cardsFlipped[0].key === cardsFlipped[1].key) {
      matches++;
      evalGame();
   }
   else {
      setTimeout(resetFlippedCards, 1000);
   }
}
Flipping a card is simple. As previously mentioned, the card is revealed by simply hiding its top-most graphic, which was named back. A conditional is first set to see if there are currently two cards already being evaluated; if not, the mouse events are immediately disabled on the card that was clicked. This prevents clicking the same card twice. Figure 5-16 shows the first two cards after they have been clicked.
Figure 5-16. Two cards after being clicked to flip over
Once two cards are flipped, the evalCardsFlipped function is called to check if they match. The key properties on each card are used to determine this, and if a match was found, the match count is increased and the game is evaluated with the function evalGame. If they don’t match, a small timeout is created to reset the flipped cards. Listing 5-28 shows these two functions, resetCardsFlipped and evalGame.
Listing 5-28. Resetting Cards when They Don’t Match and Evaluating the Game when They Do
function resetFlippedCards() {
   cardsFlipped[0].mouseEnabled = cardsFlipped[1].mouseEnabled = true;
   cardsFlipped[0].getChildByName('back').visible = true;
   cardsFlipped[1].getChildByName('back').visible = true;
   cardsFlipped = [];
}
function evalGame() {
   if (matches === faces.length) {
      setTimeout(function () {
         alert('YOU WIN!')
      }, 300)
   }
   else {
      cardsFlipped = [];
   }
}
When the two cards flipped are not the same, the resetFlippedCards function is called to put them back in play. These cards were stored in the cardsFlipped array and are referenced here to reset each card. First, the mouseEnabled properties are set back to true so they can be chosen again. The back bitmaps are hidden, and finally the cardsFlipped array is emptied. At this point, the game is back in play.
When a match is made, you need to evaluate the game to see if all matches were made. The length of the faces array is the number of matches you need, and if it is reached, an alert message is displayed. If the game should carry on, simply leave the flipped cards alone and empty the cardsFlipped array, which will resume the game.
Finally, the typical startGame function is called to set up the Ticker to update the stage (see Listing 5-29).
Listing 5-29. The Ticker and Stage Update Function
function startGame() {
   createjs.Ticker.setFPS(60);
   createjs.Ticker.addEventListener("tick", function(e){
      stage.update();
   });
}
The Complete Veggie Match Code
The complete code for Veggie Match is shown in Listing 5-30.
Listing 5-30. The Complete Code for memory.js
var stage, queue;

var faces = ['garlic', 'onion', 'pepper', 'potato', 'spinach', 'tomato'];
var cards = [];
var cardsFlipped = [];
var matches = 0;

function preload() {
   queue = new createjs.LoadQueue();
   queue.addEventListener("complete", init);
   queue.loadManifest([
      {id:"shell", src:"img/card.png"},
      {id:"back", src:"img/back.png"},
      {id:"garlic", src:"img/garlic.png"},
      {id:"onion", src:"img/onion.png"},
      {id:"pepper", src:"img/pepper.png"},
      {id:"potato", src:"img/potato.png"},
      {id:"spinach", src:"img/spinach.png"},
      {id:"tomato", src:"img/tomato.png"}
   ]);
}

function init() {
   stage = new createjs.Stage(document.getElementById('canvas'));
   startGame();
   buildCards();
   shuffleCards();
   dealCards();
}
function buildCards() {
   var i, card, card2, bmp, label, face;
   for (i = 0; i < faces.length; i++) {
      card = new createjs.Container();
      bmp = new createjs.Bitmap(queue.getResult('shell'));
      bmp.shadow = new createjs.Shadow("#666", 3, 3, 5);
      card.regX = bmp.image.width / 2;
      card.regY = bmp.image.height / 2;
      card.addChild(bmp);
      face = faces[i];
      bmp = new createjs.Bitmap(queue.getResult(face));
      bmp.regX = bmp.image.width / 2;
      bmp.regY = bmp.image.height / 2;
      bmp.x = card.regX;
      bmp.y = 70;
      card.addChild(bmp);
      label = new createjs.Text(faces[i].toUpperCase(), "20px Arial", "#009900");
      label.textAlign = 'center';
      label.x = card.regX;
      label.y = 144;
      card.addChild(label);
      bmp = new createjs.Bitmap(queue.getResult('back'));
      bmp.name = 'back';
      card.addChild(bmp);
      card2 = card.clone(true);
      card.key = card2.key = faces[i];
      cards.push(card, card2);
   }
}
function shuffleCards() {
   var i, card, randomIndex;
   var l = cards.length;
   var shuffledCards = [];
   for (i = 0; i < l; i++) {
      randomIndex = Math.floor(Math.random() * cards.length);
      shuffledCards.push(cards[randomIndex]);
      cards.splice(randomIndex, 1);
   }
   cards = cards.concat(shuffledCards);
}
function dealCards() {
   var i, card;
   var xPos = 100;
   var yPos = 100;
   var count = 0;
   for (i = 0; i < cards.length; i++) {
      card = cards[i];
      card.x = -200;
      card.y = 400;
      card.rotation = Math.random() * 600;
      card.addEventListener('click', flipCard);
      stage.addChild(card);
      createjs.Tween.get(card)
         .wait(i * 100)
         .to({x:xPos, y:yPos, rotation:0}, 300);
      xPos += 150;
      count++;
      if (count === 4) {
         count = 0;
         xPos = 100;
         yPos += 220;
      }
   }
}
function flipCard(e) {
   if (cardsFlipped.length === 2) {
      return;
   }
   var card = e.target
   card.mouseEnabled = false;
   card.getChildByName('back').visible = false;
   cardsFlipped.push(card);
   if (cardsFlipped.length === 2) {
      evalCardsFlipped();
   }
}
function evalCardsFlipped() {
   if (cardsFlipped[0].key === cardsFlipped[1].key) {
      matches++;
      evalGame();
   }
   else {
      setTimeout(resetFlippedCards, 1000);
   }
}
function resetFlippedCards() {
   cardsFlipped[0].mouseEnabled = cardsFlipped[1].mouseEnabled = true;
   cardsFlipped[0].getChildByName('back').visible = true;
   cardsFlipped[1].getChildByName('back').visible = true;
   cardsFlipped = [];
}
function evalGame() {
   if (matches === faces.length) {
      setTimeout(function () {
         alert('YOU WIN!')
      }, 300)
   }
   else {
      cardsFlipped = [];
   }
}
function startGame() {
   createjs.Ticker.setFPS(60);
   createjs.Ticker.addEventListener("tick", function (e) {
      stage.update();
   });
}
These cards should give you an idea of the importance of creating containers. You’ll be using them quite a bit as you move forward with more games. They can quickly become essential to graphic management in game development, and although this section on containers was rather short, most of your previously learned knowledge on Stage and the display list carries over.
Summary
In this chapter, you’ve taken a large step forward in making games look more polished by loading in graphics. The Bitmap object allows you to easily draw these graphics to the stage, and with some effects and filtering, you can create some cool and interesting features. You also learned the essential technique of grouping display objects by using the Container class.
In the next chapter, you will learn how to build sprite sheets, which will pack all bitmaps into a single file. These sprite sheets will be used to create sprites, which can be simple, static graphics, or full-blown animated sequences.