![]()
Game Project: The Villager RPG
In this chapter, a turn-based RPG game will be built using the lessons learned in this book. The goal for this game is to use RPG-like battle patterns to create a level-based game that can be deployed and scaled across multiple devices. The skills you have already acquired from earlier in this book will be used throughout this chapter, and a few new techniques will be introduced including creating custom events and saving the player’s progress using local storage.
There is quite a bit of code in this project, so before getting into it, a quick review of the game you will be building is necessary.
The Villager RPG
The Villager RPG is a nine-level game; each level is a battle that contains enemies that the player must defeat. The battle will be a turn-based battle system that involves a classic style wait bar, and a variety of attack and magic items can be used to attack the enemy. A potion is also available to replenish hit points during a battle. This battle system will be covered in detail in the “Reviewing the RPG Battle System” section.
The following items are the technical achievements and features you want to achieve in the game:
- Build a nine-level game, in which all progress is saved to local storage when each level is complete.
- Each level will use a reusable game class that is a turn-based system where the player attacks enemies by choosing from available attacks and items.
- Each level will be formed by a single data object which will build the enemy grid, provide attributes for level difficulty, and determine the rewards given when the level is beaten.
- Create a single Enemy class that can appear and behave based on data provided to it.
- Create effects on the enemies to indicate the types of attacks that were thrown at it.
- Extend the Event class to create a custom event that stores extra properties.
- Build a shop where the player can purchase items to be used in battle. These items can be purchased using the coins earned in battle.
- The last level should be a single boss enemy.
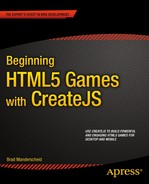
Figure 14-1 shows the game being played in its complete state.
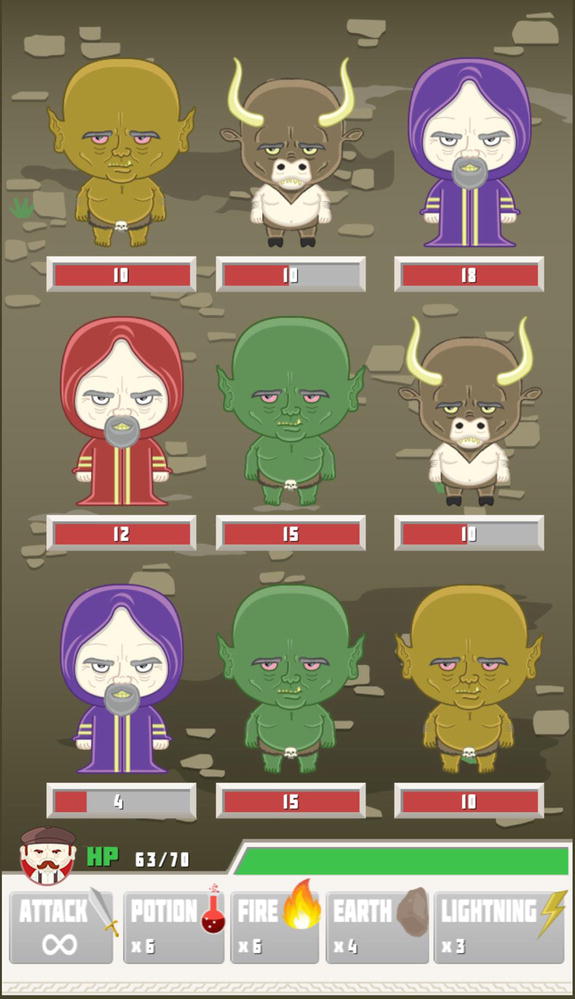
Figure 14-1. The Villager RPG in game battle
Before getting into the game code, let’s prepare the project by taking a look at the files that make up the foundation of the application.
Preparing for the Project
Several files and classes need to be set up for the creation of this game project. This section will walk you through the necessary steps to prepare for the game, starting with the single HTML file, index.html.
Setting Up the HTML
The HTML file used for this game will include several JavaScript files. It will also create an instance of the application and fire its init function, which will initialize the application. Saved data will be retrieved and loaded into the game from local storage, and a handful of global variables are declared for use throughout the application. Listing 14-1 shows the entire index.html file.
Listing 14-1. The index.html File for The Village RPG
<!DOCTYPE html>
<html>
<head>
    <title>Meynard RPG</title>

    <link href="css/styles.css" rel="stylesheet" type="text/css"/>

    <!--CREATEJS-->
    <script src="js/lib/easeljs-0.7.1.min.js"></script>
    <script src="js/lib/soundjs-0.5.2.min.js"></script>
    <script src="js/lib/preloadjs-0.4.1.min.js"></script>
    <script src="js/lib/tweenjs-0.5.1.min.js"></script>
    <script src="js/lib/BitmapText.js"></script>

    <!--DATA-->
    <script src="js/data/data.js"></script>

    <!--GAME CLASSES-->
    <script src="js/state.js"></script>
    <script src="js/events.js"></script>
    <script src="js/classes/Hero.js"></script>

    <!--COMPONENTS-->
    <script src="js/classes/components/Preloader.js"></script>

    <!--SCENES-->
    <script src="js/scenes/GameMenu.js"></script>
    <script src="js/scenes/LevelSelect.js"></script>
    <script src="js/scenes/Game.js"></script>
    <script src="js/scenes/LevelComplete.js"></script>

    <!--MANAGERS-->
    <script src="js/classes/managers/AssetManager.js"></script>

    <!--SPRITES-->
    <script src="js/classes/sprites/BattlePanel.js"></script>
    <script src="js/classes/sprites/BattleButton.js"></script>
    <script src="js/classes/sprites/Enemy.js"></script>
    <script src="js/classes/sprites/EnemyHealthBar.js"></script>
    <script src="js/classes/sprites/MagicShop.js"></script>

    <!--APPLICATION-->
    <script src="js/device.js"></script>
    <script src="js/Villager.js"></script>

</head>

<body onload="init();">

<div id="gameWrapper">
    <canvas id="canvas" width="640" height="1136"></canvas>
</div>

</body>

<script>

    var stage;
    var canvas;
    var spritesheet;
    var fontsheet;
    var screen_width;
    var screen_height;

    function init() {
        window.game = window.game || {};
        data.PlayerData.getData();
        game.main = new game.Villager();
    }

</script>

</html>
As you can see, there are quite a few JavaScript files in this application, and the init function is utilizing a few objects that are declared in these scripts. I will be covering each of these files in depth, but first, take a look at the sprite sheet images to get an idea of the sprites that will be used in the game.
Reviewing the Sprite Sheet Images
The sprite sheet files for this chapter are available with the book’s source code download. Most animations will be done via TweenJS, with the exception of the block dissolve effect on enemies, which was done in Adobe After Effects and exported as png files for Texture Packer. Another sprite sheet will also be used for the bitmap font that is used heavily in the game. Figure 14-2 and Figure 14-3 shows the sprite sheets that will be used for The Villager RPG.
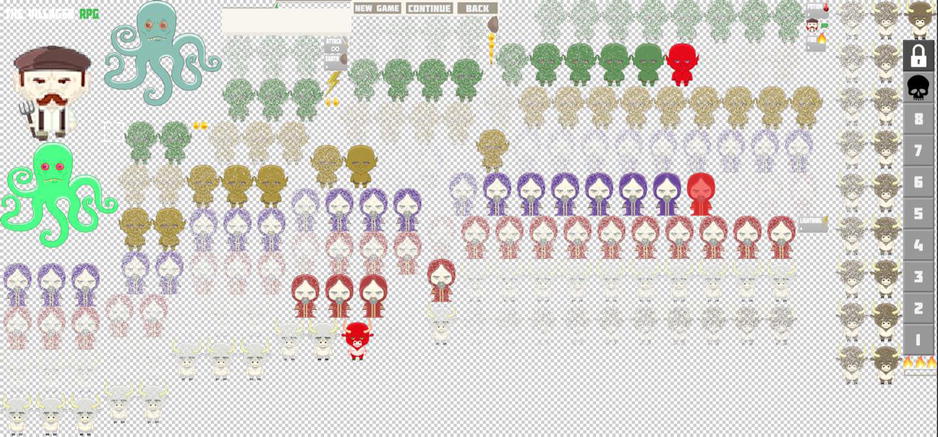
Figure 14-2. The full sprite sheet image for all sprites in The Villager RPG
Figure 14-3. The sprite sheet image for bitmap fonts
Preparing the Asset Manager
For this game, you’ll be using the same AssetManager class that was used in Space Hero in Chapter 11, updated appropriately for this game. Listing 14-2 shows the full class, with the necessary assets needed for this application in bold.
Listing 14-2. AssetManager.js - The Complete Asset Mangager Class
(function () {

   window.game = window.game || {};

   var AssetManager = function () {
      this.initialize();
   }
   var p = AssetManager.prototype = new createjs.EventDispatcher();

   p.EventDispatcher_initialize = p.initialize;

   //sounds

   //graphics
   p.GAME_SPRITES = 'game sprites';
   p.FONT_SPRITES = 'font sprites';
   p.BATTLE_BG = 'game bg';
   p.MENU_BG = 'menu bg';

   //data
   p.GAME_SPRITES_DATA = 'game sprites data';
   p.FONT_SHEET_DATA = 'font sheet data';

   //events
   p.ASSETS_PROGRESS = 'assets progress';
   p.ASSETS_COMPLETE = 'assets complete';

   p.assetsPath = 'assets/';

   p.loadManifest = null;
   p.queue = null;
   p.loadProgress = 0;

   p.initialize = function () {
      this.EventDispatcher_initialize();
      this.loadManifest = [
         {id:this.GAME_SPRITES_DATA, src:this.assetsPath +
            'spritesheet.json'},
         {id:this.GAME_SPRITES, src:this.assetsPath + 'spritesheet.png'},

         {id:this.FONT_SHEET_DATA, src:this.assetsPath + 'abc.json'},
         {id:this.FONT_SPRITES, src:this.assetsPath + 'abc.png'},

         {id:this.BATTLE_BG, src:this.assetsPath + 'battleBG.png'},
         {id:this.MENU_BG, src:this.assetsPath + 'menuBG.png'}
      ];
   }
   p.preloadAssets = function () {
      createjs.Sound.initializeDefaultPlugins();
      this.queue = new createjs.LoadQueue();
      this.queue.installPlugin(createjs.Sound);
      this.queue.on('progress',this.assetsProgress,this);
      this.queue.on('complete',this.assetsLoaded,this);
      this.queue.loadManifest(this.loadManifest);
   }
   p.assetsProgress = function (e) {
      this.loadProgress = e.progress;
      var event = new createjs.Event(this.ASSETS_PROGRESS);
      this.dispatchEvent(event);
   }
   p.assetsLoaded = function (e) {
      var event = new createjs.Event(this.ASSETS_COMPLETE);
      this.dispatchEvent(event);
   }
   p.getAsset = function (asset) {
      return this.queue.getResult(asset);
   }

   window.game.AssetManager = AssetManager;

}());
Creating the Device Class
The scaling and device orientation code that was learned in Chapter 12 will be used to create a reusable object that can be used for this and future games. The purpose of this code will be to extract the screen detection and functionality from the main application (see Listing 14-3).
Listing 14-3. Device.js - The Device Class Handles Screen Scaling
(function () {

   window.game = window.game || {};

   var Device = {}

   Device.prepare = function () {
      if (typeof window.orientation !== 'undefined') {
         window.onorientationchange = this.onOrientationChange;
         if (createjs.Touch.isSupported()) {
            createjs.Touch.enable(stage);
         }
         this.onOrientationChange();
      } else {
         window.onresize = this.resizeGame;
         this.resizeGame();
      }
   }
   Device.onOrientationChange = function () {
      var me = this;
      setTimeout(me.resizeGame, 100);
   }
   Device.resizeGame = function () {
      var nTop, nLeft, scale;
      var gameWrapper = document.getElementById('gameWrapper'),
      var w = window.innerWidth;
      var h = window.innerHeight;
      var nWidth = window.innerWidth;
      var nHeight = window.innerHeight;
      var widthToHeight = canvas.width / canvas.height;
      var nWidthToHeight = nWidth / nHeight;
      if (nWidthToHeight > widthToHeight) {
         nWidth = nHeight * widthToHeight;
         scale = nWidth / canvas.width;
         nLeft = (w / 2) - (nWidth / 2);
         gameWrapper.style.left = (nLeft) + "px";
         gameWrapper.style.top = "0px";
      }
      else {
         nHeight = nWidth / widthToHeight;
         scale = nHeight / canvas.height;
         nTop= (h / 2) - (nHeight / 2);
         gameWrapper.style.top = (nTop) + "px";
         gameWrapper.style.left = "0px";
      }
      canvas.setAttribute("style", "-webkit-transform:scale(" + scale +
          ")");
      window.scrollTo(0, 0);
}
   window.game.Device = Device;

}());
This code should all look very familiar to you. The only difference here is that it is all wrapped up in an object that can be called upon when initializing your application. The prepare function is called after all necessary values have been set—primarily the references to the canvas element and its size.
Creating the Application Class
The application class, Villager, is used to manage state by loading, running, and unloading game scenes. Again, this should be review to you at this point. Looking at the code, a few new states are introduced to adhere to this application, including a level select and a level complete scene. Listing 14-4 shows the Village.js file in its entirety.
Listing 14-4. Villager.js - The Complete Application Class with State Machine
(function (window) {

   window.game = window.game || {}

   function Villager() {
      this.initialize();
   }

   var p = Villager.prototype = new createjs.Container();

   p.Container_initialize = p.initialize;

   p.initialize = function () {
      this.Container_initialize();
      canvas = document.getElementById('canvas'),
      screen_width = canvas.width;
      screen_height = canvas.height;
      stage = new createjs.Stage(canvas);
      game.Device.prepare();
      this.preloadAssets();
   }
   p.preloadAssets = function () {
      game.assets = new game.AssetManager();
      this.preloader = new ui.Preloader('#d2354c', '#FFF'),
      this.preloader.x = (canvas.width / 2) - (this.preloader.width / 2);
      this.preloader.y = (canvas.height / 2) - (this.preloader.height /
         2);
      stage.addChild(this.preloader);
      game.assets.on(game.assets.ASSETS_PROGRESS, this.onAssetsProgress,
         this);
      game.assets.on(game.assets.ASSETS_COMPLETE, this.assetsReady, this);
      game.assets.preloadAssets();
   }
   p.onAssetsProgress = function () {
      this.preloader.update(game.assets.loadProgress);
      stage.update();
   }
   p.assetsReady = function () {
      stage.removeChild(this.preloader);
      this.createSpriteSheet();
      this.gameReady();
   }
   p.createSpriteSheet = function () {
      var assets = game.assets;
      spritesheet = new
         createjs.SpriteSheet(assets.getAsset(assets.GAME_SPRITES_DATA));
      fontsheet = new
         createjs.SpriteSheet(assets.getAsset(assets.FONT_SHEET_DATA));
   }
   p.gameReady = function () {
      createjs.Ticker.setFPS(60);
      createjs.Ticker.on("tick", this.onTick, this);
      this.changeState(game.GameStates.MAIN_MENU);
   }
   p.changeState = function (state) {
      switch (state) {
         case game.GameStates.MAIN_MENU:
            this.currentGameStateFunction = this.gameStateMainMenu;
            break;
         case game.GameStates.LEVEL_SELECT:
            this.currentGameStateFunction = this.gameStateLevelSelect;
            break;
         case game.GameStates.GAME:
            this.currentGameStateFunction = this.gameStateGame;
            break;
         case game.GameStates.LEVEL_COMPLETE:
            this.currentGameStateFunction = this.gameStateLevelComplete;
            break;
         case game.GameStates.RUN_SCENE:
            this.currentGameStateFunction = this.gameStateRunScene;
            break;
      }
   }
   p.onStateEvent = function (e, obj) {
      this.changeState(obj.state);
   }
   p.disposeCurrentScene = function () {
     if (this.currentScene != null) {
        stage.removeChild(this.currentScene);
        if (this.currentScene.dispose) {
           this.currentScene.dispose();
        }
        this.currentScene = null;
      }
   }
   p.gameStateMainMenu = function () {
         var scene = new game.GameMenu();
         scene.on(game.GameStateEvents.GAME, this.onStateEvent, this, true,
            {state:game.GameStates.GAME});
         scene.on(game.GameStateEvents.LEVEL_SELECT, this.onStateEvent, this,
            true, {state:game.GameStates.LEVEL_SELECT});
         stage.addChild(scene);
         this.disposeCurrentScene();
         this.currentScene = scene;
         this.changeState(game.GameStates.RUN_SCENE);
      }
      p.gameStateLevelSelect = function () {
         var scene = new game.LevelSelect()
         scene.on(game.GameStateEvents.GAME, this.onStateEvent, this, true,
            {state:game.GameStates.GAME});
         scene.on(game.GameStateEvents.MAIN_MENU, this.onStateEvent, this,
            true, {state:game.GameStates.MAIN_MENU});
         stage.addChild(scene);
         this.disposeCurrentScene();
         this.currentScene = scene;
         this.changeState(game.GameStates.RUN_SCENE);
      }
      p.gameStateGame = function (tickEvent) {
         var gameData = data.GameData.levelData[data.GameData.currentLevel –
            1];
         var scene = new game.Game(gameData, tickEvent.time);
         scene.on(game.GameStateEvents.LEVEL_COMPLETE, this.onStateEvent,
            this, true, {state:game.GameStates.LEVEL_COMPLETE});
         scene.on(game.GameStateEvents.MAIN_MENU, this.onStateEvent, this,
            true, {state:game.GameStates.MAIN_MENU});
      stage.addChild(scene);
      this.disposeCurrentScene()
      this.currentScene = scene;
      this.changeState(game.GameStates.RUN_SCENE);
   }
   p.gameStateLevelComplete = function () {
      var scene = new game.LevelComplete();
      scene.on(game.GameStateEvents.LEVEL_SELECT, this.onStateEvent, this,
         true, {state:game.GameStates.LEVEL_SELECT});
      stage.addChild(scene);
      this.disposeCurrentScene();
      this.currentScene = scene;
      this.changeState(game.GameStates.RUN_SCENE);
   }
   p.gameStateRunScene = function (tickEvent) {
      if (this.currentScene.run) {
         this.currentScene.run(tickEvent);
      }
   }
   p.onTick = function (e) {
      if (this.currentGameStateFunction != null) {
         this.currentGameStateFunction(e);
      }
      stage.update();
   }

   window.game.Villager = Villager;

}(window));
The application class is responsible for not only managing state, but for setting the global variables that were declared in the HTML file. The global references are used to access sprite sheets, the stage, the stage dimensions, and its canvas element. This is set up in the same manner as in the Space Hero game in Chapter 11. However, for this application, the Device object is used to handle scaling and device orientations. This is accomplished by calling its prepare method, like so:
game.Device.prepare();
You can now be assured that the game will fit in various device resolutions.
Building the Game Data
The Break-It game in Chapter 4 used an array of level objects to set up each new level in the game. This same approach will again be used, only in a much more detailed way. Data will also be built for each type of enemy and the hero stats, which will load from and save to local storage. Starting with the enemy data, let’s meet the cast of villains that the villager must defeat in the battle levels.
Meeting the Bad Guys
The bad guys make up the levels in the game. To win a level is to beat all enemies that are present in the field. Each villain, including the boss, has its own set of properties that will be pushed into the Enemy class that creates it. Before reviewing these data objects, take a look at the six enemies and the final boss that these data objects will be controlling in Figure 14-4.
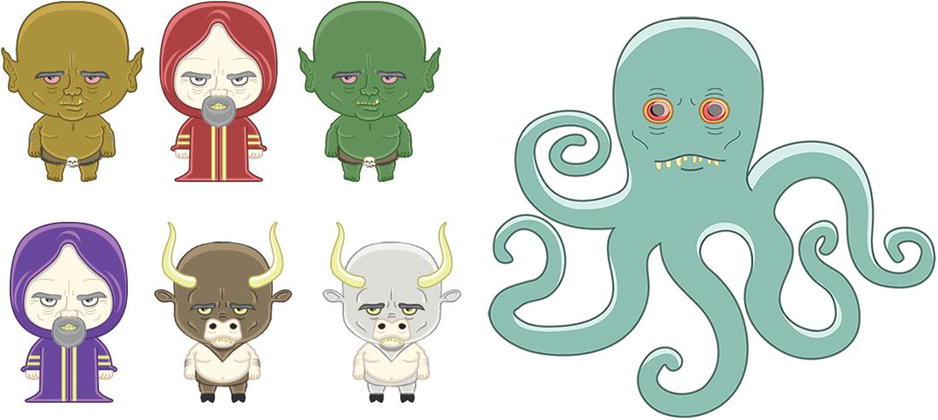
Figure 14-4. All enemies in the game
As you can see, there are three main types of field villains, each with a duplicate of itself with a slight appearance change. This technique was used often in old RPGs to extend the graphics. Because the enemies are built in a modular way, simply altering the graphic, and its data, instantly doubles the available enemies.
Now that you’ve seen a look at these menaces, it’s time to build their data, which will give them battle attributes and will dictate what sprite sheet frames should display.
Creating the Enemy Data
The data that controls each instance of Enemy will be held within an EnemyData object. This object will reside in the same file as the GameData and PlayerData objects. Before getting into the enemy data, create this JavaScript file now and name it data.js. Listing 14-5 starts this code, which declares all data objects.
Listing 14-5. The data.js File Declares All Game Data
(function () {

   window.data = window.data || {};

   var EnemyData = {};
   var GameData = {};
   var PlayerData = {};

   //build objects here

   window.data.EnemyData = EnemyData;
   window.data.GameData = GameData;
   window.data.PlayerData = PlayerData;

}());
Each enemy object will need a set of attributes, which will be pushed into each Enemy instance. These attributes are as follows:
- frame: A string used to draw the correct frame to the enemy sprite.
- maxHP: The total hit points the enemy has.
- weakness: A string that dictates what magic the enemy is weak against, if any.
- power: The power value of the enemy, used when attacking hero.
- defense: The defense value of the enemy, used when attacked by the hero.
For example, the data for an enemy might look something like this:
 EnemyData.badGuy = {
     frame:'badguy',
     maxHP:10,
     weakness:'fire',
     power:2,
     defense:1
 }
A key string for each enemy is used when building levels, and will be used to access the appropriate data when building levels. This process will be covered in the “Creating the Game and Level Data” section. Listing 14-6 shows the data for all enemies used in this game.
Listing 14-6. The Data Objects For All Enemeies
EnemyData.troll1 = {
   frame:'troll1',
   maxHP:10,
   weakness:'',
   power:2,
   defense:0
}
EnemyData.sorcerer1 = {
   frame:'sorcerer1',
   maxHP:12,
   weakness:'earth',
   power:5,
   defense:2
}
EnemyData.troll2 = {
   frame:'troll2',
   maxHP:15,
   weakness:'fire',
   power:8,
   defense:4
}
EnemyData.sorcerer2 = {
   frame:'sorcerer2',
   maxHP:18,
   weakness:'lightning',
   power:12,
   defense:6
}
EnemyData.minotaur1 = {
   frame:'minotaur1',
   maxHP:22,
   weakness:'earth',
   power:15,
   defense:8
}
EnemyData.minotaur2 = {
   frame:'minotaur2',
   maxHP:25,
   weakness:'fire',
   power:20,
   defense:12
}
EnemyData.octopus = {
   frame:'octopus',
   maxHP:100,
   weakness:'lightning',
   power:50,
   defense:20
}
Creating the Game and Level Data
The GameData object will hold values that pertain to the game as a whole, including the game’s current level, the cost and power of magic items, and most importantly, the level data. This is an array of objects what will be used to build each level. The attributes that make up a level are as follows:
- type: Can be 'field' or 'boss'. Used to determine if the battle should load multiple enemies, or one boss.
- enemies: An array of string keys. Used to instantiate the enemy objects in a battle.
- boss: The string key for the boss enemy.
- enemyStreak: The number of consecutive enemy attacks when an enemy attack commences.
- enemyAttackWait: The duration between enemy attack streaks.
- powerIncreaseAwarded: The amount that the player’s power will increase by when beating the level.
- defenseIncreaseAwarded: The amount that the player’s defense will increase by when beating the level.
- HPEarned: The amount that the player’s max hit points will increase by when beating the level.
- coinsAwarded: The amount of coins the player receives when beating the level.
Listing 14-7 shows this level data within the entire GameData object.
Listing 14-7. data.js - The GameData Object Declares the Level Data
GameData = {
    currentLevel:1
}
GameData.levelData = [
    {
        type:'field',
        enemies:['troll1', 'troll1', 'troll1'],
        enemyStreak:1,
        enemyAttackWait:5000,
        powerIncreaseAwarded:1,
        defenseIncreaseAwarded:0,
        coinsAwarded:3,
        HPEarned:1
    },
    {
        type:'field',
        enemies:['troll1', 'sorcerer1', 'troll1', 'troll1',
           'sorcerer1', 'troll1'],
        enemyStreak:2,
        enemyAttackWait:5000,
        powerIncreaseAwarded:2,
        defenseIncreaseAwarded:1,
        coinsAwarded:4,
        HPEarned:3
    },
    {
        type:'field',
        enemies:['troll2', 'sorcerer1', 'troll1', 'troll1',
           'sorcerer1', 'troll1'],
        enemyStreak:2,
        enemyAttackWait:5000,
        powerIncreaseAwarded:4,
        defenseIncreaseAwarded:2,
        coinsAwarded:8,
        HPEarned:5
    },
    {
        type:'field',
        enemies:['sorcerer1', 'troll2', 'sorcerer1', 'sorcerer1',
           'troll2', 'troll1', 'troll2', 'sorcerer1', 'troll1'],
        enemyStreak:3,
        enemyAttackWait:8000,
        powerIncreaseAwarded:6,
        defenseIncreaseAwarded:4,
        coinsAwarded:12,
        HPEarned:8
    },
    {
        type:'field',
        enemies:['sorcerer1', 'troll2', 'sorcerer2', 'sorcerer2',
          'sorcerer1', 'troll2', 'troll2', 'sorcerer1',
          'troll1'],
        enemyStreak:3,
        enemyAttackWait:7000,
        powerIncreaseAwarded:10,
        defenseIncreaseAwarded:6,
        coinsAwarded:15,
        HPEarned:12
    },
    {
        type:'field',
        enemies:['troll1', 'minotaur1', 'sorcerer2', 'sorcerer1',
           'troll2', 'minotaur1', 'sorcerer2', 'troll2',
           'troll1'],
        enemyStreak:3,
        enemyAttackWait:10000,
        powerIncreaseAwarded:1,
        defenseIncreaseAwarded:0,
        coinsAwarded:20,
        HPEarned:15
    },
    {
        type:'field',
        enemies:['troll1', 'minotaur1', 'minotaur2', 'sorcerer1',
           'troll2', 'minotaur1', 'sorcerer2', 'minotaur2', 'troll1'],
        enemyStreak:2,
        enemyAttackWait:6000,
        powerIncreaseAwarded:0,
        defenseIncreaseAwarded:0,
        coinsAwarded:0,
        HPEarned:0
    },
    {
        type:'field',
        enemies:['minotaur1', 'minotaur2', 'sorcerer1', 'sorcerer2',
           'minotaur2', 'troll2', 'sorcerer2',
           'minotaur2', 'minotaur2'],
        enemyStreak:3,
        enemyAttackWait:8000,
        powerIncreaseAwarded:1,
        defenseIncreaseAwarded:0,
        coinsAwarded:3,
        HPEarned:0
    },
    {
        type:'boss',
        boss:'octopus',
        enemyStreak:1,
        enemyAttackWait:4000,
        powerIncreaseAwarded:1,
        defenseIncreaseAwarded:0,
        coinsAwarded:3,
        HPEarned:0
    }
];
GameData.attackPower = {
    attack:0,
    fire:4,
    earth:7,
    lightning:10
}
GameData.magicCosts = {
    potion:2,
    fire:5,
    earth:7,
    lightning:10
}
After the level data, the last two objects pertain to magic items. The attackPower property lists the extra damage caused from each magic item when cast against an enemy. The last object, magicCosts, is used for building the magic shop after a level is complete. This shop will be covered in the “Creating the Magic Shop” section.
Creating the Player Data
The final data object is PlayerData, which is used to reference the data saved in local storage and is set to the property player. Listing 14-8 shows the entire PlayerData object.
Listing 14-8. data.js - The PlayerData Object Retrieves and Stores Player Data from Local Storage
PlayerData = {
        player:null,
        dataTemplate:{
            board:1,
            level:1,
            maxHP:10,
            power:5,
            defense:1,
            coins:3,
            attack:-1,
            fire:1,
            earth:0,
            lightning:0,
            potion:1,
            gameLevel:1
        },
        getData:function () {
            if (localStorage.gameLevel) {
                this.player = localStorage;
            }
            else {
                this.player = this.setLocalStorage();
            }
        },
        setLocalStorage:function () {
            for (var key in this.dataTemplate) {
                localStorage.setItem(key, this.dataTemplate[key]);
            }
            return localStorage;
        }
    }
The getData method is called before the main application class is created, within the index.html file. This is to assure that the data from local storage is either loaded or created if the values have not yet been set. This can be done by checking if the gameLevel property has been set in local storage.
if (localStorage.gameLevel) {
   this.player = localStorage;
}
If this property does exist in local storage, then you know there has been data previously saved, so it is assigned to the player property. This will be the access point to local storage when getting and saving values during gameplay.
var coins = data.PlayerData.player.coins; //10
coins += 3; //coins updated to 13 and saved to local storage
If local storage has not yet been set for the game, it is created by using the dataTemplate object within the setLocalStorage method and is then set to the player property. Figure 14-5 shows some saved data in local storage by using a Local Storage Manager extension for Chrome.
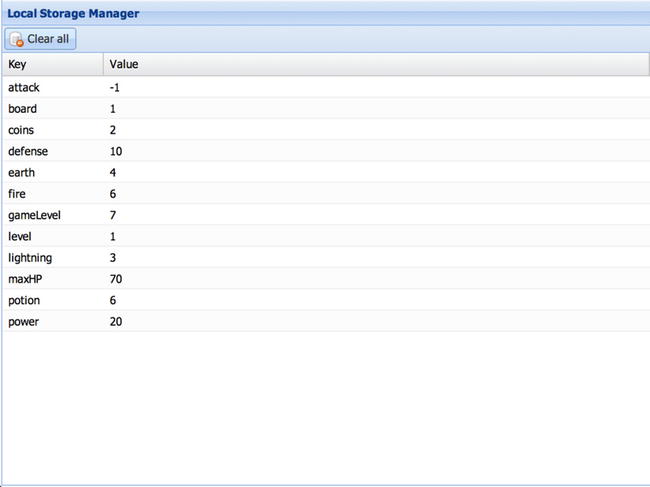
Figure 14-5. The player stats stored in local storage
With the data set for the game, player stats, and the enemies, it’s time to build the Enemy and Hero classes.
Building the Enemies and Hero
All enemies will use the same Enemy class. It should simply take a data object, retrieved by the EnemyData object, and appear and function accordingly. The Hero class will simply represent the current stats in PlayerData and will be used to play the level. Both classes will be built in this section.
Creating the Enemy Class
The Enemy class will be a container that holds two consistant display objects. One is a sprite for the enemy sprite sheet frame, and the other is for its health meter, which will be its own container class as well. The Enemy class has a few other elements and a number of things going on so I’ll break it down into a few parts, starting with the properties and initialize method (see Listing 14-9).
Listing 14-9. Enemy.js - The Enemy Class’s Properties
(function () {

   window.game = window.game || {}

   function Enemy(type) {
      this.data = data.EnemyData[type];
      this.initialize();
   }

   var p = Enemy.prototype = new createjs.Container();

   p.data = null;
   p.enemySprite = null;
   p.targetSprite = null;
   p.magicSprite = null;
   p.healthBar = null;

   p.targetTween = null;
   p.targetable = false;

   p.Container_initialize = p.initialize;

   p.initialize = function () {
      this.Container_initialize();
      this.createEnemySprite();
      this.createTargetIndicator();
      this.createHealthBar();
      this.mouseEnabled = false;
   }

   //class methods here

   window.game.Enemy = Enemy;

}());
The constructor function takes in one parameter, type, which is a string key from the level data when the level is being built. This string is used to access the appropriate enemy data and set it to the data property. Next is a list of properties used for the display objects in the class. These include the sprite for the enemy graphics, a sprite for a target indicator to imply that the enemy is targetable, a sprite to display magic effects, and finally the health bar that displays the current hit points of the enemy. The final two properties are used for targeting the enemy and will be discussed in detail later in this section.
The initialize function does its typical series of method calls to initialize the class. The mouseEnabled property on the container is initially set to false to prevent any interaction with the enemy. The list of initializing methods is seen in Listing 14-10.
Listing 14-10. Enemy.js - The Display Objects Created for the Enemy Class
p.createEnemySprite = function () {
   this.enemySprite = new createjs.Sprite(spritesheet,
      this.data.frame);
   this.addChild(this.enemySprite);
}
p.createTargetIndicator = function () {
   var bounds;
   var targetYPos = 90;
   var tweenSpeed = 700;
   this.targetSprite = new createjs.Sprite(spritesheet, 'target'),
   bounds = this.targetSprite.getBounds();
   this.targetSprite.regX = bounds.width / 2;
   this.targetSprite.regY = bounds.height / 2;
   this.targetSprite.y = targetYPos;
   this.targetSprite.x = this.enemySprite.getBounds().width / 2;
   this.targetTween = createjs.Tween
      .get(this.targetSprite, {loop:true})
      .to({alpha:.3}, tweenSpeed)
      .to({alpha:1}, tweenSpeed);
   this.targetTween.setPaused(true);
   this.targetSprite.visible = false;
   this.addChild(this.targetSprite);
}
p.createHealthBar = function () {
   var enemyBounds = this.enemySprite.getBounds();
   this.healthBar = new game.EnemyHealthBar(this.data.maxHP);
   this.healthBar.y = enemyBounds.height + 10;
   this.healthBar.x = (enemyBounds.width / 2) –
     (this.healthBar.getBounds().width / 2);
   this.addChild(this.healthBar);
}
The createEnemySprite method creates a new sprite using the appropriate frame by using the frame property in the enemy data. Next, the target indicator sprite is created in the createTargetIndicator function and is centered over the enemy sprite. A pulsing effect is added by creating a looped tween on the target. This tween is set to the class property targetTween so you can start and stop it throughout the game. The tween is paused and its target sprite is set to invisible.
The health bar for the enemy is next created and added to the container in the createHealthBar method. As mentioned earlier, this health bar is another class, and its constructor function take only one parameter, which is the amount of hit points the enemy should have. The bar is positioned and added to the enemy container. This health bar class will be built in the next section, “Creating the Enemy Health Bar.” An enemy sprite and health bar are shown in Figure 14-6.
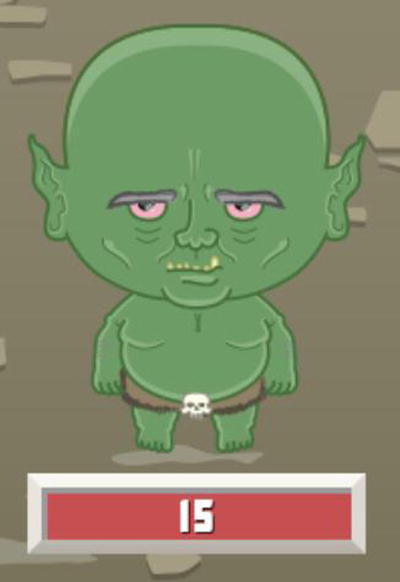
Figure 14-6. An enemy sprite with health bar
When an enemy attacks, the only thing the Enemy class actually does is create an animation on the enemy sprite (see Listing 14-11).
Listing 14-11. Enemy.js – The Enemy Sprite Bounces to Indicate it’s Attacking
p.playAttackAnimation = function () {
   var air = 80;
   createjs.Tween.get(this.enemySprite)
      .to({y:this.enemySprite.y - air}, 500, createjs.Ease.bounceOut)
      .to({y:this.enemySprite.y}, 500, createjs.Ease.bounceOut)
      .call(function () {
         this.dispatchEvent(events.ENEMY_ATTACK_ANIMATION_COMPLETE);
      }, null, this)
}
A simple bounce jump is added to enemySprite. When complete, the ENEMY_ATTACK_ANIMATION_COMPLETE event is dispatched, which will carry on the attack logic back in the game. When the hero is the one attacking, the enemy has a lot more responsibility, starting with displaying the target indicator sprite to indicate it to be a valid target (see Listing 14-12).
Listing 14-12. Enemy.js – Enabling and Disabling the Targets on Enemies
p.enableTarget = function () {
   this.targetTween.setPaused(false);
   this.targetable = this.targetSprite.visible
      = this.mouseEnabled = true;
}
p.disableTarget = function () {
   this.targetTween.setPaused(true);
   this.targetable = this.targetSprite.visible
      = this.mouseEnabled = false;
}
The enableTarget method will start the pulsing effect on the target sprite and show it. It will also set the targetable property to true and enable mouse interaction so that the player can click it. After an attack, the disableTarget method is called and does the exact opposite. An enemy in its targetable state is shown in Figure 14-7.
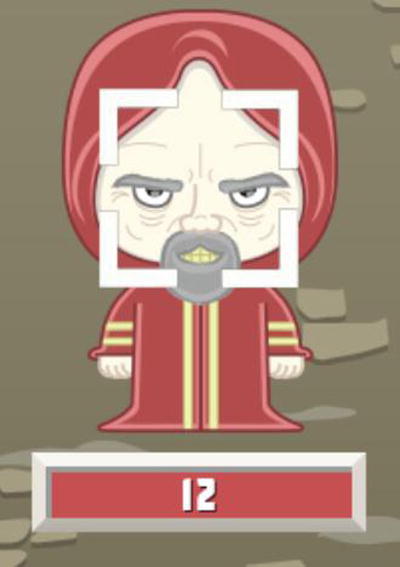
Figure 14-7. The target indicator sprite is shown when an enemy can be attacked
Next, the functionality is written that will react to the enemy being attacked (see Listing 14-13).
Listing 14-13. Enemy.js - The Methods For Attacking the Enemy
p.takeDamage = function (power, attackType) {
   var damage = power - this.data.defense;
   this.playAttackedAnimation();
   switch (attackType) {
      case 'fire':
         damage += this.getFireDamage();
         break;
      case 'earth':
         damage += this.getEarthDamage();
         break;
      case 'lightning':
         damage += this.getLightningDamage();
         break;
      default:
         damage += 0;
         break;
   }
   damage = damage > 0 ? damage : 0;
   this.healthBar.updateHP(damage);
}
p.playAttackedAnimation = function () {
   var event;
   var hit = this.enemySprite.clone();
   hit.gotoAndStop(this.data.frame + '_hit'),
   this.addChild(hit);
   createjs.Tween.get(hit)
      .to({alpha:.3}, 100, createjs.Ease.bounceInOut)
      .to({alpha:.6}, 100, createjs.Ease.bounceInOut)
      .to({alpha:.2}, 200, createjs.Ease.bounceInOut)
      .to({alpha:.3}, 100, createjs.Ease.bounceInOut)
      .to({alpha:.6}, 100, createjs.Ease.bounceInOut)
      .to({alpha:.2}, 200, createjs.Ease.bounceInOut)
      .call(function (hit) {
         this.removeChild(hit);
         this.removeChild(this.magicSprite);
         this.checkHealth();
      }, [hit], this);
}
The total damage on the enemy is factored by a few things. One is the power of the hero that is attacking it, and another is the defense value of the enemy. The last factor is the type of attack given to the enemy. The hero’s power and attack type are both passed into the takeDamage method from the game. Before further calculations are taken on damage using the attack type, an animation is first created on the enemy in the playAttackedAnimation method. This simply clones the enemy sprite and loads the red tinted frame of the same enemy from the sprite sheet. This red sprite clone is flickered to indicate being attacked, then removed when the tween is complete. You’ll notice that magicSprite is also removed. This sprite is added if a magic attack was used and is used to add extra effects over the attacked enemy sprite. One of three functions might get called, based on the attack used, and is determined in a switch statement.
switch (attackType) {
   case 'fire':
     damage += this.getFireDamage();
     break;
   case 'earth':
     damage += this.getEarthDamage();
     break;
   case 'lightning':
     damage += this.getLightningDamage();
     break;
   default:
     damage += 0;
     break;
}
Along with creating the extra effects, these functions will also determine the extra damage that should be added. Listing 14-14 shows these three damaging methods.
Listing 14-14. Enemy.js - The Magic Damage Functions Play Animations and Return Damage Values
p.getFireDamage = function () {
   var weakness = this.data.weakness == 'fire' ? 5 : 0;
   this.magicSprite = new createjs.Sprite(spritesheet, 'magic_fire'),
   this.magicSprite.y = this.enemySprite.y –
      this.magicSprite.getBounds().height +
      this.enemySprite.getBounds().height;
   this.magicSprite.alpha = .3;
   this.addChild(this.magicSprite);
   createjs.Tween.get(this.magicSprite).to({alpha:1}, 100)
      .to({alpha:.3}, 100)
      .to({alpha:.1}, 100)
      .to({alpha:.3}, 100);
   return data.GameData.attackPower.fire + weakness;
}
p.getEarthDamage = function () {
   var weakness = this.data.weakness == 'earth' ? 5 : 0;
   this.magicSprite = new createjs.Sprite(spritesheet, 'magic_rock'),
   this.magicSprite.regX = this.magicSprite.getBounds().width / 2;
   this.magicSprite.regY = this.magicSprite.getBounds().height / 2;
   this.magicSprite.x = this.enemySprite.x +
      (this.enemySprite.getBounds().width / 2);
   this.magicSprite.y = -100;
   this.addChild(this.magicSprite);
   createjs.Tween.get(this.magicSprite).to({rotation:720, y:100}, 1000);
   return data.GameData.attackPower.earth + weakness;
}
p.getLightningDamage = function () {
   var weakness = this.data.weakness == 'lightning' ? 5 : 0;
   this.magicSprite = new createjs.Sprite(spritesheet, 'magic_lightning'),
   this.magicSprite.regX = this.magicSprite.getBounds().width / 2;
   this.magicSprite.regY = this.magicSprite.getBounds().height / 2;
   this.magicSprite.x = this.enemySprite.x +
      (this.enemySprite.getBounds().width / 2);
   this.magicSprite.y = 100;
   this.magicSprite.scaleX = this.magicSprite.scaleY = .2;
   this.addChild(this.magicSprite);
   createjs.Tween.get(this.magicSprite).to({scaleX:1, scaleY:1}, 1000,
      createjs.Ease.elasticOut);
   return data.GameData.attackPower.lightning + weakness;
}
First, a check on the enemy data’s weakness property will determine if the magic used should add any extra damage. This value will simply be 5 across all enemies. Next, each function uses the magicSprite property to create that special effect by using the appropriate frame from the sprite sheet. Each magic function uses a chain of tween commands to create something cool over the enemy sprite. Figure 14-8 shows a minotaur being attacked by fire.
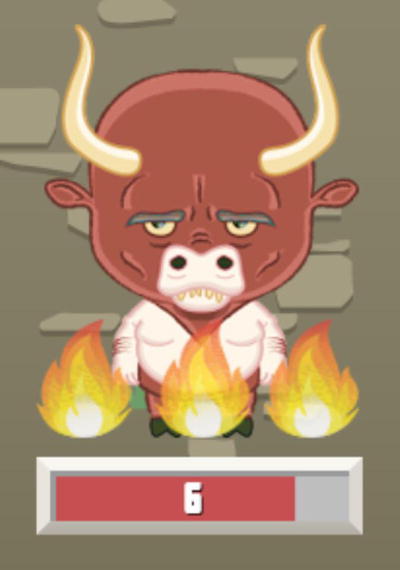
Figure 14-8. An enemy being attacked by fire
The function will also ultimately return the final damage value caused by the magic. The total magic damage is determined by referencing the attackPower object in GameData and adding it to any weakness that may have been applied. This returned value will be factored at the end of the takeDamage method and passed into the enemy health bar, which is recapped here:
damage = damage > 0 ? damage : 0;
this.healthBar.updateHP(damage);
After an enemy is attacked, its health is checked in the checkHealth method (see Listing 14-15).
Listing 14-15. Enemy.js – Checking Health of the Enemy
p.checkHealth = function () {
   var event;
   if (this.healthBar.HP <= 0) {
      this.destroy();
   }
   else {
      event = new createjs.Event(events.ENEMY_ATTACKED_COMPLETE, true);
      this.dispatchEvent(event);
   }
}

p.destroy = function () {
   var event;
   this.enemySprite.on('animationend', function () {
      event = new createjs.Event(events.ENEMY_DESTROYED, true);
      this.dispatchEvent(event);
   }, this);
   this.enemySprite.gotoAndPlay(this.data.frame + '_die'),
}
If the enemy still has hit points, the ENEMY_ATTACKED_COMPLETE event is dispatched back to the game, where it will resume the battle. If the enemy’s health bar is empty, it should die. Each enemy sprite has an animation sequence that will dissolve it away with a pixelated effect. This animation is accessed by appending the string _die to the frame data property. Once complete, the ENEMY_DESTROYED event is dispatched, and the current game state will be evaluated.
Listing 14-16 shows the entire Enemy class.
Listing 14-16. Enemy.js – The Complete Enemy Class
(function () {

   window.game = window.game || {}

   function Enemy(type) {
      this.data = data.EnemyData[type];
      this.initialize();
   }

   var p = Enemy.prototype = new createjs.Container();

   p.data = null;
   p.enemySprite = null;
   p.targetSprite = null;
   p.magicSprite = null;
   p.healthBar = null;

   p.targetTween = null;
   p.targetable = false;

   p.Container_initialize = p.initialize;

   p.initialize = function () {
      this.Container_initialize();
      this.createEnemySprite();
      this.createTargetIndicator();
      this.createHealthBar();
      this.mouseEnabled = false;
   }
   p.createEnemySprite = function () {
      this.enemySprite = new createjs.Sprite(spritesheet,
         this.data.frame);
      this.addChild(this.enemySprite);
   }
   p.createTargetIndicator = function () {
      var bounds;
      var targetYPos = 90;
      var tweenSpeed = 700;
      this.targetSprite = new createjs.Sprite(spritesheet, 'target'),
      bounds = this.targetSprite.getBounds();
      this.targetSprite.regX = bounds.width / 2;
      this.targetSprite.regY = bounds.height / 2;
      this.targetSprite.y = targetYPos;
      this.targetSprite.x = this.enemySprite.getBounds().width / 2;
      this.targetTween = createjs.Tween.get(this.targetSprite,
         {loop:true}).to({alpha:.3}, tweenSpeed).to({alpha:1},
         tweenSpeed);
      this.targetTween.setPaused(true);
      this.targetSprite.visible = false;
      this.addChild(this.targetSprite);
   }
   p.createHealthBar = function () {
      var enemyBounds = this.enemySprite.getBounds();
      this.healthBar = new game.EnemyHealthBar(this.data.maxHP);
      this.healthBar.y = enemyBounds.height + 10;
      this.healthBar.x = (enemyBounds.width / 2) –
         (this.healthBar.getBounds().width / 2);
      this.addChild(this.healthBar);
   }
   //attack hero
   p.playAttackAnimation = function () {
      var air = 80;
      createjs.Tween.get(this.enemySprite)
         .to({y:this.enemySprite.y - air}, 500, createjs.Ease.bounceOut)
         .to({y:this.enemySprite.y}, 500, createjs.Ease.bounceOut)
         .call(function () {
            this.dispatchEvent(events.ENEMY_ATTACK_ANIMATION_COMPLETE);
         }, null, this)
   }
   //attacked by hero
   p.enableTarget = function () {
      this.targetTween.setPaused(false);
      this.targetable = this.targetSprite.visible = this.mouseEnabled =
         true;
   }
   p.disableTarget = function () {
      this.targetTween.setPaused(true);
      this.targetable = this.targetSprite.visible = this.mouseEnabled =
         false;
   }
   p.takeDamage = function (power, attackType) {
      var damage = power - this.data.defense;
      this.playAttackedAnimation();
      switch (attackType) {
         case 'fire':
            damage += this.getFireDamage();
            break;
         case 'earth':
            damage += this.getEarthDamage();
            break;
         case 'lightning':
            damage += this.getLightningDamage();
            break;
         default:
            damage += 0;
            break;
      }
      damage = damage > 0 ? damage : 0;
      this.healthBar.updateHP(damage);
   }
   p.playAttackedAnimation = function () {
      var event;
      var hit = this.enemySprite.clone();
      hit.gotoAndStop(this.data.frame + '_hit'),
      this.addChild(hit);
      createjs.Tween.get(hit)
         .to({alpha:.3}, 100, createjs.Ease.bounceInOut)
         .to({alpha:.6}, 100, createjs.Ease.bounceInOut)
         .to({alpha:.2}, 200, createjs.Ease.bounceInOut)
         .to({alpha:.3}, 100, createjs.Ease.bounceInOut)
         .to({alpha:.6}, 100, createjs.Ease.bounceInOut)
         .to({alpha:.2}, 200, createjs.Ease.bounceInOut)
         .call(function (hit) {
            this.removeChild(hit);
            this.removeChild(this.magicSprite);
            this.checkHealth();
         }, [hit], this);
   }
   p.getFireDamage = function () {
      var weakness = this.data.weakness == 'fire' ? 5 : 0;
      this.magicSprite = new createjs.Sprite(spritesheet, 'magic_fire'),
      this.magicSprite.y = this.enemySprite.y –
         this.magicSprite.getBounds().height +
         this.enemySprite.getBounds().height;
      this.magicSprite.alpha = .3;
      this.addChild(this.magicSprite);
      createjs.Tween.get(this.magicSprite).to({alpha:1}, 100)
         .to({alpha:.3}, 100)
         .to({alpha:.1}, 100)
         .to({alpha:.3}, 100);
      return data.GameData.attackPower.fire + weakness;
   }
   p.getEarthDamage = function () {
      var weakness = this.data.weakness == 'earth' ? 5 : 0;
      this.magicSprite = new createjs.Sprite(spritesheet, 'magic_rock'),
      this.magicSprite.regX = this.magicSprite.getBounds().width / 2;
      this.magicSprite.regY = this.magicSprite.getBounds().height / 2;
      this.magicSprite.x = this.enemySprite.x +
         (this.enemySprite.getBounds().width / 2);
      this.magicSprite.y = -100;
      this.addChild(this.magicSprite);
      createjs.Tween.get(this.magicSprite).to({rotation:720, y:100},
         1000);
      return data.GameData.attackPower.earth + weakness;
   }
   p.getLightningDamage = function () {
      var weakness = this.data.weakness == 'lightning' ? 5 : 0;
      this.magicSprite = new createjs.Sprite(spritesheet,
        'magic_lightning'),
      this.magicSprite.regX = this.magicSprite.getBounds().width / 2;
      this.magicSprite.regY = this.magicSprite.getBounds().height / 2;
      this.magicSprite.x = this.enemySprite.x +
        (this.enemySprite.getBounds().width / 2);
      this.magicSprite.y = 100;
      this.magicSprite.scaleX = this.magicSprite.scaleY = .2;
      this.addChild(this.magicSprite);
      createjs.Tween.get(this.magicSprite).to({scaleX:1, scaleY:1}, 1000,
         createjs.Ease.elasticOut);
      return data.GameData.attackPower.lightning + weakness;
   }
   p.checkHealth = function () {
      var event;
      if (this.healthBar.HP <= 0) {
         this.destroy();
      }
      else {
         event = new createjs.Event(events.ENEMY_ATTACKED_COMPLETE, true);
         this.dispatchEvent(event);
      }
   }
   p.destroy = function () {
      var event;
      this.enemySprite.on('animationend', function () {
         event = new createjs.Event(events.ENEMY_DESTROYED, true);
         this.dispatchEvent(event);
      }, this);
      this.enemySprite.gotoAndPlay(this.data.frame + '_die'),
   }
   window.game.Enemy = Enemy;

}());
Creating the Enemy Health Bar
The health of the enemy is displayed as a progress bar, as well as text that shows the amount of hit points left. This works very similarly to the progress bar component that you built in this book, so the code should look pretty familiar. The complete EnemyHealthBar class is shown in Listing 14-17.
Listing 14-17. EnemyHealthBar.js - The EnemyHealthBar Class Displays Enemy Hit Points
(function (window) {

   window.game = window.game || {}

   function EnemyHealthBar(maxHP) {
      this.maxHP = this.HP = maxHP;
      this.initialize();
   }

   var p = EnemyHealthBar.prototype = new createjs.Container();

   p.Container_initialize = p.initialize;

   p.progressBar = null;
   p.maxHP = null;
   p.HP = null;
   p.hpTxt = null;

   p.initialize = function () {
      this.Container_initialize();
      this.addHealthBar();
      this.addHP();
   }
   p.addHealthBar = function () {
      var barXOffset = 10;
      var enemyBar = new createjs.Sprite(spritesheet, 'enemyBar'),
      var enemyBarBounds = enemyBar.getBounds();
      var barBG = new createjs.Shape();
      barBG.graphics.beginFill('#b6b6b6').drawRect(0, 0,
         enemyBarBounds.width,
         enemyBarBounds.height);
      this.progressBar = new createjs.Shape();
      this.progressBar.graphics.beginFill('#c14545').drawRect(0, 0,
         enemyBarBounds.width - barXOffset,
         enemyBarBounds.height);
      this.progressBar.x = barXOffset;
      this.addChild(barBG, this.progressBar, enemyBar);
   }
   p.addHP = function () {
      var txtXOffset = 8;
      var yPOs = 13;
      this.hpTxt = new createjs.BitmapText(this.HP.toString(),
         spritesheet);
      this.hpTxt.letterSpacing = 2;
      this.hpTxt.x = this.getBounds().width / 2 - txtXOffset;
      this.hpTxt.y = yPOs;
      this.addChild(this.hpTxt);
   }
   p.updateHP = function (HP) {
      var perc;
      this.HP = this.HP - HP < 0 ? 0 : this.HP - HP;
      perc = this.HP / this.maxHP;
      this.removeChild(this.hpTxt);
      this.addHP();
      createjs.Tween.get(this.progressBar).to({scaleX:perc}, 400);
   }

   window.game.EnemyHealthBar = EnemyHealthBar;

}(window));
Some properties are set to reference the hit points and display objects in the class. Moving right into the addHealthBar method, a sprite is created using the graphic created for the outline of the progress bar. Next, a few shapes are created for the actual progress bar: one shape for behind the bar and another for the bar itself. This bar is set to the progressBar property and its scale will be adjusted as the hit points are adjusted. These display objects are positioned accordingly and added to the container in the correct order so that sprite is on top, preserving the inner drop shadow created to overlap the progress bar.
A bitmap font is next created and added to health bar container. Its initial value is set to the HP property and is positioned to the center of the bar. The updateHP method is called from the game when then enemy is attacked, and will update the bar and create a new bitmap text object to represent the new hit point value. A quick check is placed to assure that the text or the scale of the bar will not go below 0. A tween is then applied for effect when updating the scale of the progress bar.
Creating the Hero Class
The Hero class is created to represent the current state of the player. The Hero class does not need to extend a display object. Since the game is played in first person, there is no actual graphical content for the hero attacking or being attacked. Although this is true, you still need to create an instance of something that can represent the player stats during battle. In typical, classic RPG form, losing a battle will simply end the game, as if the losing battle never took place. Because of this, a temporary holder of current player stats is needed during battle. The Hero class is used for exactly that. If the player should win, the values stored in the hero instance will be saved to local storage. Listing 14-18 shows the entire Hero class.
Listing 14-18. Hero.js - The Hero Class is Used in Level Battles
(function () {

   window.game = window.game || {}

   function Hero() {
      this.initialize();
   }

   var p = Hero.prototype = new createjs.EventDispatcher();

   p.EventDispatcher_initialize = p.initialize;

   p.HP = null;
   p.maxHP = null;
   p.power = null;
   p.defense = null;
   p.potion = null;
   p.earth = null;
   p.fire = null;
   p.lightning = null;
   p.gameLevel = null;

   p.initialize = function () {
      this.EventDispatcher_initialize();
      this.loadData()
   }
   p.loadData = function () {
      var value;
      var data = window.data.PlayerData.player;
      for (var key in data) {
         value = data[key];
         this[key] = (value * 1);
      }
      this.HP = this.maxHP;
   }
   p.takeDamage = function (damage) {
      var totalDamage = damage - this.defense;
      this.HP -= totalDamage > 0 ? totalDamage : 0;
      this.HP = this.HP >= 0 ? this.HP : 0;
   }
   p.updateInventory = function (item, quantity) {
      this[item] += quantity;
   }
   p.saveStats = function () {
      var value;
      var data = window.data.PlayerData.player;
      for (var key in data) {
         value = this[key];
         data[key] = (value * 1);
      }
   }

   window.game.Hero = Hero;

}());
Other than the HP property, all class properties are named identical to data saved to local storage. The loadData method will access the persistent PlayerData object and copy the values over to the instance of the hero. These instance properties will be used during the battle.
The Hero class only has three methods used during a level. The takeDamage method is called when an enemy attacks the hero. The amount of damage is passed into the method, which will be determined by the power value of the attacking enemy. The hero’s current defense value will counter against this attack and soften the blow. If this result is below 0, it is forced to be 0 so that a negative value is not added, which would result in added hit points. These situations can happen with high defense stats against weak enemies and is referred to as a miss. Finally, another check is needed to prevent negative hit points after the attack.
The updateInventory method will be called when the player uses a magic item during battle. It will take two parameters, the item and the quantity used. Finally, the saveStats method will be called when a level is won and will put all current stats in the hero instance back into local storage.
![]() Note You’ll notice that in many situations, values are multiplied by 1. This forces the value to be a number and assures proper calculations throughout the game. Values from local storage can often be evaluated as strings, so this procedure will prevent unwanted results.
Note You’ll notice that in many situations, values are multiplied by 1. This forces the value to be a number and assures proper calculations throughout the game. Values from local storage can often be evaluated as strings, so this procedure will prevent unwanted results.
Now that all game data is set, and the Enemy and Hero classes are ready to use, let’s take a step back and prepare the game menu scenes.
Building the Game Menus
There are only four scenes in The Villager RPG. Two are menu screens for starting the game and selecting the level you wish to play. These two menus will be covered in this section.
Creating the Main Menu Scene
The main title screen is simple. It consists of a background, a title sprite, and two buttons. One button will allow the user to continue with their current progress, and the other is for creating a brand new game. Listing 14-19 shows the entire GameMenu class.
Listing 14-19. GameMenu.js - The GameMenu Class for the Main Title Screen
(function () {

   window.game = window.game || {}

   function GameMenu() {
      this.initialize();
   }

   var p = GameMenu.prototype = new createjs.Container();

   p.Container_initialize = p.initialize;

   p.gameBtn = null;
   p.contBtn = null;

   p.initialize = function () {
      this.Container_initialize();
      this.addBG();
      this.addTitle();
      this.addButtons()
   }
   p.addBG = function () {
      var bg = new
         createjs.Bitmap(game.assets.getAsset(game.assets.MENU_BG));
      this.addChild(bg);
   }
   p.addTitle = function () {
      var title = new createjs.Sprite(spritesheet, 'title'),
      title.x = 60;
      this.addChild(title);
   }
   p.addButtons = function () {
      var bounds;
      var yPos = 850;
      this.gameBtn = new createjs.Sprite(spritesheet, 'gameBtn'),
      bounds = this.gameBtn.getBounds();
      this.gameBtn.regX = bounds.width / 2;
      this.gameBtn.x = screen_width / 2;
      this.gameBtn.y = yPos;
      this.contBtn = this.gameBtn.clone();
      this.contBtn.gotoAndStop('continueBtn'),
      this.contBtn.y = (yPos + bounds.height * 1.5);
      this.gameBtn.on('click', this.onButtonClick, this);
      this.contBtn.on('click', this.onButtonClick, this);
      this.addChild(this.gameBtn, this.contBtn);
   }
   p.onButtonClick = function (e) {
      var newGame;
      var btn = e.target
      if (btn == this.gameBtn) {
         localStorage.clear();
         data.PlayerData.setLocalStorage();
      }
      this.dispatchEvent(game.GameStateEvents.LEVEL_SELECT);
   }
   window.game.GameMenu = GameMenu;

}());
This menu is not unlike other menus built in this book so far. A title sprite and button sprites are created and positioned accordingly. Both buttons call the same handler function, which will use the target of the event to determine what to do. In the case that the button clicked was gameBtn, the local storage is cleared and new template data is set. In both cases, the LEVEL_SELECT state event is dispatched, which will bring up the level select scene. Figure 14-9 shows the main menu screen.

Figure 14-9. The game’s main menu screen
Creating the Level Select Scene
The level select screen displays buttons for all nine levels in the game. With the exception of level 1, each level will initially be locked until the level prior to it is beaten. The player’s current level is retrieved from local storage and is called gameLevel. This represents the highest level that the player can enter. Any level that is not playable is represented by a lock graphic. The playable levels are buttons with a text value representing that level number. These graphics are all included as frames in the sprite sheet. The complete LevelSelect class is shown in Listing 14-20.
Listing 14-20. LevelSelect.js - The LevelSelect Class for the Level Select Screen
(function (window) {

   window.game = window.game || {}

   function LevelSelect() {
      this.initialize();
   }

   var p = LevelSelect.prototype = new createjs.Container();

   p.Container_initialize = p.initialize;

   p.initialize = function () {
      this.Container_initialize();
      this.addBG();
      this.addBackButton();
      this.addLevelButtons();
   }
   p.addBG = function () {
      var bg = new
         createjs.Bitmap(game.assets.getAsset(game.assets.MENU_BG));
      this.addChild(bg);
   }
   p.addBackButton = function () {
      var btn = new createjs.Sprite(spritesheet, 'backBtn'),
      btn.on('click', this.onBackButtonClick, this);
      this.addChild(btn);
   }
   p.addLevelButtons = function () {
      var i, btn, btnBounds, level, frame;
      var numLevels = data.GameData.levelData.length;
      var gameLevel = data.PlayerData.player.gameLevel;
      var col = 0;
      var hGap = 34;
      var vGap = 92;
      var xPos = 50;
      var yPos = 260;
      for (i = 0; i < numLevels; i++) {
         level = i + 1;
         frame = level <= gameLevel ? 'level' + level : 'lock';
         btn = new createjs.Sprite(spritesheet, frame);
         btnBounds = btn.getBounds();
         btn.level = level;
         btn.x = xPos;
         btn.y = yPos;
         btn.mouseEnabled = level <= gameLevel;
         btn.on('click', this.onLevelButtonClick, this);
         this.addChild(btn);
         xPos += btnBounds.width + hGap;
         col++;
         if (col > 2) {
            col = 0;
            xPos = 50;
            yPos += btn.getBounds().height + vGap;
         }
      }
   }
   p.onBackButtonClick = function(e){
      this.dispatchEvent(game.GameStateEvents.MAIN_MENU);
   }
   p.onLevelButtonClick = function (e) {
      var btn = e.target;
      data.GameData.currentLevel = btn.level;
      this.dispatchEvent(game.GameStateEvents.GAME);
   }
   window.game.LevelSelect = LevelSelect;

}(window));
A background graphic and back button are first added to the container. The back button will simply fire the MAIN_MENU state event, which will bring the player back to the main menu. The addLevelButtons method is a bit more detailed. A grid of buttons is made, and the state of each button is determined by the gameLevel property that is stored in local storage. A loop is created to build the grid, and the appropriate frame from the sprite sheet is used to draw each button. As previously mentioned, a level not yet playable is represented by a lock graphic, and its mouseEnabled property is set to false to prevent it from being selected. The level buttons will be selectable and will fire the onButtonClick method when clicked.
A simple number value was dynamically injected into each level button sprite so that it can be retrieved when selected. The onButtonClick method uses this value to set the GameData object’s currentLevel property. This value will be used to access the level data needed to build the level. Finally, the GAME state event is dispatched, which will build the level with a new game scene. Figure 14-10 shows this screen with five possible levels to play.
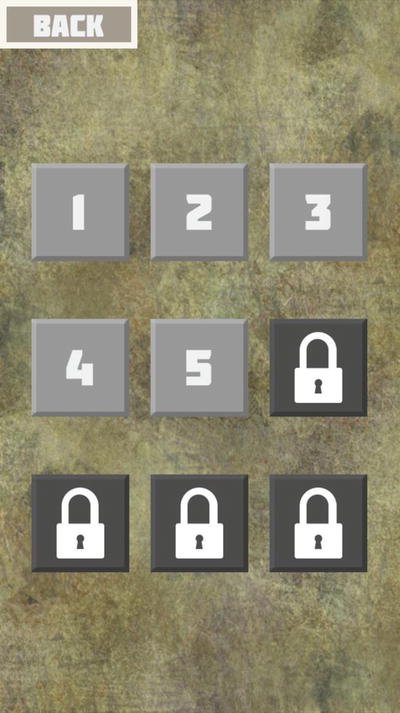
Figure 14-10. The level select screen unlocks all available levels
Building the Game Level
The game level is the meat of the game. It is the actual battle between the hero and enemies. The main goal here is to create this game scene to adjust to the level data passed into it. Before getting into the code, here’s a quick overview of what the battle will consist of, how it will work, and how to play it.
Reviewing the RPG Battle System
An RPG battle systemtypically involves some sort of menu for the player to choose from when it’s their turn to take action. In a turn-based system, like the one you will be building, there is usually an amount of time that needs to expire before the player can make their next move. A progress bar will be built to display this wait time during a battle.
There are several types of these systems, but the one you will be building will allow the enemies to continuously attack, and not wait for the player to make an action. The amount of time between enemy attacks is declared in the level data. The player will have a small menu to dictate what action they want to take. An attack action is always free, and its strength is determined by the current power status of the player. The other options are one potion, which is taken to replenish hit points, and three magic attacks. These items are not free and must be purchased between levels by using the coins earned when winning battles.
A battle will continue until all enemies are defeated in the level. When a level is complete, the player is rewarded with an increase in power, defense, max hit point count, and coins. These values are declared in the level data. These results will be displayed on a new screen, which will also include a magic shop where the player can purchase items to be used in future battles.
After winning a level, the next concurrent level is then unlocked and ready to play. Each level will increase in difficulty by introducing new, more powerful enemies into the battle. Each level won will reward higher stats, respectively. There are a total of eight field battles and one boss fight. It is very likely that a player will have to repeat levels to gain higher stats before defeating higher levels.
The game data in this type of game will always need to be tested and adjusted accordingly to properly run a successful RPG battle system that is both fun and fair. In the case of this project, the data has been loosely prepared, so it may or may not suit your standards for a well-balanced game. The point of this project is to recognize the data patterns and to see where these values can be adjusted to alter the flow of the game.
With a good understanding of what you will be building, the Game class will now be reviewed in detail, starting with its properties. There is a lot to cover, so let’s get started.
Starting the Game Class and its Properties
As in most game scenes, the Game class will be a container that will hold all logic needed to run the level. Listing 14-21 shows the signature and properties for the Game class.
Listing 14-21. Game.js - The Game Class Properties
(function () {

   window.game = window.game || {}

   function Game(levelData, startTime) {
      this.levelData = levelData;
      this.lastEnemyAttack = startTime;
      this.initialize();
   }

   var p = Game.prototype = new createjs.Container();

   p.Container_initialize = p.initialize;

   p.ENEMY_ATTACK_DURATION = 2500;

    p.battlePanel = null;
    p.enemyHolder = null;

    p.levelData = null;
    p.hero = null;

    p.enemies = null;
    p.lastEnemyAttack = null;
    p.enemiesAreAttacking = null;
    p.currentEnemyAttackCount = null;
    p.currentEnemyAttackIndex = null;

    p.attackSelected = null;
    p.levelComplete = null;

   p.gridPos = {x:40, y:60};
   p.grid = [
      {x:10, y:10},
      {x:200, y:10},
      {x:400, y:10},
      {x:10, y:300},
      {x:200, y:300},
      {x:400, y:300},
      {x:10, y:600},
      {x:200, y:600},
      {x:400, y:600}
   ]
   p.bossPos = {x:35, y:60};

   //game logic here


   p.run = function (tickerEvent) {
      if (!this.levelComplete) {
         this.checkBattlePanel();
         this.checkEnemyAttack(tickerEvent.time);
         this.checkHeroHealth();
      }
   }
   window.game.Game = Game;

}());
The level data is passed into the constructor function, and it will be used heavily in the game logic. The current time of the ticker when the game was created is also passed into the game so the lastEnemyAttack property can be set to the time at which the level began. This value is what determines when the enemies should start attacking the hero.
The ENEMY_ATTACK_DURATION is the approximate time it takes any given enemy to complete its actions during an attack. This is used along with lastEnemyAttack to properly determine when to attack the hero. This will be discussed in more detail in the “Creating the Check Level Functions” section.
The next two properties are for the two main display objects in the game container. The enemyHolder property is a container that will hold all enemy instances, and battlePanel will be an instance of the BattlePanel class that will hold all action buttons and hero stats. This class will be built and covered in the “Building the Battle Panel” section.
The levelData property is then declared, followed by hero for the Hero instance. The next series of properties pertain to the enemies. The enemies array will hold all enemy instances. These objects will be pushed to this array when building the enemy grid. The lastEnemyAttack property holds the timestamp when the last enemy attack began, and the enemiesAreAttacking will be set to true during the actual enemy attacks. The last two enemy-related values are important for handling the enemy attack sequences. Depending on the level, an enemy attack will consist of one or more sequential enemy attacks. The current streak count is stored in currentEnemyAttackCount, and the current attacking enemy, referenced by index from the enemies array, is stored in currentEnemyAttackIndex. This approach will become clearer during the “Attacking the Hero” section.
When the player selects an attack button, attackSelected is set to true. This will prevent an enemy from attacking in the middle of a hero attack. The levelComplete Boolean is used to determine if game loop should continue or stop completely to let the level finish. Finally, values are set to determine where enemies are placed on the screen when they are created.
This covers all properties in the game. Their purposes will become much clearer as the class is written, and the declared run method will be examined in the “Creating the Check Level Functions” section.
Initializing the Game Level
The initialize method calls a series of methods to build up the level. Listing 14-22 shows the initialize method and the first four functions it calls.
Listing 14-22. Game.js - The Game Class Initializing Methods
p.initialize = function () {
   this.Container_initialize();
   this.lastEnemyAttack = this.currentEnemyAttackCount =
      this.currentEnemyAttackIndex = 0;
   this.enemiesAreAttacking = this.attackSelected = this.levelComplete = false;
   this.setListeners();
   this.createHero();
   this.addBG();
   this.addEnemies();
   this.addBattlePanel();
}
p.setListeners = function () {
   this.on(events.ENEMY_ATTACKED_COMPLETE, this.onEnemyAttackedComplete,
      this);
   this.on(events.ENEMY_DESTROYED, this.onEnemyDestroyed, this);
}
p.createHero = function () {
   this.hero = new game.Hero();
}
p.addBG = function () {
   var bg = new
      createjs.Bitmap(game.assets.getAsset(game.assets.BATTLE_BG));
   this.addChild(bg);
}
p.addEnemies = function () {
   if (this.levelData.type == 'field') {
      this.populateGrid();
   }
   else {
      this.addBoss();
   }
   this.addChild(this.enemyHolder);
}
After setting the intial values of a few instance variables, the setListeners method is called. This method sets up the event listeners for the level, which pertain to the events from each enemy that will bubble up from the enemy grid container. These events will be dispatched after the animations are complete when an enemy is attacked or destroyed. Much more on these events will be covered in the “Attacking the Enemies” section.
The hero instance is created in the createHero method. The class was covered already, so you know that everything that needs to be done with it is handled within its initialization. A background graphic is next added to the container within addBG.
Next, it’s time to add the enemies. There are two types of levels. One is field and the other is called boss. Most of the time it will be a normal field battle, which will call the populateGrid method. If the level should bring a single boss enemy, addBoss is called instead. Both of these methods will add enemy objects to the enemyHolder container, which is added to the game at the end of the addEnemies method. These enemy-creating functions will be covered next.
Populating the Enemies
The enemies are created on a grid. The points on this grid were hard-coded inside of the grid property. The populateGrid will use these points when creating the enemies (see Listing 14-23).
Listing 14-23. Game.js - Adding the Enemies to the Level
p.populateGrid = function () {
   var i, startPoint, enemy, point, enemyType;
   var enemies = this.levelData.enemies;
   var len = enemies.length;
   this.enemyHolder = new createjs.Container();
   this.enemyHolder.x = this.gridPos.x;
   this.enemyHolder.y = this.gridPos.y;
   this.enemies = [];
   for (i = 0; i < len; i++) {
      point = this.grid[i];
      enemyType = enemies[i];
      enemy = new game.Enemy(enemyType);
      enemy.x = point.x;
      enemy.y = point.y;
      enemy.on('click', this.attackEnemy, this);
      this.enemyHolder.addChild(enemy);
      this.enemies[i] = enemy;
   }
}
The loop runs through the number of enemies assigned to the current level. This array is retrieved from the level data’s enemies property. The enemy type, which is the string value from the current array index in the loop, is passed into the enemy object. In the loop, the location point for each enemy is determined by the grid array. A click event listener is then assigned to each enemy, which will fire the attackEnemy event handler. Finally, each enemy instance is added to the enemyHolder container and pushed to the enemies array in the class. Figure 14-11 shows the enemy grid in level 5.
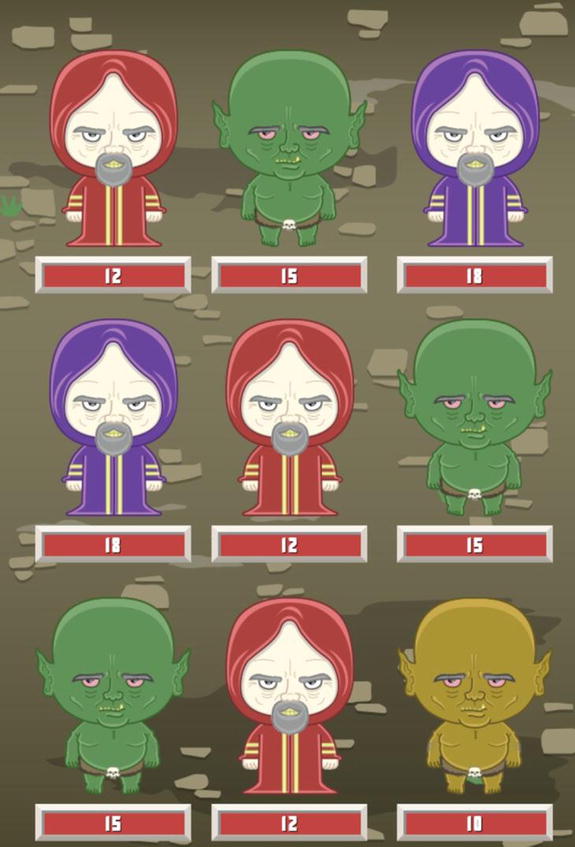
Figure 14-11. The enemies in a field battle
When creating a boss, the addBoss method is called, which is shown in Listing 14-24.
Listing 14-24. Game.js - Adding the Boss to the Final Level
p.addBoss = function () {
    var boss;
    this.enemies = []
    this.enemyHolder = new createjs.Container();
    this.enemyHolder.x = this.bossPos.x;
    this.enemyHolder.y = this.bossPos.y;
    boss = new game.Enemy(this.levelData.boss);
    boss.on('click', this.attackEnemy, this);
    this.enemies[0] = boss;
    this.enemyHolder.addChild(boss);
}
As you can see, the main difference when creating a boss is that there is only one enemy, so there is no need for a loop, and the key for the enemy type is located in the boss property in the level’s data. The boss’ location uses the bossPos class property, and the same click event is added as would have been with a regular enemy. It is then pushed to the enemies array and added to enemyContainer. Figure 14-12 shows the boss in battle.
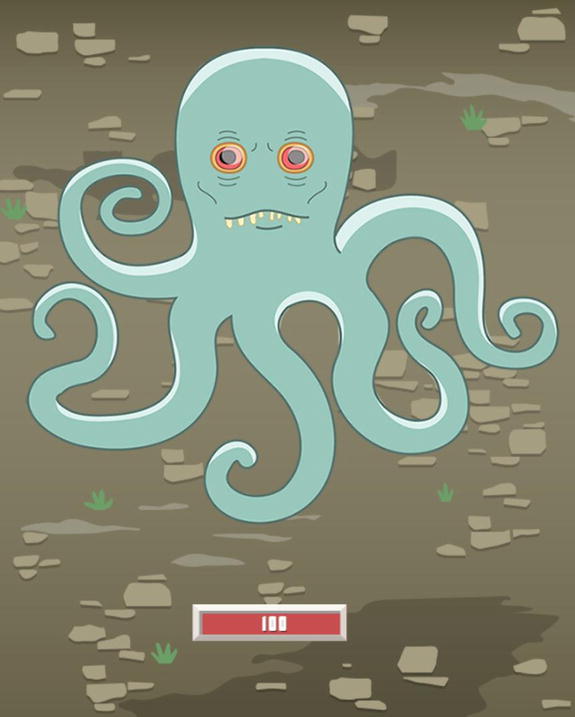
Figure 14-12. The boss level
There is one remaining initializing method, addBattlePanel. The battle panel handles all player actions and is contained within its own class. This class will be built now.
Building the Battle Panel
The battle panel is a container class that sits at the bottom of the screen. It will hold the attack and magic item buttons to use during a battle and will display the current hit points of the hero. These action buttons will be custom classes that will dispatch custom events. The panel will also contain a progress bar that will show the wait time before each player turn. This section will break down all of these components that make up the battle panel.
Creating the BattlePanel Class
The BattlePanel class contains many elements and functionality. It is the control panel for the entire level, and it is started in Listing 14-25.
Listing 14-25. BattlePanel.js - The BattlePanel Class Properties
(function () {

   window.game = window.game || {}

   function BattlePanel(hero) {
      this.hero = hero;
      this.initialize();
   }

   var p = BattlePanel.prototype = new createjs.Container();

   p.Container_initialize = p.initialize;

   p.SPEED = 8;

   p.hero = null;
   p.waitBar = null;
   p.buttonHolder = null;
   p.hpTxt = null;

   p.waitingToAttack = null;
   p.currentAttackButton = null;

   p.initialize = function () {
      this.Container_initialize();
      this.addWaitBar();
      this.addBG();
      this.addHeroHP();
      this.addButtons();
      this.disableButtons();
   }

   //class methods here

   window.game.BattlePanel = BattlePanel;

}());
The speed constant controls the speed of the wait bar’s progress. Next, a reference to the hero instance that was created in the game is passed into the class and set to the hero property. The following three properties are display objects used in the panel. When the progress bar is full, waitingToAttack will be set to true, will enable all available action buttons in the panel, and will stop the bar’s progress. Other than the potion, when a button is pressed, the action isn’t instantly triggered, but it is stored in the currentAttackButton property so it can be referenced when clicking on an enemy.
The initialize method then calls a list of functions, which will be reviewed now, starting with the creation of the wait bar, the panel’s background, and the hero’s avatar and stats (see Listing 14-26).
Listing 14-26. BattlePanel.js - Adding Display Objects to the Battle Panel
p.addWaitBar = function () {
   var progressWidth = 365;
   var progressBG = new createjs.Shape();
   this.waitingToAttack = false;
   this.waitBar = new createjs.Shape();
   progressBG.graphics.beginFill('#b6b6b6').drawRect(0, 0, progressWidth,
      40);
   this.waitBar.graphics.beginFill('#45c153').drawRect(0, 0,
      progressWidth, 40);
   this.waitBar.scaleX = 0;
   progressBG.x = this.waitBar.x = screen_width - progressWidth;
   this.addChild(progressBG, this.waitBar);
}
p.addBG = function () {
   var bg = new createjs.Sprite(spritesheet, 'battlePanel'),
   this.addChild(bg);
}
p.addHeroHP = function () {
   var hero = new createjs.Sprite(spritesheet, 'hero'),
   hero.y = -15;
   hero.x = 20;
   this.addChild(hero);
   this.hpTxt = new createjs.BitmapText('', spritesheet);
   this.hpTxt.letterSpacing = 3;
   this.hpTxt.x = 150;
   this.hpTxt.y = 15;
   this.addChild(this.hpTxt);
}
The wait bar is a simple progress indicator consisting of two shapes, much like the enemy health meter. One is used for the background and one for the bar. The bar shape is set to the waitBar property so it can be scaled with the panel updates. The background to the entire panel is a sprite and is added to the container on top of the wait bar in the addBG method.
The hero’s avatar is a small sprite that is added to the upper left of the panel. Alongside of it is the current hit point status, which is displayed with a bitmap text object. The value of this text will be continuously updated when the panel is updated from the game’s ticker.
Now the action buttons need to be placed in the panel. Listing 14-27 shows the next three methods that deal with the action buttons: addButtons, disableButtons, and enableButtons.
Listing 14-27. BattlePanel.js - Adding the Battle Action Buttons
p.addButtons = function () {
   var i, btn, btnWidth, prevButton;
   var btns = ['attack', 'potion', 'fire', 'earth', 'lightning' ];
   var player = data.PlayerData.player;
   var xPos = 70;
   var yPos = 140;
   var btnSpacing = 5;
   var len = btns.length;
   this.buttonHolder = new createjs.Container();
   for (i = 0; i < len; i++) {
      btn = new game.BattleButton(btns[i], player[btns[i]]);
      btnWidth = btn.getBounds().width;
      if (prevButton != null) {
         btn.x = ((prevButton.x + (prevButton.getBounds().width / 2)) +
            btnWidth / 2) + btnSpacing;
      }
      else {
         btn.x = xPos;
      }
      btn.y = yPos;
      btn.on('click', this.onAttackButtonSelected, this);
      this.buttonHolder.addChild(btn);
      prevButton = btn;
   }
   this.addChild(this.buttonHolder);
}
p.disableButtons = function () {
   var i, btn;
   var len = this.buttonHolder.getNumChildren();
   for (i = 0; i < len; i++) {
      btn = this.buttonHolder.getChildAt(i);
      btn.disableButton();
   }
}
p.enableButtons = function () {
   var i, btn;
   var len = this.buttonHolder.getNumChildren();
   for (i = 0; i < len; i++) {
      btn = this.buttonHolder.getChildAt(i);
      if (btn.quantity > 0 || btn.quantity < 0) {
         btn.enableButton();
      }
   }
}
A local array is built to dictate what buttons and in what order they should be laid out in the panel. A loop runs through this array while making instances of the BattleButton class. These button objects take two parameters: a string value indicating the type of action it should represent, and the quantity of it the player currently has. If you recall, the player has a permanent value of -1 for its attack value. This tells the button that it should not use quantity to determine its enablement and that it should be available forever. This will be covered more when you build this button class in the next section, “Creating the Battle Action Buttons.”
Because the buttons vary in width, the local variable prevButton is created to store that last button that was drawn inside of the loop. You do this so you can access its width and properly position the next button in line. Before being added to buttonHolder, a click event listener is attached to each button and will trigger the onAttackButtonSelected method. Figure 14-13 shows the complete visuals for the BattlePanel class.
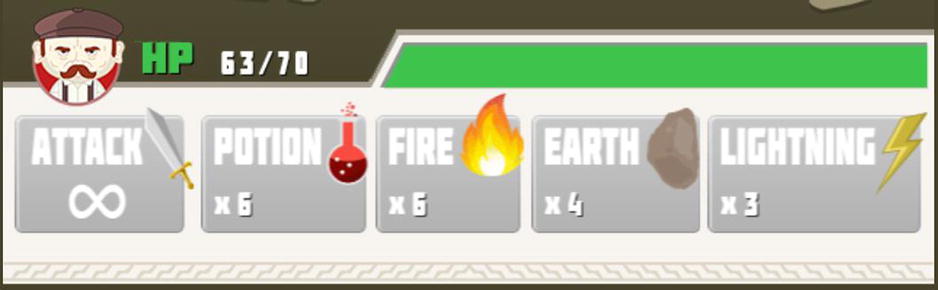
Figure 14-13. The complete battle panel in the game
The next two methods are used to enable and disable all buttons in the panel. These methods will be used often during a battle. For instance, when a user attacks an enemy, all buttons should instantly become inactive. The next time the wait bar has reached its end, the player can make another move and the available buttons will again become active.
If you recall, when the button is pressed, it will call the onAttackButtonSelected method. Listing 14-28 shows this function.
Listing 14-28. BattlePanel.js - The Click Event Handler for the Buttons
p.onAttackButtonSelected = function (e) {
   if (this.currentAttackButton != null) {
      this.currentAttackButton.enableButton();
   }
   this.currentAttackButton = e.currentTarget;
   this.currentAttackButton.selectButton();
   var event = new events.BattleButtonEvent(events.ATTACK_BUTTON_SELECTED,
      false, false, this.currentAttackButton.type);
   this.dispatchEvent(event);
}
Each time a button is clicked in a player’s turn, it is stored in the currentAttackButton property. This is for a few reasons, but for now it’s used to reset it in the case the user decides to click another. Remember, clicking a button will select it, giving the player the option to then choose their target. If the player selects fire, but then decides he just wants to attack, he can do so. This would mean that the current button was the fire button, and it should now call its enableButton method. The new attack button is then set to currentAttackButton and its selectButton method is called.
The next thing that happens is new. A custom event is being instantiated and dispatched. You’ve used plenty of events so far, but this is the first true custom event that has been utilized. What this means is that a class called BattleButtonEvent was created that extends Event. Doing this allows you to pass custom parameters into the event, which can then be retrieved by the handler. This class will be built in the “Creating Custom Events” section, but for now, just notice the last parameter. This is the attack type of the button currently in play, which is string, and will be evaluated when the attack finally commences on a target back in the game.
I’m sure you are anxious to get into this custom event, as well as the battle button class, but first let’s wrap up the BattlePanel class with the final methods (see Listing 14-29).
Listing 14-29. BattlePanel.js - The Update Functions for the BattlePanel Class
p.update = function () {
   if (!this.waitingToAttack) {
      this.updateWaitBar();
   }
   this.updateStats();
}
p.updateWaitBar = function () {
   var scale = this.waitBar.scaleX + (.001 * this.SPEED);
   if (scale > 1) {
      scale = 1;
   }
   this.waitBar.scaleX = scale;
   if (scale == 1) {
      this.waitingToAttack = true;
      this.enableButtons();
   }
}
p.updateStats = function () {
   this.hpTxt.text = this.hero.HP + '_' + this.hero.maxHP;
}
p.resetPanel = function () {
   this.waitingToAttack = false;
   this.waitBar.scaleX = 0;
   this.disableButtons();
   this.mouseEnabled = true;
   this.currentAttackButton = null;
}
The next three methods are used to update the battle panel. The update method is continuously called from the game during the game loop. It has two primary purposes: to update the wait bar, and to update the hero’s current hit points. If the waitingToAttack property is set to false, which means the wait bar should still be in progress, the updateWaitBar method is called. This will simply update the scale of the bar. When the scale of the bar reaches 1, the available action buttons are then enabled and waitingToAttack is set to true.
The updateStats method is constantly called and updates the hit point text by using the instance of the hero that was passed in from the game. Lastly, resetPanel is used to start the whole process over again after a turn as been successfully executed.
Before stepping back to create the BattleButton and BattleButtonEvent classes, take a look at the BattlePanel class in its entirety, shown in Listing 14-30.
Listing 14-30. BattlePanel.js - The Complete BattlePanel Class
(function () {

    window.game = window.game || {}

    function BattlePanel(hero) {
        this.hero = hero;
        this.initialize();
    }

    var p = BattlePanel.prototype = new createjs.Container();

    p.Container_initialize = p.initialize;

    p.SPEED = 8;

    p.hero = null;
    p.waitBar = null;
    p.buttonHolder = null;
    p.hpTxt = null;

    p.waitingToAttack = null;
    p.currentAttackButton = null;

    p.initialize = function () {
        this.Container_initialize();
        this.addWaitBar();
        this.addBG();
        this.addHeroHP();
        this.addButtons();
        this.disableButtons();
    }
    p.addWaitBar = function () {
        var progressWidth = 365;
        var progressBG = new createjs.Shape();
        this.waitingToAttack = false;
        this.waitBar = new createjs.Shape();
        progressBG.graphics.beginFill('#b6b6b6').drawRect(0, 0,
           progressWidth, 40);
        this.waitBar.graphics.beginFill('#45c153').drawRect(0, 0,
           progressWidth, 40);
        this.waitBar.scaleX = 0;
        progressBG.x = this.waitBar.x = screen_width - progressWidth;
        this.addChild(progressBG, this.waitBar);
    }
    p.addBG = function () {
        var bg = new createjs.Sprite(spritesheet, 'battlePanel'),
        this.addChild(bg);
    }
    p.addHeroHP = function () {
        var hero = new createjs.Sprite(spritesheet, 'hero'),
        hero.y = -15;
        hero.x = 20;
        this.addChild(hero);
        this.hpTxt = new createjs.BitmapText('', spritesheet);
        this.hpTxt.letterSpacing = 3;
        this.hpTxt.x = 150;
        this.hpTxt.y = 15;
        this.addChild(this.hpTxt);
    }
    p.addButtons = function () {
        var i, btn, btnWidth, prevButton;
        var btns = ['attack', 'potion', 'fire', 'earth', 'lightning' ];
        var player = data.PlayerData.player;
        var xPos = 70;
        var yPos = 140;
        var btnSpacing = 5;
        var len = btns.length;
        this.buttonHolder = new createjs.Container();
        for (i = 0; i < len; i++) {
            btn = new game.BattleButton(btns[i], player[btns[i]]);
            btnWidth = btn.getBounds().width;
            if (prevButton != null) {
                btn.x = ((prevButton.x + (prevButton.getBounds().width /
                  2)) + btnWidth / 2) + btnSpacing;
            }
            else {
                btn.x = xPos;
            }
            btn.y = yPos;
            btn.on('click', this.onAttackButtonSelected, this);
            this.buttonHolder.addChild(btn);
            prevButton = btn;
        }
        this.addChild(this.buttonHolder);
    }
    p.disableButtons = function () {
        var i, btn;
        var len = this.buttonHolder.getNumChildren();
        for (i = 0; i < len; i++) {
            btn = this.buttonHolder.getChildAt(i);
            btn.disableButton();
        }
    }
    p.enableButtons = function () {
        var i, btn;
        var len = this.buttonHolder.getNumChildren();
        for (i = 0; i < len; i++) {
            btn = this.buttonHolder.getChildAt(i);
            if (btn.quantity > 0 || btn.quantity < 0) {
                btn.enableButton();
            }
        }
    }
    p.onAttackButtonSelected = function (e) {
        if (this.currentAttackButton != null) {
            this.currentAttackButton.enableButton();
        }
        this.currentAttackButton = e.currentTarget;
        this.currentAttackButton.selectButton();
        var event = new
           events.BattleButtonEvent(events.ATTACK_BUTTON_SELECTED, false,
           false, this.currentAttackButton.type);
        this.dispatchEvent(event);
    }
    p.update = function () {
        if (!this.waitingToAttack) {
            this.updateWaitBar();
        }
        this.updateStats();
    }
    p.updateWaitBar = function () {
        var scale = this.waitBar.scaleX + (.001 * this.SPEED);
        if (scale > 1) {
            scale = 1;
        }
        this.waitBar.scaleX = scale;
        if (scale == 1) {
            this.waitingToAttack = true;
            this.enableButtons();
        }
    }
    p.updateStats = function () {
        this.hpTxt.text = this.hero.HP + '_' + this.hero.maxHP;
    }
    p.resetPanel = function () {
        this.waitingToAttack = false;
        this.waitBar.scaleX = 0;
        this.disableButtons();
        this.mouseEnabled = true;
        this.currentAttackButton = null;
    }

    window.game.BattlePanel = BattlePanel;

}());
Creating the Battle Action Buttons
The BattleButton class draws the action button, which properly displays the quantity of the items it represents and enables itself accordingly. At this point in the book, you should be able to understand what is going in the class’ code, but I will highlight some of the important areas after you review the entire class (see Listing 14-31).
Listing 14-31. BattleButton.js - The BattleButton Class for Player Actions
(function () {

   window.game = window.game || {}

   function BattleButton(frame, quantity) {
      this.initialize(frame, quantity);
   }

   var p = BattleButton.prototype = new createjs.Container();

   p.Container_initialize = p.initialize;

   p.quantityTxt = null;

   p.frame = null;
   p.type = null;
   p.quantity = null;
   p.isDown = null;

   p.initialize = function (frame, quantity) {
      this.Container_initialize();
      this.isDown = false;
      this.frame = this.type = frame;
      this.quantity = (quantity * 1);
      this.addSprite();
      this.setQuantity();
      this.cacheButton();
      this.enableButton();
   }
   p.addSprite = function () {
      var sprite = new createjs.Sprite(spritesheet, this.frame);
      var bounds = sprite.getBounds();
      this.setBounds(0, 0, bounds.width, bounds.height);
      this.regX = bounds.width / 2;
      this.regY = bounds.height;
      this.addChild(sprite);
   }
   p.setQuantity = function () {
      if (this.quantity >= 0) {
         var xPos = 25;
         var yOffset = 28;
         var yPos = this.getBounds().height - yOffset;
         this.quantityTxt = new
            createjs.BitmapText(this.quantity.toString(), spritesheet);
         this.quantityTxt.x = xPos;
         this.quantityTxt.y = yPos;
         this.addChild(this.quantityTxt);
      }
   }
   p.updateQuantity = function (quantity) {
      this.quantity += quantity;
      this.removeChild(this.quantityTxt);
      this.uncache(0, 0, this.getBounds().width, this.getBounds().height);
      this.setQuantity();
      this.cacheButton();
   }
   p.cacheButton = function () {
      this.cache(0, 0, this.getBounds().width, this.getBounds().height);
   }
   p.enableButton = function () {
      this.mouseEnabled = true;
      this.alpha = 1;
      this.resetButton();
   }
   p.disableButton = function () {
      this.mouseEnabled = false;
      this.alpha = .3;
      this.scaleX = this.scaleY = 1;
   }
   p.selectButton = function () {
      this.scaleX = this.scaleY = .9;
      this.mouseEnabled = false;
   }
   p.resetButton = function () {
      createjs.Tween.get(this).to({scaleX:1, scaleY:1}, 100);
   }
   window.game.BattleButton = BattleButton;

}());
The BattleButton class is a container, which holds one sprite and one bitmap text object to display the quantity of the item that the button represents. The button’s type, which is a string that also represents the sprite sheet frame, is passed into the constructor along with the quantity.
Once the sprite is added, setBounds is used on the container class so its size can easily be accessed when caching. Caching is a good technique to use on containers when no display objects inside it are changing. However, as you can see in updateQuantity, you need to uncache the container so that quantityTxt can be updated. You’ll also notice that you check that quantity is above 0 before creating a quantityTxt object at all. Remember that attack has an infinite quantity, which is represented with the value -1, and a textual representation of that is not needed. The potion action button, with a quantity of 9, is shown in Figure 14-14.
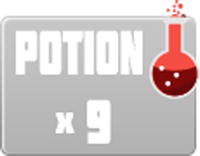
Figure 14-14. The potion button will replenish hit points
Creating Custom Events
Custom events can be very handy when you need to easily pass values around in your application. When an instance of your custom event class is created, you can pass in extra parameters into its constructor. This custom class should be written to accept and store those values accordingly. The event is created much like custom display objects are in EaselJS. This class will be written in a file named events.js. This file is set up to write this custom event class, as well as hold the event strings that you’ve seen throughout the game so far. Listing 14-32 shows the entire events.js file.
Listing 14-32. The events.js File Declares The Game’s Event Types and the Custom BattleButtonEvent Event Class
window.events = window.events || {};

events.ATTACK_BUTTON_SELECTED = 'attack button selected';
events.ENEMY_ATTACK_ANIMATION_COMPLETE = 'enemy attack animation complete';
events.ENEMY_ATTACKED_COMPLETE = 'enemy attacked complete';
events.ENEMY_DESTROYED = 'enemy destroyed';

(function(){

   function BattleButtonEvent(type,bubbles,cancelable,attackType){
      this.attackType = attackType;
      this.initialize(type,bubbles,cancelable);
   }

   var p = BattleButtonEvent.prototype = new createjs.Event();

   p.attackType = null;

   p.Event_initialize = p.initialize;

   p.initialize = function(type,bubbles,cancelable){
      this.Event_initialize(type,bubbles,cancelable);
   }

   window.events.BattleButtonEvent = BattleButtonEvent;

}());
As usual, the custom class is wrapped inside of a closure. Its structure is identical to those classes that extend from other CreateJS classes. Extending Event requires that you accept at least the first type parameter that is used in the Event class that you are extending. You’ll need to pass this into the initialize function of Event, much like you need to pass in a sprite sheet object when building a custom sprite.
p.initialize = function () {
   this.Sprite_initialize(spritesheet);
}
I prefer to pass in all three Event properties, type, bubbles, and cancelable. Any parameters after that are my own custom values that will be assigned to the custom event. Assigning these values to the class will make them accessible in the handler functions that are written to handle this event. The following is an example of how this custom event might be used within an event handler:
function onBattleButtonEvent (e){
   console.log(e.attackType); // fire
}
You’ve already seen this custom event dispatched in the “Creating the BattlePanel Class” section, and you’ll see it in use when you get back to the game code in the “Handling Battle Button Events” section.
Adding the Battle Panel to the Game
Now that the battle panel, the battle buttons, and even a custom battle button event have been created, it’s time to jump back into the game. We last left the game after adding the enemies to the grid. An instance of the BattlePanel class will now be added so you can start attacking bad guys. After the method addBoss, the addBattlePanel function is written (see Listing 14-33).
Listing 14-33. Game.js - Creating and Adding a BattlePanel Instance to the Game Container
p.addBattlePanel = function () {
   this.battlePanel = new game.BattlePanel(this.hero);
   this.battlePanel.y = screen_height –
      this.battlePanel.getBounds().height;
   this.battlePanel.on(events.ATTACK_BUTTON_SELECTED,
      this.onAttackButtonSelected, this);
   this.addChild(this.battlePanel);
}
This method will simply create the battle panel that was just built and add it to the game. The panel then listens for the ATTACK_BUTTON_SELECTED event, which was used as the type when dispatching the new and custom BattleButtonEvent event. The complete level, with enemies and battle panel, is shown in Figure 14-15.

Figure 14-15. The battle panel in action
Handling Battle Button Events
When a battle button is selected, the game should take action. Because a custom event was dispatched when clicked, the event now carries the button’s attackType string with it. Listing 14-34 shows how this is accessed in the event handler onAttackButtonSelected and the methods that it fires based on that value.
Listing 14-34. Game.js - Handling the Clicks on Battle Action Buttons
p.onAttackButtonSelected = function (e) {
   if (e.attackType == 'potion') {
      this.giveHeroPotion();
   }
   else {
      if (!this.attackSelected) {
         this.enableEnemyTargets();
      }
      this.attackSelected = e.attackType;
   }
}
p.giveHeroPotion = function () {
   var btn = this.battlePanel.currentAttackButton;
   btn.updateQuantity(-1);
   this.hero.HP += 20;
   if (this.hero.HP > this.hero.maxHP) {
      this.hero.HP = this.hero.maxHP;
   }
   this.updateHeroInventory('potion'),
   this.onEnemyAttackedComplete();
}
p.enableEnemyTargets = function () {
   var i, enemy;
   var len = this.enemyHolder.getNumChildren();
   for (i = 0; i < len; i++) {
      enemy = this.enemyHolder.getChildAt(i);
      enemy.enableTarget();
   }
}
p.disableEnemyTargets = function () {
   var i, enemy;
   var len = this.enemyHolder.getNumChildren();
   for (i = 0; i < len; i++) {
      enemy = this.enemyHolder.getChildAt(i);
      enemy.disableTarget();
   }
}
First off, if the type of button that was pressed is a potion, then the game should immediately fire the giveHeroPotion method. Since the target of a potion button will always be the hero, the action is triggered as soon as it is pressed. If it is another type of action, one that will need an enemy target to commence, then it should show the target animations on each enemy by calling the enableEnemyTargets method. The disableEnemyTargets method is also declared here and does exactly what you would expect. The game holds an attackSelected property that will be used later after selecting an enemy target. This property is set accordingly by accessing the attackType value from the event.
this.attackSelected = e.attackType;
When taking a potion, the hero gets 20 extra hit points, but cannot exceed the max hit point value. Before doing this, the button needs to be updated to show the new potion quantity. You can access this button via the instance of the battle panel, battlePanel, and by calling on the button’s update method by passing in a value of -1. If you recall, the button class will take care of the rest visually. The updateHeroInventory and onEnemyAttackedComplete methods are then called, which will be covered in the “Attacking the Enemies” section. While taking a potion is not attacking an enemy, the next steps to be taken in the game are handled within that function, so it is called here.
![]() Note You might be wondering why I went through the hassle of creating a custom event to carry the selected button’s type when I could have easily accessed the selected button via the battle panel instance. While this might be true in this case, I find it cleaner to use custom events whenever possible. Though I am using both approaches in this book, I encourage you to use custom events if the concept is clear to you, as opposed to digging into an object’s properties. After all, that object might not exist anymore in many situations, so the knowledge of custom events should prove beneficial in your future applications.
Note You might be wondering why I went through the hassle of creating a custom event to carry the selected button’s type when I could have easily accessed the selected button via the battle panel instance. While this might be true in this case, I find it cleaner to use custom events whenever possible. Though I am using both approaches in this book, I encourage you to use custom events if the concept is clear to you, as opposed to digging into an object’s properties. After all, that object might not exist anymore in many situations, so the knowledge of custom events should prove beneficial in your future applications.
Attacking the Enemies
Finally the enemies can be attacked! Most of the attack code is within the Enemy class itself; the game just needs to initiate it. Listing 14-35 shows all enemy attacking methods.
Listing 14-35. Game.js - The Game Methods for Attacking Enemies
p.attackEnemy = function (e) {
   var enemy = e.currentTarget;
   var player = data.PlayerData.player;
   var btn = this.battlePanel.currentAttackButton;
   btn.updateQuantity(-1);
   this.updateHeroInventory(this.attackSelected);
   this.disableEnemyTargets();
   this.battlePanel.disableButtons();
   enemy.takeDamage(this.hero.power, this.attackSelected);
}
p.onEnemyAttackedComplete = function (e) {
   this.attackSelected = false;
   this.battlePanel.resetPanel();
   this.checkLevel();
}
p.onEnemyDestroyed = function (e) {
   var i, enemy;
   for (i = 0; i < this.enemies.length; i++) {
      enemy = this.enemies[i];
      if (enemy === e.target) {
         this.enemies.splice(i, 1);
         break;
      }
   }
   this.enemyHolder.removeChild(e.target);
   this.onEnemyAttackedComplete(null);
}
p.updateHeroInventory = function (item) {
   this.hero.updateInventory(item, -1);
}
After enabling the targets on each enemy, they become click-enabled. Once clicked, the attackEnemy method is called. Remember, these click event listeners were created on each enemy when creating them. As with a potion action, the current button is retrieved and its quantity is updated. The enemy targets are then disabled by calling the disableEnemyTargets method, and the battle panel buttons are also disabled. Finally, the enemy is attacked by calling the takeDamage method on the targeted enemy. The method takes the hero’s power and the type of attack used. The Enemy class takes care of the rest. This might be a good time to revisit that class in the “Creating the Enemy Class” section.
The game sets two listeners on itself at the beginning of the class. As a recap, Listing 14-36 shows these event listeners being added to the game container.
Listing 14-36. Game.js - The Event Listeners Set on the Game
p.setListeners = function () {
   this.on(events.ENEMY_ATTACKED_COMPLETE, this.onEnemyAttackedComplete,
      this);
   this.on(events.ENEMY_DESTROYED, this.onEnemyDestroyed, this);
}
The enemy will dispatch these events when certain animations are complete. These two events were dispatched with bubbling, which means the event will travel up the entire display list. Because of this, the game is able to listen for these events directly, without having to attach a listener to each enemy object. After an enemy does its animation to show it being attacked, the onEnemyAttackedComplete method will be called. This will essentially reset the turn by setting the attackSelected property back to false and resetting the battle panel. The checkLevel method is then called, which will check the progress of the battle. If the enemy was destroyed, it will also do an animation, after which the onEnemyDestroyed method is called. The primary purpose of this function is to remove it from the enemies array. This array is what is used to check on the level’s progress, so the destroyed enemy needs to go. Since there is no elegant way to find this object in the array, a loop is created to find the appropriate index for splicing. The display object is removed from the stage, and onEnemyAttackedComplete is called to wrap up the turn.
One final enemy-attacking method needs to be reviewed. The updateHeroInventory method is called after any action has been taken by the player. It takes the attack type that was used and passes it along to the updateInventory method on the hero instance, along with a value of -1 for quantity. Like the other classes that have been written for the game, the hero instance will take care of the rest.
Attacking the Hero
The game would be no fun if all you did was attack and destroy enemies. The enemies will attack in streaks when it is time for an enemy attack to begin. This streak can be a number between 1 and 3, depending on the level difficulty. In a streak, the enemies will attack in sequence along the grid. When this attack should take place is determined in the game loop and the checkEnemyAttack method, which will be written in the “Creating the Check Level Functions” section. When the time comes for the enemy to attack, the beginEnemyAttack method is executed (see Listing 14-37).
Listing 14-37. Game.js - The Enemy Attack Methods
p.beginEnemyAttack = function () {
   var enemy;
   this.enemiesAreAttacking = true;
   this.battlePanel.disableButtons();
   this.currentEnemyAttackIndex = this.currentEnemyAttackIndex >=
      this.enemies.length ?
      this.currentEnemyAttackIndex - 1 : this.currentEnemyAttackIndex;
   enemy = this.enemies[this.currentEnemyAttackIndex];
   enemy.on(events.ENEMY_ATTACK_ANIMATION_COMPLETE,
      this.onEnemyAttackAnimationComplete, this, true);
   enemy.playAttackAnimation();
}
p.onEnemyAttackAnimationComplete = function (e) {
   var enemy = e.target;
   this.hero.takeDamage(enemy.data.power);
   this.battlePanel.updateStats();
   this.heroAttackedEffects();
}
The beginEnemyAttack method will be called to kick off an enemy streak and again for each time the streak advances in attacks. The first thing it does is disable the battle panel so the player cannot attack during this streak. The currentEnemyAttackIndex, which is increased at the end of each attack, is evaluated to make sure it has not exceeded the amount of available enemies. This is needed because the amount of enemies is constantly changing, and this index could be off if the enemy in that slot was killed since the last enemy streak. The next enemy in line is found by using this index value on the enemies array.
An enemy has a bounce effect for when it attacks and will dispatch the event ENEMY_ATTACK_ANIMATION_COMPLETE when it is finished. Notice that the once parameter is set to true in the on method. This is a handy way of removing the listener as soon as it handled. Finally, the enemy plays its attacking animation by calling its playAttackAnimation method.
After this enemy animation, the actual attack should take place. Like the Enemy class, the Hero class also has a takeDamage method, which will take the power value of the enemy attacking. If you recall, this method will update the hit points on the hero instance. Next, the updateStats method is called on the battlePanel object. Since the panel does not update during an enemy attack, this should be called manually after the hero has been attacked so that the HP message can be updated. Lastly, a flashy effect happens on the screen to resemble an attack from the enemy. Listing 14-38 shows how this effect is executed.
Listing 14-38. Game.js - Creating the Effect for Hero Damage
p.heroAttackedEffects = function () {
   var flash = new createjs.Shape();
   flash.graphics.beginFill('#900').drawRect(0, 0, screen_width,
      screen_height);
   flash.alpha = 0;
   this.addChild(flash);
   createjs.Tween.get(flash)
      .to({alpha:.6}, 500, createjs.Ease.bounceInOut)
      .to({alpha:0}, 500, createjs.Ease.bounceInOut)
      .call(function (flash) {
         this.removeChild(flash);
         this.evaluateEnemyStreak();
      }, [flash], this);
}
A red shape is created and added to the game. A few chained tween commands are applied to give it a flashing effect (see Figure 14-16).
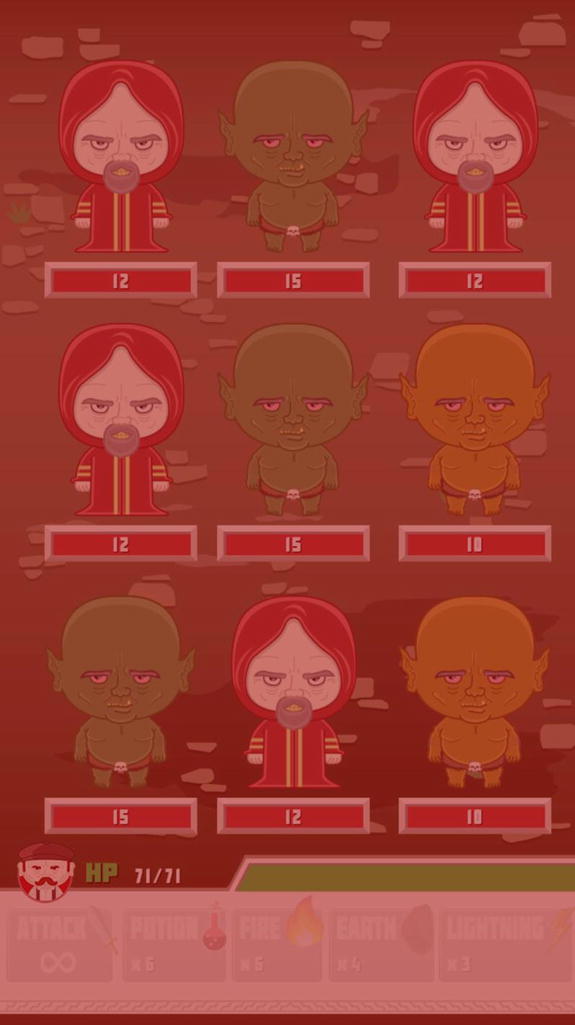
Figure 14-16. The screen flashes red when the hero is attacked
This animation will call the evaluateEnemyStreak function when complete, which is shown in Listing 14-39.
Listing 14-39. Game.js - Evaluating the Enemy Attacks
p.evaluateEnemyStreak = function () {
   this.currentEnemyAttackCount++;
   this.currentEnemyAttackIndex++;
   if (this.currentEnemyAttackIndex === this.enemies.length) {
      this.currentEnemyAttackIndex = 0;
   }
   if (!this.levelComplete && this.currentEnemyAttackCount < this.levelData.enemyStreak &&
         this.enemies.length > 0) {
      this.beginEnemyAttack();
   }
   else {
      this.enemyAttacksComplete();
   }
}
p.enemyAttacksComplete = function () {
   this.currentEnemyAttackCount = 0;
   this.enemiesAreAttacking = false;
   if (this.battlePanel.waitingToAttack) {
      this.battlePanel.enableButtons();
   }
}
The purpose of this function is to increase currentEnemyAttackCount, which was initially declared as 0, and determine if the streak should continue. The length of the streak is unique to the level and is retrieved from the level data. If the current count is less than total streak, the beginEnemyAttack is called again. If the streak should be over, enemyAttacksComplete is called, which destroys the streak and continues the game.
Creating the Check Level Functions
The main application is built to fire a run function on the current scene on every tick of the game loop. This function was introduced when starting the Game class in the “Starting the Game Class and Its Properties” section. As a recap, Listing 14-40 shows this run method.
Listing 14-40. Game.js - The run Method is Called From the Main Application’s Game Loop
p.run = function (tickerEvent) {
   if (!this.levelComplete) {
      this.checkBattlePanel();
      this.checkEnemyAttack(tickerEvent.time);
      this.checkHeroHealth();
   }
}
This function will run three checks when the level is still in progress. Listing 14-41 shows these three functions, plus the checkLevel method that is called after an enemy is attacked.
Listing 14-41. Game.js - The Game’s Check Methods Check the Status of the Level
p.checkEnemyAttack = function (time) {
   if (time >= this.lastEnemyAttack + this.levelData.enemyAttackWait &&
         !this.attackSelected && !this.enemiesAreAttacking) {
      this.lastEnemyAttack = time + (this.ENEMY_ATTACK_DURATION *
         this.levelData.enemyStreak);
      this.beginEnemyAttack();
   }
}
p.checkBattlePanel = function () {
   if (!this.enemiesAreAttacking) {
      this.battlePanel.update();
   }
}
p.checkHeroHealth = function () {
   if (this.hero.HP <= 0) {
      this.levelComplete = true;
      this.loseLevel();
   }
}
p.checkLevel = function () {
   if (this.enemies.length <= 0) {
      this.levelComplete = true;
      this.winLevel();
   }
}
The checkEnemyAttack determines if it’s time to start another enemy attack. The time property from the ticker event is passed into it so it can be compared to the sum of the class property lastEnemyAttack and the enemyAttackWait property in the level data. If time is currently greater than this number, the enemies should attack. But only if both the hero and the enemies are not already in the middle of an attack can this happen. If the enemies should start an attack, the beginEnemyAttack method is called. At this point, the lastEnemyAttack value should be set again. Only a few additions need to be added to the current time. This value should be set to the time it will be when the enemy streak is over. You can get this value by multiplying the level’s attack streak number by the ENEMY_ATTACK_DURATION constant.
this.lastEnemyAttack = time + (this.ENEMY_ATTACK_DURATION *
         this.levelData.enemyStreak);
This might seem a little strange, but the ticker’s current time will not be in scope within the enemy attack evaluation functions.
The next check method, checkBattlePanel, is a lot simpler. Its only task is to update the battle panel if the enemies are not currently attacking. The checkHeroHealth method is equally as simple. If the hero’s hit points have all been depleted, the levelComplete property is set to true and the loseLevel method is called.
The final check function is called after an enemy has been attacked or destroyed. It checks the number of enemies left. If all enemies have been defeated, levelComplete is set to true and the winLevel method is called.
Finishing the Level
If the hero has died, or if all enemies have been destroyed, the level must end. Either the hero wins and the player gets the coins and boost in stats, or the hero dies and the game ends with no chance of saving. Listing 14-42 shows the finishing methods to the Game class.
Listing 14-42. Game.js - The Winning and Losing Methods
p.winLevel = function () {
   this.hero.saveStats();
   createjs.Tween.get(this).wait(1000).call(this.leaveBattle, null, this);
}
p.loseLevel = function () {
   var flash = new createjs.Shape();
   flash.graphics.beginFill('#900').drawRect(0, 0, screen_width,
      screen_height);
   flash.alpha = 0;
   this.addChild(flash);
   createjs.Tween.get(flash)
      .wait(1000)
      .to({alpha:.8}, 2500)
      .call(this.goHome, null, this);
}
p.leaveBattle = function () {
   this.dispatchEvent(game.GameStateEvents.LEVEL_COMPLETE);
}
p.goHome = function () {
   this.dispatchEvent(game.GameStateEvents.MAIN_MENU);
}
Winning the level will first save the hero’s current stats, which is done within the saveStats method in the Hero class itself. A short timeout is created using TweenJS, which will call the leaveBattle method after one second. This method will dispatch the LEVEL_COMPLETE event and bring the player to the level complete scene.
Losing the battle creates a simple effect that slowly fades a red shape covering the entire stage. On its completion, the goHome method is called and will dispatch the MAIN_MENU event, taking the user straight back to the title screen. No rewards are given, and nothing that was done or used up in the battle is saved.
There is quite a bit going on in this game. A lot was covered while veering off into different directions while writing different classes. You can find the complete Game class code in the Game.js file along with the other source code. You can download the code from the Source Code/Downloads tab on this book’s Apress product page (www.apress.com/9781430263401). Try reading through the methods without getting hung up or lost. When coming across the use of custom classes, take a detour and review the section that created those classes.
Building the Battle Win Screen
When a level is complete, the player is rewarded with a stats increases and coins. The level complete scene will present the player with these new stats and give them the option to spend their newly earned coins. A self-contained magic shop will be created and added to this screen under the level messages. This section will create this level-winning screen.
Creating the Level Complete Scene
The level complete screen will be a container class called LevelComplete. There is seemingly a lot of code, but most of it is messaging and positioning. This class is seen in Listing 14-43.
Listing 14-43. LevelComplete.js - The LevelComplete Class Displays The Level Results and Offer Items for Purchase
(function () {

   window.game = window.game || {}

   function LevelComplete() {
      this.initialize();
   }

   var p = LevelComplete.prototype = new createjs.Container();

   p.Container_initialize = p.initialize;

   p.currentPower = null;
   p.powerIncrease = null;
   p.currentDefense = null;
   p.defenseIncrease = null;
   p.currentMAX_HP = null;
   p.maxHPIncrease = null;
   p.currentCoins = null;
   p.coinsIncrease = null;

   p.initialize = function () {
      this.Container_initialize();
      this.updateLevel();
      this.updateStats();
      this.addBG();
      this.addLevelMessaging();
      this.addShop();
      this.drawContinueButton();
   }
   p.updateLevel = function () {
      if (data.GameData.currentLevel ==
         data.PlayerData.player.gameLevel) {
            data.PlayerData.player.gameLevel =
              (data.PlayerData.player.gameLevel * 1) + 1;
      }
   }
   p.updateStats = function () {
      var player = data.PlayerData.player;
      var currentLevel =
        data.GameData.levelData[data.GameData.currentLevel - 1];
      this.currentPower = data.PlayerData.player.power * 1;
      this.powerIncrease = currentLevel.powerIncreaseAwarded * 1;
      this.currentDefense = data.PlayerData.player.defense * 1;
      this.defenseIncrease = currentLevel.defenseIncreaseAwarded * 1;
      this.currentMAX_HP = data.PlayerData.player.maxHP * 1;
      this.maxHPIncrease = currentLevel.HPEarned;
      this.currentCoins = data.PlayerData.player.coins * 1;
      this.coinsIncrease = currentLevel.coinsAwarded * 1;
      //update data
      player.power = this.currentPower + this.powerIncrease;
      player.defense = this.currentDefense + this.defenseIncrease;
      player.maxHP = this.currentMAX_HP + this.maxHPIncrease;
      player.coins = this.currentCoins + this.coinsIncrease;
   }
   p.addBG = function () {
      var bg = new
         createjs.Bitmap(game.assets.getAsset(game.assets.MENU_BG));
      this.addChild(bg);
   }
   p.addLevelMessaging = function () {
      var txt;
      var xPos = 30;
      var yPos = 40;
      var vGap = 90;
      var msgWidth = 600;
      var msgHeight = 470;
      var msgPos = {x:20, y:40};
      var msgContainer = new createjs.Container();
      //bg
      var containerBG = new createjs.Shape();
      containerBG.graphics.beginFill('#f7f4ef').drawRect(0, 0, msgWidth,
         msgHeight);
      //title
      txt = this.getBitmapTxt('LEVEL COMPLETE!', xPos, yPos);
      msgContainer.addChild(containerBG, txt);
      //attack
      yPos += vGap;
      txt = this.getBitmapTxt('ATTACK INCREASE_ + ' + this.powerIncrease +
         ' = ' + data.PlayerData.player.power, xPos, yPos);
      msgContainer.addChild(txt);
      //defense
      yPos += vGap;
      txt = this.getBitmapTxt('DEFENSE INCREASE_ + ' +
         this.defenseIncrease + ' = ' + data.PlayerData.player.defense,
         xPos, yPos);
      msgContainer.addChild(txt);
      //HP
      yPos += vGap;
      txt = this.getBitmapTxt('HP INCREASE_ + ' + this.maxHPIncrease + ' =
         ' + data.PlayerData.player.maxHP, xPos, yPos);
      msgContainer.addChild(txt);
      //coins
      yPos += vGap;
      txt = this.getBitmapTxt('COINS EARNED_ + ' + this.coinsIncrease + '
         = ' + data.PlayerData.player.coins, xPos, yPos);
      msgContainer.addChild(txt);
      //add and position container
      this.addChild(msgContainer);
      msgContainer.x = msgPos.x;
      msgContainer.y = msgPos.y;
      msgContainer.cache(0, 0, msgWidth, msgHeight);
   }
   p.getBitmapTxt = function (txt, x, y) {
      var txt = new createjs.BitmapText(txt, fontsheet);
      txt.letterSpacing = 6;
      txt.x = x;
      txt.y = y;
      return txt;
   }
   p.addShop = function () {
      var shop = new game.MagicShop();
      shop.x = 20;
      shop.y = 550;
      this.addChild(shop);
   }
   p.drawContinueButton = function () {
      var btn = new createjs.Sprite(spritesheet, 'continueBtn'),
      btn.x = (screen_width / 2) - (btn.getBounds().width / 2);
      btn.y = 1020;
      btn.on('click', this.onButtonClick, this);
      this.addChild(btn);
   }
   p.onButtonClick = function (e) {
      this.dispatchEvent(game.GameStateEvents.LEVEL_SELECT);
   }
   window.game.LevelComplete = LevelComplete;

}());
The very first thing the class does is update the level and stats of the player. The methods updateLevel and updateStats handle this by accessing and manipulating the PlayerData object, which will write to local storage. The current stats values are all referenced and saved to class properties. This is so they can be easily accessed when drawing the messages. The values are then added and saved by being assigned to the player object in PlayerData.
Next, a background sprite is added, followed by the messaging in the addLevelMessaging method. This function creates a series of bitmap text objects to display the proper messages pertaining to what was gained and what the player now has. This includes power, defense, max hit point count, and coins. A little utility function, getBitmapTxt, is used to create and return the bitmap text objects as the messages are built. The complete messaging section of the level complete screen is shown in Figure 14-17.
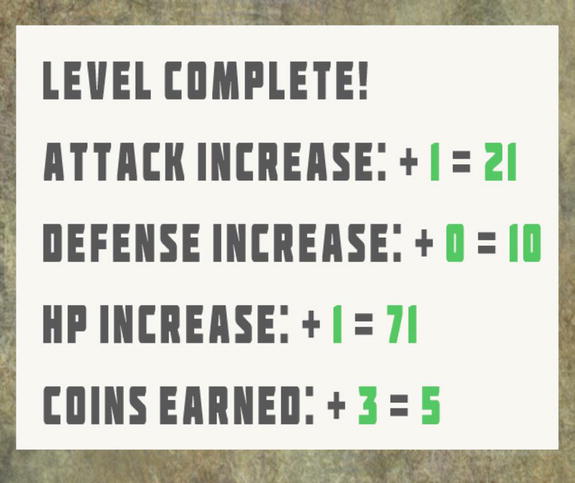
Figure 14-17. The messaging in the level complete screen
After the messaging, an instance of the MagicShop class is added and positioned to the bottom of the screen. This class will be built in the next section, “Creating the Magic Shop.” Finally, a button sprite is added to the bottom of the screen, which will move the player on to the level select screen when clicked.
Creating the Magic Shop
As previously mentioned, the magic shop is completely self-contained. It’s added to the LevelComplete class, but will handle all transactions with local storage within itself. Listing 14-44 shows the entire MagicShop class.
Listing 14-44. MagicShop.js - The MagicShop Class Allows the Player to Purchase Items for Future Battles
(function () {

   window.game = window.game || {}

   function MagicShop() {
      this.initialize();
   }

   var p = MagicShop.prototype = new createjs.Container();

   p.Container_initialize = p.initialize;

   p.coinsTxt = null;

   p.totalCoins = null;
   p.magicData = null;

   p.initialize = function () {
      this.Container_initialize();
      this.totalCoins = data.PlayerData.player.coins;
      this.magicData = data.GameData.magicCosts;
      this.addStoreMessaging();
      this.addPurse();
      this.addItemButtons();
   }
   p.addStoreMessaging = function () {
      var txt;
      var storeWidth = 600;
      var storeHeight = 440;
      var xPos = 20;
      var yPos = 20;
      var vGap = 70;
      var storeBG = new createjs.Shape();
      storeBG.graphics.beginFill('#f7f4ef').drawRect(0, 0, storeWidth,
        storeHeight);
      txt = this.getBitmapTxt('MAGIC SHOP', xPos, yPos);
      this.addChild(storeBG, txt);
      yPos += vGap;
      txt = this.getBitmapTxt('POTION_ ' + this.magicData.potion + '
         COINS', xPos, yPos, .7);
      this.addChild(txt);
      yPos += vGap * .7;
      txt = this.getBitmapTxt('FIRE_ ' + this.magicData.fire + ' COINS',
         xPos, yPos, .7);
      this.addChild(txt);
      yPos += vGap * .7;
      txt = this.getBitmapTxt('EARTH_ ' + this.magicData.earth + ' COINS',
         xPos, yPos, .7);
      this.addChild(txt);
      yPos += vGap * .7;
      txt = this.getBitmapTxt('LIGHTNING_ ' + this.magicData.lightning + '
         COINS', xPos, yPos, .7);
      this.addChild(txt);
   }
   p.addPurse = function () {
      var coin;
      var xPos = 530;
      var yPos = 20;
      var coinOffsetX = -45;
      var coinOffsetY = -8;
      coin = new createjs.Sprite(spritesheet, 'coin'),
      coin.paused = true;
      coin.x = xPos + coinOffsetX;
      coin.y = yPos + coinOffsetY;
      createjs.Tween.get(coin, {loop:true}).to({currentAnimationFrame:8},
         600)
      this.coinsTxt = this.getBitmapTxt('x' + this.totalCoins, xPos, yPos,
         .6);
      this.addChild(coin, this.coinsTxt);
   }
   p.getBitmapTxt = function (txt, x, y, scale) {
      var txt = new createjs.BitmapText(txt, fontsheet);
      txt.letterSpacing = 6;
      txt.x = x;
      txt.y = y;
      txt.scaleX = txt.scaleY = scale != null ? scale : 1;
      return txt;
   }
   p.addItemButtons = function () {
      var i, btn, btnWidth, prevButton, txt, cost, magicType;
      var btns = ['potion', 'fire', 'earth', 'lightning' ];
      var playerData = data.PlayerData.player;
      var xPos = 70;
      var yPos = 380;
      var btnSpacing = 20;
      var len = btns.length;
      for (i = 0; i < len; i++) {
         magicType = btns[i];
         cost = this.magicData[magicType];
         btn = new game.BattleButton(magicType, playerData[magicType]);
         btn.name = 'btn_' + magicType;
         btn.on('click', this.purchaseItem, this, false, {cost:cost});
         if (cost > this.totalCoins) {
            btn.disableButton();
         }
         btnWidth = btn.getBounds().width;
         if (prevButton != null) {
            btn.x = ((prevButton.x + (prevButton.getBounds().width / 2)) +
              btnWidth / 2) + btnSpacing;
         }
         else {
            btn.x = xPos;
         }
         btn.y = yPos;
         this.addChild(btn);
         prevButton = btn;
      }
      txt = this.getBitmapTxt('CLICK ITEM TO PURCHASE', 20, 400, .6);
      this.addChild(txt);
   }
   p.purchaseItem = function (e, data) {
      var player = window.data.PlayerData.player;
      var btn = e.currentTarget;
      var item = btn.type;
      var cost = data.cost;
      btn.updateQuantity(1);
      player[item] = btn.quantity;
      this.totalCoins -= cost;
      player.coins = this.totalCoins;
      this.updatePurse(cost);
      this.evaluatePurse();
   }
   p.updatePurse = function (cost) {
      var xPos = this.coinsTxt.x;
      var yPos = this.coinsTxt.y;
      this.removeChild(this.coinsTxt);
      this.coinsTxt = this.getBitmapTxt('x' + this.totalCoins, xPos, yPos,
         .6);
      this.addChild(this.coinsTxt);
   }
   p.evaluatePurse = function () {
      var i, btn, cost;
      var btns = ['potion', 'fire', 'earth', 'lightning' ];
      var len = btns.length;
      for (i = 0; i < len; i++) {
         cost = this.magicData[btns[i]];
         btn = this.getChildByName('btn_' + btns[i]);
         if (cost > this.totalCoins) {
            btn.disableButton();
         }
      }
   }
   window.game.MagicShop = MagicShop;

}());
The player’s total coins is referenced from PlayerData and set to the totalCoins property, and the cost of each item is referenced from GameData and set to magicData. These values will be used when determining if the player can buy an item or not. They are also used to build the messaging for the shop in addStoreMessaging and addPurse functions. These messages are built in the same fashion as the level messaging back in the LevelComplete class. A small, animated sprite of a spinning coin is added next to the coins text for a nice visual effect.
Next, the shop items are created in the addItemButtons method. The attack buttons are reused for the shop, and their enablement is determined by the cost of each item and the player’s total coins. Their quantity message is set by the current inventory of the player, and their positioning uses the same approach as when added to the BattlePanel class. The complete level complete screen is shown in full with the magic shop in Figure 14-18.
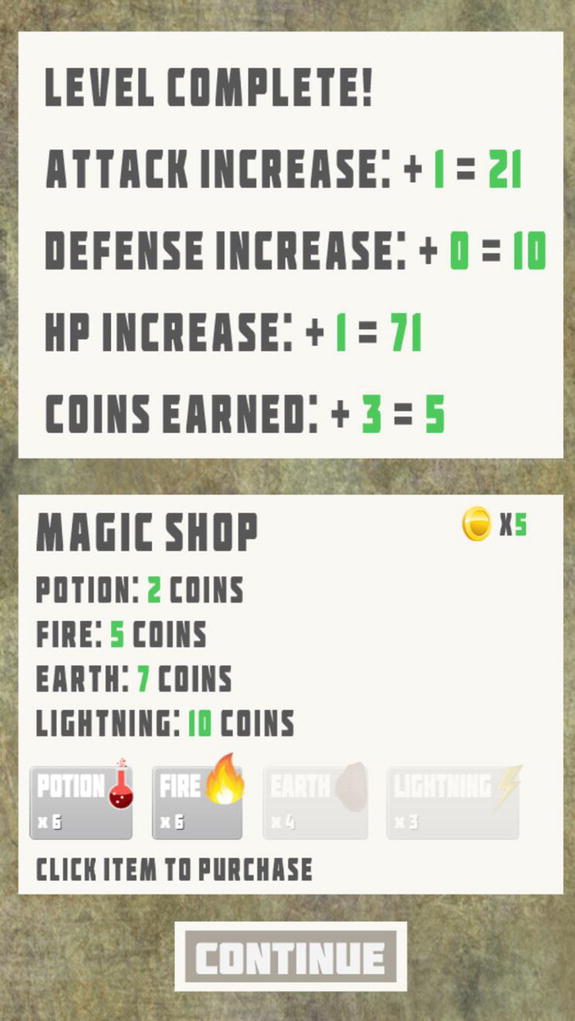
Figure 14-18. The level complete screen with magic shop
If a button is enabled and is clicked, the purchaseItem is called. This event handler is given the cost of the item so it can be subtracted from the player’s coins. This is accomplished by using the data parameter in the on method.
btn.on('click', this.purchaseItem, this, false, {cost:cost});
The button is updated to reflect the new quantity, and so is the property in the PlayerData object. Next, the totalCoins value is updated along with the coins value in PlayerData. The messaging in the store is then updated by calling updatePurse, which will redraw the number of player coins. Finally, the evaluatePurse method is run, which determines what buttons should be deactivated based on the new number of coins the player has to spend.
The Continue button will take the user back to the level select screen where they can advance to the next level or replay previous battles to gain higher stats and coins.
Summary
In this final game project, you combined all of the CreateJS skills that you learned in this book. Graphics were created using bitmap objects, sprite sheets, and the drawing API. Animations were created by utilizing both sprite sheet animation objects and TweenJS. You gained more control over the appearance of your messaging by using bitmap fonts, and other techniques such as cloning and caching were used to help build more efficient code.
Code organization was achieved by creating custom classes that extend sprites, containers, and even events. The asset and state management techniques learned in this book helped mold the game into a readable and reusable structure, and saving game data and state was achieved by using HTML5 local storage.
These techniques, along with the scaling code for various screen sizes, puts this complete game in a position to package for publishing on the Web or even in mobile app stores.