C H A P T E R 1
Overview and Installation
Welcome to Beginning SQL Server 2012 for Developers. This book has been written for those who are interested in learning how to create solutions with Microsoft SQL Server 2012, but have no prior knowledge of SQL Server 2012. You may well have had exposure to other database management systems (DBMSs), such as MySQL, Oracle, or Microsoft Access, but SQL Server uses different interfaces and has a different way of working compared to much of the competition. The aim of this book is to bring you quickly up to a level at which you are developing competently with SQL Server 2012. This book is specifically dedicated to beginners and to those who at this stage wish to use only SQL Server 2012. You may find this book useful for understanding the basics of other database management systems in the marketplace, especially when working with T-SQL. Many DBMSs use an ANSI-standard SQL, so moving from SQL Server to Oracle, Sybase, etc. after reading this book will be a great deal easier.
This chapter covers the following topics:
- Why SQL Server 2012?
- How do I know whether my hardware meets the requirements?
- Can I just confirm that I have the right operating system?
- What can I do with SQL Server 2012?
You will also then look at installing your chosen edition and cover the following:
- Installing SQL Server 2012 on a Windows 7 platform
- Options not installed by default
- Where to install SQL Server physically
- Multiple installations on one computer
- How SQL Server runs on a machine
- How security is implemented
- Logon IDs for SQL Server, especially the
sa(system administrator) logon
Why SQL Server 2012?
The following discussion is my point of view, and although it no doubt differs from that of others, the basis of the discussion holds true. SQL Server faces competition from other database management systems, not only from other Microsoft products such as Microsoft Access, but also from competitors such as Oracle, Sybase, DB2, and Informix, to name a few.
Microsoft Access is found on a large number of PCs. The fact that it is packaged with some editions of Office and has been around for a number of years in different versions of Office has helped make this DBMS ubiquitous; in fact, a great number of people actually do use the software. Unfortunately, it does have its limitations when it comes to scalability, speed, and flexibility, but for many small, in-house systems, these areas of concern are not an issue, as such systems do not require major DBMS functionality. To this end, Microsoft Access can be the correct solution.
Now you come to the serious competition: Oracle and Sybase. Oracle is seen as perhaps the market leader in the DBMS community, and it has an extremely large user base. There is no denying it is a great product to work with, if somewhat more complex to install and administer than SQL Server; it fits well with large companies that require large solutions. It also forms the backbone of some major software packages. There are many parts to Oracle, which make it a powerful tool, including scalability and performance. It also provides flexibility in that you can add on tools as you need them, making Oracle more accommodating in that area than SQL Server. For example, SQL Server 2012 forces you to install the .NET Framework on your server regardless of whether you use the new .NET functionality. However, Oracle isn't as user-friendly from a developer's point of view in areas like its ad hoc SQL Query tool and its XML and web technology tools, as well as in how you build up a complete database solution; other drawbacks include its cost and the complexity involved in installing and running it effectively. However, you will find that it is used extensively by web search engines, although SQL Server could and does work just as effectively. SQL Server has always been a one-purchase solution, such that (providing you buy the correct version or license) tools that allow you to analyze your data or copy data from one data source such as Excel into SQL Server will all be “in the box.” With Oracle, on the other hand, for every additional feature you want, you have to purchase more options.
Then there is Sybase. It is very much like SQL Server, and Sybase has recently publicly announced that it has SQL Server in its sights. There is a GUI for Sybase, although it is separate from the DBMS installation and a separate product. You will find that many Sybase developers use command-line commands or third-party tools.
Sybase is also mainly found on Unix/Linux, although there is a Windows version around. It is very fast and very robust, and it is rebooted only about once, maybe twice, a year. Being hosted on Unix, Linux, or Solaris also helps with the reduction in reboots, as you don't have the monthly Windows patching. However, Sybase isn't as command-and feature-rich as SQL Server. SQL Server has a more extensive programming language and functionality that is more powerful than Sybase.
Each DBMS has its own SQL syntax, although they all will have the same basic SQL syntax, known as the ANSI-92 standard. This means that the syntax for retrieving data, and so on, is the same from one DBMS to another. However, each DBMS has its own special syntax to maintain it, and trying to use a feature from this SQL syntax in one DBMS may not work, or may work differently, in another.
So SQL Server seems to be the best choice in the DBMS marketplace, and in many scenarios, it is. It can be small enough for a handful of users or large enough for the largest corporations. It doesn't need to cost as much as Oracle or Sybase, especially if you wish to purchase a license to develop and build your skills, which no doubt is why you are reading this book, and it does have the ability to scale up and deal with terabytes of data without many concerns. As you will see, it is easy to install, as it comes as one complete package for most of its functionality, with a simple install to be performed for the remaining areas if required.
Now that you know the reasons behind choosing SQL Server, you need to know which versions of SQL Server are out there to purchase, what market each version is aimed at, and which version will be best for you, including which version can run on your machine.
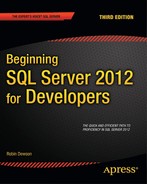
Evolution of SQL Server
SQL Server has evolved over the years into the product it is today. Table 1-1 gives a summary of this process.

Hardware Requirements
Now that you know a bit about SQL Server, the next big question on your list may well be, “Do I have a powerful enough computer to run my chosen SQL Server edition on? Will this help me refine my decision?”
Judging by today's standards of minimum-specification hardware that can be bought—even the low-cost solutions—the answer will in most cases be “yes” to most editions, although of course the better the hardware, the better it will perform. However, you may have older hardware (things move so fast that even hardware bought a few months ago can quickly be deemed below minimum specification), so let's take a look at what the minimum recommendations are and how you can check your own computer to ensure that you have sufficient resources. Modern home computers now ship with Windows 7, which is a 64-bit operating system, but many computers exist with 32-bit Windows Vista and XP. Where appropriate, requirements for each “bit” installation will be provided.
CPU
CPU specifications over the last few years have altered as each manufacturer defines its own chipset names. It is not straightforward to know whether the chip you have is better than another just by its name, and therefore, you may need to check your manufacturer's web site to see if your processor is better than the minimum.
- For 64-bit installations, at minimum you will require either AMD Opteron or AMD Athlon 64 processors, and for Intel, a minimum of Intel Xeon or Intel Pentium IV with a processing speed of at least 1.4 GHz and EM64T support.
- If you have a 32-bit installation, then you require an AMD or Intel processor that is at least Pentium III–compatible with a processor speed of at least 1.0 GHz.
As with most minimums listed here, Microsoft wholly recommends a faster processor. The faster the processor, the better your SQL Server will perform, and from this the fewer bottlenecks that could surface. Many of today's computers start at 2GHz or above, but the faster the processer the better. You will find your development time reduced by it.
However, it is not processor alone that speeds up SQL Server. A large part is the amount of memory that your computer has.
Memory
Now that you know you have a fast enough processor, it is time to check whether you have enough memory in the system. SQL Server requires a minimum of 512MB of RAM onboard your computer for the SQL Server Express edition and 1GB for all other editions, although you shouldn't have too many more applications open and running, as they could easily not leave enough memory for SQL Server to run fast enough.
The more memory the better: I really would recommend a minimum of 2GB on any computer that a developer is using with a local installation, with 4GB ideal and sufficient to give good all-around performance. If a process can be held in memory, rather than swapped out to hard drive while you are running another process, then you are not waiting on SQL Server being loaded back into memory to start off where it left off. This is called swapping, and the more memory, the less swapping that should take place.
Taking CPU speed and memory together as a whole, it is these two items that are crucial to the speed at which the computer will run, and having sufficient speed will let you develop as fast as possible.
When it comes to installing SQL Server, insufficient memory won't stop the install, but you will be warned that you need more.
Hard Disk Space
You will need lots! But name a major application these days that doesn't need lots! For SQL Server alone, ignoring any data files that you are then going to add on top, you will need over 4GB of space. Certainly, the installation options that will be used later in the chapter will mean you need this amount of space. You can reduce this by opting not to install certain options; however, even most notebooks these days come with a minimum 40GB, and 80GB is not uncommon either. Hard disk space is cheap as well, and it is better to buy one disk too large for your needs than have one hard drive that suits now, and then have to buy another later, with all the attendant problems of moving information to clear up space on the original drive.
Again, you will need spare space on the drive for the expansion of SQL Server and the databases, as well as room for temporary files that you will also need in your development process. So think big—big is beautiful!
Operating System Requirements
You will find that SQL Server 2012 will run on Windows 7 Service Pack 1 and above, as well as Vista Service Pack 2. From the server side, it will work on Windows Server 2008 with Service Pack 2 and above.
The Example
In order to demonstrate SQL Server 2012 fully, together we will develop a system for a financial company that will have features such as banking, purchasing shares, and regular buying, including a unit trust savings plan and so on. This is an application that could fit into a large organization, or with very minor modifications could be used by a single person to record banking transactions.
The book builds on this idea and develops the example, demonstrating how to take an idea and formulate it into a design with the correct architecture. It should be said, though, that the example will be the bare minimum to make it run, as I don't want to detract from SQL Server. The book will give you the power and the knowledge to take this example, expand it to suit your financial application needs, and give it the specifics and intricacies that are required to make it fully useful for yourself.
I also use a tool from Red Gate Software to generate some random test data. You do not need this tool for the book as the random data are available for download from the Apress site and my own site.
But before you can get to this point, you need to install SQL Server.
Installation
This chapter will guide you through the installation process of the Developer Edition, although virtually all that you see will be in every edition. Some of the differences will be due to the functionality of each edition. Microsoft offers a 120-day trial version at www.microsoft.com/sql, which you can use to follow along with the examples in this book if you don't already have SQL Server 2012. However, the Developer Edition is very cheap to purchase a license to use, and so, by selecting this version, it is not cost-prohibitive to continue past the trial period. You can also download the Express Edition for free, which has most of the functionality within this book, but the backup options within SQL Server Express have the greatest reduced functionality.
This book will cover many of the options and combinations of features that can be included within an installation. A number of different tools are supplied with SQL Server to be included with the installation. You will look at these tools so that a basic understanding of what they are will allow you to decide which to install.
Installation covers a great many different areas:
- Security issues
- Different types of installation—whether this is the first installation and instance of SQL Server or a subsequent instance, for development, test, or production
- Custom installations
- Installing only some of the products available
Most of these areas will be covered so that by the end of the chapter, you can feel confident and knowledgeable enough to complete any subsequent installations that suit your needs.
This book uses the Developer Edition because it is most likely the edition you will use as a developer, for it doesn't have all the operating system requirements of the Enterprise Edition. Insert the CD or download and extract SQL Server from the web site for the Microsoft SQL Server 2012 edition of your choice. What the upcoming text covers is a standard installation.
Install
Ensure that you have logged on to your machine with administrative rights so that you are allowed to create files and folders on your machine, which is obviously required for installation to be successful. If you are using a CD-ROM and the installation process does not automatically start, open up Windows Explorer and double-click setup.exe, found at the root level of the CD-ROM. If you are not using a CD-ROM, double-click the installer executable that you downloaded. This may expand the downloaded single file to a folder with the setup.exe within it.
You are now presented with the installation screen for Microsoft .NET 3.5 Framework if it is not already installed. .NET is a framework that Microsoft created that allows programs written in VB .NET, C#, and other programming languages to have a common compile set for computers. SQL Server 2012 uses .NET for some of its own internal work, but also, as a developer, you can write .NET code in any of Microsoft's .NET languages and include this within SQL Server databases. With SQL Server 2012, there is also the ability to query the database using .NET and LINQ rather than T-SQL.
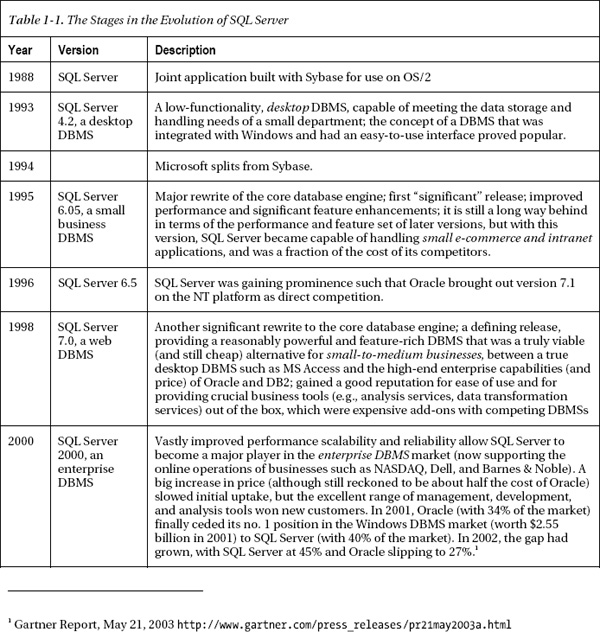
You are then presented with the SQL Server Installation Center. This screen, shown in Figure 1-1, deals with all setup processes, including new installations, upgrades from previous versions of SQL Server, and many other options for maintaining SQL Server installations.
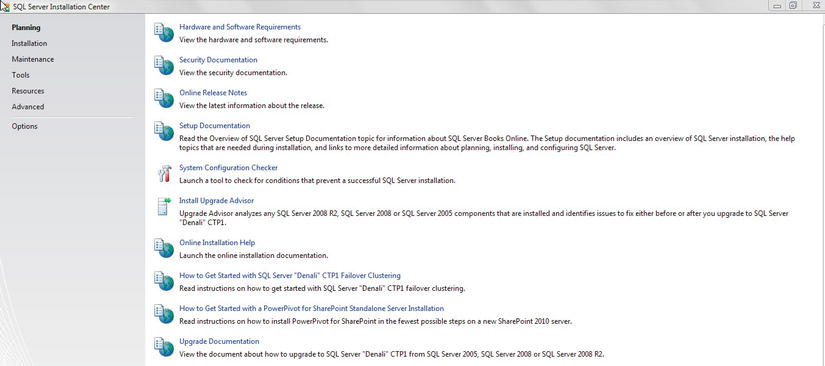
Figure 1-1. Beginning the install with the Installation Center
When you click Installation on the left-hand menu, the options within the main menu alter and you can now select the New SQL Server stand-alone installation or add features to an existing installation item (at the top of the Installation Center); then SQL Server 2012 installation starts.
You then come to the system configuration check, as you see in Figure 1-2. This is my setup support rules screen, but your screen may slightly differ depending on operating systems and service packs. Its main function is to check that the PC meets the hardware and software requirements, that there are no outstanding reboots, and that you are logged in as an administrator. There are certain requirements for certain parts of the installation, such as memory and CPU, as mentioned previously. If you have no errors, then click OK.
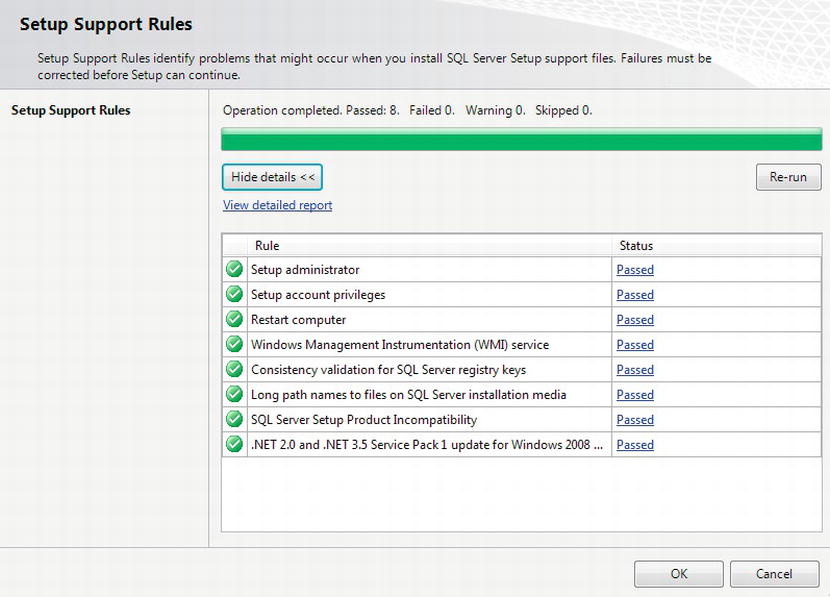
Figure 1-2. System configuration check
You are then asked about the edition of the software you wish to install. If you have bought a licensed version, then you would select the edition of SQL Server you have purchased the license for and enter the product key. If you have no license, you can install the Evaluation Edition or the Express Edition of SQL Server. The Express Edition is free and has a good feature set, and most of the content of the book can be followed within the chapters. The main difference between the Express and Evaluation Editions within the book surrounds the functionality for backups, restores, and logging of changes completed within the data of a database.
After accepting the license terms and conditions, SQL Server will then attempt to connect to the Internet and check for any product updates and service packs. It is recommended that all updates and service packs should be installed; however, these should not be applied directly to a production install without an install on a development server and your code and application tested against any updates first. Occasionally, a service pack or product update can alter functionality.
Setup Support Rules
After the setup install files are installed, the second set of checks that are performed continues to ensure that the install will proceed without failures. These second checks are more to ensure that SQL Server itself will install and perform once installed, unlike the first set of checks, which was related to the computer and operating system requirements.
You will notice in Figure 1-3 that there are two warning triangles with warning messages in the screenshot; you may have more or less depending on your computer setup. SQL Server will still install. The warnings relate to the inability of .NET installation to access the Internet, either because there is no Internet connection available or the connection used is blocked by a firewall. The second warning at this point is unlikely to be of concern, although if you are installing onto a machine that you will be accessing from a second machine either on a network or by the Internet, then the message is indicating that you have Windows Firewall enabled. If you want to connect using TCP/IP, then you need to have the correct ports open and enabled for use. Click Next.
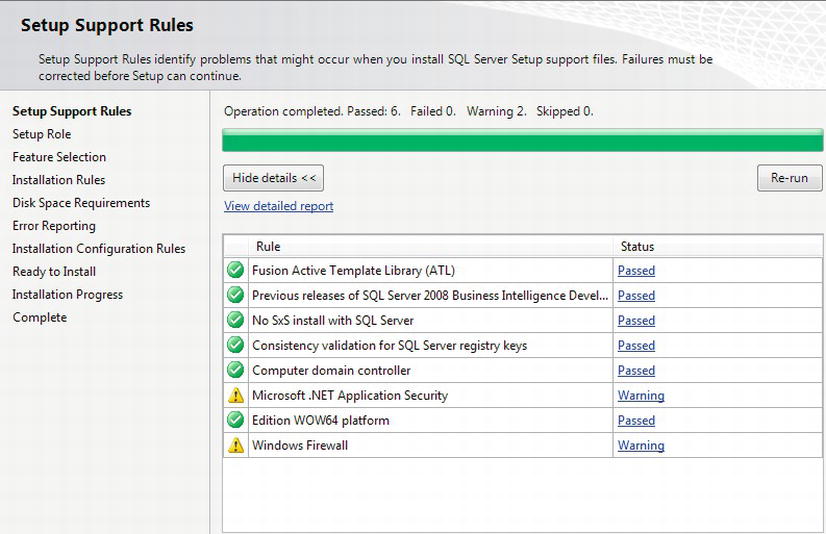
Figure 1-3. System configuration checks
Setup Role
You will now be presented with the Setup Role screen in Figure 1-4. There are three possible methods of installation that can be chosen. The first option allows you to select which specific features are to be installed on the computer. The second option allows Reporting Services to use powerful techniques and tools to deal with data held in an Analysis Services database, or Business Intelligence database, in conjunction with SharePoint. SharePoint can be found in large organizations that use it to store generated reports that can be accessed in a secure and controlled method by users. The final option is instructing the setup process to install every feature, tool, SDK, and SQL Server service that is available. You will use the SQL Server Feature Installation option. Click Next.
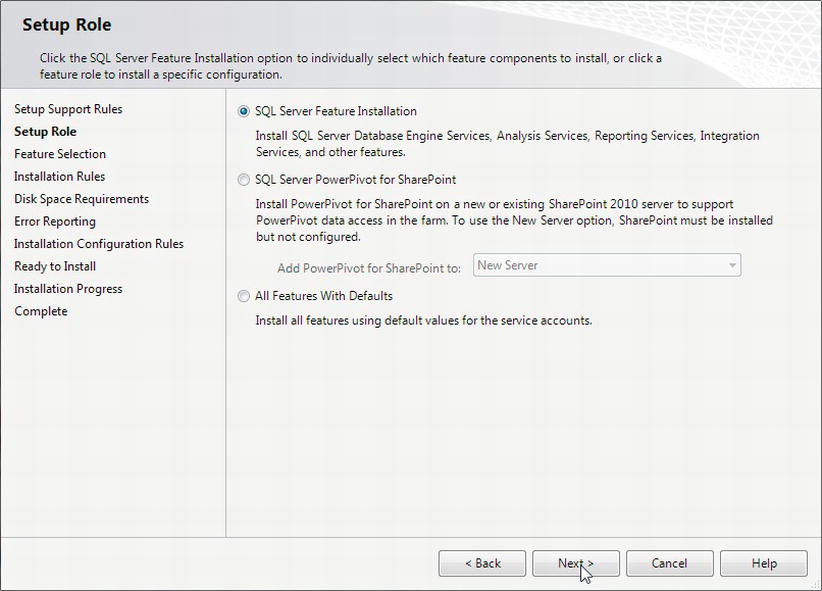
Figure 1-4. Installation type to be performed
Choosing the Features to Install
You now come to the Feature Selection screen, where you have to make some decisions. As shown in Figure 1-5, only certain options have been selected, and these are the options that will be discussed and demonstrated within this book. You can select all of the options so that you do not need to install features as you progress your SQL Server knowledge or if this will be your development instance where you'll be testing every aspect of SQL Server away from any development of projects taking place. I will go through all of the options in this chapter, but the options in Figure 1-5 are the ones I have used for this book.

Figure 1-5. Selecting the features to install
Let's briefly take a look at each of these components.
- Database Engine Services: This is the core for SQL Server 2012, and this option installs the main engine, data files, etc. to make SQL Server run.
- SQL Server Replication: When you want to send data changes not only on the database it is being executed on, but also on a similar database that has been built to duplicate those changes, then you can use this option to replicate the changes to that database.
- Full-Text Search: This option lets you allow searching of the text within your database. This is a very useful tool for searching documents or other large text-based data and could be used if you were building a search engine.
- Data Quality Services: This tool allows you or users to inspect the data within your database for data quality. You can inspect your data for duplication and quality from a reference database using the client tool to inspect the results.
- Analysis Services: Using this tool, you can take a set of data, slice and dice, and analyze the information contained. Analysis Services has received a great deal of attention from Microsoft in the last few years as it improves and expands the ability to aggregate data and perform analysis functions. It is ideal for taking data such as sales figures and allowing you to see these by product, by sales region, by client, and by any other method that could be analyzed.
- Reporting Services: There are three different features for this service. One feature is installed for each SQL Server instance, and then two options are installed once and can be used by any installed instance on the server. Reporting Services allows reports to be produced from SQL Server instead of using third-party tools such as Crystal Reports. It is used by both SQL Server and Analysis Services.
- Data Quality Client: This is the client tool that allows you or users to inspect the data within your database for data quality. You can inspect your data for duplication and quality from a reference database using the client tool to inspect the results.
- SQL Server Data Tools: When you want to analyze data using analysis-based services, then you can use this GUI to interact with your database. This used to be called Business Intelligence Development Studio.
- Client Tools Connectivity: Some of these tools sit on the client machine and provide the graphical interface to SQL Server, while others sit on the client and work with SQL Server via tools such as Visual Studio, Excel, third-party tools and utilities such as iSQL, and a basic command prompt tool. Client Tools Connectivity is the option you would package up for rollout to developers to sit on their machines.
- Integration Services: This is a very powerful tool as it allows you to build packages of processes to complete actions, such as importing data from other data sources and manipulating the data. You will see Integration Services in action in Chapter 7 when you look at building a backup maintenance plan.
- Client Tools Backwards Compatibility: Previous versions of SQL Server used different tools and methods to access data from the client tools. This option will install these tools so that if you are accessing—as an example—Integration Services on a SQL Server 2005 database that was called DTS, then you will be able to do this.
- Client Tools SDK: This is a software development kit for client tools that Microsoft uses.
- Documentation Components: This is the help system. If you need more information, clarification, or extra detail on any area of SQL Server, then this is the area to turn to.
- Management Tools: The basic option will install the components required for this book. There will be a graphical interface called Management Studio as well as the ability to write SQL at the command prompt. The complete option expands Management Studio to have the ability to interact with Reporting Services and Integration Services, as well as installing tools to help in performance monitoring of your SQL Server. You would tend to deploy the complete set to developers and the basic set to those dedicated to supporting a system, who need only to run queries against your data to solve production problems, and to retrieve and execute ad hoc queries.
- Distributed Replay Controller: Distributed replay allows for workloads to be distributed over one or more clients to try to simulate a real-life workload on SQL Server. This option is the controller of the replay.
- Distributed Replay Client: This is the client software that would be used on one or more clients to send through a distributed replay of SQL Server actions to the controller. You would install this on each client that you want to partake in the replay.
- SQL Client Connectivity SDK: SQL Native Client provides the ability to connect to SQL Server with some limitation to the functionality available from development systems. In general, from .NET and other similar languages, you would connect to SQL Server using the SQL Server ADO.NET library. If you are accessing SQL Server from a COM-based language such as the C or C++ programming languages, then you would look to install this option.
- Master Data Services (MDS): If you have multiple servers used within your organization for different data repositories, for example, one database for clients, one database for orders, another database for delivery information, then by using MDS you can bring the data together in one master data hub. Each of the databases has a valid use in its own right and does belong as a separate entity; however, an organization's management or decision-makers may need to see the whole picture to assess how the company is performing.
Of these components, Replication, Full-Text Searching, Analysis Services, SQL Server Data Tools, and Master Data Services fall outside the scope of this book, and I touch upon Integration Services only as mentioned.
![]() Note At this point, SQL Server no longer has the option to install the sample databases. You can download the samples from
Note At this point, SQL Server no longer has the option to install the sample databases. You can download the samples from www.codeplex.com/SqlServerSamples.
Naming the Instance
After a final check that nothing will block the installation via the Install Rules check, you are ready to start defining the the options selected earlier.
It is possible to install SQL Server more than once on one computer. This could happen when you have a powerful server and it has enough resources such as memory and processor to cope with two or three different applications running. ISPs will have this setup when you request SQL Server, as this is their and your cheapest option and allows SQL Server to be easily maintained by them. These different applications may be required to have their own SQL Server databases. Each install is called an instance. You are now at the stage that you can name the instance of the install. Each instance must have a unique name attached to it, although “no name,” known as a default instance, is also classified as a unique name.
Naming instances is important as the first step to organizing your environments. For example, you may have an instance for development, another instance for system testing, and finally one for user testing. It is bad practice to share production server hardware with anything but production databases. If you share your hardware, and if you have a rogue development action that occurs and crashes the server, you will stop production from running. Although you would have to make this decision at the start of the install process you are currently going through, it is a useful second reminder here when naming the instance to give some indication of what environment it is for. I tend to use DEV1, STG1, UAT1, and PRD1. The reason for the number is to cater for the scenario for replication, if you split audit, archiving, live data, and so on.
The default instance is available as an option, which is what is selected when you are not giving the install a specific name. You should avoid this, as it gives you an installation with no name and therefore no hint as to its use. Even if you believe this will be your only instance or that while you are learning, a name is not required, it is good practice to name the instance as shown in Figure 1-6. Choose the name you wish to use, and then click Next. Once you have instances installed on the server and you complete further installations, they will be listed here. You can also see the path detailed for each of the directories for the three services selected in the previous step. Click Next. The next screen checks the amount of free space on the selected drive. Click Next.
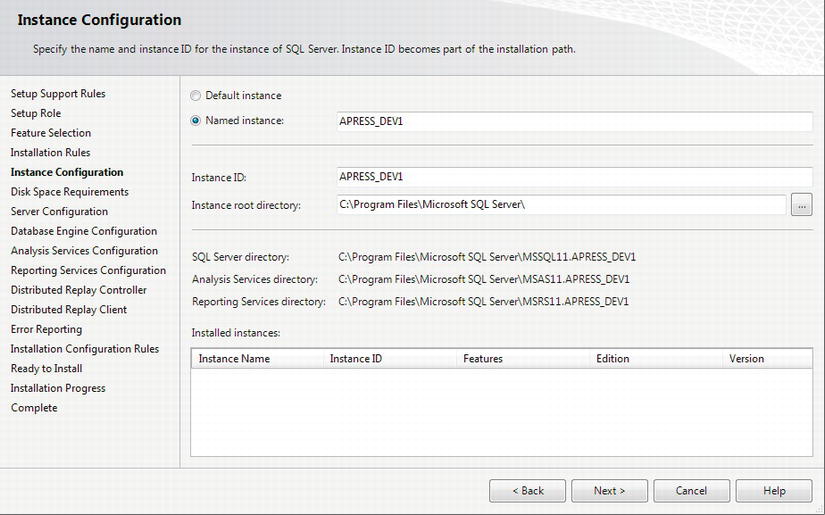
Figure 1-6. Naming the install instance
Service Accounts
SQL Server and other services, as defined in the Feature Selection screen (shown in Figure 1-5), require you to log on to Windows before starting, just as you need to log on to Windows before using your system. SQL Server, Reporting Services, and so on can run without you or anyone being logged in to the computer the install took place on. They can run just so long as the computer has fired up successfully. This is normal when SQL Server is installed on a server that is held in a remote location like a server room.
When the computer boots up and loads Windows, not only will Windows be running but also there will be processes that run in the background before you or any other user has logged in to Windows. The ability to run services with no user-based account logged in to Windows is the behavior that is required for SQL Server. SQL Server needs to use a system-based Windows account.
Nothing can run on Windows without having some sort of login. If you do log in to the computer with your Windows account while working through this book, you can use this Windows user ID for SQL Server to also log in and start the required services. However, if you have your SQL Server running on a separate machine such as a server in a specialized server room, at your client's location, or at your ISP, then you will not be around to log on to that machine every time SQL Server is required. In that situation, it is necessary to use a Windows service account, which is similar to how your virus checker runs without being logged in with your own account.
Each built-in service account has special rights and privileges within Windows, and therefore choosing the correct service account for the correct SQL Server service is important. If you are on a network domain, not normally found in the home environment, then it is possible for the domain administrator to create domain accounts that can be used as service accounts, and this is the option to choose when there is a network domain. For the moment, although not the best option within a production environment, you will use the built-in service accounts. In a networked environment, it is best to create new service accounts for SQL Server.
You will look at service accounts in more detail toward the end of the chapter. The options you see in Figure 1-7 will install SQL Server with a low-level set of privileges, and Figure 1-7 also shows more services than you would see if you chose the options in Figure 1-5. The extra services are included if you did choose more options to install.
You can always change which accounts are used to run SQL Server later. You will notice that SQL Server Browser service is disabled. If you install SQL Server on a remote computer such as a server, then you may opt to enable this service so that client computers can search and browse for your SQL Server installation rather than having to know the exact computer name and instance. ISPs are unlikely to switch this service on, as they will give any users the SQL Server server name; however, corporations are likely to have this service running so that you can find SQL Server instances within the network. For the book, switch this service to automatically start.
Click Next to continue with the install.
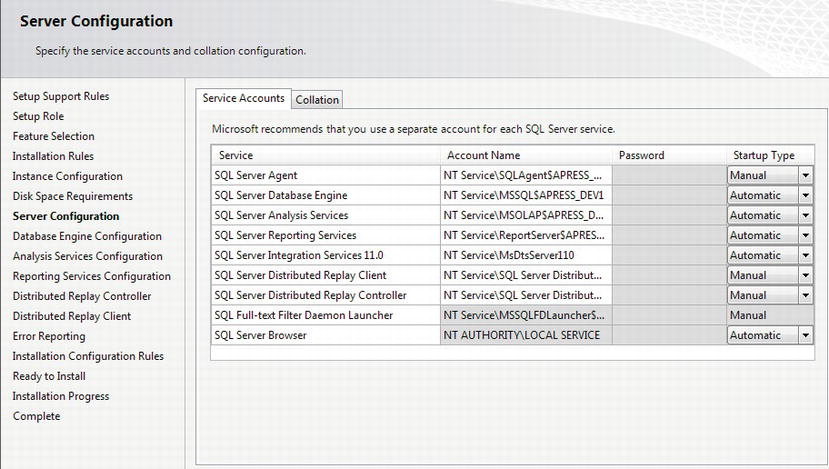
Figure 1-7. Service account selection
Authentication Mode
You now come to how you want to enforce security on your SQL Server installation. As Figure 1-8 shows, there are two choices: Windows authentication mode and mixed mode. You will learn more about modes later in the chapter, but, very, very simply, Windows authentication mode denotes that you are going to use Windows security to maintain your SQL Server logins, whereas mixed mode uses either Windows security or a SQL Server–defined login ID and password. You also need to define a password for a special login ID, called sa, if you are working with mixed mode. Again, you will learn more about this in a moment, but for now you must enter a valid password. Use a meaningful and impossible-to-guess password, but not one that you will forget.
It is also necessary to define a SQL Server administrator account. This is a special account that you can use to log on in dire emergencies, such as when SQL Server refuses connections. This special account allows you to log on, debug the situation, and get SQL Server back up and running. Normally, this administrator account would be a server account ID, but for now, use the account you have used to log on to your computer.
You will also see a similar screen for Analysis Services if you selected Analysis Services from the features list, and the settings are the same.
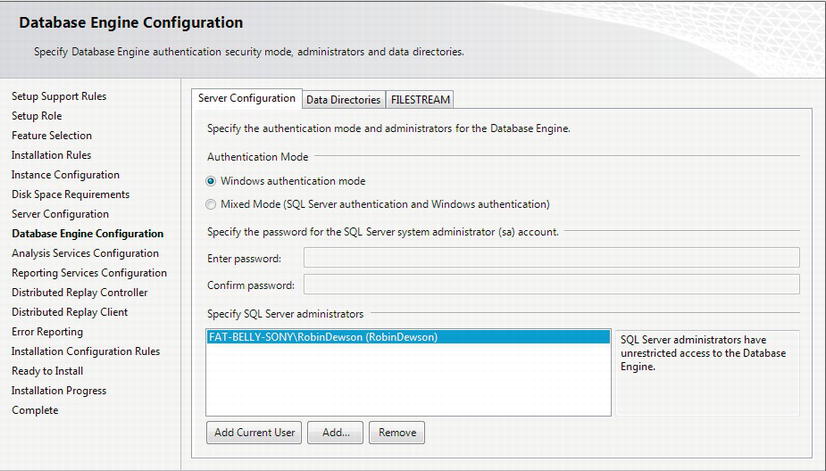
Figure 1-8. Authentication choices, including the SQL Server administrator account
Defining the Data Directories
The Data Directories tab, as shown in Figure 1-9, is where you define where SQL Server stores its data, backup directories, and temporary database by default. For each instance, you define where the relevant folders should reside. As stated earlier, you can have several installations on one physical or virtual server, and it is not uncommon for a physical or virtual server to hold more than one production installation of SQL Server. For example, there could be an installation for accounts, another for product control, and so on. Each instance would have its data held in a different data directory. This includes any temporary databases that are created and any log files that are generated, so although the physical server is shared, the installation is isolated. A virtual server is similar to a physical server, but it can be one large server that has been split, quite often using software, into multiple servers. This is the method used by many companies, including Microsoft on its Azure platform. The virtuality is dealt with by the Windows engineering teams rather than the DBMS engineering teams. As you are dealing with only one instance within this book, leave these settings as they are.
You will see the same tabs shown in Figure 1-9 in the next step if you selected Analysis Services.
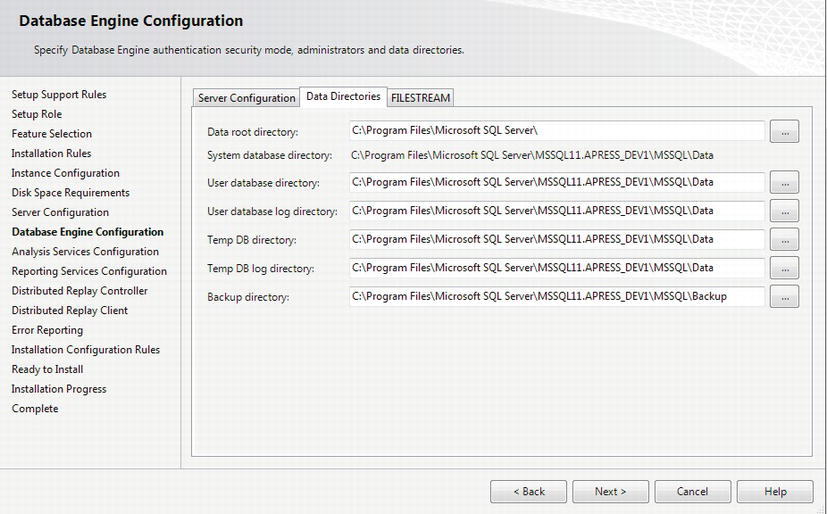
Figure 1-9. Defining the locations of SQL Server data directories
FILESTREAM options
The FILESTREAM tab as shown in Figure 1-10 is another type of data directory that is used when dealing with large amounts of unstructured data. In the past, this data was held totally separate from SQL Server with a link to where the data was held, but FILESTREAM allows the data to be managed by SQL Server, and this tab informs SQL Server of where it resides. FILESTREAM data are also used for full-text searching. If you enable filestreaming, then you have the option to hold the data in FileTables. I think of this functionality as similar to SharePoint, which holds large unstructured data like Word, Excel, etc. do. SharePoint holds and manages the documents. By holding the data in FileTables, you can then access the documents from Windows and Windows applications, but SQL Server will also provide the ability to search the documents, similarly to a search engine. Leave this option disabled.
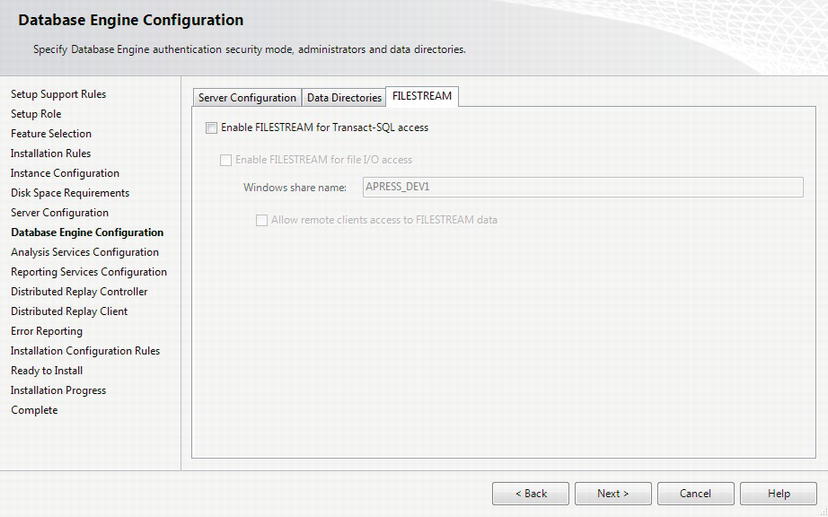
Figure 1-10. FILESTREAM and FileTable options
Creating the Reporting Services Database
If you selected Reporting Services to be installed, you need to create a database for the reporting server to use. There are three different possible installation options for Reporting Services: native, SharePoint, and installed but not configured. If you select the last option, SQL Server Reporting Services will be installed on the server but will not be configured. This is ideal if you're setting up a specific server just for the reporting options or if SQL Server is being installed in unattended mode and the reporting server will be configured after this completes. Once installed, you would then have to create a reporting database.
The native mode configuration, as shown in Figure 1-11, is the simplest and the option demonstrated here. It installs Reporting Services and also creates the necessary databases within your SQL Server. It will be available only if you are installing on a local instance rather than a remote instance and if Reporting Services is also on that local instance. Default values are used for the service account, the report server URL on the local instance (which will be localhost), the Report Manager URL, and the name of the Reporting Services.
If you have a SharePoint installation and you want Reporting Services to use that architecture, then select the Reporting Services SharePoint install option, which allows you to use SharePoint's functionality and storage for reporting purposes.
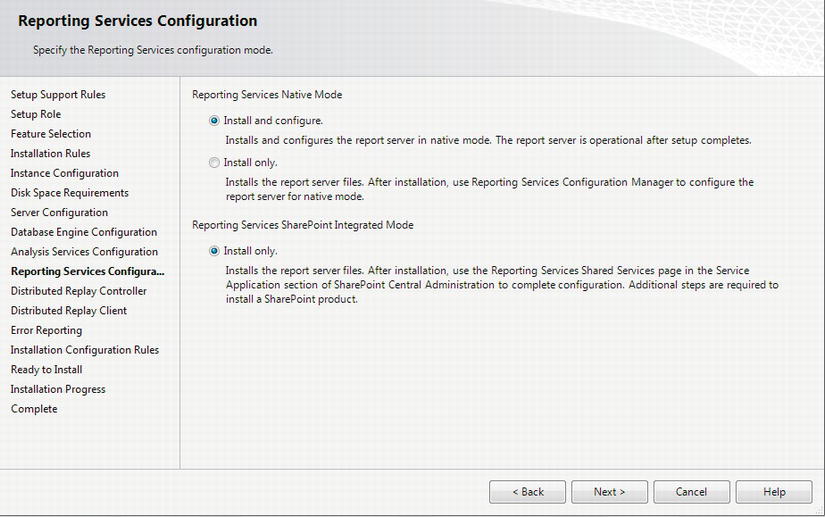
Figure 1-11. Installing native mode configuration for Reporting Services
Distributed Replay Options
Although not covered in the book, distributed replay allows for one or more client computers to connect to a SQL Server instance to send a workload to SQL Server for it to process. The controller will sit with the SQL Server installation and control the clients' connections through to the server. The client is used to mimic a user and the workload being sent through. Figure 1-12 shows the name of the controller for it to connect to.
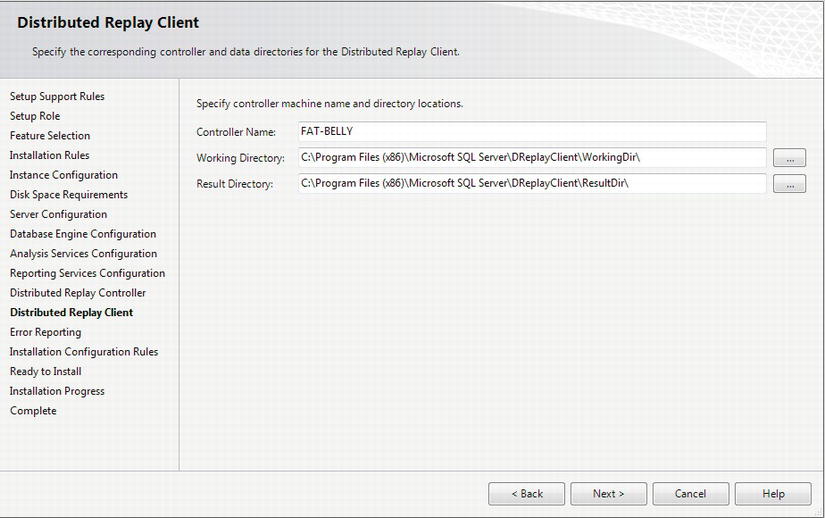
Figure 1-12. Controller computer for the Distributed Replay Client
Error and Usage Report Settings
After a final check of the installation rules, you move to the error and usage settings. Within SQL Server, it is possible for any errors to be automatically reported and sent to Microsoft. These include fatal errors where SQL Server shuts down unexpectedly. It is recommended that you keep the error settings shown in Figure 1-13 enabled, although some companies do prefer the reports to remain on their own server. No organizational information will be sent, so your data will still be secure. This is similar to sending reports when Excel crashes, for example. It is better to have these options enabled.
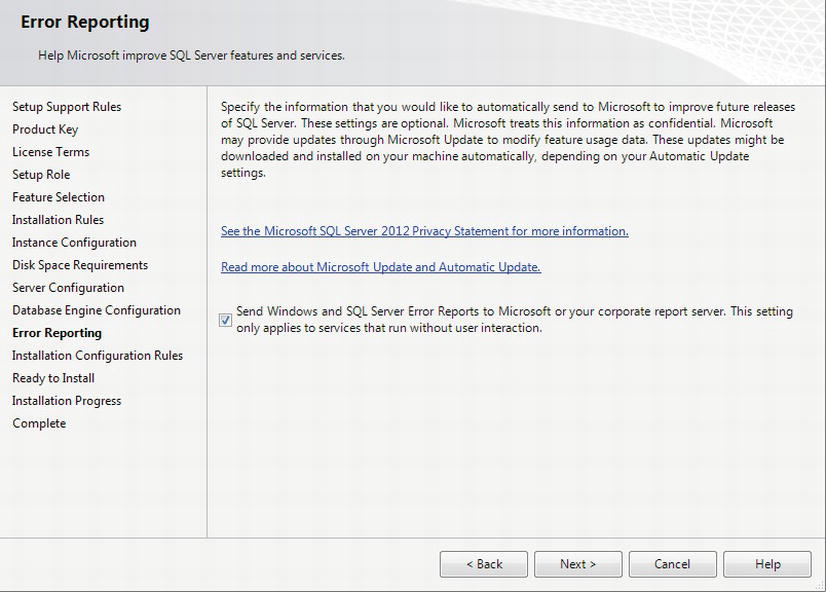
Figure 1-13. Error and usage reporting settings
When you click Next, a final check is made to ensure that the install should be able to complete, and finally by clicking Next the final screen (see Figure 1-14) is displayed. The setup collection is complete, and you are ready to install. You can now install SQL Server, and you will be able to monitor the installation progress.
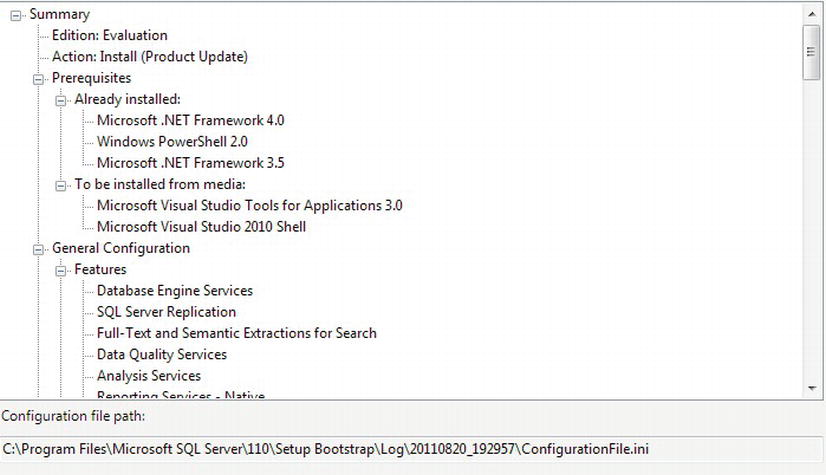
Figure 1-14. Complete setup details
Security
To discuss further the Service Account dialog box that you came across in the installation properly, I need to delve into the area of Windows security.
In this section, you will first examine the concept of Windows services as opposed to programs, and then move on to discussing different types of authentication you can choose when installing SQL Server.
Services Accounts
SQL Server runs as a Windows service. So what is a service? A good example of a service is any antivirus software that runs continuously from when the user restarts a computer to the point that the computer shuts down. A program, on the other hand, is either loaded in memory and running, or not started. So what is the advantage of running a service? When you have a unit of work that can run as a service, Windows can control a great deal more concerning that process. A service can be set to start automatically before any user has even logged on; all other programs require a user to be logged in to Windows in order for the services to start.
A service also has absolutely no user interface. There will be no form to display and no user input to deal with at runtime. The only interaction with the process runs either through a separate user interface, which then links to the service but is a totally separate unit of work (for example, SQL Server Management Studio), or from Windows management of that service itself. Any output that comes from the service must go to the event log, which is a Windows area that stores any notification from the services that Windows runs.
Having no interface means that the whole process can be controlled without human intervention. Providing the service is designed well, Windows can take care of every eventuality itself, and can also run the service before anyone has even logged in to the computer.
In most production environments, SQL Server will be running on a remote server, one probably locked away in a secure and controlled area, possibly where the only people allowed in are hardware engineers. There probably isn't even a remote access program installed, as this could give unauthorized access to these computers. SQL Server will run quite happily and, with any luck, never give an error. But what if one day there is an error? If SQL Server is running as a program, you'll have to make some sort of decision. Even if SQL Server crashes, there at least has to be some sort of mechanism to restart it. This means another process needs to be run—a monitoring process, which in itself could result in a whole ream of problems. However, as a service, SQL Server is under Windows control. If a problem occurs, whether with SQL Server, Windows, or any outside influence, Windows is smart enough to deal with it through the services process.
If you do log in to the computer, as you likely will while working through this book, then you can use this Windows user ID for SQL Server to also log in and start its service. The Windows user ID that SQL Server uses is known as a local system account.
On the other hand, you can create a Windows login that exists purely for SQL Server, and this is the correct behavior to implement in production. You avoid it in this book only to keep things simple while you are learning SQL Server.
Your Windows account should be set up so that the password expires after so many days, or so that it locks out after a number of incorrect password attempts. This is to protect your computer and the network, among many other things. However, SQL Server should use a separate account that also has an expiring password and the ability to lock the account after a number of unsuccessful attempts. The account will also be set up to access only specific resources both on the local computer as well as network-related. This kind of non–user-specific, “generic” account removes the link between SQL Server and a person within an organization. If you are looking at the domain account option as shown earlier in Figure 1-7, this account is likely to be in a network environment or a production environment. There is an option to define a different account for each service. That ability is crucial when in a corporate environment because of the security implications that you must deal with.
SQL Server has several different processes that exist for different work. There is an executable named sqlservr.exe that is used to run SQL Server itself. You'll see that process listed in Task Manager as MSSQL$instancename. Including the instance name as part of the process name allows each instance to be unaffected if a different instance is stopped. Another executable named sqlagent.exe represents the SQL Server Agent, which runs processes such as batch jobs and is shown in Task Manager as SQLAgent$Instancename. So even if you stop MSSQL$Instancename, the SQLAgent$Instancename process will continue. This behavior reinforces the fact that the SQL Server and SQL Server Agent processes should be on different accounts. Finally SQL Server Agent, because it runs batch processes and complex tasks including working with other servers, needs a more powerful domain account than the SQL Server process. SQL Server Agent may need access to tape drives for backups, for example. Your network administrator may have created these accounts and will know which account is best to use or best to create for these tasks.
It's time to move on to the options you are given during installation regarding authentication mode.
Looking at the Authentication Mode
Probably the most crucial information in the whole setup process, and also the biggest decision that you have to make, concerns the authentication mode you wish to apply to your server. As you saw earlier in the setup process, there are two choices: Windows authentication mode and mixed mode.
Windows Authentication Mode
To log on to a Windows machine, the user must supply a username. There is no way around this. So, to log on to Windows, the username and password have to be validated within Windows. When this is done, Windows is actually verifying the user against username credentials held within the domain controller, or, if you are running Windows/SQL Server on a stand-alone machine at home, the credentials held locally. These credentials check the access group the user belongs to (the user rights). The user could be an administrator, who has the ability to alter anything within the computer, all the way down to a basic user, who has very restricted rights. This then gives you a trusted connection; in other words, applications that are started up after logging in to Windows can trust that Windows has verified that the account has passed the necessary security checks.
Once you have logged in to Windows, SQL Server uses a trusted connection when working with Windows authentication mode. This means SQL Server is trusting that the username and password have been validated as I just mentioned. If, however, the Windows username you give does not exist within SQL Server, you won't be able to log on. However, if the username isn't valid, SQL Server will check the Windows group that the user belongs to and check its security to see whether that group is set up to access SQL Server. If that user has administration rights to your computer, then the user may well be able to at least connect to SQL Server.
Other people can also log on to your machine provided they have access to it with their user ID and password. Although they might be able to get to SQL Server by finding the executable on the C drive, SQL Server will first check whether that user has a valid login within SQL Server. If the login isn't valid, SQL Server will check the Windows group that the user belongs to and then check this user using its security model to see whether that group is set up to access SQL Server. If that user has administration rights to your computer, the user may well be able to at least connect to SQL Server. SSE on Windows Vista Home works slightly differently with its security compared to Windows Vista Ultimate, Windows XP, Windows Server 2003, and so on. We will look at the differences in detail in Chapter 4, but for now, in the upcoming text, it is important to compare the two different scenarios in general terms.
You are in a bit of a Catch-22 situation here. You need to know about security for your install process, but to demonstrate it fully means working with SQL Server Management Studio, which the next chapter covers. I will keep that area simple, so let's look at an example involving security now.
EXERCISE 1-1. TRY IT OUT: WINDOWS AUTHENTICATION MODE
- Ensure that you are logged on to your machine as an administrator. If you are on a local computer, chances are that your login is in fact an administrator ID. If this computer is on a network and you are unsure about your access rights, ask your PC support desk to help you out with the ID and password. On Windows Vista or Windows 7, you may need to change your user control access to avoid many dialogs confirming that you wish to continue with each step.
- From Start /Control Panel, select User Accounts.
- When the Users and Passwords dialog box comes up, click Create a New Account on XP or Manage Another Account on Vista/7, followed by Create New Account.
- Once the Name the New Account dialog box comes up, enter the username MSmith, as shown in Figure 1-15.
- Ensure that the account type specified is Standard on Vista/7. This means that it will not have administrator privileges.
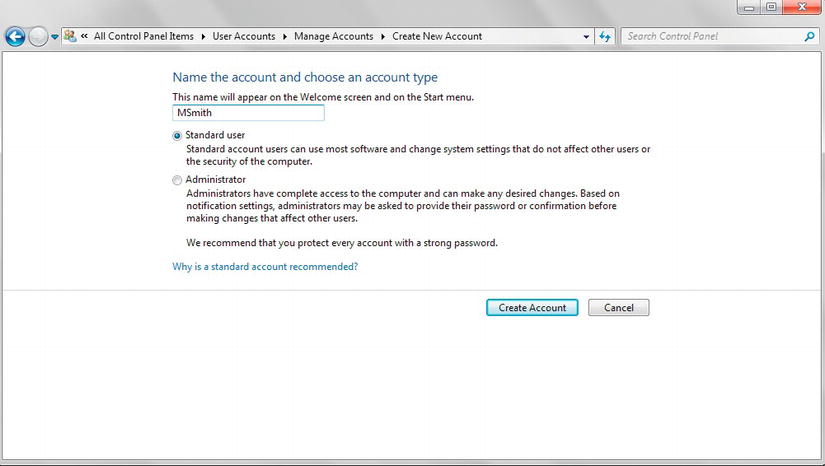
Figure 1-15. Creating a new user account
- Stay in the User Accounts dialog box, as you want to add a second username. Repeat the preceding process using the following details:
- Username: StepBrown
- Account type: (Computer) Administrator
- Log off from Windows, and then log on using the first ID that you created: MSmith.
- Once logged in, start up SQL Server Management Studio by selecting Start
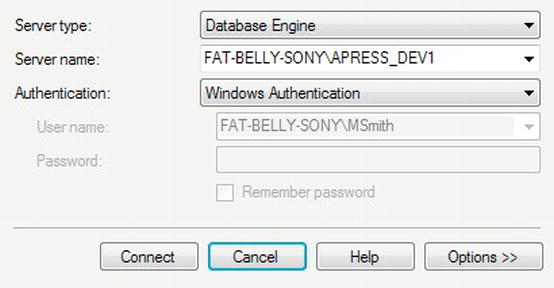
 All Programs Microsoft SQL Server 2012 SQL Server Management Studio. You will need to populate the dialog with the server name of the install. Click Browse For More, select Database Engine, and select the install. We will go through this in more detail in Chapter 2. The dialog should look like Figure 1-16.
- Examine the error message that appears, which should resemble what you see in Figure 1-17. MSmith as a login has not been defined within SQL Server specifically and does not belong to a group that allows access. The only group at the moment is a user who is in the Administrators Windows group. Recall that MSmith is a limited user.
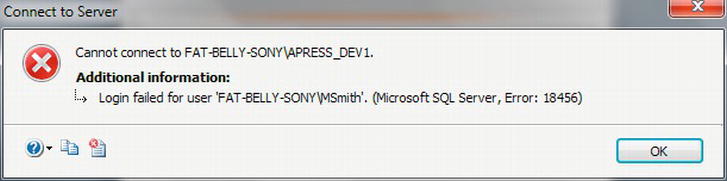
Figure 1-17. Failed login to server
- You will now try out the other user you created. Close down SQL Server, log off Windows, and log on using the second ID you created—StepBrown. Once logged in, start up SQL Server Management Studio and connect to your server. Similar to MSmith, the login will not work.
- If you start up SQL Server Management Studio on your own login, then it should allow you to gain access. If you have followed the chapter, then you will need to have as the server name the name of your computer, followed by a backslash () and the name of the instance, APRESS_DEV1. If you have installed SQL Server with no instance name, then you need just your computer name or you need to enter (local).
You have created two usernames on top of the username you already have as your own account: one that has restricted access (MSmith) and one that has administration rights (StepBrown), as well as your own account that installed SQL Server. Neither of these specific usernames exists within SQL Server itself: after all, you haven't entered them and they haven't appeared as if by magic. The Windows security model has ensured that both new IDs are valid as well as your own. If the ID or password were incorrect, there would be no way that you could be logged in to Windows. Therefore, when you try to connect to SQL Server, the only check that is performed is whether the user has access to SQL Server either via membership of an operating system group that has been defined within SQL Server or through the specific logged-in user account that has been defined to SQL Server. As you can see in Figure 1-18, neither MSmith nor StepBrown exists within SQL Server. You can see my login, and therefore I am entitled to connect. SQL Server in previous versions added a group to the list of logins. The group is called BUILTINAdministrators, and StepBrown would have been a member of the group. If this group existed, then step 10 would have succeeded. BUILTINAdministrators is a dangerous group to have within SQL Server, as many people can be administrators within a network domain and therefore could have access to your server and log in; it is a loophole in your security if you keep this as a login. In existing installations, if you see this group exists, then investigate removing it and certainly do not add it for new installations. The same is true if you see a group called BUILTINUsers. In Chapter 4, you will see how to build specific groups of users to allow individuals access to your server.
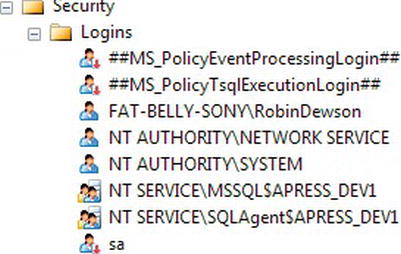
Figure 1-18. Object Explorer for SQL Server
Mixed Mode
If you installed SQL Server with mixed mode, this means you could use either Windows authentication, as has just been covered, or SQL Server authentication.
How does mixed mode differ from Windows authentication mode? To start with, you need to supply a user ID and password to connect rather than SQL Server taking the Windows ID, or the group the user belongs to, of the logged-in account. There is no assumption that the username supplied is a valid Windows ID. Using mixed mode is also appropriate in many cases when working with ISPs. To clarify this, if you are working on your remote data at a local client machine, the remote machine would need to know the credentials of your login, and the easiest method is to use SQL Server authentication. Be clear that in this scenario, it is you connecting to your data from your machine. The web site code used to access your data, if written in ASP.NET, may use a Windows account to log in, so although you may lock out your SQL Server mixed-mode account, it should not stop your web site from working.
You will learn how to add usernames to SQL Server (as opposed to adding Windows users) when I talk about security in Chapter 4.
This leaves one area of security left that needs to be discussed here: the sa login.
The sa Login
The sa login is a default login that has full administration rights for SQL Server. If you selected mixed mode authentication during the installation process, you would be forced to include a password for this account. This is because the sa user ID is such a powerful login. It also exists in every SQL Server installation; therefore, any hacker knows that this user ID exists and so will try to connect to the server using it. Prior to SQL Server 2005, when creating a password became compulsory, many installations had the password blank, therefore allowing hackers instant access. If you log in to SQL Server as sa, you will have full control over any aspect of SQL Server. SQL Server inserts this ID no matter which authentication mode you install. If you have a Windows account defined as sa—for example, for Steve Austin—then this user will be able to log in to the server if you have set the server up to implement Windows authentication mode without any further intervention on his part. Try to avoid login IDs of sa.
In a mixed mode installation, sa will be a valid username and validated as such. As you can guess, if any user gets ahold of this username and the password, that user will have full access to view and amend or delete any item of data. At worst, the user could corrupt any database, as well as corrupt SQL Server itself. The user could even set up tasks that e-mail data to a remote location as it is being processed.
It is essential to set up a strong password on the sa account in the Authentication Mode screen if you choose mixed mode. It is a major improvement in SQL Server 2012 that you are now forced to enter a password, although it is possible to set up a very easily guessed password. Do not use passwords such as “password” or “adminpwd,” for example. Always keep the password safe, but also make a note of it in a safe place. If you forget the sa password and this is the only administration ID that exists, you will need to reinstall SQL Server to get out of this problem. A good password is one that mixes numbers and letters, but doesn't include letters that can be made into numbers and numbers into letters in all cases. For example, pa55word is just as easy to guess as password. Or 4pr355 for Apress.
There is also another reason not to log on to SQL Server with the sa username. At times it will be essential to know who is running a particular query on a SQL Server database. In a production database, someone may be running an update of the data, which is filling up the disk space or filling up the transaction log. You will need to contact that person to check whether he or she can stop the process. If that person logs in as sa, you will have no idea who he or she is. However, if that person logged on with an identifiable name, he or she would have an ID in SQL Server, which you could track. By restricting the sa login so that people have to use their own accounts, you can ensure a much higher degree of system monitoring and integrity.
There will be times that you want mixed mode authentication; it is perfectly acceptable to want this. Internet providers use mixed mode, because many applications may be on one web server. If this ISP is a reseller (in other words, many people around the globe use the one computer), you will not want these people to have the ability to see your data. You have also decided not to have sa as an administration logon at this point. So what do you do? Well, you create a logon ID that will have the access privileges you wish; in other words, it will have the ability to just see the data and work with the data you need, and no more. The ISP may require you to supply a user ID and password that it uses to create an account on its SQL Server instance. You will encounter more about this in Chapter 4.
![]() Note Regardless of the authentication mode, it is important that you always supply a strong password.
Note Regardless of the authentication mode, it is important that you always supply a strong password.
Summary
By this point, you should understand the small differences between each version of SQL Server. You should also know how to check your computer to see whether it is suitable for a SQL Server installation.
By following the steps given earlier, you should have a successful installation of SQL Server 2012 on your computer. You may even have completed the installation twice so that you have a development server installation as well as a test server installation. This is a good idea, and something to consider if you have only one installation so far. Whether you are working in a large corporation or are a “one-man band,” keeping your production and development code separate leads to greatly reduced complications if, when developing, you need to make a production fix.
This chapter introduced you to security in SQL Server so that you can feel comfortable knowing which way you want to implement this and how to deal with different usernames. You may not have any data yet, but you want to ensure that when you do, only the right people get to look at it!
You are now ready to explore SQL Server 2012. One of the best ways of managing SQL Server is by using SQL Server Management Studio, which will be discussed next.