
C H A P T E R 7
Database Backups and Recovery
Now that you have created a major part of the database in the previous chapters, and before moving on to inserting and manipulating the data, this is a good point to take a moment to back up the database, just so that if things go wrong, it will be possible to recover back to a stable point.
What is abundantly clear when working with any sort of system where data are held is that there must be a comprehensible and workable backup and recovery strategy in place for when things go wrong. The recovery may also be required to cater to problems from a hardware failure to an act of God. In any of these instances, we may move to an offsite location, which is a building a safe distance away from our current building housing the computing equipment. That is quite a dramatic step and is a decision that would be taken at a higher level of authority than you probably have; however, you must create a backup of your system and store it according to the recommendations of the board of directors, whether they are for in-house or offsite storage. Companies have gone bust because a good and secure backup storage plan wasn’t in place when their building burned down, for example. This is, of course, a worst-case scenario, and there are times that moving out of the current building to a second secure location is not necessary.
This chapter looks at different backup strategies that can be implemented by you as a developer or an administrator and shows you how to implement them. I also show you scenarios where the database is in use 24 hours a day, 7 days a week, and how you need to form a backup strategy around such scenarios. From there, I show you how to perform an ad hoc backup of the database as well as scheduled transaction log backups. I make it clear in this chapter when you would perform both of these types of backups and when they would be useful. Of course, after the backup, you have to test that the backup can be restored. Generally, this backup is restored onto a nonproduction system. Some companies have complete environments established to test their disaster-recovery scenarios.
What you have to realize, and what will be demonstrated, is that there are different methods of taking backups depending on what you are trying to achieve. The most common scenarios are discussed and demonstrated in this chapter, but you will also get to look at database maintenance plans. It is imperative that you get the correct backup strategy in place and that it works. This point will be repeated throughout the chapter.
So, in this chapter, you will learn about the following:
- Backup strategies
- When a problem might occur during the backup and restore process
- How to take a database offline and then bring it back online
- How to create a backup
- Different media for building a backup and what needs to be considered
- The transaction log and how to back it up
- When to back up the data, and when to back up the transaction log
- Scheduling backups, and what happens if the server isn’t running at the scheduled time
- Restoring a database
- Detaching and attaching a database
- Working with users still attached to the database when you need them not to be connected
- Building SQL statements for backing up the database structure, and when it is useful to have them
Backup Strategies
Backing up a database, no matter how large or small, should form part of your database solution. Even if a backup is taken only once a week or even once a month, it is crucial that you sit down and decide which backup strategy is right for you. Much of this decision lies in the hands of the system and business owners for your company, since they must weigh the risk they’re willing to take against the cost of minimizing that risk. Many different strategies can be adopted within your overall main backup strategy, depending on days of the week or perhaps a period within the month. In this section of the chapter, I will cover areas of backups to help the correct decision to be made.
Recovery Models
When backing up a database, the information that is backed up is partially decided by the recovery model of the database as well as what type of database backup is being performed. In this section, I discuss these models, but you may find you return to this section once you have looked at the exercises within this chapter as well as after discussing transactions in Chapter 9. It is necessary to discuss models at this point, as they are something you need to be aware of for the rest of the chapter.
The first model to discuss is the Full Recovery model. This is the most comprehensive model available and is the most robust for data recovery from backups. This model allows recovery of a corrupt database from a backup to the granularity of a specific point in time. This is achieved by performing a backup on the database as well as the transaction log of the database. Transaction logs are discussed shortly. The ApressFinancial database is set to Full Recovery, and you will see how a backup and restore are performed in this model within this chapter and Chapter 8. The main point about Full Recovery is that this mode provides the lowest level of recording of changes within your tables. This means that there are space and performance issues to consider compared to the recovery of the database.
The next model to discuss is the Bulk-Logged Recovery model. Similar to the Full Recovery model, both the database and the transaction logs are required to be backed up for a full model to be implemented. The difference is that less information is recorded in the transaction log on what work has been completed against your tables for bulk actions. A bulk action is an action that covers a large amount of data, such as a bulk load of data or creating an index. In Full Recovery, each row would be logged; in Bulk-Logged only the action details are logged. However, in both of these models, any failure is recoverable using both the database backup and transaction log backups.
The last model is the Simple Recovery model. In this model, only the database is backed up; the transaction log is not. What this means is that the data in the tables once committed to the database will be backed up. Any restore from a Simple Recovery model means that only data that were backed up can be restored. Therefore, if you completed a backup using the Simple Recovery model on Saturday, and your database was corrupted on Tuesday, then any changes to the database since the backup on Saturday would be lost. With the other two models, you could restore the data back to the point of failure.
Types of Backups
Based on the strategy that you choose, you have to decide what type of backup you need. Full database backups take a complete snapshot of a database at any given point. A differential backup backs up only the data that has changed since the last full backup. Finally, a transaction log backup backs up only the data in the transaction log, which consists of transactions that were recently committed to the database. All of these types of backups can be done while your SQL Server is online and while users are actively hitting your database. To be able to restore a database to any point in time, you have to use a combination of these backup types.
Backup Strategy Decisions
When determining your backup strategy, first look at your application and ask yourself the following questions:
- How much of the data can be lost, if any, at any point of failure? In other words, how crucial is it that no data are lost?
- How often are the data updated? Do you need regular backups from a performance viewpoint as well as a recovery viewpoint? For historical databases that have their data modified only periodically, you would, at most, complete a backup postpopulation.
- Do you need to back up all the data all of the time, or can you do this periodically, and then back up only the data that have altered in the meanwhile?
- How much of the data needs to be backed up, and how long do you need to keep the copies of the backups?
- In the event of catastrophic failure, how long will it take to completely rebuild the database, if it’s even possible?
Many more questions can be asked, but for the moment, these are the most crucial questions that need answers. If you can afford to allow data updates to be lost, then you need a straightforward periodic database backup—for example, you need to back up the whole database once a week. This is simple and easy to complete and requires little thought. However, this scenario is rare and is usually found in data-warehousing systems or those with a large amount of static data that can be rebuilt.
Transaction Log Backups
For every data modification, a record is kept in the transaction log file (discussed in more detail in the section “Transaction Logs”), which has a limited amount of space. This amount of space was defined when you set up the database as a fixed maximum size or, if you are allowing it to grow unrestrictedly, equals the amount of hard drive. If you back up and clear the transaction log file, this will free up the space logically initially and also aid performance. This is known as logical log truncation. The smaller the active part of the transaction log file, the better. The more transactions there are in the transaction log file, the longer it will take to recover from a corrupt database. This is due to the fact that a restore will have to restore the data and then every transaction log backup to the point of failure, and finally, depending on the failure and how you want to restore, you may have to restore any completed transactions that were in the transaction log but not yet physically committed to the tables. That is, each transaction log will have to be restored to update the database, not just the latest log file. If there are transactions in the transaction log that have been committed since the last transaction log backup and you want to restore these, then you will need to back up the transaction log, called a tail backup, and restore that as well. This is a great deal to consider and may seem a lot to take in and decide upon, but as you will see throughout the chapter, it is not quite as daunting as this section may read. If you have multiple small files and they are held on media that has to be mounted each time, such as a tape, then you will have to take mounting time into consideration as well.
Frequency of a Backup
The real crux of a backup strategy is how frequently you want to take a backup. If you need to back up all the data each time, how often will that need to take place? This could well be every night, and many production systems do just this. By completing a full data backup every night, you are allowing yourself to be in a state where only one or two restores may need to occur to get back to a working state in a disaster scenario. This would be the data backup, followed by the single transaction log backup, if one was taken in the meantime. This is much better than having one data backup to be restored, and then a log file for every day since the data file backup. What happens if the failure is on a Friday at lunchtime and you completed your last whole database backup on a Saturday evening? That would take one data file and six transaction log file restores to complete.
Sit down and take stock. As often as you can, take a full database backup, then take a differential backup, followed by transaction log backups. However, you have to weigh the time that a full backup takes against a differential backup or a transaction log; how much processing time you have to complete these backups; and the risk level of having to complete, for example, six transaction log restores.
The problem is that there is no universally right answer. Each situation is different, and it is only through experience, which comes from testing your solution thoroughly, that you find out what is best for your situation.
Transaction Logs
Data within the database is stored, of course, on your hard drive, or on a hard drive on a server. Imagine the work involved on the disk controller, and imagine the work SQL Server has to do every time data are added, amended, or removed. Writing data is a slow process compared to other memory-based processes, so inevitably, SQL Server slows down every time data are written. A good comparison is to think how long it takes you to find a point in a document where you want to amend, insert, modify, or erase a sentence, even using MS Word, compared to how long it takes you to read a sentence. What if part of the way through writing the data, a power outage occurred and you had no uninterruptible power supply (UPS) in place? What a mess you would be in, not knowing what had been written to disk and therefore your tables within your database, and what hadn’t!
It is also possible in SQL Server to update several tables at once. How would you work around the fact that some of the tables had been updated, but when it came to updating a specific table, the update failed? Well, this is where transaction logs come into play. Transactions themselves are covered in Chapter 9, but very simply, a transaction is a single unit of work that can contain one or more table modifications that are all successful and committed to the database or, if some are unsuccessful, the modifications are discarded. It is also possible to roll back a transaction so that no changes are made to the database, which can either be invoked by SQL Server or by issuing a specific T-SQL command. But you must be wondering what all this has to do with a transaction log, and you’re probably even wondering what a transaction log is. Before moving on, there is one last area of background information we need to discuss first.
The log file is a complex item that consists of virtual, logical, and physical logs, but to keep it simple, the transaction log has a physical size—in other words, it is like any other file on the hard drive. Virtual log files are files of no fixed size and are built internally by SQL Server as part of the physical creation of the transaction log.
The transaction log increases in size as necessary to accommodate the transactions. It is a wraparound file. This means that when SQL Server reaches the end of the file as defined by the size when it was set up, it will wrap around to the beginning again, looking for free space to use. SQL Server can wrap around without increasing the physical log file size when there is free virtual transaction space. Virtual transaction log space becomes free when SQL Server can write the data from the transaction log into the underlying tables within the database.
Every database within a SQL Server instance has its own transaction log. Every time SQL Server is requested to do any data modifications—whether these are additions, deletions, or modifications—a record is kept of the action. There are several reasons for this.
First of all, a piece of code could in fact do several different updates at once, either to different rows of data or to rows of data in different tables or even databases. If one of the updates fails, for example, when you are attempting to place ASCII characters into a column that allows only numerics, then you may wish to return the values in all the updated fields to their original value. This is called rolling back a transaction. SQL Server achieves this, in part, by looking at the data held in the transaction log. However, any successful action where all the updates are valid could be permanently stored on file—a process called committing a transaction.
As more and more actions are placed in the transaction log, it will become full. Some of these actions will still be within a transaction, and others may form part of a completed transaction ready to be committed to the database. At certain points, SQL Server will want to remove all the actions it can by committing completed transactions to the underlying tables to relieve some space in the transaction log for further actions. One point could be when the transaction log reaches 70% full. SQL Server would then issue a checkpoint. The use of a checkpoint ensures that any data modifications are actually committed to the database and not held in any buffers or the transaction log, so that if a problem occurs, such as a power failure, there is a specific point that you can start from. Therefore, at the end of a checkpoint transaction, you know the database is in a consistent and valid state. As SQL Server knows that at a checkpoint all is well within the database, there is no need to keep the completed transactions recorded in the transaction log stored up to the checkpoint and therefore it will remove the transactions stored in the virtual logs. SQL Server therefore issues a truncation of the transaction log to remove these records, minimizing the size of the log on the computer. This is known as truncating the transaction log. It is thus necessary to ensure that you have a large enough transaction log defined to hold the largest valid uncommitted transaction, as these transactions obviously will not be truncated. A transaction log can become full with a rogue query as well—that is, one that is coded incorrectly and keeps adding more and more uncommitted transactions. When the transaction log reaches 70%, there is nothing to checkpoint; eventually the transaction log will fill up, and your SQL Server will stop. This is where you will need the help of an experienced database administrator.
If you have a power failure, you might have to “replay” all the work completed since the last backup, and in certain scenarios, you could use the transaction log to do this. When a data modification is completed via a T-SQL command, the details are recorded first in the transaction log. These changes are flushed to disk and therefore no longer in memory, before SQL Server starts to make changes to the tables that you are affecting. SQL Server doesn’t write data immediately to disk. It is kept in a buffer cache until this cache is full or until SQL Server issues a checkpoint, and then the data are written out. If a power failure occurs while the cache is still filling up, then that data are lost. Once the power comes back, though, SQL Server would start from its last checkpoint state, and any updates after the last checkpoint that were logged as successful transactions will be performed from the transaction log.
Transaction logs are best kept, if at all possible, on a hard drive separate from that holding the data. The reason for this is that data are written serially when it is written to a transaction log. Therefore, if nothing else is on the hard drive except the transaction log, the disk heads will be in the right place to continue writing each time. This is a minor overhead, but if performance is an issue, this is worth considering.
When Problems May Occur
Obviously, when taking a backup, it must work; otherwise, you have wasted your time, but crucially, you are leaving your database and organization in a vulnerable position if the backup fails. If you have time within your backup window to verify that a backup has been successful, then you must do it. As you will see, SQL Server gives you different options for doing this. It cannot be stressed strongly enough that verifying a backup is just as crucial as taking the backup in the first place. There have been situations where a backup has been taken every night; however, no one has noticed that the backup has failed, and then when a hardware failure occurs, there’s no backup to use as a restore on a new machine. In one case I know of, almost a week’s worth of data was lost. Luckily, the weekend backups had succeeded; otherwise, the company would have been in a major data loss situation. The cause of the failed backups was that the tapes being inserted for the backup were not large enough to hold the backup being performed. Therefore, the tapes became full, and the backup failed. Obviously, this company failed not only to verify the backup, but also to have processes in place to check that its backup strategy was still working after a period of implementation. The only sure and positive way of ensuring a backup has succeeded is to restore the database to a specific restore test location and check the data. Although you will see SQL Server does have a method of checking a backup, this still isn’t a guarantee that the backup worked. Do take time to complete regular restores to a location to test that everything is okay. I believe for several reasons that restoring a backup to a test region after each backup should be mandatory for all installations. Not only are you checking the backup has worked, but also you can use this restore to inspect production quality data as part of any problem solving or user requests without endangering your production system.
You should always review your backup strategy on a regular basis. Even better, put in place jobs that run each day that give some sort of space report so that it is possible to instantly see that a potential problem is looming. SQL Server Reporting Services is a new tool that would be ideal for producing and distributing space reports to database administrators and system owners alike. It is also possible to build an automated job to run that checks the space and e-mails the results. This is achievable via SQL Server Integration Services.
Backups: Taking a Database Offline
SQL Server does not have to be offline to perform a backup, as you will see as you go through the book and work through creating SQL Server–defined backups using wizards and T-SQL. In most environments, you will not have the luxury of taking a database offline before backing it up, because users are constantly making data changes. Backing up a database can take a long time, and the longer it takes, the longer users cannot be working with the data while it is offline. However, by taking your database offline, you do not have to use SQL Server to perform the backup. This strategy is one in which you take a disk backup, which means the hard drive is backed up, rather than a specific database within a server. However, don’t forget that by taking your database offline, you will have to take a backup of the directory using some sort of drive backup.
If you have your database on a server, no doubt some sort of server backup strategy is in place, and so your database will be backed up fully and successfully through this method; if you can take your database “out of service” in time for those backups, then you should do so if you are using this option to back up your database. This does allow you to think about your SQL Server deployment strategy. If you have several databases that can be taken offline as part of the backup, then it is worth considering whether they can all reside on the same physical server, and you can set your server backup times accordingly. However, this is a rare scenario, and even rarer within a production environment. Taking the database offline means taking your database out of service. Nobody can update or access the data, modify table structures, and so on. In this next section, you will take ApressFinancial offline, allowing a physical backup to be taken. Just to reiterate and clarify: This is being demonstrated only to complete your knowledge of backups, and it is rare that you will perform this action in a live scenario.
TRY IT OUT: TAKING A DATABASE OFFLINE
- Open SQL Server Management Studio and open a Query Editor pane. Enter and execute the following code:
USE master

GO

ALTER DATABASE ApressFinancial

SET OFFLINE - Notice the first command is a
USEcommand and then the master database is listed. This will move the connection away from the database that it is currently pointing at and point the connection to the master database. If you still had a connection, this code would fail, which is demonstrated in later examples in this chapter. - Try to click some of the nodes for the
ApressFinancialdatabase—for example, the Tables node if it is available. If you do not see the Tables node, try expanding theApressFinancialdatabase node. As shown in Figure 7-1, you are reminded that the database is offline by the change in icon and it therefore cannot be viewed or modified. You are also not able to access the database through any application such as Query Editor.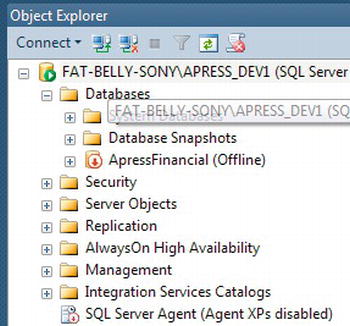
Figure 7-1. The database is offline and therefore unable to be opened.
To take a database offline, SQL Server must be able to gain exclusive access to the database. This means that no user can be in the database when you issue the command. If users are connected, then the OFFLINE query will continue to execute and wait until all users are disconnected. You can force the query to take the database offline by rolling back any transactions that are running. To do this, you can execute the SET OFFLINE WITH ROLLBACK IMMEDIATE or SET OFFLINE WITH ROLLBACK AFTER nn SECONDS. Transactions are covered in Chapter 9. However, in essence what both of these options indicate to SQL Server is that any changes in progress to any data within the tables in the database should be discarded. I am not keen on either of these two options, unless the database needs to be taken offline for an emergency or you are aware at the time of the command of what the ramifications are of rolling back any changes.
As said earlier, that’s all there is to it. The database is now no longer available for any updates or modifications, so you can back it up using any backup utility that takes files from a hard drive.
If you have to restore from a backup completed this way, don’t forget to take the database offline first, then restore from the backup, and finally bring the database back online, ready for use:
USE master

go

ALTER DATABASE ApressFinancial

SET ONLINE
There is one area to note when using backup strategies that employ these methods. If you have a server backup that runs, for example, at 0200 hours, do you fancy getting up every night, just before 2 a.m., taking the database offline, and then bringing the server back up once the backup is complete? No—not many people would. Of course, there are installations where people are working through the night, so this is less of a problem, but what if they are busy? Or forget? Then your whole backup will fail because the files are in use, and therefore the server will not back up these files. It is possible to create jobs that take your database offline and bring it online again, so this method is still possible, but you are adding more steps to the process.
So let’s now look at a more friendly method of backing up the data by using SQL Server instead.
Backing Up the Data
You will probably use SQL Server to back up the database rather than a Windows backup utility with an offline database. As you will see in the coming exercises, it is a simple process with different methods of achieving the goal of backing up the data. By using SQL Server, you are keeping the backup of the database under the control of an automated process that can control its own destiny, and as you will find out later, it can also control the system when things go wrong. There are two types of backups that can be taken on the database, and one backup option available for the transaction log providing the recovery model is Full or Bulk-Logged.
Backup Considerations
The first possibility, a full backup, is straightforward. Selecting the Full option ensures that the whole database will be backed up. The ApressFinancial database was built with Full Recovery mode, the default mode for databases built with SQL Server Developer Edition. In this mode, you only back up the database and not the full transaction log as this is completed separately. This database backup would be seen as any starting point for a restore from a database failure.
The second possibility is the differential backup, also known as an incremental backup. Use the Differential backup option when the circumstances are such that a full backup is either not required or not possible, but there has been at least one full backup completed at some point on the database and the full backup media has not expired. When a backup is taken, it is possible that the media has an expiration date, at which point the media is free and available to be used for any future backups. A differential backup performs a backup on data changed since the last backup. For example, you may take a full backup on the weekend and then a differential backup every night. When it comes to restoring, you would restore the weekend full backup, and then add to that the latest differential backup taken from that point. A word of warning here: If you do take a week’s worth of differential backups, and you back up to magnetic tape rather than a hard drive, do keep at least enough different tapes for each differential backup. Therefore, use a complete backup when necessary, and then in the interim, use a differential backup.
The last possibility, the transaction log backup, could be used as the most frequent method of backup in a production environment when using the Full or Bulk-Logged recovery models. As data are modified, details of the modifications are stored in the transaction log. These remain in place until an action “truncates” the transaction log, as I have discussed earlier in this chapter, which means that the transaction log will increase constantly in size if not in Simple Recovery. When you issue a transaction log backup, you are just backing up the transaction log, which issues a checkpoint, and all committed transactions are stored onto the backup. This means that if a system failure occurs, you will restore from a full backup, then from your differential backups for the week, and finally from any transaction log backups after that point.
You are probably wondering why you can’t just use differential backups. Transaction logs can fill up during the working day, or perhaps you have set differential backups to happen weekly because there is so little data modification. However, you do need to account for when a transaction log may fill up before you reach the next differential backup. By taking a backup of the transaction log, this is a great deal faster than the other two methods. Certainly in heavily used databases, you may have several transaction log backups in the day. You see how to do this using T-SQL after you take your first full backup. To remind you, at least one valid and non-expired backup must exist before you can take a transaction log backup, as you need a point at which the transaction log can roll committed transactions forward from.
Before moving on, there are a couple more points concerning backups that you must keep in mind, and it is recommended strongly that these directions be followed. The most important point is to keep a regular and up-to-date backup of the master and msdb system databases. SQL Server very rarely becomes corrupted, but it can happen for any number of reasons, from a hard drive failure to a developer altering the database in error. It doesn’t really matter what the cause of the database failure is, but if you don’t have a backup of the master database, you could find yourself in trouble. However, be warned. Restoring the master database should not be performed unless you really have to, and only if you are experienced with SQL Server. Restoring the master database is not like restoring other databases, and it has to be completed outside SQL Server Management Studio. This book quite deliberately does not cover having to restore the master database, since it is a very advanced topic. If you wish to know more, then take a look at “SQL Server Books Online” for more details.
When it comes to the msdb database and when to back it up, it could be that a daily backup is required. If you recall, this database holds job schedules and other information pertinent to SQL Server Agent for scheduling. If you have jobs that run each day, and you need to keep information about when jobs were run, a daily backup may be required. However, if you wish only to keep a backup of jobs that are set up and there is no need to know when certain jobs ran and whether they were successful, then perhaps look at backing up this database weekly.
The model database should be backed up if any details within the model database have been altered. This should be pretty infrequent, and therefore backing up this database need not be as regular as any other database; once a week is probably frequent enough.
Backing up tempdb is not necessary, because this should be seen as a transient database, which has no set state. Therefore, it would be very unusual to back up this database.
![]() Note When SQL Server is restarted,
Note When SQL Server is restarted, tempdb is dropped and is re-created as part of the startup process.
As you can see, it is not just your own databases that need to be considered and remembered when it comes to dealing with your backup strategy. A database within SQL Server is not an insular arrangement and affects the system databases just as much. If in doubt, back it up more frequently than is required!
The backup coverage will be split into two parts. The first part will perform the backup manually. Obviously, this means we have to be available to perform the backup, but this can be rectified quite easily. Once this has been covered, the next section will show you how to schedule a backup to run at a specific time, which relieves us of needing to be available to complete a backup at the specified time.
Performing a Manual SQL Server Backup
Let’s start by looking at the manual backup. As already mentioned, you have to be on hand to do this, but it is useful to understand all the steps even if you plan to set up automatic backups in your production environment. The aim of this first exercise is to perform a full backup on media that will never expire and therefore will exist until physically deleted. The backup will be placed in the SQL Server default location. You will also see how to cater for second and subsequent backups and the options available.
It is possible to alter the expiry date of the backup. Different types of backups will have different expiry dates. This means that after the defined date, the media you have stored your backup on will allow the data to be overwritten if using SQL Server (you can’t delete the file manually!). For example, you might have a weekly full backup that you want to keep three instances of, and then the first full backup of the month you may wish to keep for six months, or even longer if it is a database that you must keep for government legislation. In this option, you can retain the backup for a set number of days (for example, 21 days) or for a set period of time (a specific date covers for uneven days in a month, or a year, for example).
A default destination is defined automatically by SQL Server, which might be acceptable. In the example, it will be on your hard drive, in a location below where your data are. It is best to have a directory set aside for backups so that they are easy to find, perhaps with a name such as SQL Server Backups. However, it is not recommended in production to store your backups in a subfolder of where your database resides. What if the hard drive fails? You can gain a substantial performance improvement by backing up the database to a separate disk or to a RAID 1 drive if one is available. This is because data are written to the backup file in a sequential manner. Some installations will back up the database to the hard drive for speed but will then initiate a second automatic job that will copy to tape the backup file generated. This then allows for the speed of hard drive backup and the security of tape.
In this exercise, you will see the Options page discussed, but all the options will be left as a default; however, on the main page, you will alter the destination of the backup to be a folder that is more in keeping with a better strategy.
TRY IT OUT: BACKING UP THE DATA
- Ensure SQL Server Management Studio is running. If you did not bring your database back online from the previous section, find the
ApressFinancialdatabase, right-click, select Tasks, and the select Bring Online. After the successful message, close the dialog, right-click again, select Tasks, and then click Back Up. - This brings up the SQL Server Back Up Database dialog box. Take a moment to peruse this dialog box, as shown in Figure 7-2. Notice that a Full backup is to be taken that will never expire.
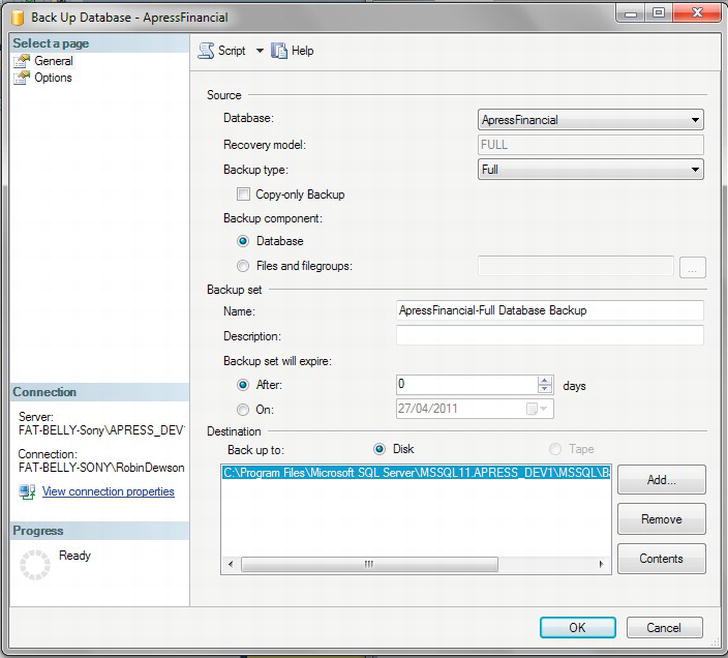
- Although you have chosen your own database to back up, you could alter which database by changing the value in the combo box. Next is the backup type, and you have up to three options to choose from: Full, Differential, and Transaction Log. The options depend on the recovery model you have in place. During the creation of the database, you specified Full recovery mode, which means that all the options are available. If you are developing with SQL Server Express, then the Simple recovery mode is chosen as the default.
- It is better to alter the destination folder away from the SQL Server folders. Windows protects these folders and permissions can alter. Click Remove, which will remove the single folder defined and will leave the list destinations empty.
- Click Add, which will display a SQL Server Select Backup Destination dialog box, as shown in Figure 7-3.
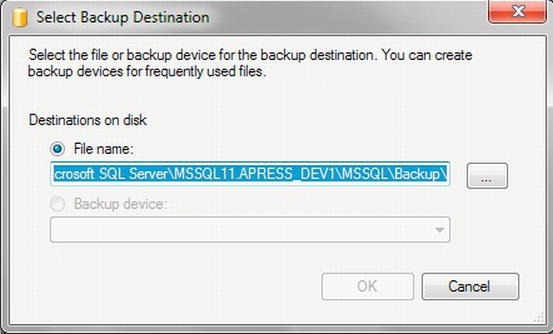
Figure 7-3. Database backup destination file name selection dialog
- You can either type in a folder location and file name for the backup or click the ellipsis to navigate and select a folder. You will also need to type in a file name and file suffix. I have a folder on my hard drive for my SQL Server backups, and I have named the backup file
ApressFinancialFirstFullBackup.bak, as shown in Figure 7-4. Once you are happy, click OK.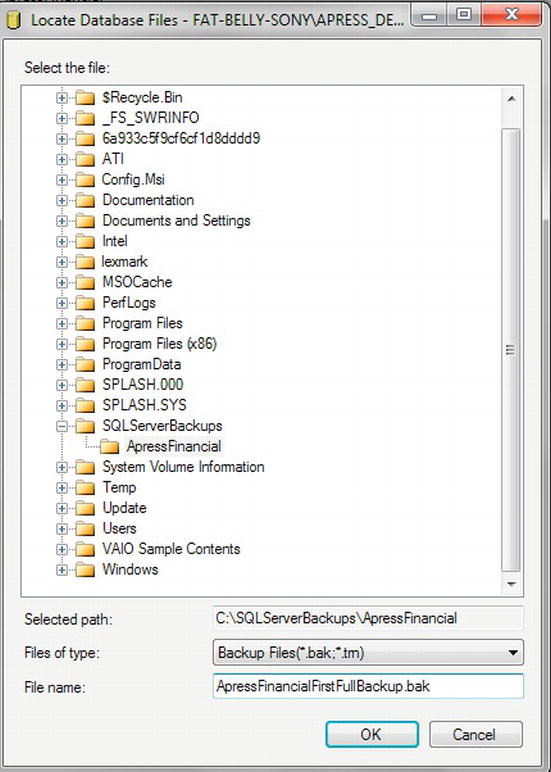
Figure 7-4. Backup folder selected and backup file name entered
- Move to the Options tab, as shown in Figure 7-5, where you can define what options you want to happen as part of this backup.
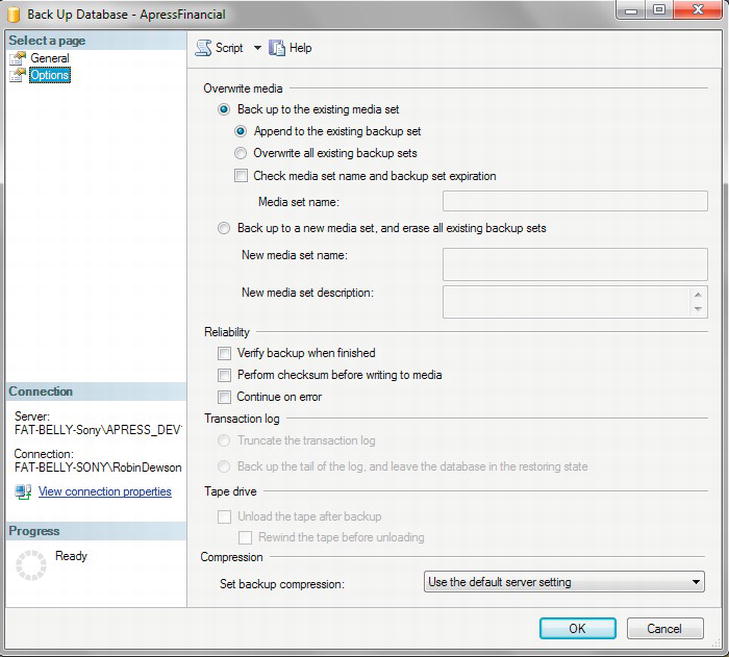
- The first section of this dialog box deals with what you want to happen on second and subsequent backups. The first time the backup is run, it creates the backup files, but when you run subsequent backups, do you want to append to the current data or overwrite it? If this is a full backup, then you may overwrite, as you should be placing this full backup over an old nonrequired backup. To ensure that the correct media set has been loaded and that you do not overwrite a valid media set, then ensure you check the media set name and expiry option found below the Overwrite option. However, if this is a differential backup, where it is perhaps the second or third of the week, then you will append to the existing backup set. This will be after the previous differential backups, and it means that if you need to do a restore, all the backups will be one after another and therefore will provide the fastest retrieval.
- The Check Media Set Name option forces the backup to check that where the data are going to be backed up to is still a valid name and, if appending, that the data set has not expired. This is, of course, a backup point of failure that I mentioned before, which can mean a backup is not taken.
- You use the Back Up to a New Media Set, and Erase All Existing Backup Sets option when any previous backups are no longer required. This is ideal when moving the database from development to either user testing or even production, and you don’t want to be able to restore from an incorrect backup. There is no point in wishing to restore a production server from a development backup, after all.
- The second section deals with the reliability of the backup. It is possible to simply back up the data and trust that everything worked perfectly, meaning no data transmission errors occurred between your SQL Server and the backup device, or that no errors occurred when writing the data. A situation such as this is unusual, but there will be times when it does happen. Do you trust that those times will occur when you will not need a backup? I suggest this is something you cannot and should not rely on. Therefore, although it will increase the amount of time the backup takes, it is good to choose one of the two options in this section. The first option allows a verification of the backup where SQL Server compares what has been backed up with what it expects to have been backed up, and the second option allows for checksum processing, whereby SQL Server performs a mathematical calculation on the data to back up, which generates a checksum that can then be compared once the data has been transmitted from SQL Server to the backup device. If you select the second option, you can also specify whether to continue if you get a checksum error.
- If you are doing a transaction log backup, the next area of the dialog box will be enabled. You can logically shrink the transaction log by removing all entries that have just been backed up by selecting the first option, Truncate the Transaction Log. To save processing time, the physical transaction log is not shrunk and just the transactions are deleted. Recall from the Transaction Log section earlier how SQL Server will use a virtual log. The second option, Back Up the Tail of the Log, is used when there has been some sort of database corruption. If you want to back up transaction log records that have not been backed up prior to performing a restore to correct the corruption, then you would use this option. To clarify, a database becomes corrupt, and you need to be able to restore up to the last backup, and then add all the transactions that have occurred since the last backup. By executing a backup of the tail of the log, you can restore the database and then use this tail-log backup to add the missing transactions.
- The penultimate area of the dialog box is available if you are using tapes as your backup medium. You can eject the tape once the backup has finished. This is a useful option, as the computer operators would know to remove the tape for dispatch to the safe backup area. The second option, which specifies a rewind, is useful for full backups. On differential backups, however, SQL Server would be halted when running the next backup while the tape device got to the right place on the tape to continue the backup, and therefore rewinding the tape is not desirable.
- Finally, it is possible to set the compression level for the backup. This is ideal if you need keep space taken for each backup to a minimum. This may occur if you are then sending the backup over your Internet for it to be used as a restore to a remote data server. Notice that, by default, it takes the compression level set for the server, but it’s possible to overwrite this with a new setting. If you do use compressed backups, then you will save on I/O and the backup operation will complete in less time, but completing the compression will increase the amount of processing SQL Server is using. It is possible to reduce the priority of completing a compressed backup so that it doesn’t affect SQL Server by using the resource governor. This is an advanced topic and not covered in this book.
- Clicking OK starts the backup. Once the backup is finished, you should see the dialog box shown in Figure 7-6.
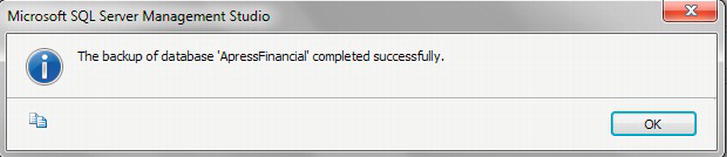
Figure 7-6. A successful backup
The first backup of the ApressFinancial database has now taken place and should have been successful. If you now move to the directory on the hard drive where the backup took place, then you will see the ApressFinancial backup file.
Recall that it was mentioned earlier that a company lost a week’s worth of data. It had set up the option to append to media, the tape had become full, and the administrator had not set up the proper scenario to alert someone when a problem occurred. So there was not just one failure in the system, but two; however, it still highlights that if you are using the option to append to the existing backup set, you must check that enough room is available on the medium that you are appending to for the backup to succeed.
Creating a backup of your database and the data is the most crucial action in building a database solution. Get it wrong, and you may as well go home. Well, not quite, but if (or when) things go wrong, and you don’t have a valid or recent enough backup that is acceptable to the users of your database, it will take a long time for you as a developer to recover from that situation and get back to the excellent working relationship you had beforehand.
The backup taken in the preceding example is the simplest backup to perform. It is a complete backup of the particular SQL Server database, and it happens while you are watching. If it goes wrong, you will instantly see and be able to deal with it. However, most backups, in a production system especially, do not happen when you are there; instead, they usually happen throughout the night. Creating a database backup with a schedule to run at the optimal time is the ideal solution and certainly an area to consider. You will see this in Chapter 8, although if you are using SQL Server Express Edition, the ability to schedule jobs is not available.
Backing Up the Database Using T-SQL
Now that you have backed up the database using the dialog within Management Studio, it is useful to demonstrate performing a backup with T-SQL. These commands and statements can be used within a stored procedure that can be scheduled to run at required intervals as part of an overnight task. If you are using SQL Server Express, there are third-party tools that you can purchase that will run a schedule and not just tasks for databases so scheduling a backup is still possible. As a developer, you can also write your own scheduling software using the development language of your choice, and it is not something that is too difficult to create.
There are two different types of backups. It is possible to back up either the database or specific filegroups or files that are part of the database. The code for the database backup follows. The highlighted code demonstrates which of the two possible options is the optional default used when neither option is specified and the option COMPRESSION/NO COMPRESSION is not available within SQL Server Express Edition:
BACKUP DATABASE { database_name | @database_name_var }

TO < backup_device > [ ,...n ]

[ [ MIRROR TO < backup_device > [ ,...n ] ] [ ...next-mirror ] ]

[ WITH

     [ BLOCKSIZE = { blocksize | @blocksize_variable } ]

     [ [ , ] { CHECKSUM | NO_CHECKSUM } ]

     [ [ , ] { STOP_ON_ERROR | CONTINUE_AFTER_ERROR } ]

     [ [ , ] DESCRIPTION = { 'text' | @text_variable } ]

     [ [ , ] DIFFERENTIAL ]

     [ [ , ] EXPIREDATE = { date | @date_var }

     | RETAINDAYS = { days | @days_var } ]

     | { COMPRESSION | NO_COMPRESSION }

     [ [ , ] PASSWORD = { password | @password_variable } ]

     [ [ , ] { FORMAT | NOFORMAT } ]

     [ [ , ] { INIT | NOINIT } ]

     [ [ , ] { NOSKIP | SKIP } ]

     [ [ , ] MEDIADESCRIPTION = { 'text' | @text_variable } ]

     [ [ , ] MEDIANAME = { media_name | @media_name_variable } ]

     [ [ , ] MEDIAPASSWORD = { mediapassword | @mediapassword_variable } ]

     [ [ , ] NAME = { backup_set_name | @backup_set_name_var } ]

     [ [ , ] { NOREWIND | REWIND } ]

     [ [ , ] { NOUNLOAD | UNLOAD } ]

     [ [ , ] STATS [ = percentage ] ]

     [ [ , ] COPY_ONLY ]

]
If instead you wish just to back up specific filegroups, the difference in the code is highlighted in bold in the BACKUP DATABASE statement shown here:
BACKUP DATABASE { database_name | @database_name_var }

   <file_or_filegroup> [ ,...f ]

TO <backup_device> [ ,...n ]

[ [ MIRROR TO <backup_device> [ ,...n ] ] [ ...next-mirror ] ]

[ WITH

     [ BLOCKSIZE = { blocksize | @blocksize_variable } ]

     [ [ , ] { CHECKSUM | NO_CHECKSUM } ]

     [ [ , ] { STOP_ON_ERROR | CONTINUE_AFTER_ERROR } ]

     [ [ , ] DESCRIPTION = { 'text' | @text_variable } ]

     [ [ , ] DIFFERENTIAL ]

     [ [ , ] EXPIREDATE = { date | @date_var }

    | RETAINDAYS = { days | @days_var } ]

     | { COMPRESSION | NO_COMPRESSION }

     [ [ , ] PASSWORD = { password | @password_variable } ]

     [ [ , ] { FORMAT | NOFORMAT } ]

     [ [ , ] { INIT | NOINIT } ]

     [ [ , ] { NOSKIP | SKIP } ]

     [ [ , ] MEDIADESCRIPTION = { 'text' | @text_variable } ]

     [ [ , ] MEDIANAME = { media_name | @media_name_variable } ]

     [ [ , ] MEDIAPASSWORD = { mediapassword | @mediapassword_variable } ]

     [ [ , ] NAME = { backup_set_name | @backup_set_name_var } ]

     [ [ , ] { NOREWIND | REWIND } ]

     [ [ , ] { NOUNLOAD | UNLOAD } ]

     [ [ , ] STATS [ = percentage ] ]

     [ [ , ] COPY_ONLY ]
I can now give a brief description of all the options that are available. You looked at some of these options previously with the Back Up Database dialog box. Seeing these descriptions allows you to compare options within T-SQL and within the backup dialog boxes:
database_name | @database_name_var: Either the name of a database or a local variable that gives the name of the database to back upfile_or_filegroup: The name of the file or filegroup to back upbackup_device: The name of the logical or physical backup device to useMIRROR TO: The backup file is mirrored to two to four different file locations.BLOCKSIZE: The block size to use; for example, if backing up to CD-ROM, then you would set a block size of 2048.CHECKSUM | NO_CHECKSUM: Specifies whether to perform checksum calculations to ensure the transmission of dataSTOP_ON_ERROR | CONTINUE_AFTER_ERROR: Specifies whether to stop on a checksum errorDESCRIPTION: A description of the backupDIFFERENTIAL: If this is a differential backup, then specify this option. Without this option, a full backup is taken.EXPIREDATE: The date the backup expires and is therefore available to be overwrittenRETAINDAYS: The number of days the backup will be kept before the system will allow it to be overwrittenCOMPRESSION: Lets you compress your backup and reduce the amount of space taken
![]() Note Compression backups are available only on the Developer and Enterprise Editions of SQL Server. If you don’t define this option, then the server instance setting will be used. You can change it at the server level via the
Note Compression backups are available only on the Developer and Enterprise Editions of SQL Server. If you don’t define this option, then the server instance setting will be used. You can change it at the server level via the sp_configure system stored procedure.
PASSWORD: The password associated with the backup; this must be supplied when interrogating the backup for any restore operation. There is no strong encryption on this option, so there is the potential that it could be broken easily.FORMAT | NOFORMAT: Specifies whether to format the storage mediumINIT | NOINIT:INITkeeps the media header created with the format but erases the contents provided that theexpiredateandretaindayshave expired. If you want to initialize the media without checking these options, define the next option,SKIP.NOINITwill not initialize the media.NOSKIP | SKIP: If you want to skip the checking ofexpiredateorretaindayswhen using the media set, then select theSKIPoption. Otherwise,expiredateandretaindayswill be checked.
![]() Note A media set is an ordered set of backups on the same disk or tape.
Note A media set is an ordered set of backups on the same disk or tape.
MEDIADESCRIPTION: Gives a description to the media setMEDIANAME: Names the media setMEDIAPASSWORD: Gives the media set its passwordNAME: Names the backup setNOREWIND | REWIND: Specifies whether to rewind a tape once the backup has completedNOUNLOAD | UNLOAD: Specifies whether the tape is unloaded or kept on the tape drive once the backup is completedSTATS [ = percentage ]: SQL Server provides a message at this percentage interval telling you how much of the approximate backup has completed. It’s useful for gauging the progress of long-running backups.COPY_ONLY: Tells SQL Server that this is a copy of the data; it cannot be used as a full backup point for differential backups, as the differential backups will be in line with the last “pure” full backup. This option is ideal if you take weekly backups for dumping the data to a user test region, as it will not affect the production backup process. The only remaining option is for files or filegroups where you can name the file or filegroup that the backup is for. The preceding options do not change for files or filegroups.
TRY IT OUT: BACKING UP THE DATABASE USING T-SQL FOR A FULL BACKUP
13 percent processed.

22 percent processed.

31 percent processed.

40 percent processed.

54 percent processed.

63 percent processed.

72 percent processed.

81 percent processed.

90 percent processed.

Processed 722 pages for database 'ApressFinancial', file 'ApressFinancial'

on file 2.

100 percent processed.

Processed 2 pages for database 'ApressFinancial', file 'ApressFinancial_log'

on file 2.

BACKUP DATABASE successfully processed 274 pages in 0.522 seconds (4.086 MB/sec).
You now have a full backup of the database, which could be used as the starting point of any recovery of a corrupt database. However, over time changes will have been made to the database, and whether it is a few hours, days or weeks later, you now want to perform a backup of those changes that have occurred. In the next section, you will see a differential backup where the options are shown within Management Studio, and from these the T-SQL will be generated for the backup.
TRY IT OUT: BACKING UP THE DATABASE WITH A DIFFERENTIAL BACKUP
- From Management Studio, select from Object Explorer the
ApressFinancialdatabase, right-click, and from the menu that appears select Tasks and then Backup. You will then see the same screen as you saw in the “Backing Up the Data” exercise. The next backup of the database to be taken is a differential backup, so alter the Backup type to this option. This query will not allow this backup to expire until 60 days have elapsed, as shown in Figure 7-7, and therefore the After option needs altering. It will also be adding this differential backup to the full backup that was taken in the previous exercise. Notice that the Destination list box already has the correct location and file name. Note At the end of the screenshots, don’t back up, but click the Generate Script button, which will place the T-SQL equivalent code in a new query window, where you will then be asked to run it.
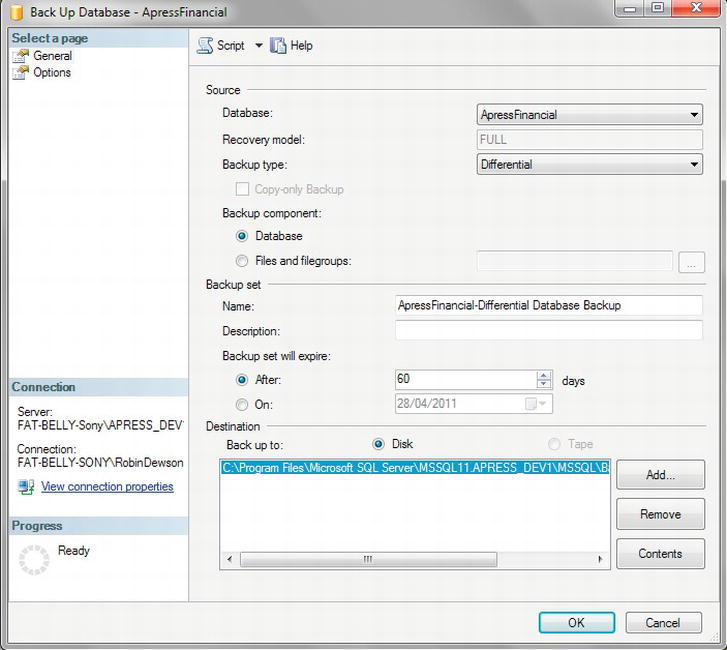
- Moving to the Options page, you will be appending the differential backup to the same media set as the full backup. This time you will include some reliability checking by clicking the “Verify backup when finished” option. Make sure your version of the window matches Figure 7-8.
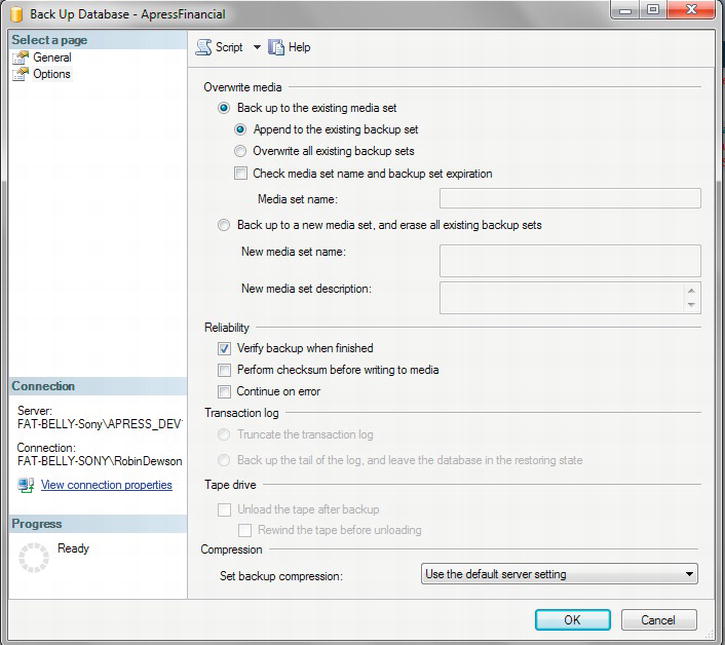
Figure 7-8. Options for backing up a database (differential)
- Rather than clicking OK, you will see at the top of the window a menu with the option Script. Click this menu drop-down, and from the options displayed select Script Action to New Query Window. Then click Cancel. This will generate code based on your options and place it in a new query window.
- The first part of the generated code deals with the differential backup. I have put this code in bold. Again, ensure that the
TO DISKandNAMEoptions are all on the same line of the Query Editor window pane.BACKUP DATABASE [ApressFinancial] TO DISK = N'C:SQLServerBackupsApressFinancial
ApressFinancialFirstFullBackup.bak'WITH DIFFERENTIAL, RETAINDAYS = 60, NOFORMAT, NOINIT,
NAME = N'ApressFinancial-Differential Database Backup',
SKIP, NOREWIND, NOUNLOAD, STATS = 10
GO
declare @backupSetId as int
select @backupSetId = position
from msdb..backupset
where database_name=N'ApressFinancial'
and backup_set_id=(select max(backup_set_id)
from msdb..backupset ,
where database_name=N'ApressFinancial')
if @backupSetId is null
begin
    raiserror(N'Verify failed. Backup information for

    database ''ApressFinancial'' not found.', 16, 1)

end

RESTORE VERIFYONLY

FROM DISK = N'C:SQLServerBackupsApressFinancial

ApressFinancialFirstFullBackup.bak'

WITH FILE = @backupSetId,

NOUNLOAD,

NOREWIND

GO - The second part of the query is where the reliability checking takes place. This is more complex T-SQL than I have covered, so for the moment just trust that it works and that it does what it is supposed to. You will encounter this code once more when looking at more complex T-SQL later in the book in Chapter 14. However, the basis of the code is that a check is made in the
msdbdatabase to retrieve the last backup set that was taken, that the query will perform a “restore” of the database as verification only without actually restoring any data, and that the restore can complete successfully. If it can’t verify the backup set or that the restore is okay, then you will get an error message.BACKUP DATABASE [ApressFinancial]
TO DISK = N'C:SQLServerBackupsApressFinancial
ApressFinancialFirstFullBackup.bak'
WITH DIFFERENTIAL, RETAINDAYS = 60, NOFORMAT, NOINIT,
NAME = N'ApressFinancial-Differential Database Backup',
SKIP, NOREWIND, NOUNLOAD, STATS = 10
GO
declare @backupSetId as int
select @backupSetId = position
from msdb..backupset
where database_name=N'ApressFinancial'
and backup_set_id=(select max(backup_set_id)
from msdb..backupset
where database_name=N'ApressFinancial')
if @backupSetId is null
beginraiserror(N'Verify failed. Backup information for
database ''ApressFinancial'' not found.', 16, 1)
end
RESTORE VERIFYONLY
FROM DISK = N'C:SQLServerBackupsApressFinancial
ApressFinancialFirstFullBackup.bak'
WITH FILE = @backupSetId,
NOUNLOAD,
NOREWIND
GO - When the code is executed, which you should do now, you will see something like the results that follow. Again, they contain details of the amount of data backed up as well as which file number on the media set the backup is.
19 percent processed.

39 percent processed.

58 percent processed.

78 percent processed.

97 percent processed.

Processed 32 pages for database 'ApressFinancial',

file 'ApressFinancial' on file 3.

100 percent processed.

Processed 1 pages for database 'ApressFinancial',

file 'ApressFinancial_log' on file 3.

BACKUP DATABASE WITH DIFFERENTIAL successfully processed 33 pages

in 0.099 seconds (2.604 MB/sec).

The backup set on file 3 is valid.
Transaction Log Backup Using T-SQL
You can back up not only the data, but also, and just as importantly, the transaction log for the database. Just to recap, the transaction log is a file used by databases to log every transaction, including data modification actions such as rebuilding indexes. In other words, every data modification that has taken place on any table within the database will be recorded within the transaction log (there is one major exception, but I will cover this when looking at deleting data later in the book). The transaction log is then used in many different scenarios within a database solution, but where it is most useful, from a database recovery point of view, is when a database crashes. In this case, the transaction log can be used to move forward from the last data backup, using the transactions listed within the transaction log.
If a database crash occurs, then the full and differential backups will take you only to the last valid backup. For data entered since that point, the only way to restore the information is to then “replay” the transactions that were committed and recorded as committed in the transaction log via a tail-log backup. Any actions that were in progress at the time of the failure that were within a transaction that was still in progress would have to be rerun from the start.
So, to clarify, if you were in the process of deleting data within a table and the power was switched off, you would use your full and differential backups to restore the data. You would then use the information within the transaction log to replay all successful transactions, but because the delete had not been successful, the table would have all the data still within it.
Backing up the transaction log is a good strategy to employ when a large number of updates occur to the data through the day. A transaction log backup should take place at set times throughout the day, depending on how large the transaction log has grown and how crucial it was to get your system back up and running after any unexpected outage. When a transaction log is backed up, the transaction log itself is logically shrunk in size so that it is kept small. It also gives you point-in-time recoverability; this means that you can quickly restore to any time in the past at which the transaction was backed up.
Backing up a transaction log is similar to backing up a database. The full syntax is as follows and differs from a database backup only by using the LOG keyword instead of DATABASE and the options NO_TRUNCATE and NORECOVERY/STANDBY:
BACKUP LOG { database_name | @database_name_var }

{

   TO <backup_device> [ ,...n ]

[ [ MIRROR TO <backup_device> [ ,...n ] ] [ ...next-mirror ] ]

     [ WITH

     [ BLOCKSIZE = { blocksize | @blocksize_variable } ]

     [ [ , ] { CHECKSUM | NO_CHECKSUM } ]

     [ [ , ] { STOP_ON_ERROR | CONTINUE_AFTER_ERROR } ]

     [ [ , ] DESCRIPTION = { 'text' | @text_variable } ]

     [ [ ,] EXPIREDATE = { date | @date_var }

     | RETAINDAYS = { days | @days_var } ]

     | { COMPRESSION | NO_COMPRESSION }

     [ [ , ] PASSWORD = { password | @password_variable } ]

     [ [ , ] { FORMAT | NOFORMAT } ]

     [ [ , ] { INIT | NOINIT } ]

     [ [ , ] { NOSKIP | SKIP } ]

     [ [ , ] MEDIADESCRIPTION = { 'text' | @text_variable } ]

     [ [ , ] MEDIANAME = { media_name | @media_name_variable } ]

     [ [ , ] MEDIAPASSWORD = { mediapassword | @mediapassword_variable } ]

     [ [ , ] NAME = { backup_set_name | @backup_set_name_var } ]

     [ [ , ] NO_TRUNCATE ]

     [ [ , ] { NORECOVERY | STANDBY = undo_file_name } ]

     [ [ , ] { NOREWIND | REWIND } ]

     [ [ , ] { NOUNLOAD | UNLOAD } ]

     [ [ , ] STATS [ = percentage ] ]

     [ [ , ] COPY_ONLY ]

     ]

}
As with the database backup, if you are using SQL Server Express, then the compression option is not available. Now let’s look at the options not covered earlier when looking at backing up the database:
LOG: Determines that you wish to produce a backup of the transaction log rather than a backup of a database or files/filegroupsNO_TRUNCATE: Doesn’t truncate the log after the backup; if the database is corrupt, using this option will allow the backup to be attempted at least. Without this option, you will get an error message.NORECOVERY | STANDBY: After the backup, the database will be in a state whereby it looks to anyone trying to connect as if it is still being restored and is not available.
![]() Note The
Note The LOG options NO_TRUNCATE and NORECOVER | STANDBY are used when the database is corrupt and you wish to back up the transaction log prior to performing a restore.
In the following exercise, a transaction log will be backed up using T-SQL. As the ApressFinancial database is using a Full Recovery model, this action will back up all the transactions recorded since the last differential backup and then remove these transactions from the log itself. A transaction log backup is not available for Simple Recovery models.
TRY IT OUT: BACKING UP THE TRANSACTION LOG USING T-SQL
- In a Query Editor pane, enter the following T-SQL code.
Note If you are in Simple Recovery mode, then backing up the transaction log will fail.
BACKUP LOG [ApressFinancial] TO

 DISK = N'C:SQLServerBackupsApressFinancial

 ApressFinancialFirstFullBackup.bak'

 WITH NOFORMAT, NOINIT,

 NAME = N'ApressFinancial-Transaction Log Backup',

 SKIP, NOREWIND, NOUNLOAD,

 STATS = 10

GO - This backs up the transaction log to the same media set as the full and differential backups. While you are developing and learning SQL Server, this is a valid scenario, and in some production setups you may want to back up to the same place as your daily full backup. However, the downside is that if you take several transaction log backups between each differential backup and full backup, then SQL Server will have to “skip” these if they were not required as part of the restore operation. On a tape drive, this could cause significant overhead. In this scenario, you would be better off saving the transaction log files to a different media set.
- Execute the code to back up the transaction log, and you should see output similar to the following, where the transaction log has been successfully backed up and placed on file 4:
100 percent processed.

Processed 4 pages for database 'ApressFinancial', file

'ApressFinancial_log' on file 4.

BACKUP LOG successfully processed 4 pages in 0.135 seconds (0.235 MB/sec).
You can back up the transaction log from Management Studio similar to how you have performed the database backup earlier in the chapter. The only real difference is contained within the Options page, which is shown in Figure 7-9. Toward the bottom of the page, you will see the Transaction Log section, where you can either truncate the transaction log or back up the tail of the log. In this instance, you are performing only a backup of the transaction log. This will back up all the transactions completed since the last backup. The second option, backing up the tail of the log, is demonstrated and discussed later in the chapter when you will see how to restore a database to a point in time after the last backup was taken.
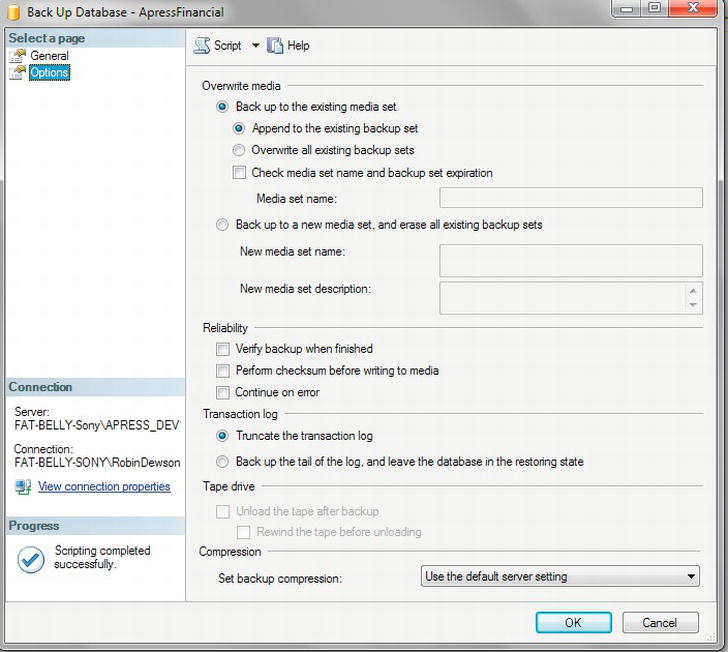
Figure 7-9. Backing up a transaction log
Restoring a Database
Now that the data has been backed up, what if you needed to complete a restore? As I have mentioned, there are two scenarios in which a restore could be required: either you are restoring to another system as a check that the database backup worked or as part of restoring the database to a different server, or you are recovering from a failure on your database. The second type of restore, in which a failure has occurred, is not one you wish to perform but will happen; it could be set up by creating a long-running transaction and then simply switching your computer off—not one of life’s greatest ideas to do deliberately! This book therefore will not be demonstrating this option, and it is not really for a beginner to attempt. However, I will discuss the concept within this section of the chapter. The first option, a simple restore, is easy to replicate and perform, and this will be the option I will cover.
You can choose between two means to restore the database: SQL Server Management Studio and T-SQL. If you need a restore within the development environment to remove test data and get back to a stable, predefined set of data to complete the testing, then this next section should help you. It might also be that you do a weekly refresh of your user test region from a production backup. The bottom line is that you are performing a “regular” restore.
Before completing the restore, you will first modify the ApressFinancial database to prove that the restore works, as there is no data within the database yet to prove the restore has worked by that method. Keep in mind, however, that a restore will restore not only the data structures, but also the data, the permissions, and other areas of the database not yet covered in the book—for example, views, stored procedures, and so on.
Restoring Using SQL Server Management Studio
The restore demonstrated in the following example will be a complete database restore of the ApressFinancial database. In other words, it will restore all the full and differential backups taken.
It is also possible to restore to a point in time, which is used if you are restoring the database as well as rolling forward changes recorded in the transaction log. This situation is similar to the scenario mentioned earlier about a power failure or hard drive failure. In the first restore, you will be restoring only from existing backups. You need to be aware of the point in time that you want to restore to; it is not possible to investigate the transaction log and make a decision based on information contained within it. The decision has to be time-based. On the General page, you will see a Timeline button, which would allow you to perform a restore to a point in time. This option will be discussed further later in the chapter.
When taking a backup, details are stored in msdb, but it is possible to restore a database from a backup that is not in msdb. For example, if you are rebuilding a server due to corruption, and msdb was one of the databases corrupted, it is necessary to have the option of finding a backup file and restoring from that instead. Or perhaps the last full backup taken is not the backup you wish to restore. This might occur in a development scenario, in which you wish to restore to a backup before major changes were done that you wish to remove. There would be no transaction log involved or required to be involved; therefore restoring to a point in time would not be a valid scenario. This is where you could use the From Device option. By selecting this option and clicking the ellipsis to the right, you can navigate to any old backup files.
Finally, on the General page, you can click which of the items in the backup you wish to restore. The default is all backups to be selected; however, if you want to restore to a point in an earlier backup and not to restore a later backup, then you can unselect the late backups.
It is also possible to restore the database to a completely new location as well as a new name. This is ideal for a hardware failure or to restore to a copy location.
When restoring there are a number of options concerning how the restore should be applied to the database. These are as follows:
- Overwrite the Existing Database: Although a potentially dangerous option to select, this is the most likely option to be enabled for a restore to a point in time contained within the latest backup. A restore to a point in the latest backup can be required when data modifications have taken place in error, such as deleting financial transactions in error and a backup of the transaction log had been taken. If the log backup was taken, financial transactions were added correctly, and then the error occurred and you wanted to keep the financial transactions added correctly, then you have a small but not insurmountable problem. The first action to complete would be a new transaction log backup, sometimes called a tail-log backup, by issuing a
BACKUP LOGwith theWITH NORECOVERYoption. This backs up the database but then indicates that you want to restore the database, and therefore the database will not allow any new data modifications. You would then select restore but disable the Overwrite the Existing Database option, as this is the safer option. - Preserve the Replication Settings: A more advanced option for when a database is sending changes to another database; for the time being, leave this option disabled.
- Prompt Before Restoring Each Backup: If you would like a prompt message before each restore file is activated, then select this. This is ideal if you need to swap media over.
- Restrict Access to the Restored Database: You may wish to check out the database after a restore to ensure the restore is what you wish, or in a production environment to run further checks on the database integrity.
- Recovery State has one of three options:
-
RESTORE WITH RECOVERY: This option defines whether users can immediately connect and work with the data after the restore. -
RESTORE WITH NORECOVERY: With this option, you can indicate that the database has been partially restored and you are unsure if you need to perform additional actions such as further restores. If a transaction is in progress, such as deleting a table, then whatever has been deleted will still be deleted and will not be rolled back. -
RESTORE WITH STANDBY: A combination of the first two options; if a transaction is in progress, such as deleting rows in a table, then the connection could occur once the deletion has been rolled back. However, the changes are also kept in a separate file, so that any of these actions that have been rolled back can be reapplied. This might happen if there are several actions within a transaction and some can be reapplied.
-
If you wanted to restore to a point in time, you would need to take a tail-log backup. This is discussed later in the chapter when discussing restoring to a point in time. You can also force-close any connections that are currently connected to the database, and, finally, you can restore the database a file at a time with a prompt between each file restore.
You have had a lot of options and points thrown at you, so let’s take a look at restoring a database.
TRY IT OUT: RESTORING A DATABASE
- Add a new column to the
ShareDetails.Sharestable using the following code in a Query Editor pane, and execute:USE ApressFinancial
GO
ALTER TABLE ShareDetails.Shares
ADD DummyColumn varchar(30) - Once you have confirmed that the column has been added by looking in Object Explorer, you can now use the backup you created earlier to restore the database, which will remove the changes you have just completed. From the Object Explorer window, select the
ApressFinancialdatabase, right-click, and select Tasks Restore Database. This brings up the dialog box shown in Figure 7-10. You will be restoring from all of the existing backups, which will remove the column created in the previous step.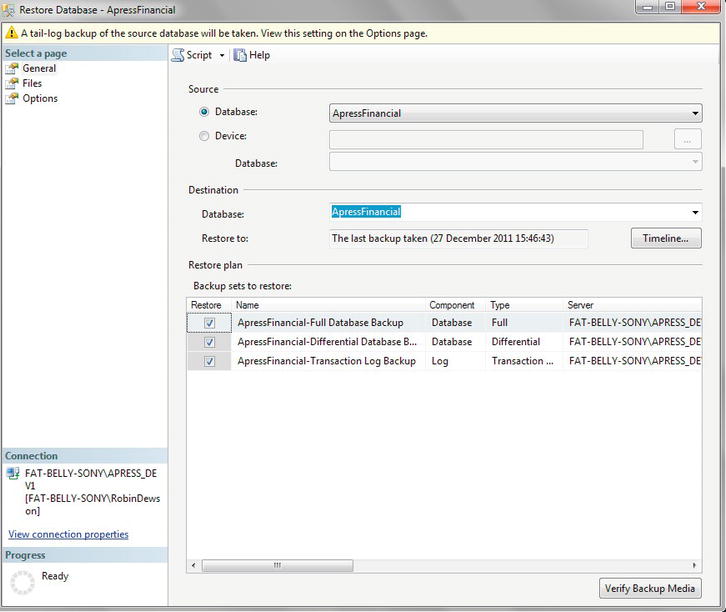
- It is possible to change the database you wish to restore by changing the name in the To Database combo box or by simply overwriting the name that is there.
- If you switch to the Files page, you have the option of restoring the database to a new folder location as well as a new database name. This is ideal in scenarios such as taking a production backup of a database and restoring it to a production copy or if you need to restore a database to a new server. You would do this by selecting the “Relocate all files to folder” check box, as shown in Figure 7-11. As you will be restoring to the same location and name, leave the box unselected.
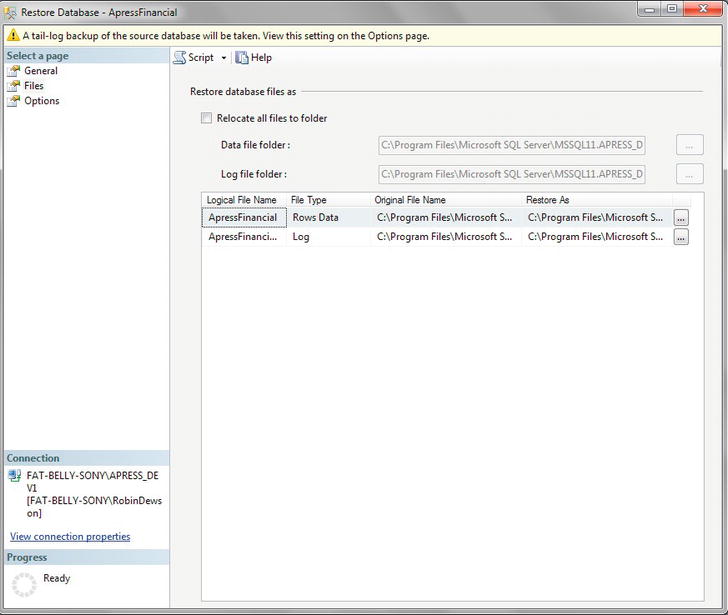
Figure 7-11. Restoring a database: Altering the location of the database
- On the Options page, there are a number of points to consider as discussed prior to the exercise. You should select Overwrite the Existing Database and deselect the “Take tail-log backup before restore” check box, shown in Figure 7-12, as the database changes are not being replicated to another database, and you also have no need to keep the database to a single user post-backup, as no further work may be required on a power failure, or to check that the correct restore has been completed.
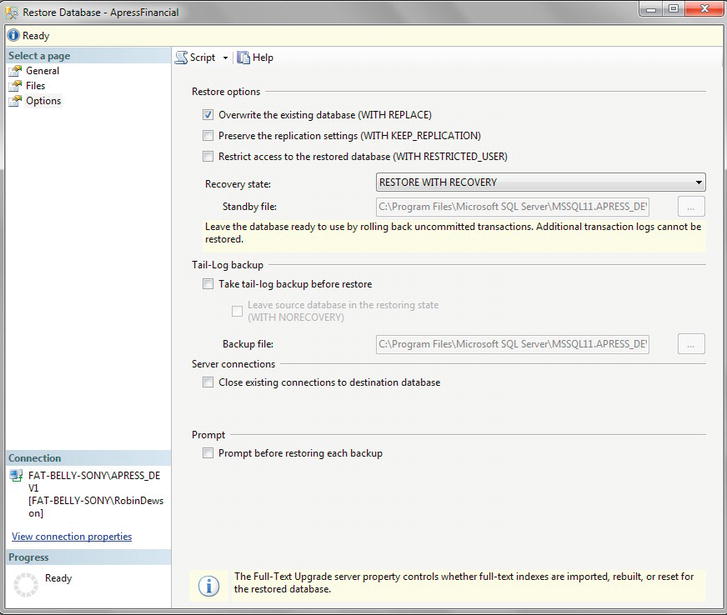
- Once you have the option settings you require or use the settings suggested, a quick click of OK performs the restore. You should see the message in Figure 7-13. If you then move back to the database after clicking OK, you will see that the column you just added has been removed when you look in Object Explorer for the
ApressFinancialShareDetails.Sharestable.
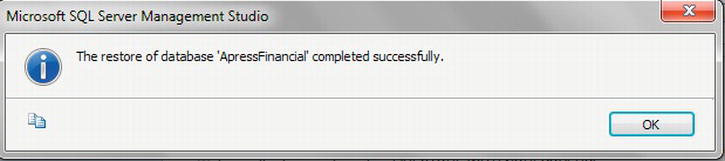
Figure 7-13. Restore successful
Restoring Using T-SQL
Using Management Studio is a pretty fast way to restore a database, and when under pressure, it may even be the best way forward. However, it is not the most flexible way of performing a restore, as some options that are available via T-SQL are not in this wizard. Some of these options were covered when you performed a backup, such as performing checksums when transferring data from the media device back to the database or unloading media at the end of the restore. If there is also a password on the backup medium, this option is not available within the screen in the example you have just completed, but you can use passwords with T-SQL. Being comfortable building a restore via T-SQL is important in becoming a more proficient and professional developer or administrator. Also by knowing how to restore via T-SQL, you can use the code in a scheduled script such as a nightly restore to a development server of your production data.
Restoring a Database
The syntax for restoring a database is similar to that for database backups. After looking at the syntax, I will then go through the options you will not be familiar with. The items in bold are the default values.
RESTORE DATABASE { database_name | @database_name_var }

[ FROM <backup_device> [ ,...n ] ]

[ WITH

  [ { CHECKSUM | NO_CHECKSUM } ]

  [ [ , ] { CONTINUE_AFTER_ERROR | STOP_ON_ERROR } ]

  [ [ , ] FILE = { file_number | @file_number } ]

  [ [ , ] KEEP_REPLICATION ]

  [ [ , ] MEDIANAME = { media_name | @media_name_variable } ]

  [ [ , ] MEDIAPASSWORD = { mediapassword |

          @mediapassword_variable } ]

  [ [ , ] MOVE 'logical_file_name' TO 'operating_system_file_name' ]

          [ ,...n ]

  [ [ , ] PASSWORD = { password | @password_variable } ]

  [ [ , ] { RECOVERY | NORECOVERY | STANDBY =

         {standby_file_name | @standby_file_name_var }

  } ]

  [ [ , ] REPLACE ]

  [ [ , ] RESTART ]

  [ [ , ] RESTRICTED_USER ]

  [ [ , ] { REWIND | NOREWIND } ]
  [ [ , ] STATS [ = percentage ] ]

  [ [ , ] { STOPAT = { date_time | @date_time_var }

   | STOPATMARK = { 'mark_name' | 'lsn:lsn_number' }

            [ AFTER datetime ]

   | STOPBEFOREMARK = { 'mark_name' | 'lsn:lsn_number' }

           [ AFTER datetime ]

  } ]

  [ [ , ] { UNLOAD | NOUNLOAD } ]

]
The options I have not yet covered are as follows:
KEEP_REPLICATION: When working with replication, consider using this option. Replication is when changes completed in one database are automatically sent to another database. The most common scenario is when you have a central database replicating changes to satellite databases, and possibly vice versa.MOVE: When completing a restore, the MDF and LDF files that are being restored have to be placed where they were backed up from. However, by using this option, you can change that location.RECOVERY | NORECOVERY | STANDBY: These three options are the same, and in the same order, as their counterparts (in parentheses) in the Management Studio screen:-
RECOVERY(Leave the Database Ready to Use): This option defines that after the restore is finished, users can immediately connect to and work with the data. If a transaction is in progress, such as updating rows in a table, then not until the updates have been rolled back and therefore the table is back in its “original” state will connections to the database be allowed. -
NORECOVERY(Leave the Database Non-operational): With this option, you are indicating that the database has been partially restored, and you are unsure whether you need to perform additional actions. If a transaction is in progress, such as inserting rows in a table, then the insertions will not be rolled back. This allows additional restores to get to a specific point in time. You will see how to then alter the database so that it is operational in the following exercises. -
STANDBY(Leave the Database in Read-Only Mode): A combination of the first two options; if a transaction is in progress, such as deleting rows in a table, then the deletion will be rolled back. However, the changes are also in a separate file, so that any of these actions that have been rolled back can be reapplied. This might happen if several actions occurred within a transaction and some can be reapplied.
-
REPLACE: This works the same as the screen option Overwrite the Existing Database.RESTART: If a restore is stopped partway through, then using this option will restart the restore at the point it was stopped.RESTRICTED_USER: Use this with theRECOVERYoption to allow only users in specific restricted groups to access the database. Use this to allow further checking by a database owner, or by thedbowner,dbcreator, orsysadminroles.STOPAT | STOPATMARK | STOPBEFOREMARK: Used to specify a specific date and time at which to stop the restore
Restoring a Transaction Log
The syntax for restoring the transaction log is exactly the same, with the only difference being the definition: you are completing a LOG rather than a DATABASE restore:
RESTORE LOG { database_name | @database_name_var }

   <file_or_filegroup_or_pages> [ ,...f ]

[ FROM <backup_device> [ ,...n ] ]

[ WITH

  [ { CHECKSUM | NO_CHECKSUM } ]

  [ [ , ] { CONTINUE_AFTER_ERROR | STOP_ON_ERROR } ]

  [ [ , ] FILE = { file_number | @file_number } ]

  [ [ , ] KEEP_REPLICATION ]

  [ [ , ] MEDIANAME = { media_name | @media_name_variable } ]

  [ [ , ] MEDIAPASSWORD = { mediapassword | @mediapassword_variable }   ]

  [ [ , ] MOVE 'logical_file_name' TO 'operating_system_file_name' ]

               [ ,...n ]

  [ [ , ] PASSWORD = { password | @password_variable } ]

  [ [ , ] { RECOVERY | NORECOVERY | STANDBY =

         {standby_file_name | @standby_file_name_var } }

  ]

  [ [ , ] REPLACE ]

  [ [ , ] RESTART ]

  [ [ , ] RESTRICTED_USER ]

  [ [ , ] { REWIND | NOREWIND } ]

  [ [ , ] STATS [=percentage ] ]

  [ [ , ] { STOPAT = { date_time | @date_time_var }

   |  STOPATMARK = { 'mark_name' | 'lsn:lsn_number' }

            [ AFTER datetime ]

   |  STOPBEFOREMARK = { 'mark_name' | 'lsn:lsn_number' }

            [ AFTER datetime ]

  } ]

  [ [ , ] { UNLOAD | NOUNLOAD } ]

]
TRY IT OUT: RESTORING USING T-SQL
- Open up an empty Query Editor pane and enter the following code. This will add the column that you want to see “removed” after a restore.
- Now replace this code with the restore code that follows. Don’t execute any of the code just yet, as this piece of code is the first part only. Recall that when performing the backups,
FILE 2was theFULLbackup taken. This is what the first restore will do. Note Ensure that the FROM DISKoption is all on one line. Also recall thatFILE = 2may beFILE = 3or any other number, depending on the backups taken, and this may be the case with different file numbers as you progress.USE [master]
GO
RESTORE DATABASE [ApressFinancial] FROM DISK =
N'C:SQLServerBackupsApressFinancial
ApressFinancialFirstFullBackup.bak'
WITH FILE = 2, NORECOVERY, NOUNLOAD, REPLACE, STATS = 5
- Continue the code with the second part of the restore, which will be the differential backup restore. This uses
FILE 3from the backup set.RESTORE DATABASE [ApressFinancial] FROM DISK =
N'C:SQLServerBackupsApressFinancial
ApressFinancialFirstFullBackup.bak'
WITH FILE = 3, NORECOVERY, NOUNLOAD,
STATS = 5 - The final part of the restore operation is to restore the transaction log file. Once all this code is in, you can run it all.
RESTORE LOG [ApressFinancial] FROM DISK =
N'C:SQLServerBackupsApressFinancial
ApressFinancialFirstFullBackup.bak'
WITH FILE = 4, NOUNLOAD, STATS = 5 - Once the code has fully executed, you should see results similar to those listed here:
11 percent processed.
20 percent processed.
32 percent processed.
41 percent processed.
52 percent processed.
61 percent processed.
70 percent processed.
82 percent processed.
90 percent processed.
100 percent processed.
Processed 272 pages for database 'ApressFinancial',
file 'ApressFinancial' on file 2.
Processed 2 pages for database 'ApressFinancial',
file 'ApressFinancial_log' on file 2.
RESTORE DATABASE successfully processed 274 pages
in 0.509 seconds (4.191 MB/sec).
24 percent processed.
48 percent processed.
72 percent processed.
96 percent processed.
100 percent processed.
Processed 32 pages for database 'ApressFinancial',
file 'ApressFinancial' on file 3.
Processed 1 pages for database 'ApressFinancial',
file 'ApressFinancial_log' on file 3.
RESTORE DATABASE successfully processed 33 pages
in 0.168 seconds (1.534 MB/sec).
100 percent processed.
Processed 0 pages for database 'ApressFinancial',
file 'ApressFinancial' on file 4.
Processed 6 pages for database 'ApressFinancial',
file 'ApressFinancial_log' on file 4.
RESTORE LOG successfully processed 6 pages
in 0.044 seconds (0.998 MB/sec).
You can now move back to the ShareDetails.Shares table and check that the column added has now been removed. You may have to perform a refresh within Object Explorer first to see the changes.
Restoring a database in production will in most instances take place under pressure, as the database will have become corrupt or been inadvertently damaged. The production system is obviously down and not working, and you have irate users wanting to know how long before the system will be up. This is hopefully the worst-case scenario, but it is that sort of level of pressure that you will be working under when you have to restore the database. Therefore, having the correct backup strategy for your organization based on full, differential, and transaction log backups is crucial. Also having scripts in place ready for restores will help speed up getting the database back online. Full database backups for a system that requires high availability so that the restore takes the least amount of time may be what you need.
Restoring to a Point in Time
As mentioned a few times, there may come a time when you have taken a transaction log backup, and before the next transaction log backup is taken a problem occurs, caused either by a developer or your system. This is when there are actions that have occurred that you wish to keep but there are subsequent actions that should not be restored. What is required is a tail-log backup followed by a restore to a specific point in time.
In a real-life scenario on a production database, this can be tricky and dangerous to get the exact point in time if you have data modifications happening at the time of the failure. You may have to make a hard decision of where to restore to and realize that some data may be lost. If it is during an overnight batch, then it may be easier depending on your failure, as batches can be easier to track back to where to restore to, as you should be aware of what was running at any specific point in time.
To restore to a point in time requires a number of actions to be performed successfully before the restore is complete.
First of all, you are required to back up the transaction log changes from the last successful backup to the current point in time. This is called taking a tail-log backup. You also need to put the database in NORECOVERY mode, which means that nobody will be able to connect. This will avoid database changes being applied that will be lost during the restore.
Once the backup is complete, the restore can commence. You would apply the last full backup, followed by all differential backups, and then the transaction log backups that have been taken. You are then left with the restore to the point in time from the tail-log backup. This uses the same syntax as the other transaction log restores but with the STOPAT option defined, which determines the date and time at which to stop restoring.
It is possible, if required, to then open the database to a single user, who can then check the tables that are required to be checked in case a different time would be better. You will see this option when detaching a database in the next section.
You have seen the process of performing a backup and restore of your database in the examples you have just performed, and so in this section I will demonstrate how to restore up to a point in time with specific transactions restored and other actions after that point discarded.
To demonstrate this, the following exercise will apply two changes to the database, one of which will remain in place, and the other will be rolled back as it will be after the point in time.
TRY IT OUT: DETACHING A DATABASE
- The first change will remain after the rollback. Enter the following code, execute it, and take a note of the time of execution.
CREATE TABLE TransactionDetails.TransactionHistory
(Column1 varchar(200) NULL,
Column2 int NULL)
GO - Now wait a period of time. You will have to be able to distinguish between the times of the two actions, so pick something easy. I am going to wait five minutes.
- Once a period has passed, enter the following code and execute it.
ALTER TABLE ShareDetails.Shares
ADD DummyColumn varchar(30) - Now you have two changes to the database; the first will be kept and the second will be rolled back. There is no backup taken at this point that you can restore to that would keep the
TransactionDetails.TransactionHistorytable and remove theDummyColumncolumn. Therefore you need to take a tail-log backup first and then restore to a point in time. It is possible to do this in one action. Highlight theApressFinancialdatabase, and right-click. From the pop-up menu, select Tasks Restore Database. The Restore Database window opens, as shown in Figure 7-14.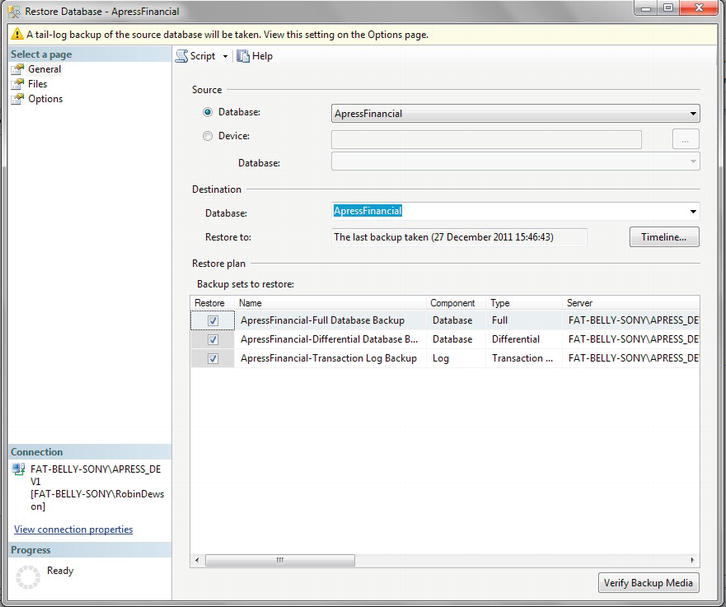
Figure 7-14. Restore Database window
- Click the Timeline button, which should bring up a dialog similar to Figure 7-15. The date and times will differ but show the last backup that was taken. This is so that a regular restore will be to the last backup, which is a more regular scenario and therefore makes sense to be the default.
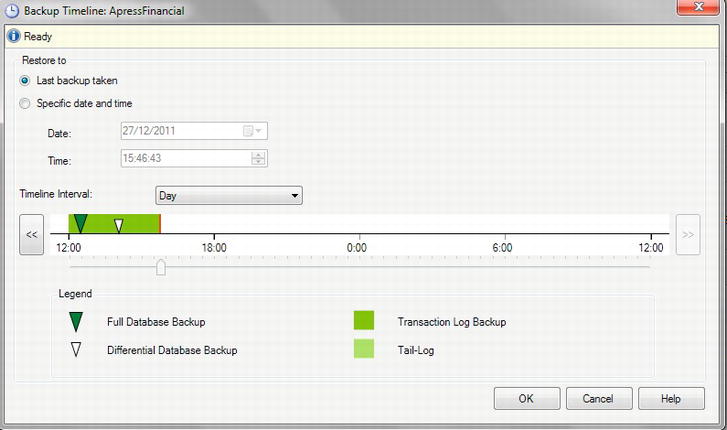
- To restore some of the modifications since the last backup, you need to select the option “Specific date and time”. You would then select the date and time that the first modification was taken. The screen will look something like Figure 7-16. Once you are happy, click OK.
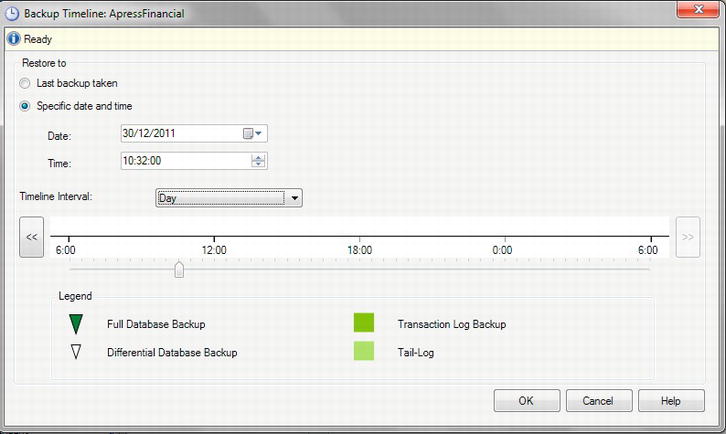
Figure 7-16. The Backup Timeline dialog with the date and time set
- Move to the Options page, and select the options to overwrite the existing database; but you need to leave the database in a
NORECOVERYstate after the tail-log backup so that the restore can be successfully completed (see Figure 7-17).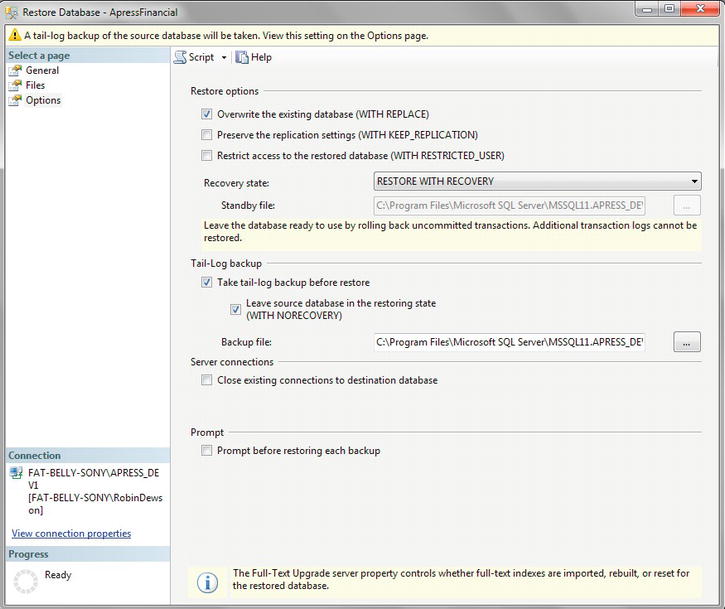
- Once you are happy, from the menu select Script New Query Editor window, which will generate the T-SQL that will achieve the restore. The code is split over the next three steps. The first section will back up the tail of the transaction log.
BACKUP LOG [ApressFinancial] TO DISK =
N'C:Program FilesMicrosoft SQL ServerMSSQL11.APRESS_DEV1MSSQLBackup ApressFinancial_LogBackup_2011-12-30_10-36.bak'
WITH NOFORMAT, NOINIT, NAME =
N'ApressFinancial_LogBackup_2011-12-30_10-36-00',
NOSKIP, NOREWIND, NOUNLOAD, NORECOVERY, STATS = 5 - The next step is a restore of the full backup, the differential backup, and the transaction log backup taken so far.
RESTORE DATABASE [ApressFinancial] FROM DISK =
N'C:SQLServerBackupsApressFinancial
ApressFinancialFirstFullBackup.bak'
WITH FILE = 2, NORECOVERY, NOUNLOAD, STATS = 5
RESTORE DATABASE [ApressFinancial] FROM DISK =

N'C:SQLServerBackupsApressFinancial

ApressFinancialFirstFullBackup.bak'

WITH FILE = 3, NORECOVERY, NOUNLOAD,

STATS = 5
RESTORE LOG [ApressFinancial] FROM DISK =
N'C:SQLServerBackupsApressFinancial
ApressFinancialFirstFullBackup.bak'
WITH FILE = 4, NORECOVERY, NOUNLOAD, STATS = 5 - The final step is where you can stop the restore of the transaction log at a specific point of time by using the
STOPAToption.RESTORE LOG [ApressFinancial] FROM DISK =
N'C:Program FilesMicrosoft SQL ServerMSSQL11.APRESS_DEV1MSSQLBackup
ApressFinancial_LogBackup_2011-12-30_10-36.bak'
WITH FILE = 2, NOUNLOAD, STATS = 5, STOPAT = N'2011-12-30T10:32:00'
GO - Finally I will drop the
TransactionDetails.TransactionsHistorytable as it is not required for the book. I entered the following code and executed it. There is no harm in keeping this table if you want, but you will not see it in any figures within the book going forward.DROP TABLE TransactionDetails.TransactionHistory
Detaching and Attaching a Database
Now that you can back up and restore a database, you have other methods available for dealing with the database. There may be a time in the life of your SQL Server database when you have to move it from one server to another, or in fact just from one hard drive to another. For example, perhaps you currently have ApressFinancial on the C drive, and this is getting full, so you would like to move the database to another hard drive. Or perhaps you are moving from an old, slower server to a new, faster server or a server on a better network. By detaching and reattaching the database, you can do this simply and easily.
I would like to make a few points here; they may seem straightforward and really obvious, but better to mention them than cause problems at a later stage. First of all, no updates can be occurring, no jobs can be running, and no users can be attached. Secondly, just in case, take a full backup before moving the database. This may add time to the process, but it is better to be safe than sorry. Also, ensure that where you are moving the database to has enough disk space, not only for the move, but also for expected future growth; otherwise, you will be moving your database twice. You should not attach your database to a server without immediately completing a backup on the new server afterward; this way, you can ensure that the databases are protected in their new state.
Detaching a database physically removes the details from the SQL Server master and msdb databases, but does not remove the files from the disk that it resides on. However, detaching the database from SQL Server then allows you to safely move, copy, or delete the files that make up the database, if you so desire within Windows. This is the only way that a database should be physically removed from a server for moving it
Detaching and Attaching Using SQL Server Management Studio
Let’s start by using SSMS to detach and attach a database.
TRY IT OUT: DETACHING A DATABASE
- First of all, it is necessary to ensure that nobody is logged in to the database, and even if someone is, that the user is not doing any updates. However, to demonstrate what happens when a user is connected to the database, ensure that SQL Server Management Studio is running and that there is a Query Editor pane with a connection to the
ApressFinancialdatabase. You may already have a connection via a query pane still open from the previous examples. - Find the
ApressFinancialdatabase in Object Explorer, and ensure that it is selected. Right-click and select Tasks Detach. This brings up the Detach Database dialog box for theApressFinancialdatabase, as shown in Figure 7-18.
- To remove all the connected users, select the Drop Connections check box. The second option, Update Statistics, means that the SQL Server statistics for indexes and so on will be updated before the database is detached. The information is stored separately from the other data files in SQL Server, so selecting this option ensures that when the database is detached the files are not lost and therefore don’t need re-creating. The status is Not Ready due to the message indicating that there is still “1 Active connection(s).”
Note In this example, select the Drop Connections box. However, in a production environment, this could be very dangerous. There is a system stored procedure called
sp_whothat can tell you what connections exist within the server. The stored proceduresp_whowill list the information from the whole data server and cannot be refined to the database you are interested in. You will see how to execute stored procedures in Chapter 12. - Once you are happy, you can click OK to finish detaching the database.
That’s it. The database is detached, is no longer part of SQL Server, and is ready to be moved or even deleted. If you check Object Explorer in SQL Server Management Studio, you will see that the database is no longer listed.
Detaching a database, although seemingly a simple and innocuous operation, has the potential to be fraught with problems and worries. As the example demonstrated, ensuring that there are no users attached to the database at the time of detaching is not as easy as it first may seem. Setting up the database options to eliminate connections or to stop updates is possible only once everyone has been removed from connections to the database. There is no easy way of removing connections safely, as you never know what an application with a connection to the database is doing. You could remove a connection that is in the middle of processing. If you are going down the route of detaching the database, though, there is an obvious reason to do this, such as moving servers and removing the database, so you would have a plan of action, which would include reaching agreement with application owners that any connections found at the time of work will be removed. Users would have been notified days or weeks in advance, and the database owner would have coordinated a date and time when nobody should be connected. Also, the database owner would be around if there were any problems, and he or she could make the decision to kill any connections left hanging around.
To reiterate, detaching the database is a process that removes entries within the SQL Server system tables to inform SQL Server that this database is no longer within this instance of SQL Server and therefore cannot be used. It is as simple as that. If you are removing the database completely, then you will need to delete the files from the directory they were created in.
![]() Note It is possible to detach the database using a system stored procedure, although this does not let you kill the connections. This has to be done via the T-SQL command
Note It is possible to detach the database using a system stored procedure, although this does not let you kill the connections. This has to be done via the T-SQL command sp_detach_db, which you will see shortly in the chapter.
You need to reattach the database before being able to demonstrate detaching via T-SQL, so let’s do that now. This would occur on new SQL Server instances after physically moving the files.
TRY IT OUT: ATTACHING A DATABASE
- Within Object Explorer, highlight the Databases node, right-click, and select Attach.
- This brings up the Attach Databases dialog box, shown in Figure 7-19. To add a database, click Add.
Figure 7-19. Options for attaching a database
- This brings up the Locate Database Files dialog box, shown in Figure 7-20. You can use this like other Windows explorers to locate where your database MDF files are. Once you find the database you want to reattach, highlight it and then click OK.
- This brings you back to the Attach Databases dialog box with the details filled in, as you see in Figure 7-21. Take a moment to look over the information in this dialog box. Any problems SQL Server finds will be detailed in the Messages column. It is also possible to attach more than one database, but it is best to do databases one at a time.
- This then leaves you to click OK to reattach the database. Moving to Object Explorer, you should see your database at the bottom of the list, where it will remain until the explorer is refreshed.
Attaching a database involves informing SQL Server of the name and the location of the data files and the transaction log files. The files can be placed anywhere on a computer, but it is recommended you place the data in a sensible location. For example, the folders tempfiles or tobedeleted sport extreme names, but do demonstrate the unsuitability that should be avoided.
When moving the data from one physical server to another, the data does not need to be in a subdirectory of Microsoft SQL Server installation found under Program Files. In fact, in production environments, this is the last place you would locate the data. In a production environment, you may have multiple drives or drive partitions; certainly many organizations have this set up. You would generally want to keep these files away from any program files or the pagefile.sys file, because SQL Server’s performance can be maximized when these files are separated; so if a second drive is available, it is best to place the files on a different drive than system files. However, for the purpose of this book, placing the data in the DATA directory under the instance of SQL Server is perfectly valid and acceptable.
Once the two data files have been copied, it is a simple process of using a couple of mouse clicks to attach these files into the instance. What happens in the background, very basically, is that SQL Server takes the name of the database and the location of the data files and places them into internal tables that are used to store information about databases. It then scans the data files to retrieve information, such as the names of the tables, to populate the system tables where necessary.
The main point to keep in mind is the database owner (see Chapters 1, 2, and 5). It is just as important to use a valid database owner and not the sa login when attaching a database as it is when creating a database. The database, when it is attached, will be given the owner of the login attaching the database.
Detaching and Attaching Using T-SQL
Detaching and attaching a database is an ideal way to move a database from one server to another as part of an overall solution. It’s clean, simple, and ideal if you are rolling out a “base” database to many client sites, but it’s not the only way of doing it. Detaching a database is simply removing it logically from a server, but keeping the physical files. This then allows these files to be moved to anywhere, from another hard drive to a DVD, for further copying to a client computer if need be, and then reattaching the database at the other end.
Detaching a database removes entries from the master and msdb databases. The physical backup files will still be there, so if you do need to complete a restore after a detach and reattach, then you can use the From Device option in the Restore Wizard to define the full location in the RESTORE T-SQL command to get to those files.
![]() Note Detaching a database can be done only by a member of the
Note Detaching a database can be done only by a member of the db_owner role.
sp_detach_db [ @dbname= ] 'dbname'

    [ , [ @skipchecks= ] 'skipchecks' ]

    [ , [ @KeepFulltextIndexFile= ] 'KeepFulltextIndexFile' ]
The options are straightforward, with each being optional. If they are not supplied, then the default value is mentioned within the following bulleted list:
dbname: The name of the database to detach; if this option is missed, then no database will be detached.skipchecks:NULL(the default) will update statistics.truewill skip the updating of statistics.KeepFulltextIndexFile:true(the default) will keep all the full-text index files that have been generated with this database.
![]() Note Full-text index files are special files that hold information about data set up for full-text searching, which is an area outside the scope of this book. Basically, full-text searching gives the ability to search on all text in a column or multiple columns of data, and is also functionality used by search engines.
Note Full-text index files are special files that hold information about data set up for full-text searching, which is an area outside the scope of this book. Basically, full-text searching gives the ability to search on all text in a column or multiple columns of data, and is also functionality used by search engines.
You might be expecting that you would use a stored procedure called sp_attach_db to reattach the database. This command does exist, but it will be made obsolete in future versions of SQL Server. The correct syntax is a “specialized” CREATE DATABASE command:
CREATE DATABASE database_name

    ON <filespec> [ ,...n ]

    FOR { ATTACH [ WITH <service_broker_option> ]

        | ATTACH_REBUILD_LOG }
The syntax is easy to follow. The first option, ON, specifies the name of the primary database file to attach, which has the MDF suffix. We will ignore the second option, <service_broker_option>, as this is for a more advanced database.
The third option, ATTACH_REBUILD_LOG, is for situations where you wish to attach a database but at least one transaction log file is missing. Specifying this option rebuilds the transaction log. No database can be attached when SQL Server believes that there are missing files. If you do use this option, then you will lose the full, differential, and transaction log backup chains that exist on SQL Server, so complete a full backup after attaching to reestablish the backup baseline. This option tends to be used when you deliberately wish to lose the transaction log file, such as a read-only version of the database for reporting purposes.
![]() Note If you receive any error messages, then reattach all files associated with the database, not just the main primary file, if you had more than one file, which can happen in large systems.
Note If you receive any error messages, then reattach all files associated with the database, not just the main primary file, if you had more than one file, which can happen in large systems.
Now let’s go through the steps for detaching and reattaching the ApressFinancial database using T-SQL.
TRY IT OUT: DETACHING AND REATTACHING A DATABASE USING T-SQL
- The first test you will do is to check if there are any active connections before you try to detach. There is a system stored procedure called
sp_whothat you can execute that lists out the connections that are on the server and what database the connections are connected to. Figure 7-22 shows the stored procedure in Query Editor and a list of most of the connections on my server at the time of running. Notice that the last connection is connected to theApressFinancialdatabase.
Figure 7-22. Server connections with
ApressFinancialat the bottom - The connection in Figure 7-22 is from Query Editor, which ran
sp_who. The connection was pointing to theApressFinancialdatabase. If I alter the database tomaster, then there will be noApressFinancialconnections. You should be able to achieve the same goal and remove all connections yourself as only you are using the database and should know where the connections are. - You can achieve removing all connections by placing the database in single-user mode using T-SQL without needing to close your panes that have active connections. Open up a second tab with a connection to
ApressFinancial, and enter some random characters, any characters. You should now have two, or more, connections to theApressFinancialdatabase. You can now remove these connections and place the database into a single connection mode. Enter the following code and execute it.ALTER DATABASE ApressFinancial
SET SINGLE_USER WITH ROLLBACK IMMEDIATE - As there should be only one connection at this point, you can proceed to detaching the database. Using the same Query Editor pane as the
SET SINGLE_USERcommand, enter thesp_detach_dbcode as follows. Once you have done so, execute the code. Take note that you are simulating explicitly moving this connection to a “safe” system database, away from the database you wish to detach.USE master
GO
sp_detach_db 'ApressFinancial' - The results you will see will be similar to the following:
Command(s) completed successfully.
- Now that the database has been detached, you need to reattach it, simulating a move to a new server. Enter the following code in a Query Editor pane. Replace the
FILENAMEparameters with the path to where your database is located and ensure that the path is all on one line.CREATE DATABASE ApressFinancial
ON (FILENAME=N’C:Program FilesMicrosoft SQL ServerMSSQL11.APRESS_DEV1
MSSQLDATAApressFinancial.MDF')
FOR ATTACH - After executing the code, you should see the following message:
Command(s) completed successfully.
- To change the database from
SINGLE_USERtoMULTI_USER, enter the following code:ALTER DATABASE ApressFinancial
SET MULTI_USER
You have now successfully detached and reattached the database.
Producing SQL Script for the Database
This section demonstrates a different method of backing up the structure of the database and the tables and indexes contained within it by using T-SQL commands to complete this.
![]() Note Only the structure will be generated as T-SQL commands; no data will be backed up—only the schema that is needed to re-create the actual database can be scripted here.
Note Only the structure will be generated as T-SQL commands; no data will be backed up—only the schema that is needed to re-create the actual database can be scripted here.
The usefulness of this procedure is limited and is really helpful only for keeping structure backups or producing an empty database, but it is useful to know rather than going through the process of copying the database with all the data when the data are not required.
This method tends to be used to keep the structure within a source repository such as Visual SourceSafe. It is also useful for setting up empty databases when moving from development to testing or into production.
TRY IT OUT: PRODUCING THE DATABASE SQL
- Ensure that SQL Server Management Studio is running and that you have expanded the server so that you can see the
ApressFinancialdatabase. Right-click, and select Tasks Generate Scripts. After the initial wizard introduction screen, click Next to see the Choose Objects screen shown in Figure 7-23 that allows the database to be scripted. There are two options for scripting: either the entire database, the default and the option desired, or the ability to script just part of the database. Click Next.
- On the Set Scripting Options screen, there are a number of options about the scripting. It is possible to script the database and save it to a file, or you can publish the script to a web service. Figure 7-24 shows the default settings for saving the scripts to a file. You will see an Advanced button on the right, which lets you alter some scripting options. I will go through this at the end of the exercise, but for purposes of this exercise just accept the default settings. Click Next.
Note The ability to publish to a web service allows for a database script to be sent to a remote server.
Figure 7-24. Options for the script
- You are now presented with a Summary screen, so simply click Next.
- The scripts are then prepared as shown in Figure 7-25, with any problems or errors listed prior to saving the file. Clicking Finish closes the final wizard screen.
Advanced Script Options
Figure 7-26 shows the list of options available to you within the wizard for saving the file, with a short description of each detailed here. Several of the options will exist for publishing to a web service, but of course the web service option will have its own set of settings. You will have seen many of these options in Chapter 2.
Figure 7-26. The scripting options available
- ANSI Padding: ANSI padding details how data are held when it doesn’t fill the size defined for the data type.
- Append to File: If you set this to
true, then SQL Server will append the script to the file selected instead of overwriting it. - Continue Scripting on Error: If there are any problems in producing the script, you can decide if you wish to continue scripting.
- Convert UDDTs to Base Types: As part of SQL Server, you can change the base data types, such as
int, to your own named type, so you could name a “copy” ofintasmyint. This is a bit more advanced, but if you do this, then selectingtruewill convertmyintback toint. - Generate Script for Dependent Objects: A very useful option; if there are any dependencies on what you are wanting to script and you haven’t selected that object to script, then there will be problems rebuilding the object later. Selecting
truemeans that these dependent objects will also be scripted. - Include Descriptive Headers: This includes a date-time stamp as well as a short descriptive header of each object as it is reached within the script.
- Include If NOT EXISTS: If you select all the objects to be scripted and set this to
true, SQL Server will put a test around each object so that if that object is already in the database when the script is run, it won’t be created. There will be no test for specific columns when scripting a table, but there will be a test for the table itself. - Include system constraint names: There are constraints that are generated by SQL Server automatically as part of Declarative Management Framework. You will see this functionality in Chapter 12. If you wish to keep the same names rather than generate new names, a value of
truewill keep the name the same. This is ideal for transferring an exact replica of the database from one location to another. It is not necessarily always needed to keep the same name. - Include unsupported statements: If you want to keep statements that are no longer supported, then set this value to
true. The unsupported statements such as those that have been deprecated will be kept, but there will be a comment. This is ideal for when you are scripting up or down a SQL Server version so that you know what functionality you will need to consider fixing before running on the target server. - Schema qualify object names: Include the schema name in each object; it would be rare to have this set to
false, as you would normally want to keep the schema names. - Script Bindings: If a default value is defined for a column, then a value of
truewill define the column binding. - Script Collation: If you wish the SQL Server collation to be scripted, enable this option. This is useful if you are unsure of the collation the script will then be run against.
- Script Defaults: In
ApressFinancialtables, we have some default values that will be set on columns when rows are added. Setting this totruewill set these defaults. - Script
DROPandCREATE: If you are generating a script where the objects may already exist in the target server, then it might be better to drop the object before creating. A value oftruewill generate within the T-SQL theDROPand then theCREATE. - Script Extended Properties: Extra properties can be placed on every SQL Server object. These will be scripted if you select
true. - Script for Server Version: A setting of
truewill not script objects that are not supported on the SQL Server version you are generating the script for. - Script for the database engine type: If you have objects in your database that are not available on the target engine type, such as targeting SQL Server Express from a script built on SQL Server Enterprise, then these objects will not be scripted.
- Script Logins: This scripts all Windows and SQL Server authentication logins.
- Script Object-Level Permissions: Each object will have permissions on who can do what. For example, on a table, you can set up permissions on who can add, delete, or select the data. This option includes these options.
- Script Owner: This scripts the owner of the database if specified.
- Script Statistics: This specifies whether to script the SQL Server column and index statistics. It avoids rebuilding them when re-creating the database using the script; however, it increases the time taken to build the script as well as the size of the script.
- Script USE DATABASE: Between each object, this specifies whether to script a
USEdatabase statement. It’s ideal if used with scripting-dependent objects. - Types of data to script: The default for this option is Schema, which means that the script will detail only the objects columns. You can just script the data within the database objects selected where
INSERTstatements are generated, or you can generate both the schema and the data. For large tables, this is not an ideal way to port database objects from a source to a target, but it does give the ability if required. - Script Change Tracking: Change tracking allows for data modifications to be tracked within SQL Server where the data that existed before the change are kept. This allows you to see what information has been altered. This is ideal for any tables that you need to audit changes or if you want to know when and what changes have happened. This can also be achieved by creating a trigger that writes the before image to your own built-in audit table.
- Script Check Constraints: This script checks constraints.
- Script Data Compression Options: If you are using data compression, then setting this to
truewill also script the options that you have in effect. - Script Foreign Keys: Any foreign keys are scripted.
- Script Full-Text Indexes: If you have any full-text indexes, this indicates whether you want to script them.
- Script Indexes: This specifies whether to script table and view indexes.
- Script Primary Keys: This dictates whether to script primary keys.
- Script Triggers: For any trigger, this specifies whether you wish these to be within the script.
- Script Unique Keys: Any unique keys are scripted.
Summary
You have seen a great deal in this chapter that is crucial to ensuring that your database is always secure. As a manager drummed into me, the unexpected will always happen, but you must always be able to recover from it, no matter what. Therefore, regular backups that are known to work and even the occasional “disaster recovery test” should be done to ensure that you can restore when something unexpected and bad happens. No matter what your managing director says, the data of a company are its most important asset, not the people. Without the data, a company cannot function. If you cannot ensure that the data will be there, then the company will be in a very dangerous position.
You should now be comfortable in taking different backups and restores and knowing what is required to keep your database secure.
This concludes your look at the different methods of backing up, restoring, moving, and scripting databases. While this covers every way of ensuring your database structure and data will never be lost, you still need to maintain the database on a regular basis. This is what you will take a look at in the next chapter.