
C H A P T E R 8
Database Maintenance
At this point, you have now created a backup and performed a restore of the example database. You have also covered the different methods to back up and restore the database. However, there is no real plan for regular maintenance and detection and reporting of problems in the database strategy. Any jobs for backup of the database or transaction log that I have demonstrated so far are held as single units of work called steps. Not only that, but also there is nothing in place that will look after the data and indexes held within the database to ensure that they are still functioning correctly and that the data are still stored in the optimal fashion. Without a process that runs regularly, you would need to perform all of this by hand regularly and check the results each time. What a waste of time, and boring to boot!
This chapter will demonstrate building an automatic maintenance plan and then checking on the plan after it has run to ensure that all has gone well with it. This plan will perform regular backups and checks on the database and keep it in optimum health. This section will then show you how to set up the ability to e-mail results.
To do this, you will use the Database Maintenance Plan Wizard, which will help you build an automated job to monitor corruption within the database, optimize how the data are stored, and back up both the database and the transaction logs. Finally, the wizard will generate a schedule for the job to process at regular intervals. You will also see how to set up and configure SQL Server Database Mail so that errors can be mailed to a team monitoring the servers.
Some areas of this chapter, like the backup screens, are straightforward, as they were covered earlier in Chapter 7; however, this now brings the whole maintenance of the database into one job.
Creating a Database Maintenance Plan
Now that the database is up and built and the tables are there, it really is time to start considering a whole database maintenance plan before data are entered. This will cover securing your data, ensuring performance, and rectifying database corruption through to ensuring that your database is performing as you expect it to be. Even though corruption is rare in SQL Server, it can be caused when SQL Server loses power abruptly, for example, or through hardware issues such as a motherboard failure or someone removing the network cable.
There are many areas of building a maintenance plan, and this section covers a lot of them. One or two areas are only touched on, as they are quite advanced and will not be covered in this book. You will still need a little background so that you can see how crucial this area is, and you can move on to those more advanced areas a bit later on.
A single maintenance plan can be built for one database or several databases, but I recommend one plan per database. A single plan can be set up for system databases and all user databases by selecting those options at the start of the Database Maintenance Plan Wizard. I also recommend one plan for each system database as well. The logic behind these recommendations is that each user database will have its own needs, its own overnight routines, and even its own people for callout when things go wrong, even if there is some sort of logical link between databases. Even if you are a one-man band, each user database should still have a maintenance plan. Therefore, in keeping with this, only the ApressFinancial database will be selected.
Once the plan has been built, it will be stored within SQL Server, but will have been built as a SQL Server Integration Services (SSIS) job. This is a technique within SQL Server for running several tasks in sequence with conditions, which also has the ability to work with errors that occur. SSIS could (and does) take up a whole book in itself, but building the plan and seeing what is generated will demonstrate the very basics of what it can achieve.
Maintenance plans use extended stored procedures, which are disabled by default. This means that until extended stored procedures are enabled, it is not possible to build a maintenance plan. To demonstrate how you can enable this option via T-SQL, you will use a system stored procedure in the first step to do this.
There are two methods to building a database maintenance plan: you can either use a wizard or select options from a multitabbed screen.
There are a number of tasks that can be included in a maintenance plan:
- Check Database Integrity: This executes SQL Server database integrity checks on the data and structure of the database, both physical and logical.
- Shrink Database: The transaction log is truncated and logically shrunk. The database is also shrunk.
- Reorganize Index: As data are inserted and deleted, fragmentation of indexes can take place. This reorganizes the index a bit like completing a disk defrag.
- Rebuild Index: Instead of just reorganizing the indexes, it is possible to drop and re-create them.
- Update Statistics: Statistics are kept to aid the execution of queries. These can get out of date if you don't have the option set to keep these up to date, and this option can update them at this point.
- Clean Up History: This removes historical information such as job history for a set period of time.
- Execute SQL Server Agent Job: This executes a predefined SQL Server Agent job. At present, there are no jobs in the database, so this option cannot be selected.
- Back Up Database (Full): As discussed earlier, this backs up the full database.
- Back Up Database (Differential): As discussed earlier, this backs up the changes since the last full backup.
- Back Up Database (Transaction Log): As discussed earlier, this backs up just the transaction log.
- Maintenance Cleanup Task: This cleans up any transient files left over after the task has completed.
Let's take a moment to look at options that are likely to be the most useful aside from the backups—the reorganization and rebuild index options. If fragmentation is low—below 30%, typically—then you should perform a reorganization. If fragmentation is greater, then it is best to reindex. Indexes exist on tables and views and become more fragmented than whole pages of data on a high-data modification system. Like rebuilding indexes, reorganization of indexes should be completed on a regular basis, probably weekly; however, if your batch window allows you to perform this more frequently, then look to do so. When rebuilding indexes, you can define with a certain amount of free space to allow for increases and mid-index insertions on each index page. This is a bit like inserting lines of text in a book. If you think you are going to do this, then leaving gaps at the end of the page allows for these rows to be added. Failure to leave enough means shuffling data from that page through to the end of the book.
A maintenance plan can run within a SQL Server Agent job either as an ad hoc process or on a scheduled basis. Depending on your overall application design, or even on your company standards, it may be that you have dependencies on when a database maintenance plan can run. To expand on this to clarify my point, it could be that you have processes in the overall application that load data into your database. In ApressFinancial, this could be further details about shares, such as details of new stocks or stock actions. In corporations, it could be data from other systems, such as the orders system informing the inventory system a delivery of raw materials has been made. These processes would generate some sort of triggering action to indicate that they were complete and the database could start its maintenance. Over the years, I have used software called AutoSys, owned by Computer Associates, which schedules these jobs, and when a specific process completes I use this completion to start my maintenance task. Therefore, depending on how the whole application has been designed, a scheduled maintenance plan may be the correct method or an ad hoc/on-demand plan should be generated. It is also very easy to switch between these two, so it is not a decision that you are stuck with.
If a plan is scheduled, it should be timed for an appropriate time for the application. This could be at a quiet time of your application or at specific times within any batch processing, but, depending on what you select, a maintenance plan can be quite labor-intensive, such as rebuilding indexes and reorganizing your data. You could set up a plan to run before batch processing, at the end, or even at both ends of the schedule. Depending on the actions in the plan, it is also possible to alter the scheduling to occur when the CPU is idle. This option is ideal for heavily used, large-volume, high-performance databases where no fixed time can be defined to run the schedule, or even if you wish the process to run multiple times in a day when the server can execute the plan. One scheduling option that can be very useful is to run when SQL Server Agent starts. If a server automatically reboots, as part of a scheduled weekly reboot, or if the reboot occurs due to a Microsoft patching installation, then you may want to have a plan that takes a backup of the database, or a plan that verifies the integrity of the database post-reboot. You would create a maintenance plan to complete those tasks and use the SQL Server Agent schedule option to accomplish this.
The main option of interest when rebuilding indexes is Sort Results in tempdb. You could be low on disk space because when you built your database, you set it to grow no larger than a specific size. Couple this with a situation in which your indexes are so fragmented that they take up more space than they will post-defragmentation. This could be because you have a large number of gaps due to deletions of rows within the index or modifications on a clustered index causing rows to be moved. When rebuilding indexes, this would by default be completed within the database the rebuild is for. The “old” indexes are kept until the new indexes are built. If there is not enough space to store them, it would not be possible to rebuild the index, unless you physically increased the size of the database. This is not a simple process. Therefore, by using the option to rebuild the new indexes within tempdb, you do not need to increase your database size. Also, tempdb will not be used as intensively. Therefore, it might also be faster to rebuild your indexes within that database. This is an option you may use a great deal.
A maintenance task can also be synchronous or asynchronous where you have different tasks running at the same time. This has the potential to make the maintenance plan complete in less time, but you have to be careful that the right tasks run in the right sequence.
In the following exercise, I am going to demonstrate building a scheduled maintenance plan via a wizard.
TRY IT OUT: CREATING A DATABASE MAINTENANCE PLAN
- This is a potentially two-stage process. First, configure the server to show advanced options, then reconfigure the server and set it to
true, as detailed by the number 1, the optionAgent XPs. Enter and execute the following code:sp_configure 'show advanced options', 1
GO
RECONFIGURE
GO
sp_configure 'Agent XPs', 1
GO
RECONFIGURE
GO - You should now see the following output, which is generated from the
sp_configurestatements:
Configuration option 'show advanced options' changed from 0 to 1.

Run the RECONFIGURE statement to install.

Configuration option 'Agent XPs' changed from 0 to 1.

Run the RECONFIGURE statement to install.
- From Object Explorer, find the Management Node and expand it, and you should find Maintenance Plans. Right-click and select the second option, Maintenance Plan Wizard, as shown in Figure 8-1. This starts the wizard, and once you have read the initial screen, click Next.
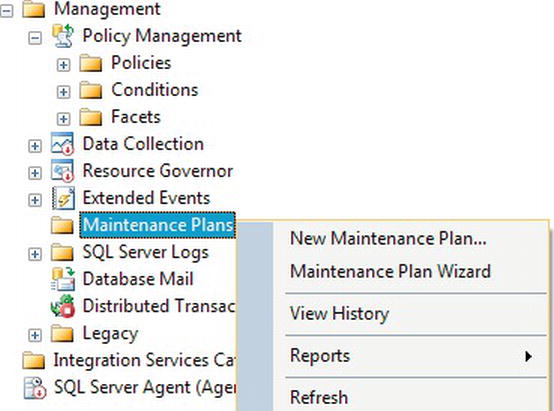
Figure 8-1. Generating a maintenance plan via the wizard
- Enter a suitable name and description for the maintenance plan. It is possible to run tasks under either separate schedules or one schedule. Choose separate schedules when you want to space the tasks out or run them simultaneously. Choose a single schedule for the entire plan when you want to run the tasks synchronously. The single schedule is the option you want to take at this time as it is possible to break out certain tasks, and I will show how this can be achieved later in the chapter. You will notice at the bottom of the screen, as shown in Figure 8-2, that you can define a schedule for the plan. The default is for it to run On Demand; however, it can run at specified times and days, and this is the option that you want. Click the Change button found at the bottom right of the screen.
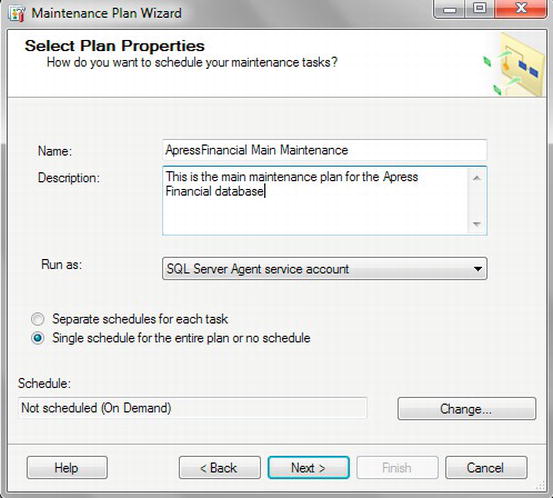
Figure 8-2. Selecting the schedule for the maintenance plan
- You will now see the screen shown in Figure 8-3, which is where you can define the schedule times for the maintenance plan. The schedule type can be one of the options discussed prior to the exercise. This plan will keep the default options, for the moment, of running weekly on a Sunday at midnight. Once the database development has progressed, this can always be changed. Once done, click OK, and then click Next when you return to the screen shown in Figure 8-2.
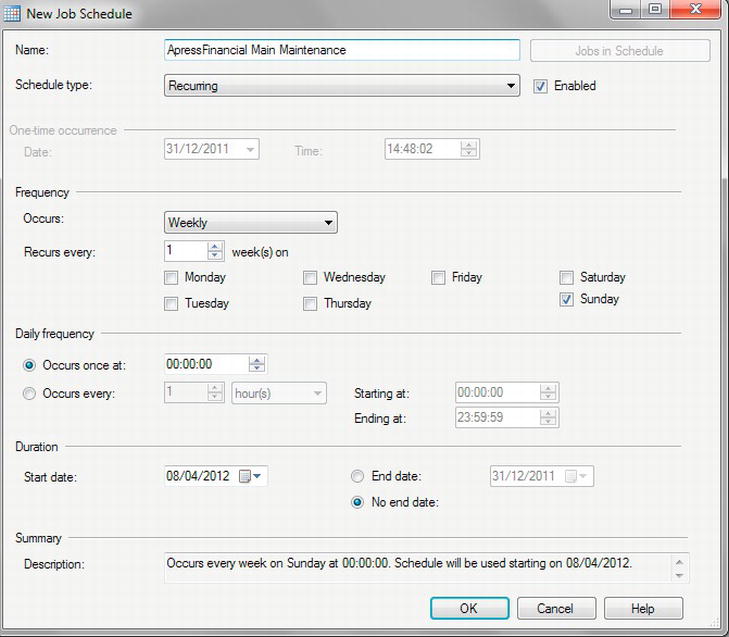
Figure 8-3. Defining the schedule
- The next screen brings you to a set of choices of actions that you wish the plan to perform. In your plan, you will be performing almost every action, with the exceptions of cleaning up the history of the database and the differential backup option. You will add the option of cleaning up the history later when showing how to modify a plan. Select the options as shown in Figure 8-4, and click Next.

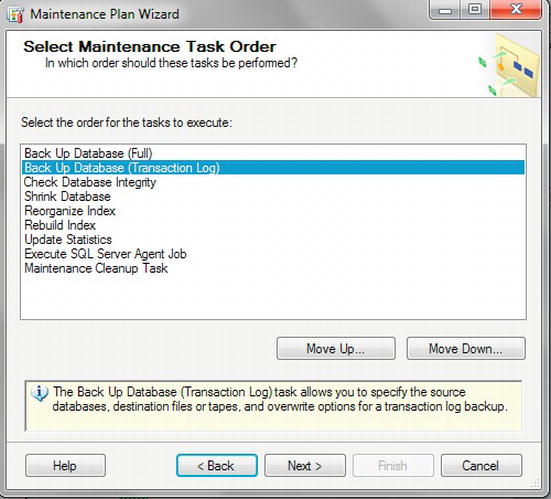
- This then brings you to a summary of the options that have been selected. It is now possible to move the options to a different order if you wish. As you can see in Figure 8-5, the Back Up Database (Full) option has been moved up to the start and the transaction log backup second. This is in case any of the following options fail and cause corruption. You may wish to move these options to the end if you have a good backup scheduled before this maintenance work. This is a decision that you have to make as any restore may require a rerun of the commands after the full backup. There is no recommended order. Once you have the order you want, click Next.
- The wizard then moves on and takes each task one at a time and gives you a screen containing options available for that task. The first option you have is a full backup, as shown in Figure 8-6, as this was the first option in the order I defined. Most of this is very similar to the backup you completed earlier. However, it is possible to select specific databases or all databases as part of this plan. Select the Specific Databases option to be taken to a second screen, where you can define which ones to back up.

- When you choose to back up specific databases, Figure 8-7 appears. Here you can select—only for this task within the plan—which database or set of databases you want to work with. It is best to have separate maintenance plans for each user database and one separate maintenance plan for the system databases, as I mentioned earlier. This splits up the workload not only into sizable, useful, and easy-to-understand units of work, but also into logical components as each database may have a different maintenance plan. You will also have different requirements for the system databases from the user-defined databases as mentioned in Chapter 7. It is preferable not to select the All User Databases option because SQL Server will automatically begin running the maintenance plan on databases that may have been added without your knowledge, and may not be under your “ownership.” For your example, select the
ApressFinancialdatabase after clicking the “These databases” radio button. Click OK. This will return you to the full backup screen, where you can click Next. The full list of choices is as follows:- All Databases: Specifies all system and user databases
- System Databases: Ignores all user databases, such as
ApressFinancial - All User Databases: Ignores any system-defined database, such as
master,model, and so on - These Databases: Allows you to select which system and user databases you wish to use
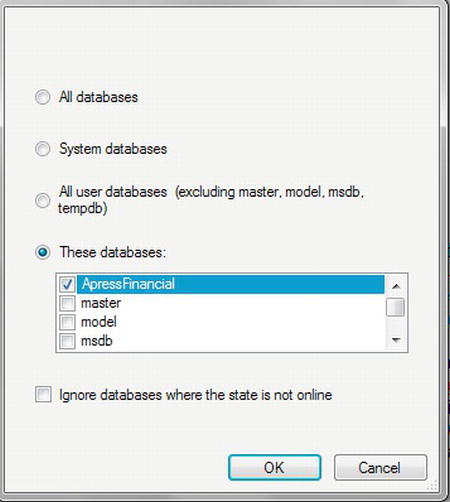
Figure 8-7. Selecting the database to use
- The next option for the wizard is a transaction log backup. Select the specific databases option again and then
ApressFinancialto back up its transaction log. Click Next to move on to the third item. - In the subsequent screen, which you see in Figure 8-8, you progress to the next task in the ordered list, which is the check integrity task. This task instructs SQL Server to perform a special SQL Server command that checks the integrity of the database to see that everything is in a stable and noncorrupt state. It does this by running a SQL Server command,
DBCC CHECKDB. Once you have selectedApressFinancial, the “Include indexes” option is automatically checked. Click Next.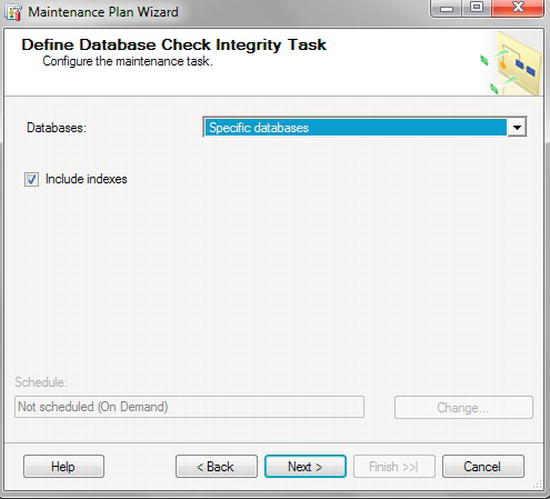
Figure 8-8. Database integrity check
DBCCis short for database console commands. TheCHECKDBcommand runs three sub-DBCCcommands to simplify the process so that you don't have to run the three commands yourself. The first isDBCC CHECKALLOC, and this checks the space allocation of the database. The second command isDBCC CHECKTABLE. This command will check that the pages of each table are valid and not corrupt. The final command isDBCC CHECKCATALOG, and this checks the consistency of the system metatables.- Moving on, you can define when to reduce the logical or physical size of your database through the screen shown in Figure 8-9. The “Return freed space to operating system” option will shrink the database if it has space it is not fully using. Be aware, though, that shrinking the database takes a fair amount of your server resources, and it may be better to keep the space within the database unless you had a one-off expansion. You don't want to shrink the database for it to have to be expanded very soon after shrinking the size. The shrinking of a database I have found not to be a common exercise, but it exists in this example so you are aware of the option. After you select this option, you will be given the opportunity to still leave a given percentage of space free for database growth. Do not fully shrink the database to 0% of free space or your performance will be worse, as the database will have to grow automatically.
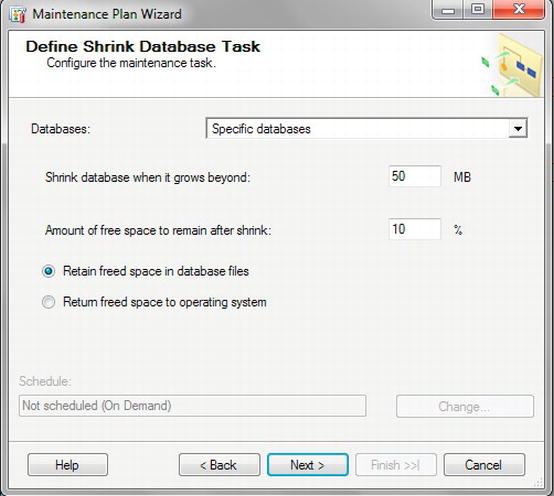
Figure 8-9. Shrinking the database
- Click Next to bring up the Define Reorganize Index Tag screen, shown in Figure 8-10. As data are added, modified, and deleted, indexes, like tables, can also require reorganizing, which you can do through this screen. Again, this is like a hard drive defrag where there are gaps or data out of order, and by reorganizing indexes you can ensure that SQL Server is able to access the data as fast as possible. This option, which should be completed at least weekly for a high-data modification system, moves only index pages.
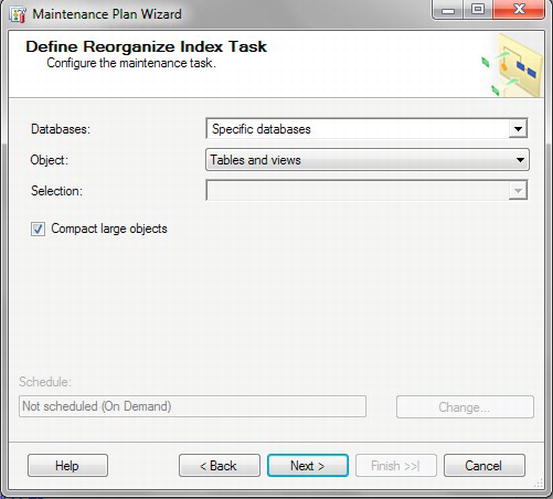
Figure 8-10. Reorganizing the indexes
- Click Next to bring up the screen shown in Figure 8-11. This next screen deals with individual rows of indexes. Before you go on, note that there is no real point to reorganizing and reindexing in the same maintenance plan. You should do only one or the other. Which option you should choose comes down to the amount of fragmentation within an index. Fragmentation and reorganization were discussed earlier. Select the
ApressFinancialdatabase in the Databases drop-down and the “Sort results in tempdb” option.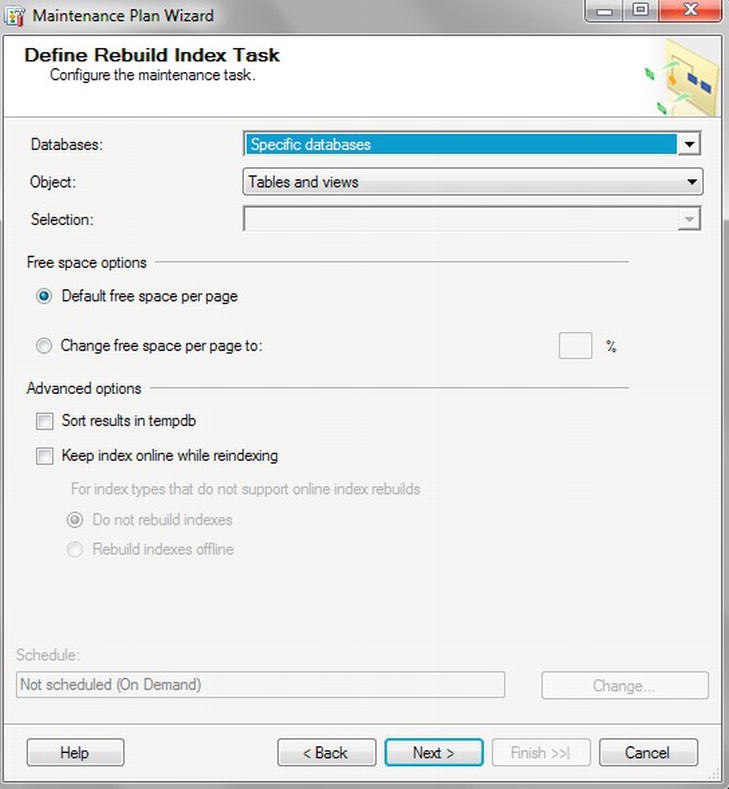
- Move on to the Define Update Statistics Task screen, shown in Figure 8-12, by clicking Next. As has been mentioned before, as data are created, modified, and deleted, SQL Server keeps statistics on that data to aid data retrieval. These can become out of date either because you have set up your database not to keep statistics updated automatically or because the statistics naturally become out of date. Therefore, you can re-create those statistics with the plan. Statistics are kept not only for indexes but also for data within individual columns.
 Tip The Auto Update Statistics database option is normally on; although this does mean more processing for SQL Server, the increase is minimal, and you'll rarely notice any impact. Some installations will have this switched off so that statistics are updated via a scheduled task. This is sometimes the case when every nanosecond of response time is required from the server, so it is worth checking the setting if you are unsure.
Figure 8-12. Updating the database statistics
- Clicking Next will move you to the SQL Server Agent screen. Sometimes there will be a separate job or process to run that is outside of the possible actions within the wizard. This could be to check that the database still meets the standards defined as you saw when you checked whether the database met the ANSI NULLS test. The jobs that are currently defined within SQL Server Agent are listed in this dialog, as shown in Figure 8-13. Select any jobs you wish to run. There is a job within SQL Server that removes the history of checking policies already existing, and as you selected as one of the options that you wanted to define a job to execute, you do have to select at least one job to proceed to the next screen. Click Next.

Figure 8-13. Defining a process to run inside a SQL Server Agent job
- The Define Maintenance Cleanup Task screen, shown in Figure 8-14, defines the cleanup actions of the maintenance task when it runs. This is ideal to ensure that your maintenance plans don't take up unwanted and unnecessary space and are easy to view and monitor. Click Next.
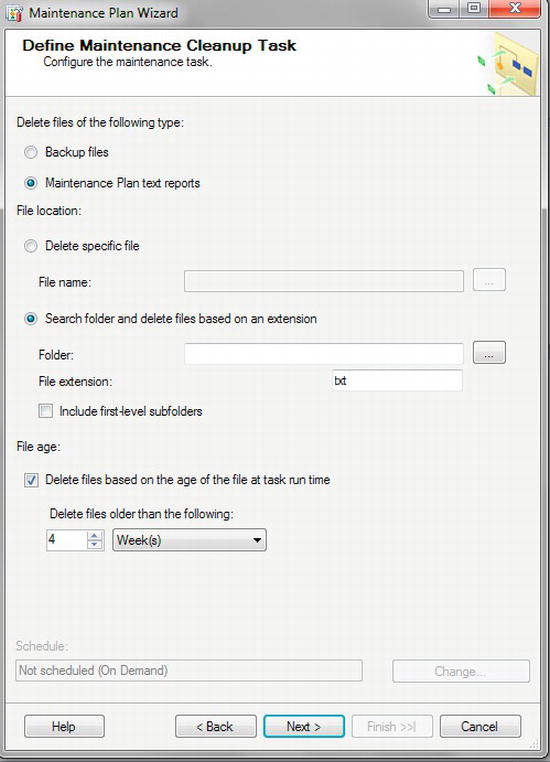
Figure 8-14. Ensuring the maintenance task is cleaned up efficiently
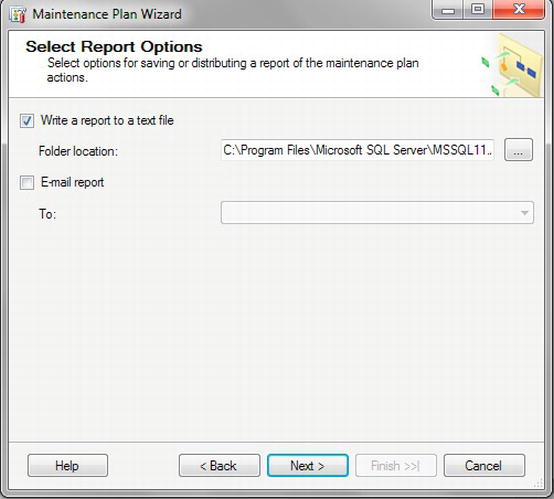
- The next task, illustrated in Figure 8-15, involves choosing where to write out the details of the maintenance plan and each step's success or failure. For the moment, place the output in a report. Later in the chapter, you will see how to mail that report from SQL Server. Click Next.
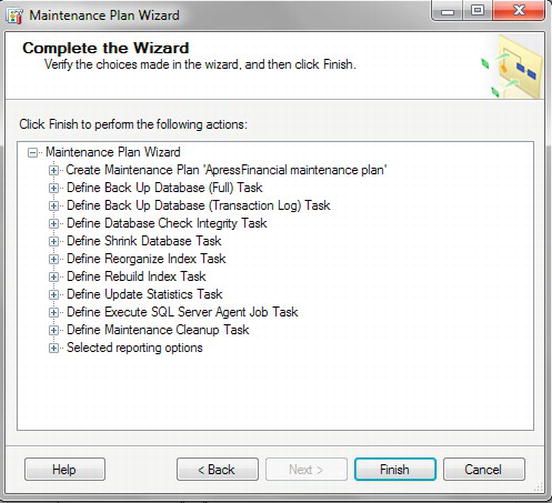
- Similar to when you produced a script for the database, you will now see a summary of what will be performed within the plan (see Figure 8-16). Here you can review what will be completed, and with the number of different options that will be performed, it is a good place to complete a double-check. Clicking Finish produces the maintenance plan itself.
- Once the plan is within
msdbdatabase, you should see the completed screen shown in Figure 8-17.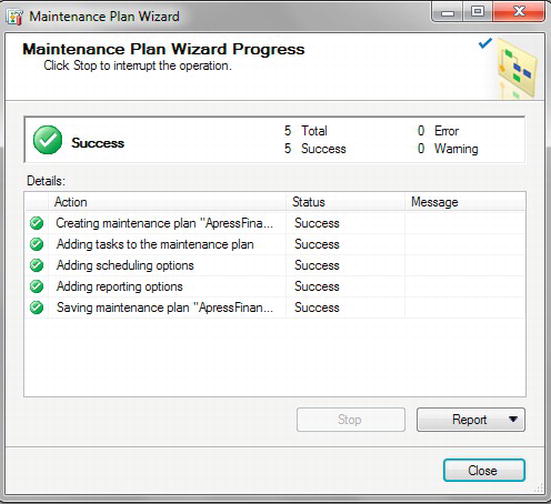
You now have successfully built a maintenance plan. You may have several plans, one for a weekend, one for pre-batch, etc., all dependent on how you want to maintain your database. The important point is that you backup your database.
The next step is to execute the plan.
Executing the Plan
Now that a plan has been built, the next step will be to execute the plan. For a maintenance plan to execute, SQL Server Agent needs to be running. It is likely at this point in the book that it is not, as it will be defined to start manually rather than automatically. This default exists for security reasons so that jobs cannot be built, deployed, and then executed on your server without your prior knowledge. You may find that some corporations keep SQL Server Agent stopped until required. It is possible to start SQL Server Agent within Management Studio for ad hoc starts of the process, or you can start the service from Administrative Tools within the Control Panel. It is also possible to start SQL Server Agent via a command prompt, therefore allowing you to put the start and stop into scheduling software.
In the following exercise, you will see how to start SQL Server Agent and then execute a maintenance plan manually.
TRY IT OUT: EXECUTING A DATABASE MAINTENANCE PLAN
- You can start the SQL Server Agent service with one of two methods. The first and likely the most common method will be to start the service within Windows rather than Management Studio, by selecting Start
 Control Panel Administrative Tools Services, as shown in Figure 8-18.
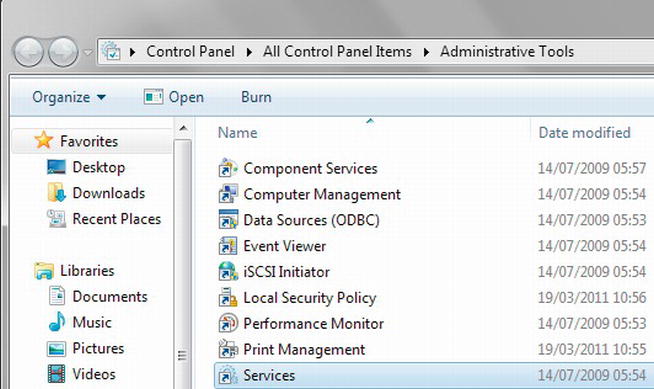
Figure 8-18. Finding the Services option within the Control Panel
- Double-click Services, which displays Figure 8-19. Scroll down until you see SQL Server Agent and the instance name you want to define the SQL Server Agent starting action. In your case, it will be
APRESS_DEV1, but there will be one entry per SQL Server instance on a box. Notice in Figure 8-19 that the status is blank and the Startup Type is set to manual. This denotes that the service has not started and it will not start automatically.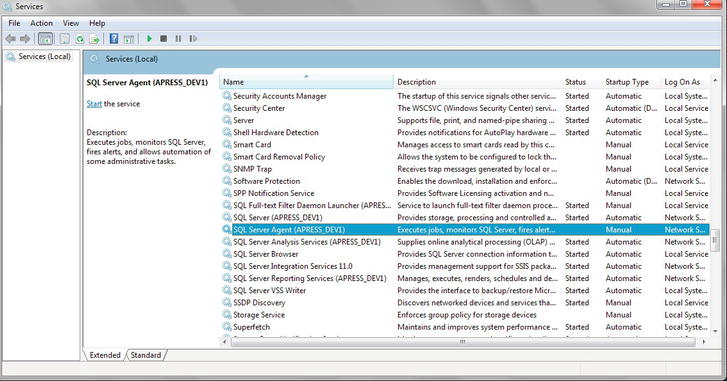
Figure 8-19. Locating SQL Server Agent for the required SQL Server instance
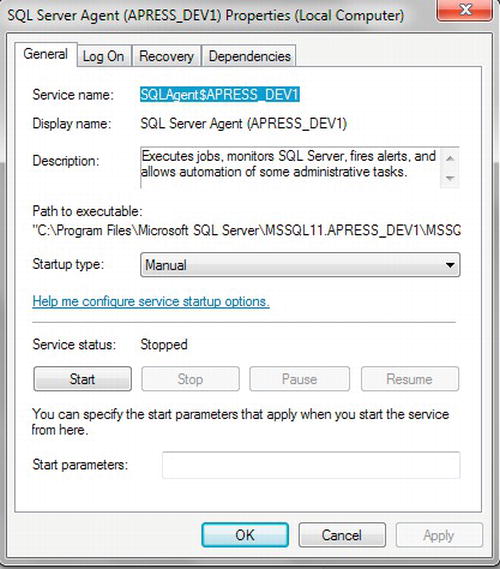
- Highlight SQL Server Agent, right-click, and select Properties. This will display a screen similar to Figure 8-20. This screen is very similar to what you would see for any service listed within the Services window. The first tab indicates the service name, how the service starts, and the current running state of the service. It is advisable to keep the startup type as manual. You will return to this tab in a moment to start SQL Server Agent, but click the Log On tab.
- To start the SQL Server Agent service within SQL Server, find the SQL Server Agent node within Management Studio, right-click, and select Start, as demonstrated in Figure 8-21.

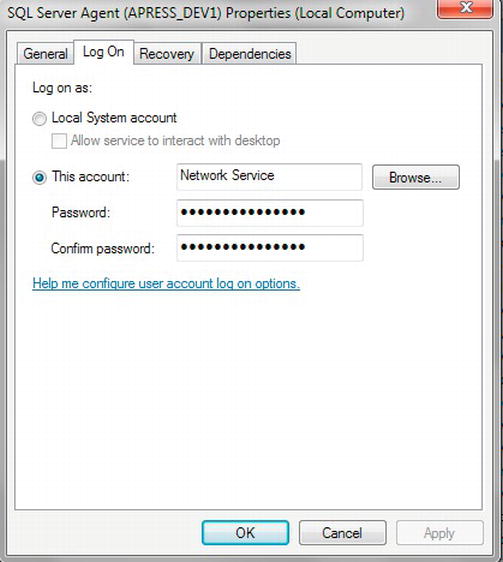
- When you were installing SQL Server in Chapter 1, you had to make a decision on what accounts should be used for certain processes. One of those processes was SQL Server Agent, and you will see the account chosen. Here you can alter which account you wish to use. Some companies wish you to use a separate Windows account rather than a Windows-system based account as was chosen during installation and shown in Figure 8-22. Keep the account defined in Chapter 1 as this is the best option for the current setup. If you did not start SQL Server Agent from within Management Studio, move back to the General tab and click Start. Click OK to close the screen.
- Now that SQL Server Agent is running, you can execute the plan. If the plan had a scheduled start date and time, it is possible to execute the plan outside of the maintenance plan schedule rather than having to wait on the chosen time. Move back to Management Studio, where the maintenance plan created previously can now be found under the Management/Maintenance Plan nodes in Object Explorer. Right-click the nodes to bring up the pop-up menu shown in Figure 8-23. Selecting Execute starts the plan immediately. Do so now.

- While the plan is executing, the dialog box shown in Figure 8-24 is displayed.
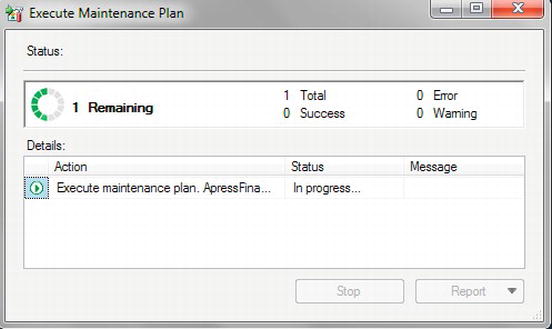
Figure 8-24. Maintenance plan executing
- In Figure 8-25, you can see the log that has been created for the maintenance plan once that plan has been completed. You can view this log by selecting View History from the same pop-up menu used to execute the plan. On the left, you can view other logs that are generated within SQL Server. Notice in the figure that I have selected one of the steps, and in the bottom half of the screen, if there had been an error, then the error details would be shown. You can also view the T-SQL that was executed.

Figure 8-25. Log file viewer showing the maintenance plan has run
Setting Up Database Mail
It would be better to be notified about jobs that have failed rather than having to monitor each job as it processes manually. One of the ways to do this would be for the maintenance job to mail out results of its work. It is possible in SQL Server to use SMTP mail to send out notifications from your server. This means that you don't need to install a MAPI client, such as Microsoft Outlook, because SMTP processing is contained within a Windows install. The fact that you don't need another product on the server has benefits in terms of making your server more stable. To supplement stability, SMTP runs in a process outside SQL Server. Even if there are SMTP issues, SQL Server should not be affected if the SMTP process stops for any reason.
On top of this, SQL Server comes with built-in system stored procedures and functionality to use SMTP to send out mail. These features are collectively called Database Mail.
The use of Database Mail has many positives for error notification, but it is not the total solution for monitoring SQL Server or even the underlying server. The most extreme problem is that the server crashes, reboots, uses 100% processing power, and runs out of memory, among other server-specific problems, all of which would stop an e-mail being sent. Other tools need to be deployed on the server that are either third-party-based or where you can write your own using .NET, Java, etc. The very basic premise of these tools is that they “heartbeat” at regular intervals, in other words, transmit at regular intervals notifications to a central separate server that the Windows server is alive and performing well. The tool will have performed the necessary health checks about the server and notify via the heartbeat if it notices an issue arising to the central server. The central server looks out for problems, and then it notifies the necessary person, who can then react to the issue. This tool is generally standardized company-wide and not on a per-server basis.
This section will cover only how to set up and test Database Mail and will not cover the monitoring of the Windows server. You will see how to implement Database Mail within the maintenance task created in the preceding section.
TRY IT OUT: SETTING UP DATABASE MAIL
- To configure Database Mail, you need to create a mail profile for SQL Server to use. SQL Server Agent must be running to be able to create a mail profile. If SQL Server Agent is not running (although from the maintenance plan example it is likely that it is running), as denoted by a red circle with white cross or white circle with a red arrow, then highlight it, right-click, and select Start, as shown in Figure 8-26.
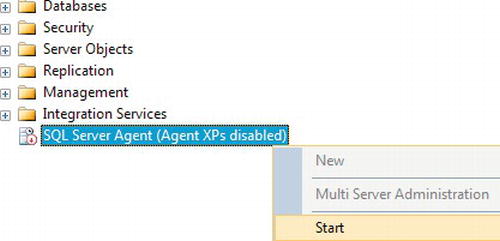
Figure 8-26. The Configure Database Mail pop-up menu option
- Find the Database Mail node under the Management node. Right-click, and select Configure Database Mail, as shown in Figure 8-27. By selecting Configure Database Mail, you start the Database Mail Configuration Wizard. The first screen is a Welcome screen. Click Next to take you past the welcome screen within the wizard.

- Figure 8-28 shows the first screen of the configuration. This screen allows you to complete one of three tasks. As there are no existing mail accounts set up via either SQL Server or the Windows Control Panel's Mail option, you require the first Configuration Task option. If you already have on your server a mail account you wish to use, then select the second option. The third option lets you change the options if you already have Database Mail set up. Click Next.
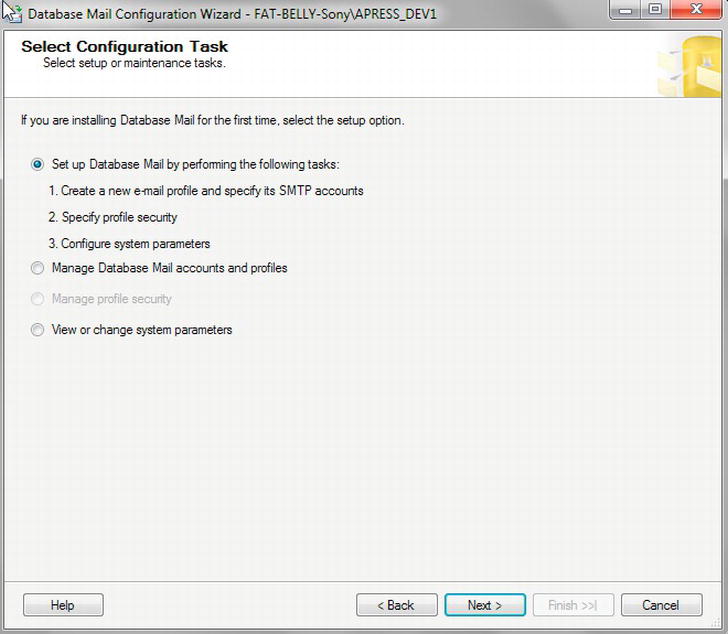
Figure 8-28. Create or manage a new profile and system parameters
- Database Mail would normally be enabled via a system stored procedure,
sp_configure 'Database Mail XPs'. If it is not enabled, then a helpful message is shown. If you see this dialog, then click Yes. - You should now be at the start of setting up a new profile, as shown in Figure 8-29, where the profile name and description have been entered. Once you're happy with your description, click Add to create a new SMTP account.
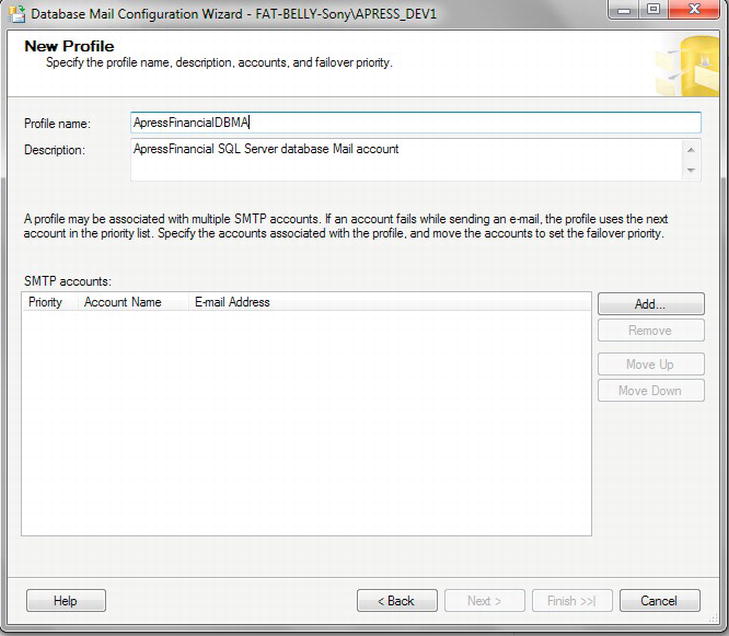
Figure 8-29. A New Profile screen with no profiles already existing
- This brings you to the dialog shown in Figure 8-30, in which you need to specify your SMTP details. The settings are similar to what you would use when setting up your mail account within Outlook, Outlook Express, or any other SMTP (or MAPI) e-mail client. Recall, though, that SQL Server is using SMTP, so you don't need Outlook or any other MAPI mail client installed, and you need only the details you would use to connect to your SMTP server. If you're uncertain about any of the details that you need, contact your ISP or your mail administrator.
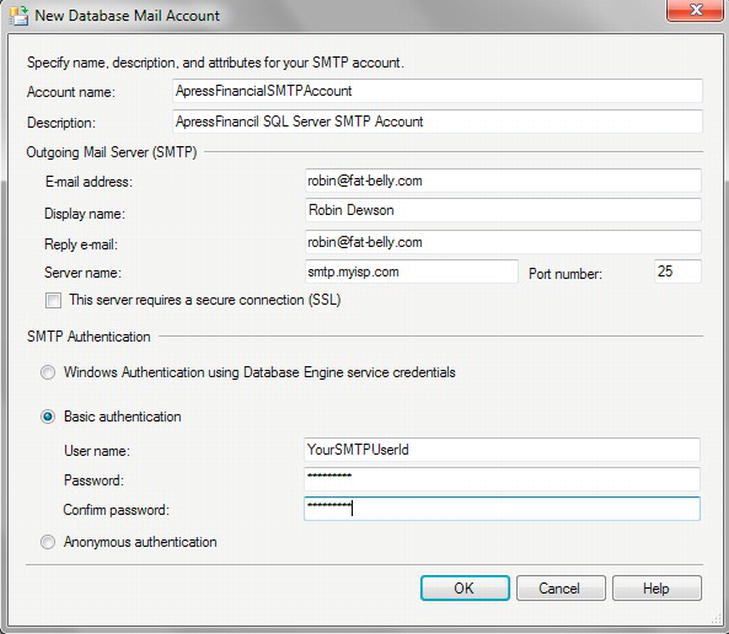
- Clicking OK adds the details to the
msdbdatabase on the server and then adds the account name in the New Profile dialog, as shown in Figure 8-31. The mail account at this point, though, has not been created within Windows. When you're ready, click Next.
- You are now at the screen for the public and private profiles. A public profile is one that has been created for any login to use in sending an e-mail from within SQL Server. You will use that option for simplicity, as shown in Figure 8-32. However, you should use a private profile when you have decided on your SQL Server implementation strategy, as its use is restricted to specific roles within the database. Private profiles are the more secure option and would prevent someone from deliberately or inadvertently sending out a mass e-mail from your server. The final action would be to make the profile the default, also known as global, mail profile so that you don't have to define the specific profile each time. If you do decide on a public profile as part of your setup, then you could be opening your organization up to mass mailings via a rogue piece of code if you define the profile as the default. Select the public profiles option with care.
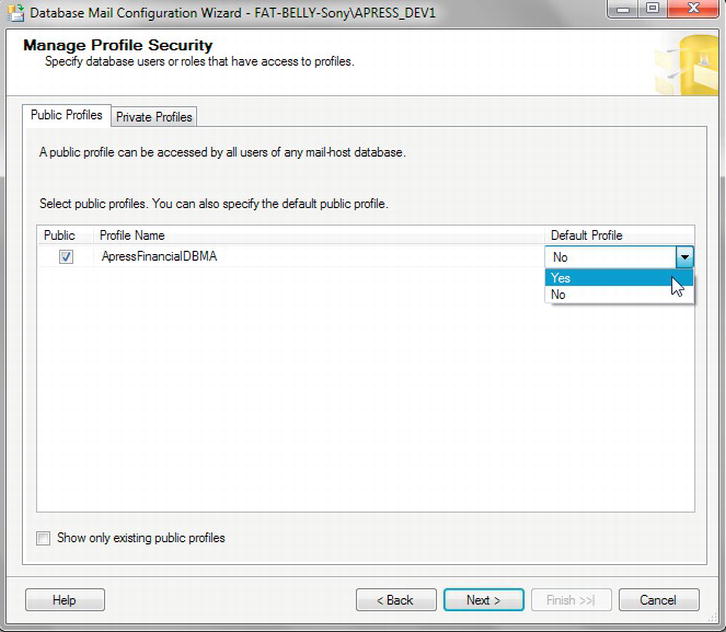
Figure 8-32. Private profile screen detailing private mail access only
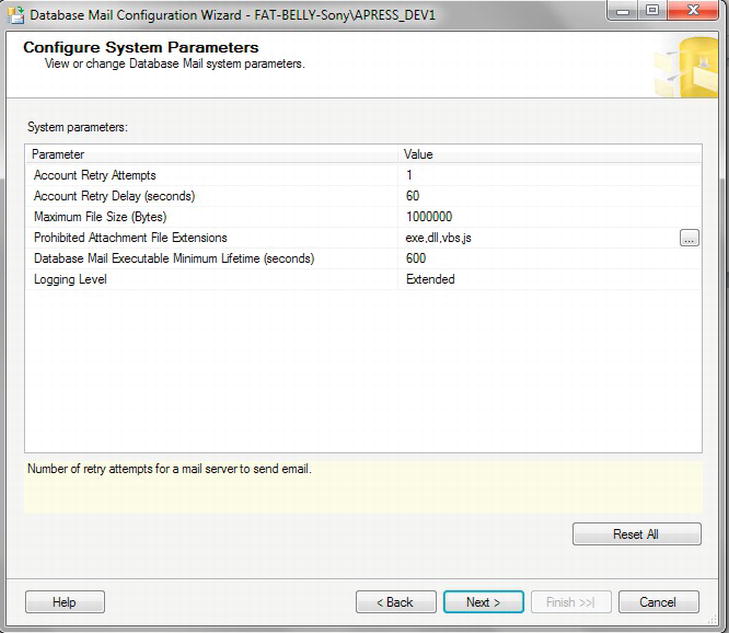
- The last screen, shown in Figure 8-33, details the system parameters for mailing. These are the same system parameters that you can alter through the third option that you saw in Figure 8-28. The parameters include the following:
- Account Retry Attempts: Determines the number of times to attempt to send a mail before marking the mail as failed to deliver
- Account Retry Delay (Seconds): Determines how long to wait before trying to send a mail again
- Maximum File Size (Bytes): Limits the size of mail that can be delivered to prevent large files being sent out; if you're sending out reports as well as job notifications, you may want to set up two profiles—one with a larger maximum file size than the other.
- Prohibited Attachment File Extensions: Defines which file extensions are prohibited; obviously, you don't wish your database to send out dangerous e-mails or even e-mails containing executables that are protected.
- Database Mail Executable Minimum Lifetime (Seconds): It's always best to shut down processes that are not required on a server to free up as many resources as possible. This option defines the number of seconds that Database Mail will continue to run while waiting on any new mails to process before shutting down. If the number's too low, resources will be used to start and stop frequently, so don't reduce this figure too much.
- Logging Level: When an e-mail is sent, fails to send, or is queued to send, these actions can be logged within the
msdbdatabase. Three possible logging levels for Database Mail can be used to track these and other scenarios: - Normal: Logs only any errors regarding sending your mail
- Extended: Logs errors, warnings, and information about your mail
- Verbose: Logs everything Database Mail does; this is the best setting to use when setting up Database Mail for the first time so that any errors generated from this wizard or your first executions are logged. However, the logging at this level is severe and not recommended to remain in force for extended periods, as it creates a large
msdb.
- When you're done, click Next.
- You will now see a summary screen indicating the options selected, as shown in Figure 8-34. When you click Finish, SQL Server processes the wizard and adds the profile and the mail account to SQL Server.
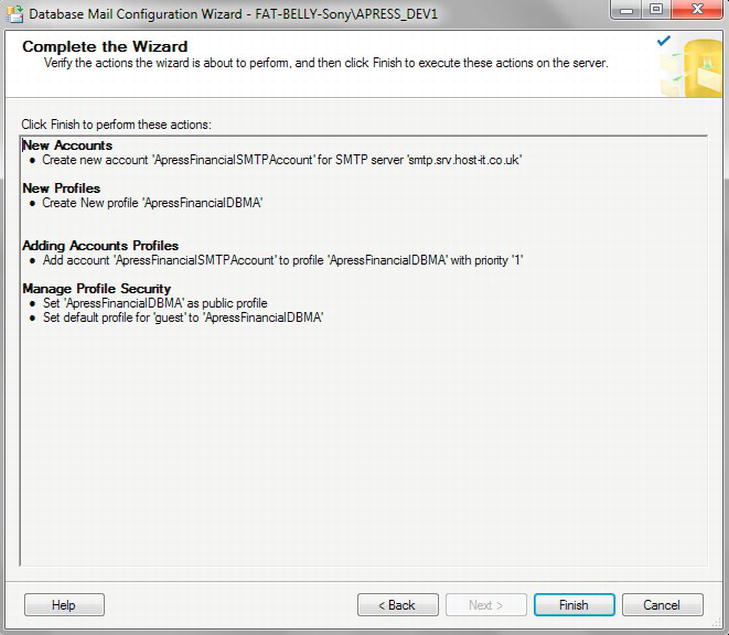
Figure 8-34. The final Database Mail configuration screen, ready to process
- Providing everything has been created correctly, you should see a dialog similar to Figure 8-35. No mail testing is completed at this point, so to do that part of the setup, click Close. The next action will be to test out your setup.
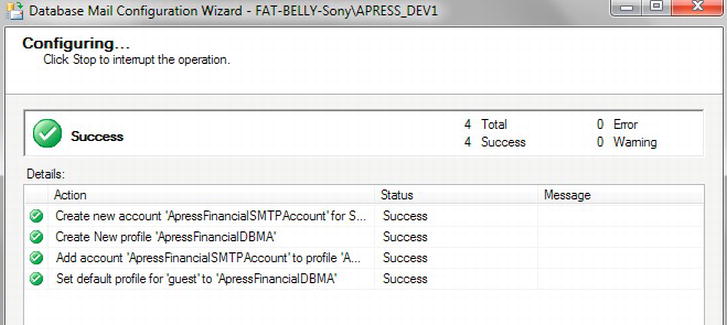
Figure 8-35. The account profile and details created successfully
- Now that your Database Mail is set up, send a test e-mail to check out your SMTP settings, connection, and so on. From the Database Mail node, right-click, and select Send Test E-Mail from the pop-up menu, as shown in Figure 8-36.
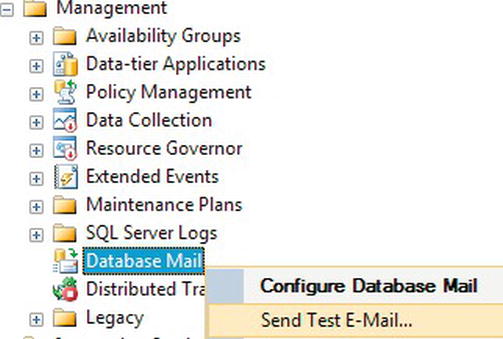
Figure 8-36. The pop-up dialog to check for sending a test e-mail
- This then shows you a dialog similar to the one in Figure 8-37, which has been populated with the details of the test e-mail to send. If you have more than one profile, select each profile in turn to test them out and ensure they're working. Once completed, click Close.

Figure 8-37. Sending a test e-mail to check that everything is all okay
Modifying a Maintenance Plan
At this point, you have created a plan using the wizard, and you now have a working Database Mail account. In this section, you will apply the account to the maintenance plan and send the mail when the plan runs.
It is possible to modify the plan and add or remove steps, change the description, or add further subplans. The maintenance plan uses SQL Server Integration Services, which is commonly known as SSIS, to perform its duties. SSIS uses steps shown in a flowchart to demonstrate which items are being dealt with. SSIS is outside the scope of this book, so you won't be looking any further at modifying the plan by drilling into it to see the steps. Instead, you will alter only the reporting method. However, SSIS is an interesting area, especially if you want to move to the analysis of data via Business Intelligence and working with data in cubes. SSIS is used heavily in this area to load the initial data into a SQL Server database, which is then used to build a cube of data that is then “sliced and diced” to look at the data in many different ways. But if you are interested in using SSIS to work with your data, then I recommend the following books:
- Pro SQL Server 2012 Integration Services, by Francis Rodrigues and Michael Coles (Apress, 2012)
- SSIS Design Patterns, by Matt Masson et al. (Apress, 2012)
TRY IT OUT: SETTING UP DATABASE MAIL
- The first step is to provide a specific operator within SQL Server Agent for the maintenance plan. From Object Explorer, select SQL Server Agent and highlight Operators. Right-click and from the menu select New Operator, as shown in Figure 8-38.
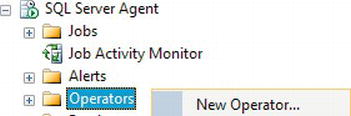
Figure 8-38. Creating an operator from SQL Server Agent
- The New Operator screen is then shown, where you can enter how this operator will operate. You are required to give a name and then one of three methods of notification. The operator is for the maintenance plan, and the operator will have a “To” e-mail name. I have entered my own e-mail address, as shown in Figure 8-39. Once you have entered your own e-mail address, click OK to add the operator.
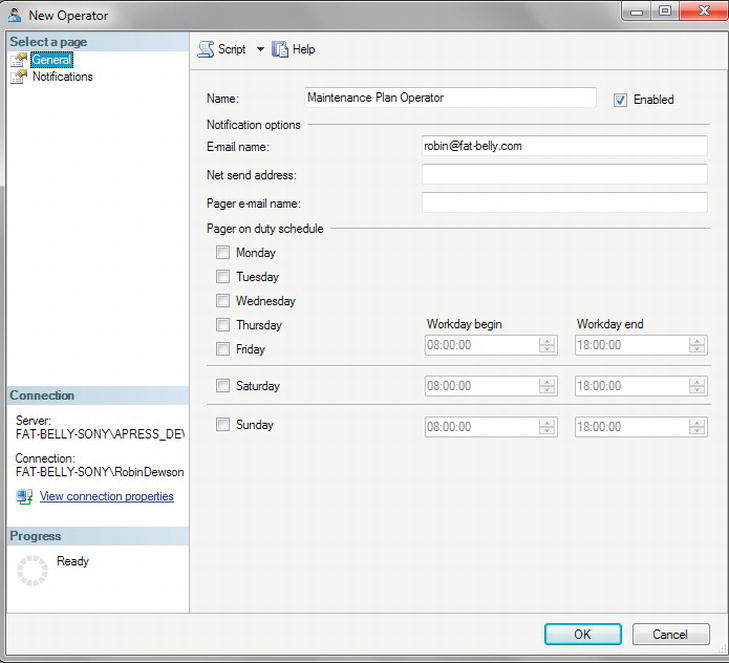
Figure 8-39. New Operator screen defining notifications
- Now find the plan generated earlier in the Maintenance Plans node under the Management node in your SQL Server Object Explorer. It may well be highlighted from your execution earlier. Right-click and select Modify, as demonstrated in Figure 8-40.
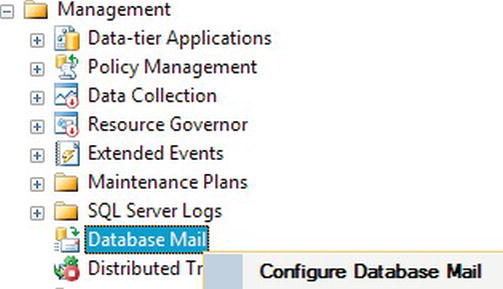
Figure 8-40. Modifying the existing plan
- As partially shown in Figure 8-41, you are now presented with a new tab in SQL Server Management Studio that shows a graphical representation of the maintenance plan. What you will see is a simplistic SSIS project.
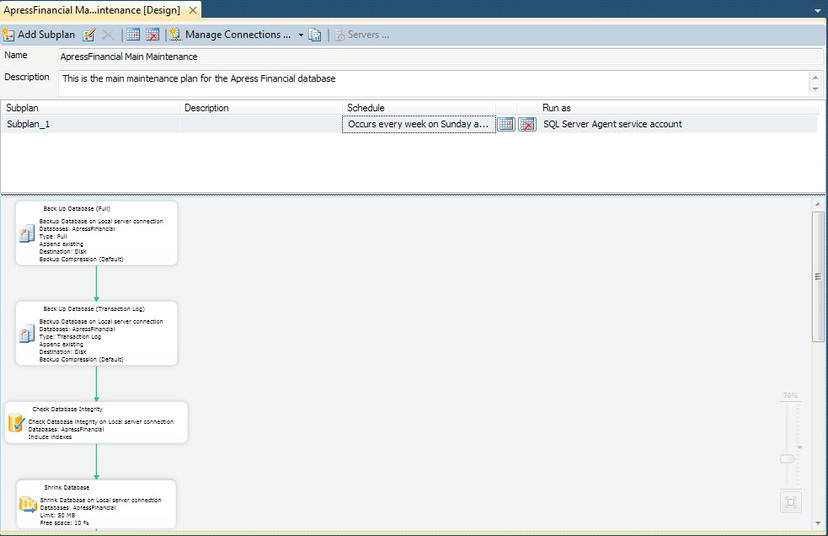
Figure 8-41. The maintenance plan in graphical format
Note In the bottom right of the screen, you will see a very faint graphic. This is a slider that will allow for zooming in and out of the maintenance plan. You can also drag the steps around the screen to get a different layout. - As shown in Figure 8-42, to the right of the Manage Connections button on the plan toolbar is a button to alter the reporting and logging options.

Figure 8-42. Managing the Maintenance Plan connections
- You are now presented with the Reporting and Logging dialog, as you can see in Figure 8-43. It is possible to produce both a text and an e-mail version of the report. Select the “Send report to an email recipient” option to use the SQL Server Agent operator created in the previous section. Once complete, select OK.

Figure 8-43. Reporting and logging
- Once you close and save the maintenance plan, you can now execute it. You should receive an e-mail detailing either a success or a failure of the job and the steps within the job.
Summary
Having a positive, regularly run maintenance plan is required to ensure your database is working correctly and performing as well as it has been designed to do. Ensuring that errors are found and dealt with by checking the database integrity, that statistics are as up to date as possible, making sure that indexes are reorganized and ensuring that errors are logged and correctly reported will avoid problems occurring, as errors may occur at the worst possible time in the life of the corporation.
As part of this maintenance plan, it is also necessary to be notified of problems so that you're aware of them and can deal with them quickly and efficiently. A database mail account is perfect for this, as it can notify you of problems in a process out of SQL Server.