C H A P T E R 11
Building a View
A view is a virtual table that, in itself, doesn't contain any data or information. All it contains is the query that the user defines when creating the view. A view is a named query against one or more tables. Views are used as a security measure by restricting users to certain columns or rows from an underlying table, as a method of joining data from multiple tables and presenting it as if that data resided in one table, and as a method of returning summary data instead of detailed data. Another use for a view is to provide a method of accessing the underlying data in a manner that provides the end user with a business layout. For example, you will see within this chapter the building of a view that shows customer details along with enriched transaction details, thus making it easier for anyone interrogating your data, even someone who has no knowledge of the underlying data model, to access useful information.
Building a simple view is a straightforward process and can be completed in SQL Server Management Studio or a Query Editor pane using T-SQL within SQL Server. Each of these tools has two options to build a view, and this chapter covers all four options so that you become conversant with building a view, no matter which tool is currently at hand.
To give things a bit more bite in this chapter, I'll also demonstrate a query within a query, known as a subquery, along with how to create a subquery to create a column in a result set.
Finally, having an index on a view can speed up data retrieval, but it also can create performance problems just as indexes on tables can create performance problems. Building an index on a view is not quite as straightforward as building an index on a table.
The aim of this chapter is to
- Make you aware of what a view is
- Inform you as to how views can improve a database's security
- Show how to encrypt your view so that the source tables accessed cannot be seen
- Demonstrate building a view using
- Management Studio View Designer
- An existing viewA Query Editor pane and T-SQL
- Show how to join two tables within a view
- Demonstrate subqueries within a view
- Build an index on a view and give the reasons you would or would not do this
Why a View?
There will be times when you'll want to group together data from more than one table, or perhaps allow users to see only specific information from a particular table, where some of the columns may contain sensitive or even irrelevant data. A view can take one or more columns from one or more tables and present this information to a user, without the user accessing the actual underlying tables. A view protects the data layer while allowing access to the data. All of these scenarios can be seen as the basis and reason for building a view rather than another method of data extraction. Views are similar to queries in Microsoft Access. Because a view represents data as if it were another table—a virtual table in fact—it is also possible to create a view of a view.
Let's take a look at how a view works. As you know, there is a customer table that holds information about your customers, such as their first names, last names, account numbers, and balances. There will be times when you'll want your users to have access to only the first and last names, but not to the other sensitive data. This is where a view comes into play. You would create a view that returns only a customer's first and last name but no other information, hiding from view his or her financially sensitive data.
Creating a view can give a user enough information to satisfy a query he or she may have about data within a database without that user having to know any T-SQL commands. A view actually stores the query that creates it, and when you execute the view, the underlying query is the code that is being executed. The underlying code can be as complex as required, but leave the end user with a simple SELECT * statement to run with perhaps a small amount of filtering via a simple WHERE clause. Similar to retrieving data from a table, you should name your columns to return and not use the SELECT * format to return all columns.
Using a view, in addition to retrieving data, you can also modify the data that are being displayed, delete data, and in some situations, insert new data. There are several rules and limitations for deleting, modifying, and inserting data from multitable views, some of which will be covered in the “Indexing a View” section later in the chapter.
However, a view is not a tool for processing data like a stored procedure is. A view is able to hold only one query at a time. Therefore, a view is more like a query than a stored procedure. With views, you can include tables from databases that are running on different servers just as you can with stored procedures or queries within Query Editor. Providing the user ID has the necessary security credentials, it is possible to include tables from several databases.
So to summarize, a view is a virtual table created by a stored SQL statement that can span multiple tables. Views can be used as a method of security within your database, and they provide a simpler front end to a user querying the data.
Later in the chapter, you will see how to build a view and how all of these ideas are put into practice. Before we get to that, let's look in more depth at how a view can be used as a security vehicle
![]() Note When there is more than one table to retrieve data from on a regular basis, creating a view is quite often a sensible solution, even more so when you want to use views as a method of simplifying the database schema and abstracting the database data into a presentation layer for users.
Note When there is more than one table to retrieve data from on a regular basis, creating a view is quite often a sensible solution, even more so when you want to use views as a method of simplifying the database schema and abstracting the database data into a presentation layer for users.
Using Views for Security
Security is always an issue when building your database. So far, the book has covered the different database-provided roles, when to use them, how to set up different types of roles, and how useful they are. By restricting all users from accessing or modifying the data directly in the tables, you will then force everyone to use views and stored procedures to complete any data task. (There will be more on stored procedures in the next chapter.)
However, by taking a view on the data and assigning which role can have select access, update access, and so on, you are protecting not only the underlying tables, but also particular columns of data. This is all covered in the discussions involving security in this chapter and how to lock down direct access to the tables.
Security encompasses not only the protection of data, but also the protection of your system. At some point as a developer, you will build a view and then someone else will come along and remove or alter a column from an underlying table that was used in the view. This causes problems; however, this chapter will show you how to get around this problem and secure the build of a view so that this sort of thing doesn't happen.
Imagine that you have a table holding specific security-sensitive information alongside general information—an example would be where you perhaps work for the licensing agency for driver's licenses, and alongside the name and address, there is a column to define the number of fines that have had to be paid. As you can see, this is information that should not be viewed by all employees within the organization. So, what do you do?
The simplest answer is to create a view on the data where you exclude the columns holding the sensitive data. In this way, you can restrict access on the table to the bare minimum of roles or logins, and leave either a view or a stored procedure as the only method of data retrieval allowed. This way, the information returned is restricted to only those columns that a general user is allowed to see.
It is also possible to place a WHERE clause within a view to restrict the rows returned. This could be useful when you don't wish all employee salaries to be listed: perhaps excluding the salaries of the top executives would be advised!
All these methods give you, as a developer, a method for protecting the physical data in the base tables behind the views. Combine this with what you learned about roles and restricting table access, and you can really tighten the security surrounding your data. With more and more companies embracing initiatives like Sarbanes-Oxley, where security should be so tight a company can be defined as having secure data, views are a great method of getting toward this goal.
Another method of securing views is to encrypt the view definition, which you explore next
Encrypting View Definitions
As well as restricting access to certain tables or columns within a database, views also give you the option of encrypting the SQL query that is used to retrieve the data. Once a view is built and you are happy that it is functioning correctly, you would release that view to production; it is at this point that you would add the final area of security—you would encrypt the view.
The most common situation where you will find views encrypted is when the information returned by the view is of a privileged nature. To expand further, not only are you using a view to return specific information, but also you don't wish anyone to see how that information was returned, for whatever reason. You would therefore encrypt the SQL code that makes up the view, which would mean that how the information was being returned would not be visible.
There is a downside to encrypting a view: once the process of encryption is completed, it is difficult to get back the details of the view. There are tools on the Internet that can decrypt an encrypted view. When you encrypt a view, the view definition is not processed via encryption algorithms, but is merely obfuscated—in other words, changed so that prying eyes cannot see the code. These tools can return the obfuscation back to the original code. Therefore, if you need to modify the view, you will find that it is awkward. Not only will you have to use a tool, but also you will have to delete the view and re-create it, as it will not be editable. So, if you build a view and encrypt it, you should make sure that you keep a copy of the source somewhere. This is why it is recommended that encrypted views should be used with care and really should be placed only in production, or at worst, in user testing.
Always keep a copy of the original view, before encryption, in the company's source-control system—for example, Visual SourceSafe—and make sure that regular backups are available
Now that I have touched upon the security issues behind views, it is time to start creating views for the database solution that you are building.
Creating a View: SQL Server Management Studio
The first task for you is to create a view using SQL Server Management Studio. This is perhaps the simplest solution, as it allows you to use drag-and-drop to build the view. This may be the slowest method for creating a new view, but it does give you the greatest visual flexibility for building the view and its presentation, and this may also be the best method for dealing with views that already exist and require only minor modifications.
View Designer can aid you in the design of a view or the modification of any view already built. For example, it can assist if you are trying to build a complex view from a simple view, or it can even be used as a trial-and-error tool while you are gaining your T-SQL knowledge. When you open View Designer, you are initially presented with a modal dialog where you can select the tables and/or views that you want to use within the view you are creating. You can always add further tables or views at any point, so a base set of tables or views is a good place to start. Once a table is added, the beginnings of a SELECT statement are created. At any point, you can build a view using either SQL or tables.
There are four separate parts to View Designer, each of which can be switched on or off for viewing via the toolbar buttons on top. Take a look at these toolbar buttons, shown in Figure 11-1.
Figure 11-1. View toolbar buttons
An overview of the buttons, working left to right, follows:
- The first button brings up the top pane-the diagram pane-where you can see the tables involved and their relationship to each other in the view.
- The next button accesses the criteria pane, where you can filter the information you want to display.
- The third button accesses the SQL pane, where you will see the
SELECTstatement, the columns involved, theJOINs, and finally theWHEREfilter critera. - The fourth button accesses the Results pane. If you execute the view, the data returned will be displayed.
- The fifth button will execute the query in the view.
- The sixth button verifies the SQL, ideal if you are building a view via the SQL designer rather than the other panes in View Designer as you can check the SQL you are entering is valid.
- The seventh button will add a new column to the column selector where data can be “grouped by.” You will see
GROUP BYin Chapter 13. - The penultimate button allows further tables to be added via a table modal dialog selector.
- Finally the last button is the same as Query Editor, where a derived table can be added.
However, enough of the background—let's take a look at how View Designer works. In this example, you will be making a view of Shares.
TRY IT OUT: CREATING A VIEW IN SQL SERVER MANAGEMENT STUDIO
- Ensure that SQL Server Management Studio is running and that the
ApressFinancialdatabase is expanded. - Find the Views node, and right-click it–this displays the pop-up menu shown in Figure 11-2. From there, select New View.
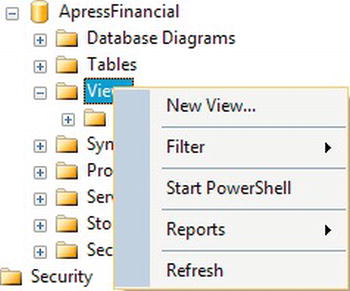
Figure 11-2. Creating a new view
- The next screen you will see is View Designer, with a modal dialog box on top presenting a list of tables that you can add to make the view. The background is pretty empty at the moment (move the dialog box around if you need to). It is within View Designer that you will see all of the information required to build a view. There are no tables in the view at this time, so View Designer has nothing to show. For those of you who are familiar with Access, you will see that View Designer is similar to the Access Query Designer, only a bit more sophisticated!
- You want to add your table, so moving back to the modal dialog box, shown in Figure 11-3, select
ShareDetails.Shares, shown asShares (ShareDetails)on the screen, click Add, and then click Close to remove the dialog box.
- Take a moment to see how View Designer has changed, as illustrated in Figure 11-4. Notice that the background Query Designer area has been altered, the
ShareDetails.Sharestable has been added, and the beginnings of aSELECTstatement now appear about two-thirds of the way down the screen. You will see theShareDetails.Sharestable listed in the top part of Query Designer (the diagram pane) with no check marks against any of the column names, indicating that there are not yet any columns within the view.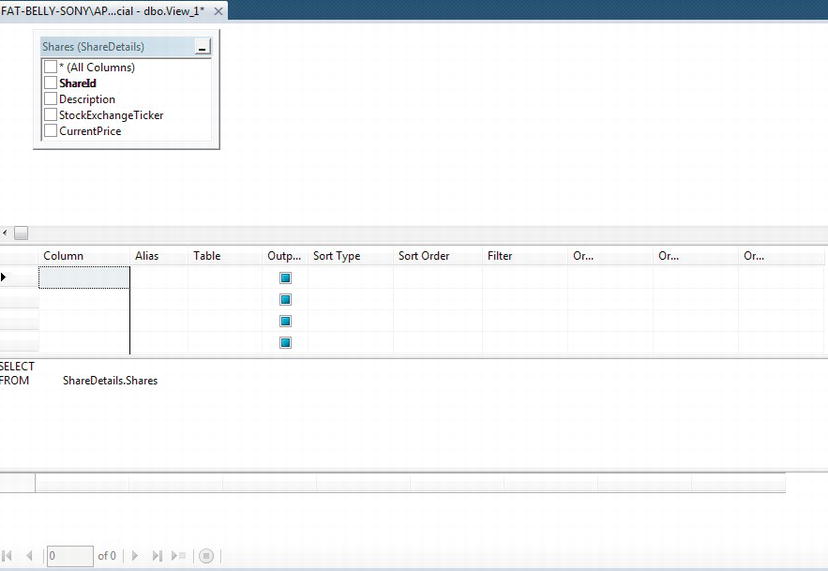
- What you want is a view that will display the share description, the stock market ticker ID, and the current price. You will also need the
ShareIdfor the next exercise. If you wanted all the columns displayed, you could click the check box next to* (All Columns), but for this example, just place checks against all four columns, as shown in Figure 11-5. Notice as you check the boxes how the two areas below the table pane alter. The middle grid pane lists all the columns selected and gives you options for sorting and giving the column an alias name. The bottom part is the underlying query of the columns selected. The finished designer will look as shown in Figure 11-5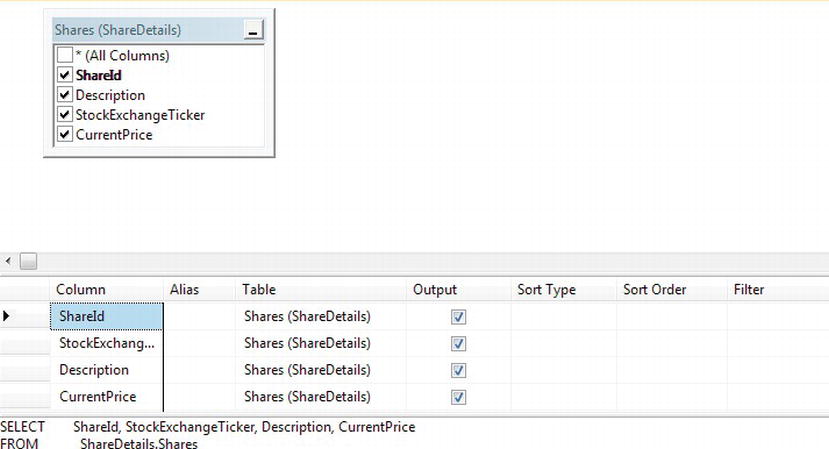
- You are going to change the details in the column grid now to enforce sorting criteria and to give the column aliases. This means that if a user just does
SELECT *from the view, then he or she will receive the data in the order defined by the view's query by default. It also means that some of the column names will have been altered from those of the underlying table when the output is returned. You want to ensure that the shares come out from the view in ascending name order. Move to theSort Typecolumn, and click in the row that corresponds toDescription. Select Ascending, as shown in Figure 11-6.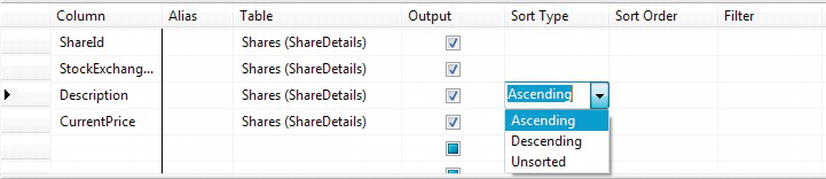
Figure 11-6. Placing an order on the data
- In the next column,
Sort Order, if you were defining more than one column to sort, you would define the order to sort the columns in. The value 1 is likely to have been automatically entered when you selected theDescriptionto be sorted in ascending sequence. If you have more than one column, you can alter the sort order as it is not enforced by the order that you select your columns. - You still need to add the aliases to give the column names more meaning, similar to using the
ASclause you saw in Chapter 10, which are found in the second column of the grid. Notice the fourth column,CurrentPrice. To make this column more user-friendly, you make the nameLatest Price, with a space. Be aware that having a column alias within the view with a space is acceptable, but if you give a column an alias with a space and that column is then specifically named when displaying the data, the column name will require square brackets around it. You will see this in a moment. When you type this and tab out of the column, it becomes[Latest Price], as you see in Figure 11-7; SQL Server places the square brackets around the name because of the space.
Figure 11-7. Alias with identifier
- Scrolling to the right of the screen allows you to define a filter for the view as well so that you can restrict what a user can see. Although sort orders can be changed by the T-SQL that calls the view, filters placed within the view cannot return more data than the view allows. So, for example, if you had a view that returned salaries, you could place a filter so that salaries of those people not to return, such as an MD, could be restricted within the view. In this example, you will list only those shares that have a current price—in other words, where
CurrentPriceis greater than 0, as shown in Figure 11-8.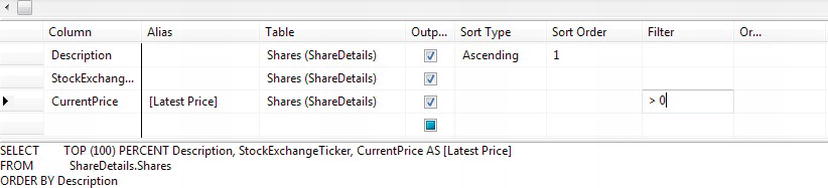
Figure 11-8. Filtering the data
- Notice the SQL pane, which now has the filter within it as well as the sorting order. Also take a look at the diagram pane and how the table display has been altered, as you see in Figure 11-9. The diagram pane indicates the columns that are defined in an
ORDER BYand the columns that are filtered.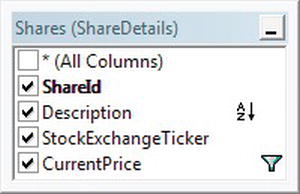
Figure 11-9. The table with the view options applied
- Moving back to the T-SQL in the SQL pane, what about the
TOP (100) PERCENTclause? Where did that come from? First of all, if you specify an order in a view, then by default SQL Server will place theTOP (100) PERCENTclause within the SQL, just as you saw in Chapter 10. It can be used if the table is very large and you don't want to allow users to return all the data on a production system, as it would tie up resources. You can also remove that clause from the SQL pane if you want; this will unlink your query from the designer and the Properties window, but you would also need to remove theORDER BY. TheORDER BYis here only for theTOPclause. Once SQL Server determines which rows are the top N percent of rows to return, SQL Server is free to return those N percent rows in a random order. If the user of the view required a specific order, then anORDER BYwould be required when using the view if the view did not contain anORDER BYclause. A final point to notice is how the column aliases are defined. The physical column is named, followed byASand then the alias Note The
 ASwhen defining aliases is optional.SELECT TOP (100) PERCENT ShareId, Description,
StockExchangeTicker, CurrentPrice AS [Latest Price]
FROM ShareDetails.Shares
WHERE (CurrentPrice > 0)
ORDER BY Description - If you wish to remove the
TOPclause, it is better to do this within the Properties window, shown in Figure 11-10 and usually found on the right of SQL Server Management Studio; however, you also need to remove the sorting. (If the Properties window is not there, it can be found by selecting View Properties Window from the menu or by pressing F4.) Within the properties, you can remove the
 TOPclause by setting Top Specification to No. You can also define whether this view is read-only by setting Update Specification to No.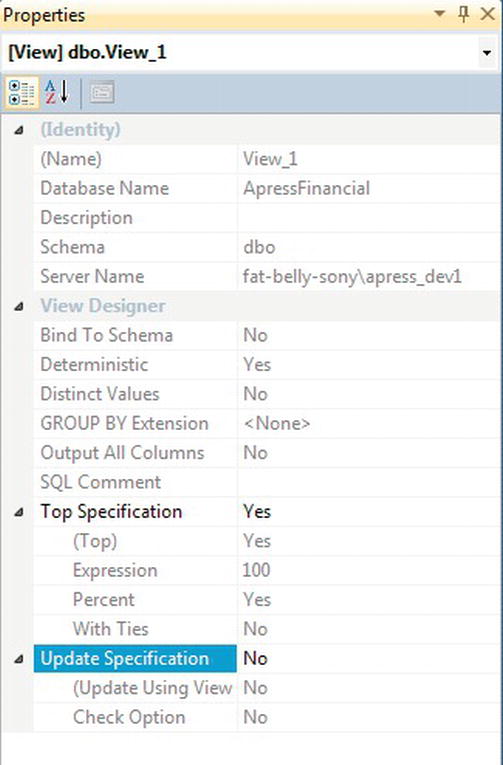
- You do need to change some of the properties in the view definition, as shown in Figure 11-11.
•
Description: It is very useful to give the view a description.•
Schema: Like a table, a view should belong to a schema. This can be from an existing schema, or if you have a view traversing more than one table, you may have a schema to cater to that scenario. In your case, it fits into theShareDetailsschema.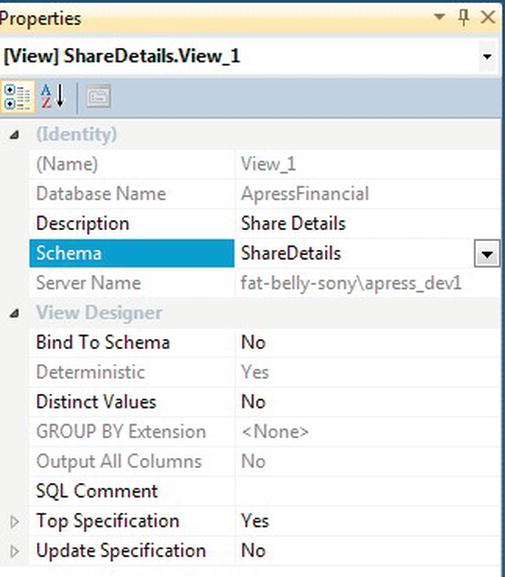
- Although the definition for the view is complete, you need to test it out. First, close the Properties window. By executing the query with the execute button (the one sporting the red exclamation point), you will see the results in the Results pane.
- Now that the view is complete, it is time to save it to the database. Clicking the Close button will bring up a dialog box asking whether you want to save the view, just as you saw in Chapter 5 when building a table. Click Yes to bring up the Choose Name dialog box in which you give the view a name. You may find while starting out that there is a benefit to prefixing the name of the view with something like
vw_so that you know when looking at the object that it's a view. Many organizations do use this naming standard; however, it is not compulsory, and SQL Server Management Studio makes it clear what each object is, but it is useful when looking at the T-SQL. The naming standard comes from a time when tools did not make it clear what object belonged to which group of object types. Once you have the name you wish, as shown in Figure 11-12, click OK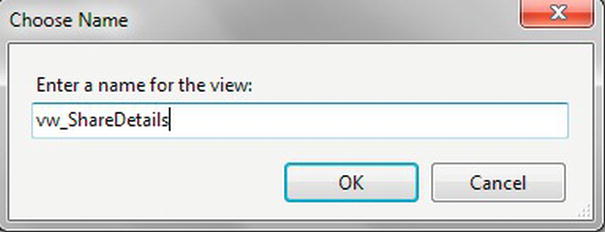
- You will be presented with a warning dialog box, as shown in Figure 11-13, that is the same information as in step 8. Click OK to save the view. This will bring you back to SQL Server Management Studio, where you will see the view saved.
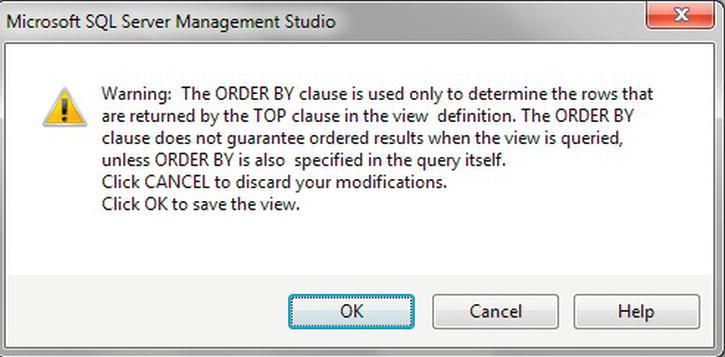
Figure 11-13.
ORDER BYwarning when saving a view
You have now created your first view on the database. However, this method of building a view is a bit slow and cumbersome for something so simple. What if you wanted to combine two tables, or a view and another table?
Creating a View Using a View
Creating a view that uses another view is as straightforward as building a view based on a table. The downside of building a view with a view is that it cannot be indexed for faster execution. Therefore, depending on what the T-SQL of the final view is, data retrieval may not be as fast as it could be with an index. Also, by having a view within a view, you are adding increased complexity when debugging or profiling performance. Therefore, consider including the T-SQL from the selected view in this new view.
In this example, you will build a view of share prices using the vw_CurrentShares view created previously. In reality, you would use the ShareDetails.Shares table along with ShareDetails.SharesPrices for the reasons just discussed.
TRY IT OUT: CREATING A VIEW WITH A VIEW
- From SQL Server Management Studio Object Explorer, find Views, right-click, and select New View. The Add Table dialog box comes up as before.
- From the Tables tab, select
SharePrices(ShareDetails)and click Add. - Move to the Views tab; there should be only one view, shown in Figure 11-14, as that is all you have created. Select the view, click Add, and then click Close.
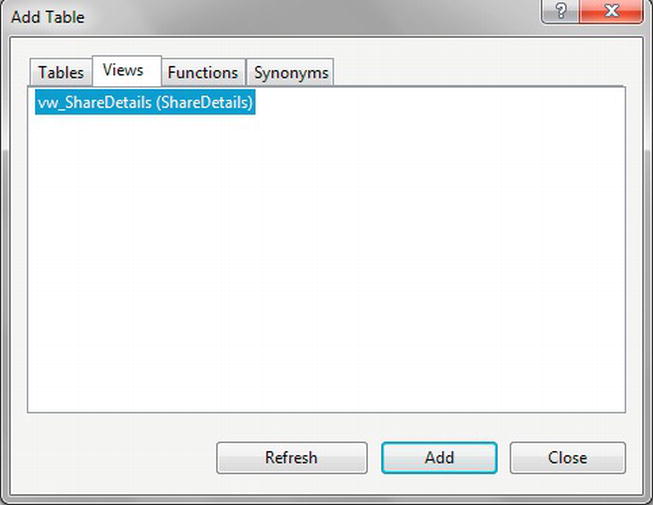
Figure 11-14. Adding a view
- View Designer will now look similar to Figure 11-15, with one table and one view.
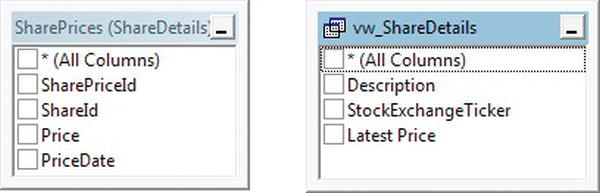
Figure 11-15. With more than one object, how the basic view looks
- An
INNER JOINis required between the table and the view to provide the link, so that for each share you get all the share prices only. It is very easy to link the two tables together by dragging a column from one table to a column in another table. This is very similar to how the relationships are built in Database Diagram Designer, as you saw earlier in the book. First of all, click theShareIdcolumn in thevw_CurrentSharesview. Keeping the mouse button down, drag the mouse pointer from thevw_CurrentSharesview over to theShareIdcolumn in theShareDetails.SharePricestable and then release it. View Designer should now look like Figure 11-16. You have not really created a relationship in the truest sense of the word—this is simply the relationship between the columns for the purpose of this query. You can see one gray line, which shows which fields are used for the join. You can also achieve the same result by entering the T-SQL in the SQL pane in View Designer.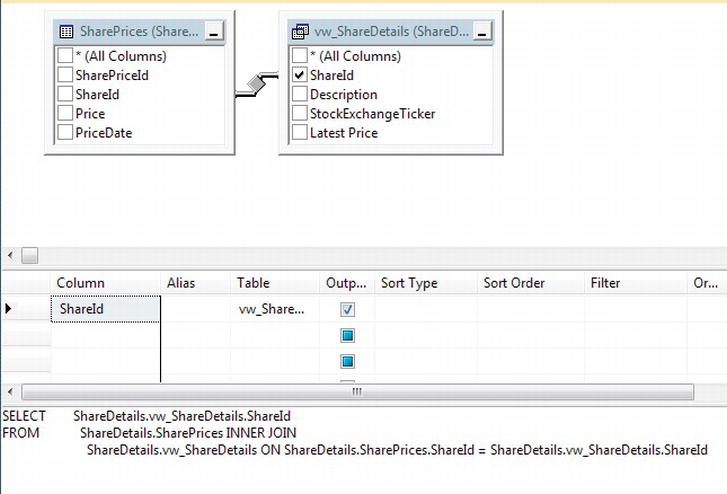
Figure 11-16. The view with the
JOINcompleted - Select
PriceandPriceDatefrom theShareDetails.SharePricestable andDescriptionfrom thevw_ShareDetailsview, as shown in Figure 11-17.ShareIdwould already be selected in theSharePricestable from the drag-and-drop join from the previous step. If it is not selected, then select it now.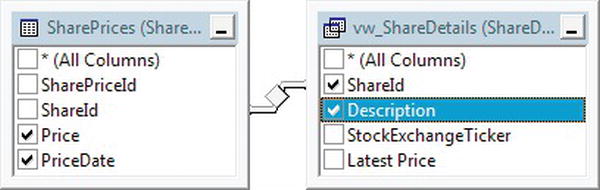
Figure 11-17. How the view with a
JOINlooks - The final part to this view creation is to build the sort orders. You want the result to be in the order of ascending description, but you want the most recent price first and the first price last. Figure 11-18 shows the criteria pane with these options.

Figure 11-18. Sorting with ascending and descending columns
- Moving to the SQL pane, note that the code shows the columns, as well as the
INNER JOINof the twoShareIdcolumns, and finally the ordering of the data for theTOPclause.SELECT TOP (100) PERCENT ShareDetails.vw_ShareDetails.ShareId,
ShareDetails.SharePrices.Price,
ShareDetails.SharePrices.PriceDate,
ShareDetails.vw_ShareDetails.Description
FROM ShareDetails.SharePrices
INNER JOIN ShareDetails.vw_ShareDetails
ON ShareDetails.SharePrices.ShareId =
ShareDetails.vw_ShareDetails.ShareId
ORDER BY ShareDetails.vw_ShareDetails.Description,
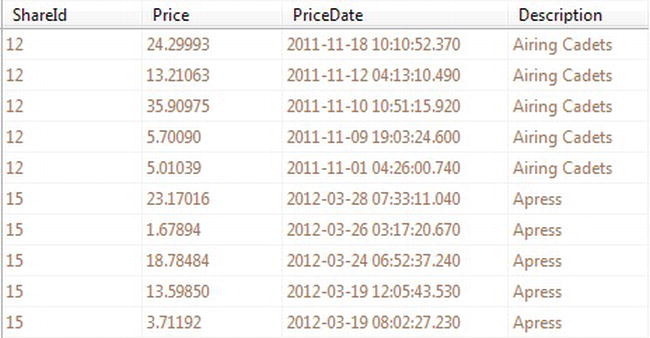
ShareDetails.SharePrices.PriceDate DESC - Execute the code within the view's code window by pressing the execute button, and you should see the results, part of which are displayed in Figure 11-19.
- Assign the view to the
ShareDetailsschema in the view's Properties window, and supply a description, as shown in Figure 11-20; then click the Close button and save the view asvw_SharePrices.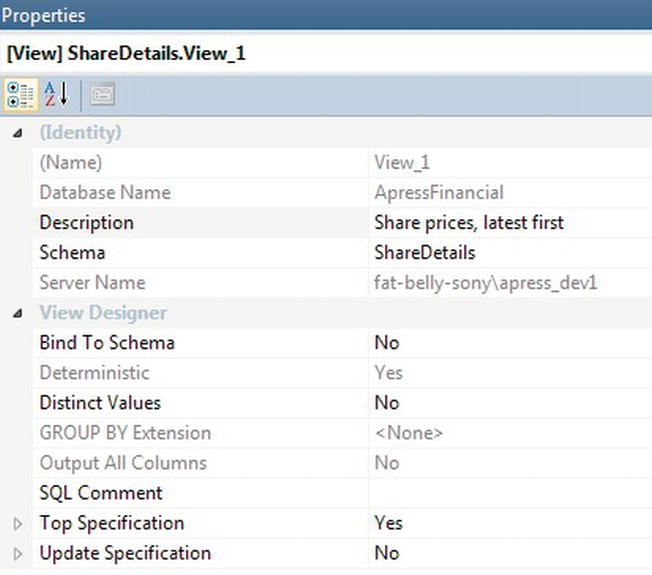
Figure 11-20. Setting the view schema
Now that you have built views using the designer, it's time to build one with T-SQL.
Creating a View Using T-SQL Syntax
Very quickly, you will find that creating a view using T-SQL is the better way forward. It is just as fast as building a view using the designer. To reiterate a point that I have made a few times, as a developer, knowing the T-SQL syntax is very useful for migrating changes from your development server to your production server, as well as having the flexibility to build objects within your code in .NET and so on.
As with previous chapters, the next section will look at the full syntax and then the more usual syntax you will use when building a view.
The CREATE VIEW Syntax
The CREATE VIEW syntax is very simple and straightforward. The syntax for a view is very similar to the syntax of a table, although there are three interesting options that can also be attributed to the view. Here is the syntax for building a view:
CREATE VIEW [schema_name.]view_name

WITH {ENCRYPTION | SCHEMABINDING | VIEW_METADATA}

AS

SELECT_statement

[WITH CHECK OPTION]
Taking a look at the first section of the syntax, notice that the name of the view can be prefixed with the name of the schema; however, the schema are optional. Provided that you are in the correct database and are logged in with the ID you want to create the view for, the schema_name option is not required, especially if the logon has the desired schema as its default, because the options will be assumed from the connection details. However, it may not be a similar login that executes the scripts later in your application's life, and the login used might not have the same default schema. It is best to define the view with the schema name for clarity. For production views, rather than views used purely by a single SQL Server user, it is recommended that they be built by the database owner. If the view is built by another, then when someone tries to execute the view, that user will need to prefix the name of the view with the login of the person who created it.
Following on from these options, you build the query, typically formed with a SELECT statement that makes up the view itself. As you saw in the previous example, the SELECT statement can cover one or many tables or views, many columns, and as many filtering options using the WHERE statement as you need. You cannot reference any temporary variable or temporary table within a view, or create a new table from a view by using the INTO clause. To clarify, it is not possible to have a SELECT column INTO new_table
The ENCRYPTION option will take the view created and encrypt the schema contained so that the view is secure and no one can see the underlying code or modify the contents of the SELECT statement within. However (I know I keep repeating this, but it is so important), do keep a backup of the contents of the view in a safe place in development in case any modifications are required.
![]() Tip Encrypting views may seem like a good idea to hide even further the schema of your database from potential users; however, use encrypted views with caution, and always keep a backup of the source in a safe and secure environment. People have been known to keep a printout of the view just in case the source becomes corrupt. Use encrypted views sparsely, and only when really required.
Tip Encrypting views may seem like a good idea to hide even further the schema of your database from potential users; however, use encrypted views with caution, and always keep a backup of the source in a safe and secure environment. People have been known to keep a printout of the view just in case the source becomes corrupt. Use encrypted views sparsely, and only when really required.
The SCHEMABINDING option ensures that any column referenced within the view cannot be dropped from the underlying table without dropping the view built with SCHEMABINDING first. This, therefore, keeps the view secure with the knowledge that there will be no runtime errors when columns have been altered or dropped from the underlying table, and the view is not altered in line with those changes. If you try to remove a column from the table that is contained within a schema-bound view, for example, then you will receive an error. There is one knock-on effect when using SCHEMABINDING: all tables or other views named within the SELECT statement must be prefixed with the name of the schema of the table or view, even if the owner of these objects is the same as the schema of the view. There is a section on this later in the chapter.
The final option for the view is VIEW_METADATA. When working with views using C#, Java, Excel, and so on, you can request for the metadata of the view to be returned. Without this option, the metadata will be of the base tables within the view. To hide this information and display the column names from the view instead, then build your view with the VIEW_METADATA option.
Let's go back to the two options that will be used less often, the first being the WITH CHECK option. If the view is being used as the basis of completing insertions or updates, then any modification should fit within the criteria of the view. To clarify this, if you have a view with a WHERE filter where the share price is greater than 0 and you try to alter a share price to a negative amount using the view rather than the base tables, the modification will fail. However, a change in price to a positive amount would be allowed. You will see this option in use in the next example.
![]() Note Even with
Note Even with WITH CHECK OPTION defined, if the data are modified directly in the table, it won't be verified against any views defined with the underlying tables, although, of course, the data will be added to the table. Also, if the view uses TOP, then WITH CHECK OPTION cannot be used.
The final possible option, VIEW_METADATA, exposes the view's metadata if you are calling the view via ODBC, OLE DB, and so on—in other words, from a program that is external to SQL Server.
Now that you are aware of the basic syntax for creating a view, the next example will take this knowledge and build a new view for the database
Creating a View with CREATE VIEW and SELECT
Creating views by using T-SQL code in a Query Editor pane is, in my experience, the fastest and best option. This can be a faster method for building views than using SQL Server Management Studio, especially as you become more experienced with T-SQL commands. This section will demonstrate the T-SQL syntax required to create a view.
The SELECT statement forms the basis for most views, so this is where most of the emphasis is placed when developing a view. By getting the SELECT statement correct and retrieving the required data, it can then be easily transformed into a view. This is how the view in the following example is created, so let's look at building a view using T-SQL and a Query Editor pane. In the following example, you will create a view that returns a list of transactions for each customer with some customer information.
TRY IT OUT: CREATING A VIEW IN A QUERY EDITOR PANE
Now that you have created a basic view using T-SQL, let's go a little deeper with an example incorporating SCHEMABINDING.
Binding Columns in a View with SCHEMABINDING
The following example will bind the columns used in the view to the actual tables that lie behind the view, so that if any column contained within the view is modified, an error message will be displayed and the changes will be cancelled. The error received will be shown so that you can see for yourself what happens.
First of all, you need to build the view before going on to discuss the background. This view is going to list products for customers, therefore linking the Customers.CustomerProducts and CustomerDetails.FinancialProducts tables.
TRY IT OUT: CREATING A VIEW WITH SCHEMABINDING
- Open a new Query Editor pane, and connect it to the
ApressFinancialdatabase. You can then create the T-SQL that will form the basis of your view.SELECT c.FirstName + ' ' + c.LastName AS CustomerName,
c.CustomerId, fp.ProductName, cp.AmountToCollect, cp.Frequency,
cp.LastCollected
FROM CustomerDetails.Customers c
JOIN CustomerDetails.CustomerProducts cp ON cp.CustomerId = c.CustomerId
JOIN CustomerDetails.FinancialProducts fp ON
fp.ProductId = cp.FinancialProductId - Test out that the
SELECTT-SQL works as required by executing it. The results you get returned should look similar to Figure 11-21.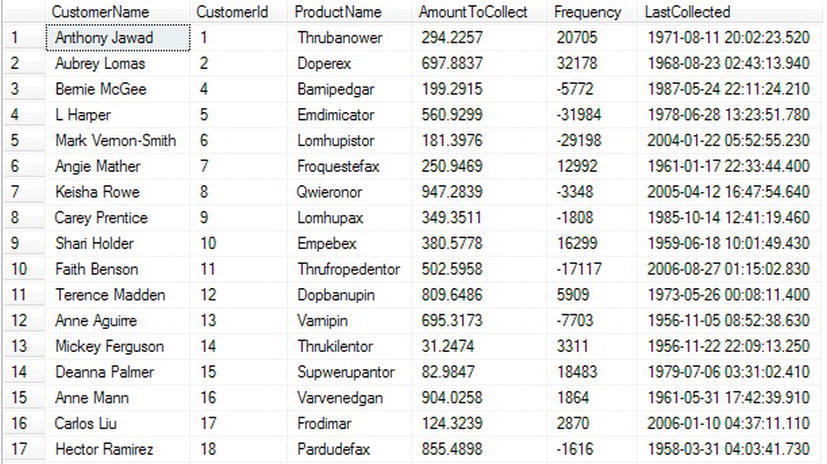
Figure 11-21. Testing schema binding in T-SQL
- You now need to create the
CREATE VIEW. First of all, you are completing a test to see whether the view already exists within the system catalogs. If it does, then youDROPit. Then you define the view using theWITH SCHEMABINDINGclause. The other change to the T-SQL is to prefix the tables you are using with the schema that the tables come from. This is to ensure that the schema binding is successful and can regulate when a column is droppedIF EXISTS(SELECT TABLE_NAME FROM INFORMATION_SCHEMA.VIEWS
WHERE TABLE_NAME = N'vw_CustFinProducts'
AND TABLE_SCHEMA = N'CustomerDetails')
DROP VIEW CustomerDetails.vw_CustFinProducts
GO
CREATE VIEW CustomerDetails.vw_CustFinProducts
WITH SCHEMABINDING
AS
SELECT c.FirstName + ' ' + c.LastName AS CustomerName,

c.CustomerId, fp.ProductName, cp.AmountToCollect, cp.Frequency,

cp.LastCollected

FROM CustomerDetails.Customers c

JOIN CustomerDetails.CustomerProducts cp ON cp.CustomerId = c.CustomerId

JOIN CustomerDetails.FinancialProducts fp ON

fp.ProductId = cp.FinancialProductId - Once done, execute the code. You should then see the following message:
The command(s) completed successfully.
- Now that your
vw_CustFinProductsview is created, which you can check by looking in SQL Server Management Studio Object Explorer, it is possible to demonstrate what happens if you try to alter a column used in the view so as to affect one of the underlying tables. Enter the following code, and then execute it:ALTER TABLE CustomerDetails.Customers
ALTER COLUMN FirstName nvarchar(100) - You will then see in the Results pane two error messages: the first shows that an alteration has been attempted on the
CustomerDetails.Customerstable, has been disallowed, and names the view stopping this, and the second shows that the alteration failed
Msg 5074, Level 16, State 1, Line 1

The object 'vw_CustFinProducts' is dependent on column 'FirstName'.

Msg 4922, Level 16, State 9, Line 1

ALTER TABLE ALTER COLUMN FirstName failed because one or more objects

access this column.
![]() Caution You will find that in most cases when building views the
Caution You will find that in most cases when building views the SCHEMABINDING option is a good option to have on a view, ensuring that a view that works today will always work. It would be only when someone deliberately removed your view from the system to complete table changes and then didn't correctly put it back that you would find that a view had stopped working. Herein lies yet another scenario for keeping the code of encrypted views at hand: if you have encrypted views, along with SCHEMABINDING, and someone wants to alter an underlying table, you had better have the code available!
Indexing a View
Views can be indexed just as tables can be indexed. Rules in choosing columns to make indexes on a view are similar to those for a table. There are also some major requirements you need to meet before you can index a view. I will show you these first so that you are aware of which views can be indexed and what you have to do with your view.
When building indexes on views, the first index to be created must be a unique clustered index. Once such an index has been built, additional nonclustered indexes on this view can then be created. This can also be taken further, in that if you have a view with subsequent indexes on it, and you drop the unique clustered index, then all of the other indexes will automatically be dropped. Also, if you drop the view, as you would expect, the indexes are also dropped.
The view that the index is to build on must contain only tables and cannot contain views. The tables must all come from one database, and the view must also reside in that database and have been built with the SCHEMABINDING option.
As you saw when creating your database, certain options can be switched on or off. The following options must be set to ON while creating an index. These options need to be set to ON only for that session and would therefore precede the CREATE INDEX statement.
SET ANSI_NULLS ON

SET ANSI_PADDING ON

SET ANSI_WARNINGS ON

SET CONCAT_NULL_YIELDS_NULL ON

SET ARITHABORT ON

SET QUOTED_IDENTIFIER ON
On top of this, the NUMERIC_ROUNDABORT option must be set to OFF.
SET NUMERIC_ROUNDABORT OFF
Finally, the view itself cannot have text, ntext, or image columns defined in it (don't forget, though, that these three data types are being deprecated, so you should be avoiding creating tables with these contained within them anyway). In Chapter 12, you'll learn how to group data through a clause called GROUP BY. If you have grouping within your view, the columns used to group data are the only columns that can be in the first index.
Although these seem like they could be quite restrictive requirements, the upside is that indexing views also comes with major speed implications. If a view has no index, every time that the view is executed, the data behind the view, including any joins, are rebuilt and executed. However, as the first index is a clustered index, this is similar to a clustered table index, and the data will be retrieved at index-creation time and stored in that order. Also, like table indexes, when the data are modified, then the index will receive the updates as well. Therefore, if SQL Server can use the clustered index, there will be no need to run the query again.
SQL Server will use any indexes that you have on the tables when building the views. Indexing a view is most beneficial when the data in the underlying tables are not changing frequently and when the view is executed often. Keep in mind that a view is taking information from other tables and is not a table itself, and therefore any updates to the underlying tables will not be reflected in the view until the view is rerun.
By placing an index on a view, the columns named within the index are stored within the database, as are all of the columns defined for the view, along with the data rows. Therefore, any changes to the raw data within the native tables will also be reflected in the data stored for the view. Keep in mind the performance issues with this. Every data change in the tables used in the views requires SQL Server to evaluate the effect the change has on the view. This requires more processing by SQL Server, causing a slowdown in performance. Temper this perceived gain of using an index with the downside of the extra processing required to keep the data up to date in two places for the table and two places for the index for those columns involved in the view.
Now that you are aware of the pros and cons of building indexes on views, and how they differ from indexes for tables, it is time to build an index on your view.
The aim of this index is to locate a row in the view quickly. You want to be able to find all the products for a customer based on his or her customer ID. Building the index is very quick and very simple, especially since you already know the basics from building indexes earlier in the book
TRY IT OUT: INDEXING A VIEW
- The view you want to index is
vw_CustFinProducts, which was created withSCHEMABINDING. The unique clustered index will be on theCustomerIdandProductName, as you know that this will be unique. In a Query Editor pane, enter the following code:CREATE UNIQUE CLUSTERED INDEX ix_CustFinProds
ON CustomerDetails.vw_CustFinProducts (CustomerId,ProductName) - Execute this code. When you do, you might get an error as follows; however, as long as no options have been altered for your SSMS and you have followed the book, this error should not be seen:
Msg 1935, Level 16, State 1, Line 1

Cannot create index. Object 'vw_CustFinProducts' was created with the

following SET options off: 'ANSI_NULLS, QUOTED_IDENTIFIER'.
- As was mentioned when discussing the options required to index a view, you may not have these two options set to
ON. You would therefore have to re-create the view. From Object Explorer, right-clickvw_CustFinProductsand select Script View As DROP AND CREATE To New Query Editor Window, as shown in Figure 11-22.

Figure 11-22. Scripting the view
- This brings up the code in a new Query Editor pane. Modify the two
SEToptions. Executing the code should be successful.USE [ApressFinancial]
GO
DROP VIEW [CustomerDetails].[vw_CustFinProducts]
GO
SET ANSI_NULLS ON
GO
SET QUOTED_IDENTIFIER ON
GO
CREATE VIEW [CustomerDetails].[vw_CustFinProducts]
WITH SCHEMABINDING
AS
SELECT c.FirstName + ' ' + c.LastName AS CustomerName,
c.CustomerId, fp.ProductName, cp.AmountToCollect, cp.Frequency,
cp.LastCollected
FROM CustomerDetails.Customers c
JOIN CustomerDetails.CustomerProducts cp ON
cp.CustomerId = c.CustomerId
JOIN CustomerDetails.FinancialProducts fp ON
fp.ProductId = cp.FinancialProductId
GO - You can then move back to your pane with the
CREATE INDEXstatement. Executing that code should be successful now as well.
The index on a view has now been successfully created. As you can see, there are a number of restrictions, but not to the point that no index can exist. You just have to think about what you are doing, and if you have a query in your view that contains an item from the preceding list and you wish to create an index, you'll just have to find a way around it.
Summary
This chapter has given you the confidence, when building your own view, of knowing which options and features of views you wish to use. I have covered what a view is, how views can improve a database's security, how to encrypt your view, building a view using SQL Server Management Studio and a Query Editor pane, how to join two tables within a view, and indexing a view.
Creating a view, when there is more than one table to retrieve data from on a regular basis, is quite often a sensible solution, even more so when you wish to use views as a method of simplifying the database schema and abstracting the database data into a more presentable form for users.
Encrypting views may seem like a good idea to hide the schema of your database even further from potential users; however, do use encrypted views with caution, and always keep a backup of the source in a safe and secure environment. People have been known to keep a printout of the view just in case the source becomes corrupt. Use encrypted views sparsely, and only when really required.
Having seen three different methods to build a view, you should have found a method that suits you and your style of working. You may find that as time moves on, the tool used alters, as do the methods within that tool. Never discount any tool or option within SQL Server and banish it to the annals of history: always keep each option and tool in mind, for one day that area may be your savior. When starting out, switch between each method for building a view so that you are fully conversant with each method.
You will find that in most cases when building views, the SCHEMABINDING option will be a good option to have on a view, ensuring that a view that works today will always work. It would be only when someone deliberately removes your view from the system to complete table changes, and then doesn't correctly put it back, that you would find that a view has stopped working. Herein lies yet another scenario for keeping the code of encrypted views at hand: if you have encrypted views, along with SCHEMABINDING, and someone wishes to alter an underlying table, then you had better have the code available!
Finally, being aware of the differences between indexes on tables and indexes in views is crucial to a successful and well-performing view. If you are unsure, then try out the view with and then without an index within your development environment.