
C H A P T E R 5
Defining Tables
Now that you have created the database, it needs to have the ability to store information. After all, without this, what is the point of a database? The first area that needs to be worked on is the table definitions.
To be functional, a database needs at least one table, but it can have many and, depending on the solution you are building, the number of tables can become quite large. Therefore, it is important that you as a developer know as much about tables, their structures, and their contents as possible. The aim of this chapter is to teach just that, so that you have a sound base to work from regarding tables, which you can then use for creating other objects associated with tables.
The design of a table is crucial. Each table needs to contain the correct information for its collection of columns to allow the correct relationships to be established. One of the skills of a database developer or administrator is to ensure that the final design is the correct solution, hence avoiding painful alterations once further development of the system is in progress. For example, if you designed a system where the table definitions had some major problems and required columns to be moved around, you would have to revisit any applications using the tables. This can involve an enormous amount of work. You learned about database design in Chapter 3; in that chapter, you also created the database in which your tables will reside, so you know what tables you need and what data they will store.
So that we can successfully create a table, this chapter will cover the following:
- How to define a table
- The different types of data that can be stored
- How and where a table is stored
- Creating a table using SQL Server Management Studio and Query Editor
- Dealing with more advanced areas of table creation, including the following:
- How to make a row unique
- Special data states
- Dealing with pictures and large text data
What Is a Table?
A table is a repository for data, with items of data grouped in one or more columns. Tables contain zero or more rows of information. You can think of an Excel spreadsheet as a table, albeit a very simple table with few or no rules governing the data. If you look at Figure 5-1, you will see that the first three columns contain data that can be assumed to be first name, last name, and date of birth, but the fourth column is free-format and varies between a hotel room number, a house number, and a flat number. There is no consistency. In fact, in Excel, all the columns could in reality contain any data.
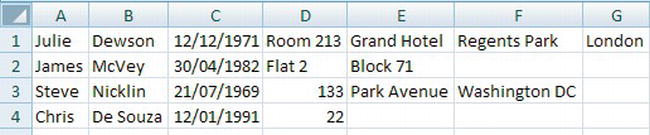
Figure 5-1. Excel showing partial address details
What sets a table inside SQL Server apart from other kinds of tables is that a SQL Server table will have specific types of data held in each column, and a predetermined type of data defined for a column can never change without affecting every row of data within that column for that table. If you use Excel, in a specific column you could have a character in one row, a number in the next row, a monetary value in the following row, and so on. That cannot happen in a database table. You can store all of these different values, but they would all have to be stored as a data type that holds strings, which defeats the purpose of using a database in the first place.
At the time a table is created, every column will have a specific data type. Therefore, very careful consideration has to be made when defining a table to ensure that the column data type is the most appropriate. There is no point in selecting a generic data type (a string, for example) to cover all eventualities, because you would have to revisit the design later anyway. Leaving all data types as a string would cause problems with math functions, for example, when you needed to add taxes to a price or when you wanted to add a number of days to a date for delivery times after an order is placed.
A table’s purpose is to hold specific information. The table requires a meaningful name and one or more columns, each given a meaningful name and a data type.
When it comes time to create a table, you do have to be connected to SQL Server with a login that belongs to the correct server and a database role that can create tables, such as sysadmin or db_ddladmin. When you create a table, it has to be owned within the database, and this is done by assigning the table to a schema. Recall that Chapter 4 discussed a schema for grouping objects and to be used as a basis for object security. As a developer, grouping objects together into a schema gives your database a more logical feel and will also allow you to reduce development time as part of the natural order of objects.
Some data types have fixed storage specifications, whereas with other data types, you have to decide for yourself how many characters the maximum will be. If you had a column defined for holding surnames, it would hold character values. There would also be no sense in setting the maximum length of this column at 10 characters, because many surnames are longer than this. Similarly, there would be little sense in saying the maximum should be 1,000 characters. You have to reach a sensible balance. Some of that balance will come from the data analysis, which you completed in Chapter 3; some of the size setting will come from data that already exist either in a database you are expanding or perhaps another database, as there will be similar data held. To expand on this point, if you were developing a sales database, the size of a part item number would be defined from the inventory database, as this would hold all of the part details including part number.
![]() Note Even when working with variable-length data types for which you specify a maximum amount of characters to be stored, SQL Server still stores only the data you actually enter. Thus, you can create a surname column to hold up to 1,000 characters, and space is not wasted when most names are far shorter than that. However, you need to keep a sensible and valid balance. A surname of 1,000 characters does not meet that balance.
Note Even when working with variable-length data types for which you specify a maximum amount of characters to be stored, SQL Server still stores only the data you actually enter. Thus, you can create a surname column to hold up to 1,000 characters, and space is not wasted when most names are far shorter than that. However, you need to keep a sensible and valid balance. A surname of 1,000 characters does not meet that balance.
The rows of data that will be held in a table should be related logically to each other. If a table is defined to hold customer information, this is all it should hold. Under no circumstances should you consider putting information that is not about a customer in the table. It would be illogical to put, for example, details of a customer’s orders within it. When you are defining columns, avoid the temptation to use one column for more than one piece of information. This is one of the easiest mistakes that can be made by a developer. A column usage should be to hold one item type of data. For example, a column created to hold the date an order was received could also be used to hold the date an order was dispatched, but that would give you problems with knowing what the date being held actually was. Having separate columns for these dates would keep things completely clear.
![]() Note There are two types of tables, system and user tables. System tables should never be accessed directly, although some information is available through a system view.
Note There are two types of tables, system and user tables. System tables should never be accessed directly, although some information is available through a system view.
With SQL Server 2012, a second type of user table is available to you as a developer called a FileTable. This is a specialized user table type that allows for files of unstructured data such as Word documents, Excel spreadsheets, etc. that can be held within SQL Server for unstructured access. It is then possible for SQL Server to search these documents using FILESTREAM technology. Within the book, I look only at traditional user tables.
SQL Server Data Types
You have learned a great deal about SQL Server before you have even created your first table. However, it is essential to know all this information before creating a table and looking at the security of your database to avoid any ramifications of it all going horribly wrong. You also now know why you have to be careful with users to ensure that a user has enough security privileges to build tables. In this section, you will be introduced to the data types that exist within SQL Server. Some of these can be defined as data types for columns within tables, and others are used within T-SQL programs.
Defining a table can be completed either in SQL Server Management Studio, Query Editor, or in SQL Server’s database designer tool. You can also create a table through a number of other means using developer tools and languages, but these three methods are the ones on which this book will focus. You will create the first table with SQL Server Management Studio. This is the Customers table, which will hold details about each customer. But before you can do this, it is necessary to look at the different types of data that can be stored.
Table Data Types
SQL Server has many different data types that are available for each column of data. This section will explain the different data types and help you down the path of choosing the right type for each column. Data types described in this section are known as base data types. Recall from looking at the SQL Server scripting options in Chapter 2 that you have the option to convert user data types to base data types. This book concentrates on base data types only. However, it is possible to create your own user data type, and there are advantages to doing so. If you want to have consistency over several tables, usually but not exclusively on the same server for a specific type of column, then it is possible to create a data type and give it a name, and then it can be used when defining a table. An example is where you want all tax identifiers to be defined the same. Once I have covered these base data types, you will see a demonstration of this.
![]() Note You can use .NET to build more complex data types that also perform extra functionality.
Note You can use .NET to build more complex data types that also perform extra functionality.
You will find that several data types may look similar, but keep in mind that each data type has a specific use. For example, unless you really need to define characters to be stored as Unicode, then don’t use the N prefix data types. Unicode characters use up more space than standard characters due to the potentially wide range of characters that SQL Server has to store. Also, when looking at numbers, if the largest value you will store in a column is 100, then don’t go for the data type that will allow the largest number to be stored. This would be a waste of disk space.
Let’s take a look at the possible base data types you can use in a table. Afterward, you’ll see data types you can use in a program, and throughout the book you will see several of these data types in use in the example.
char
The char data type is fixed in length and can hold a maximum of 256 characters. If you define a column to be 20 characters long, 20 characters will be stored. If you enter less than the number of characters defined, the remaining length will be space filled to the right. Therefore, if a column were defined as char (10), “aaa” would be stored as “aaa ”. Use this data type when the column data are to be of fixed length, which tends to be the case for customer IDs and bank account IDs. If you define the column with no value, a length of 1 will be defined. However, that is not good practice, and all lengths should be defined for clarity.
nchar
The nchar type is the same as char, but will hold characters in Unicode format rather than ANSI. The Unicode format has a larger character set range than ANSI. ANSI character sets hold only up to 256 characters. However, Unicode character sets hold up to 65,536 different characters. Unicode data types do take up more storage in SQL Server; in fact, SQL Server allocates double the space internally, so unless there is a need in your database to hold this type of character, it is easier to stick with ANSI. If you define the column with no value, a length of 1 will be defined. However, that is not good practice, and all lengths should be defined for clarity.
varchar
The varchar data type holds alphanumeric data, just like char. The difference is that each row can hold a different number of characters up to the maximum length defined. If a column is defined as varchar(50), this means that the data in the column can be up to a maximum of 50 characters long. However, if you store a string of only three characters, only three storage spaces are used up. This definition is perfect for scenarios in which there is no specific length of data—for example, people’s names or descriptions where the length of the stored item does not matter. The maximum size of a varchar column is 8,000 characters. However, if you define the column with no size—that is, varchar()—the length will default to 1.
You can also use another setting that can exceed the 8,000-character limit, by defining the data type with the constant max. You would use this when you believe the data to be less than 8,000 characters in length but you want to account for instances when the data may exceed this limit. If you know you will exceed the 8,000-character limit in at least one row, use this option. Finally, you should use max for large blocks of text, because it will eventually supersede the text data type.
nvarchar
The nvarchar type is defined in a similar way to varchar, except it uses Unicode and therefore doubles the amount of space required to store the data. If you define the column with no value, a length of 1 will be defined. However, that is not good practice, and all lengths should be defined for clarity.
text
The text data type holds data where the data are longer than 8,000 characters. But do not use this data type as it is deprecated and will be removed. Use varchar(max) instead.
ntext
This data type will also be removed. As with the text data type, ntext is the Unicode version and should also not be used. Use nvarchar(max) instead.
image
image is very much like the text data type, except it is for any type of binary data. However, like text and ntext, this data type will also be removed and you should use varbinary(max) instead.
int
The int data type, or integer, is used for holding numeric values that do not have a decimal point (whole numbers). There is a range limit to the value of the numbers held: int will hold any number between the values of –2,147,483,648 and 2,147,483,647.
bigint
The bigint data type, or big integer, is similar to int, except that much larger numbers can be held. A range of −9,223,372,036,854,775,808 through 9,223,372,036,854,775,807 can be stored.
smallint
The smallint data type, or small integer, holds small integer numbers in the range of –32,768 through 32,767. Do take care when defining columns with this data type, and make sure there really is no possibility of exceeding these limits. There is always a big danger when creating a column with this data type that you have to go back and change the data type; so if in doubt, select int.
tinyint
The tinyint data type, or tiny integer, is even smaller than smallint and holds numbers from 0 through 255. It could be used to hold a numeric value for each US or Canadian state or perhaps every county in the United Kingdom.
decimal/numeric
Both of these data types hold the same precision and ranges of data. The range is from −10 to the power 38 + 1 through 10 to the power 38 – 1. These are quite large ranges, from −0.00000000000000000000000000000000000001 through 10,000,000,000,000,000,000,000,000,000. However, do take care with this, because you cannot store 38 digits to the right and left of the decimal point. You can store only up to and including 38 digits. So, the greater the precision required to the right of the decimal point, the fewer digits are left to represent the whole number.
float
For me the float and real data types are the most dangerous of data types for a novice developer; they should be used in the correct circumstances and should be avoided if complete accuracy is necessary. The float data type is used for numbers where the decimal point is not fixed. float data types hold very large numbers in the range of −1.79E+308 through 1.79E+308. There is a warning with this data type: the values cannot always be seen as 100% accurate, because they can be approximate. The approximation arises from the way the number is physically stored as binary code. You will have problems where a number ends in .3, .6, or .7. The value stored has to be approximated, or rounded, because some values can’t be stored accurately, because they may have more decimal places than can be catered to. A well-known example is the value of pi.
real
The real data type is very much like float, except that real can store only numbers in the range of –3.40E+38 through 3.40E+38. This data type also holds an approximate value. The real and float data types can look like the ideal data type for their flexibility on the numerics they can hold, but look at other numeric data types when you need accurate numbers.
money
The money data type is used for holding numeric values up to four decimal places. If you need to use more than four decimal places, you need to look to another data type, such as decimal. This data type doesn’t actually store the currency symbol to signify the monetary type, so you should not use this data type for different currency values. The money data type has a range of −922,337,203,685,477.5808 through 922,337,203,685,477.5807. If you need to store the currency symbol of the currency that is held here ($ or USD for dollars, £ or GBP for British pounds, and so on), then you would need to store this separately, because the money data type does not hold the currency symbol. A column defined as money will hold the money to 1/10,000 of a decimal unit.
smallmoney
This data type is similar to money, with the exception of the range, which lies between −214,748.3648 and 214,748.3647.
date
The date data type has been built to hold a date from January 1, AD 1 through December 31, 9999. The format is YYYY-MM-DD. Until SQL Server 2008, it was not possible to treat the date and time as two separate data types without having to build such types yourself using .NET. Therefore, in the past, you were storing unnecessary data. For example, it is common to see datetime columns holding only date values. This data type is a great advancement, as it reduces confusion and gives the correct refinement for the data that the column contains.
datetime
The datetime data type will hold any date and time from January 1, 1753 through December 31, 9999. However, it stores not only a date, but also a time alongside it. If you populate a column defined as datetime just with a date, a default time of 12:00:00 will be stored as well.
datetime2
Similar to datetime, datetime2 is used to hold a date and a time. The main difference is that, with datetime2, the fractions of a second can be held with greater precision. In addition, this type can also store a date from January 1, AD 1 through December 31, 9999. The format is YYYY-MM-DD hh:mm:ss[.nnnnnnn].
smalldatetime
This data type is very much like datetime, except the date range is January 1, 1900 through to June 6, 2079. The reason for the strange date at the end of the range lies in the binary storage representation of this datetime.
datetimeoffset
If you need to store a time relative to a specific date and time zone, then you should define your column with this type. The date and time are stored in this data type in Coordinated Universal Time (UTC). You define the amount of time to add or subtract depending on the time zone to which the value should relate. For example, if you want to store 6 p.m. on March 24, 2008 in US Eastern Standard Time, the value would be stored as 2008-03-24 13:00:00 +05:00. The +05:00 relates to the fact that US Eastern Standard Time is five hours ahead of UTC. The format for this data type is YYYY-MM-DD hh:mm:ss[.nnnnnnn] [+|-]hh:mm.
time
If you just want to hold a time based on the 24-hour clock, then you can define a column in this data type. The format is hh:mm:ss[.nnnnnnn]. Similar to the date data type, this has been introduced to provide a column storing just the time of day. As you can see from the format, a time column can hold up to a precision of 100 nanoseconds. This is greater precision than is supported by the datetime data type.
hierarchyid
Prior to SQL Server 2008, producing a hierarchy of data could prove complex and usually had to involve a self-join of the data. An example of a hierarchy of data would be the structure of employees in a company from the lowest-level employee up through the management structure to the CEO. Now, however, it is possible to define a column of the hierarchyid data type that will allow you to say how a given row sits in an overall hierarchy of rows. This data type is a system variable length data type to a maximum of 892 bytes.
geometry
The geometry data type is a planar CLR data type that allows you to store geographical information in a “flat Earth” way. Data within this data type can be one of eleven different geometry measurements, such as a point, curve, and polygon, among others. It is possible to store only one type of measurement in each column defined, and part of the data stored will be the definition of the type of data.
geography
This CLR data type stores “round Earth” data. Therefore, data are stored as degrees of latitude and longitude but use the same type of measurement as the geometry data type.
![]() Note The
Note The geometry and geography data types require a chapter, if not a whole book, to understand and deal with fully. They won’t be covered within this book but can be found in Beginning Spatial with SQL Server 2008, by Alastair Aitchison (Apress, 2009).
rowversion
This is an unusual data type as it is used for a column for which you would not be expected to supply a value. The rowversion data type holds a binary number generated by SQL Server, which will be unique for each row within a database. Every time a record is modified, the column with this data type in the record will be modified to reflect the time of modification. Therefore, you can use columns with this data type in more advanced techniques where you want to keep a version history of what has been changed.
![]() Note
Note rowversion used to be called timestamp, and you may come across timestamp in databases created in older versions of SQL Server.
uniqueidentifier
The uniqueidentifier data type holds a globally unique identifier (GUID). This is similar to the timestamp data type, in that the identifier is created by a SQL Server command when a record is inserted or modified. The identifier is generated from information from the network card on a machine, the processor ID, and the date and time. If you have no network card, uniqueidentifier is generated from information from your own machine information only. These IDs should be unique throughout the world.
binary
Data held in this data type is in binary format. This data type is mainly used for data held as flags or combinations of flags. For example, perhaps you wanted to hold flags about a customer. You need to know whether the customer is active (value = 1), ordered within the last month (value = 2), placed the last order for more than $1,000 (value = 4), or meets loyalty criteria (value = 8). This would add up to four columns of data within a database. However, by using binary values, if a client had a value of 13 in binary, then he would have values 1 + 4 + 8, which means he is active, his last order was more than $1,000, and he meets the loyalty criteria. When you define the column of a set size in binary, all data will be of that size.
varbinary
The varbinary data type is very much like binary, except the physical column size per row will differ depending on the value stored. varbinary(max) can hold values more than 8,000 characters in length and should be used for holding data such as images.
bit
The bit data type holds a value of 0 or 1. Usually, bit is used to determine true (1) or false (0) values.
xml
XML data can be held in its own special data type rather than in a varchar(max) column. There are special query commands that can then be used to query and work with this data. Prior to SQL Server 2005, XML data was almost an afterthought with no data type, and earlier versions of SQL Server had extremely limited functionality to work with the XML data that did exist.
Program Data Types
There are three more data types that can be used within a program, which you will take a look at now.
cursor
Data can be held in a memory-resident state called a cursor. It is like a table because it has rows and columns of data, but that’s where the similarity ends. There are no indexes, for example. A cursor is used to build up a set of data for processing one row at a time.
table
A table data type has similarities to both a cursor and a table. It holds rows and columns of data, but the data cannot be indexed. In this case, you deal with the data a “set at a time,” like a normal table. You’ll learn about both the cursor and table data types later in the book, in Chapter 14, because they are more advanced topics.
sql_variant
It is possible to have a data type that can hold a few different data types. I will be honest—I don’t recommend using this data type because it shows you are unsure of your data and what type of data to expect. Before putting data into a data type, you need to be sure what type of data you are getting. You can use sql_variant as a program data type or a column data type, but the same argument applies in both cases. I won’t discuss this data type any further within this book.
Columns As More Than Simple Data Repositories
Assigning a data type to a column defines what you expect the column to hold. But column definitions have more power than just this. It is possible to fill the column with a seed value, or even with no value whatsoever.
Default Values
As a row is added to a table, rather than requiring developers to add values to columns that could be populated by SQL Server, such as a column that details using a date and time when a row of data was added, it is possible to place a default value there instead. The default value can be any valid value for that data type. A default value can be overwritten and is not “set in stone.”
Generating IDENTITY Values
When adding a new row to a SQL Server table, you may want to give this row a unique but easily identifiable ID number that can be used to link a row in one table with a row in another. Within the ApressFinancial database, there will be a table holding a list of transactions that needs to be linked to the customer table. Rather than trying to link on values that cannot guarantee a unique link (first name and surname, for example), a unique numeric ID value gives that possibility, provided it is used in conjunction with a unique index. If you have a customer with an ID of 100 in the Customers table and you have linked to the Transaction table via the ID, you could retrieve all the financial transactions for that customer where the foreign key is 100. However, this could mean that when you want to insert a new customer, you have to figure out which ID is next via some T-SQL code or using a table that just holds “next number” identities. But fear not, this is where the IDENTITY option within a column definition is invaluable.
![]() Note For those readers who have used Microsoft Access, the
Note For those readers who have used Microsoft Access, the IDENTITY keyword option is similar to AutoNumber.
By defining a column using the IDENTITY option, you are informing SQL Server of the following:
- The column will have a value generated by SQL Server.
- There will be a start point (seed).
- An increment value is given, informing SQL Server by how much each new ID should increase.
- SQL server will manage the allocation of IDs.
You would have to perform all of these tasks if SQL Server did not do so. Therefore, by using this option in a column definition, you can use the value generated to create a solid, reliable, and unique link from one table to another, rather than relying on more imprecise selection criteria. However, you have to realize that the numbers generated are not guaranteed to be in ascending sequential order, as gaps can occur, as you will see in an example later in this chapter. In Chapter 14, you will see an alternative to IDENTITY called sequences, which is a lot more involved and less straightforward than IDENTITY.
Using IDENTITY is ideal if you wish to create a column within your table with unique numbers. There is an alternative, which is to use the unique identifier data type with a default value of a system function called NEWID(). There are a few drawbacks to using this data type as it will always use 16 bytes of data (bigint is only 8 bytes); if you want to know the value of an inserted row, you need to generate the value before the row is inserted (IDENTITY values can be retrieved via a system variable), and the value generated would be awkward to use in any reporting outside of the database.
Normally, a user would not insert the value; instead, SQL Server would create it automatically. However, you can enter explicit values if you use the SET IDENTITY_INSERT option to alter the database setting to ON for the specific table. This is not a regular occurrence, but you will come across scenarios when you will find this a useful feature. I have used this option in the past when archiving data from the production system, and then when I wanted to un-archive the data back into the production system with the initial identity values.
The Use of NULL Values
Columns can be defined as NULL or NOT NULL within your T-SQL code, or, if using the Table Designer, you can check or uncheck the Allow Nulls option. These two different constraints define whether data must be entered into the column. A NULL value means there is absolutely nothing entered in that column—no data at all. A NULL value is in a special data state, with special meaning. It means that data value within the column is unknown.
If a value is a NULL value, no data has been inserted into the column or the data that did exist has been eradicated. This also means that you have to perform special function statements within any T-SQL code to test for this value. Take the example of a column defined to hold characters, but where one of the rows has a NULL value within it. If you executed a query that carries out string manipulation, the row with the NULL value might cause an error. The use of NULLs is covered in Chapter 9.
Creating a Table in SQL Server Management Studio
It is now time for you to create the first table in your example application. Every organization has to have a set of customers and will need to store these details. Within this table, it will hold information such as each customer’s name and an ID to an external system where addresses are held. The only product that your company has where a customer can have an ongoing cash balance with funds that aren’t cleared is a bank account. This means your table will also hold the bank account ID, the current balance, and any amount clearing.
TRY IT OUT: CREATING A TABLE
- Ensure that SQL Server Management Studio is running.
- Expand Object Explorer so that you can see the
ApressFinancialdatabase, created in Chapter 3. - Expand the
ApressFinancialdatabase so that you can see the Tables node, as shown in Figure 5-2.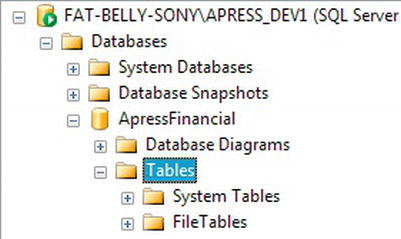
Figure 5-2.
ApressFinancialwith no user tables defined in the Tables node - Right-click the Tables node and select New Table. This will take you into the Table Designer. Figure 5-3 shows how the Table Designer looks when you first enter it.
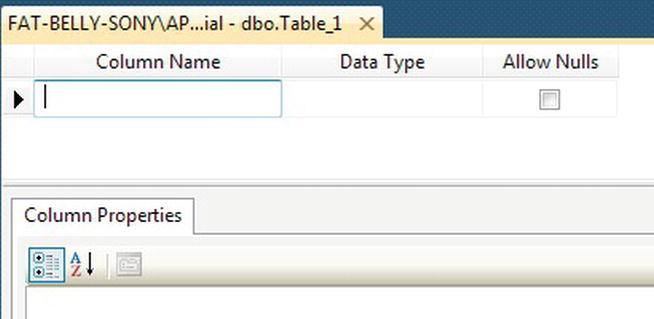
Figure 5-3. Creating your first table with no columns as yet
- From this screen, you need to enter the details for each column within the table. Enter the first column,
CustomerId, in theColumn Namecolumn. Tip When naming columns, try to avoid using spaces. Either keep the column names without spaces, like I have done with
 CustomerId, or use an underscore (_) instead of a space. It is perfectly valid to have column names with spaces. However, to use these columns in SQL code, you have to surround the names with square brackets ([]), which is very cumbersome. - At the moment, notice that Column Properties in the middle of Figure 5-3 is empty. This will fill up when you start entering a data type after entering the column name. The Column Properties section is just as crucial as the top half of the screen where you enter the column name and data type.
- The drop-down combo box that lists the data types is one of the first areas provided by SQL Server to help you with table creation. This way, you don’t have to remember every data type there is within SQL Server. By having all the necessary values listed, it is simple enough to just select the most suitable one. In this instance, you want to select
int, as shown in Figure 5-4.
- The final major item when creating a column within a table is the Allow Nulls check box option. If you don’t check the box, some sort of data must be placed in this column. Leaving the check box in the default state, which alters to checked when you start typing the column name, will allow
NULLvalues in the column, which is not recommended if the data are required (name, order number, etc.) or the column(s) are going to be used as the main method to find data within your queries, relationships, or indexes. You can also allowNULLs for numeric columns, so instead of needing to enter a zero, you can just skip over that column when it comes to entering the data. In this instance, you want data to be populated within every row as it will be used within a relationship, so remove the check mark that has appeared automatically. - The Column Properties section for the column will now look like the screen shown in Figure 5-5. Take a moment to peruse this section. You can see the name, whether
NULLs are allowed, and the type of data you are storing. There will be changes to what is displayed depending on the data type chosen.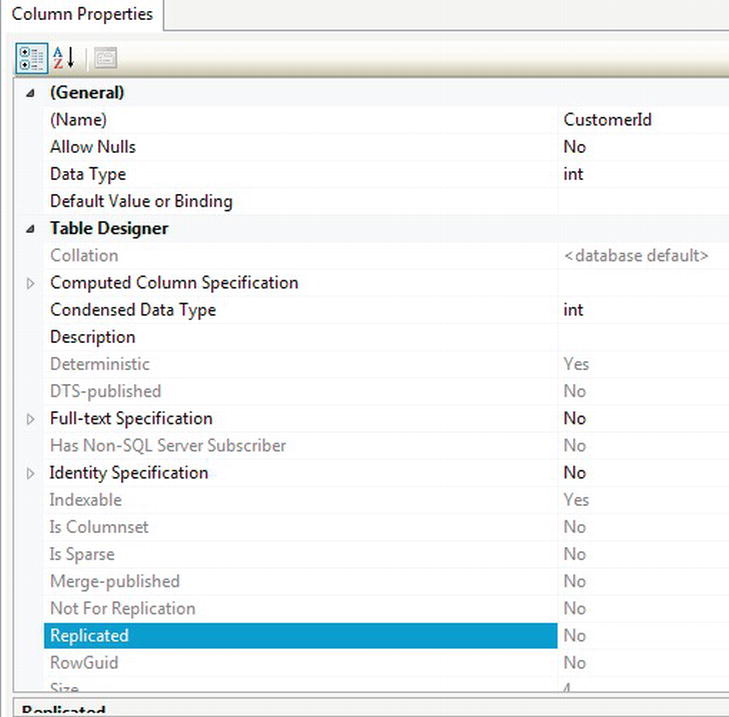
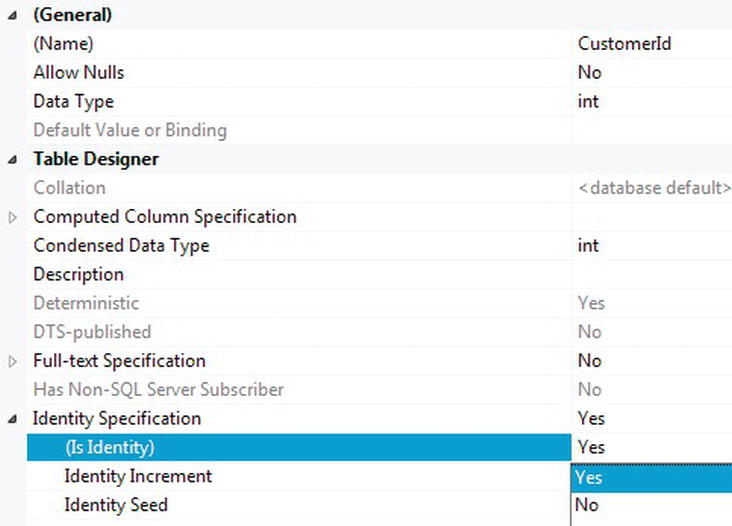
- You want this column to be an identity column. If you have not already done so, within the Column Properties area, expand the Identity Specification node, as you need to set the Is Identity property to Yes, as shown in Figure 5-6. This will set the Identity Increment to 1 and the Identity Seed to 1 as well.
- It is now possible to add in a few more columns as shown in Figure 5-7. Go ahead and add the columns now.
Titleis an integer data type as this will reference a table of titles such as Mr, Mrs, Miss, Dr, and so on. Not everybody will have more than a first name and last name, although some people may have initials. Therefore, allowNULLvalues for any initials they may have. Leave the box checked on theOtherInitialscolumn, as shown in Figure 5-7. Alter the length of this column to ten characters, which should be more than enough. The list of columns is provided for ease of use:•
Title:tinyint•
FirstName:varchar(50)•
OtherInitials:varchar(10)and also allowNULLvalues•
LastName:varchar(50)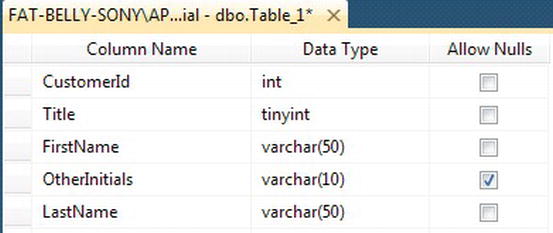
- You can now define your final columns, which you see in Figure 5-8. I suggest that you allow
AccountTypeandCustomerBalanceto allowNULLvalues, as this would be a good indicator of when a customer has no account, such as when the customer is in the process of creating an account. This is a good demonstration of where aNULLvalue removes confusion. If a value was forced into these two columns, then you would need a row in the account types table to indicate “No accounts.” Similarly aNULLvalue inUnclearedBalancecan indicate there are no funds pending clearance, but a value of zero could indicate that funds were processing and all amounts have been dealt with. The last two columns will record when the account was opened and closed. By setting the default value of theDateAddedcolumn using a SQL Server function that returns the current date and time,GETDATE(), every time a row is added, it is not necessary for a value to be entered for this column, as SQL Server will put the date and time in for you. A default value can be a constant value, the value from a function, or a value bound to a formula. TheDateClosedcolumn allowsNULLvalues, and this is the perfect indicator to demonstrate when the account is fully closed whenDateClosedhas a value contained within it. The full table layout is shown in Figure 5-8, and the columns are defined here.•
AddressLine1:varchar(100)•
AddressLine2:varchar(100)and allowNULLvalues•
AddressLine3:varchar(100)and allowNULLvalues•
TownOrCity:int•
ZipCode:varchar(20)and allowNULLvalues•
USState:tinyint•
AccountType:tinyintand allowNULLvalues•
ClearedBalance:moneyand allowNULLvalues•
UnclearedBalance:moneyand allowNULLvalues•
DateOpened:dateand have a default value defined asGETDATE()•
DateClosed:dateand allowNULLvalues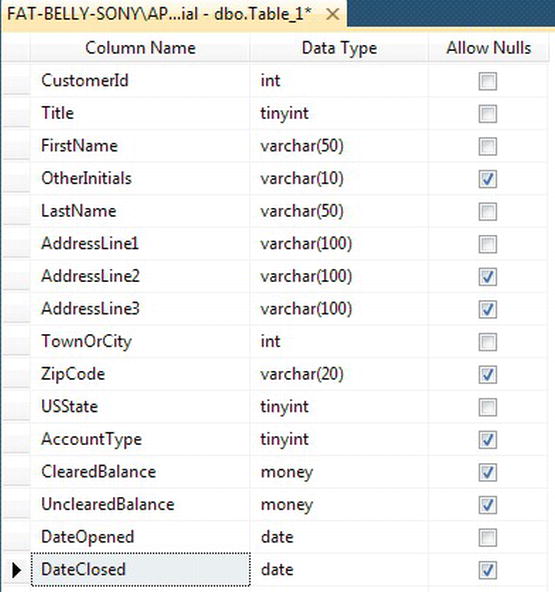
Figure 5-8. The table column definition is now complete.
Note In Chapter 3, when I discussed normalization, I also covered when data should be denormalized. The Customerstable is the one place a small amount of denormalization for speed of access is required. To speed up the process when a client goes to a cash point, there is a column that holds the account number so that a single row of data to the cash point can be sent. The system can therefore cross-check with the client’s card as well as the cleared and uncleared balance for display. This data will also be held within theCustomerProductsandTransactionstables, which will be defined later. If the account number was stored in theCustomerProductstable only, you would have to access two rows of data before you could send the data to the cash machine: one with the account number and one with the balances. With the number of actions that happen at peak times from cash machines, point of sale terminals and so on, speed is critical and small design considerations such as this can make a huge difference. As a developer, it is critical that you build an optimized database. - Before you save the table, you need to define some properties for it, such as the schema owner. On the right, you should see the Table Properties dialog window, as shown in Figure 5-9. If this is not displayed, you can press F4 or from the menu select View Properties Window. First of all, give the table a name,
Customers, and give the table some sort of description. Then move to the schema owner details. When you click the Schema combo box, it presents you with a list of possible schemas the table can belong to. In Chapter 4, you built the schema to use for this table,CustomerDetails.
Figure 5-9. Table properties
- Now that you are finished, you can save the table either by clicking the Save toolbar button, which sports a floppy disk icon, or by clicking the X (close) button on the Table Designer to close the window, which should bring up the Save dialog box, asking if you want to save the changes. By clicking Yes, you get a second box asking for the name of the table if you didn’t enter a table name in the Table Properties dialog window, as shown in Figure 5-10, or if you did enter a table name, then the table is saved using the name specified and you are returned to SQL Server Management Studio.
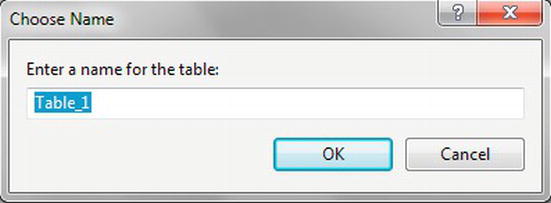
Figure 5-10. Saving a table that was not given a name
- Object Explorer in SQL Server Management Studio may not automatically refresh the Tables node and show your new table. If it does not, then highlight Object Explorer and refresh either via F5 or by clicking the refresh icon. If you now right-click the table and select Properties, you can see important details about the table, as shown in Figure 5-11. The first section details who is currently connected. Then you see the date the table was created, its name, and the schema name of the owner of the table.
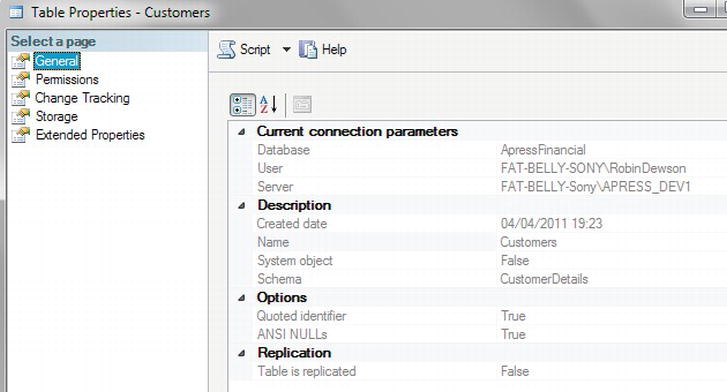
Figure 5-11. Table properties
• The menu that opened when you right-clicked the table included various other options (see Figure 5-12).
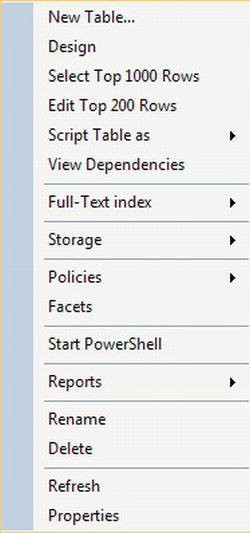
Figure 5-12. Table properties
Although many of these options are discussed elsewhere in the book, let’s take a look at them briefly before moving on:
- New Table: Builds a new table as has just been demonstrated
- Design: Takes you into the design mode to let you alter a table definition; it will also allow you to access other attributes of a table such as indexes and relationships.
- Select TOP 1000 Rows: Displays up to the first 1,000 rows of data; the number of rows returned can be altered via the options that were discussed in Chapter 2.
- Edit Top 200 Rows: Allows the first 200 rows to be displayed and can be edited; this can also be altered via the options discussed in Chapter 2; however, increasing this number can have issues, especially over a slow connection from the client to the server. There are ways you can work with this option so that 200 rows or even fewer can be used to update the data. However, I strongly recommend that you do not use this option in a production environment. When I discuss the use of transactions in Chapter 9, you will see how this option could cause problems.
- Script Table As: Displays several different scripting options, including scripting the table as a
CREATEor aDROP, as well as options forSELECTing rows,DELETE-ing rows,UPDATE-ing rows, andINSERTing rows; if you do use the designer to build a table, then building a script for the table that is then placed in source control along with all your other code is very useful. It’s also ideal if you deploy changes via scripting to your production databases. You will see this later in the chapter. - View Dependencies: Lists out any other stored procedures, views, and objects that use the table; this is a good option when you want to alter the properties of a table including adding columns. As a developer, your system will constantly be improved with new functionality, and finding the dependencies of your table will help you understand and realize the scope of related objects that require investigation and also potentially need to be altered.
- Full-Text Index: Displays a special type of indexing for text data; data can be stored so that keywords within the data are indexed. One example system I have worked on stored Word documents of publications that were then indexed so that keywords could be searched for. You could also store web pages and use full-text indexing to build a search engine, for example.
- Storage: An advanced feature of SQL Server is the ability to split, known as partition, the data within tables. Partitioning can be used to speed up performance on tables with a very large number of rows. If a table has millions of rows, then a range of rows can be placed in one partition, a second range in a second partition, and so on. This is outside the scope of this book and is an area that requires a great deal of thought.
- Policies/Facets: Lets you view and run policies for the table; this was demonstrated in Chapter 4 when you saw how to enforce
ANSI NULLs on a database. - Start Powershell: This option opens a command prompt window that allows you to create PowerShell scripts using the PowerShell scripting language.
- Reports: Executes a prebuilt custom report
- Rename: Renames a table to a new table; renaming a table in early development can be acceptable but renaming a table after this point should be avoided unless absolutely necessary. If you do have to rename a table, use the View Dependencies option to see what else requires altering, and don’t forget your .NET, Java, and so on code that could also work with the table by name.
- Delete: Drops the table from the database; before dropping a table, I strongly suggest you click the Show Dependencies button, equivalent to the View Dependencies menu option that is displayed on the screen, but I will go through deleting a table toward the end of this chapter.
- Refresh: Refreshes the list of tables; sometimes SQL Server does not automatically or quickly update the list of tables. There are triggers that will cause a refresh, such as collapsing and expanding the tables node, but selecting this menu option, clicking the refresh button at the top of Object Explorer, or pressing F5 will refresh the node you are on. If you are at the database level, then pressing F5 or the refresh button will refresh the objects within the database at all levels.
- Properties: Produces a dialog with a number of properties about the table; this is shown in Figure 5-11.
Now that a table has been created in SQL Server Management Studio, let’s look at creating a table within Query Editor.
Creating a Table Through Query Editor
The next table that needs to be created is the one that will hold the details of the financial transactions that each customer has. These transactions will not be just simple money-in and money-out transactions, but will also be those financial transactions involving shares when a dividend is received or a tax credit if the shares are held in a product that is tax-free. You know from the design that details of which product the transaction relates to will be held in a separate table, so you need to create a link between the transaction table and one holding some sort of reference data. It is also necessary to have a link between this table and the CustomerDetails.Customers table. Notice the slight name change of the Customers table to allow for the inclusion of the schema name. This should mean that your naming convention should be schemaname.tablename. Finally, if the transaction relates to shares and is not recording the finances involved, then you need to record that this is the case. To clarify this last point, when a client buys some shares, there will be two records: one for the money leaving the account to buy the shares, and another showing the physical number of shares purchased.
Now, let’s create this table using Query Editor instead of SQL Server Management Studio.
TRY IT OUT: DEFINING A TABLE THROUGH QUERY EDITOR
- Ensure that you are pointing to the
ApressFinancialdatabase in Query Editor. If you’re not, you’ll find that you may be creating the table in the wrong database. If you are creating code to be placed in .NET, Java, and so on, then there are advantages to prefixing the code with the following T-SQL syntax. This will then point the connection to the correct database. You will see this on occasion within the book as a reminder.USE ApressFinancial
GO - In Query Editor, enter the following code:
CREATE TABLE TransactionDetails.Transactions
(TransactionId int IDENTITY(1,1) NOT NULL,
CustomerId int NOT NULL,
TransactionType smallint NOT NULL,
DateEntered datetime NOT NULL,
Amount numeric(18, 5) NOT NULL,
ReferenceDetails nvarchar(50) NULL,
Notes nvarchar(max) NULL,
RelatedShareId int NULL,
RelatedProductId int NOT NULL) Note Notice that when you type this code into Query Editor, the keywords are colored. For example, CREATE TABLEis in blue, as isNOT NULL. This helps you to avoid typing mistakes. The colors are defined in the options that were demonstrated in Chapter 2, and they can be easily altered. - Execute the code by either pressing F5 or clicking the toolbar’s Execute button.
- You should now see the following message in the Results pane:
The command(s) completed successfully.
- However, you may have received an error message instead. This could be for a number of reasons, from a typing mistake to not having the authority to create tables. I could list every message that you could receive at this point, but I would be doing so for many pages. Taking one example here, as you can see, the error messages generated are usually self-explanatory. This is informing me that I have a typing error on line 5:
Msg 102, Level 15, State 1, Line 5
Incorrect syntax near 'NUL'.
- Now move to Object Explorer. If it is already open, you will have to refresh the Table details tree nodes (by right-clicking the Tables node and selecting Refresh). You should then see the
TransactionDetails.Transactionstable alongside theCustomerDetails.Customerstable created previously.
HOW IT WORKS: DEFINING A TABLE THROUGH QUERY EDITOR
Now that you’ve created a table in SQL Server Management Studio and another using Query Editor, let’s create one using a template.
Creating a Table: Using a Template
SQL Server has a third method of creating tables, although it is my least favored method. In this section, you will learn how to create a table based on a template either that you define or that comes predefined with SQL Server. In the following exercise, you will use a predefined template.
A large number of templates are built into SQL Server Management Studio for everyday tasks. It is also possible to build your own template for repetitive tasks, which is where I can see more power for developers in this area.
Templates can be found in their own explorer window. Select View Template Explorer, displayed initially on the right-hand side of SQL Server Management Studio.
TRY IT OUT: CREATING A TABLE USING A TEMPLATE
- Expand the Table node within the Template Browser. About halfway down, you will see a template called Create Table. Double-click this to open up a new Query Editor pane with the template for creating a table, as shown in Figure 5-13.
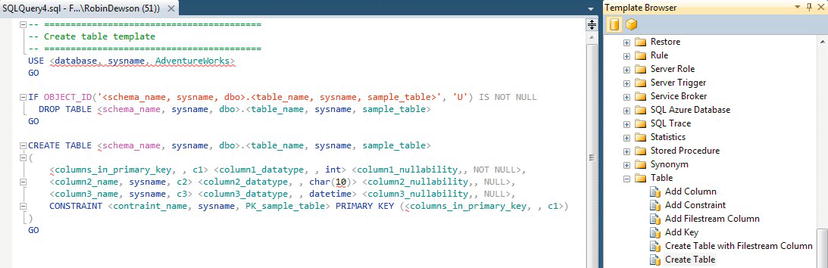
Figure 5-13. List of templates with
CREATE TABLEopened - Take a close look at the following, which is the listing from the template. A template includes a number of parameters. These are enclosed by angle brackets (<>):
-- =========================================
-- Create table template
-- =========================================
USE <database, sysname, AdventureWorks>
GO
IF OBJECT_ID('<schema_name, sysname, dbo>.<table_name,
sysname, sample_table>', 'U') IS NOT NULL
DROP TABLE <schema_name, sysname, dbo>.<table_name,
sysname, sample_table>
GO
CREATE TABLE <schema_name, sysname, dbo>.<table_name,
sysname, sample_table>
(
<columns_in_primary_key, , c1> <column1_datatype, ,
int> <column1_nullability,, NOT NULL>,
<column2_name, sysname, c2> <column2_datatype, ,
char(10)> <column2_nullability,, NULL>,
<column3_name, sysname, c3> <column3_datatype, ,
datetime> <column3_nullability,, NULL>,
CONSTRAINT <contraint_name, sysname, PK_sample_table>
PRIMARY KEY (<columns_in_primary_key, , c1>)
)
GO - By selecting from the menu, Query Specify values for Template parameters, you can alter the parameters to make a set of meaningful code from the template. Do this now, so that the parameters can be altered. Figure 5-14 shows the third table to be created for the database,
TransactionDetails.TransactionTypes. The template code that is placed in Query Editor caters for only three columns for a table. It is possible to work with tables of four or more columns, as you will see by simply copying and pasting the template rows of text, or by entering the T-SQL code for the extra columns. Before choosing to display the template parameters screen, you could alter the template code to include the fourth column or as many columns as required. The extra columns , provided you have generated the correct code, will be listed in the template parameters dialog. As you type, you will notice that everything has to be hand-coded and there are no helpful combo boxes to help with choices of data types, as you had within the Table Designer. Enter the details as shown in Figure 5-14, and when you scroll down, you will see a parameter calledCONSTRAINT. You can either leave the details as they are or blank them out; it doesn’t matter, as you will be removing that code in a moment. Tip You can already see how templates can become restrictive. To improve this, if you feel that a better template would be to allow for more columns, it is possible to alter the underlying template. Be aware, though, that an upgrade to SQL Server could reset the templates back to their default setting. It is therefore better to take the SQL Server template as a base and then save it as your own template. This is demonstrated in a moment.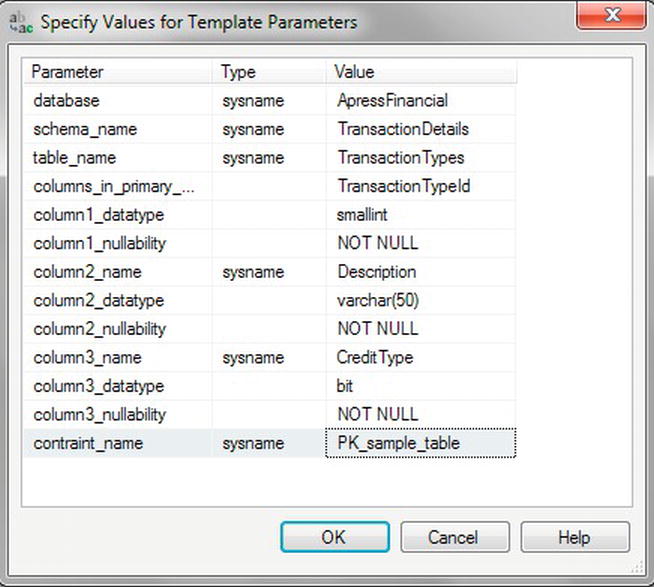
Figure 5-14. Template parameters for
TransactionTypes - After clicking OK, the code is as follows. The main point of interest is the
IFstatement after switching to theApressFinancialdatabase. This code queries SQL Server’s system tables to check for aTransactionTypestable within theTransactionDetailsschema. If it does exist, then theDROP TABLEstatement is executed. This statement will delete the table defined from SQL Server, if possible. One example of when this is not possible would be if a connection to the table existed. You will see when it is not possible to drop a table while there is a connection in Chapter 9. An error message may be displayed if the table has links with other tables or if someone has a lock on it, thus preventing the deletion. You will see this type of lock in Chapter 9.-- =========================================
-- Create table template
-- =========================================
USE ApressFinancial

GO
IF OBJECT_ID('TransactionDetails.TransactionTypes', 'U')
IS NOT NULL
DROP TABLE TransactionDetails.TransactionTypes
GO
CREATE TABLE TransactionDetails.TransactionTypes
(
TransactionTypeId smallint NOT NULL,
Description varchar(50) NOT NULL,
CreditType bit NOT NULL,
CONSTRAINT PK_sample_table
PRIMARY KEY (TransactionTypeId)
)
GO - The full code for the
TransactionTypestable follows. Once you have entered it, you can execute it. Note that there is a change to the generated template code. You need to put in theIDENTITYdetails for theTransactionTypeIdcolumn. There is a fourth column that should be held within this table, but you are not going to place that column in at this time. It will be added when you take a look at how to alter a table in the section “The ALTER TABLE Statement” later in this chapter. Finally, you need to remove theCONSTRAINTstatement, as you are not creating a key at this time.-- =========================================
-- Create table template
-- =========================================
USE ApressFinancial
GO
IF OBJECT_ID('TransactionDetails.TransactionTypes', 'U') IS NOT NULL
DROP TABLE TransactionDetails.TransactionTypes
GO
CREATE TABLE TransactionDetails.TransactionTypes
(
TransactionTypeId smallint IDENTITY(1,1) NOT NULL,
Description varchar(50) NOT NULL,
CreditType bit NOT NULL
)
GO
Now that you have your third table, I can take you through altering the CREATE TABLE template, as it would be better to have the IDENTITY parameter there as well as four or five columns.
Creating and Altering a Template
The processes for creating and altering a template follow the same steps. All templates are stored in a central location and are available for every connection to SQL Server on that computer; therefore, templates are not database or server-restricted. The path to where they reside on my computer is C:UsersRobinDewsonAppDataRoamingMicrosoftSQL Server Management Studio11.0TemplatesSql. The preferred method, though, is to create a new node for templates from within Template Explorer by right-clicking and selecting New ![]() Folder.
Folder.
![]() Note Don’t create the folder directly in the
Note Don’t create the folder directly in the Sql folder, as this is not picked up by SQL Server Management Studio until you exit and reenter SQL Server Management Studio.
You could create different formats of templates for slightly different actions on tables. You saw the CREATE TABLE template previously, but what if you wanted a template that included a CREATE TABLE specification with an IDENTITY column? This is possible by taking a current template and upgrading it for a new template. In the following exercise, this is what you will be building, a new template by taking an existing template as a base and then creating a table from it.
TRY IT OUT: CREATING YOUR OWN TEMPLATE FROM AN EXISTING TEMPLATE
- From Template Explorer, find the Table node, right-click, select New
 Template, and name it Create Table With Identity, as shown in Figure 5-15.
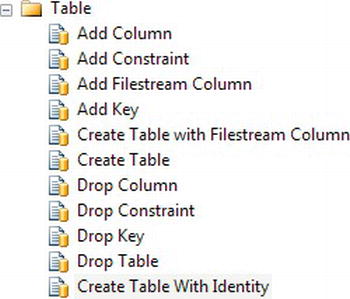
Figure 5-15. A new template in Template Explorer
- From Template Explorer, find the
CREATE TABLEtemplate, right-click it, and select Edit. This will display the template that you saw earlier. Select all the code in this template, and then copy it to the clipboard using Ctrl+C. Find the Create Table With Identity template you just created, right-click and select Edit, and paste the code from the clipboard into the new Query Editor. Change the comment to something meaningful—for example, Create table withIDENTITY—and then you can start altering the code. - The first change is to add that the first column is an
IDENTITYcolumn. You know where this is located within the syntax from the code earlier: it comes directly after the data type. - The next step is to add a new parameter, input a set of angle brackets, and then create the name of the parameter as the first option. The second option is the type of parameter this is—for example,
sysname—which defines that the parameter is a system name, which is just an alias fornvarchar(256). The third option is the value for the parameter; in this case, you will be including the value ofIDENTITY(1,1). - The final set of code follows, where you can also see a fourth column has been defined with a
bitdata type. I have also altered the database that the template will point to found in theUSEcommand at the top of the code to theApressFinancialdatabase. Tip You can check the data type alias by running the sp_help sysnameT-SQL command.-- =========================================
-- Create table template with IDENTITY
-- =========================================
USE <database, sysname, ApressFinancial>
GO
IF OBJECT_ID('<schema_name, sysname, dbo>.
<table_name, sysname, sample_table>', 'U')
IS NOT NULL
DROP TABLE <schema_name, sysname, dbo>.
<table_name, sysname, sample_table>
GO
CREATE TABLE <schema_name, sysname, dbo>.
<table_name, sysname, sample_table>
(
<columns_in_primary_key, , c1> <column1_datatype, , int>
<identity,,IDENTITY (1,1)> <column1_nullability,, NOT NULL>,
<column2_name, sysname, c2> <column2_datatype, , char(10)>
<column2_nullability,, NULL>,
<column3_name, sysname, c3> <column3_datatype, , datetime>
<column3_nullability,, NULL>,
<column4_name, sysname, c4> <column4_datatype, , bit>
<column4_nullability,, NULL>,
CONSTRAINT <contraint_name, sysname, PK_sample_table>
PRIMARY KEY (<columns_in_primary_key, , c1>)
)
GO - Now the code is built, but before you test it, save the template by clicking the floppy disk icon or by pressing Ctrl+S.
- You can now proceed to test the template by creating the next table in your solution: the
Sharestable that resides in theShareDetailsschema, as shown in Figure 5-16.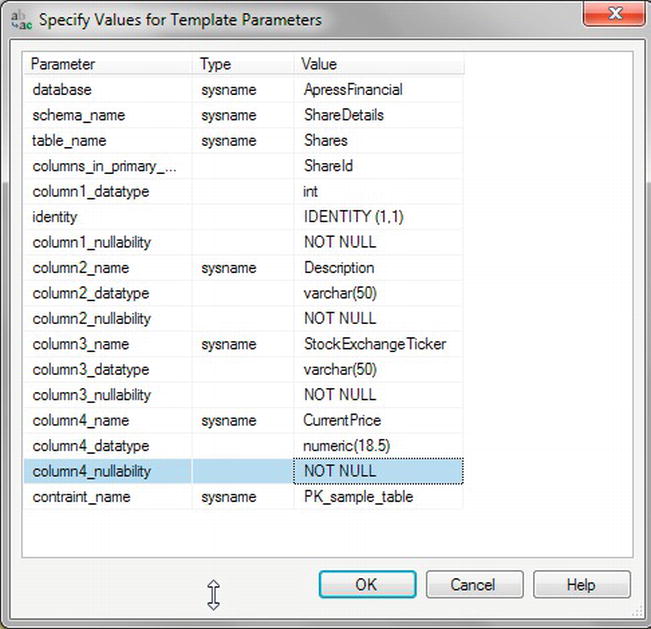
Figure 5-16. Using the new template to create the
Sharestable - Although you have just created a new template, you will see again that it’s not a perfect fit. But templates are not all bad, and they do allow you to create a standard definition with hints that you feel would be beneficial, so they should not be totally discounted.
- Remove the
CONSTRAINTline of code so that the T-SQL is similar to the code here, and execute so that the table is created.-- =========================================
-- Create table template with IDENTITY
-- =========================================
USE ApressFinancial
GO
IF OBJECT_ID('ShareDetails.Shares', 'U') IS NOT NULL
DROP TABLE ShareDetails.Shares
GO
CREATE TABLE ShareDetails.Shares
(
ShareId int IDENTITY (1,1) NOT NULL,
Description varchar(50) NOT NULL,
StockExchangeTicker varchar(50) NULL,
CurrentPrice numeric(18,5) NOT NULL
)
GO
The ALTER TABLE Statement
When using the original template, you had created the table with only three columns; however, the table requires a fourth column. One solution is to delete the table with DROP TABLE, but if you had placed some test data in the table before you realized you had missed the column, this would not be ideal, and of course once the table is in a production environment, dropping the table would not be possible without losing the data. There is an alternative: the ALTER TABLE statement, which allows restrictive alterations to a table layout but keeps the contents. SQL Server Management Studio uses this statement when altering a table graphically, but here I will show you how to use it to add the missing fourth column for the TransactionTypes table.
Columns can be added, removed, or modified using the ALTER TABLE statement. Removing a column will remove the data only within that column and not any other column, but careful thought has to take place before adding or altering a column.
There are two scenarios when adding a new column to a table: should it contain NULL values for all the existing rows, or should there be a default value instead? Any new columns created using the ALTER TABLE statement where a value is expected and therefore defined as NOT NULL will take time to implement. This is because any existing data will have NULL values for the new column, or will be defined with a default value; after all, SQL Server has no way of knowing what value to automatically enter if you want specific values without the business logic there. To clarify, in the CustomerDetails.Customers table, if you were adding the DateOpened column after the table was created, SQL Server has no method of working out the date each individual customer’s account was opened as it is unable to read the customer agreement that would have been signed.
![]() Note It is common practice when creating columns to allow
Note It is common practice when creating columns to allow NULL values, as the default value may not be valid in some rows.
In the following exercise, you will be adding a new column to a table without a default value and it can contain NULL values. You will then alter the table so that it cannot contain NULL values.
TRY IT OUT: ADDING A COLUMN
Defining the Remaining Tables
Now that three of the tables have been created, you need to create the remaining three tables. You will do this as code placed in Query Editor. There is nothing specifically new to cover in this next section, and therefore only the code is listed. Enter the following code and then execute it as before. You can then move into SQL Server Management Studio and refresh it, after which you should be able to see the new tables. Note that the CustomerDetails.CustomerProducts and CustomerDetails.FinancialProducts tables have no IDENTITY columns. These two tables will be used in Chapter 14 to demonstrate how the SEQUENCE object works as an alternative to IDENTITY.
    USE ApressFinancial

    GO

    CREATE TABLE CustomerDetails.CustomerProducts(

                 CustomerFinancialProductId int NOT NULL,

                 CustomerId int NOT NULL,

                 FinancialProductId int NOT NULL,

                 AmountToCollect money NOT NULL,

                 Frequency smallint NOT NULL,

                 LastCollected datetime NOT NULL,

                 LastCollection datetime NOT NULL,

                 Renewable bit NOT NULL

    )

    ON [PRIMARY]

    GO

    CREATE TABLE CustomerDetails.FinancialProducts(

                 ProductId int NOT NULL,

                 ProductName nvarchar(50) NOT NULL

    ) ON [PRIMARY]


    GO

    CREATE TABLE ShareDetails.SharePrices(

                 SharePriceId bigint IDENTITY(1,1) NOT NULL,

                 ShareId int NOT NULL,

                 Price numeric(18, 5) NOT NULL,

                 PriceDate datetime NOT NULL

    ) ON [PRIMARY]


    GO
Setting a Primary Key
Setting a primary key constraint can be completed in SQL Server Management Studio with just a couple of mouse clicks. This section will demonstrate how easy this actually is. In Chapter 3, I discussed how primary keys are used for referencing other tables as well as aiding data integrity, and I will discuss the difference between a primary key constraint and an index in Chapter 6.
TRY IT OUT: SETTING A PRIMARY KEY
- Ensure that SQL Server Management Studio is running and that you have navigated to the
ApressFinancialdatabase. Find theShareDetails.Sharestable, right-click it, and select Design. - Once in the Table Designer, select the
ShareIdcolumn. This will be the column to set the primary key for. Right-click to bring up the pop-up menu shown in Figure 5-17.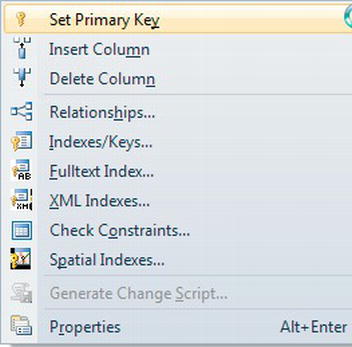
- Select the Set Primary Key option from the pop-up menu. This will then change the display to place a small key in the leftmost column details. Only one column has been defined as the primary key, as you see in Figure 5-18.
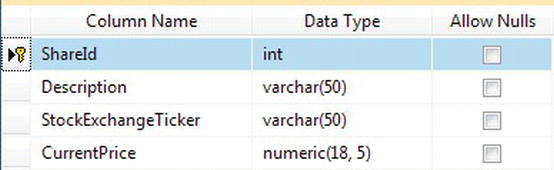
Figure 5-18. Primary key defined
- However, this is not all that happens, as you will see. Save the table modifications by clicking the Save button or pressing Ctrl+S. Click the Manage Indexes/Keys button on the toolbar. This brings up the dialog box shown in Figure 5-19. Look at the Type, the third option down in the General section. It says Primary Key. Notice that a key definition has been created for you, with a name and the selected column, informing you that the index is unique and clustered (more on indexes and their relation to primary keys in Chapter 6).
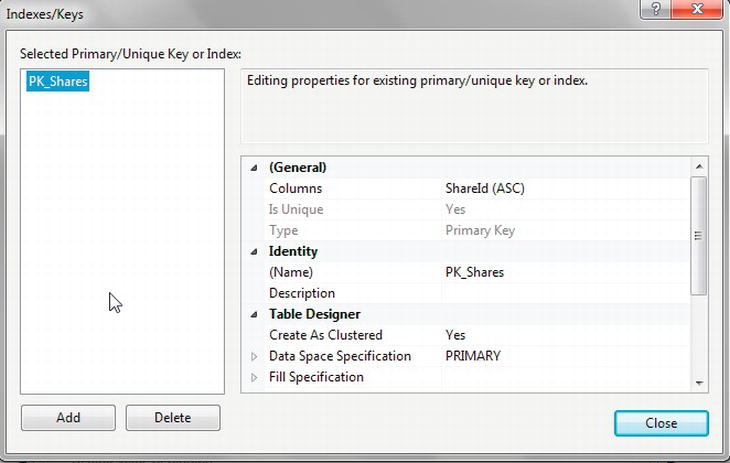
Figure 5-19. Indexes/Keys dialog box
That’s all there is to creating and setting a primary key. A primary key has now been set up on the ShareDetails.Shares table. In this instance, any record added to this table will ensure that the data will be kept in ShareId ascending order (this has to do with the index, which you will see in Chapter 6), and it is impossible to insert a duplicate row of data. This key can then be used to link to other tables within the database at a later stage.
Creating a Relationship
I covered relationships in Chapter 3, but no relationships have been created. The first relationship that you create will be between the customer and customer transactions tables. This will be a one-to-many relationship, in which there is one customer record to many transaction records. Keep in mind that although a customer may have several customer records—one for each product he or she has bought—the relationship is a combination of customer and product to transactions because a new CustomerId will be generated for each product the customer buys. You will now build that first relationship.
TRY IT OUT: BUILDING A RELATIONSHIP
- Ensure that SQL Server Management Studio is running and that the
ApressFinancialdatabase is selected and expanded. You need to add a primary key constraint toCustomerDetails.Customersfirst of all so that the relationship can be built. Enter the code that follows and then execute it:ALTER TABLE CustomerDetails.Customers
ADD CONSTRAINT
PK_Customers PRIMARY KEY CLUSTERED
(
CustomerId
)
WITH( STATISTICS_NORECOMPUTE = OFF, IGNORE_DUP_KEY = OFF,
ALLOW_ROW_LOCKS = ON, ALLOW_PAGE_LOCKS = ON)
ON [PRIMARY]
GO - Find and select the
TransactionDetails.Transactionstable, and then right-click to display the pop-up menu. Select Design to invoke the Table Designer. - Once in the Table Designer, right-click and select Relationships from the pop-up menu shown in Figure 5-20, or click the Relationships button on the Table Designer toolbar.
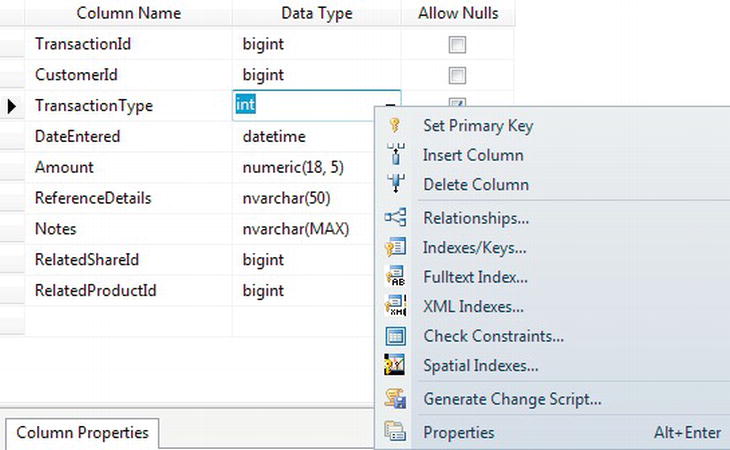
Figure 5-20. Building a relationship
- This brings up the Relationship Designer. As it’s empty, you need to click Add. This will then populate the screen, as shown in Figure 5-21.
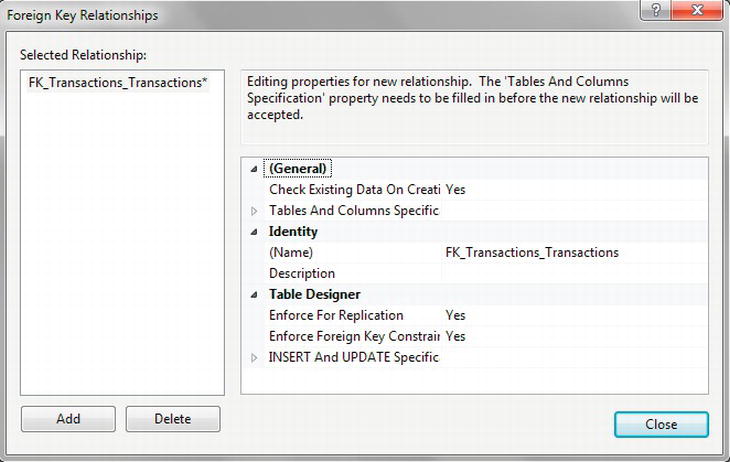
- The first requirement is to change the name to make it more meaningful. Quite often you will find that naming the key
FK_ParentTable_ChildTableis the best method, so in this case change it toFK_Customers_Transactions, as theCustomerDetails.Customerstable will be the master table for this foreign key. Next expand the Tables And Columns Specification node, which will allow the relationship to be built. Notice that there is now an ellipsis button on the right, as shown in Figure 5-22. To create the relationship, click the ellipsis.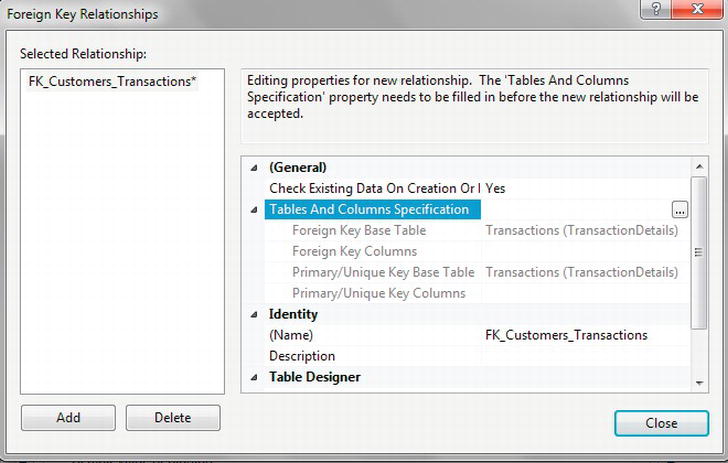
- You need to define the column in each table that is the link that forms the relationship. You are linking each customer record to many transaction records, and you can do so via the
CustomerId. So select that column for both tables, as shown in Figure 5-23. Now click OK.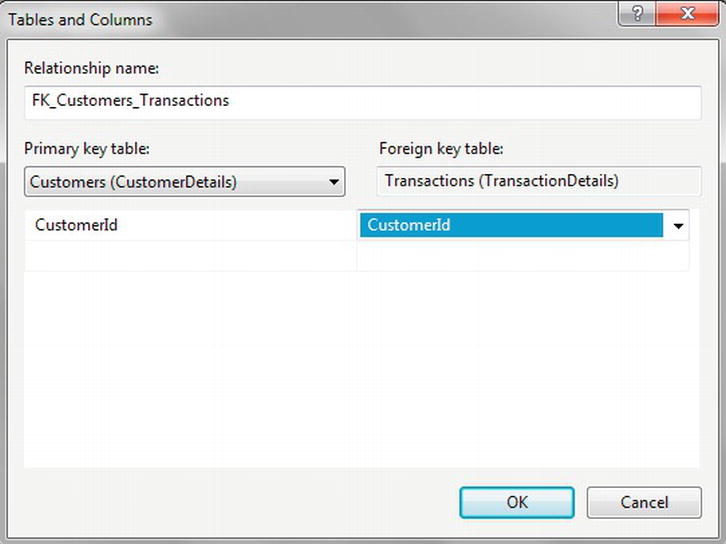
Figure 5-23. Columns selection
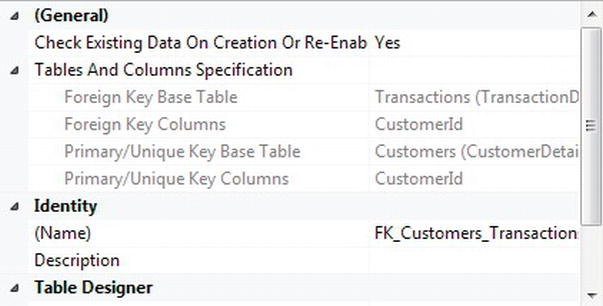
Note In this instance, both columns have the same name, but this is not mandatory. The only requirement is that the information in the two columns be the same. - This brings you back to the Foreign Key Relationships definition screen, shown in Figure 5-24. Notice that at the top of the list items in the grayed-out area, you can see the details of the foreign key you just defined. Within the Identity section, there is now also a description of the foreign key.
- Ignore the option Enforce for Replication found if you scroll the window displayed.
- There are two other options that are displayed at the bottom of the dialog box, as shown in Figure 5-25. Leave the options as the defaults, and I will explain them in a moment.

Figure 5-25.
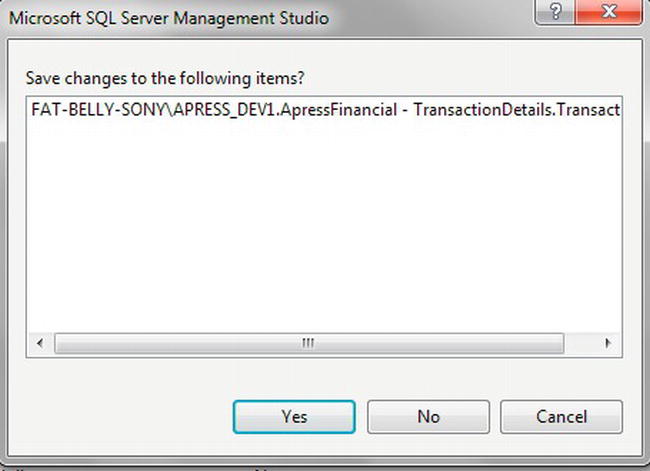
INSERTAndUPDATESpecification - Closing this dialog box does not save the changes. Not until you save or close the Table Designer will the changes be applied. When you do so, you should see the dialog box in Figure 5-26 notifying you that two tables are to be changed. Click Yes to save the changes.
The relationship is now built, but what about those options you left alone? Let’s go through those now.
Check Existing Data on Creation
If there is data within either of the tables, by setting this option found at the top of the relationship design window to Yes, you are instructing SQL Server that when the time comes to physically add the relationship at the point of saving the table, the data within the tables is to be checked. If the data meets the definition of the relationship, then the relationship is successfully inserted into the table. However, if any data fails the relationship test, then the relationship is not applied to the database. An example of this would be when it is necessary to ensure that there is a customer record for all transactions, but if there are customer transaction records that don’t have a corresponding customer record, the relationship addition would fail and would not be applied. Obviously, if you come across this, you have a decision to make. Either correct the data by adding master records or altering the old records, and then reapply the relationship, or revisit the relationship to ensure it is what you want.
By creating the relationship, you want the data within the relationship to work; therefore you would select No if you were going to go back and fix the data after the additions. What if you still miss rows? Would this be a problem? In the preceding scenario, there should be no transaction records without customer records. But you may still wish to add the relationship to stop further anomalies going forward.
Enforce Foreign Key Constraints
Once the relationship has been created and placed in the database, it is possible to prevent the relationship from being broken. If you set Check Existing Data on Creation to Yes as I have just discussed, then you are more than likely hoping to keep the integrity of the data intact. That option will check only the existing data. It does nothing for further additions, deletions, and updates on the data. However, by setting the Enforce Foreign Key Constraints option to Yes, found toward the bottom of the relationship designer window, you ensure that any addition, modification, or deletion of the data will not break the relationship. It doesn’t stop changing or removing data, provided that the integrity of the database is kept in sync. For example, it would be possible to change the customer number of transactions, provided that the new customer number also exists with the CustomerDetails.Customers table.
Choosing Delete and Update Rules
The final section to discuss is found as the last area of the relationship designer under INSERT And UPDATE Specification. This area deals with when a deletion or an update of a row is performed on the parent table, in this case the CustomerDetails.Customers table. It is possible for one of four actions to then occur on the related data, based on the following options:
- No Action: If a customer is deleted, then no further actions occur and could potentially leave the database with transactions for
customerids that no longer exist. However, a positive for this action is that as a developer, you would write code to complete the deletion of transactions for this customer and so would be in control. This is ideal if you were archiving the data from one database to another. - Cascade: If you delete a customer, then all of the transaction rows for that customer will also be deleted.
- Set Null: If you delete a customer, then if the
CustomerIdcolumn in theTransactionDetails.Transactionstable could acceptNULLas a value, the value would be set toNULL. In the customers/transactions scenario, we have specified the column cannot acceptNULLvalues, and therefore the value will remain, and in this scenario this action would be the same as No Action. The danger with this is that you are leaving “unlinked” rows behind—a scenario that can be valid, but do take care. - Set Default: When defining the table, the column could be defined so that a default value is placed in it. On setting the option to this value, you are saying that the column will revert to this default value—again, a dangerous setting, but potentially a less dangerous option than
SET NULL, as at least there is a meaningful value within the column.
![]() Note If at any point you do decide to implement cascade deletion, then please do take the greatest of care, as it can result in deletions that you may regret. If you implemented this on the
Note If at any point you do decide to implement cascade deletion, then please do take the greatest of care, as it can result in deletions that you may regret. If you implemented this on the CustomerDetails.Customers table, when you delete a customer, then all the transactions will be gone. This is ideal for use if you have an archive database to which all rows are archived. To keep your current and online system lean and fast, you could use delete cascades to quickly and cleanly remove customers who have closed their accounts.
Building a Relationship via T-SQL
It is also possible to build a relationship, or constraint, through a T-SQL statement. This would be done using an ALTER TABLE SQL statement. In the following example, a relationship will be created between the TransactionDetails.Transactions table and the ShareDetails.Shares table. Let’s now take a few moments to check the syntax for building a constraint within T-SQL code:
ALTER TABLE child_table_name

WITH NOCHECK|CHECK

ADD CONSTRAINT [Constraint_Name]

FOREIGN KEY (child_column_name, ...,)

REFERENCES [master_table_name]([master_column_name, ...,])
You have to use an ALTER TABLE statement to achieve the goal of inserting a constraint to build the relationship. After naming the child table in the ALTER TABLE statement, you then need to decide whether you want the foreign key to check the existing data when it is being created. This is similar to the Check Existing Data on Creation option you saw earlier.
Now we move on to building the constraint. To do this, you must first of all instruct SQL Server that this is what you are intending to complete, and so you will need the ADD CONSTRAINT command.
Next, you name the constraint you are building. Again, I tend to use underscores instead of spaces. However, if you do wish to use spaces, which I wholeheartedly discourage, then you’ll have to surround the name of the key using the square brackets ([ ]). I know I mentioned this before, but it’s crucial to realize the impact of having spaces in a column, table, or constraint name. Every time you wish to deal with an object that has a name separated by spaces, then you will also need to surround it with square brackets. Why make extra work for yourself?
Now that the name of the constraint has been defined, the next stage is to inform SQL Server that a FOREIGN KEY is being defined next. Recall that a constraint can also be used for other functionality, such as creating a default value to be inserted into a column.
When defining the foreign key, ensure that all column names are separated by a comma and surrounded by parentheses. The final stage of building a relationship in code is to specify the master table of the constraint and the columns involved.
The rule here is that there must be a one-to-one match on columns on the child table and the master table, and that all corresponding columns must match on data type.
It is as simple as that. When building relationships, you may wish to use SQL Server Management Studio, as there is a lot less typing involved, and you can also instantly see the exact correspondence between the columns and whether they match in the same order. However, with T-SQL, you can save the code, and it will be ready for deployment to production servers when required, and you can also keep a copy for storage in your code repository, such as Visual SourceSafe.
TRY IT OUT: USING T-SQL TO BUILD A RELATIONSHIP
Relationships: Database or Application
Here is one last, quick discussion before you reach the end of the chapter. You have seen a relationship between two tables built. There are positives to this approach as it will enforce referential integrity via SQL Server. If referential integrity breaks, then SQL Server will return an error code from the T-SQL that is executed.
However, there is an alternative approach, and that is to enforce referential integrity via code. This can be achieved with several different methods, including extra T-SQL code that is written when a data modification is to be executed, the building of a trigger that executes automatically when a modification occurs, or within your application code written in Java, Excel, .NET, and so on. Further thought and design away from the database are required to accomplish this task, and strong control is required on the coding techniques within your application or elsewhere within the database. You may be wondering why you should put yourself through the extra work and hardship: by keeping the referential integrity through code, it does provide for flexibility if data are loaded correctly but out of sequence. For example, if you loaded customer transactions before you inserted customers, or you wanted to be in full control of archiving your data, the integrity checks would not interfere.
It can be a hard choice, but I believe that using physical relationships is the best option in the large majority of cases; however, you have to be aware that, as a developer and as you progress through your career, you will find applications that use the logical implementation, and you should be aware that it exists. However, when given the choice, I strongly believe that relationships should be held within the database rather than the application code.
Summary
So, now you know how to create a table. This chapter has covered several options for doing so, but there is one point that you should keep in mind when building a table, whether you are creating or modifying it. When creating a table in SQL Server Management Studio, you should always save the table first by clicking the Save toolbar button. If you have made a mistake when defining the table and you close the table, and in doing so save in one action, you will get an error message informing you that an error has occurred, and all your changes will be lost. You will then have to go back into the Table Designer and reapply any changes made.
Try also to get used to using both SQL Server Management Studio and Query Editor, as you may find that Query Editor gives you a more comfortable feel to the way you want to work. Also, you will find that in Query Editor, you can save your work to a file on your hard drive as you go along. You can also do this within SQL Server Management Studio; however, the changes are saved to a text file as a set of SQL commands, which then need to be run through Query Editor anyway.