
CHAPTER 5
Basics of Game Networking
This chapter introduces the basic concepts involved in creating games that support networking, so you'll be prepared to create a real multiplayer game in the next chapter. Before discussing the details of XNA support for networking, let's look at networked games in general and identify some of the most common problems faced when coding such games.
Introducing Multiplayer Games
Online multiplayer games, also known as network-enabled games or simply networked games, are hard to code. Period. That said, it's also important to state that, in XNA, this difficulty is not related to coding for connecting the machines (PC or Xbox 360) or making them communicate with each other. That's because XNA hides all complexities from you in this case, as it does with everything else in the framework.
Networked games are hard to code because there are many extra problems to deal with: your program will receive messages from the host or other players, send messages back to them, process the local player input, and perform the physics and artificial intelligence calculations, while not letting the screen freeze between each frame drawn (one of the worst things that might happen in a multiplayer game).
Fortunately, XNA can help developers with most of the communication problems, such as providing ways to control the message flow between players and host to guarantee that no message is lost and that all messages arrive in the same order they were sent. Nevertheless, there will still be some problems to solve.
Network Topology
The most common topologies for networked games are peer-to-peer and client/server connections. Because XNA network implementation is not tied to any type of connection, you can code any of these types, depending on the way you organize your network code.
Peer-to-Peer Networking
In peer-to-peer connections, every player is aware of every other player in the game, sending and receiving messages from, and to, all players, as illustrated in Figure 5-1.
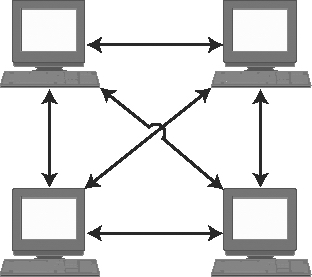
Figure 5-1. Peer-to-peer connection
The most obvious benefit of using this network organization is that you don't need a dedicated server to play the game, so every group of players can play it within their own local area network (LAN), or even through the Internet, as long as they know the addresses of the other members of the group.
In this type of connection, one of the players acts as a host, so all the new players connect to that player. However, once connected, the messages flow directly from one player to all others. If the player who is also the host disconnects from the game, the game might stop or simply choose another player as the new host, depending on what the game developers defined.
The main problem you face when coding peer-to-peer games is that you can't have too many players in the same game session, because the number of messages will increase exponentially with every new player who joins. For instance, in Figure 5-1 we have four players, so every time you need to update a player's status (for example, move), you send three messages, one for each player. Because you have four players, during each game turn, you exchange 4 × 3 = 12 messages. Making the same calculations with a five-player game increases this to 5 × 4 = 20 messages per turn, and in a six-player game, you'll reach 6 × 5 = 30 messages.
Usually, having more than ten players in the same game session is not suggested, because every message can take dozens of bytes, so you'll consume the bandwidth available in your network quickly. But it's still possible if the game development team can make the messages as small as possible; for example, passing only the players' inputs across the computers, and letting games on every player's machine calculate everything else from these inputs.
Client/Server Networking
The second most common game network topology is client/server. In this kind of network, all players connect to a host, which usually processes the messages and does the game synchronization, sending messages back to each of the players, as illustrated in Figure 5-2.
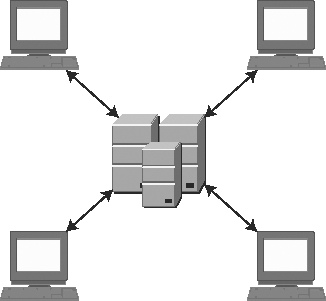
Figure 5-2. Client/server connection
Client/server games consume a lot less bandwidth per player, which allows you to send more data (and maybe create a more complex game). However, on the other hand, the player depends on having a host to connect to (so it usually can't be played on a home LAN).
When coding client/server games, you must decide which actions will take place on the host, and which actions will take place on the client machines. Is it better to put all the game physics and intelligence on the players' machines, using a host just as a forwarder of messages, or is it better to include all the game code on the host, leaving just the input gathering and rendering code on the players' machines?
There is no right answer to this question, because it depends largely on the game constraints and goals. When making your decision, you'll need to take into account how many players will be connected to the server, and how much it will cost the server processor to perform each activity (for all players). You also might need to verify the cost for each player's machine to do its own calculations against the bandwidth impact for doing all calculations on the server and passing the results to the players. Even when the server could do a specific operation better, you might decide to run it on the client, if passing the results of the operation will use a large amount of the available bandwidth.
Other Networking Topologies
Along with peer-to-peer and client/server, other types of network organization exist. Some are useful in game development; others are not. For example, in a ring topology, each player sends messages to one specific player, creating a ring that will eventually return to the first player in the sequence, as shown in Figure 5-3.
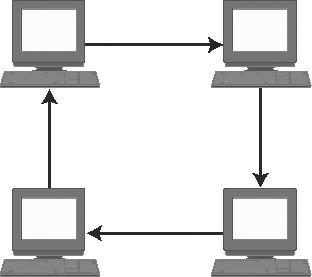
Figure 5-3. Ring network topology
This network organization is usually not practical for games, because the first player in the sequence would need to wait for the message to go around to every other player before it returned to that player, which can easily lead to unacceptable waiting times.
Another example of a different approach is using network groups: each player exchanges messages only with the other players in the group, and the host (which could be a dedicated server or a player) exchanges information with other groups, when needed. The group organization is designed for the number of messages passed between the groups to be as small as possible. Figure 5-4 illustrates a game network topology based on groups.
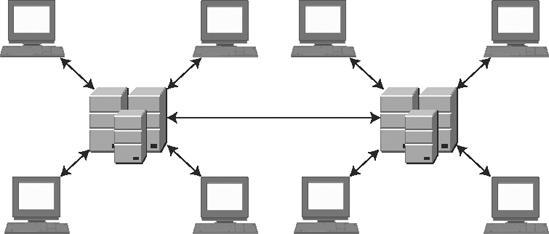
Figure 5-4. A group-based network topology
This approach is a mix of the client/server and peer-to-peer topologies, which aims to have the benefits of each one.
In the next section, we'll discuss some choices you must make when producing your network game project.
Turn-Based vs. Real-Time Games
Whether to design your multiplayer game as turn-based or real-time is probably one of the first decisions you'll make, and probably the one that will have the greatest impact on your game project.
The Turn-Based Approach
In turn-based games, each player will think about his move, do the proper action, and then pass the control to the next player. Although the first type of game that comes to mind is board games, such as chess or Monopoly, there are sophisticated action games based on turns, such as the old X-COM series, where you move each of your soldiers (using his energy to walk or fire), and then the enemies move, using the same rules.
Choosing this approach will save you a lot of headaches when trying to deal with the latency between your game messages, especially when running through the Internet, but might lead to a less than optimal game play, because this type of game is unusual. Never choose this approach if you have many players (say, more than three or four, depending on the game pace), because if each player needs to wait more than a couple minutes to play again, the game will rapidly become uninteresting—except, of course, if the players actually expect a delay, as in a chess match. A practical idea is letting the players communicate with one another (by voice or by typing a message), even when it is not their turn, so you can improve the interaction between players and make the waiting less boring.
The Real-Time Approach
Creating continuous action multiplayer games that support remote players, like Halo, is challenging. That's mainly because you must transfer a certain amount of data within tight time frames, which, unfortunately, depends on the response time of something beyond your control—the network. At the same time, you need to make sure that all players have synchronized information, especially in fast-paced action games where players are fighting against one another.
One possible approach is to send all the data updates to each of the players, so that you can ensure that everyone has the most recent events on their machines. However, this approach consumes the entire bandwidth available, even for just a few players.
In the other extreme, you can carefully calculate exactly which information should be sent to each player, and then send the minimum data needed. For instance, if another player is behind you or in another part of the game level, you can't see that player, so you don't need to receive information from that player. Although it saves bandwidth, this approach consumes CPUs cycles on the players' machines by calculating the data to send, leaving fewer cycles to calculate the game physics and draw the graphics.
Then again, the best approach is to find a balance according to your game requirements. There is no right answer; just minimize the data while trying not to expend too much processing time on this minimization, and keep in mind that your game may be running on slower machines or might face unpredictably bad network response times.
In the next section, we'll discuss some other points to consider when coding multiplayer games.
Some Technical Tips
In this section, we present some technical tips for creating multiplayer games. Although this is not an exhaustive list, it provides a good starting point for anyone who wants to write a networked game.
Plan the Game Carefully
Although careful planning is important for every game, it's an absolute must for multiplayer games. Because you'll have different programs, or at least different parts of the same program, interacting through the network, you must define every message that will be exchanged and every way the programs might process them.
It's crucial to the success of the game that you define where and when each process will occur, to guarantee that each player is synchronized. Programmers tend to forget these details, because in stand-alone programs everything occurs directly after the command is processed. However, in multiplayer games, this is not the case. For example, if you are coding a shooter game, one player can shoot another player's character and, almost at the same time, in the remote machine, the other player's character might be moving out of the firing range of the first player. If all processing occurs locally on each player's machine, the first player will see a successful shot. Although the message with the shot information did not reach the other player's machine, the remote player jumped out of the way, so the remote player will see the shot missing.
So, devising an algorithm that guarantees synchronization is as important as not using a lot of bandwidth. Considering that you might face bad response times when running across the network, this is challenging.
Code for Network Features from the Beginning
It's far better to code everything from the ground up than to try to adjust a stand-alone game to support networking. Even in a simple program, you might face situations where adjusting the program will lead to a less than optimal result, compared to writing the game with networking in mind.
If you're planning to create a game that will support networking only in a second version, prepare all your code, from the first version, to be "network-friendly." For example, isolate the routines that deal with user input from the rest of the game, so you can change these routines to receive remote input later. Also, plan how to synchronize input from all players, even if in the first version all players are local.
Note XNA network routines allow you to create games with more than one local player. The best approach, in this case, would be to use these routines right away, to create the first version of your game. That way, it would support networking from the start, even if there is no support for remote players in the first version.
Define the Message Types and Sizes Carefully
Bandwidth is a rare and expensive thing, so use it sparingly.
After defining all messages that your programs will exchange in the project phase, you should diagram the complete flow of a typical game cycle (the game's main loop, including the calls for the Update and Draw methods of your XNA Game class), so you can check if you are forgetting anything important. You must create this flow for at least two to three players, plus the server, if any exists, because some situations will occur with three players that don't occur with two (for instance, a player can receive out-of-order messages from different players).
After being sure that you aren't forgetting anything, you must go back and recheck every message to see if you are using the minimum space possible for each message, especially those that will be exchanged most frequently. For example, a single bit can be used as a flag, so a Byte can hold up to eight flags. Also, a Byte takes 256 different values, so if your values are within this range, you can use the Byte data type instead of the Int16 one, which takes 2 bytes.
A final word on this: be sure that you know the real size of the data types you are using. For example, an Int32 takes 4 bytes, while an Int16 takes 2 bytes. Another interesting example refers to strings: they do not occupy the same amount of bytes as the number of characters. They have extra internal control bytes that help, for example, when defining the string's length.
Note ANSI strings (1 byte per character) are the default for most Western countries, but this does not suffice for writing every character in Eastern countries, such as the kana characters in Japan and China. That's because you have only 256 possible characters in ANSI. Unicode is the default for such countries. With Unicode, every character could be one of up to 65,536 different values—enough for any language. C# adopts Unicode as its format for all strings, which means that XNA also supports Unicode.
Hide the Latency from the Player
Latency is the worst enemy of every multiplayer game programming team. And, even worse, there's no solution for this problem. It's not a bug; it's a fact of life, so you must learn—and code—to live with it.
Because you never know for sure how much time it will take to receive the next message, you can use some tricks to distract players while they wait. For example, say your game is a strategy game such as the Age of Empires series, where the player can give orders to game characters. However, the character will move only after the client machine receives confirmation from the host that the command has been received. You can make your characters say something ("Yes, master!" would suffice, although it's very innovative) just after the command is issued, so the player has the impression that the result is immediate, although it really will start (hopefully) a number of milliseconds later.
You can use this same idea with animations instead of sounds. The game character can start a little animation, such as making an "okay" sign with his hand or moving his head around as if looking for a way to start the command. This kind of trick is effective.
Another thing you can do when facing extra-long waiting times for the next message is let your program continue the action based on the last input, maybe at a lower rate. For example, if you know the speed and the direction of the other players' starships in a space battle game, you can suppose that they are still moving in the same direction, and move their spaceships a little following this supposition. However, as soon as the new message arrives, you must check and correct the other players' positions. This can be a challenge, even for experienced programmers, and can lead to problems in the game, such as a spaceship appearing to jump from one place to another. You can solve this with a smoothing trick, by adjusting the position in more than one game cycle, but this technique will add extra complexity to your game.
The important thing about latency is that while it will probably always be a problem, players didn't, don't, and won't ever accept latency in games. Few things are worse for a player than receiving a pop-up window with a message such as "waiting for the answer from the host." So, your team will need to spend some hours addressing this topic at the game project stage, if you are planning to do a serious multiplayer game.
Note XNA provides a way to simulate latency. You can easily test your program in "real conditions," with NetworkSession.SimulatedLatency. You can also simulate a percentage of message loss between computers, another common problem, with NetworkSession.SimulatedPacketLoss. You won't use these commands in this chapter, but they may be very useful for testing your own network games.
Include Single-Player Features in Your Multiplayer Game
Many players don't like, or simply don't have the money or the time, to play games with other players. Many games that are solely multiplayer have failed, so be careful if you want to follow this approach.
We'll give a simple example: Halo is a great game, and multiplayer features give a whole new experience for the players, as everyone who has played it knows. Just imagine now if Halo had no history, no computer-controlled characters, and was restricted to death-match and other player-against-player options. It would surely still be a good game given its details, but would hardly be a great game. We could say that the strongest argument against this would be Counter-Strike, which released as a modification (mod) without single-player functionality, and it's still the most downloaded Half-Life mod in history (with a few hundred thousand players left). However, the game developers did eventually release single-player functionality!
Another simple example is the Net Rumble starter kit, released with XNA 2.0 (and also works with XNA 3.0). It's a nice game, but if you play alone, all you have is a spaceship with some floating rocks to shoot, with no goal—no fun at all. Coding a computer-controlled ship might be a challenge for starters, but will surely make a real difference if you want to play alone, or even if you want to test the game while coding without partners.
Remember that having computer-controlled characters is useful even in network games, so you should spend some time thinking about this in your games.
Use Different Threads to Handle Network Messages
Here's a simple but important tip: dedicate a specific thread to message sending and receiving, and have another thread or threads deal with the game physics and artificial intelligence. This approach gives you more flexibility to hide the latency and get the most from your hardware, be it PC or Xbox.
We won't talk about multithreading in this book, but you should learn more about it when you're ready to create more advanced games.
Test, Test, Test!
Multiplayer games have extra sources of errors, and sometimes the errors are harder to find and fix, so testing from the beginning is a real must.
The first tests you should do involve message delivery and handling, to check if your code will behave properly if a network packet is lost or if it receives the packets in a different order than the order in which they were sent. For example, if a remote player makes his character crouch and then shoot, disregarding the packet arrival order in the current machine could have that character shoot before crouching, which would be undesirable.
Note XNA allows you to choose if you want the framework to guarantee the reliability of the packets (so no message is ever lost), using the SendDataOptions.Reliable flag, and the packet order (so the messages always arrive in the same order they were sent), with SendDataOptions.InOrder. Although it might sound good to always have the messages arriving, and in order, setting both flags might lead to greater latency times, because the XNA Framework will do extra work and eventually resend messages. The better approach is to create a game that doesn't rely on these features.
Multiplayer game reliability is always a problem. Just imagine you have created a game that has an uptime of 99.9 percent. This means that your game can run, on the average, for 23 hours and 59 minutes without crashing. Does that sound good enough?
Well, if you have ten players in your game, using ten different machines, they will probably not crash at the same time. However, for a ten-player game, where each player has a 0.1 percent chance of crashing, the total risk of a crash for any one of the players is 0.1 percent times 10—a 1 percent risk of crash. This may sound like a low risk, but that 1 percent actually means that you'll probably have a player crashing every 100 minutes (1 hour and 40 minutes), which certainly is a bad thing. If your program is good enough, the other players can continue playing—even if it's kind of frustrating when playing in a team to see a companion freezing or disappearing from the team.
When coding your next network game, keep these figures in mind, and follow our tip: test, test, and test. And after that, test it all over again.
Introducing XNA Networking
XNA 3.0 offers a set of functions and components through the Microsoft.Xna.Framework.GamerServices and the Microsoft.Xna.Framework.Net namespaces, which enables the creation of multiplayer game hosts (that other players can connect to), handles the connections and message exchanging between players and the host, and includes many extra features, such as native support for voice communications.
In the remainder of this chapter, you'll create a simple class to illustrate the basic features needed to implement simple multiplayer games, so you'll be ready to explore these concepts further in the next chapter and later on your own.
Although coding a complete multiplayer game might be challenging, the basic steps are simple for creating a multiplayer host, where other players can connect. The game host can be a player, in a peer-to-peer game, or a server machine, if you are using the client/server approach. There are four steps to create a host:
- Sign in a gamer (with a local or remote profile).
- Create a session, establishing its properties, including available slots.
- Wait for other players to join and be ready.
- Change the session state to "game started."
Similarly, you can resume the creation of a game client in four simple steps, which are valid for both peer-to-peer and client/server games:
- Sign in a gamer (with a local or remote profile).
- Find any sessions with empty slots to join.
- Join the session.
- Change the player state to "ready."
In the next section, we'll present the NetworkHelper class, which you'll create to help your program use XNA's basic network features.
Starting the Gamer Services Component
In 2002, Microsoft created Xbox LIVE (officially spelled with all caps), an online service for distributing game content (such as demos, trailers, and extra content for games) and connecting Xbox players. The ability to play your console games with remote players, display your high scores online, and much more led to a widespread adoption of LIVE. By the end of 2008, there were around 15 million Gold members on Xbox LIVE. Who knows how many Silver members (free accounts) there are? This made Microsoft extend the online service for Windows Games in 2007, with the launching of Games for Windows—LIVE.
In XNA 3.0 you can connect to both Xbox and Windows LIVE services, depending on the platform on which your game is running. You can also connect up to eight Zunes on an ad hoc network, for multiplayer Zune games.
The XNA programming team packed all the complexity of manipulating LIVE profiles in the GamerServices namespace, making it simple for developers to use LIVE capabilities such as creating local accounts, connecting to a LIVE profile, and using many available LIVE guide user interface screens to manipulate gamer information.
The easiest way to get access to LIVE features is through the GamerServicesComponent that, when created in a game, runs the Gamer Services pump at regular intervals. This allows your game, for instance, to respond to user interaction such as presenting the LIVE guide when the user presses the Home key.
Let's see this in action in a simple project. Follow these steps to get started:
- Create a new Windows Game project, and name it
XNADemo. - Open the
Game1class. Include the following code line in the class constructor, just after the line that sets the content root directory:
Components.Add(new GamerServicesComponent(this)); - Run the game. Press the Home key on your keyboard.
- Windows LIVE will display the opening screen shown in Figure 5-5, and let you create a new gamer profile (free of charge) if you don't have one yet, or connect to LIVE using an existing profile.
- If you already have a local profile, or if you ever connected to a LIVE profile from your machine, a different set of screens will be presented, so you don't need to follow the next steps to create a local profile. You can log in and skip to the next section.
- If you don't have a LIVE profile, choose Create New Profile, and you will see the screen in Figure 5-6. Proceed with the next steps to create a local profile.
Note You can sign in to LIVE from an XNA game only if you have a (paid) XNA Creators Club account. Since these accounts are not available for all countries yet, in the rest of the chapter, we will use an offline account, which will let us create multiplayer games for Windows and Zune. However, feel free to sign in and use your current profile if you already have a Creators Club account. Remember that if you want to create XNA games for Xbox 360, you will need to have a Creators Club account to submit your games.
Figure 5-5. The Games for Windows LIVE opening screen
Figure 5-6. The Create Gamer Profile screen
- In the Create Gamer Profile screen, choose the Create Offline Profile option. You will be prompted for a profile name, as shown in Figure 5-7. This profile name (which you can modify later) will be used to identify you when playing network games. Choose a name for your profile and click Submit.
Figure 5-7. Entering a profile name
- Your local profile will be created, and the Save Game Profile screen will appear, as shown in Figure 5-8. Here, you can click Join LIVE to open Internet Explorer and navigate to the Game for Windows-LIVE site. Clicking Customize Profile enables you to configure your profile (for example, the profile image). Clicking Done takes you to a screen where you can configure details about your profile and see some functions (chat, friends, games, and so on) that will be available only if you join LIVE, as shown in Figure 5-9.
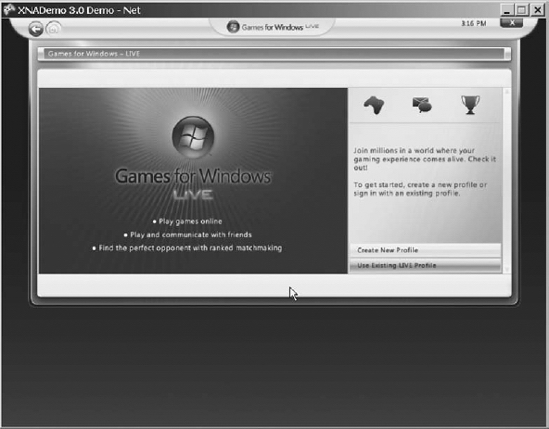
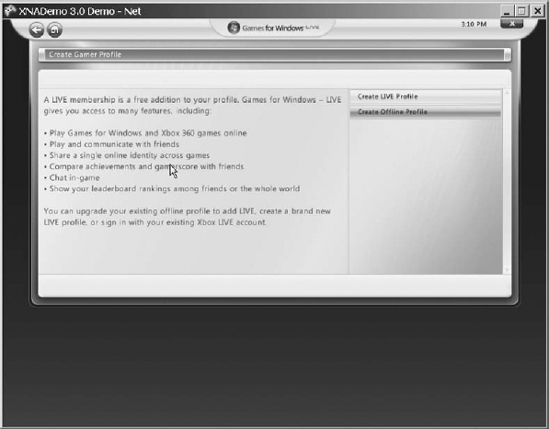
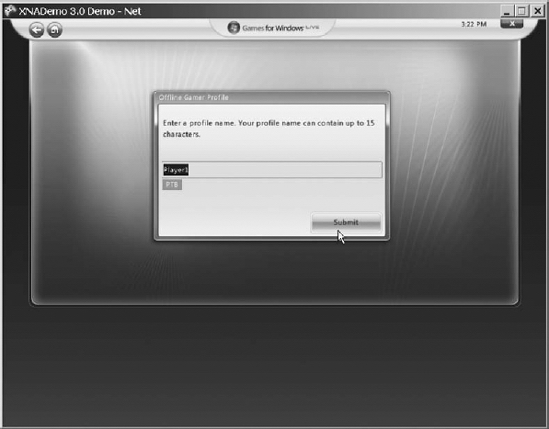
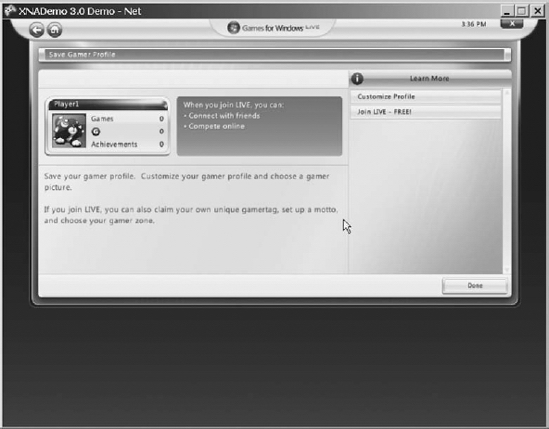
Figure 5-8. Finishing up your new profile
In the next section, you will continue coding the sample by creating a helper class that will demonstrate, in a simple way, the basic concepts on XNA networking.
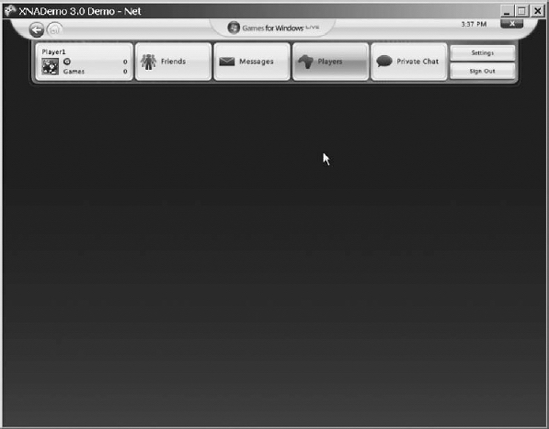
Figure 5-9. The Games for Windows LIVE screen, for a signed-in player
Defining the NetworkHelper Class
When creating a real project, you need to choose which approach to creating the network supporting classes is the best. For this example, which is just intended to help you understand the networking concepts, let's keep things as simple as possible. Because the client and the host programs usually have many common features, you'll create a single class, grouping all XNA network routines.
Open the XNADemo project you created in the previous section. Then right-click the project name in the Solution Explorer window and choose Add ![]() Class to create a new, empty class. Name the class
Class to create a new, empty class. Name the class NetworkHelper. Include the references to the Microsoft.Xna.Framework.Net and Microsoft.Xna.Framework.GamerServices namespaces at the beginning of the class, and you're ready to go:
using System;

using Microsoft.Xna.Framework.Net;

using Microsoft.Xna.Framework.GamerServices;
namespace XNADemo

{

    class clsNetWorkHelper

    {

    }

}
In the next sections, you'll follow the steps to create a host outlined earlier in the chapter: sign in a gamer, create a session, wait for other players to join and be ready, and then change the session state to game started. Using these steps as a guide, you will create the necessary methods and properties in your network helper class.
Signing in a Gamer
In the section "Starting the Gamer Services Component," you created a local profile with automatic sign-in (the default configuration for new profiles), so you don't need to code anything else to sign in a gamer. However, because your goal here is to learn, you'll create a method named SignInGamer, in the NetworkHelper class, which allows you to display the LIVE guide screens programmatically:
public void SignInGamer()

{

     if (!Guide.IsVisible)

     {

         Guide.ShowSignIn(1, false);

     }

}
This code fragment uses the Guide class to show the LIVE guide. This class is the entry point to any operation related to the LIVE guide. It contains methods to present the guide, show message boxes, and handle text entry and other interface elements. These methods work both in Xbox 360 and Windows.
In the code sample, first you check if the guide is visible and, if not, present it through the ShowSignIn method. This method takes two arguments: the number of panes displayed for gamers' sign-in (always 1 in Windows; 1, 2, or 4 in Xbox 360), and a flag indicating if only online profiles should be displayed. In this case, you are choosing to present one pane, and to display both online and offline profiles.
Now, if you want to display the LIVE guide—for example, when the user presses the F1 key on the keyboard—you can create a network helper object and call this method. To do this, you must define the new object in the Game1 class:
NetworkHelper networkHelper;
Then, in the Initialize method of the Game1 class, create the object:
networkHelper = new NetworkHelper();
Finally, call the method in the Update method of the Game1 class, which will look like this after your adjustment:
protected override void Update(GameTime gameTime)

{

    // Allows the game to exit

    if (GamePad.GetState(PlayerIndex.One).Buttons.Back ==

        ButtonState.Pressed)

        this.Exit();


    // Presents the LIVE Guide to sign in

    if (Keyboard.GetState().IsKeyDown(Keys.F1))

        networkHelper.SignInGamer();


    base.Update(gameTime);

}
Run the program now and press the F1 key on the keyboard. The LIVE guide pops up.
Now that you have a signed-in player, the next step is to create a session.
Creating a Session
The XNA Framework NetworkSession class represents a multiplayer session and is used to create, find, join, and end sessions. It also offers a series of properties that allow you to gather information about the current session.
Note XNA 3.0 still can start only one Games for Windows—LIVE network support program per machine, so you need to run your sample on two machines to test it: one for creating the session and another to find and join the session.
To create a new session, you'll use the NetworkSession.Create method, which receives up to five parameters:
- The session type, which can be
NetworkSessionType.Local(no networking, used for split-screen games; works only for Xbox 360),NetworkSessionType.SystemLink(connects two machines, Xbox 360 or PC, in the same subnet),NetworkSessionType.PlayerMatch(allows connection through the LIVE servers) andNetworkSessionType.Ranked(used for ranked commercial games that passed Xbox LIVE certification). - The maximum number of local (in the same machine) players.
- The numbers of slots for players on this session (from 2 to a maximum of 31 players).
- The number of private slots (optional parameter), stating how many of the session slots are reserved for players who join through invitation. If this number is equal to the number of session slots, the session will accept only invited players.
- The session properties (optional parameter): a collection of custom properties that you can use to define any game-specific values, such as the game difficulty level or the time limit for the session. These properties, stored as a
NetworkSessionPropertiesclass, are also used to filter the results when searching for sessions to join.
To create the session, you'll define some private class-level variables and code a new method, CreateSession, in your NetworkHelper class:
private NetworkSession session = null;  // The game session

private int maximumGamers = 2;  // Only 2 will play

private int maximumLocalPlayers = 1;  // No split-screen, only remote players


public void CreateSession()

{

    if (session == null)

    {

        session = NetworkSession.Create(NetworkSessionType.SystemLink,

                                        maximumLocalPlayers,

                                        maximumGamers);

     }

}
Creating a multiplayer game session in XNA is simple as that: only one command, and you're good to go!
However, for this session to work, processing the network packets properly, you'll need to call its Update method on every game update cycle. To do this, include an Update method on your NetworkHelper class:
public void Update()

{

    if (session != null)

        session.Update();

}
The best way to call this method in every game loop cycle is by including the following line at the beginning of the Game1 Update method:
networkHelper.Update();
Now your session is created and ready to process network messages. You might also want to configure some details about the session behavior. For instance, you can include the following lines just after the session creation:
// If the host goes out, another machine will assume as a new host

session.AllowHostMigration = true;

// Allow players to join a game in progress

session.AllowJoinInProgress = true;
You can also configure your NetworkHelper class to respond to session events. To see what is going on, create a new read-only string property for your class, Message, and code the session event handlers to set this property properly:
// Message regarding the session's current state

private String message = "Waiting for user command...";

public String Message

{

    get { return message; }

}
Now that the message property is set up, let's include the event hooks in the CreateSession method, after the session creation, by incorporating the following lines:
session.GamerJoined +=

               new EventHandler<GamerJoinedEventArgs>(session_GamerJoined);

session.GamerLeft +=

               new EventHandler<GamerLeftEventArgs>(session_GamerLeft);

session.GameStarted +=

               new EventHandler<GameStartedEventArgs>(session_GameStarted);

session.GameEnded +=

               new EventHandler<GameEndedEventArgs>(session_GameEnded);

session.SessionEnded +=

               new EventHandler<NetworkSessionEndedEventArgs>(session_SessionEnded);

session.HostChanged +=

               new EventHandler<HostChangedEventArgs>(session_HostChanged);
In the previous code excerpt, you inform the session object that you'll handle every single event that it offers. However, you must keep in mind this is not necessary: you should code only the relevant events according to your game logic. For example, if you set the session property AllowHostMigration to False, the HostChanged event will never happen.
Getting back to our example, all you need for now is to set the message property you created with some explanatory messages, so you can code the game's main class to write the message content in the game window, and then be able to see when each event happens.
The next listing presents the code snippets for setting the message property on each event you created the hook for:
void session_GamerJoined(object sender, GamerJoinedEventArgs e)

{

    if (e.Gamer.IsHost)

        message = "The Host started the session!";

    else

        message = "Gamer " + e.Gamer.Tag + " joined the session!";

}
void session_GamerLeft(object sender, GamerLeftEventArgs e)

{

    message = "Gamer " + e.Gamer.Tag + " left the session!";

}


void session_GameStarted(object sender, GameStartedEventArgs e)

{

    message = "Game Started";

 }


void session_HostChanged(object sender, HostChangedEventArgs e)

{

    message = "Host changed from " + e.OldHost.Tag + " to " + e.NewHost.Tag;

}


void session_SessionEnded(object sender, NetworkSessionEndedEventArgs e)

{

    message = "The session has ended";

}


void session_GameEnded(object sender, GameEndedEventArgs e)

{

    message = "Game Over";

}
The session events have self-explanatory names. The GamerJoined event happens every time a new gamer joins the session, so you must include the proper code for new player initialization there. The GamerLeft event occurs when a gamer leaves the session, so here you must include the code for gracefully allowing the game to continue without that player, or maybe the code to end the game, and so on.
To finish coding for session creation, you need to write only the code in the Update method of the Game1 class to start a session (let's say, when the user presses the F2 key on the keyboard):
// Creates a session

if (Keyboard.GetState().IsKeyDown(Keys.F2))

    networkHelper.CreateSession();
Your program is ready to go, but if you want to see the message with the session state, you need to code for it. Right-click your project in the Solution Explorer window and choose Add ![]() New Item. Choose to add a new
New Item. Choose to add a new SpriteFont in your project and name it Arial. Include the following line at the beginning of the Game1 class to declare the SpriteFont object:
SpriteFont Arial;
Then load the file you just included in the project by adding the following line to the LoadContent method of the Game1 class:
Arial = Content.Load<SpriteFont>("Arial");
Now, all you need is to use the SpriteBatch the XNA Framework kindly created for you to draw the message using your SpriteFont, in the Draw method of the Game1 class:
// Show the current session state

spriteBatch.Begin();

spriteBatch.DrawString(Arial, "Game State: " + networkHelper.Message,

                                      new Vector2(20, lineHeight), Color.Yellow);

spriteBatch.End();
Run your program now, and press F1 (or the Start button on your gamepad) to bring up the player sign-in screen. Sign in from this screen and close it, and then press F2 to start a new session. You can see the result—not quite impressive—in Figure 5-10.
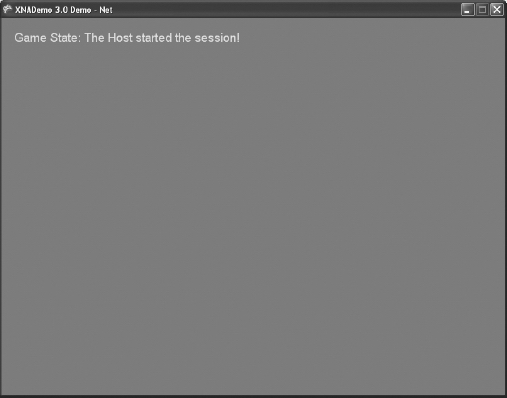
Figure 5-10. Game screen with a "The Host started the session!" message
Note XNA Game Studio 3.0 introduces a change in the behavior of network sessions. In XNA 2.0, every time a local player signed out, the session ended. For XNA games running in Windows, this was not a problem, since you can have only one local player. However, for the Xbox 360, this was undesirable, since you can have up to four local players. With XNA 3.0, if a local player signs out, his profile is simply removed from the session, and the session will end only if there are no more local players connected to it.
In the next section, you'll code the client-side routines used to find and join sessions.
Finding and Joining a Session Synchronously
Connecting synchronously to an existing session is almost as easy as creating a session, with straightforward code. You need to search for available sessions using the Find method of the NetworkSession object, then check if a session has empty slots for you to connect, and finally join the session found.
By including the next code piece in your NetworkHelper class, you'll be able to make your sample search and join game sessions:
public void FindSession()

{

   // All sessions found

   AvailableNetworkSessionCollection availableSessions;

   // The session we'll join

   AvailableNetworkSession availableSession = null;


    availableSessions = NetworkSession.Find(NetworkSessionType.SystemLink,

        maximumLocalPlayers, null);


    // Get a session with available gamer slots

    foreach (AvailableNetworkSession curSession in availableSessions)

    {

        int TotalSessionSlots = curSession.OpenPublicGamerSlots +

                                              curSession.OpenPrivateGamerSlots;

        if (TotalSessionSlots > curSession.CurrentGamerCount)

            availableSession = curSession;

    }


   // If a session was found, connect to it

   if (availableSession != null)

   {

       message = "Found an available session at host " +

                   availableSession.HostGamertag;

       session = NetworkSession.Join(availableSession);

   }

   else

       message = "No sessions found!";

}
Let's review the code, step by step, to understand its details.
First, you define two variables that will receive objects that help you find and manage sessions: AvailableNetworkSessionCollection, which is a collection of sessions, as returned from the NetworkSession.Find method, and AvailableNetworkSession, which is an item of such a collection.
Note The AvailableNetworkSession object is different from the NetworkSession object. It is only a reference to an available session, with properties that describe a session. You can use it to create a NetworkSession object through the NetworkSession.Join method.
After retrieving these objects, you use the NetworkSession.Find method to retrieve the collection of available sessions. This method receives three parameters: the network session type you are searching for (these types were discussed in the previous session); the maximum number of players; and a collection of NetworkSessionProperties custom properties, which must match the properties used in the session creation. In this example, because you created a session with no custom properties, you can simply pass null as this last argument.
After retrieving the available sessions, the previous code loops through these sessions and checks if any of them have empty slots for you to sign in, comparing the sum of the available session properties OpenPublicGamerSlots and OpenPrivateGamerSlots with the total gamers already signed in to the session, given by the CurrentGamerCount property.
Finally, you set the message NetworkHelper property with the corresponding message (stating if you did or didn't find a session to join). If you find a session with empty slots, you join the session using the NetworkSession.Join method, passing the available session found as a parameter.
To finish coding for session finding, you need to adjust the Update method of the Game1 class to call your Find method. You can fire the session to find when the user presses the F3 key on the keyboard through the following code:
// Looks for a session

if (Keyboard.GetState().IsKeyDown(Keys.F3))

    networkHelper.FindSession();
To test your program, you'll need two machines. Run the program on both machines, and follow the steps presented earlier in the section "Creating a Session" on the first computer.
On the second computer, run the program. Press the F1 key to be sure that there's a signed-in player (otherwise the session finding will fail), and then press F3 to find a session. If both computers are in the same subnet, XNA will be able to find the session, and the screen will present the message "Found an available session at host XXX," where XXX is the gamer tag signed in to the host machine, as shown in Figure 5-11.
Tip The AvailableNetworkSession object has a property, QualityOfService, which is a class filled with information about the quality of the connection after the XNA Framework gathers this data (check the isAvailable property of this class to check if data is already gathered). This class has four properties, which present the minimum and average round-trip time for the network packets, and the available bandwidth from the host to the local machine and from the local machine to the host. You can find more detailed information about the AvailableNetworkSession properties and methods at http://msdn.microsoft.com/en-us/library/microsoft.xna.framework.net.availablenetworksession.aspx.
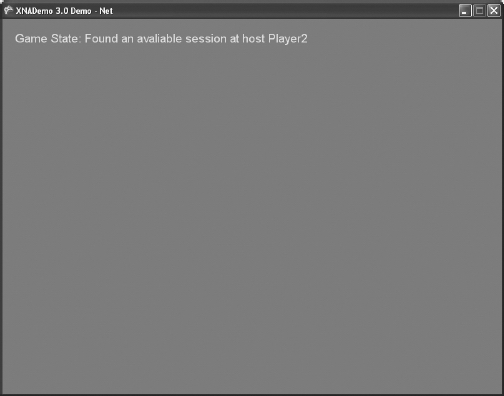
Figure 5-11. Game screen with a "Found an available session" message
In the next section, you'll see how to find sessions asynchronously.
Finding and Joining a Session Asynchronously
Coding for asynchronous session searching is an approach commonly used in games because you usually don't want to freeze the game and the player options when searching for available sessions. The basic idea for session finding and joining is the same as you saw in the previous section. However, here, you'll use the BeginFind and EndFind NetworkSession methods, which start a session search, indicating the function to be called when the searching is ended, and get the results from the search, respectively.
The next code sample, to be included in your NetworkHelper class, defines a new variable used to store and track the status of the asynchronous operation, and a method that will call BeginFind to start the session searching:
IAsyncResult AsyncSessionFind = null;

public void AsyncFindSession()

{

    message = "Asynchronous search started!";
    if (AsyncSessionFind == null)

    {

        AsyncSessionFind = NetworkSession.BeginFind(

          NetworkSessionType.SystemLink,  maximumLocalPlayers, null,

          new AsyncCallback(session_SessionFound), null);

    }

}
BeginFind receives the same parameters from the Find method discussed in the previous section (session type, maximum number of players, and custom session properties), plus the address of the callback function (which is called when the search results are ready). BeginFind also receives an object used to store the state of the asynchronous operation (let's not bother about this last one right now; it's fine just to pass a null value).
In the previous code sample, you passed session_SessionFound as the callback function for BeginFind. The next code excerpt presents the code for the callback function that, as you'll see, is very similar to your previously coded FindSession method:
public void session_SessionFound(IAsyncResult result)

{

   // All sessions found

  AvailableNetworkSessionCollection availableSessions;

  // The session we will join

  AvailableNetworkSession availableSession = null;


    if (AsyncSessionFind.IsCompleted)

    {

        availableSessions = NetworkSession.EndFind(result);


         // Look for a session with available gamer slots

        foreach (AvailableNetworkSession curSession in

                   availableSessions)

        {

            int TotalSessionSlots = curSession.OpenPublicGamerSlots +

                                    curSession.OpenPrivateGamerSlots;

            if (TotalSessionSlots > curSession.CurrentGamerCount)

                availableSession = curSession;

        }


        // If a session was found, connect to it

        if (availableSession != null)

        {

            message = "Found an available session at host" +

                         availableSession.HostGamertag;

            session = NetworkSession.Join(availableSession);

        }

        else

            message = "No sessions found!";
        // Reset the session finding result

        AsyncSessionFind = null;

    }

}
This code excerpt is almost identical to your FindSession synchronous method; in fact, only three lines are different:
- The test to check the
AsyncSessionFind.IsCompletedproperty to see if the results are already available - Using
NetworkSession.EndFind(instead ofNetworkSession.Find) to retrieve the available sessions collection - The last line of the listing, where you simply reset the
AsyncSessionFindresult variable
So, if you understand the synchronous session searching concepts, you have just a few new things to learn when dealing with asynchronous ones.
All you need to do now is to revise the Update method of the Game1 class to call the new asynchronous session-finding method, by including the following lines:
// Find a session asynchronously

if (Keyboard.GetState().IsKeyDown(Keys.F4))

      networkHelper.AsyncFindSession();
You can test the new code by again executing the steps you used in the previous section to join a session synchronously, except that you press the F4 key instead of F3. On the client machine, you'll see the message "Asynchronous search started!" followed, a few seconds later, by the message that states the result of the session searching.
Now you have two machines with signed-in gamers. The first one creates a session and acts as a host, and the second one joins the session created. So, it's time to inform XNA that you are ready to go and start the game!
Starting the Game
In XNA, A game session has three possible states, informed by its SessionState property:
NetworkSessionState.Lobby: A session in this state means that the local machine has joined a session and is ready to start, but is waiting for other players to join and the host to start the game. The host knows when all players are ready by checking theIsEveryoneReadyproperty of thesessionobject. It can check the number of signed-in gamers by consultingGamer.SignedInGamers.Count.NetworkSessionState.Playing: When the host starts the game, by calling theStartGamemethod of the session object, theGameStartedsession event is fired for all players, and the session state changes fromLobbytoPlaying.NetworkSessionState.Ended: Similarly, the host calls theEndGamemethod of the session object to finish a game, firing theGameEndedsession event for all players and changing the session state fromPlayingtoEnded.
So, once you have all players connected in the same session, you need every player to report that she is ready and to include the code in the host to start and end the game.
Signaling that all local players (maximum of one in Windows; up to four in Xbox 360) are ready is easy through the session object, which has a collection with references to all local gamers' profiles. The next code sample shows a new method for your NetworkHelper class that does this job:
public void SetPlayerReady ()

{

    foreach (LocalNetworkGamer gamer in session.LocalGamers)

        gamer.IsReady = true;

}
Although you can use this method in a real game, in this sample, you have only two players, so you don't need to wait for other players to join. As soon as the second machine joins a session, the host can start the game. To do this, you can include an extra line on the gamerJoined event to start the game as soon as the host detects that another player joined the game, as presented in the following code snippet:
void session_GamerJoined(object sender, GamerJoinedEventArgs e)

{

    if (e.Gamer.IsHost)

    {

        message = "The Host started the session!";

    }

    else

    {

        message = "Gamer " + e.Gamer.Tag + " joined the session!";

        // Other played joined, start the game!

        session.StartGame();

    }

}
If you run your program now on your two test machines, pressing F2 on the host machine and pressing F3 or F4 to find the session on the second machine, the host machine will automatically start the game and present the game started message (which you coded in the GameStarted event of the session object in the earlier section "Creating a Session").
At this point, you have two machines connected in the same game. Following the general guidelines presented in this section, you can easily extend the sample by writing the code to end the game by calling the session.EndGame method.
All you need to know now is how to send data from one machine to another, and you'll have all the basic knowledge needed to include network support in your games.
Handling Messages
Sending and receiving messages is simply a matter of calling the SendData and ReceiveData methods of the LocalNetworkGamer class, which represents a local player.
Both methods can handle arrays of bytes or a packet writer, which is a binary data streamer. A packet writer receives basic data types and transforms them into an array of bytes in an efficient way. Because dealing with packet writers is easier, let's work with them. Start by creating a new class-level variable in your NetworkHelper class, named packetWriter:
PacketWriter packetWriter = new PacketWriter();
You can now use this packet writer to stream your messages to one or all the other remote players by looping through your session's LocalGamers collection and calling the SendData method, as follows:
public void SendMessage(string key)

{

    foreach (LocalNetworkGamer localPlayer in session.LocalGamers)

    {

        packetWriter.Write(key);

        localPlayer.SendData(packetWriter, SendDataOptions.None);

        message = "Sending message: " + key;

    }

}
The SendData method can define the reliability and the order reinforcement for the message in its SendDataOptions parameter, which can be set to the follows:
None: Packet sent with no guarantees.InOrder: Packet sent in order, but a packet loss might happen.Reliable: Packet always reaches its destination, but might arrive out of order.ReliableInOrder: No packet loss, and all packets are delivered in the same order they were sent.Chat: Mark the message as chat data (new to XNA 3.0).
Note The Chat option can be combined with the other members of the enumeration, such as InOrder or Reliable, and will cause the data inside the network packet to be sent without encryption. This was included to allow XNA network packets to comply with international regulations regarding encrypted chat. Keep in mind that to maintain security, other game data should not use this flag, although it's okay to mix chat data with other data (in other words, to mix encrypted and nonencrypted data) in the same packet.
Remember what we said in the beginning of this chapter: decide which option is best for your game.
Additionally, the SendData method has overloads that receive an extra NetworkGamer parameter, which allows your game to send messages to a specific player. If this parameter is not reported, the message is delivered to all signed-in players.
In the SendMessage method, you are packing only one string, but you could pack a number of variables, depending on your game logic. For example, if you want to send the left thumb-stick and both triggers' state to all other players, you can write your packet as shown in the next code fragment:
GamePadState GamePad1 = GamePad.GetState(PlayerIndex.One);

packetWriter.Write(GamePad1.Triggers.Left);

packetWriter.Write(GamePad1.Triggers.Right);

packetWriter.Write(GamePad1.ThumbSticks.Left);
The method to receive messages is just as simple: you'll loop through the local gamers' collection and check if there is any available message. If so, you need to call the ReceiveData method of the LocalNetworkGamer object until you consume all available data. ReceiveData returns arrays of bytes or a packetReader (the counterpart of packetWriter, used to write the packet), and also a NetworkGamer object with data from the remote player, which you can use to test if you want to process the message or not, depending on the game logic.
The next code excerpt presents a simple implementation of a routine that consumes messages from other players:
PacketReader packetReader = new PacketReader();

public void ReceiveMessage()

{

    NetworkGamer remotePlayer;  // The sender of the message


    foreach (LocalNetworkGamer localPlayer in session.LocalGamers)

    {

        // While there is data available for us, keep reading

        while (localPlayer.IsDataAvailable)

        {

            localPlayer.ReceiveData(packetReader, out remotePlayer);

            // Ignore input from local players

            if (!remotePlayer.IsLocal)

                message = "Received message: " +

                           packetReader.ReadString();

        }

     }

}
The send and receive routines of your game must write and read the same data structures, in the same order.
And if you want to read the left thumbstick and both triggers' data, you need to write your code for reading packets as follows:
remoteThumbstick = packetReader.ReadVector2();

remoteLeftTrigger = packetReader.ReadSingle();

remoteRightTrigger = packetReader.ReadSingle();
Note You must use the same order for the data types when writing and reading the packets, since all data will be converted to bytes in a byte stream. If you read the information in a different order, you may not get any application errors, but you could end up with invalid data, which may be a hard problem to debug.
Now that your sending and writing routines are in place, you need to call them from the Update method of the Game1 class, to test them. Because you want to send and receive messages only when the game is running, create a new property for the NetworkHelper class that returns the current session state:
public NetworkSessionState SessionState

{

    get

    {

        if (session == null)

            return NetworkSessionState.Ended;

        else

            return session.SessionState;

    }

}
Now, let's include the calls for sending and receiving messages in the Update method, when the session is in "playing" state:
if (networkHelper.SessionState == NetworkSessionState.Playing)

{

    // Send any key pressed to the remote player

    foreach (Keys key in Keyboard.GetState().GetPressedKeys())

        networkHelper.SendMessage(key.ToString());


    // Receive the keys from the remote player

    networkHelper.ReceiveMessage();

}
To test your program, run the test from the previous section, until you have two machines connected and the game started. At this point, press any key, and you'll see the message "Sending message:" followed by the key pressed on the first machine, and the message "Received message:" followed by the key pressed on the remote machine in the second one.
Adding a Final Touch
While we presented the various concepts through this chapter, you programmed a lot of keys to have a special meaning. To help you when testing your program, what about updating the Draw method of the Game1 class to present some helper messages stating the meaning of each key? Just update this method to reflect the next code example:
protected override void Draw(GameTime gameTime)

{

    graphics.GraphicsDevice.Clear(Color.CornflowerBlue);


    // Show the current session state

    spriteBatch.Begin();

    spriteBatch.DrawString(Arial, "Game State: " +

                 networkHelper.Message,

                 new Vector2(20, 20), Color.Yellow);

    spriteBatch.DrawString(Arial, "Press:", new Vector2(20, 100),

                 Color.Snow);

    spriteBatch.DrawString(Arial, " - F1 to sign in",

                 new Vector2(20, 120), Color.Snow);

    spriteBatch.DrawString(Arial, " - F2 to create a session",

                 new Vector2(20, 140), Color.Snow);

    spriteBatch.DrawString(Arial, " - F3 to find a session",

                 new Vector2(20, 160), Color.Snow);

    spriteBatch.DrawString(Arial, " - F4 to asynchronously find a

session",

                     new Vector2(20, 180), Color.Snow);


    spriteBatch.DrawString(Arial, "After the game starts, press other

keys to send messages",

                 new Vector2(20, 220), Color.Snow);

    spriteBatch.End();


    base.Draw(gameTime);

}
Now, when you start the game, you have a quick reference for all keys that have some special meaning, as presented in Figure 5-12.
Remember that when testing this application, you need to execute the commands in order: sign in a gamer, create a session, join a session (only on the other machine), set the players as "ready," and start sending and receiving messages. For example, make sure that you never try to create or find a session if there are no signed-in players.
And that completes this chapter's example.
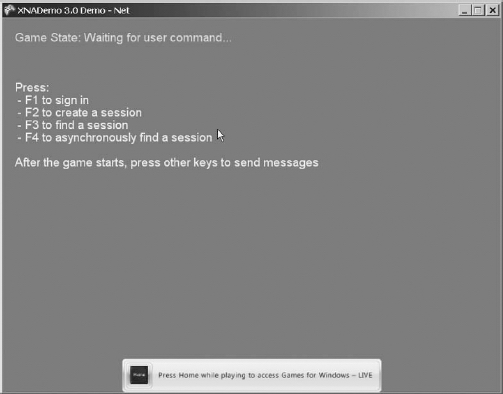
Figure 5-12. Game screen with the key helper messages
Summary
This chapter started by presenting some generic concepts involved in creating networked games. Planning carefully and testing the networked games thoroughly are probably the most important points, because networked games have many more potential error sources than local, single-player games.
As for XNA network features, everything is pretty simple:
- When you include the Gamer Services component in your game, you automatically have access to all LIVE guide features.
- To host a session, all you need to do is call the
NetworkSession.Createmethod. - Joining a session on a remote computer is as simple as calling the
NetworkSession.Findmethod (to look for a session) and theNetworkSession.Joinmethod (to join a session). - Starting and ending a game is also simple: when the host calls the
StartGamemethod of the session object, all players enter the game playing state and receive aGameStartedevent. TheGameEndmethod generates opposite results, firing aGameEndedevent and setting the session to a game ended state. - Sending messages is as easy as using the
PacketWriterandPacketReaderclasses and theSendDataandReceiveDatamethods of theLocalNetworkGamerclass.
In the next chapter, you'll apply the XNA networking concepts you learned here to create a network-enabled version of the Rock Rain game.