
CHAPTER 2
2D Graphics, Audio, and Input Basics
In this chapter, you'll create a simple program that manipulates simple 2D graphics. By doing so, you'll explore some relevant 2D game-creation concepts, such as the use of sprites and collision-detection algorithms. You'll also see how to deal with user input in XNA. Finally, you'll learn some basics of using audio in your games. By the end of this chapter, you'll be ready to start creating 2D games.
2D Graphics
In the previous chapter, you learned how to create an empty Windows Game project using XNA Game Studio. Now, you'll create a basic project that displays two simple 2D images on the screen. You'll learn how to move these images and make them collide with the window borders and against each other. But first, you need to be familiar with some of the terminology related to graphics in a game.
Common Gaming Terms
Many terms used in game programming jargon describe specific uses of graphics in a game. The following are some of the most common ones:
- Sprite:
- A sprite is a 2D image that can be manipulated independently from the rest of a game scene. This term is used often to describe the image displayed or the class used by the game to display the image (which includes properties such as velocity, position, width, height, and so on). Because the computer always draws the 2D image as a rectangle, a sprite usually encompasses transparent areas so it provides the illusion of a nonrectangular drawing. The term animated sprite refers to a sprite whose images change at predetermined time intervals, to generate the illusion of movement (such as a walking man or a spinning wheel).
- Textures:
- A texture refers to a 2D image loaded in a 3D model, which can be seen from any point of view, depending on the position of the model and the position of the camera used to render the scene. You can use textures to help create the illusion of a highly detailed model, when a detailed image is mapped over a simple 3D model.
- Billboard:
- In the 3D world, a billboard is a texture that is mapped to a special plane that is always perpendicular to the camera axis. Using 3D-like images in billboarding is an effective technique for creating game components—such as a tree, a road sign, or a torch in the wall—without the need to create highly detailed models. This allows more detailed scenes with the same rendering processing power.
Tip The Billboards sample provided at the XNA Creators Club web site (http://creators.xna.com/en-US/sample/billboard) demonstrates how the billboarding technique can be used effectively.
- Background:
- A 2D game scene is usually composed of a background image with many sprites displayed over it. When this background is a moving image, you have a scrolling background, which is the main characteristic in games called scrollers. It's also worth mentioning parallax scrolling, a special scrolling technique in which the 2D game has more than one scrolling background with different scrolling speeds, which provides the illusion of a 3D environment. For example, while the player character moves to the left, trees and bushes behind it move at the player's speed, mountains "far away" from the character move slowly, and clouds in the sky move very slowly.
Tip The Microsoft Developer Network (MSDN) site has a nice example of how to improve the Platformer Starter Kit (which comes as a new game project type when you install XNA 3.0) by including levels with parallax scrolling. You can find this example at http://msdn.microsoft.com/en-us/library/dd254919.aspx.
- Tiles:
- These are small images used as tiles to compose a bigger image, usually a level background. For example, platform games typically use tiles to create different platform levels based on the same basic images. The term tiled map is often used to describe game levels created with tiles, and sometimes to describe files with the information needed to create such levels based on tiles. A classic example of the use of tiles is for building a terrain. Role-playing games (RPGs) usually provide a level editor application that lets you build the levels by picking different tiles from the application and joining them together.
In the next sections, you'll create a simple XNA program to demonstrate the concepts of drawing sprites, moving them on the screen, and handling sprite collisions with other sprites and with the game window border. However, before you start coding, let's take a quick look at the 2D coordinate systems and screen coordinates.
2D and Screen Coordinate Systems
While it's not our goal to cover all math concepts involved in creating 2D games, if you understand the basic ideas introduced in this chapter, you'll be able to build on this knowledge when creating your own 2D games and easily comprehend other related concepts.
You probably heard about 2D coordinate systems in geometry class. Just to remind you, Figure 2-1 represents a triangle, expressed by each of its vertices, in a 2D coordinate system. Analyze the vertices' coordinates to make sure you understand the concept.
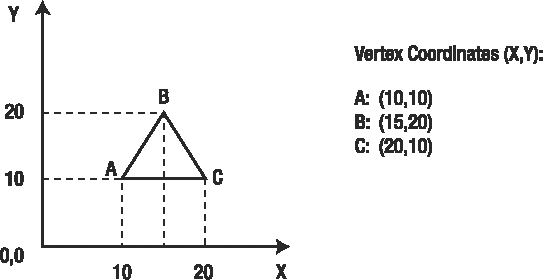
Figure 2-1. A triangle in a 2D coordinate system
The main difference between the coordinate system presented in Figure 2-1 and the coordinates used when creating a 2D game—called screen coordinates—is that the axis origin is not at the bottom left. Instead, the axis origin is located in the top-left position, as depicted in Figure 2-2. Compare Figures 2-1 and 2-2 to understand how this difference impacts the vertices' definition: the higher a vertex appears on the screen, the lower its y-axis coordinates.
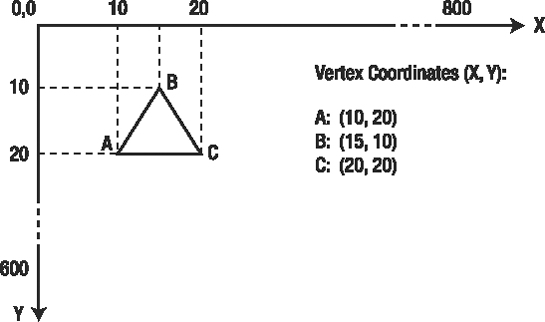
Figure 2-2. The same triangle as in Figure 2-1, but in screen coordinates
Another important detail is that the screen coordinates are directly related to the screen resolution. So, if you configure your monitor to an 800 × 600 resolution, that means that the x axis will have 800 pixels (each pixel is an independent point on the screen) and the y axis will have 600 pixels, as suggested in Figure 2-2.
Drawing a Sprite Using XNA
Let's now create a simple example in XNA to display a sprite in a given position on the screen.
Start by creating a new project, or by opening the empty project you created in the previous chapter.
Creating the Sprite Class
To group the sprite image and some associated properties (such as position, size, and velocity), you'll create a simple class, which will be extended as we explore new concepts in this chapter.
To create the class, right-click the project name in the Solution Explorer window and choose Add New Item. In the New Item dialog box, choose Class as the item type and name it clsSprite. Add the following code in the clsSprite.cs file:
using Microsoft.Xna.Framework.Graphics;   // For Texture2D

using Microsoft.Xna.Framework;  //  For Vector2

class clsSprite

{

   public Texture2D texture { get; set;}  // Sprite texture, read-only property

   public Vector2 position { get; set; }  // Sprite position on screen

   public Vector2 size { get; set; }      // Sprite size in pixels


   public clsSprite (Texture2D newTexture, Vector2 newPosition, Vector2 newSize)

   {

       texture = newTexture;

       position = newPosition;

       size = newSize;

   }

}
This is a simple sprite class, which includes the following properties:
texture:- Stores the sprite image using XNA's
Texture2Dclass. This class has many properties and methods to help deal with textures; you'll see some of them in Chapters 3 and 4. The texture is stored in this class as a 2D grid of texels. Similar to pixels, which are the smallest unit that can be drawn on the screen, texels are the smallest unit that can be stored by the graphics processing unit (GPU), and they include color and transparency values.
size:- Stores the sprite's size using XNA's
Vector2class. This class has two properties,XandY, which are used to store the image width and height.
position:- Stores the position of the sprite using XNA's
Vector2class. TheXandYproperties of the class store the screen coordinates for the sprite.
For now, this class stores only the sprite properties, and does not include any methods. These properties are created using the C# simplified version for defining a get/set structure.
Adding the Sprite Image
The first step in creating a sprite is to include a new image in your game, so you can use it through the Content Pipeline. Choose any image you would like to use for this example, as long as it is in one of the formats supported by XNA (listed in Chapter 1). For our example, we used a simple 64 × 64 pixel image of a blue ball with a magenta background, which we created with Windows Paint and saved as ball.bmp.
Tip XNA allows you to create transparent sections in your sprite in two ways. You can use an advanced image editor, such as Photoshop, GIMP (http://www.gimp.org), or Paint.NET (http://www.getpaint.net) to create image files with transparent areas. Alternatively, you can simply color the areas you don't want to show with magenta. In our example, the background of the ball image will not be drawn. When creating images with magenta areas in Windows Paint, don't save them in JPG format, because this format does not preserve the original colors when saving.
To add your image to your project, right-click the project's Content folder in the Solution Explorer window and select Add ![]() Existing Item, as shown in Figure 2-3. By default, the Add Existing Item dialog box will list all content types supported by XNA 3.0. Choosing Texture Files in the "Files of type" list in this dialog box will make it easier to find an image file.
Existing Item, as shown in Figure 2-3. By default, the Add Existing Item dialog box will list all content types supported by XNA 3.0. Choosing Texture Files in the "Files of type" list in this dialog box will make it easier to find an image file.
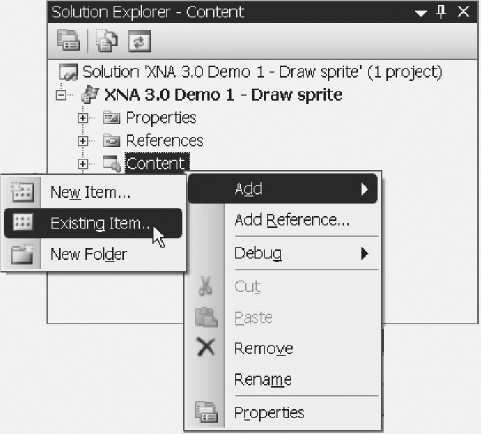
Figure 2-3. Adding an image to the game project
After including the image in the game solution, select the image name in the Solution Explorer window and press F4. This brings up (if it's not already visible) the Properties window for the recently included image, as shown in Figure 2-4.
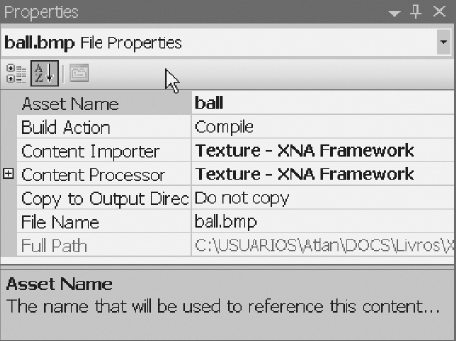
Figure 2-4. The image properties
The Properties window presents information such as the content importer and the content processor used for this content (also called asset), which were introduced in the previous chapter The Asset Name property defines how your code will refer to this content.
Drawing the Sprite on the Screen
Once you have an image, the next step is including the code for drawing it on the screen. To do this, you'll need a SpriteBatch (an XNA class that draws sprites on the screen) and the texture that will be used as the sprite image (in this case, you'll load this texture into your clsSprite class).
Usually, there is more than one way to code a particular task. In this case, you can read the texture from the clsSprite class and draw it in the Draw method of the Game1 class, or you can extend your clsSprite class to create a Draw method that will draw the sprite. Let's go with the former option, by including this new method in the clsSprite class:
public void Draw(SpriteBatch spriteBatch)

{

    spriteBatch.Draw(texture, position, Color.White);

}
The Draw method has many overloads, which allow you to draw only part of the original texture, to scale or rotate the image, and so on. Here, you are using the simplest one, which receives only three arguments: the texture to draw, the position in screen coordinates (both are already properties of clsSprite class), and a color channel modulation used to tint the image. Using any color other than white in this last parameter draws the image with a composition of its original colors and color tone.
Note For information about the other Draw method overloads, see the MSDN documentation for the XNA 3.0 SpriteBatch.Draw method (http://msdn.microsoft.com/en-us/library/microsoft.xna.framework.graphics.spritebatch.draw.aspx). For example, If you want to rotate your image, look for the overloads that expect the rotation parameter, or use the SpriteEffects parameter, if you just want to flip the sprite horizontally or vertically. Overloads with a scale parameter allow you to change the size of the sprite, which can be used in many ways, such as to create a zoom effect.
Now let's adjust the Game1 class. A new Windows Game project already creates a SpriteBatch object for you, so you'll start by creating a clsSprite object in the Game1 class. Include this definition at the beginning of the class, just after the device and SpriteBatch objects that were automatically created for you. You'll see something like the next code fragment:
public class Game1 : Microsoft.Xna.Framework.Game

{

   GraphicsDeviceManager graphics;  // The device

   SpriteBatch spriteBatch;         // The sprite renderer


   clsSprite mySprite1;             // My sprite class
Obviously, you need to create these objects with valid values before using them. You do so in the LoadContent method, which is where you include graphics initialization (as discussed in the previous chapter). Because the project already creates the SpriteBatch object, all you need to do is create the clsSprite object:
protected override void LoadContent()

{

    // Load a 2D texture sprite

    mySprite1 = new clsSprite(Content.Load<Texture2D>("ball"),

                            new Vector2(0f, 0f), new Vector2(64f, 64f));


    // Create a new SpriteBatch, which can be used to draw textures

    spriteBatch = new SpriteBatch(GraphicsDevice);

}
Note The previous code sample uses Vector2(0f, 0f) to define a zeroed 2D vector, but you could use the Vector2.Zero static property as well. The XNA Framework offers such properties to improve the code's readability.
Even though you included a single code line (for creating the mySprite1 object), a lot of things are going on. You created your sprite class by using the content manager to load the Texture2D based on the image asset name, ball. You also defined the sprite position as (0, 0) and decided on the sprite size: 64 pixels wide and 64 pixels tall.
For the SpriteBatch's creation, you're passing the graphics device as a parameter. In the previous chapter, we mentioned that the device (represented here by the GraphicsDevice variable) is your entry point to the graphics handling layer, and through it you do any graphical operations. Here, you are informing the SpriteBatch which device it should use when drawing the sprites. In the next section, you'll see how to use the device to change the program's window size.
It's always a good programming practice to destroy everything you created when the program ends. To do this, you need to dispose of the texture of clsSprite you created in the LoadContent method. As you probably guessed, you do this in the UnloadContent method. The code for disposing of the object follows:
protected override void UnloadContent()

{

    // Free the previously allocated resources

    mySprite1.texture.Dispose();

}
Note You could also create a Dispose method in the clsSprite class to dispose of the texture, and call it from the UnloadContent method. This would be a more object-oriented code practice. It's up to you to choose the code practice you think is best.
Finally, you need to include code to draw the sprite using the SpriteBatch object you created. You use the SpriteBatch, as its name suggests, to draw a batch of sprites, grouping one or more calls to its Draw method inside a block started by a call to the Begin method and closed by a call to the End method, as follows:
protected override void Draw(GameTime gameTime)

{

    graphics.GraphicsDevice.Clear(Color.CornflowerBlue);


    spriteBatch.Begin();

    mySprite1.Draw(spriteBatch);

    spriteBatch.End();


    base.Draw(gameTime);

}
The Begin method can also receive parameters that will be used when rendering every sprite in the block. For instance, if the texture has transparency information, you can tell the SpriteBatch to take this into account when drawing, by changing the Begin code line to the following:
spriteBatch.Begin(SpriteBlendMode.AlphaBlend);
Another very interesting parameter of the Begin method is transformMatrix, which receives a transformation matrix that will apply transformations (scale, rotation, or translation) to the entire batch of sprites being drawn. You will learn more about matrices in Chapter 8.
Running the program now results in a window with the sprite sitting in the upper-left corner—the (0, 0) position of the program window—as shown in Figure 2-5.
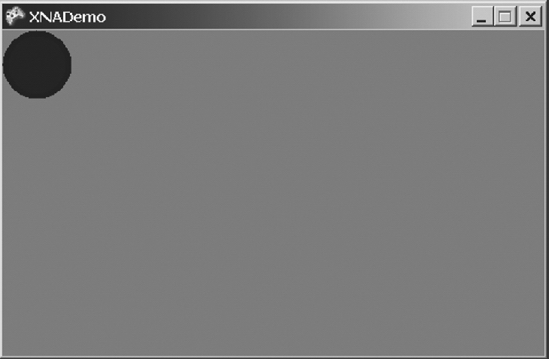
Figure 2-5. The sprite rendered in the (0, 0) position of the program window
Changing the Window Size
If you want to change the size of the window (for example, to a 500 × 300 window), you can inform the device about the new dimensions (through the graphics object) in the Game1 constructor, by including the following code lines just after the creation of the graphics object:
graphics.PreferredBackBufferWidth = 500;

graphics.PreferredBackBufferHeight = 300;
In these lines, you're changing the backbuffer width and height, which reflects in the window size, because you're working in windowed mode. This backbuffer is part of the technique used to draw the game scene without image flickering, called double buffering. In double buffering, you use two places, or buffers, to draw and display the game scene; while the first one is presented to the player, the second, invisible one (the backbuffer) is being drawn. After the drawing is finished, the backbuffer content is moved to the screen, so the player doesn't see only part of the scene if it takes too long to be drawn (the bad visual effect known as flickering).
Fortunately, you don't need to worry about such details, because XNA hides this complexity from you. But now you know why the property is called PreferredBackBufferWidth, instead of something like PreferredWindowsWidth!
Moving the Sprite on the Screen
Because you work directly with screen coordinates when creating 2D games, moving a sprite is simple. All you need to do is draw the sprite in a different position. By incrementing the x coordinate of the sprite position, the sprite moves to the right; by decrementing, you move the sprite to the left. If you want to move the sprite down on the screen, you need to increment the y coordinate. You move the sprite up by decrementing the y coordinate. Keep in mind that the (0, 0) point in screen coordinates is the upper-left corner of the window.
The XNA Framework basic game project provides a specific place to do the game calculations: the Update overridable method.
You can move the sprite by simply adding one line in the code, incrementing the X position of the sprite, according to the following line of code:
mySprite1.position.X += 1;
Because you use the sprite's position property when rendering the sprite in the Draw method, by including this line, you'll be able to see the sprite moving across the window, to the right, until it disappears from the screen.
To create a more game-like sprite, let's do something a little more sophisticated. First, create a new property in the clsSprite class, velocity, that defines the sprite velocity on both the x and y axes. Then modify the class constructor to receive and store the screen coordinates, so you can include a method that moves the sprite according to the given velocity, which doesn't let the sprite move off the screen.
To begin, delete the code line that changes the X position of the sprite. Next, modify the sprite class constructor, and change the sprite creation code in the Game1 class. In the clsSprite.cs file, make the following adjustment to the class constructor:
private Vector2 screenSize { get; set; } // Screen size

public clsSprite (Texture2D newTexture, Vector2 newPosition,

                  Vector2 newSize, int ScreenWidth, int ScreenHeight)

{

    texture = newTexture;

    position = newPosition;

    size = newSize;

    screenSize = new Vector2(ScreenWidth, ScreenHeight);

}
Change the sprite-creation code accordingly in the Game1.cs file, in the LoadContent method:
mySprite1 = new clsSprite(Content.Load<Texture2D>("xna_thumbnail"),

                          new Vector2(0f, 0f), new Vector2(64f, 64f),

                          graphics.PreferredBackBufferWidth,

                          graphics.PreferredBackBufferHeight);
Create a new property in the sprite class, velocity:
public Vector2 velocity { get; set; } // Sprite velocity
Set this velocity to (1,1) in the LoadContent method, after the sprite-creation code, so you'll inform the sprite that it should move one pixel per update on both the x and y axes. This way, the sprite will move diagonally across the screen.
mySprite1.velocity = new Vector2(1, 1);
You have the screen bounds, and you have the speed. Now you need to create a method—let's call it Move—in the sprite class that moves the sprite according to the sprite velocity, respecting the screen boundaries. The code for this method follows:
public void Move()

{


    // If we'll move out of the screen, invert velocity


    // Checking right boundary

    if (position.X + size.X + velocity.X > screenSize.X)

        velocity = new Vector2(-velocity.X, velocity.Y);

    // Checking bottom boundary

    if (position.Y + size.Y + velocity.Y > screenSize.Y)

        velocity = new Vector2(velocity.X, -velocity.Y);

    // Checking left boundary

    if (position.X + velocity.X < 0)

        velocity = new Vector2(-velocity.X, velocity.Y);

    // Checking upper  boundary

    if (position.Y + velocity.Y < 0)

        velocity = new Vector2(velocity.X, -velocity.Y);

    // Since we adjusted the velocity, just add it to the current position

    position += velocity;

}
Because Vector2 classes represent both the sprite position and velocity, you could simply add the vectors to change the sprite position. However, because you don't want to add the velocity if it will take the sprite off the screen, you include code to invert the velocity in this situation.
Checking for left and top screen boundaries is a direct test, because the sprite position is given by its upper-left corner. However, when checking if the sprite will leave the screen on the right, you must add the sprite width to the sprite's X position to make the sprite bounce with its right corner, or it would leave the screen before bouncing back. Similarly, when checking if the sprite is leaving through the bottom of the screen, you must add the sprite height to its Y position so the sprite will bounce with its bottom.
As a final step, include the call to the sprite's Move method in the Update method of the Game1.cs class:
mySprite1.Move();
Read the code carefully to be sure you understand the tests, and then run the code. The sprite will move across the screen and bounce against the window borders!
Coding for Collision Detection
Making the sprite bounce on the window borders is already a simple collision-detection test, but in 2D games, you usually want to test for collisions between sprites.
If you do an Internet search for "collision-detection algorithm," you'll find thousands of pages describing many different algorithms for detecting collisions on 2D and 3D systems. Here, we'll present a simple example to help you understand the concept.
When testing for collisions, it's usually not reasonable to test every single pixel of a sprite against every single pixel of another sprite, so the collision-detection algorithms are based on approximating the object shape with some easily calculated formula. The most common collision-detection algorithm uses bounding boxes, which approximate the object shape with one or more rectangles, or "boxes." Figure 2-6 shows a plane sprite, whose form is approximated by two boxes.
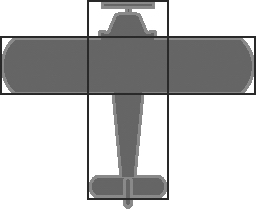
Figure 2-6. Two boxes may be used to calculate collisions for a plane sprite.
An easy way to implement the bounding-box test is simply to check if the x,y position of the upper-bound corner in the first box (which wraps the first sprite you want to test) is inside the second box (which wraps the second object to test). In other words, check whether the X and Y values of the box being tested are less than or equal to the corresponding X and Y values of the other box, plus the width of the other box.
In your clsSprite class, implement a method (named Collides) that will receive a sprite as a parameter, and test the received sprite against the current sprite. If there's a collision, the method will return true.
public bool Collides(clsSprite otherSprite)

{

    // Check if two sprites collide

    if (this.position.X + this.size.X > otherSprite.position.X &&

        this.position.X < otherSprite.position.X + otherSprite.size.X &&

        this.position.Y + this.size.Y > otherSprite.position.Y &&

        this.position.Y < otherSprite.position.Y + otherSprite.size.Y)

        return true;

    else

        return false;

}
Check this code against the diagram in Figure 2-7, to be sure you understand the algorithm.
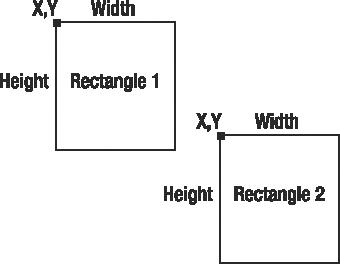
Figure 2-7. Two nonoverlapping boxes
According to the code sample, the two boxes will overlap only if both the x and y coordinates of rectangle 2 are within range (X to X + width, Y to Y + height) of rectangle 1. Looking at Figure 2-7, you see that the y coordinate for rectangle 2 is not greater than the y coordinate plus the height of rectangle 1. This means that your boxes might be colliding. But when checking the x coordinate of rectangle 2, you see that it's greater than the x coordinate plus the width of rectangle 1, which means that no collision is possible.
Figure 2-8 illustrates a case in which you do have a collision. In this case, you can check that both x and y positions of rectangle 2 are within the range of rectangle 1. In the code sample, you also do the opposite test, checking if the x and y coordinates of rectangle 1 are within the range of rectangle 2. Because you're checking just one point, it's possible for rectangle 2's top-left corner to be outside rectangle 1, but for the top-left corner of rectangle 1 to be inside rectangle 2.
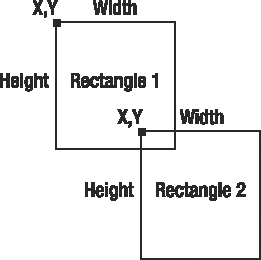
Figure 2-8. Two overlapping boxes
To test your method, you'll create a second, standing sprite in the middle of the window. To do this, you need to replicate the sprite-creation code and include the code for testing collisions in the Update method of the Game1 class.
First, include the sprite's variable definition at the beginning of the Game1 class, along with the previous sprite definition.
clsSprite mySprite2;
Now, in the LoadContent method, include the code for the sprite creation and set its starting velocity:
mySprite2 = new clsSprite(Content.Load<Texture2D>("xna_thumbnail"),

                          new Vector2(218f, 118f), new Vector2(64f, 64f),

                          graphics.PreferredBackBufferWidth,

                          graphics.PreferredBackBufferHeight);

mySprite2.velocity = new Vector2(3, −3);
In the UnloadContent method, include the code for disposing of the sprite:
mySprite2.texture.Dispose();
In the Update method, include the code to move the second sprite:
mySprite2.Move();
Finally, in the Draw method, include the code for drawing the new sprite. The code for drawing the two sprites follows:
spriteBatch.Begin(SpriteBlendMode.AlphaBlend);

mySprite1.Draw(spriteBatch);

mySprite2.Draw(spriteBatch);

spriteBatch.End();
If you run the program now, you'll see both sprites, but they aren't bouncing yet. You can make them bounce by including a call to the Collides method in the Update method and changing the velocity between the sprites, as follows:
if (mySprite1.Collides(mySprite2))

{

    Vector2 tempVelocity = mySprite1.velocity;

    mySprite1.velocity = mySprite2.velocity;

    mySprite2.velocity = tempVelocity;

}
In this code, you store the velocity of mySprite1 in the tempVelocity variable, set the velocity of mySprite1 to the velocity to mySprite2, and then set the velocity of mySprite2 to tempVelocity, thus changing the velocity between the sprites.
If you run the code now, you'll see the sprites moving and bouncing against each other and against the window borders, as shown in Figure 2-9.
Although the collision is detected using the bounding-box algorithm, after some tests, you will see a problem: if the boxes collide diagonally, the circles will bounce before they really "hit" each other.
When testing for collisions between circles, you can simply check if the distance between the circle centers are less than the sum of their radius. If it is, there is a collision. This provides a precise way to test for circle collisions.
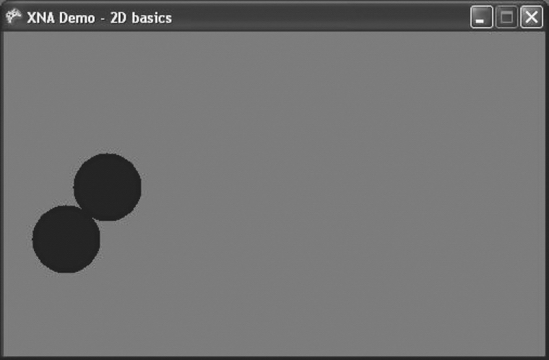
Figure 2-9. The sprites now move and collide.
To change your clsSprite code to support collisions between two circle sprites, create two new read-only properties, center and radius, which are calculated according to the other sprite properties.
public Vector2 center{ get{ return position + (size/2);}  } // Sprite center

public float radius { get { return size.X / 2; } } // Sprite radius
Next, create a new method for testing this specific type of collision:
public bool CircleCollides(clsSprite otherSprite)

{    // Check if two circle sprites collided

    return (Vector2.Distance(this.center, otherSprite.center) <

        this.radius + otherSprite.radius);

}
Finally, change the Update method of the Game1 class to call CircleCollides instead of Collides. You'll see that the circles will now bounce only when they actually collide.
Game Input
In this section, we'll explore basic concepts of dealing with user input in XNA. You'll create an improved version of the previous example, in which you'll move the second sprite you created using the Xbox 360 gamepad.
Using the Xbox 360 Gamepad
When you create a new XNA Windows Game project type, the Update method of the Game1 class already includes code for dealing with user input:
// Allows the game to exit

if (GamePad.GetState(PlayerIndex.One).Buttons.Back == ButtonState.Pressed)

     this.Exit();
This code presents the GamePad class: the basic entry point to get user input from the Xbox 360 gamepad. If you explore the GamePad properties and methods using Visual C# Express IntelliSense, you'll easily understand how to use the GetState method to get the current state of buttons (Buttons structure), the thumbsticks (ThumbSticks structure), directional pad (DPad structure), and the controller triggers (Triggers structure). There is also a property to inform you if the gamepad is connected (IsConnected).
Another interesting detail is that you can vibrate the gamepad by calling the SetVibration method of the GamePad class.
Let's see how you can use this information to improve your example.
First, in the Game1 class, remove the code that sets the starting velocity of mySprite2 in the LoadContent method and remove the call to mSprite2.Move in the Update method. These changes will prevent mySprite2 from moving by itself. You also need to change the collision-detection code, simplifying it to merely invert the mySprite1 velocity, as follows:
if (mySprite1.Collides(mySprite2))

    mySprite1.velocity *= −1;
Now, to make the second sprite move according to gamepad input, all you need to do is include two new code lines in the Update method of the Game1 class:
// Change the sprite 2 position using the left thumbstick

Vector2 LeftThumb = GamePad.GetState(PlayerIndex.One).ThumbSticks.Left;

mySprite2.position += new Vector2(LeftThumb.X, -LeftThumb.Y) * 5;
In this code, you're adding a Vector2 to mySprite2.position. This vector is five times the value of the left thumbstick, except that you invert the Y property of the left thumbstick. If you think this is weird, recall from the earlier discussion in the "2D and Screen Coordinate Systems" section that the X position increments from left to right, and the Y position increments from the top to the bottom of the screen. The values of the X and Y properties of the thumbsticks range from −1 to 1, according to how much the thumbstick is pushed to the right or the bottom (positive values) or left and up (negative values). Therefore, you must invert the y coordinate to move the ball as expected. The multiplication by five is simply to make the ball move faster, according to the gamepad input.
To make the gamepad vibrate when mySprite1 collides with mySprite2 is also easy. Simply change the collision-detection code in the Update method of the Game1 class to reflect the next code fragment:
if (mySprite1.Collides(mySprite2))

{

    mySprite1.velocity *= −1;

    GamePad.SetVibration(PlayerIndex.One, 1.0f, 1.0f);

}
else

    GamePad.SetVibration(PlayerIndex.One, 0f, 0f);
Note that you need to set the gamepad vibration to zero when the sprites are not colliding; otherwise, it keeps on vibrating continuously.
Run the program now and move the sprite with the gamepad. When the sprites overlap, mySprite1 bounces and the gamepad vibrates.
Note The second and third arguments of the SetVibration method range from 0 to 1, and define the speed for the left (low-frequency) and right (high-frequency) motors. You can include code in your program to generate different types of vibrations depending on the game conditions—for example, if the game collision is on the left or on the right of the player character.
Using the Keyboard
If, instead of the gamepad, you want to use the keyboard to control the sprite position, you can use KeyBoard.GetState to get the current state of any key:
KeyboardState keyboardState = Keyboard.GetState();

if (keyboardState.IsKeyDown(Keys.Up))

    mySprite2.position += new Vector2(0, −5);

if (keyboardState.IsKeyDown(Keys.Down))

    mySprite2.position += new Vector2(0, 5);

if (keyboardState.IsKeyDown(Keys.Left))

    mySprite2.position += new Vector2(−5, 0);

if (keyboardState.IsKeyDown(Keys.Right))

    mySprite2.position += new Vector2(5, 0);
Using the Mouse
If, on the other hand, you want to use the mouse to control the sprite, you could use Mouse.GetState to get the current position of the mouse, and include code to make the sprite head to the current mouse position with the following code:
if (mySprite2.position.X < Mouse.GetState().X)

    mySprite2.position += new Vector2(5, 0);

if (mySprite2.position.X > Mouse.GetState().X)

    mySprite2.position += new Vector2(−5, 0);

if (mySprite2.position.Y < Mouse.GetState().Y)

    mySprite2.position += new Vector2(0, 5);

if (mySprite2.position.Y > Mouse.GetState().Y)

    mySprite2.position += new Vector2(0, −5);
Game Audio
In this section, you'll improve your example by including background sound and a bouncing sound effect, thus exploring basic audio concepts in XNA.
XNA deals with sound using the same structure it uses to manage graphics: the Content Pipeline. To XNA, sound is just another type of game content. But there is a difference, in fact: although you can directly add graphics content in a XNA game project, the sound content to be added must be in a specific file format, generated by the Microsoft Cross-Platform Audio Creation Tool, known as XACT.
Creating Audio Content with XACT
You use XACT to create sound banks and wave banks, compiled into an XAP file, which the game can then use through the content manager.
In this section, you'll learn the basics of how to create audio content with XACT and use it in a program, so you'll be ready to include audio content in your games. In the following chapters, you'll see how to do this when creating real games!
Follow these steps to create a new XACT project:
- Start XACT by choosing Start
 Programs Microsoft XNA Game Studio 3.0 Tools Cross-Platform Audio Creation Tool (XACT).
 - In the XACT main window, choose File New Project to create a new audio project, and save it as
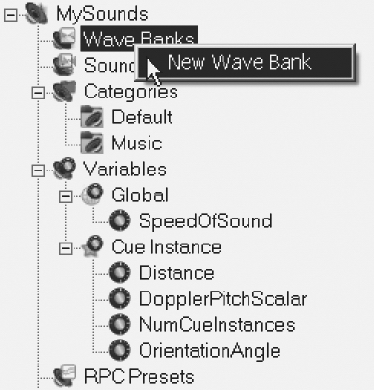
MySounds. - On the left side of the window,
MySoundsnow appears as a root node, with many types of child nodes below it. Right-click Wave Bank and select New Wave Bank in the pop-up menu, as shown in Figure 2-10.
Figure 2-10. Creating a new wave bank in XACT
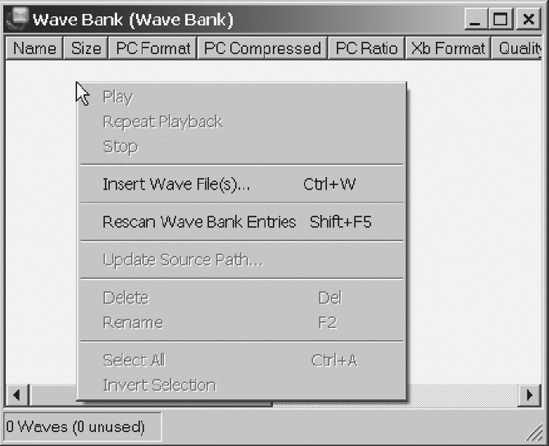
- A new, blank window with the new wave bank appears. Right-click this window to see a pop-up menu that offers options for wave banks, as shown in Figure 2-11, and choose Insert Wave File(s).
Figure 2-11. Operations available for wave banks
- To stick with easily found wave files (sound files with a
.wavextension), search for thechord.wavandnotify.wavfiles on your hard disk. These files are installed by default in Windows, as system event sounds. (Alternatively, you can choose any available wave files.) The two files are inserted in your wave bank. - You also need to create a sound bank. Right-click the Sound Banks item on the left side of the window and choose to insert a new sound bank. A new window, with the newly created sound bank, appears on the right.
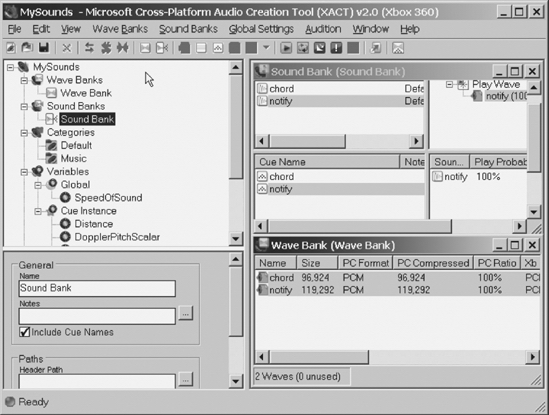
- To better arrange your windows, select Windows Tile Horizontally. The windows are now easier to see, as shown in Figure 2-12.
Figure 2-12. The XACT tool, after organizing its windows
- Select both the file names in the wave bank (by Ctrl-clicking them) and drag them to the second panel in the left of the Sound Bank window—the panel with Cue Name and Notes columns. The file names in the wave bank turn from red to green, and the file names are added as contents in the sound list and cue list in the Sound Bank window.
- Let's use a looping sound, so you can learn how to play, pause, and stop sound to use as background music in games. To do this, in the sound list, click the
notifysound. In the properties pane that appears beneath the tree list on the right, under Looping, you'll see an Infinite check box. Mark this check box, as shown in Figure 2-13. - Save the project as
MySounds.xap. You're ready to use the sounds in your program!
Note To hear the sound samples from the sound bank or from the wave bank inside XACT by clicking the Play button on the XACT toolbar, the XACT Auditioning Utility must be running. Run it by choosing Start ![]() Programs
Programs ![]() Microsoft XNA Game Studio 3.0
Microsoft XNA Game Studio 3.0 ![]() Tools
Tools ![]() XACT Auditioning Utility.
XACT Auditioning Utility.
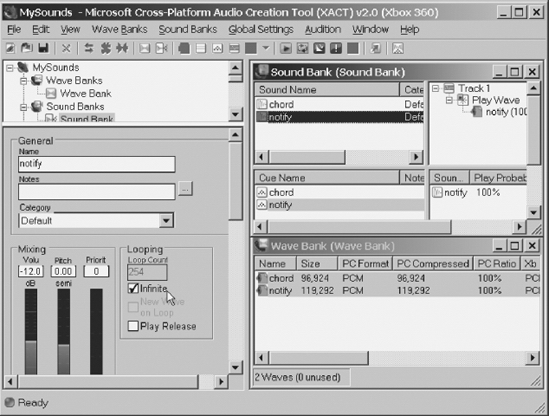
Figure 2-13. Setting Play Wave properties in the XACT tool
Using Audio in Games
XNA makes using audio content in games as simple as using graphics and dealing with player input.
As a first step, you need to include the audio content in the solution, so you can use it in your game. Then you define the audio-related objects, initialize these objects, and finally, use the content in the game code.
You include the audio content in the game in the same way you included graphics content earlier in this chapter: by right-clicking the Content folder in the Solution Explorer window and choosing Add Existing Item from the pop-up menu. Remember that in the Add Existing Item dialog box, all types of files are listed by default. You can choose Audio Files in the "Files of type" drop-down list to make it easier to find the MySounds.xap file you created in the previous section. You don't need to include the .wav files as content in the project, because the final wave bank will contain all sound files included in the audio project when you compile your game.
After including the MySounds.xap file in the solution, you need to create the following three objects to manage the file contents:
AudioEngine:- This object is the program reference to the audio services in the computer, and is used mainly to adjust a few general settings and as a parameter to create the wave and sound banks. When creating an
AudioEngineobject in your program, you need to use the name of the global settings file for the XACT content as a parameter. This settings file name is generated when the XAP file is compiled, and as a default has the same name as the XAP file, with an.xgsextension.
WaveBank:- This is a collection of wave files. To create this bank in your code, you need to pass as parameters the
AudioEngineobject (which must be previously created) and the compiled wave bank file, which is generated when you compile your project with the default nameWave Bank.xwb.Although the wave bank is not explicitly used in your program, you need to create this object, because the sound cues in the sound bank depend on the wave files in this bank.
SoundBank:- This is a collection of sound cues. You can define cues as references to the wave files stored in the wave bank, along with properties that establish details on how to play these wave files and methods that let you manage their playback.
The next code sample shows how to extend the previous example by including code to create and initialize the audio components:
// Audio objects

AudioEngine audioEngine;

WaveBank waveBank;

SoundBank soundBank;


protected override void Initialize()

{

    audioEngine = new AudioEngine(@"ContentMySounds.xgs");

    // Assume the default names for the wave and sound banks.

    // To change these names, change properties in XACT.

    waveBank = new WaveBank(audioEngine, @"ContentWave Bank.xwb");

    soundBank = new SoundBank(audioEngine, @"ContentSound Bank.xsb");


    base.Initialize();

}
You can play a sound in two ways: with a simple playback or in a playback loop. Once you initialize the audio objects, doing a playback is a matter of calling a simple method: PlayCue. You can improve on the previous example by playing a sound cue every time the sprites collide. Find the collision detection test in the Update method of the Game1 class, and adjust it to play the chord sound sample, as follows:
if (mySprite1.Collides(mySprite2))

{

    mySprite1.velocity *= −1;

    GamePad.SetVibration(PlayerIndex.One,1.0f, 1.0f);

    soundBank.PlayCue("chord");

}
else

    GamePad.SetVibration(PlayerIndex.One, 0f, 0f);
You can also extend the sample by including the infinite looping sound you defined in the XACT project. However, to do this, you need more control over the sound than simply starting to play it from the sound bank. You need a way to start it, and then stop, pause, and resume it when needed, and some way to know the current state of the sound (playing, paused, stopped, and so on). The Cue object provides the methods and properties you need. Let's extend our example by creating a new Cue object, named MyLoopingSound, in Game1:
Cue myLoopingSound;
In the Initialize method, read the sound cue and play it by including the following code fragment:
myLoopingSound = soundBank.GetCue("notify");

myLoopingSound.Play();
In this code fragment, you use the Play method to start the playback of the notify sound. Because you set the Looping property in the XACT interface of this sound to Infinite (see Figure 2-13), the sound will continuously play when you start your program. Run the program now and hear it for yourself.
The Cue object offers a series of methods and properties that give you better control over the playback. The next code sample presents an example of how to pause and resume the cue when the B button on the Xbox 360 gamepad is pressed. If you don't have a gamepad plugged into your computer, you can change this to a keyboard key or a mouse button, using what you learned earlier in this chapter.
// Play or stop an infinite looping sound when pressing the B button

if (GamePad.GetState(PlayerIndex.One).Buttons.B == ButtonState.Pressed)

{

    if (myLoopingSound.IsPaused)

        myLoopingSound.Resume();

    else

        myLoopingSound.Pause();

}
Note The Stop method for the Cue object lets you stop the sound immediately or "as authored," which means that the audio engine will wait for the end of the current sound phase or the next transition to stop the sound gracefully. But remember that if you stop a sound, you can't play it again, unless you call the GetCue method once again.
Summary
In this chapter, you learned the basic 2D graphics vocabulary, and how to create a simple XNA program that enables you to load, display, and move images.
It's important to remember how to load a Texture2D from the Content Pipeline:
Texture2D MyTexture = Content.Load<Texture2D>("xna_thumbnail")
and how to display this texture using a SpriteBatch object:
spriteBatch.Begin();

spriteBatch.Draw(MyTexture, new Vector2(0f, 0f), Color.White);

spriteBatch.End();
You also saw that with a few lines of code, you can not only create sprites that collide in XNA, but also deal with player input and play sounds.
When reading player input, remember the basic objects: GamePad, Keyboard, and Mouse. These three objects provide a GetState method that allows you to get the player input, returning, respectively, a GamePadState, KeyboardState, and MouseState object, each with the information from the corresponding input device.
To add audio, remember that before using any sound in your game, you need to create a project in XACT, which generates the XAP content file that can be included in your game solution. Once the content is in place and the proper audio object's initialization is done, you can play sounds directly from the sound bank using the Play method, or get a Cue object from the sound bank and use its properties and methods to play, pause, resume, and stop playing a sound.
With this knowledge, you're now prepared to put it all together in a real game. That's exactly what you'll do in the next chapter. Get your umbrella and prepare for the Rock Rain—the complete game you'll create next!