
CHAPTER 6
Rock Rain Live!
The game in Chapter 4 mainly showed a playability change, allowing a match between two players on the same PC or on the same Xbox 360 console. This is nice, but how about being able to play with your friend on the other side of the world? And what about matches with one player running on a PC and another one on an Xbox 360? Wouldn't that be cool?
In this chapter, you'll use the concepts in the previous chapter and add a networked multiplayer feature to Rock Rain, called multiplayer online. This new version is named Rock Rain Live.
Planning Rock Rain Live
Rock Rain Enhanced already implements many of the features that you need for a new multiplayer online version of Rock Rain. For the new version, you'll add a new item to the game's starting screen menu that leads to another scene with the options of network games (create a game, join a game's session, and so on). With this new scene, the start scene will look like Figure 6-1.
Still, you need to consider how your game will work in a network. You saw in the previous chapter that XNA offers all the support for data transport between the players through a network, whether it a local network or through Xbox LIVE. It's simple to send and receive data in a synchronized and safe way, but the main question is this: what should you send or receive between the two players to create a network match?
Remember that Rock Rain is a game in which you must dodge the meteors (and the other player) and try to get the energy source to remain as long as possible in the game. So, the two players must be synchronized so that they see the same meteors, the other player's score, the energy source, and so on; that is, they must share the same state of the game.
In Chapter 2, we talked a little about game state. Controlling this state is one of the most important tasks in any game. In Rock Rain Live's case, along with controlling this state, you also need to think about how to synchronize this state between the two players who will be playing a match through a local network or through the LIVE network from Microsoft.
In this game, you'll use a client/server architecture, described in the previous chapter, where one of the players is the game's server, offering the synchrony services of the game state itself. You'll call that player the local player. The other player is the game's client, consuming the data from the server to show the correct status of the game to the other player. You'll call that player the remote player.
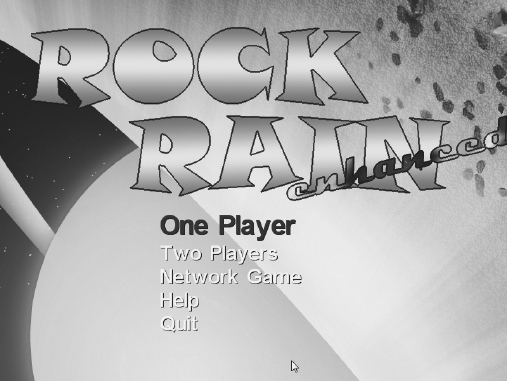
Figure 6-1. The new start scene
It seems obvious then that the remote player will always consume information from the local player to obtain the game state. The remote player will always ask the state of the game, obtaining from the local player the score of the game, the meteors' positions, and so on. This means that the local player will always have "control" of the game state, and it's up to that player to change this state (add a new meteor, for instance).
However, the remote player controls a new game state: its own position on the screen. You'll also need to inform the local player of the remote player's position, so that the game state stays synchronized between the two players.
This information exchange involves a lot of code, but it's not complicated. You'll create all the communication protocols to send the game state information between the players in a simple but powerful way, which can be changed or extended to other games.
Adding the Support for Network Games
Thanks to the excellent XNA network support, adding these new features to Rock Rain Enhanced is simple. Actually, you can copy all the game project code from Chapter 4 and change its name to Rock Rain Live. Also, change the classes' namespace name to RockRainLive (using Visual Studio's refactoring tool if you wish). Then add the following line in the Game1 class constructor:
// Add Live support

Components.Add(new GamerServicesComponent(this));
Also add the namespace reference:
using Microsoft.Xna.Framework.GamerServices;
Execute the game. It's the same old version of Rock Rain. Press the Home key on the keyboard or the Guide button on the Xbox 360 gamepad, and you'll see a host of new features.
Now you can start to implement your new version of Rock Rain.
Changing the Opening Screen
Since the screen flow is now different, you must change the opening screen to reflect the new Network Game option, which initially involves a menu change. So, locate the StartScene class constructor and change the line where you created the menu, as follows:
// Create the menu

string[] items = {"One Player", "Two Players", "Network Game",

                    "Help", "Quit"};
Because you added a new item, you need to change the HandleStartSceneInput method of the Game1 class so that you update the indices of the menu options that open the help screen and of the option that quits the game:
/// <summary>

/// Handle buttons and keyboard in StartScene

/// </summary>

private void HandleStartSceneInput()

{

    if (CheckEnterA())

    {

        audio.MenuSelect.Play();

        switch (startScene.SelectedMenuIndex)

        {

            case 0:

                actionScene.TwoPlayers = false;

                ShowScene(actionScene);

                break;

            case 1:

                actionScene.TwoPlayers = true;

                ShowScene(actionScene);

                break;

            case 3:

                ShowScene(helpScene);

                break;
Also, in the HandleScenesInput method of the Game1 class (which manipulates the input of all scenes), add the manipulation support for this new scene:
/// <summary>

/// Handle input of all game scenes

/// </summary>

private void HandleScenesInput()

{

    // Handle start scene input

    if (activeScene == startScene)

    {

        HandleStartSceneInput();

    }

    // Handle help scene input

    else if (activeScene == helpScene)

    {

        if (CheckEnterA())

        {

            ShowScene(startScene);

        }

    }

    // Handle action scene input

    else if (activeScene == actionScene)

    {

        HandleActionInput();

    }

    else

    {

        // Handle network scene input

        HandleNetworkSceneInput();

    }

}
Let's create the method that will manipulate the network's scene input.
/// <summary>

/// Handle network scene menu

/// </summary>

private void HandleNetworkSceneInput()

{

}
The guide that you saw in the previous chapter adds a series of services to your game, and, when it's opened, your game should not capture the user's inputs, because this could confuse the player. Therefore, also change the Update method of the Game1 class, as follows, so you don't capture the user's inputs when the guide is opened:
/// <summary>

/// Allows the game to run logic such as updating the world,

/// checking for collisions, gathering input, and playing audio.

/// </summary>

/// <param name="gameTime">Provides a snapshot of timing values.</param>

protected override void Update(GameTime gameTime)

{

    // Handle Game Inputs

    if (!Guide.IsVisible)

    {

        HandleScenesInput();

    }


    base.Update(gameTime);

}
Execute the game and everything should work normally, except the Network Game option does nothing. You'll make this option open the multiplayer game scene later.
Creating the Network Game Scene
Now you'll create the scene that allows players to create a session or join a session of a network game. Similar to what you did in Chapter 4, add a new public class called NetworkScene and derive it from GameScene (in the RockRain.Core namespace) so that you have a new scene class. First, add the namespace reference for the network support:
using Microsoft.Xna.Framework.GamerServices;
In this scene, you have only a background image, a menu, and a text line to show the messages related to the connection with the other player and background music. In it, you can choose, through the menu, to start a new network game (creating a server), join a game that's already started, or log in to the network and return to the previous scene. Each option opens a new menu, in such a way that you need to track this scene's state so that you can show the correct menu. The following enumeration creates the possible state of this scene:
// Scene state

public enum NetworkGameState

{

    idle = 1,

    joining = 2,

    creating = 3

}
As already mentioned, in this scene you have a menu, a background texture, and a blinking message. Declare the objects necessary to compose this scene:
// Misc

protected TextMenuComponent menu;

private readonly SpriteFont messageFont;

private Vector2 messagePosition,messageShadowPosition;

private string message;

protected TimeSpan elapsedTime = TimeSpan.Zero;


// SpriteBatch

protected SpriteBatch spriteBatch = null;


// Scene state

private NetworkGameState state;

// Used for message blink

private bool showMessage = true;
In the constructor, initialize these objects, as you did with all the scenes throughout Chapter 4:
/// <summary>

/// Default constructor

/// </summary>

/// <param name="game">Main game object</param>

/// <param name="smallFont">Font for the menu items</param>

/// <param name="largeFont">Font for the menu selected item</param>

/// <param name="background">Texture for background image</param>

public NetworkScene(Game game, SpriteFont smallFont, SpriteFont largeFont,

                    Texture2D background) : base(game)

{

    messageFont = largeFont;

    Components.Add(new ImageComponent(game, background,

                                    ImageComponent.DrawMode.Stretch));


    // Create the menu component

    menu = new TextMenuComponent(game, smallFont, largeFont);

    Components.Add(menu);


    // Get the current sprite batch

    spriteBatch = (SpriteBatch)Game.Services.GetService(

                                    typeof(SpriteBatch));

}
The scene state must also be the same when the user opens it:
/// <summary>

/// Show scene

/// </summary>

public override void Show()

{

    state = NetworkGameState.idle;


    base.Show();

}
The menu components largely perform the drawing of the scene itself, for images that were already added to the scene. You need to draw only the message text that keeps blinking, just as you did in the scene of the game's beginning, in Chapter 4. Note that the message is also drawn twice to give a shadow effect:
/// <summary>

/// Allows the game component to draw your content in game screen

/// </summary>

public override void Draw(GameTime gameTime)

{

    base.Draw(gameTime);


    if (!string.IsNullOrEmpty(message) && showMessage)

    {

        DrawMessage();

    }

}


/// <summary>

/// Helper draws notification messages before calling blocking

/// network methods.

/// </summary>

void DrawMessage()

{

    // Draw the shadow

    spriteBatch.DrawString(messageFont, message, messageShadowPosition,

        Color.Black);


    // Draw the message

    spriteBatch.DrawString(messageFont, message, messagePosition,

        Color.DarkOrange);

}
You should expose the message attribute of the class so that the program is able to tell the scene in which the message will be showed. You use this message to show text such as "connecting . . ." or "connection terminated":
/// <summary>

/// Text of the message line

/// </summary>

public string Message

{

    get { return message; }

    set

    {

        message = value;

        // Calculate the message position

        messagePosition = new Vector2();

        messagePosition.X = (Game.Window.ClientBounds.Width -

            messageFont.MeasureString(message).X)/2;

        messagePosition.Y = 130;


        // Calculate the message shadow position

        messageShadowPosition = messagePosition;

        messageShadowPosition.Y++;

        messageShadowPosition.X--;


    }

}
The Update method is responsible only for controlling the time to create the blink effect of the message on the screen and updating the menu to reflect the scene's current status:
/// <summary>

/// Allows the game component to update itself

/// </summary>

/// <param name="gameTime">Provides a snapshot of timing values</param>

public override void Update(GameTime gameTime)

{

    elapsedTime += gameTime.ElapsedGameTime;


    if (elapsedTime > TimeSpan.FromSeconds(1))

    {

        elapsedTime -= TimeSpan.FromSeconds(1);

        showMessage = !showMessage;

    }


    // Set the menu for the current state

    UpdateMenus();


    base.Update(gameTime);

}
The UpdateMenus method creates the menu for the current status. In particular, you create a menu when there is no user logged into the network, so that the user can log in before creating or joining a game:
/// <summary>

/// Build a menu for each scene state and network status

/// </summary>

private void UpdateMenus()

{

    if (Gamer.SignedInGamers.Count == 0)

    {

        string[] items = {"Sign in", "Back"};

        menu.SetMenuItems(items);

    }

    else

    {

        if (state == NetworkGameState.idle)

        {

            string[] items = {"Join a System Link Game",

                "Create a System Link Game", "Sign out", "Back"};

            menu.SetMenuItems(items);

        }

        if (state == NetworkGameState.creating)

        {

            string[] items = { "Cancel"};

            menu.SetMenuItems(items);

        }

    }


    // Put the menu centered in screen

    menu.Position = new Vector2((Game.Window.ClientBounds.Width -

                                  menu.Width) / 2, 330);

}
And as you've always done, expose the menu option selected so that the Game1 class is able to execute the options the user selects. Also, expose the scene state so that the Game1 class is also able to change it when needed. Then add the following code to the NetworkScene class:
/// <summary>

/// Gets the selected menu option

/// </summary>

public int SelectedMenuIndex

{

    get { return menu.SelectedIndex; }

}
/// <summary>

/// Scene state

/// </summary>

public NetworkGameState State

{

    get { return state; }

    set

    {

        state = value;

        menu.SelectedIndex = 0;

    }

}
Now you can use this scene in your game. Start by adding the declaration to a NetworkScene object in the Game1 class:
protected NetworkScene networkScene;
Then add the background texture of this new scene:
protected Texture2D networkBackgroundTexture;
The background images for this project are available with the rest of the downloadable code for this book (from the book's details page at http://www.apress.com). Add these images to the Content folder. Then change the LoadContent method, adding the following lines to load the background texture and create the network scene object:
// Create the network scene

networkBackgroundTexture = Content.Load<Texture2D>("NetworkBackground");

networkScene = new NetworkScene(this,smallFont,largeFont,

                        networkBackgroundTexture);

Components.Add(networkScene);
You need to show this scene only when the user selects it from the initial scene menu. So, add the following code to the switch found in the HandleStartSceneInput method in the Game1 class:
case 2:

    ShowScene(networkScene);

    break;
Execute the program. Select the Network Game option, and you will see something like Figure 6-2.
Next, return to the HandleNetworkSceneInput method and implement the methods that create and join a session of a network game.
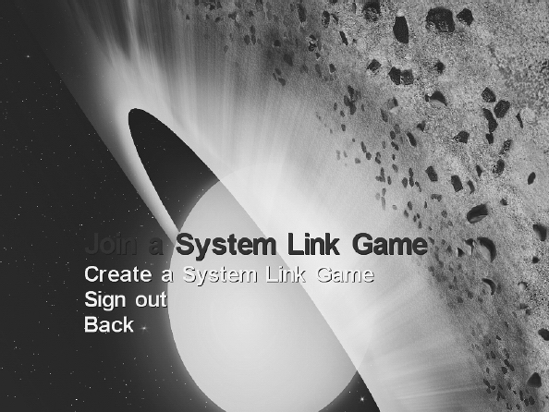
Figure 6-2. The network game scene
Controlling the Input to the Scene
The HandleNetworkSceneInput method deals with all input originating from the menu for this scene:
/// <summary>

/// Handle Network Scene menu

/// </summary>

private void HandleNetworkSceneInput()

{

    if (CheckEnterA())

    {

        audio.MenuSelect.Play();

        if (Gamer.SignedInGamers.Count == 0)

        {

            HandleNotSigned();

        }
This code separates the menu treatment for two distinct situations: when the user is connected and when the user is not connected to the network. The HandleNotSigned method contains all the code for the menu when it's showing the options for a not-connected player, and the HandleSigned method contains the options for a connected user.
All that an unconnected user can do is connect to the network or go back to the initial scene. So, the HandleNotSigned method is simple:
/// <summary>

/// Handle network scene menu for an unconnected user

/// </summary>

private void HandleNotSigned()

{

    switch (networkScene.SelectedMenuIndex)

    {

        case 0:

            if (!Guide.IsVisible)

            {

                Guide.ShowSignIn(1, false);

                break;

            }

            break;

        case 1:

            ShowScene(startScene);

            break;

    }

}
On the other hand, a user who is connected to the network can create a new game, join an already created session, change the authenticated user, or go back to the initial scene.
If this connected user is creating a game, the user can also cancel the wait for the other player. You implement these situations in the HandleSigned method, as follows:
/// <summary>

/// Handle network scene menu for a connected user

/// </summary>

private void HandleSigned()

{

    switch (networkScene.State)

    {

        case NetworkScene.NetworkGameState.idle:

            switch (networkScene.SelectedMenuIndex)

            {
                case 0:

                    // Join a network game

                    JoinSession();

                    break;

                case 1:

                    // Create a network game

                    CreateSession();

                    break;

                case 2:

                    // Show the guide to change user

                    if (!Guide.IsVisible)

                    {

                        Guide.ShowSignIn(1, false);

                        break;

                    }

                    break;

                case 3:

                    // Back to start scene

                    ShowScene(startScene);

                    break;

            }

            break;

        case NetworkScene.NetworkGameState.creating:

            // Close the session created

            CloseSession();

            // Wait for a new command

            networkScene.State = NetworkScene.NetworkGameState.idle;

            networkScene.Message = "";

            break;

    }

}
The CreateSession, JoinSession, and CloseSession methods are common to all network games. They start and end all the communication between the players. You'll implement them soon, but let's first create a class to help you with the network services necessary for Rock Rain Live.
Creating the NetworkHelper Class
You saw in the previous chapter that all the network services in your XNA game are centralized in the NetworkSession class. With it, you use objects from the PacketWriter and PacketReader classes to write and read network data. For organizational purposes, you'll create a class that encapsulates all the necessary data transport functionality, using these classes, so that you have only one object you can use to send and read data from the server and the client, and to the server and the client. This class is simple—just add a new class called NetworkHelper to the project, and add the following code:
using Microsoft.Xna.Framework.Net;


namespace RockRainLive

{

    /// <summary>

    /// Helper for network services

    /// </summary>

    class NetworkHelper

    {

        // Network stuff

        private NetworkSession networkSession;

        private readonly PacketWriter serverPacketWriter = new PacketWriter();

        private readonly PacketReader serverPacketReader = new PacketReader();

        private readonly PacketWriter clientPacketWriter = new PacketWriter();

        private readonly PacketReader clientPacketReader = new PacketReader();


        /// <summary>

        /// The active network session

        /// </summary>

        public NetworkSession NetworkGameSession

        {

            get { return networkSession; }

            set { networkSession = value; }

        }


        /// <summary>

        /// Writer for the server data

        /// </summary>

        public PacketWriter ServerPacketWriter

        {

            get { return serverPacketWriter; }

        }


        /// <summary>

        /// Writer for the client data

        /// </summary>

        public PacketWriter ClientPacketWriter

        {

            get { return clientPacketWriter; }

        }
        /// <summary>

        /// Reader for the client data

        /// </summary>

        public PacketReader ClientPacketReader

        {

            get { return clientPacketReader; }

        }


        /// <summary>

        /// Reader for the server data

        /// </summary>

        public PacketReader ServerPacketReader

        {

            get { return serverPacketReader; }

        }


        /// <summary>

        /// Send all server data

        /// </summary>

        public void SendServerData()

        {

            if (ServerPacketWriter.Length > 0)

            {

                // Send the combined data to everyone in the session.

                LocalNetworkGamer server = (LocalNetworkGamer) networkSession.Host;


                server.SendData(ServerPacketWriter, SendDataOptions.InOrder);

            }

        }


        /// <summary>

        /// Read server data

        /// </summary>

        public NetworkGamer ReadServerData(LocalNetworkGamer gamer)

        {

            NetworkGamer sender;


            // Read a single packet from the network.

            gamer.ReceiveData(ServerPacketReader, out sender);

            return sender;

        }
        /// <summary>

        /// Send all client data

        /// </summary>

        public void SendClientData()

        {

            if (ClientPacketWriter.Length > 0)

            {

                // The first player is always running in the server...

                networkSession.LocalGamers[0].SendData(clientPacketWriter,

                                                       SendDataOptions.InOrder,

                                                       networkSession.Host);

            }

        }


        /// <summary>

        /// Read the client data

        /// </summary>

        public NetworkGamer ReadClientData(LocalNetworkGamer gamer)

        {

            NetworkGamer sender;


            // Read a single packet from the network.

            gamer.ReceiveData(ClientPacketReader, out sender);

            return sender;

        }

    }

}
This class contains your NetworkSession object, as well as methods to send and read the data packages through the PacketWriter and PacketReader objects, both for the client and for the server. You'll use this class to implement your communication protocol in the next section. For now, you'll initialize the NetworkSession object of this class, as you did in the previous chapter, to create a game session, join an existing session, or terminate a session; that is, you'll implement the CreateSession, JoinSession, and CloseSession methods that we mentioned earlier in the chapter.
Creating the Game Sessions
Now you'll start adding the network support to your game. You'll initially create all the network session support for your new game so that later you can send and receive data between the client and the server. Then you'll declare an object for the NetworkHelper class that you created, as well as the constants for the maximum number of local players and for the game session. Add the attributes to the Game1 class:
// Network stuff

private readonly NetworkHelper networkHelper;

private const int maxLocalPlayers = 1;

private const int maxSessionPlayers = 2;
Then add a reference to the network's support classes:
using Microsoft.Xna.Framework.Net;
Next, initialize the networkHelper object in the class constructor. Also add it to the game services, because the various classes of your game will use it later on:
networkHelper = new NetworkHelper();

Services.AddService(typeof(NetworkHelper), networkHelper);
You can use this class now. First, create the method that creates the network game session. This method is called when the user selects the corresponding option in the network scene:
/// <summary>

/// Create a session for a game server

/// </summary>

private void CreateSession()

{

    networkHelper.NetworkGameSession = NetworkSession.Create(

                                        NetworkSessionType.SystemLink,

                                        maxLocalPlayers, maxSessionPlayers);

    HookSessionEvents();

    networkScene.State = NetworkScene.NetworkGameState.creating;

    networkScene.Message = "Waiting for another player...";

}
Note This Rock Rain version can create games for local network usage, called SystemLink in XNA. The procedures for the game creation using the Xbox LIVE network are exactly the same, but require that both players have the Creators Club signature (even on the PC). This makes its professional use difficult, so we won't cover this kind of connection in this book.
You created a session using the Create method of the NetworkSession class, according to what you learned in the previous chapter. You also initialized the network scene object to reflect the action that you just took, setting its state to creating and showing a message that you were waiting for the other player to join the session.
The HookSessionEvents method initializes some event handlers to handle events for the session control, also according to what you saw in the previous chapter. In this Rock Rain version, you handle the events that happen when the player joins a game and when the player terminates the session:
/// <summary>

/// After creating or joining a network session, we must subscribe to

/// some events so we will be notified when the session changes state.

/// </summary>

void HookSessionEvents()

{

    networkHelper.NetworkGameSession.GamerJoined +=

        GamerJoinedEventHandler;

    networkHelper.NetworkGameSession.SessionEnded +=

        SessionEndedEventHandler;

}
When the session is terminated, the preceding code calls the SessionEndedEventHandler method to display the game's network scene again, showing an error message that was sent as the reason for the session to end (using the EndReason attribute of the NetworkSessionEndedEventArgs class that is passed as a method parameter), as follows:
// <summary>

/// Event handler notifies us when the network session has ended.

/// </summary>

void SessionEndedEventHandler(object sender, NetworkSessionEndedEventArgs e)

{

    networkScene.Message = e.EndReason.ToString();

    networkScene.State = NetworkScene.NetworkGameState.idle;


    CloseSession();


    if (activeScene != networkScene)

    {

        ShowScene(networkScene);

    }

}
In the GamerJoinedEventHandler method, which is called when the player (local or remote) joins a game session, you check if all (two) players have already joined the session to start the game itself. This activates the action scene for both players and associates the player with the corresponding Player object, which you'll subsequently use to differentiate the local player from the remote player:
/// <summary>

/// This event handler will be called whenever a new gamer joins the

/// session.

/// </summary>

void GamerJoinedEventHandler(object sender, GamerJoinedEventArgs e)

{

    // Associate the ship with the joined player

    if (actionScene.Player1.Gamer == null)

    {

        actionScene.Player1.Gamer = e.Gamer;

    }
    else

    {

        actionScene.Player2.Gamer = e.Gamer;

    }


    if (networkHelper.NetworkGameSession.AllGamers.Count ==

        maxSessionPlayers)

    {

        actionScene.TwoPlayers = true;

        ShowScene(actionScene);

    }

}
The method to terminate the session just releases the NetworkSession object, as it did in the previous chapter:
/// <summary>

/// Quit the game session

/// </summary>

private void CloseSession()

{

    networkHelper.NetworkGameSession.Dispose();

    networkHelper.NetworkGameSession = null;

}
Finally, you have the method to join a game session:
/// <summary>

/// Joins an existing network session

/// </summary>

void JoinSession()


{

    networkScene.Message = "Joining a game...";

    networkScene.State = NetworkScene.NetworkGameState.joining;


    try

    {

        // Search for sessions

        using (AvailableNetworkSessionCollection availableSessions =

                    NetworkSession.Find(NetworkSessionType.SystemLink,

                                        maxLocalPlayers, null))

        {

            if (availableSessions.Count == 0)

            {

                networkScene.Message = "No network sessions found.";

                networkScene.State = NetworkScene.NetworkGameState.idle;

                return;

            }
            // Join the first session we found.

            networkHelper.NetworkGameSession = NetworkSession.Join(

                                                    availableSessions[0]);


            HookSessionEvents();

        }

    }

    catch (Exception e)

    {

        networkScene.Message = e.Message;

        networkScene.State = NetworkScene.NetworkGameState.idle;

    }

}
This code is practically the same as in the previous chapter. You just add some messages to the network scene based on the success or failure of joining the game:
Now that you can create, terminate, and join a session in progress for a network game, you already have all the necessary structure to be able to send and receive data. You should now start to think about what your communication protocol will be. We'll cover that in the following section.
Let's Talk
A communication protocol is a "language" spoken between the client and the server. It defines the way the messages are sent and received so that with this message exchange you can keep your game state in sync.
You saw in the previous chapter that these messages are sent and received through PacketWriter and PacketReader class objects, respectively. You can send or receive any kind of data with these classes, but you need to define a protocol so that this communication is done efficiently.
Suppose that you're playing a network game with a friend on the other side of the world and you suddenly pause the game. You need to tell the other player somehow that you paused, and therefore his game must also pause, so that he doesn't obtain any advantage while you're on the toilet. How do you let the other player know that you paused, and how do you let him know when you return to the game?
In the case of Rock Rain, your protocol is simple. Each message that you send to the other player is composed of a header with a character that explains which message is being sent, followed by the message itself.
In the case of pausing the game, the header is 'P' and the message is true or false, depending on the pause status. So, when the player pauses, the header is 'P' and the message is true. When the player resumes after the pause, the header is 'P' and the message is false.
So, when you detect that the user wants to pause or stop the pause, you should send this data to the PacketWriter object corresponding to the client or to the server, depending on which one wants to change the pause state. To do this, change the HandleActionInput method of the Game1 class and add the following lines:
if (enterKey)

{

    if (actionScene.GameOver)

    {

        ShowScene(startScene);

    }

    else

    {

        audio.MenuBack.Play();

        actionScene.Paused = !actionScene.Paused;

        // Send the pause command to the other player

        if (networkHelper.NetworkGameSession != null)

        {

            // If we are the server, send using the server packets

            if (networkHelper.NetworkGameSession.IsHost)

            {

                networkHelper.ServerPacketWriter.Write('P'),

                networkHelper.ServerPacketWriter.Write(

                                                    actionScene.Paused);

            }

            else

            {

                networkHelper.ClientPacketWriter.Write('P'),

                networkHelper.ClientPacketWriter.Write(

                                                    actionScene.Paused);

            }

        }

    }

    if (backKey)

    {

        if (networkHelper.NetworkGameSession != null)

        {

            CloseSession();

            networkScene.State = NetworkScene.NetworkGameState.idle;

            networkScene.Message = "";

            ShowScene(networkScene);

        }

        else

        {

            ShowScene(startScene);

        }

    }

}
Note Be careful when defining the format of your messages. The network traffic has a lot of influence on the performance of an online game. Overall, strive for the least amount of traffic possible, so that the server doesn't keep processing messages for too long. Besides the client/server model, XNA offers the peer-to-peer (P2P) model, which might be more adequate for games with excessive message exchange or with large states, such as the massive multiplayer online (MMO) type of games.
Notice that you put the message header first ('P') in the ClientPacketWriter or in the ServerPacketWriter, then include the message itself (actionScene.Paused) so that the message is now formatted and ready to be sent.
You also added new code in the treatment of the Back key. If it's activated during a network game, it makes the game terminate the connection and return to the network scene, instead of simply returning to the initial scene.
Now you need to read this message, interpret it, and change the game state (paused or not) according to the message content. It's good design to keep the method that deals with the messages close to the class that contains the game state itself. In Rock Rain's case, it's the class that represents the action scene.
Before you do anything else, you need your NetworkHelper object. So, declare it in the ActionScene class:
// Network stuff

private readonly NetworkHelper networkHelper;
Initialize it in the class constructor:
// Get the current server state for a networked multiplayer game

networkHelper = (NetworkHelper)

    Game.Services.GetService(typeof (NetworkHelper));
Now you'll create two methods in the ActionScene class: one to interpret the messages that come from the client, and another one for the server messages. Add the following method in the ActionScene class:
/// <summary>

///  Handle all data incoming from the client

/// </summary>

public void HandleClientData()

{

    while (networkHelper.ClientPacketReader.PeekChar() != −1)

    {

        char header = networkHelper.ClientPacketReader.ReadChar();

        switch (header)

        {

            case 'P':

                Paused = networkHelper.ClientPacketReader.ReadBoolean();

                break;

        }

    }

}
This method will be called when you need to interpret any message originating from the remote player (client). The while condition loops through all PacketReaders of the client to read all messages, as demonstrated in the previous chapter, and interprets them accordingly. The PeekChar method checks the first character in the message to get the message header, which contains the message type information.
In the case of a 'P' message, for a pause, all you do is assign the value of the message to the Paused attribute for the scene, which pauses the game or not.
For the pause message that comes from the server, the code is practically the same:
/// <summary>

///  Handle all data incoming from the server

/// </summary>

public void HandleServerData()

{

    while (networkHelper.ServerPacketReader.PeekChar() != −1)

    {

        char header = networkHelper.ServerPacketReader.ReadChar();

        switch (header)

        {

            case 'P':

                Paused = networkHelper.ServerPacketReader.ReadBoolean();

                break;

        }

    }

}
The difference is that you now use the server's PacketReader. Note that because the server maintains the game state, many new messages are created and interpreted here, while on the client, only this pause message and another message with the position of the remote player are sent. We'll go back to these methods later.
Now you need to call these methods; that is, you need to put all the sending and receiving of the network data in the game's loop. As you did in the previous chapter, add this in the Update method of the Game1 class, and use the methods of the NetworkHelper class that send and receive data. Put the following code in the Update method of the Game1 class:
// Handle the network session

if (networkHelper.NetworkGameSession != null)

{

    // Only send if we are not the server. There is no point sending

    // packets to ourselves, because we already know what they will

    // contain!

    if (!networkHelper.NetworkGameSession.IsHost)

    {

        networkHelper.SendClientData();

    }
    else

    {

        // If we are the server, transmit the game state

        networkHelper.SendServerData();

    }


    // Pump the data

    networkHelper.NetworkGameSession.Update();


    // Read any incoming network packets

    foreach (LocalNetworkGamer gamer in

            networkHelper.NetworkGameSession.LocalGamers)

    {

        // Keep reading as long as incoming packets are available

        while (gamer.IsDataAvailable)

        {

            NetworkGamer sender;

            if (gamer.IsHost)

            {

                sender = networkHelper.ReadClientData(gamer);

                if (!sender.IsLocal)

                {

                    actionScene.HandleClientData();

                }

            }

            else

            {

                sender = networkHelper.ReadServerData(gamer);

                if (!sender.IsLocal)

                {

                    actionScene.HandleServerData();

                }

            }

        }

    }


}
So, for each game loop, you're always reading and sending the necessary data packages.
You also need to expose the Player objects to associate the network Gamer class for each player who joins the game session. Add the following code:
public Player Player1

{

    get { return player1; }

}
public Player Player2

{

    get { return player2; }

}
Now let's add new messages to the other game states.
Synchronizing the Players
What defines a player's state? It's not only the player's position on the screen, but also that user's score and energy level. You need to inform the other player of an opponent's status so that the game stays synchronized. Create the status message for this. The header for this message is 'S', as the message is Position, Score, Energy. The 'S' message sends all the necessary information for a player, and both players (the local player, player1, and remote player, player2) must send their status through the network.
For the remote player, add the following code in the HandleClientData method of the ActionScene class:
case 'S':

    player2.Position =

        networkHelper.ClientPacketReader.ReadVector2();

    player2.Power =

        networkHelper.ClientPacketReader.ReadInt32();

    player2.Score =

        networkHelper.ClientPacketReader.ReadInt32();

    break;
If it's the 'S' message, it will be followed by the player's position (a Vector2 object) and the player's score and energy level (Int32 objects). You need to update the player2 object's attributes with only these values.
Similarly, add the following code to deal with the player's movement on the server side—in this case, in the HandleServerData method:
case 'S':

    player1.Position =

        networkHelper.ServerPacketReader.ReadVector2();

    player1.Power =

        networkHelper.ServerPacketReader.ReadInt32();

    player1.Score =

        networkHelper.ServerPacketReader.ReadInt32();

    break;
You must alter the Player class (which represents the player1 and player2 objects) to send the player's position through the network. In fact, the class must change to stop any alterations of its state by the remote player. If alterations are allowed (such as changing the position), a message must send this change to the server.
Adding Network Support to the Player Class
If you're adding network support, you also need your instance of the NetworkHelper class. Declare it in the Player class:
// Network stuff

private readonly NetworkHelper networkHelper;
Then initialize it in the class constructor:
// Get the current server state for a networked multiplayer game

networkHelper = (NetworkHelper)

    Game.Services.GetService(typeof (NetworkHelper));
Now let's change the Update method of this class so that it sends the 'S' message, with the ship's status. Change the code of the method as follows:
if (networkHelper.NetworkGameSession != null)

{

    if (gamer.IsLocal)

    {

        // Local gamers always use the main gamepad and keyboard keys

        HandleInput(PlayerIndex.One);

        UpdateShip(gameTime);

        UpdateNetworkData();

    }

}

else

{

    HandleInput(playerIndex);

    UpdateShip(gameTime);

}
Note that the messages are sent only to the local player. You don't need to send the remote player's changes to that player. Also, in the case of a multiplayer game via a network, the two players don't need to divide the keyboard or use two gamepads, so they always use the same gamepad or keyboard keys.
The following UpdateNetworkData method creates the messages that will be sent:
/// <summary>

/// Update server data with the ship info

/// </summary>

private void UpdateNetworkData()

{

    if (networkHelper.NetworkGameSession.IsHost)

    {

        networkHelper.ServerPacketWriter.Write('S'),

        networkHelper.ServerPacketWriter.Write(position);

        networkHelper.ServerPacketWriter.Write(power);

        networkHelper.ServerPacketWriter.Write(score);

    }
    else

    {

        networkHelper.ClientPacketWriter.Write('S'),

        networkHelper.ClientPacketWriter.Write(position);

        networkHelper.ClientPacketWriter.Write(power);

        networkHelper.ClientPacketWriter.Write(score);


    }

}
This adds the message data in the corresponding PacketWriter, as you did earlier. The code you added to the Update method of the Game1 class also sends this data, and the HandleClientData and HandleServerData methods of the ActionScene class handle it, the same way they handle the pause message. In this way, you'll add the network support to all the other objects that contain some game state.
Adding Network Support to the PowerSource Class
The PowerSource class, which represents the item that gives energy to the player, also contains an important state in the game: its position. Through this position and the other players' positions, you'll be able to know if any player managed to get any energy during a match.
Create a message to tell the position of this item. This message has the header 'L' and the message Position. This state is kept only on the server. Then add the following code to the HandleServerData method of the ActionScene class:
case 'L':

    powerSource.Position =

        networkHelper.ServerPacketReader.ReadVector2();

    break;
Think it's repetitive? Great!
Next, add an attribute of the NetworkHelper type and initialize it in the PowerSource class constructor, the same way as did with the Player class, and change the Update method as follows:
/// <summary>

/// Allows the game component to update itself

/// </summary>

/// <param name="gameTime">Provides a snapshot of timing values</param>

public override void Update(GameTime gameTime)

{

    if ((networkHelper.NetworkGameSession == null) ||

        (networkHelper.NetworkGameSession.IsHost))

    {

        // Check if the meteor is still visible

        if (position.Y >= Game.Window.ClientBounds.Height)

        {

            PutinStartPosition();

        }
        // Move

        position.Y += 1;


        networkHelper.ServerPacketWriter.Write('L'),

        networkHelper.ServerPacketWriter.Write(position);

    }


    base.Update(gameTime);

}
The Update method updates the position of only the object that is running on the server side. The HandleServerData method sets the position of the object on the client side with the data sent by the instance that runs on the server, so that both stay synchronized.
You already synchronized the players, the energy source, and the game pause. Only the meteors are left.
Adding Network Support for the Meteors
The game's meteors are represented by two distinct classes: the Meteor class, which represents the sprite of the meteor itself, and the MeteorsManager class, which represents the entire meteor field in the game. Each class changes the game state in its own way, and you'll alter its code to add the network game support separately.
In the Meteor class, only the PutinStartPosition and Update methods change the attributes of an instance. So, you'll change these methods. But which message will be sent to represent a meteor state?
In Rock Rain, each meteor updates only its position on the screen, so you can send a message with an 'R' header and the message Index, Position. Each meteor on the screen sends this message, to inform the client of its position in the game. Because the value of the Index property can identify each meteor, let's send them together so that the client knows about which meteor position it's being informed. As explained in Chapter 5, the server keeps the entire state of the game—in this case, the meteors' positions.
First, add and initialize an instance of the NetworkHelper class, as you've done before. Change the PutinStartPosition method:
/// <summary>

/// Initialize meteor position and velocity

/// </summary>

public void PutinStartPosition()

{

    // Only the server can set the meteor attributes

    if ((networkHelper.NetworkGameSession == null) ||

        (networkHelper.NetworkGameSession.IsHost))

    {

        position.X = random.Next(Game.Window.ClientBounds.Width -

                                 currentFrame.Width);

        position.Y = 0;

        YSpeed = 1 + random.Next(9);

        XSpeed = random.Next(3) - 1;

    }

}
Following is the code for the Update method:
/// <summary>

/// Update the meteor position

/// </summary>

public override void Update(GameTime gameTime)

{

    // Check if the meteor is still visible

    if ((position.Y >= Game.Window.ClientBounds.Height) ||

        (position.X >= Game.Window.ClientBounds.Width) ||

        (position.X <= 0))

    {

        PutinStartPosition();

    }


    // Move meteor

    position.Y += Yspeed;

    position.X += Xspeed;


    // Send the meteor info to the client

    if ((networkHelper.NetworkGameSession != null) &&

        (networkHelper.NetworkGameSession.IsHost))

    {

        networkHelper.ServerPacketWriter.Write('R'),

        networkHelper.ServerPacketWriter.Write(index);

        networkHelper.ServerPacketWriter.Write(position);

    }


    base.Update(gameTime);

}
This is another message that is sent only by the server, so you handle it in the HandleServerData method of the ActionScene class, as you did with the other messages:
case 'R':

    int meteorId = networkHelper.ServerPacketReader.ReadInt32();

    meteors.AllMeteors[meteorId].Position =

        networkHelper.ServerPacketReader.ReadVector2();

    break;
In the preceding code, you just set the position of the specified meteor with the position value sent in the message. Because you're doing this for each meteor, you'll then synchronize the position of all of them during the game.
Another state change situation occurs when a new meteor is added to the scene. The MeteorsManager class performs this operation. The client must be notified about a new object added by the server, so that the client can see a new meteor with the same characteristics.
Add and initialize an instance of the NetworkHelper object and change the Start method of the MeteorsManager class:
/// <summary>

/// Start the meteors' rain

/// </summary>

public void Start()

{

    if ((networkHelper.NetworkGameSession == null) ||

        (networkHelper.NetworkGameSession.IsHost))

    {

        // Initialize a counter

        elapsedTime = TimeSpan.Zero;


        // Add the meteors

        for (int i = 0; i < STARTMETEORCOUNT; i++)

        {

            AddNewMeteor();

        }

    }

}
This way, only the server is able to add new meteors, and when a new meteor is added you must send a message to inform the client. This message contains the attributes of a meteor. It has the header 'M' and the message Index, Position, Horizontal Speed, Vertical Speed.
Then change the AddNewMeteor method to send a message with the other attributes of the new meteor:
/// <summary>

/// Add a new meteor in the scene

/// </summary>

/// <returns>the new meteor</returns>

private Meteor AddNewMeteor()

{

    Meteor newMeteor = new Meteor(Game, ref meteorTexture);

    newMeteor.Initialize();

    meteors.Add(newMeteor);

    newMeteor.Index = meteors.Count-1;


    // Send the new meteor info to the client

    if ((networkHelper.NetworkGameSession != null) &&

        (networkHelper.NetworkGameSession.IsHost))

    {

        networkHelper.ServerPacketWriter.Write('M'),

        networkHelper.ServerPacketWriter.Write(newMeteor.Index);

        networkHelper.ServerPacketWriter.Write(newMeteor.Position);

        networkHelper.ServerPacketWriter.Write(newMeteor.XSpeed);

        networkHelper.ServerPacketWriter.Write(newMeteor.YSpeed);

    }b


    return newMeteor;

}
And again handle this message in the HandleServerData event of the ActionScene class so that a new meteor is added to the client's meteor list:
case 'M':

    int index = networkHelper.ServerPacketReader.ReadInt32();

    Vector2 position =

        networkHelper.ServerPacketReader.ReadVector2();

    int xspeed = networkHelper.ServerPacketReader.ReadInt32();

    int yspeed = networkHelper.ServerPacketReader.ReadInt32();

    meteors.AddNewMeteor(index,position,xspeed,yspeed);

    break;
Now, the motion as well as the addition of new meteors are synchronized with the client.
There's still a third point where the game state is changed: when the Update method checks if it's necessary to add a new meteor. Only the server can execute this operation, so change the method as follows:
// Only the server can add new meteors

if ((networkHelper.NetworkGameSession == null) ||

    (networkHelper.NetworkGameSession.IsHost))

{

    CheckforNewMeteor(gameTime);

}
That's it! All the objects are now synchronized. The server will control all the game state and send it to the client so it keeps the game synchronized. The client will receive all the messages and change the status of its objects according to the content of these messages, to maintain an online match, just as if you were beside your opponent. Figure 6-3 illustrates the message traffic between the players. Now call that friend of yours who lives in Japan for a Rock Rain match!
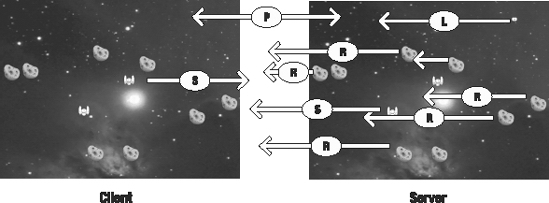
Figure 6-3. The chat between server and client
Summary
This chapter covered the basic principles of how to plan and create an online multiplayer game. Correct definitions for the protocol and sending messages are essential for keeping the game state synchronized between the various players. XNA offers powerful classes so that this work becomes simple, and you don't need to worry about the details of sending and receiving data through the network.
How about adding a new feature to send messages between the players? How about adding support for three or four players? If you try, you'll see that it's not that hard to make Rock Rain a massive multiplayer online game.