
CHAPTER 4
Improving Your First 2D Game
Let's face reality. Rock Rain is cool, fun, but—it's too simple, isn't it? In this chapter, you're going to add some more characteristics of a "real game" to it. We'll show you some more sophisticated techniques you can use to create a better game. Let's go.
Planning Rock Rain's New Version
A striking feature of any game is missing in Rock Rain: the presentation screen! When the player runs the game, he is immediately thrown in the meteor field without warning. The ideal would be to show a screen—the game presentation—leading to another screen with instructions, the game help, and an option to start the game itself. That's much more elegant.
Let's also change some aspects of the playability. Now the game will have animated sprites and an energy meter, and will be able to be played by two players simultaneously. That's more interesting, isn't it?
So, start by creating a new project, as you did in the previous chapter. Name the project RockRainEnhanced. Add a new folder called Core, and add to this folder the SimpleRumblePad component that you created in the version of Rock Rain in the previous chapter. You can download more media content for this game, including new textures and sounds, from this book's details page at the Apress web site (http://www.apress.com). Add those files in your project's Content folder.
Creating the Game Screens
All modern games have many screens: a screen for the opening, a screen for the instructions, a screen for the game itself, and so on. Because each screen shows a lot more than a simple image, in the game industry, it's common to call these screens scenes.
A scene is composed (normally) of some background image, background music, and a group of "actors" that "act" in the scene to show to the user some information about the game. For example, Figure 4-1 shows the opening screen of Rock Rain Enhanced.
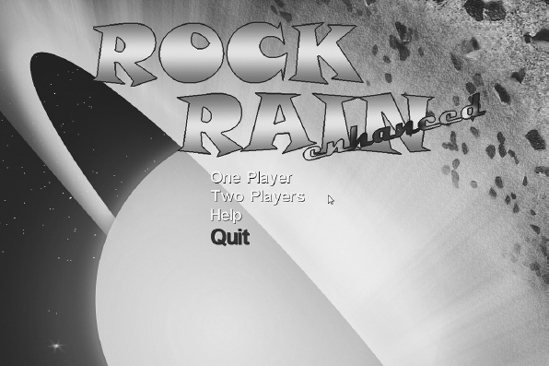
Figure 4-1. Opening screen of Rock Rain Enhanced
In this scene, you have a nice background screen and two words that come up from the screen's margin to form the word "Rock Rain," as well as an options menu for the game, along with background music.
Note that you have some actors here in this scene. Besides the sprites that have moved to form the game's title, you have an animated menu that moves with the Xbox 360 gamepad or keyboard. This group of images, sounds, and actors forms this scene. The user can go to another scene according to the menu options. In this version of Rock Rain, you have three scenes: the start scene, the help scene, and the action scene. Figure 4-2 shows the flow of these game scenes.
Now, using XNA terms, each game scene is a GameComponent that has other GameComponents representing the actors of the scene. Each scene has its own unique qualities, but the scenes also have some things in common. For example, each scene contains its own collection of GameComponents that represents the actors in that scene. Also, in each scene, a method shows it or closes it according to the flow of the scenes that the user chose (when you open the action scene, you'll need to also close the start scene, for example).
You'll also be able to pause each scene. This is useful when you want to interrupt a game for a fast trip to the bathroom, for example. You do this by simply not executing the Update method of the scene's GameComponents. Remember that XNA calls the Update method to update the status of a GameComponent. If it isn't called, the GameComponent won't be updated, and it will be "stopped" in the game scene.
In this architecture, the only GameComponents that will be added to the list of the game's components are the scenes, because the other GameComponents that build the scene itself will be added to the lists of components of the proper scene.
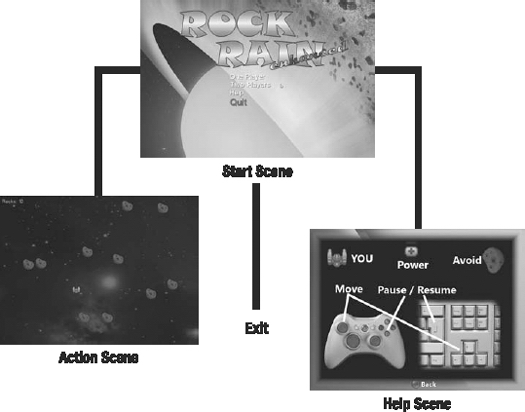
Figure 4-2. Flow of the game scenes
You'll initially create the class that implements the common fun ctionality of the scenes, and then add a new GameComponent called GameScene. For project organization purposes, put it inside the Core folder.
Start with the code. First, your scene is a visual component, so derive it from DrawableGameComponent, instead of GameComponent. Next, as mentioned, each scene contains your own list of actors, meaning that it has your own list of GameComponents. Start declaring it in the class as follows:
/// <summary>

/// List of child GameComponents

/// </summary>

private readonly List<GameComponent> components;
Also add a property to expose the Components list, to be able to add to new actors to the scene from the derived classes:
/// <summary>

/// Components of game scene

/// </summary>

public List<GameComponent> Components

{

    get { return components; }

}
In the constructor of this class, you'll initialize this list and set that the component will not be visible or will have its status updated initially, using the attributes Visible and Enabled of the DrawableGameComponent class:
/// <summary>

/// Default constructor

/// </summary>

public GameScene(Game game) : base(game){

    components = new List<GameComponent>();

    Visible = false;

    Enabled = false;

}
Then, to show or hide the scene, change the values of these attributes. You create two methods for this:
/// <summary>

/// Show the scene

/// </summary>

public virtual void Show()

{

    Visible = true;

    Enabled = true;

}

/// <summary>

/// Hide the scene

/// </summary>

public virtual void Hide()

{

    Visible = false;

    Enabled = false;

}
Now you need to handle the actors of the scene correctly. For each call to the Update method of the scene, you must call the respective method for each actor in the scene, to update your status. If the object of the scene is disabled (Enabled = false), then XNA won't call the Update method, and none of the actors of the scene will be updated either, because its respective Update methods won't have executed:
/// <summary>

/// Allows the GameComponent to update itself

/// </summary>

/// <param name="gameTime">Provides a snapshot of timing values</param>

public override void Update(GameTime gameTime)

{

    // Update the child GameComponents (if Enabled)

    for (int i = 0; i < components.Count; i++)

    {
         if (components[i].Enabled)

         {

             components[i].Update(gameTime);

       }

    }

    base.Update(gameTime);

}
The drawing code for the actors is similar. For each Draw method executed in the scene, call the Draw method for each DrawableGameComponent that is inserted in the list of components of the scene:
///  summary>

/// Allows the GameComponent to draw your content in the game screen

/// </summary>

public override void Draw(GameTime gameTime)

{

    // Draw the child GameComponents (if drawable)

    for (int i = 0; i <   components.Count; i++)

    {

        GameComponent gc = components[i];

        if ((gc is DrawableGameComponent) &&

            ((DrawableGameComponent) gc).Visible)

        {

            ((DrawableGameComponent) gc).Draw(gameTime);

        }

   }

    base.Draw(gameTime);

}
In short, all that this GameComponent does is correctly manipulate calling the Draw and Update methods of the game class, drawing and updating the other GameComponents that compose a scene. Also, note that the Show and Hide methods show and hide a game scene, avoiding the execution of the Draw and Update methods using the Visible and Enabled properties. Simple, isn't it?
Let's create three GameComponents derived from this class: one for the start scene of the game, another for the help scene, and another for the action scene itself. The game class will show the correct scene according to the game state. That is, you start in the opening scene, and then players can go to the action scene, and return to the opening after losing all their lives. Alternatively, players can choose to go to the help scene from the start scene, and so on, until they choose the option to leave the start scene.
So, add three GameComponents called StartScene, HelpScene, and ActionScene, respectively. As you start with the help scene, declare it in the Game1 class of your game, as follows:
// Game scenes

protected HelpScene helpScene;

// Active game scene

protected GameScene activeScene;
Note that these three GameComponents will be derived from the GameScene class, seen before. However, you don't need to change them now—you'll go back to each of them shortly. The activeScene attribute contains the active scene in the game.
Creating the Help Screen
Let's start with the most simple scene in this game. In this scene, you'll show the game instructions, and the user will be able to click the A button on the Xbox 360 gamepad or the Enter key on the keyboard to go back to the initial scene.
This scene contains only the instructions for how to play the game, and you can create it just by showing a simple image with the game instructions. However, as the scene is composed of GameComponents, first you need one GameComponent to draw images.
Add a new GameComponent to the Core folder and name it ImageComponent.cs. Again, this component is a visual component, so derive it from DrawableGameComponent instead of GameComponent.
This GameComponent is able to draw a texture on the screen in centered mode or stretched mode, to fit the image on the screen. Add the following enumeration, which the constructor will use to inform the component that the image must be drawn:
public enum DrawMode

{

    Center = 1,

    Stretch,

};
You already know that you need a Texture2D object, a Rectangle object, and a SpriteBatch object to draw an image, along with the proper attribute that describes how the image will be drawn in this case. Declare these objects in the class:
// Texture to draw

protected readonly Texture2D texture;

// Draw mode

protected readonly DrawMode drawMode;

// SpriteBatch

protected SpriteBatch spriteBatch = null;

// Image Rectangle

protected Rectangle imageRect;
In the class constructor, calculate the destination rectangle of the image on the screen, which depends on how the image will be drawn, in the DrawMode enumeration value:
/// <summary>

/// Default constructor

/// </summary>

/// <param name="game">The game object</param>

/// <param name="texture">Texture to draw</param>

/// <param name="drawMode">Draw mode</param>

public ImageComponent(Game game, Texture2D texture, DrawMode drawMode)

: base(game)
{

      this.texture = texture;

      this.drawMode = drawMode;

      // Get the current sprite batch

      spriteBatch = (SpriteBatch)

            Game.Services.GetService(typeof (SpriteBatch));


      // Create a rectangle with the size and position of the image

      switch (drawMode)

      {

            case DrawMode.Center:

            imageRect = new Rectangle((Game.Window.ClientBounds.Width -

                  texture.Width)/2,(Game.Window.ClientBounds.Height -

                  texture.Height)/2,texture.Width, texture.Height);

            break;

            case DrawMode.Stretch:

                  imageRect = new Rectangle(0, 0, Game.Window.ClientBounds.Width,

                        Game.Window.ClientBounds.Height);

            break;

       }

}
In the Draw method, you just use the SpriteBatch object to draw the image:
/// <summary>

/// Allows the GameComponent to draw itself

/// </summary>

/// <param name="gameTime">Provides a snapshot of timing values</param>

public override void Draw(GameTime gameTime)

{

      spriteBatch.Draw(texture, imageRect, Color.White);

      base.Draw(gameTime);

}
Putting an image in a scene might not be as simple as you thought it would be. If this image is shown on a TV or on an ordinary monitor with a 4:3 aspect ratio, it will be displayed correctly. However, if it is drawn on a widescreen monitor or regular TV, it can be distorted and look weird on the screen.
So, you can create two images: one for the 4:3 monitors and TVs, and another for wide-screen. You can choose the image to be drawn according to the screen type, although you'll always need to create two versions of each image that you want to show. Another often used alternative is to draw two overlapping images. One image is in the background, distorted to take up the whole screen (both 4:3 and widescreen), and another is drawn centered on top, so it looks okay on either type of monitor. In your game, you'll use the textures in Figure 4-3.
Also note the treatment that was given to the input processing. You always compare the device's previous state with its current state to check if a user in fact pressed a button or key in the current scene.

Figure 4-3. Images that are part of the help scene
That way, your help scene has only two GameComponents that draw images: one to draw the background image and another to draw the foreground image with the instructions. Add a new class called HelpScene and add the code from Listing 4-1.
Listing 4-1 Help Scene GameComponent
#region Using Statements


using Microsoft.Xna.Framework;

using Microsoft.Xna.Framework.Graphics;

using RockRainEnhanced.Core;


#endregion


namespace RockRainEnhanced

{

    /// <summary>

    /// This is a GameComponent that represents the help scene

    /// </summary>
     public class HelpScene : GameScene

     {

        public HelpScene(Game game, Texture2D textureBack, Texture2D textureFront)

            : base(game)

        {

            Components.Add(new ImageComponent(game, textureBack,

                ImageComponent.DrawMode.Stretch));

            Components.Add(new ImageComponent(game, textureFront,

                ImageComponent.DrawMode.Center));

        }

     }

}
Also add the following code in the Game1 class and change the LoadContent method to see this component in action. You just load the associated content, create an instance of HelpScene, and execute the Show method of the HelpScene object:
// Textures

protected Texture2D helpBackgroundTexture, helpForegroundTexture;


/// <summary>

/// LoadContent will be called once per game and is the place to load

/// all your content

/// </summary>

protected override void LoadContent()

{

    // Create a new SpriteBatch, which can be used to draw textures

    spriteBatch = new SpriteBatch(graphics.GraphicsDevice);

    Services.AddService(typeof (SpriteBatch), spriteBatch);


    // Create the Credits / Instruction scene

    helpBackgroundTexture = Content.Load<Texture2D>("helpbackground");

    helpForegroundTexture = Content.Load<Texture2D>("helpForeground");

    helpScene = new HelpScene(this, helpBackgroundTexture,

            helpForegroundTexture);

    Components.Add(helpScene);

    helpScene.Show();

    activeScene = helpScene;

}
Execute the code. The result appears in Figure 4-4. See how the scene is adequately shown both in normal format (4:3) and in widescreen (16:9).
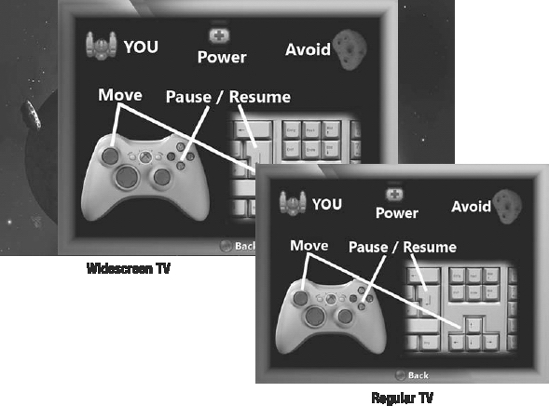
Figure 4-4. Help scene in normal and widescreen format
Creating the Opening Screen
The opening screen of a game always gives a "taste" of the game itself. Normally it's something striking, which must show some of the game features and give the user a navigation menu between the game itself, options, help, and so on.
For Rock Rain, you'll create a scene with the game name in large letters coming from the screen borders and an option menu right beneath (1980s arcade style), with a background with some meteor theme. You'll use the textures in Figure 4-5 to do this.
Then you'll have four actors in the opening screen. One is named "Rock," which comes into the scene from the left and goes to the center. The second one is named "Rain," and comes from the right also to the center of the screen. The third is named "enhanced," which keeps blinking right below the word "Rain."
The fourth actor shows after the preceding three, and is a menu with the game options. Because it's a little more sophisticated than just a sprite animation, you'll first create a GameComponent to handle menus.
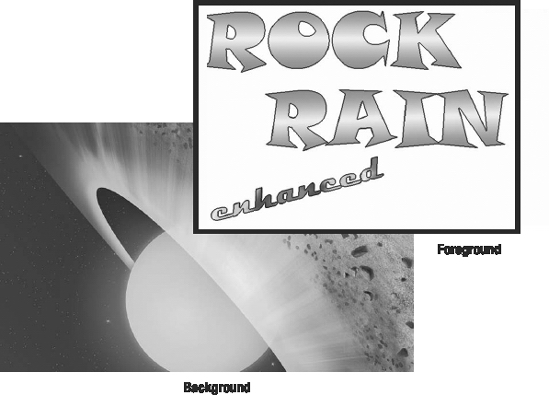
Figure 4-5. Textures of the opening screen
Creating an Audio Library Class
Your game is now composed of several scenes, and various sound effects will be used by these scenes. It's good practice to create a class to load and maintain a bank of audio content to facilitate the access to your music and sound effects in scenes. Create this class, and then add a new class to call audiolibrary and declare new objects with sound effects and game music to this class:
private SoundEffect explosion;

private SoundEffect newMeteor;

private SoundEffect menuBack;

private SoundEffect menuSelect;

private SoundEffect menuScroll;

private SoundEffect powerGet;

private SoundEffect powerShow;

private Song backMusic;

private Song startMusic;
You need access to these objects through properties, of course. Declare the properties as follows:
public SoundEffect Explosion

{

    get { return explosion; }

}

public SoundEffect NewMeteor

{

    get { return newMeteor; }

}

public SoundEffect MenuBack

{

    get { return menuBack; }

}

public SoundEffect MenuSelect

{

    get { return menuSelect; }

}

public SoundEffect MenuScroll

{

    get { return menuScroll; }

}

public SoundEffect PowerGet

{

    get { return powerGet; }

}

public SoundEffect PowerShow

{

    get { return powerShow; }

}

public Song BackMusic

{

    get { return backMusic; }

}

public Song StartMusic

{

    get { return startMusic; }

}
And just to make everything better encapsulated, create a method to load all this content within this class:
public void LoadContent(ContentManager Content)

{

       explosion = Content.Load<SoundEffect>("explosion");

       newMeteor = Content.Load<SoundEffect>("newmeteor");
       backMusic = Content.Load<Song>("backMusic");

       startMusic = Content.Load<Song>("startMusic");

       menuBack = Content.Load<SoundEffect>("menu_back");

       menuSelect = Content.Load<SoundEffect>("menu_select3");

       menuScroll = Content.Load<SoundEffect>("menu_scroll");

       powerShow = Content.Load<SoundEffect>("powershow");

       powerGet = Content.Load<SoundEffect>("powerget");

}
The idea is that all scenes have access to an instance of the class that will contain the entire audio content of your game, as with the instance of SpriteBatch. So let's initialize an instance of this class immediately after initialization of spriteBatch in the LoadContent method in the Game1 class:
// Load audio elements

audio = new AudioLibrary();

audio.LoadContent(Content);

Services.AddService(typeof(AudioLibrary), audio);
Now you can get the audio instance whenever you need to play some music or sound effects in your scenes, which you'll start to do next.
Creating the Menu Component
Your menu for the game will be simple and functional at the same time. It will be drawn using two different fonts, where the bigger font will highlight the selected item.
Start adding a new GameComponent called TextMenuComponent in the Core folder. Again, this component is a visual component, so derive it from DrawableGameComponent, instead of GameComponent.
In this component, you'll need two fonts to draw the text in normal and selected status, a string list with the items to be drawn, the color of the regular and selected items, the size and position of the menu, and, as always, a SpriteBatch object to draw the text in the screen. Add the following code to the class to declare these objects:
// SpriteBatch

protected SpriteBatch spriteBatch = null;

// Fonts

protected readonly SpriteFont regularFont, selectedFont;

// Colors

protected Color regularColor = Color.White, selectedColor = Color.Red;

// Menu position

protected Vector2 position = new Vector2();

// Items

protected int selectedIndex = 0;

private readonly List<string> menuItems;

// Size of menu in pixels

protected int width, height;
Also add a set of properties to handle these attributes:
/// <summary>

/// Set the menu options

/// </summary>

/// <param name="items"></param>

public void SetMenuItems(string[] items)

{

        menuItems.Clear();

        menuItems.AddRange(items);

        CalculateBounds();

}


/// <summary>

/// Width of menu in pixels

/// </summary>

public int Width

{

        get { return width; }

}

/// <summary>

/// Height of menu in pixels

/// </summary>

public int Height

{

        get { return height; }

}

/// <summary>

/// Selected menu item index

/// </summary>

public int SelectedIndex

{

        get { return selectedIndex; }

        set { selectedIndex = value; }

}

/// <summary>

/// Regular item color

/// </summary>

public Color RegularColor

{

        get { return regularColor; }

        set { regularColor = value; }

}

/// <summary>

/// Selected item color

/// </summary>
public Color SelectedColor

{

        get { return selectedColor; }

        set { selectedColor = value; }

}

/// <summary>

/// Position of component on screen

/// </summary>

public Vector2 Position

{

        get { return position; }

        set { position = value; }

}
Notice the CalculateBounds method in the SetMenuItems method. The items on the menu are drawn centered horizontally. To do this, you need to calculate the width and the height of the menu—values that might vary in accordance with the items that have been added to the component and the font size. The CalculateBounds method does this calculation using the MeasureString method of the SpriteFont class, which gets the string size in pixels using this font.
/// <summary>

/// Get the menu bounds

/// </summary>

protected void CalculateBounds()

{

    width = 0;

    height = 0;

    foreach (string item in menuItems)

    {

        Vector2 size = selectedFont.MeasureString(item);

        if (size.X > width)

        {

            width = (int) size.X;

        }

        height += selectedFont.LineSpacing;

    }

}
The Draw method that draws these elements is simple, because you need only a loop drawing each item, below each other, using the correct font for the selected and regular entries. Each item is drawn with a little overlapped shadow, created by drawing the same text twice, which gives a better look to the text. The code of this method follows:
/// <summary>

/// Allows the GameComponent to draw itself

/// </summary>

/// <param name="gameTime">Provides a snapshot of timing values</param>
public override void Draw(GameTime gameTime)

{

    float y = position.Y;

    for (int i = 0; i < menuItems.Count; i++)

    {

        SpriteFont font;

        Color theColor;

        if (i == SelectedIndex)

        {

            font = selectedFont;

            theColor = selectedColor;

        }

        else

        {

            font = regularFont;

            theColor = regularColor;

        }


        // Draw the text shadow

        spriteBatch.DrawString(font, menuItems[i],

            new Vector2(position.X + 1, y + 1), Color.Black);

        // Draw the text item

        spriteBatch.DrawString(font, menuItems[i],

            new Vector2(position.X, y), theColor);

        y += font.LineSpacing;

     }


     base.Draw(gameTime);

}
In fact, the drawn part of this class is the simplest part. This component must handle the user input as well, using the keyboard (up and down arrows) or the Xbox 360 gamepad. You want some sound effects to notify users when they change or select a menu item. In this case, add some new attributes to this class, to handle sound and user input:
// Used to handle input

protected KeyboardState oldKeyboardState;

protected GamePadState oldGamePadState;

// For audio effects

protected AudioLibrary audio;
As before, the Update method is the right place to handle the user input. You just check the keyboard and the gamepad state, as you saw in the previous chapters, to change the attribute's selectedIndex value:
/// <summary>

/// Allows the GameComponent to update itself

/// </summary>

/// <param name="gameTime">Provides a snapshot of timing values</param>

public override void Update(GameTime gameTime)

{

    GamePadState gamepadState = GamePad.GetState(PlayerIndex.One);

    KeyboardState keyboardState = Keyboard.GetState();


    bool down, up;

    // Handle the keyboard

    down = (oldKeyboardState.IsKeyDown(Keys.Down) &&

        (keyboardState.IsKeyUp(Keys.Down)));

    up = (oldKeyboardState.IsKeyDown(Keys.Up) &&

        (keyboardState.IsKeyUp(Keys.Up)));

    // Handle the D-pad

    down |= (oldGamePadState.DPad.Down == ButtonState.Pressed) &&

            (gamepadState.DPad.Down == ButtonState.Released);

    up |= (oldGamePadState.DPad.Up == ButtonState.Pressed) &&

        (gamepadState.DPad.Up == ButtonState.Released);


    if (down || up)

    {

        audio.MenuScroll.Play();     }


    if (down)

    {

        selectedIndex++;

        if (selectedIndex == menuItems.Count)

        {

            selectedIndex = 0;

        }

    }

    if (up)

    {

        selectedIndex--;

        if (selectedIndex == −1)

        {

            selectedIndex = menuItems.Count - 1;

        }

    }


     oldKeyboardState = keyboardState;

     oldGamePadState = gamepadState;


     base.Update(gameTime);

}
Finally, in the class constructor, you must initialize all these things:
/// <summary>

/// Default constructor

/// </summary>

/// <param name="game">Main game object</param>

/// <param name="normalFont">Font for regular items</param>

/// <param name="selectedFont">Font for selected item</param>

public TextMenuComponent(Game game, SpriteFont normalFont,

    SpriteFont selectedFont) : base(game)

{

    regularFont = normalFont;

    this.selectedFont = selectedFont;

    menuItems = new List<string>();


    // Get the current sprite batch

    spriteBatch = (SpriteBatch)

        Game.Services.GetService(typeof (SpriteBatch));


    // // Get the audio library

    // audio = (AudioLibrary)

        Game.Services.GetService(typeof(AudioLibrary));


    // Used for input handling

    oldKeyboardState = Keyboard.GetState();

    oldGamePadState = GamePad.GetState(PlayerIndex.One);

}
Adding More to the Opening Screen
As you did with the HelpScene, add a new class called StartScene, derived from GameScene. In this scene, you have an initial animation with two sprites (the "Rock" and "Rain" words), a menu, background music, and another sprite with the word "enhanced" flashing on the screen. Start adding the following attributes to the StartScene class:
// Misc

protected TextMenuComponent menu;

protected readonly Texture2D elements;

// Audio

protected AudioLibrary audio;// SpriteBatch

protected SpriteBatch spriteBatch = null;

// GUI stuff

protected Rectangle rockRect = new Rectangle(0, 0, 536, 131);

protected Vector2 rockPosition;

protected Rectangle rainRect = new Rectangle(120, 165, 517, 130);

protected Vector2 rainPosition;

protected Rectangle enhancedRect = new Rectangle(8, 304, 375, 144);

protected Vector2 enhancedPosition;
protected bool showEnhanced;

protected TimeSpan elapsedTime = TimeSpan.Zero;
The attributes rockRect, rainRect, and enhancedRect refer to the rectangle that contains the images for the "Rock," "Rain," and "enhanced" in the texture. The attributes rockPosition, rainPosition, and enhancedPosition contain the position of these items on the screen. Draw these images in your chosen positions, but change the position of the "Rock" and "Rain" sprites to obtain a nice initial animation. When the "Rock" and "Rain" words are in the correct place, you'll flash the "enhanced" word on the screen and show the initial menu.
All this is done in the Update method, as follows. Note the calculations for the Xbox 360 version, to handle the 16:9 screen width.
/// <summary>

/// Allows the GameComponent to update itself

/// </summary>

/// <param name="gameTime">Provides a snapshot of timing values</param>

public override void Update(GameTime gameTime)

{

    if (!menu.Visible)

    {

        if (rainPosition.X >= (Game.Window.ClientBounds.Width - 595)/2)

        {

            rainPosition.X -= 15;

        }


        if (rockPosition.X <= (Game.Window.ClientBounds.Width - 715)/2)

        {

            rockPosition.X += 15;

        }

        else

        {

            menu.Visible = true;

            menu.Enabled = true;


            MediaPlayer.Play(audio.StartMusic);#if XBOX360

            enhancedPosition = new Vector2((rainPosition.X +

            rainRect.Width - enhancedRect.Width / 2), rainPosition.Y);

#else

            enhancedPosition =

                new Vector2((rainPosition.X + rainRect.Width -

                enhancedRect.Width/2) - 80, rainPosition.Y);

#endif

            showEnhanced = true;

         }

    }

    else

    {

        elapsedTime += gameTime.ElapsedGameTime;
         if (elapsedTime > TimeSpan.FromSeconds(1))

         {

            elapsedTime -= TimeSpan.FromSeconds(1);

            showEnhanced = !showEnhanced;

         }

    }


    base.Update(gameTime);

}
The Draw method draws the sprites in your actual position and draws the "enhanced" sprite if the " Rock" and "Rain" sprites are in their final position (controlled by the showEnhanced attribute):
/// <summary>

/// Allows the GameComponent to draw itself

/// </summary>

/// <param name="gameTime">Provides a snapshot of timing values</param>

public override void Draw(GameTime gameTime)

{

    base.Draw(gameTime);


    spriteBatch.Draw(elements, rockPosition, rockRect, Color.White);

    spriteBatch.Draw(elements, rainPosition, rainRect, Color.White);

    if (showEnhanced)

    {

        spriteBatch.Draw(elements, enhancedPosition, enhancedRect,

                         Color.White);

    }

}
You need to do some more work here. The Show method must put these sprites in their initial position and start the audio effects. The Hide method must stop the background music; otherwise, this music will play in another scene, won't it? The code for these methods follows:
/// <summary>

/// Show the start scene

/// </summary>

public override void Show()

{

    audio.NewMeteor.Play();

    rockPosition.X = −1*rockRect.Width;

    rockPosition.Y = 40;

    rainPosition.X = Game.Window.ClientBounds.Width;

    rainPosition.Y = 180;

    // Put the menu centered in screen

    menu.Position = new Vector2((Game.Window.ClientBounds.Width -

                                  menu.Width)/2, 330);
     // These elements will be visible when the "Rock Rain" title

     // is done

     menu.Visible = false;

     menu.Enabled = false;

     showEnhanced = false;


     base.Show();

}


/// <summary>

/// Hide the start scene

/// </summary>

public override void Hide()

{

    MediaPlayer.Stop();    base.Hide();

}
In the constructor, you must initialize everything, including the Menu component with the game options:
/// <summary>

/// Default Constructor

/// </summary>

/// <param name="game">Main game object</param>

/// <param name="smallFont">Font for the menu items</param>

/// <param name="largeFont">Font for the menu selected item</param>

/// <param name="background">Texture for background image</param>

/// <param name="elements">Texture with the foreground elements</param>

public StartScene(Game game, SpriteFont smallFont, SpriteFont largeFont,

                    Texture2D background,Texture2D elements)

    : base(game)

{

    this.elements = elements;

    Components.Add(new ImageComponent(game, background,

                                    ImageComponent.DrawMode.Center));


    // Create the menu

    string[] items = {"One Player", "Two Players", "Help", "Quit"};

    menu = new TextMenuComponent(game, smallFont, largeFont);

    menu.SetMenuItems(items);

    Components.Add(menu);


    // Get the current sprite batch

    spriteBatch = (SpriteBatch) Game.Services.GetService(

                                    typeof (SpriteBatch));

    // Get the audio library

    audio = (AudioLibrary)

                                    Game.Services.GetService(typeof(AudioLibrary));}
Now modify the code of the LoadContent method in the Game1 class to load the content needed in this scene:
/// <summary>

/// LoadContent will be called once per game and is the place to load

/// all your content

/// </summary>

protected override void LoadContent()

{

       // Create a new SpriteBatch, which can be used to draw textures

        spriteBatch = new SpriteBatch(graphics.GraphicsDevice);

        Services.AddService(typeof (SpriteBatch), spriteBatch);

        // Create the Credits / Instruction scene

        helpBackgroundTexture = Content.Load<Texture2D>("helpbackground");

        helpForegroundTexture = Content.Load<Texture2D>("helpForeground");

        helpScene = new HelpScene(this, helpBackgroundTexture,

                helpForegroundTexture);

        Components.Add(helpScene);


        // Create the start scene

        smallFont = Content.Load<SpriteFont>("menuSmall");

        largeFont = Content.Load<SpriteFont>("menuLarge");

        startBackgroundTexture = Content.Load<Texture2D>("startbackground");

        startElementsTexture = Content.Load<Texture2D>("startSceneElements");

        startScene = new StartScene(this, smallFont$, largeFont,

            startBackgroundTexture, startElementsTexture);

        Components.Add(startScene);


        startScene.Show();

        activeScene = startScene;

    }

}
Declare these objects in the Game1 class to see the scene in action:
protected StartScene startScene;

protected Texture2D startBackgroundTexture, startElementsTexture;

// Fonts

private SpriteFont smallFont, largeFont
Execute the program, and you should see something similar to Figure 4-1.
Creating the Action Scene
Up to now, you've created only the opening and help scenes of the game. The most important scene is still missing: the game scene itself! This scene will look like the first version of Rock Rain, with the addition of some game rule changes and two-player support. Still, there is an interesting change: the use of animated sprites.
Creating a Game Component to Animate Sprites
As seen in Chapter 2, animated sprites are a basic resource in any 2D game. They allow you to have actors in the scene that are more than a single moving image, giving the illusion of animation, just as in TV cartoons. In Rock Rain's case, you're using animated sprites to animate your meteors, which now spin while they move on the screen. So, create a class called Sprite and use the code in Listing 4-2 for this GameComponent. This code is just an improved version of the code shown in Chapter 2. Put it inside the project's Core folder.
Listing 4-2 The Sprite GameComponent
#region Using Statements


using System;

using System.Collections.Generic;

using Microsoft.Xna.Framework;

using Microsoft.Xna.Framework.Graphics;


#endregion


namespace RockRainEnhanced.Core

{

    /// <summary>

    /// This is a GameComponent that implements an animated sprite

    /// </summary>

    public class Sprite : DrawableGameComponent

    {

        private int activeFrame;

        private readonly Texture2D texture;

        private List<Rectangle> frames;


        protected Vector2 position;

        protected TimeSpan elapsedTime = TimeSpan.Zero;

        protected Rectangle currentFrame;

        protected long frameDelay;

        protected SpriteBatch sbBatch;


        /// <summary>

        /// Default constructor

        /// </summary>

        /// <param name="game">The game object</param>

        /// <param name="theTexture">Texture that contains the sprite frames</param>

        public Sprite(Game game, ref Texture2D theTexture)

            : base(game)

        {

            texture = theTexture;

            activeFrame = 0;

        }
           /// <summary>

           /// List with the frames of the animation

           /// </summary>

           public List<Rectangle> Frames

           {

               get { return frames; }

               set { frames = value; }

           }


           /// <summary>

           /// Allows the GameComponent to perform any initialization it needs to

           /// before starting to run.  This is where it can query for any required

           /// services and load content.

           /// </summary>

           public override void Initialize()

           {

               // Get the current sprite batch

               sbBatch = (SpriteBatch) Game.Services.GetService(typeof (SpriteBatch));


               base.Initialize();

           }


           /// <summary>

           /// Allows the GameComponent to update itself

           /// </summary>

           /// <param name="gameTime">Provides a snapshot of timing values</param>

           public override void Update(GameTime gameTime)

           {

               elapsedTime += gameTime.ElapsedGameTime;


               // It's time for a next frame?

               if (elapsedTime > TimeSpan.FromMilliseconds(frameDelay))

               {

                   elapsedTime -= TimeSpan.FromMilliseconds(frameDelay);

                   activeFrame++;

                   if (activeFrame == frames.Count)

                   {

                       activeFrame = 0;

                   }

                   // Get the current frame

                   currentFrame = frames[activeFrame];

              }
              base.Update(gameTime);

        }


        /// <summary>

        /// Draw the sprite.

        /// </summary>

        /// <param name="gameTime">Provides a snapshot of timing values</param>

        public override void Draw(GameTime gameTime)

        {

            sbBatch.Draw(texture, position, currentFrame, Color.White);


            base.Draw(gameTime);

        }

    }

}
The Update method changes the current frame each n milliseconds to create the animation illusion, and the Draw method draws the current frame in the current position on the screen. Now you'll use this class to create an animated sprite of the meteors. Create a class called Meteor and use the code in Listing 4-3.
Listing 4-3 The Meteor GameComponent
using System;

using System.Collections.Generic;

using Microsoft.Xna.Framework;

using Microsoft.Xna.Framework.Graphics;

using RockRainEnhanced.Core;


namespace RockRainEnhanced

{

    /// <summary>

    /// This class is the animated sprite for a meteor

    /// </summary>

    public class Meteor : Sprite

    {

        // Vertical velocity

        protected int Yspeed;

        // Horizontal velocity

        protected int Xspeed;

        protected Random random;


        // Unique ID for this meteor

        private int index;
        public Meteor(Game game, ref Texture2D theTexture) :

            base(game, ref theTexture)

        {

            Frames = new List<Rectangle>();

            Rectangle frame = new Rectangle();

            frame.X = 468;

            frame.Y = 0;

            frame.Width = 49;

            frame.Height = 44;

            Frames.Add(frame);


            frame.Y = 50;

            Frames.Add(frame);


            frame.Y = 98;

            frame.Height = 45;

            Frames.Add(frame);


            frame.Y = 146;

            frame.Height = 49;

            Frames.Add(frame);


            frame.Y = 200;

            frame.Height = 44;

            Frames.Add(frame);


            frame.Y = 250;

            Frames.Add(frame);


            frame.Y = 299;

            Frames.Add(frame);


            frame.Y = 350;

            frame.Height = 49;

            Frames.Add(frame);


            // Initialize the random number generator and put the meteor in your

            // start position

            random = new Random(GetHashCode());

            PutinStartPosition();

        }


        /// <summary>

        /// Initialize meteor position and velocity

        /// </summary>
        public void PutinStartPosition()

        {

            position.X = random.Next(Game.Window.ClientBounds.Width -

                currentFrame.Width);

            position.Y = 0;

            YSpeed = 1 + random.Next(9);

            XSpeed = random.Next(3) - 1;

        }


        /// <summary>

        /// Update the meteor position

        /// </summary>

        public override void Update(GameTime gameTime)

        {

            // Check if the meteor is still visible

            if ((position.Y >= Game.Window.ClientBounds.Height) ||

                (position.X >= Game.Window.ClientBounds.Width) ||

                (position.X <= 0))

            {

                PutinStartPosition();

            }


            // Move meteor

            position.Y += Yspeed;

            position.X += Xspeed;


            base.Update(gameTime);

         }


         /// Vertical velocity

         /// </summary>

         public int YSpeed

         {

             get { return Yspeed; }

             set

             {

                Yspeed = value;

                frameDelay = 200 - (Yspeed * 5);

             }

         }


         /// <summary>

         /// Horizontal velocity

         /// </summary>
         public int XSpeed

         {

            get { return Xspeed; }

            set { Xspeed = value; }

         }


         /// <summary>

         /// Meteor identifier

         /// </summary>

         public int Index

         {

             get { return index; }

             set { index = value; }

         }


         /// <summary>

         /// Check if the meteor intersects with the specified rectangle

         /// </summary>

         /// <param name="rect">test rectangle</param>

         /// <returns>true, if has a collision</returns>

         public bool CheckCollision(Rectangle rect)

         {

             Rectangle spriterect =new Rectangle((int) position.X, (int) position.Y,

                 currentFrame.Width, currentFrame.Height);

             return spriterect.Intersects(rect);

         }

     }

}
This class is similar to the first version in the previous chapter, but the code that adds the animation frames is in the constructor. All the rest follows the same previous logic. The meteors will "fall," but now with an animation where they appear to spin. Cool, isn't it?
You also added a property Index to get a unique identifier for each meteor in the game, to be able to get a specified meteor when needed (you'll use this feature in the next version of Rock Rain).
Let's create one more GameComponent to centralize all the meteor treatment. This class will be responsible for drawing and updating all the game's meteors, as well as doing the collision test and adding new meteors as time goes by. The advantage of having an object to manage other objects is that the game design becomes simpler, and, at the same time, more efficient. For example, you don't need to pass through all the GameComponents to do a collision test, as in the version in the previous chapter. Now you pass through just the GameComponents that are under control of this manager, which controls only the meteors. This way, you gain a little performance benefit.
Add a class called MeteorsManager and add the code in Listing 4-4.
Listing 4-4 The Meteorsmanager GameComponent
#region Using Statements


using System;

using System.Collections.Generic;

using Microsoft.Xna.Framework;

using Microsoft.Xna.Framework.Graphics;

using RockRainEnhanced.Core;


#endregion


namespace RockRainEnhanced

{

    /// <summary>

    /// This GameComponent implements a manager for all meteors in the game

    /// </summary>

    public class MeteorsManager : DrawableGameComponent

    {

        // List of active meteors

        protected List<Meteor> meteors;

        // Constant for initial meteor count

        private const int STARTMETEORCOUNT = 10;

        // Time for a new meteor

        private const int ADDMETEORTIME = 5000;


        protected Texture2D meteorTexture;

        protected TimeSpan elapsedTime = TimeSpan.Zero;

        protected AudioLibrary audio;


        public MeteorsManager(Game game, ref Texture2D theTexture)

            : base(game)

        {

            meteorTexture = theTexture;

            meteors = new List<Meteor>();

        }


        /// <summary>

        /// Allows the GameComponent to perform any initialization it needs to

        /// before starting to run.  This is where it can query for any required

        /// services and load content.

        /// </summary>

        public override void Initialize()

        {

            // Get the audio library

            audio = (AudioLibrary)

                        Game.Services.GetService(typeof(AudioLibrary));

            meteors.Clear();
             Start();


             for (int i = 0; i < meteors.Count; i++)

             {

                 meteors[i].Initialize();

             }


             base.Initialize();

         }


        /// <summary>

        /// Start the meteor rain

        /// </summary>

        public void Start()

        {

            // Initialize a counter

            elapsedTime = TimeSpan.Zero;


            // Add the meteors

            for (int i = 0; i < STARTMETEORCOUNT; i++)

            {

                AddNewMeteor();

            }

         }


         /// <summary>

         /// All meteors in the game

         /// </summary>

         public List<Meteor> AllMeteors

         {

             get { return meteors; }

         }


         /// <summary>

         /// Check if it is time for a new meteor

         /// </summary>

         private void CheckforNewMeteor(GameTime gameTime)

         {

            // Add a rock each ADDMETEORTIME

            elapsedTime += gameTime.ElapsedGameTime;


            if (elapsedTime > TimeSpan.FromMilliseconds(ADDMETEORTIME))

            {

                elapsedTime -= TimeSpan.FromMilliseconds(ADDMETEORTIME);
                 AddNewMeteor();

                 // Play a sound for a new meteor

                 audio.NewMeteor.Play();             }

         }


         /// <summary>

         /// Add a new meteor in the scene

         /// </summary>

         private void AddNewMeteor()

         {

             Meteor newMeteor = new Meteor(Game, ref meteorTexture);

             newMeteor.Initialize();

             meteors.Add(newMeteor);

             // Set the meteor identifier

             newMeteor.Index = meteors.Count - 1;


         }


         /// <summary>

         /// Allows the GameComponent to update itself

         /// </summary>

         /// <param name="gameTime">Provides a snapshot of timing values</param>

         public override void Update(GameTime gameTime)

         {

             CheckforNewMeteor(gameTime);


             // Update meteors

             for (int i = 0; i < meteors.Count; i++)

             {

                 meteors[i].Update(gameTime);

             }


             base.Update(gameTime);

         }


         /// <summary>

         /// Check if the ship collided with a meteor

         /// <returns>true, if has a collision</returns>

         /// </summary>

         public bool CheckForCollisions(Rectangle rect)

         {

             for (int i = 0; i < meteors.Count; i++)

             {

                 if (meteors[i].CheckCollision(rect))

                 {

                     // BOOM!!

                     audio.Explosion.Play();
                     // Put the meteor back to your initial position

                     meteors[i].PutinStartPosition();


                     return true;

                }

             }

             return false;

        }


        /// <summary>

        /// Allows the GameComponent to draw your content in the game screen

        /// </summary>

        public override void Draw(GameTime gameTime)

        {

            // Draw the meteors

            for (int i = 0; i < meteors.Count; i++)

            {

                meteors[i].Draw(gameTime);

            }


            base.Draw(gameTime);

         }

    }

}
Observe that this class contains a great deal of the code that was previously inside the Game1 class in the previous chapter, but essentially it does the same thing. You'll use this class later to compose the action scene.
Note Overall, it's a good idea to create a management class for each group of GameComponents in a game. It's normal to see classes such as EnemyManager, WizardManager, and so on, because this puts all the complexity of this type of game element in only one class. This simplifies the code and maximizes the reuse of these components in other games.
Adding the Scoreboard
Another element you need to create for the action scene is the scoreboard. This scoreboard shows the quantity of points and energy of the player's ship. This class is simple: it only draws two lines of text on the screen. Add a class to the project called Score, and add the code in Listing 4-5.
Listing 4-5 The Score GameComponent
#region Using Statements


using Microsoft.Xna.Framework;

using Microsoft.Xna.Framework.Graphics;


#endregion


namespace RockRainEnhanced

{

    /// <summary>

    /// This is a GameComponent that implements the game score

    /// </summary>

    public class Score : DrawableGameComponent

    {

        // SpriteBatch

        protected SpriteBatch spriteBatch = null;


        // Score position

        protected Vector2 position = new Vector2();


        // Values

        protected int value;

        protected int power;


        protected readonly SpriteFont font;

        protected readonly Color fontColor;


        public Score(Game game, SpriteFont font, Color fontColor)

            : base(game)

        {

            this.font = font;

            this.fontColor = fontColor;

            // Get the current sprite batch

            spriteBatch = (SpriteBatch)

                            Game.Services.GetService(typeof (SpriteBatch));

        }


        /// <summary>

        /// Points value

        /// </summary>
        public int Value

        {

            get { return value; }

            set { this.value = value; }

        }


        /// <summary>

        /// Power value

        /// </summary>

        public int Power

        {

            get { return power; }

            set { power = value; }

        }


        /// <summary>

        /// Position of component on screen

        /// </summary>

        public Vector2 Position

        {

            get { return position; }

            set { position = value; }

        }


        /// <summary>

        /// Allows the GameComponent to draw itself

        /// </summary>

        /// <param name="gameTime">Provides a snapshot of timing values</param>

        public override void Draw(GameTime gameTime)

        {

            string TextToDraw = string.Format("Score: {0}", value);


            // Draw the text shadow

            spriteBatch.DrawString(font, TextToDraw, new Vector2(position.X + 1,

                                    position.Y + 1), Color.Black);

            // Draw the text item

            spriteBatch.DrawString(font, TextToDraw,

                                    new Vector2(position.X, position.Y),

                                    fontColor);


            float height = font.MeasureString(TextToDraw).Y;

            TextToDraw = string.Format("Power: {0}", power);

            // Draw the text shadow

            spriteBatch.DrawString(font, TextToDraw,

                new Vector2(position.X + 1, position.Y + 1 + height),

                Color.Black);
            // Draw the text item

            spriteBatch.DrawString(font, TextToDraw,

                new Vector2(position.X, position.Y + 1 + height),

                fontColor);


            base.Draw(gameTime);

        }

    }

}
Again, this looks like the code in the previous version, only this time it is encapsulated in a class. Also, the text is now drawn with a little shadow under it, to enhance the legibility and give it a touch of style, as you did with the Menu component.
Creating the Energy Source
The change in Rock Rain's playability brings up the need for an interesting additional component. The player's ship now contains a finite energy source, which decreases over time and falls even more after a meteor collision. You must provide a means for players to recharge their ships, so they can stay in the game longer, accumulating more points.
You'll create a new GameComponent, which looks like a small barrel of energy that shows up at regular intervals and "falls" together with the meteors. If the player touches this power source game component, it will refuel the ship with more energy. The idea is that the player keeps an eye out for this new element and tries to obtain it without hitting any incoming meteors.
Add a new class called PowerSource and add the code in Listing 4-6.
Listing 4-6 The Powersource GameComponent
#region Using Statements


using System;

using System.Collections.Generic;

using Microsoft.Xna.Framework;

using Microsoft.Xna.Framework.Graphics;

using RockRainEnhanced.Core;


#endregion


namespace RockRainEnhanced

{

    /// <summary>

    /// This is a GameComponent that implements the power source element

    /// </summary>

    public class PowerSource : Sprite

    {

        protected Texture2D texture;

        protected Random random;
         public PowerSource(Game game, ref Texture2D theTexture)

             : base(game, ref theTexture)

         {

             texture = theTexture;


             Frames = new List<Rectangle>();

             Rectangle frame = new Rectangle();

             frame.X = 291;

             frame.Y = 17;

             frame.Width = 14;

             frame.Height = 12;

             Frames.Add(frame);


             frame.Y = 30;

             Frames.Add(frame);


             frame.Y = 43;

             Frames.Add(frame);


             frame.Y = 57;

             Frames.Add(frame);


             frame.Y = 70;

             Frames.Add(frame);


             frame.Y = 82;

             Frames.Add(frame);


             frameDelay = 200;


             // Initialize the random number generator and put the power

             // source in your start position

             random = new Random(GetHashCode());

             PutinStartPosition();

         }


         /// <summary>

         /// Initialize position and velocity

         /// </summary>

         public void PutinStartPosition()

         {

             position.X = random.Next(Game.Window.ClientBounds.Width -

                 currentFrame.Width);

             position.Y = −10;

             Enabled = false;

         }
         public override void Update(GameTime gameTime)

         {

             // Check if the power source is still visible

             if (position.Y >= Game.Window.ClientBounds.Height)

             {

                 position.Y = 0;

                 Enabled = false;

             }


             // Move

             position.Y += 1;


             base.Update(gameTime);

        }


        /// <summary>

        /// Check if the object intersects with the specified rectangle

        /// </summary>

        /// <param name="rect">test rectangle</param>

        /// <returns>true, if has a collision</returns>

        public bool CheckCollision(Rectangle rect)

        {

            Rectangle spriterect =

                new Rectangle((int) position.X, (int) position.Y,

                currentFrame.Width, currentFrame.Height);

            return spriterect.Intersects(rect);

        }

    }

}
You did a similar thing with the Meteor class, creating an animation with the list of frames and updating its vertical position as time goes by, to give the "falling" effect.
Creating the Player's Game Component
You're almost finished creating the components for the action scene, but the main actor is still missing: the player! In this new version, the code for the player's GameComponent is mostly the same as in the previous chapter, but with the addition of multiplayer support. This support differs from the previous version mainly in the treatment of energy, keyboard, points, and the way the player is drawn. The code of the Player class is in Listing 4-7.
Listing 4-7 The Player GameComponent
#region Using Statements


using System;

using Microsoft.Xna.Framework;

using Microsoft.Xna.Framework.Graphics;

using Microsoft.Xna.Framework.Input;
#endregion


namespace RockRainEnhanced

{

    /// <summary>

    /// This is a GameComponent that implements the player ship

    /// </summary>

    public class Player : DrawableGameComponent

    {

        protected Texture2D texture;

        protected Rectangle spriteRectangle;

        protected Vector2 position;

        protected TimeSpan elapsedTime = TimeSpan.Zero;

        protected PlayerIndex playerIndex;


        // Screen area

        protected Rectangle screenBounds;


        // Game stuff

        protected int score;

        protected int power;

        private const int INITIALPOWER = 100;


        public Player(Game game, ref Texture2D theTexture, PlayerIndex playerID,

            Rectangle rectangle) : base(game)

        {

            texture = theTexture;

            position = new Vector2();

            playerIndex = playerID;


            // Create the source rectangle.

            // This represents where the sprite picture is in the surface

            spriteRectangle = rectangle;


#if XBOX360

    // On the 360, we need to take care about the TV "safe" area.

            screenBounds = new Rectangle((int)(Game.Window.ClientBounds.Width *

                0.03f),(int)(Game.Window.ClientBounds.Height * 0.03f),

                Game.Window.ClientBounds.Width -

                (int)(Game.Window.ClientBounds.Width * 0.03f),

                Game.Window.ClientBounds.Height -

                (int)(Game.Window.ClientBounds.Height * 0.03f));

#else

            screenBounds = new Rectangle(0, 0, Game.Window.ClientBounds.Width,

                Game.Window.ClientBounds.Height);

#endif

         }
        /// <summary>

        /// Put the ship in your start position on screen

        /// </summary>

        public void Reset()

        {

            if (playerIndex == PlayerIndex.One)

            {

                position.X = screenBounds.Width/3;

            }

            else

            {

                position.X = (int) (screenBounds.Width/1.5);

            }


            position.Y = screenBounds.Height - spriteRectangle.Height;

            score = 0;

            power = INITIALPOWER;

        }


        /// <summary>

        /// Total points of the player

        /// </summary>

        public int Score

        {

            get { return score; }

            set

            {

                if (value < 0)

                {

                    score = 0;

                }

                else

                {

                    score = value;

                }

            }

         }


         /// <summary>

         /// Remaining power

         /// </summary>

         public int Power

         {

             get { return power; }

             set { power = value; }

         }
        /// <summary>

        /// Update the ship position, points, and power

        /// </summary>

        public override void Update(GameTime gameTime)

        {

            // Move the ship with the Xbox controller

            GamePadState gamepadstatus = GamePad.GetState(playerIndex);

            position.Y += (int) ((gamepadstatus.ThumbSticks.Left.Y*3)*−2);

            position.X += (int) ((gamepadstatus.ThumbSticks.Left.X*3)*2);


            // Move the ship with the keyboard

            if (playerIndex == PlayerIndex.One)

            {

                HandlePlayer1KeyBoard();

            }

            else

            {

                HandlePlayer2KeyBoard();

            }


            // Keep the player inside the screen

            KeepInBound();


            // Update score

            elapsedTime += gameTime.ElapsedGameTime;


            if (elapsedTime > TimeSpan.FromSeconds(1))

            {

                elapsedTime -= TimeSpan.FromSeconds(1);

                score++;

                power--;

            }


            base.Update(gameTime);

        }


        /// <summary>

        /// Keep the ship inside the screen

        /// </summary>

        private void KeepInBound()

        {

            if (position.X < screenBounds.Left)

            {

                position.X = screenBounds.Left;

            }
if (position.X > screenBounds.Width - spriteRectangle.Width)

            {

            position.X = screenBounds.Width - spriteRectangle.Width;

            }

            if (position.Y < screenBounds.Top)

            {

            position.Y = screenBounds.Top;

            }

            if (position.Y > screenBounds.Height - spriteRectangle.Height)

            {

                position.Y = screenBounds.Height - spriteRectangle.Height;

            }

        }


         /// <summary>

         /// Handle the keys for player 1 (arrow keys)

         /// </summary>

         private void HandlePlayer1KeyBoard()

         {

             KeyboardState keyboard = Keyboard.GetState();

             if (keyboard.IsKeyDown(Keys.Up))

             {

                 position.Y -= 3;

             }

             if (keyboard.IsKeyDown(Keys.Down))

             {

                 position.Y += 3;

             }

             if (keyboard.IsKeyDown(Keys.Left))

             {

                 position.X -= 3;

             }

             if (keyboard.IsKeyDown(Keys.Right))

             {

                 position.X += 3;

             }

         }


         /// <summary>

         /// Handle the keys for player 2 (ASDW)

         /// </summary>

         private void HandlePlayer2KeyBoard()

         {

             KeyboardState keyboard = Keyboard.GetState();
             if (keyboard.IsKeyDown(Keys.W))

             {

                 position.Y -= 3;

             }

             if (keyboard.IsKeyDown(Keys.S))

             {

                 position.Y += 3;

             }

             if (keyboard.IsKeyDown(Keys.A))

             {

                 position.X -= 3;

             }

             if (keyboard.IsKeyDown(Keys.D))

             {

                 position.X += 3;

             }

         }


         /// <summary>

         /// Draw the ship sprite

         /// </summary>

         public override void Draw(GameTime gameTime)

         {

             // Get the current sprite batch

             SpriteBatch sBatch = (SpriteBatch)

                 Game.Services.GetService(typeof (SpriteBatch));


             // Draw the ship

             sBatch.Draw(texture, position, spriteRectangle, Color.White);


             base.Draw(gameTime);

         }


         /// <summary>

         /// Get the bound rectangle of ship position on screen

         /// </summary>

         public Rectangle GetBounds()

         {

             return new Rectangle((int) position.X, (int) position.Y,

                 spriteRectangle.Width, spriteRectangle.Height);

         }

    }

}
As you can see, this is practically the same class as in the previous chapter, but in the Update method, you handle the user input a little differently, testing the PlayerIndex to check for the correct gamepad or keyboard keys. In a multiplayer game, you'll instantiate two objects for this class with different PlayerIndexes and different rectangles in texture, for different ship sprites.
Bringing Everything Together
Now you have all the action scene components. The meteors, the score, and the player (or players) are ready to be put to work. Next, add a class called ActionScene. This scene is the most complex scene of the game. It coordinates the action of all the components, as well as controls the game state, such as pause and gameOver.
Start declaring all elements of this scene, as follows:
// Basics

protected Texture2D actionTexture;

protected AudioLibrary audio;

protected SpriteBatch spriteBatch = null;


// Game elements

protected Player player1;

protected Player player2;

protected MeteorsManager meteors;

protected PowerSource powerSource;

protected SimpleRumblePad rumblePad;

protected ImageComponent background;

protected Score scorePlayer1;

protected Score scorePlayer2;


// GUI stuff

protected Vector2 pausePosition;

protected Vector2 gameoverPosition;

protected Rectangle pauseRect = new Rectangle(1, 120, 200, 44);

protected Rectangle gameoverRect = new Rectangle(1, 170, 350, 48);


// GameState elements

protected bool paused;

protected bool gameOver;

protected TimeSpan elapsedTime = TimeSpan.Zero;

protected bool twoPlayers;
These look like the attributes from the game in the previous chapter, but you now have two Player instances (for a multiplayer game); two attributes for controlling the game state (paused and gameOver); the components for Score, PowerSource, and Meteors; and so on.
The constructor initializes all these objects, as follows:
/// <summary>

/// Default constructor

/// </summary>

/// <param name="game">The main game object</param>

/// <param name="theTexture">Texture with the sprite elements</param>

/// <param name="backgroundTexture">Texture for the background</param>

/// <param name="font">Font used in the score</param>
public ActionScene(Game game, Texture2D theTexture,

    Texture2D backgroundTexture, SpriteFont font) : base(game)

{

    // Get the audio library

    audio = (AudioLibrary)

        Game.Services.GetService(typeof(AudioLibrary));

    background = new ImageComponent(game, backgroundTexture,

        ImageComponent.DrawMode.Stretch);

    Components.Add(background);


    actionTexture = theTexture;


    spriteBatch = (SpriteBatch)

        Game.Services.GetService(typeof (SpriteBatch));

    meteors = new MeteorsManager(Game, ref actionTexture);

    Components.Add(meteors);


    player1 = new Player(Game, ref actionTexture, PlayerIndex.One,

        new Rectangle(323, 15, 30, 30));

    player1.Initialize();

    Components.Add(player1);


    player2 = new Player(Game, ref actionTexture, PlayerIndex.Two,

        new Rectangle(360, 17, 30, 30));

    player2.Initialize();

    Components.Add(player2);


    scorePlayer1 = new Score(game, font, Color.Blue);

    scorePlayer1.Position = new Vector2(10, 10);

    Components.Add(scorePlayer1);

    scorePlayer2 = new Score(game, font, Color.Red);

    scorePlayer2.Position = new Vector2(

        Game.Window.ClientBounds.Width - 200, 10);

    Components.Add(scorePlayer2);


    rumblePad = new SimpleRumblePad(game);

    Components.Add(rumblePad);


    powerSource = new PowerSource(game, ref actionTexture);

    powerSource.Initialize();

    Components.Add(powerSource);

}
Here, you create two instances for the Player class. For each player, just change the PlayerIndex and the Rectangle of the image of the ship in the texture.
You also need to control the game state and define if the game is for one or two players, or check if some of the players are already dead. Add these properties to the class:
/// <summary>

/// Indicate the 2-players game mode

/// </summary>

public bool TwoPlayers

{

    get { return twoPlayers; }

    set { twoPlayers = value; }

}


/// <summary>

/// True, if the game is in gameOver state

/// </summary>

public bool GameOver

{

    get { return gameOver; }

}


/// <summary>

/// Paused mode

/// </summary>

public bool Paused

{

    get { return paused; }

    set

    {

        paused = value;

        if (paused)

        {

            MediaPlayer.Pause();        }

        else

        {

            MediaPlayer.Resume();       }

     }

}
As with all the other scenes, you can use the Show and Hide methods to initialize and release scene components. In the Show method, you start playing the background music and setting the player2 status if you have a two-player game:
/// <summary>

/// Show the action scene

/// </summary>

public override void Show()

{


    MediaPlayer.Play(audio.BackMusic);

    meteors.Initialize();

    powerSource.PutinStartPosition();
    player1.Reset();

    player2.Reset();


    paused = false;

    pausePosition.X = (Game.Window.ClientBounds.Width -

        pauseRect.Width)/2;

    pausePosition.Y = (Game.Window.ClientBounds.Height -

        pauseRect.Height)/2;


    gameOver = false;

    gameoverPosition.X = (Game.Window.ClientBounds.Width -

        gameoverRect.Width)/2;

    gameoverPosition.Y = (Game.Window.ClientBounds.Height -

        gameoverRect.Height)/2;


    // Is it a two-player game?

    player2.Visible = twoPlayers;

    player2.Enabled = twoPlayers;

    scorePlayer2.Visible = twoPlayers;

    scorePlayer2.Enabled = twoPlayers;


    base.Show();

}


/// <summary>

/// Hide the scene

/// </summary>

public override void Hide()

{

    // Stop the background music

    MediaPlayer.Stop();    // Stop the rumble

    rumblePad.Stop(PlayerIndex.One);

    rumblePad.Stop(PlayerIndex.Two);


    base.Hide();

}
And, as always, the Update method synchronizes all these objects, checking the collisions and changing the game state for game over when some players die.
/// <summary>

/// Allows the GameComponent to update itself

/// </summary>

/// <param name="gameTime">Provides a snapshot of timing values</param>

public override void Update(GameTime gameTime)

{
    if ((!paused) && (!gameOver) && (!Guide.IsVisible))

    {

        // Check collisions with meteors

        HandleDamages();


        // Check if a player gets a power boost

        HandlePowerSourceSprite(gameTime);


        // Update score

        scorePlayer1.Value = player1.Score;

        scorePlayer1.Power = player1.Power;

        if (twoPlayers)

        {

            scorePlayer2.Value = player2.Score;

            scorePlayer2.Power = player2.Power;

        }


        // Check if player is dead

        gameOver = ((player1.Power <= 0) || (player2.Power <= 0));

        if (gameOver)

        {

            player1.Visible = (player1.Power > 0);

            player2.Visible = (player2.Power > 0) && twoPlayers;

            // Stop the music

            MediaPlayer.Stop();            // Stop rumble

            rumblePad.Stop(PlayerIndex.One);

            rumblePad.Stop(PlayerIndex.Two);

        }


        // Update all other GameComponents

        base.Update(gameTime);

     }


     // In gameOver state, keep the meteors' animation

     if (gameOver)

     {

         meteors.Update(gameTime);

     }

}
The HandleDamages and HandlePowerSourceSprite methods check the collisions with the meteors (and lose some player power), check the collision with the power source (and add some power to the player), and check if a player has zero or less power to end the game and put the player in a game over state.
The HandleDamages method is also similar to the collision test method from the previous chapter. Again, this method checks the collision with the players and meteors and one player with another player. For each collision, the player loses ten points and ten power units.
/// <summary>

/// Handle collisions with a meteor

/// </summary>

private void HandleDamages()

{

    // Check collision for player 1

    if (meteors.CheckForCollisions(player1.GetBounds()))

    {

        // Shake!

        rumblePad.RumblePad(PlayerIndex.One, 500, 1.0f, 1.0f);

        // Player penalty

        player1.Power -= 10;

        player1.Score -= 10;

    }


    // Check collision for player 2

    if (twoPlayers)

    {

        if (meteors.CheckForCollisions(player2.GetBounds()))

        {

            // Shake!

            rumblePad.RumblePad(PlayerIndex.Two, 500, 1.0f, 1.0f);

            // Player penalty

            player2.Power -= 10;

            player2.Score -= 10;

        }


        // Check for collision between the players

        if (player1.GetBounds().Intersects(player2.GetBounds()))

        {

            rumblePad.RumblePad(PlayerIndex.One, 500, 1.0f, 1.0f);

            player1.Power -= 10;

            player1.Score -= 10;

            rumblePad.RumblePad(PlayerIndex.Two, 500, 1.0f, 1.0f);

            player2.Power -= 10;

            player2.Score -= 10;

        }

     }

}
The HandlePowerSourceSprite method does the same job, but with the PowerSource sprite. If a player collides with this sprite, the player gets 50 power units. The method also checks if it's time to send a new power source in the game, using an interval of 15 seconds.
/// <summary>

/// Handle power-up stuff

/// </summary>
private void HandlePowerSourceSprite(GameTime gameTime)

{

    if (powerSource.CheckCollision(player1.GetBounds()))

    {

        // Player 1 gets the power source

        audio.PowerGet.Play();         elapsedTime = TimeSpan.Zero;

        powerSource.PutinStartPosition();

        player1.Power += 50;

    }


    if (twoPlayers)

    {

        // Player 2 gets the power source

        if (powerSource.CheckCollision(player2.GetBounds()))

        {

            audio.PowerGet.Play();            elapsedTime = TimeSpan.Zero;

            powerSource.PutinStartPosition();

            player2.Power += 50;

        }

    }


    // Check for sending a new power source

    elapsedTime += gameTime.ElapsedGameTime;

    if (elapsedTime > TimeSpan.FromSeconds(15))

    {

        elapsedTime -= TimeSpan.FromSeconds(15);

        powerSource.Enabled = true;

    }

}
And finally, the Draw method just draws some objects for a specified game state:
/// <summary>

/// Allows the GameComponent to draw itself

/// </summary>

/// <param name="gameTime">Provides a snapshot of timing values</param>

public override void Draw(GameTime gameTime)

{

    // Draw all GameComponents

    base.Draw(gameTime);


    if (paused)

    {

        // Draw the "pause" text

        spriteBatch.Draw(actionTexture, pausePosition, pauseRect,

            Color.White);

    }
    if (gameOver)

    {

        // Draw the "gameover" text

        spriteBatch.Draw(actionTexture, gameoverPosition, gameoverRect,

            Color.White);

    }
Observe that once again a great deal of the game logic that you created in the previous chapter was kept. You added only the two-player support and two more game states: one when the user pauses the game (pressing the Enter key or pressing the A button on the Xbox 360 gamepad during the game), or when one of the players runs out of energy. When this happens, the game shows a message on the screen and waits for the player to press the Enter key or the A button on the Xbox 360 gamepad.
Navigating Between the Scenes
With all the scenes created, now you only need to show them according to the user's selections. Through the menu in the opening scene, users can show the help scene, the action scene (with one or two players), or just leave the game. Here, you'll use a technique in which you concentrate all the inputs that refer to the navigation or control of the scene states in one class. In this case, you use the Game1 class, so that you have a central point where you start the scenes and control the Game1 class's state. Add the following code in the Game1 class:
private readonly GraphicsDeviceManager graphics;

private SpriteBatch spriteBatch;


// Textures

protected Texture2D helpBackgroundTexture, helpForegroundTexture;

protected Texture2D startBackgroundTexture, startElementsTexture;

protected Texture2D actionElementsTexture, actionBackgroundTexture;

// Game scenes

protected HelpScene helpScene;

protected StartScene startScene;

protected ActionScene actionScene;

protected GameScene activeScene;


// Audio stuff

protected AudioLibrary audio;


// Fonts

private SpriteFont smallFont, largeFont, scoreFont;


// Used to handle input

protected KeyboardState oldKeyboardState;

protected GamePadState oldGamePadState;
In the LoadContent method, add the code to create and load the content for the ActionScene object:
// Create the action scene

actionElementsTexture = Content.Load<Texture2D>("rockrainenhanced");

actionBackgroundTexture = Content.Load<Texture2D>("SpaceBackground");

scoreFont = Content.Load<SpriteFont>("score");

actionScene = new ActionScene(this, actionElementsTexture,

    actionBackgroundTexture, scoreFont);

Components.Add(actionScene);


// Start the game in the start scene

startScene.Show();

activeScene = startScene;
Again, in this class, you'll load all the game assets and initialize all the scenes, putting the StartScene as the scene to be opened initially.
The Update method handles all user input for each scene, and changes the active scene if necessary:
/// <summary>

/// Allows the game to run logic such as updating the world,

/// checking for collisions, gathering input, and playing audio.

/// </summary>

/// <param name="gameTime">Provides a snapshot of timing values</param>

protected override void Update(GameTime gameTime)

{

// Handle game inputs

    HandleScenesInput();


    base.Update(gameTime);

}
HandleScenesInput just calls the handler for the active scene in the game:
/// <summary>

/// Handle input of all game scenes

/// </summary>

private void HandleScenesInput()

{

    // Handle start scene input

    if (activeScene == startScene)

    {

        HandleStartSceneInput();

    }

    // Handle help scene input

    else if (activeScene == helpScene)

    {

        if (CheckEnterA())

        {

            ShowScene(startScene);

        }

    }
    // Handle action scene input

    else if (activeScene == actionScene)

    {

        HandleActionInput();

    }

}
The CheckEnterA method is a simple code to test the Enter key and the A button on an Xbox 360 gamepad:
/// <summary>

/// Check if the Enter Key or A button was pressed

/// </summary>

/// <returns>true, if Enter key or A button was pressed</returns>

private bool CheckEnterA()

{

    // Get the keyboard and gamePad state

    GamePadState gamepadState = GamePad.GetState(PlayerIndex.One);

    KeyboardState keyboardState = Keyboard.GetState();


    bool result = (oldKeyboardState.IsKeyDown(Keys.Enter) &&

        (keyboardState.IsKeyUp(Keys.Enter)));

    result |= (oldGamePadState.Buttons.A == ButtonState.Pressed) &&

              (gamepadState.Buttons.A == ButtonState.Released);


    oldKeyboardState = keyboardState;

    oldGamePadState = gamepadState;


    return result;

}
The HandleStartSceneInput shows the correct scene following the user selection in the menu. If a two-player game is selected, you just set the TwoPlayers attribute in the actionScene to true:
/// <summary>

/// Handle buttons and keyboard in start scene

/// </summary>

private void HandleStartSceneInput()

{

    if (CheckEnterA())

    {

       audio.MenuSelect.Play();        switch (startScene.SelectedMenuIndex)

       {

           case 0:

               actionScene.TwoPlayers = false;

               ShowScene(actionScene);

               break;
           case 1:

               actionScene.TwoPlayers = true;

               ShowScene(actionScene);

               break;

           case 2:

               ShowScene(helpScene);

               break;

           case 3:

               Exit();

               break;

       }

   }

}
HandleActionInput handles input in the action scene to pause and cancel a game, using a keyboard or an Xbox 360 gamepad:
/// <summary>

/// Check if the Enter Key or A button was pressed

/// </summary>

/// <returns>true, if Enter key or A button was pressed</returns>

private void HandleActionInput()

{

    // Get the keyboard and gamePad state

    GamePadState gamepadState = GamePad.GetState(PlayerIndex.One);

    KeyboardState keyboardState = Keyboard.GetState();


    bool backKey = (oldKeyboardState.IsKeyDown(Keys.Escape) &&

        (keyboardState.IsKeyUp(Keys.Escape)));

    backKey |= (oldGamePadState.Buttons.Back == ButtonState.Pressed) &&

               (gamepadState.Buttons.Back == ButtonState.Released);


    bool enterKey = (oldKeyboardState.IsKeyDown(Keys.Enter) &&

        (keyboardState.IsKeyUp(Keys.Enter)));

    enterKey |= (oldGamePadState.Buttons.A == ButtonState.Pressed) &&

                (gamepadState.Buttons.A == ButtonState.Released);


    oldKeyboardState = keyboardState;

    oldGamePadState = gamepadState;


    if (enterKey)

    {

        if (actionScene.GameOver)

        {

            ShowScene(startScene);

        }
         else

         {

            audio.MenuBack.Play();            actionScene.Paused =

!actionScene.Paused;

         }

    }


    if (backKey)

    {

       ShowScene(startScene);

    }

}
The ShowScene method is just a helper to Show a new scene and Hide a previous scene, as follows:
/// <summary>

/// Open a new scene

/// </summary>

/// <param name="scene">Scene to be opened</param>

protected void ShowScene(GameScene scene)

{

    activeScene.Hide();

    activeScene = scene;

    scene.Show();

}
What about the Draw method? Well, all elements of your game are GameComponents now, so just let XNA do its job:
/// <summary>

/// This is called when the game should draw itself.

/// </summary>

/// <param name="gameTime">Provides a snapshot of timing values</param>

protected override void Draw(GameTime gameTime)

{

    // Begin

    spriteBatch.Begin();


    // Draw all GameComponents

    base.Draw(gameTime);


    // End

    spriteBatch.End();

}
That's it. Compile and execute the game to see the final result. The architecture is flexible, an d it's easy to add new features to your game, as you'll see in Chapter 6. Try adding new meteor types or new ways to acquire energy, for instance. You'll start to understand how games are "assem bled" from GameComponents.
Summary
In this chapter, you started from a simple game and evolved that into a more elaborate game with simple techniques that are useful to any kind of game. You saw the value of the GameComponents and their reuse capability. Feel free to improve and change this game and build your own awesome version of Rock Rain!