
CHAPTER 3
Creating Your First 2D Game
In this chapter, you'll create your first game and explore some of the techniques discussed in the previous chapter. Your first game will be both simple and fun. It will run on a PC or on an Xbox 360 console.
But as trivial as the game might seem, it still must be well planned. Many projects fail because of too little effort in this phase, which leads to projects without a defined end, or projects that are finished but do not achieve their goals. Planning involves discovering the questions that must be answered before starting a game project. This book intends to teach making games the right way, so let's start right.
Design for the First Game: Rock Rain
You're an intergalactic explorer, and you're stuck in an endless asteroid field! How long will you resist this rock rain? This is the main theme of your game, a frenetic challenge where you need to dodge a lot of asteroids that pass rapidly across the screen. It's like an Asteroids clone.
This is a simple and old game concept. Players need to avoid getting hit by meteors, and the longer they remain without a collision, the more points they get. Additionally, the quantity of meteors increases as time goes by, making the challenge harder and harder. To satisfy your curiosity, Figure 3-1 shows an example of a screen in your first game.
Right now, you'll clarify the game constraints and rules before you program anything. In the case of Rock Rain, they're simple:
- The player is able to move freely around the screen and cannot leave the screen boundaries.
- The meteors appear at the top of the screen and move down with a random angle and speed. After some time, a new meteor is added to this "rain."
- The score is determined by the number of meteors on the screen.
- If the player collides with a meteor, the player's score will be zeroed, and the game will restart with the initial quantity of meteors.
Values such as the starting quantity of meteors and how long it should take before another meteor is added to the screen were not specified, because they're game parameters, rather than rules.
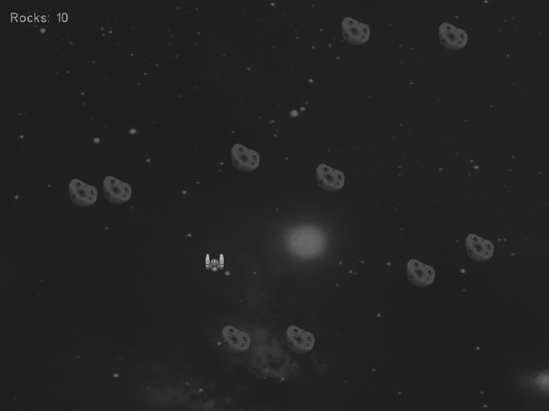
Figure 3-1. Final look of Rock Rain
From a game programmer's point of view, things like spaceships, meteors, and scores are objects in your game. You should also detail these objects before you start programming anything.
Each object in the game has its own characteristics and behavior: the rocks fall, the player controls the spaceship, the score grows with the meteor count, and so on. The correct definition of the behavior and the state control of the game's objects are the most challenging tasks in game programming. That's why your game should be well thought out before you start to build anything.
You also need to consider the audio portions for the game. For Rock Rain, you'll have only three sound effects: music that plays while the game is active, a sound that plays when a new meteor is added to the game, and an explosion sound that plays when the player collides with a meteor. And as another feature, when a collision occurs, you'll make the player's Xbox 360 gamepad shake, to give an impact effect.
Let's Get to It
As you might have guessed, your first game is created as an XNA Windows Game project, which you've explored in the previous chapters. So, start by opening Visual Studio and creating a new Windows Game project called RockRain. The Solution Explorer window will look like Figure 3-2.
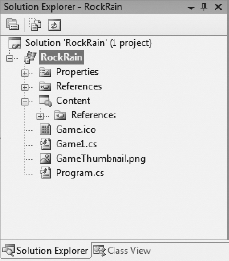
Figure 3-2. The Solution Explorer window after creating the Rock Rain project
As explained in Chapter 1, the Content folder is a special item in XNA projects. In this folder, you'll place all the game's assets, such as images, sounds, and so on—everything that should be loaded through the Content Pipeline.
You can download all the files used in this project from the book's details page at the Apress web site (http://www.apress.com).
Drawing the Background
Start by putting a background in your game. For a space game, nothing is better than an image of a galaxy! Add the file SpaceBackground.dds to the Content folder.
You should load this texture so that it fits the whole screen of the game. First, define the texture in your code. Add this attribute to your Game1 class:
// Background texture

private Texture2D backgroundTexture;
As you saw in the previous chapter, you'll load this texture and initialize the spriteBatch object in the LoadContent method:
// Create a new SpriteBatch, which can be used to draw textures.

spriteBatch = new SpriteBatch(GraphicsDevice);

// Load all textures

backgroundTexture = content.Load<Texture2D>(" SpaceBackground");

}
You need to load the texture using the spriteBatch object. Declare it in the Game1 class:
private SpriteBatch spriteBatch = null;
Now you can draw the background. Add the following code in the Draw method of the Game1 class:
// Draw background texture in a separate pass.

spriteBatch.Begin();

spriteBatch.Draw(backgroundTexture,new Rectangle(0, 0,

            graphics.GraphicsDevice.DisplayMode.Width,

            graphics.GraphicsDevice.DisplayMode.Height),

            Color.LightGray);

spriteBatch.End();
Run the game by pressing F5. If everything is correct, the result will look like Figure 3-3.
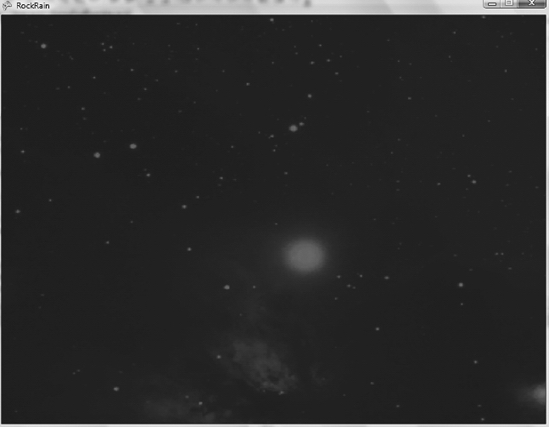
Figure 3-3. Rock Rain background
Creating the Player's Game Component
The player is represented in the game as a small spaceship that can be controlled using an Xbox 360 gamepad or a PC keyboard. The image of this spaceship is in the RockRain.png file. Add it to the project inside the Content folder. This texture contains the image of the player's spaceship and also the meteors that the player must avoid (see Figure 3-4).

Figure 3-4. Player and meteor texture
As you did for the background, first declare the texture in the Game1 class:
private Texture2D meteorTexture;
Then load it in the LoadContent method immediately after loading the background texture:
meteorTexture = content.Load<Texture2D>(" RockRain");
Note The graphics in this chapter and the next were built using SpriteLIB GPL, available from http://www.flyingyogi.com/fun/spritelib.html. SpriteLib GPL is a collection of static and animated grap hic objects (also commonly known as sprites).
Now you'll create a class that represents the player in the game. Add a new GameComponent to the project, name the file Ship.cs (as in Figure 3-5), and click OK. The new file added to the project contains a class that derives from GameComponent. This game component will be visible in the game; therefore, it must be drawn. Derive from DrawableGameComponent so that you have a Draw method you can use to draw in the game.
This game component copies the texture region that contains the picture of the spaceship in the specified position. To accomplish that, it needs the texture where this picture is, the coordinates of the picture in this texture, and the coordinates on the screen where the picture must be rendered.
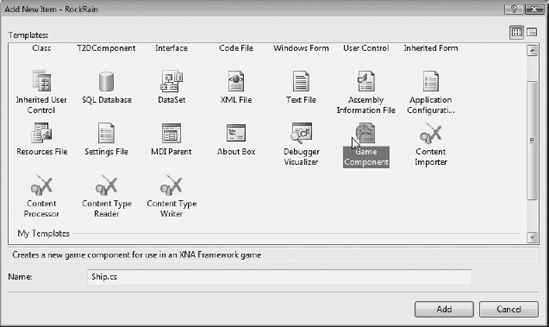
Figure 3-5. Adding a new game component
The component needs to move according to the Xbox 360 gamepad or PC keyboard controls. Also, it must remain within the screen boundaries; that is, the spaceship cannot disappear by leaving the defined borders of the game's window.
See that you have two steps of a DrawableGameComponent well defined:
- In the
Drawmethod, you copy the spaceship picture to the screen. - In the
Updatemethod, you update the screen according to the Xbox 360 gamepad or keyboard state.
This class code follows:
#region Using Statements

using System;

using System.Collections.Generic;

using Microsoft.Xna.Framework;

using Microsoft.Xna.Framework.Graphics;

using Microsoft.Xna.Framework.Input;

#endregion


namespace RockRain

{

    /// <summary>

    /// This is a game component that implements the player ship.
    /// </summary>

    public class Ship : Microsoft.Xna.Framework.DrawableGameComponent

    {

        protected Texture2D texture;

        protected Rectangle spriteRectangle;

        protected Vector2 position;


        // Width and height of sprite in texture

        protected const int SHIPWIDTH = 30;

        protected const int SHIPHEIGHT = 30;


        // Screen area

        protected Rectangle screenBounds;


        public Ship(Game game, ref Texture2D theTexture)

            : base(game)

        {

            texture = theTexture;

            position = new Vector2();


            // Create the source rectangle.

            // This represents where the sprite picture is in the surface

            spriteRectangle = new Rectangle(31, 83, SHIPWIDTH, SHIPHEIGHT);


#if XBOX360

            // On the 360, we need to be careful about the TV's "safe" area.

            screenBounds = new Rectangle(

                    (int)(Game.Window.ClientBounds.Width * 0.03f),

                    (int)(Game.Window.ClientBounds.Height * 0.03f),

                    Game.Window.ClientBounds.Width -

                    (int)(Game.Window.ClientBounds.Width * 0.03f),

                    Game.Window.ClientBounds.Height -

                    (int)(Game.Window.ClientBounds.Height * 0.03f));#else

            screenBounds = new Rectangle(0,0,

                Game.Window.ClientBounds.Width,

                Game.Window.ClientBounds.Height);

#endif

        }


        /// <summary>

        /// Put the ship in your start position in the screen

        /// </summary>

        public void PutinStartPosition()

        {

            position.X = screenBounds.Width / 2;

            position.Y = screenBounds.Height - SHIPHEIGHT;

        }
        /// <summary>

        /// Update the ship position

        /// </summary>

        public override void Update(GameTime gameTime)

        {

            // Move the ship with the Xbox controller

            GamePadState gamepadstatus = GamePad.GetState(PlayerIndex.One);

            position.Y += (int)((gamepadstatus.ThumbSticks.Left.Y * 3) * −2);

            position.X += (int)((gamepadstatus.ThumbSticks.Left.X * 3) * 2);


            // Move the ship with the keyboard

            KeyboardState keyboard = Keyboard.GetState();

            if (keyboard.IsKeyDown(Keys.Up))

            {

                position.Y -= 3;

            }

            if (keyboard.IsKeyDown(Keys.Down))

            {

                position.Y += 3;

            }

            if (keyboard.IsKeyDown(Keys.Left))

            {

                position.X -= 3;

            }

            if (keyboard.IsKeyDown(Keys.Right))

            {

                position.X += 3;

            }


            // Keep the ship inside the screen

            if (position.X < screenBounds.Left)

            {

                position.X = screenBounds.Left;

            }

            if (position.X > screenBounds.Width - SHIPWIDTH)

            {

                position.X = screenBounds.Width - SHIPWIDTH;

            }

            if (position.Y < screenBounds.Top)

            {

                position.Y = screenBounds.Top;

            }

            if (position.Y > screenBounds.Height - SHIPHEIGHT)

            {

                position.Y = screenBounds.Height - SHIPHEIGHT;

            }

             base.Update(gameTime);

         }


         /// <summary>

         /// Draw the ship sprite

         /// </summary>

         public override void Draw(GameTime gameTime)

         {

             // Get the current sprite batch

             SpriteBatch sBatch =

                 (SpriteBatch)Game.Services.GetService(typeof(SpriteBatch));


             // Draw the ship

             sBatch.Draw(texture, position, spriteRectangle, Color.White);


             base.Draw(gameTime);

         }


         /// <summary>

         /// Get the bound rectangle of ship position in screen

         /// </summary>

         public Rectangle GetBounds()

         {

             return new Rectangle((int)position.X, (int)position.Y,

                 SHIPWIDTH, SHIPHEIGHT);

         }

    }

}
Note that the Draw method does not create a SpriteBatch, as was created when you rendered the background texture. Ideally (following the "batch" concept), you should not keep creating and destroying SpriteBatch objects, because this jeopardizes the application's performance. You could create a "global" SpriteBatch and use it in your classes. However, this would create a coupling between your game components and a global attribute of a specific game (which is not desirable in object-oriented programming). XNA has an excellent solution to supply this global object and still allow you to reuse the component's code easily: the game service.
You can think of a game service as a service that is available to anyone who has a reference to a Game. The idea behind it is that a component should be able to depend on certain types, or services, for its functionality. If that service isn't available, then the component can't operate correctly.
In this case, the Draw method will look for an active SpriteBatch directly in the GameServices collection and use it to draw itself on the screen. Of course, you must add this SpriteBatch to GameServices. So, add the following code directly after creating the SpriteBatch in the LoadContent method of the Game1 class:
// Add the SpriteBatch service

Services.AddService(typeof(SpriteBatch), spriteBatch);
All the GameComponent items in your game will use this SpriteBatch.
Let's talk a little about this class. The Update method checks the keyboard and Xbox 360 gamepad to update the Position attribute and change the position of the ship on the screen. In this method, you also check if the ship is inside the screen boundaries. If not, the code puts the ship inside the visible area of the screen.
The GetBound method just returns the rectangle that has the ship boundaries in the screen. You'll use this rectangle later to do collision tests with meteors. Finally, the PutinStartPosition puts the ship in its initial position, centered horizontally in the bottom area of the screen. This method is called when you need to put the ship in its starting position; for example, when a new round starts.
Now let's test this GameComponent. Create a Start method that will be used to initialize the game objects (only the player for the moment), as follows:
/// <summary>

/// Initialize the game round

/// </summary>

private void Start()

{

    // Create (if necessary) and put the player in start position

    if (player == null)

    {

        // Add the player component

        player = new Ship(this, ref meteorTexture);

        Components.Add(player);

    }

    player.PutinStartPosition();

}
Observe that the player attribute contains a reference to the player's GameComponent. You also need to add this component to the components list of the Game itself to be able to have XNA call the Draw and Update methods of this object in the game.
Finally, declare the player attribute in the Game1 class:
private Ship player;
Now let's go back to the game's logic as a whole. The game's logic is normally implemented inside the Update method of the Game class. In this case, you can start with the following code:
/// <summary>

/// Allows the game to run logic such as updating the world,

/// checking for collisions, gathering input, and playing audio.

/// </summary>

/// <param name="gameTime">Provides a snapshot of timing values.</param>

protected override void Update(GameTime gameTime)

{

    // Allows the game to exit

    gamepadstatus = GamePad.GetState(PlayerIndex.One);

    keyboard = Keyboard.GetState();

    if ((gamepadstatus.Buttons.Back == ButtonState.Pressed) ||

        (keyboard.IsKeyDown(Keys.Escape)))

    {

        Exit();

    }


    // Start if not started yet

    if (player == null)

    {

        Start();

    }


    // Update all other components

    base.Update(gameTime);

}
Initially, this code checks if the user pressed the Esc key or the Back button on the Xbox 360 gamepad, which ends the game. Then, if necessary, the code starts the game through the Start method.
One detail is still missing. The Draw method of your game draws only the background. You also need to make it draw all the other GameComponent items of the game, so add the following code immediately after the code that draws the background:
// Start rendering sprites

spriteBatch.Begin(SpriteBlendMode.AlphaBlend);

// Draw the game components (sprites included)

base.Draw(gameTime);

// End rendering sprites

spriteBatch.End();
Save and execute the code. Now you can move the spaceship around the screen with the Xbox 360 gamepad or the PC arrow keys. Observe that all the movement logic of the spaceship is being handled by its own component that you created, although XNA automatically calls its Update method through the base.Update call of the Game1 class. You'll create meteors following the same principle. The difference is that the player won't move the meteors.
Creating the Meteors
The concepts you used to create a component for the player are the same that you'll use to create the meteors. The only difference is that the meteors' initial position and movement depend on a random factor. The meteors' code follows:
#region Using Statements

using System;

using System.Collections.Generic;

using Microsoft.Xna.Framework;

using Microsoft.Xna.Framework.Content;

using Microsoft.Xna.Framework.Graphics;

#endregion

namespace FirstGame

{

    /// <summary>

    /// This is a game component that implements the rocks the player must avoid.

    /// </summary>

    public class Meteor : Microsoft.Xna.Framework.DrawableGameComponent

    {

        protected Texture2D texture;

        protected Rectangle spriteRectangle;

        protected Vector2 position;

        protected int Yspeed;

        protected int Xspeed;

        protected Random random;


        // Width and height of sprite in texture

        protected const int METEORWIDTH = 45;

        protected const int METEORHEIGHT = 45;


        public Meteor(Game game, ref Texture2D theTexture)

            : base(game)

        {

            texture = theTexture;

            position = new Vector2();


            // Create the source rectangle.

            // This represents where the sprite picture is in the surface

            spriteRectangle = new Rectangle(20, 16, METEORWIDTH, METEORHEIGHT);


            // Initialize the random number generator and put the meteor in

            // its start position

            random = new Random(this.GetHashCode());

            PutinStartPosition();

        }


        /// <summary>

        /// Initialize meteor position and velocity

        /// </summary>

        protected void PutinStartPosition()

        {

            position.X = random.Next(Game.Window.ClientBounds.Width - METEORWIDTH);

            position.Y = 0;

            Yspeed = 1 + random.Next(9);

            Xspeed = random.Next(3) - 1;

        }


        /// <summary>

        /// Allows the game component to draw your content in the game screen

        /// </summary>

        public override void Draw(GameTime gameTime)

        {

            // Get the current sprite batch

            SpriteBatch sBatch =

                       (SpriteBatch) Game.Services.GetService(typeof(SpriteBatch));


            // Draw the meteor

            sBatch.Draw(texture, position, spriteRectangle, Color.White);


            base.Draw(gameTime);

        }


        /// <summary>

        /// Allows the game component to update itself.

        /// </summary>

        /// <param name="gameTime">Provides a snapshot of timing values.</param>

        public override void Update(GameTime gameTime)

        {

            // Check if the meteor is still visible

            if ((position.Y >= Game.Window.ClientBounds.Height) ||

                (position.X >= Game.Window.ClientBounds.Width) || (position.X <= 0))

            {

                PutinStartPosition();

            }


            // Move meteor

            position.Y += Yspeed;

            position.X += Xspeed;


            base.Update(gameTime);

        }


        /// <summary>

        /// Check if the meteor intersects with the specified rectangle

        /// </summary>

        /// <param name="rect">test rectangle</param>

        /// <returns>true, if has a collision</returns>

        public bool CheckCollision(Rectangle rect)

        {

            Rectangle spriterect = new Rectangle((int)position.X, (int)position.Y,

                        METEORWIDTH, METEORHEIGHT);

            return spriterect.Intersects(rect);

        }

    }

}
The PutinStartPosition method puts the meteor in a random horizontal position at the top of the screen, and also obtains the vertical and horizontal displacement speed of the meteor, which each call of the class's Update method refreshes.
A CheckCollision method verifies if the rectangle that delimits the meteor intersects with a rectangle passed as a parameter. This will be the rectangle that delimits the position of the player's spaceship on the screen.
Now let's put the meteors on the screen. Add the following code in the Start method of the Game1 class:
// Add the meteors

for (int i = 0; i < STARTMETEORCOUNT; i++)

{

    Components.Add(new Meteor(this, ref meteorTexture));

}
The STARTMETEORCOUNT constant defines the initial number of meteors that will appear in the game. Declare it in the Game1 class as follows:
private const int STARTMETEORCOUNT = 10;
Execute the program by pressing F5. Look at the beauty of the meteor rain. Note that each instance of the Meteor component behaves in an independent way, just as the Ship component does.
Creating the Game Logic
Your game components are nearly ready. Now you need to make them work together; that is, when the player's spaceship collides with a meteor, the game will restart.
So, just as you have a Start method that initializes the game components, create a method called DoGameLogic that executes the game logic itself. Right now, this method only iterates the game component list, to check if a meteor collided with the player's spaceship. If there's a collision, the meteors should be taken out of the game so that they can be re-created in their initial position. This code follows:
/// <summary>

/// Run the game logic

/// </summary>

private void DoGameLogic()

{

    // Check collisions

    bool hasCollision = false;

    Rectangle shipRectangle = player.GetBounds();

    foreach (GameComponent gc in Components)

    {

        if (gc is Meteor)

        {

            hasCollision = ((Meteor)gc).CheckCollision(shipRectangle);

            if (hasCollision)

            {

                // Remove all previous meteors

                RemoveAllMeteors();

                // Let's start again

                Start();


                break;

            }

         }

     }

}

/// <summary>

/// Remove all meteors

/// </summary>

private void RemoveAllMeteors()

{

    for (int i = 0; i < Components.Count; i++)

    {

        if (Components[i] is Meteor)

        {

            Components.RemoveAt(i);

            i--;

        }

     }

}
You should call the DoGameLogic method inside the Update method of the Game1 class, immediately before the line that contains the base.Update(gameTime) call. This calls your game logic inside the game loop. Execute the program and see that when the spaceship collides with the meteor, the program puts all the objects in their initial position, and continues this loop until the user leaves the application.
Now let's make the player's life a little harder. In your game, a new meteor will be added after some time has passed. As the meteors behave in an independent way, you just need to add a new Meteor component to the game, and it does all the rest. This is done with the method in the following code. Call this method inside the doGameLoop method, after the foreach loop.
/// <summary>

/// Check if it is time for a new rock!

/// </summary>

private void CheckforNewMeteor()

{

    // Add a rock each ADDMETEORTIME

    if ((System.Environment.TickCount - lastTickCount) > ADDMETEORTIME)

    {

        lastTickCount = System.Environment.TickCount;

        Components.Add(new Meteor(this, ref meteorTexture));

        rockCount++;

    }

}
The ADDMETEORTIME constant represents the interval, in milliseconds, at which a new meteor should be added. Declare it in the Game1 class as follows:
private const int ADDMETEORTIME = 5000;
This 5 seconds (or 5,000 milliseconds) setting is a "magic number," and you can change it to alter the game difficulty later.
Two new attributes store the number of meteors added (rockCount) and the time to calculate the desired interval (lastTickCount). Declare them as follows:
private const int ADDMETEORTIME = 5000;

private int lastTickCount;

private int rockCount;
You should initialize these attributes in the Start method, so add the following code to this method:
// Initialize a counter

lastTickCount = System.Environment.TickCount;

// Reset rock count

rockCount = STARTMETEORCOUNT;
So, every 5 seconds, a new meteor is added to the game.
Run the game again, and see how long you can play without hitting a rock.
Adding Sounds
As you saw in Chapter 2, it is very simple to add music and sound effects to your games. For Rock Rain, you'll use two WAV files for sound effects and a MP3 file for background music Add the following files to the Content folder:
Explosion.wavis an explosion sound that plays when the player collides with a meteor.Backmusic.mp3is the game's background music.Newmeteor.wavplays when a new meteor is added to the game.
Before you do anything else, declare the audio objects in the Game1 class:
// Audio stuff

private SoundEffect explosion;

private SoundEffect newMeteor;

private Song backMusic;
Initialize them in the LoadContent method of the Game1 class:
// Load audio elements


explosion = Content.Load<SoundEffect>("explosion");

newMeteor = Content.Load<SoundEffect>("newmeteor");

backMusic = Content.Load<Song>("backmusic");

// Play the background music

MediaPlayer.Play(backMusic);
Also, add the following code inside the DoGameLogic method, so that the explosion sound is played before calling the Start method again:
explosion.Play();
Then add the following code inside CheckforNewMeteor, immediately after the line that contains rockCount++:
newMeteor.Play();
This plays a sound when a new meteor is added to the game.
Run the game again. You'll see how the sound effects make the game even more entertaining.
Adding a Scoreboard
The Rock Rain scoreboard will show the current number of meteors on the screen. First, you need to create the game source and draw it in the game.
Then add a new SpriteFont. Call it font and add the following code to declare an object for it:
private SpriteFont gameFont;
Initialize the object in the LoadGraphicsContent method, just as you did with the other contents, inside the if statement, as follows:
// Load game font

gameFont = content.Load<SpriteFont>("Content//font");
The scoreboard is a typical GameComponent, but to show that you don't need to create a component for it, you'll draw this scoreboard in the Draw method of the Game1 class. You can draw it immediately after drawing the game sprites. Add the following code in the Draw method of the Game1 class:
// Draw score

spriteBatch.Begin();

spriteBatch.DrawString(gameFont, "Rocks: " + rockCount.ToString(),

new Vector2(15, 15), Color.YellowGreen);

spriteBatch.End();
Notice that you used a separate spriteBatch object to draw the scoreboard. This way, the steps to draw the background picture, the sprites, and the scoreboard are also separated in the video card, avoiding any possible "confusion" that the card might experience.
Caution Be careful with the use of third-party fonts in your games. Some fonts, such as TrueType and OpenType, are not royalty-free and have legal restrictions regarding their use. This is especially true of fonts used by Windows. You can find many free fonts on web sites across the Internet.
Shake, Baby!
Your game is almost ready. Now let's add one more effect to the game: the vibration. When players collide with a meteor, in addition to the explosion sound, you'll make the Xbox 360 gamepad vibrate to simulate the impact.
As you saw in the previous chapter, you can start and finish the Xbox 360 gamepad vibration through the SetVibration method. You're going to create a nonvisual GameComponent that will help you with this effect.
Add a new GameComponent to the project with the following code:
#region Using Statements

using System;

using System.Collections.Generic;

using Microsoft.Xna.Framework;

using Microsoft.Xna.Framework.Input;

#endregion


namespace FirstGame

{

    /// <summary>

    /// This component helps shake your Xbox 360 gamepad

    /// </summary>

    public class SimpleRumblePad : Microsoft.Xna.Framework.GameComponent

    {

        private int time;

        private int lastTickCount;


        public SimpleRumblePad(Game game)

            : base(game)

        {

        }


        /// <summary>

        /// Allows the game component to update itself.

        /// </summary>

        /// <param name="gameTime">Provides a snapshot of timing values.</param>

        public override void Update(GameTime gameTime)

        {

            if (time > 0) {

                int elapsed = System.Environment.TickCount - lastTickCount;

                if (elapsed >= time)

                {

                    time = 0;

                    GamePad.SetVibration(PlayerIndex.One, 0, 0);

                }

            }

            base.Update(gameTime);

         }

        /// <summary>

        /// Turn off the rumble

        /// </summary>

        protected override void Dispose(bool disposing)

        {

            GamePad.SetVibration(PlayerIndex.One, 0, 0);


            base.Dispose(disposing);

        }


        /// <summary>

        /// Set the vibration

        /// </summary>

        /// <param name="Time">Vibration time</param>

        /// <param name="LeftMotor">Left Motor Intensity</param>

        /// <param name="RightMotor">Right Motor Intensity</param>

        public void RumblePad(int Time, float LeftMotor, float RightMotor)

        {

            lastTickCount = System.Environment.TickCount;

            time = Time;

            GamePad.SetVibration(PlayerIndex.One, LeftMotor, RightMotor);

        }

    }

}
In this class, the RumblePad method receives the amount of time that the controller should vibrate and the vibration motor's intensity as parameters.
As usual, declare it in the Game1 class, as follows:
// Rumble effect

private SimpleRumblePad rumblePad;
Initialize it in the Initialize method of the Game1 class:
rumblePad = new SimpleRumblePad(this);

Components.Add(rumblePad);
Make the controller vibrate immediately after executing the explosion sound, in the DoGameLogic method:
// Shake!

rumblePad.RumblePad(500, 1.0f, 1.0f);
Congratulations—you've just finished your first game!
An Xbox 360 Version of Rock Rain
You know that XNA technology allows you to create games for the PC as well as the Xbox 360. If you wish to make a console version of Rock Rain, all you need to do is create a copy of this project for Xbox 360. Just right-click the RockRain project in the Solution Explorer window and choose Create Copy of Project for Xbox 360, as shown in Figure 3-6. Compile the project, and it's ready to go. You immediately have a game that works on the Xbox 360.
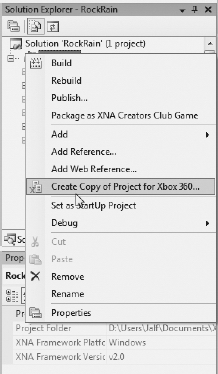
Figure 3-6. Creating an Xbox 360 version of Rock Rain
However, not everything is that simple. First, to deploy your game to the Xbox 360, you need an XNA Creators Club subscription, which enables your PC and the correctly registered console to communicate. (Your subscription can be renewed annually or every three months.) Additionally, to deploy the game, your console must be connected to the Xbox LIVE network.
You also need to take into account the difference between TVs (used by the console games) and monitors (used by the PC games). With an ordinary PC monitor, you have access to all areas of the screen. With a TV, you're forced to use what is called the safe area, which is the area visible on the TV screen. In other words, not everything that you put on the screen is visible on an ordinary TV. Older TVs can display less of the space outside the safe area than ones made more recently. Flat-panel, plasma, and liquid crystal display (LCD) screens generally can show most of the "unsafe" area.
This leads you to a problem regarding the margin of the screen. As the player cannot leave the margin of the screen, knowing exactly where the visible margin of the screen is can be a problem. Normally, the game industry works with a 3 to 5 percent physical margin.
So, in your Ship class, which represents the player's spaceship, add this code in the part where you calculated the size of the screen, in the class constructor:
#if XBOX360

      // On the 360, we need to be careful about the TV's "safe" area.

      screenBounds = new Rectangle((int)(Game.Window.ClientBounds.Width * 0.03f),

                            (int)(Game.Window.ClientBounds.Height * 0.03f),

                            Game.Window.ClientBounds.Width -

       (int)(Game.Window.ClientBounds.Width * 0.03f),

       Game.Window.ClientBounds.Height -

        (int)(Game.Window.ClientBounds.Height * 0.03f));

#else

       screenBounds = new Rectangle(0,0,Game.Window.ClientBounds.Width,

                   Game.Window.ClientBounds.Height);

#endif
Now, when you want to build the Xbox 360 project, compile the code that creates the rectangle that defines the screen margin with a size 3 percent smaller than the rectangle of a PC project, which takes all the monitor space. It's that simple.
Summary
In this chapter, you learned the basics of creating 2D games, and you went through a small project planning phase, focusing on the items that the game programmer and designer should have in mind before starting to write any code.
You also learned how to model your game using game components and create the game logic itself, modifying and testing the state of these components inside the game's loop. You saw that you can implement simple sprites using GameComponent objects and take advantage of all the classes that XNA already offers.
You also saw how you can add sounds and vibration effects to your game, as well as use a conditional compilation to solve the TV safe area issue of video game consoles.