Examining the Different Application States
The iOS includes events that you can handle in your application delegate so that you can monitor your application's current state. The following Try It Out shows the various states that an application goes through.
TRY IT OUT: Handling Application Event States
![]()
- Using Xcode, create a Single View Application (iPhone) project and name it States. You will also use the project name as the Class Prefix and ensure that you have the Use Automatic Reference Counting option unchecked.
- Add the following bold code to the StatesAppDelegate.m file:
#import “StatesAppDelegate.h”

#import “StatesViewController.h”

@implementation StatesAppDelegate

@synthesize window = _window;
@synthesize viewController = _viewController;

- (BOOL)application:(UIApplication *)application
      didFinishLaunchingWithOptions:(NSDictionary *)launchOptions
{
   NSLog(@“application:didFinishLaunchingWithOptions:”);
   self.window = [[[UIWindow alloc] initWithFrame:[[UIScreen mainScreen] bounds]]
     autorelease];
   // Override point for customization after application launch.
   self.viewController = [[[StatesViewController alloc]
     initWithNibName:@“StatesViewController” bundle:nil] autorelease];
   self.window.rootViewController = self.viewController;
   [self.window makeKeyAndVisible];
   return YES;
}

- (void)applicationWillResignActive:(UIApplication *)application
{
    NSLog(@“applicationWillResignActive:”);
    /*
     Sent when the application is about to move from active to inactive state.
This can occur for certain types of temporary interruptions (such as an
incoming phone call or SMS message) or when the user quits the application and
it begins the transition to the background state.
     Use this method to pause ongoing tasks, disable timers, and throttle down
OpenGL ES frame rates. Games should use this method to pause the game.
     */
}

- (void)applicationDidEnterBackground:(UIApplication *)application
{
    NSLog(@“applicationDidEnterBackground:”);
    /*
    Use this method to release shared resources, save user data, invalidate
timers, and store enough application state information to restore your
application to its current state in case it is terminated later.
    If your application supports background execution, this method is called
instead of applicationWillTerminate: when the user quits.
    */
}

- (void)applicationWillEnterForeground:(UIApplication *)application
{
    NSLog(@“applicationWillEnterForeground:”);
    /*
     Called as part of the transition from the background to the inactive state;
here you can undo many of the changes made on entering the background.
     */
}

- (void)applicationDidBecomeActive:(UIApplication *)application
{
    NSLog(@“applicationDidBecomeActive:”);
    /*
     Restart any tasks that were paused (or not yet started) while the
application was inactive. If the application was previously in the background,
optionally refresh the user interface.
     */
}

- (void)applicationWillTerminate:(UIApplication *)application
{
    NSLog(@“applicationWillTerminate:”);
    /*
    Called when the application is about to terminate.
    Save data if appropriate.
    See also applicationDidEnterBackground:.
     */
}

@end
- In Xcode, press Command-Shift-C to display the output window.
- Press Command-R to test the application on the iPhone Simulator.
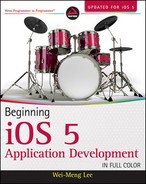
- Observe the output in the output window (see Figure 21-1).

- On the iPhone Simulator, press the Home button to send the application to the background. Note the output in the output window again:
2011-08-16 19:38:04.253 States[2851:ef03] application:didFinishLaunchingWithOptions:
2011-08-16 19:38:04.257 States[2851:ef03] applicationDidBecomeActive:
2011-08-16 19:41:14.035 States[2851:ef03] applicationWillResignActive:
2011-08-16 19:41:14.036 States[2851:ef03] applicationDidEnterBackground:
- In the Home screen of the iPhone Simulator, click the application icon to start the application again. Note the output in the output window:
2011-08-16 19:38:04.253 States[2851:ef03] application:didFinishLaunchingWithOptions:
2011-08-16 19:38:04.257 States[2851:ef03] applicationDidBecomeActive:
2011-08-16 19:41:14.035 States[2851:ef03] applicationWillResignActive:
2011-08-16 19:41:14.036 States[2851:ef03] applicationDidEnterBackground:
2011-08-16 19:42:11.173 States[2851:ef03]    applicationWillEnterForeground:
2011-08-16 19:42:11.174 States[2851:ef03]    applicationDidBecomeActive:
This exercise demonstrates the various states that an application goes through when it is loaded and when it goes into background mode.
In general, you should save your application state in the applicationDidEnterBackground: event when the application goes into the background. When an application goes into the background, execution of the application is suspended.
When the application returns to the foreground, you should restore its state in the applicationDidBecomeActive: event.
Opting Out of Background Mode
Although the default behavior of all applications compiled using the iOS SDK is to support background mode, you can override this behavior by adding an entry to your application's Info.plist file. The following Try It Out demonstrates how.
TRY IT OUT: Disabling Background Mode
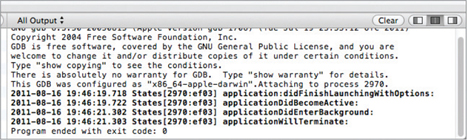
- Using the same project created in the previous section, select the States-info.plist file, right-click on any of the keys and select Show Raw Keys/Values. Then, add a new key to the file and label the key UIApplicationExitsOnSuspend (see Figure 21-2).

- Set the value of this key to YES.
- Press Command-R to test the application on the iPhone Simulator again. When the application has been loaded onto the Simulator, press the Home button. Note the output, as shown in Figure 21-3.
This example demonstrates how to disable the background mode for your application. By enabling the UIApplicationExitsOnSuspend key in your application, the iOS automatically terminates your application when the Home button is pressed.
Detecting Multitasking Support
Because not all devices running the iOS support background applications, it is important that your applications have a way to detect this.
You can enable this via the following code snippet:
- (void)viewDidLoad
{
    UIDevice *device = [UIDevice currentDevice];
    bool backgroundSupported = NO;

    if ([device respondsToSelector:@selector(isMultitaskingSupported)])
        backgroundSupported = device.multitaskingSupported;

    if (backgroundSupported)
        NSLog(@“Supports multitasking”);
    else {
        NSLog(@“Does not support multitasking”);
    }
    [super viewDidLoad];
}
Tracking Locations in the Background
You have seen how an application behaves when it is suspended and how to disable multitasking for an application. This section looks at an example that demonstrates how an application can continue to run even when it is in the background.
One of the three types of applications permitted to run in the background is the location-based services application. In Chapter 20, you learn how to use the Core Location framework to obtain geographical data. The limitation with the example shown in that chapter is that as soon as the application goes into the background, your application can no longer receive location updates.
The following Try It Out demonstrates how to enable the application to continue receiving location updates even as it goes into the background.
TRY IT OUT: Tracking Locations in the Background
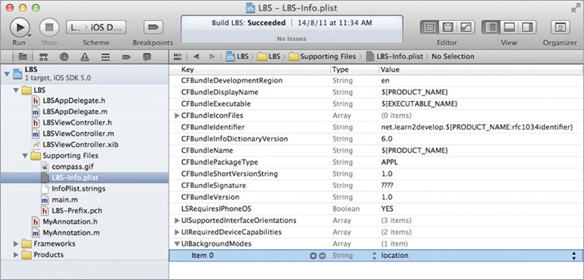
- Using the LBS project created in Chapter 20, select the LBS-Info.plist file and add a new key to it.
- Right-click on any of the keys and select Show Raw Keys/Values. Add the key named UIBackgroundModes (see Figure 21-4).
- Expand the key and set its first value to location (see Figure 21-5).
- In the LBSAppDelegate.m file, add the following bold statements:
#import “LBSAppDelegate.h”

#import “LBSViewController.h”

@implementation LBSAppDelegate

@synthesize window = _window;
@synthesize viewController = _viewController;

- (BOOL)application:(UIApplication *)application
didFinishLaunchingWithOptions:(NSDictionary *)launchOptions
{
   NSLog(@“application:didFinishLaunchingWithOptions:”);
   self.window = [[[UIWindow alloc] initWithFrame:[[UIScreen mainScreen] bounds]]
     autorelease];
   // Override point for customization after application launch.
   self.viewController = [[[LBSViewController alloc]
     initWithNibName:@“LBSViewController” bundle:nil] autorelease];
   self.window.rootViewController = self.viewController;
   [self.window makeKeyAndVisible];
   return YES;
}

- (void)applicationWillResignActive:(UIApplication *)application
{
    NSLog(@“applicationWillResignActive:”);
    /*
     Sent when the application is about to move from active to inactive state.
This can occur for certain types of temporary interruptions (such as an
incoming phone call or SMS message) or when the user quits the application and
it begins the transition to the background state.
     Use this method to pause ongoing tasks, disable timers, and throttle down OpenGL ES frame rates. Games should use this method to pause the game.
     */
}

- (void)applicationDidEnterBackground:(UIApplication *)application
{
    NSLog(@“applicationDidEnterBackground:”);
    /*
     Use this method to release shared resources, save user data, invalidate
timers, and store enough application state information to restore your
application to its current state in case it is terminated later.
     If your application supports background execution, this method is called
instead of applicationWillTerminate: when the user quits.
     */
}

- (void)applicationWillEnterForeground:(UIApplication *)application
{
    NSLog(@“applicationWillEnterForeground:”);
    /*
     Called as part of the transition from the background to the inactive state;
here you can undo many of the changes made on entering the background.
     */
}

- (void)applicationDidBecomeActive:(UIApplication *)application
{
    NSLog(@“applicationDidBecomeActive:”);
    /*
     Restart any tasks that were paused (or not yet started) while the
application was inactive. If the application was previously in the background,
optionally refresh the user interface.
     */
}

- (void)applicationWillTerminate:(UIApplication *)application
{
    NSLog(@“applicationWillTerminate:”);
    /*
     Called when the application is about to terminate.
     Save data if appropriate.
     See also applicationDidEnterBackground:.
     */
}

@end
- In the LBSViewController.m file, add the following bold statements:
- (void) locationManager:(CLLocationManager *) manager didUpdateToLocation:(CLLocation *) newLocation fromLocation:(CLLocation *) oldLocation { //... //---display accuracy--- NSString *acc = [[NSString alloc] initWithFormat:@“%f”, newLocation.horizontalAccuracy]; accuracyTextField.text = acc; //---print out the lat and long--- NSLog(@“%@|%@”,latitudeTextField.text, longitudeTextField.text); [acc release]; [lat release]; [lng release]; //---update the map--- MKCoordinateSpan span; span.latitudeDelta = .001; span.longitudeDelta = .001; //... } - Press Command-R to test the application on the iPhone Simulator. When the application has finished loading on the Simulator, press the Home button to send the application to the background. Select Debug
 Location Freeway Drive. Observe the output shown in the output window (press Command-Shift-C in Xcode):
2011-08-16 20:10:02.311 LBS[3322:11903]
   application:didFinishLaunchingWithOptions:
2011-08-16 20:10:02.327 LBS[3322:11903] applicationDidBecomeActive:
2011-08-16 20:10:06.868 LBS[3322:11903] applicationWillResignActive:
2011-08-16 20:10:06.869    LBS[3322:11903]    applicationDidEnterBackground:
2011-08-16 20:10:12.655    LBS[3322:11903]    37.335275|-122.032547
2011-08-16 20:10:13.661    LBS[3322:11903]    37.335256|-122.032548
2011-08-16 20:10:14.655    LBS[3322:11903]    37.335236|-122.032549
2011-08-16 20:10:15.654    LBS[3322:11903]    37.335215|-122.032549
2011-08-16 20:10:16.655    LBS[3322:11903]    37.335196|-122.032550
2011-08-16 20:10:17.653    LBS[3322:11903]    37.335175|-122.032551
2011-08-16 20:10:18.650    LBS[3322:11903]    37.335151|-122.032553
2011-08-16 20:10:19.651    LBS[3322:11903]    37.335121|-122.032562
2011-08-16 20:10:20.683    LBS[3322:11903]    37.335072|-122.032604

How It Works
In order to enable your application to continue receiving location data even when it goes into the background, you need to set the UIBackgroundModes key in the Info.plist file to location. The UIBackgroundModes key is an array, and it can contain one or more of the following values:
- location
- audio
- voip
Note that no change to your code is required in order to enable your application to run in the background — you need only set the UIBackgroundModes key. The output shown in the window proves that even though the application has gone into the background, it continues to receive location data:
2011-08-16 20:10:06.868 LBS[3322:11903]    applicationWillResignActive:
2011-08-16 20:10:06.869 LBS[3322:11903]    applicationDidEnterBackground:
2011-08-16 20:10:12.655 LBS[3322:11903]    37.335275|-122.032547
2011-08-16 20:10:13.661 LBS[3322:11903]    37.335256|-122.032548
2011-08-16 20:10:14.655 LBS[3322:11903]    37.335236|-122.032549
Making Your Location Apps More Energy Efficient
The project that you modified in the previous section enables you to continuously track your location even though the application may be running in the background. While some scenarios require you to track all location changes, many do not. For example, your application may just need to track a point every few hundred meters. In this case, it is important to prevent the application from continuously tracking every single point, as this takes a heavy toll on the battery.
Instead of using the startUpdatingLocation method of the CLLocationManager class to receive location updates, you can use the startMonitoringSignificantLocationChanges method, like this:
- (void)viewDidLoad
{
    lm = [[CLLocationManager alloc] init];
    lm.delegate = self;
    lm.desiredAccuracy = kCLLocationAccuracyBest;

    //lm.distanceFilter = kCLDistanceFilterNone;
//[lm startUpdatingLocation];

    [lm startMonitoringSignificantLocationChanges];

    //---get the compass readings---
    [lm startUpdatingHeading];

    //...
    [super viewDidLoad];
}
The startMonitoringSignificantLocationChanges method reports location data only when the device has moved a significant distance. Specifically, it reports location data only when it detects that the device has switched to another cell tower. This method works only with iPhones (and only iPhone 3GS, iPhone 4, and iPhone 4S; the older iPhone 3G does not support this feature). If you use this method to track location, the distanceFilter property is not needed. When a location update is received, it calls the same locationManager:didUpdateToLocation:fromLocation: method to report location data.
Using the startMonitoringSignificantLocationChanges method greatly reduces the power consumption of your device, as it does not use the power-intensive GPS radio. Note also that if you use this feature, there is no need to have the UIBackgroundModes key in the Info.plist file — the OS automatically wakes your application up from suspended mode to receive the location data.
If your application is terminated when a new location update event is received, it will automatically relaunch your application. To determine whether the application is restarted due to a change in location, you can check for the UIApplicationLaunchOptionsLocationKey key in the application's delegate's application:didFinishLaunchingWithOptions: event, like this:
- (BOOL)application:(UIApplication *)application
didFinishLaunchingWithOptions:(NSDictionary *)launchOptions
{
    NSLog(0“application:didFinishLaunchingWithOptions:”);

    //---if application is restarted due to changes in location---
    if ([launchOptions
         objectForKey:UIApplicationLaunchOptionsLocationKey]) {

    UIAlertView *alert = [[UIAlertView alloc]
                          initWithTitle:@“LBS app restarted”
                          message:@“App restarted due to changes in location.”
                          delegate:self
                          cancelButtonTitle:@“OK”
                          otherButtonTitles:nil];
    [alert show];
    [alert release];
}

self.window = [[[UIWindow alloc] initWithFrame:[[UIScreen mainScreen]
    bounds]] autorelease];
// Override point for customization after application launch.
    self.viewController = [[[LBSViewController alloc]
initWithNibName:@“LBSViewController” bundle:nil] autorelease];
    self.window.rootViewController = self.viewController;
    [self.window makeKeyAndVisible]; return YES;
}
Once the application is restarted, you should create another instance of the CLLocationManager class and start the monitoring again.
To stop monitoring for location changes, use the stopMonitoringSignificantLocationChanges method:
[lm stopMonitoringSignificantLocationChanges];
Note that you need to test the preceding using a real device as it has no effect on the iPhone Simulator.