
ACCESSING THE CAMERA AND THE PHOTO LIBRARY
The iPhone 4 (and 4S) (as well as the iPad 2) has a camera (in fact two - one front facing and one rear facing) that enables users to both take pictures and record videos. These pictures and videos are saved in the Photos application. As a developer, you have two options to manipulate the camera and to access the pictures and videos stored in the Photos application:
- You can invoke the camera to take pictures or record a video.
- You can invoke the Photos application to allow users to select a picture or video from the photo albums. You can then use the picture or video selected in your application.
Accessing the Photo Library
Every iOS device includes the Photos application, in which pictures are stored. Using the iOS SDK, you can use the UIImagePickerController class to programmatically display a UI that enables users to select pictures from the Photos application. The following Try It Out demonstrates how you can do that in your application.
TRY IT OUT: Accessing the Photos in the Photo Library
![]()
- Using Xcode, create a Single View Application (iPhone) project and name it PhotoLibrary. You will also use the project name as the Class Prefix and ensure that you have the Use Automatic Reference Counting option unchecked.
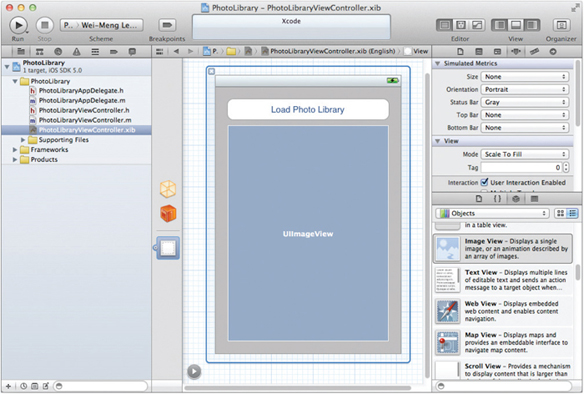
- Select the PhotoLibraryViewController.xib file to edit it in Interface Builder.
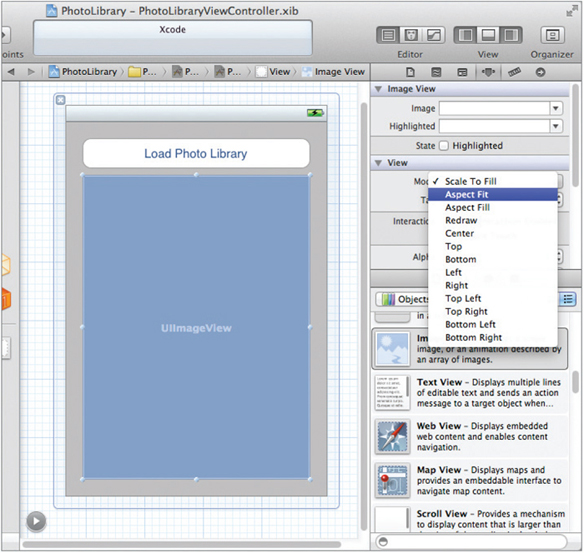
- Populate the View window with the following views (see Figure 14-9):
- Round Rect Button
- ImageView
- In the Attributes Inspector window for the ImageView view, set the Mode to Aspect Fit (see Figure 14-10).
- In the PhotoLibraryViewController.h file, insert the following statements that appear in bold:
#import <UIKit/UIKit.h>

@interface PhotoLibraryViewController : UIViewController
<UINavigationControllerDelegate,
UIImagePickerControllerDelegate> { IBOutlet UIImageView *imageView; UIImagePickerController *imagePicker; } @property (nonatomic, retain) UIImageView *imageView; -(IBAction) btnClicked: (id) sender; @end
- Back in Interface Builder, Control-click and drag the File's Owner item to the ImageView view and select imageView.
- Control-click and drag the Button view to the File's Owner item and select btnClicked:.
- In the PhotoLibraryViewController.m file, insert the following statements that appear in bold:
#import “PhotoLibraryViewController.h”

@implementation PhotoLibraryViewController

@synthesize imageView;

- (void)viewDidLoad {
    imagePicker = [[UIImagePickerController alloc] init];
    [super viewDidLoad];
}

- (IBAction) btnClicked: (id) sender{
    imagePicker.delegate = self;
    imagePicker.sourceType =
    UIImagePickerControllerSourceTypePhotoLibrary;

    //---show the Image Picker---
    [self presentModalViewController:imagePicker animated:YES];
}

- (void)imagePickerController:(UIImagePickerController *)picker
didFinishPickingMediaWithInfo:(NSDictionary *)info {
    UIImage *image;
    NSURL *mediaUrl;
    mediaUrl = (NSURL *)[info valueForKey:
                           UIImagePickerControllerMediaURL];
    if (mediaUrl == nil) {
        image = (UIImage *) [info valueForKey:
                                UIImagePickerControllerEditedImage];
           if (image == nil) {
               //---original image selected---
               image = (UIImage *)
               [info valueForKey:UIImagePickerControllerOriginalImage];

               //---display the image---
               imageView.image = image;
} else { //---edited image picked--- //---get the cropping rectangle applied to the image--- CGRect rect = [[info valueForKey:UIImagePickerControllerCropRect] CGRectValue]; //--display the image--- imageView.image = image; } } //---hide the Image Picker--- [picker dismissModalViewControllerAnimated:YES]; } - (void)imagePickerControllerDidCancel:(UIImagePickerController *)picker { //---user did not select image; hide the Image Picker--- [picker dismissModalViewControllerAnimated:YES]; } - (void)dealloc { [imageView release]; [imagePicker release]; [super dealloc]; }
- Press Command-R to test the application on the iPhone Simulator.
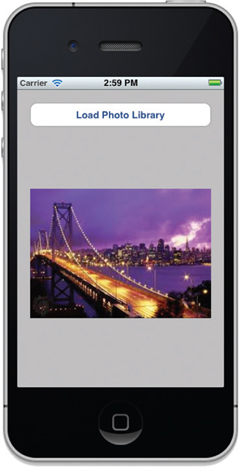
- When the application is loaded, tap the Load Photo Library button. The Photo Albums on the iPhone Simulator appear. Select a particular album (see Figure 14-11), and then select a picture. The selected picture will then be displayed on the ImageView view (see Figure 14-12).

![]() NOTE Because the iPhone Simulator does not contain any built-in photo albums, you might not be able to test this application on the simulator. Thus, I suggest you test this on a real device. Appendix A discusses how to test your application on real devices.
NOTE Because the iPhone Simulator does not contain any built-in photo albums, you might not be able to test this application on the simulator. Thus, I suggest you test this on a real device. Appendix A discusses how to test your application on real devices.
How It Works
Access to the Photo Library is provided by the UIImagePickerController class, which provides the UI for choosing and taking pictures and videos on your iPhone. All you need to do is create an instance of this class and provide a delegate that conforms to the UIImagePickerControllerDelegate protocol. In addition, your delegate must conform to the UINavigationControllerDelegate protocol because the UIImagePickerController class uses the Navigation Controller to enable users to select photos from the Photo Library. Therefore, you first needed to specify the protocols in PhotoLibraryViewController.h:
@interface PhotoLibraryViewController : UIViewController
    <UINavigationControllerDelegate,
    UIImagePickerControllerDelegate>
{
When the Load Library button is clicked, you set the type of picker interface displayed by the UIImagePickerController class and then display it modally:
- (IBAction) btnClicked: (id) sender{
    imagePicker.delegate = self;
    imagePicker.sourceType =
    UIImagePickerControllerSourceTypePhotoLibrary;
    //---show the Image Picker---
    [self presentModalViewController:imagePicker animated:YES];
}
Note that if you want the picture to be editable when the user chooses it, you can add the following statement:
imagePicker.allowsEditing = YES;
By default, the source type is always UIImagePickerControllerSourceTypePhotoLibrary, but you can change it to one of the following:
- UIImagePickerControllerSourceTypeCamera — For taking photos directly with the camera
- UIImagePickerControllerSourceTypeSavedPhotosAlbum — For directly going to the Photo Albums application
When a picture has been selected by the user, the imagePickerController:didFinishPickingMediaWithInfo: event fires, which you handle by checking the type of media selected by the user:
- (void)imagePickerController:(UIImagePickerController *)picker
didFinishPickingMediaWithInfo:(NSDictionary *)info {
    UIImage *image;
NSURL *mediaUrl;
mediaUrl = (NSURL *)[info valueForKey:
                     UIImagePickerControllerMediaURL];

if (mediaUrl == nil) {
   image = (UIImage *) [info valueForKey:
                         UIImagePickerControllerEditedImage];
   if (image == nil) {
       //---original image selected---
       image = (UIImage *)
       [info valueForKey:UIImagePickerControllerOriginalImage];

       //---display the image---
       imageView.image = image;
   }
   else { //---edited image picked---
       //---get the cropping rectangle applied to the image---
        CGRect rect =
        [[info valueForKey:UIImagePickerControllerCropRect]
        CGRectValue];

       //---display the image---
        imageView.image = image;
      }
   }
   //---hide the Image Picker---
   [picker dismissModalViewControllerAnimated:YES];
}
The type of media selected by the user is encapsulated in the info: parameter. You use the valueForKey: method to extract the appropriate media type and then typecast it to the respective type:
mediaUrl = (NSURL *)
 [info valueForKey:UIImagePickerControllerMediaURL];
If the user cancels the selection, the imagePickerControllerDidCancel: event fires. In this case, you simply dismiss the Image Picker:
- (void)imagePickerControllerDidCancel:(UIImagePickerController *)
   picker {
    //---user did not select image; hide the Image Picker---
    [picker dismissModalViewControllerAnimated:YES];
}
Accessing the Camera
Besides accessing the Photo Library, you can also access the camera on your iPhone. Although accessing the hardware is the focus of the next chapter, this section takes a look at how to access the camera because it is also accomplished using the UIImagePickerController class.
In the following Try It Out, you modify the existing project created in the previous section. There isn't much to modify because most of the code you have written still applies.
TRY IT OUT: Activating the Camera
- Using the same project created in the previous section, edit the PhotoLibraryViewController.m file by changing the source type of the Image Picker to camera (see code highlighted in bold):
- (IBAction) btnClicked: (id) sender{ imagePicker.delegate = self; //---comment this out--- /* imagePicker.sourceType = UIImagePickerControllerSourceTypePhotoLibrary; */ //---invoke the camera--- imagePicker.sourceType = UIImagePickerControllerSourceTypeCamera; NSArray *mediaTypes = [NSArray arrayWithObjects:kUTTypeImage, nil]; imagePicker.mediaTypes = mediaTypes; imagePicker.cameraCaptureMode = UIImagePickerControllerCameraCaptureModePhoto; imagePicker.allowsEditing = YES; //---show the Image Picker--- [self presentModalViewController:imagePicker animated:YES]; } - In the PhotoLibraryViewController.m file, define the following two methods:
-(NSString *) filePath: (NSString *) fileName {
   NSArray *paths =
       NSSearchPathForDirectoriesInDomains(
           NSDocumentDirectory, NSUserDomainMask, YES);
   NSString *documentsDir = [paths objectAtIndex:0];
   return [documentsDir stringByAppendingPathComponent:fileName];
}

- (void) saveImage{
    //---get the data from the ImageView---
    NSData *imageData =
    [NSData dataWithData:UIImagePNGRepresentation(imageView.image)];

    //---write the data to file---
    [imageData writeToFile:[self filePath:@“MyPicture.png”] atomically:YES];
}
- Insert the following statements that appear in bold:
- (void)imagePickerController:(UIImagePickerController *)picker
didFinishPickingMediaWithInfo:(NSDictionary *)info {
    UIImage *image;
    NSURL *mediaUrl;
    mediaUrl = (NSURL *)[info valueForKey:UIImagePickerControllerMediaURL];

    if (mediaUrl == nil) {
        image = (UIImage *) [info valueForKey:UIImagePickerControllerEditedImage];
if (image == nil) { //---original image selected--- image = (UIImage *) [info valueForKey:UIImagePickerControllerOriginalImage]; //---display the image--- imageView.image = image; } else { //---edited image picked--- //---get the cropping rectangle applied to the image--- CGRect rect = [[info valueForKey:UIImagePickerControllerCropRect] CGRectValue]; //---display the image--- imageView.image = image; } //---save the image captured--- [self saveImage]; } //---hide the Image Picker--- [picker dismissModalViewControllerAnimated:YES]; }
- Press Command-R to test the application on a real iPhone.
- Tap the Load Photo Library button. You can now use your iPhone's camera to take photos. Once a photo is taken (see Figure 14-13), the picture is saved to the Documents folder of your application.

In this exercise you modified the source type of the Image Picker to camera:
imagePicker.sourceType = UIImagePickerControllerSourceTypeCamera;
When the camera takes a picture, the picture is passed back in the imagePickerController:didFinishPickingMediaWithInfo: method and displayed in the ImageView view. However, it is your responsibility to manually save the image to a location on the phone. In this case, you defined the filePath: method to save the picture to the Documents folder of your application:
- (NSString *) filePath: (NSString *) fileName {
    NSArray *paths =
        NSSearchPathForDirectoriesInDomains(
            NSDocumentDirectory, NSUserDomainMask, YES);
    NSString *documentsDir = [paths objectAtIndex:0];
    return [documentsDir stringByAppendingPathComponent:fileName];
}
The saveImage: method extracts the image data on the ImageView view and then calls the filePath: method to save the data into a file named MyPicture.png:
- (void) saveImage{
    //---get the date from the ImageView---
    NSData *imageData =
    [NSData dataWithData:UIImagePNGRepresentation(imageView.image)];

    //---write the date to file---
    [imageData writeToFile:[self filePath:@“MyPicture.png”] atomically:YES];
}
![]() NOTE By default on the iPhone 4 and iPhone 4S, the rear camera is always activated when you use the UIImagePickerController class. If you want to activate the front camera instead, you can set the cameraDevice property of the UIImagePickerController class, which can be either of the following values: UIImagePickerControllerCameraDeviceRear (default) or UIImagePickerControllerCameraDeviceFront.
NOTE By default on the iPhone 4 and iPhone 4S, the rear camera is always activated when you use the UIImagePickerController class. If you want to activate the front camera instead, you can set the cameraDevice property of the UIImagePickerController class, which can be either of the following values: UIImagePickerControllerCameraDeviceRear (default) or UIImagePickerControllerCameraDeviceFront.
Appendix A discusses how to prepare your iPhone for testing.