USING VIEWS
So far, you have seen quite a number of views in action: Round Rect Button, Text Field, and Label. All these views are quite straightforward, but they provide a good opportunity for learning how to apply the concepts behind outlets and actions.
To use more views, you can locate them in the Object Library window in the Utilities panel (see Figure 3-6).

The Library is broadly divided into the following sections:
- Objects & Controllers — Contains views that control other views, such as the View Controller, Tab Bar Controller, Navigation Controller, and so on
- Data Views — Contains views that display data, such as the Image View, Table View, Data Picker, Picker View, and so on
- Controls — Contains views that accept input from users as well as display values, such as the Label, Round Rect Button, Text Field, and so on
- Windows & Bars — Contains views that display other miscellaneous views, such as View, Search Bar, Toolbar, and so on
- Gesture Recognizers — Contains classes that perform gesture recognition. Gestures include the tap, the pinch, rotation, and so on.
In the following sections, you learn how to use some of the views available in the Library. Although it is beyond the scope of this book to show the use of every view, you will see a number of views in action throughout the book. By learning some of the fundamental view concepts in this chapter, you can use other views later without problems.
Using the Alert View
One of the views not listed in the Library is the UIAlertView. The UIAlertView displays an alert view to the user and is usually created during runtime. Hence, you have to create it using code.
![]() NOTE You actually saw the UIAlertView In the previous section. In this section, you will learn how it actually works.
NOTE You actually saw the UIAlertView In the previous section. In this section, you will learn how it actually works.
The UIAlertView is useful for cases in which you have to display a message to the user. In addition, it can serve as a quick debugging tool when you want to observe the value of a variable during runtime.
The following Try It Out explores the UIAlertView in more detail.
TRY IT OUT: Using the Alert View
![]()
- Using Xcode, create a new Single View Application (iPhone) project and name it UsingViews. You will also use the project name as the Class Prefix and ensure that you have the Use Automatic Reference Counting option unchecked.
- In the UsingViewsViewController.m file, add the following bold code to the viewDidLoad method:
- (void)viewDidLoad { UIAlertView *alert = [[UIAlertView alloc] initWithTitle:@“Hello” message:@“This is an alert view” delegate:self cancelButtonTitle:@“OK” otherButtonTitles:nil]; [alert show]; [alert release]; [super viewDidLoad]; } - Press Command-R to test the application on the iPhone Simulator. When the application is loaded, you see the alert view shown in Figure 3-7. Clicking the OK button dismisses the alert.
- In Xcode, modify the otherButtonTitles parameter by setting it with the value shown in bold:
- (void)viewDidLoad
{
    UIAlertView *alert =
        [[UIAlertView alloc] initWithTitle:@“Hello”
                                   message:@“This is an alert view”
                                  delegate:self
                         cancelButtonTitle:@“OK”
                         otherButtonTitles:@“Option 1”, nil];
   [alert show];
   [alert release];
   [super viewDidLoad];
}
- In the UsingViewsViewController.h file, add the following line that appears in bold:
#import <UIKit/UIKit.h> @interface UsingViewsViewController : UIViewController <UIAlertViewDelegate> @end - In the UsingViewsViewController.m file, add the following method:
-(void) alertView:(UIAlertView *)alertView
clickedButtonAtIndex:(NSInteger)buttonIndex {
NSLog(@“%d”, buttonIndex);
}
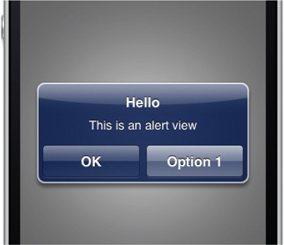
- Press Command-R to test the application on the iPhone Simulator. Notice that there is now one more button in addition to the OK button (see Figure 3-8). Clicking either the OK button or the Option 1 button dismisses the alert.
- Back in Xcode, modify the otherButtonTitles parameter by setting it with the value shown in bold:
- (void)viewDidLoad
{
    UIAlertView *alert =
        [[UIAlertView alloc] initWithTitle:@“Hello”
                                   message:@“This is an alert view”
                                  delegate:self
                         cancelButtonTitle:@“OK”
                         otherButtonTitles:@“Option 1”, @“Option 2”, nil];
    [alert show];
    [alert release];
    [super viewDidLoad];
}
- Press Command-R to test the application in the iPhone Simulator again. Observe the placement of the three buttons (see Figure 3-9). Clicking any of the buttons dismisses the alert.
- Click any one of the buttons — Option 1, Option 2, or OK.
- In Xcode, press Command-Shift-C to view the Output window (you can also select View
 Debug Area Activate Console from the menu). Observe the values printed. You can rerun the application a number of times, clicking the different buttons to observe the values printed. The values printed for each button clicked are as follows:
- OK button — 0
- Option 1 — 1
- Option 2 — 2
How It Works
To use UIAlertView, you first instantiate it and initialize it with the various arguments:
UIAlertView *alert =
    [[UIAlertView alloc] initWithTitle:@“Hello”
                              message:@“This is an alert view”
                             delegate:self
                    cancelButtonTitle:@“OK”
                    otherButtonTitles:nil];
The first parameter is the title of the alert view, which you set to “Hello”. The second is the message, which you set to “This is an alert view”. The third is the delegate, which you need to set to an object that will handle the events fired by the UIAlertView object. In this case, you set it to self, which means that the event handler will be implemented in the current class — that is, the View Controller. The cancelButtonTitle parameter displays a button to dismiss your alert view. Last, the otherButtonTitles parameter enables you to display additional buttons if needed. If no additional buttons are needed, simply set this to nil.
To show the alert view modally, use the show method:
[alert show];
![]() WARNING Note that showing the alert view modally using the show method does not cause the program to stall execution at this statement. The subsequent statements after this line continue to execute even though the user may not have dismissed the alert.
WARNING Note that showing the alert view modally using the show method does not cause the program to stall execution at this statement. The subsequent statements after this line continue to execute even though the user may not have dismissed the alert.
For simple use of the alert view, you don't really need to handle the events fired by it. Tapping the OK button (as set in the cancelButtonTitle parameter) simply dismisses the alert view.
If you want more than one button, you need to set the otherButtonTitles parameter, like this:
UIAlertView *alert =
    [[UIAlertView alloc] initWithTitle:@“Hello”
                              message:@“This is an alert view”
                             delegate:self
                    cancelButtonTitle:@“OK”
                    otherButtonTitles:@“Option 1”, @“Option 2”,
                                         nil];
Note that you need to end the otherButtonTitles parameter with a nil or a runtime error will occur.
![]() NOTE There is no limit to how many buttons you can display in a UIAlertView, but I don't advise using more than two buttons. If you try to use more buttons than you have screen space for, the buttons will overflow the screen, which can look very messy.
NOTE There is no limit to how many buttons you can display in a UIAlertView, but I don't advise using more than two buttons. If you try to use more buttons than you have screen space for, the buttons will overflow the screen, which can look very messy.
Now that you have more than one button, you need to be able to determine which button the user pressed — in particular, whether Option 1 or Option 2 was pressed. To do so, you need to handle the event raised by the UIAlertView class. You do so by ensuring that your View Controller implements the UIAlertViewDelegate protocol:
@interface UsingViewsViewController : UIViewController
<UIAlertViewDelegate>

@end
The UIAlertViewDelegate protocol contains several methods associated with the alert view. To know which button the user tapped, you need to implement the alertView:clickedButtonAtIndex: method:
- (void) alertView:(UIAlertView *)alertView
clickedButtonAtIndex:(NSInteger)buttonIndex {
    NSLog(@“%d”, buttonIndex);
}
The index of the button clicked is passed in via the buttonIndex parameter.
![]() NOTE Refer to Appendix C for a discussion of the concept of protocols in Objective-C.
NOTE Refer to Appendix C for a discussion of the concept of protocols in Objective-C.
Using the Action Sheet
Although the alert view can display multiple buttons, its primary use is still as a mechanism to alert users when something happens. If you need to display a message to the user with multiple options, you should use an action sheet, rather than the alert view. An action sheet displays a collection of buttons from which the user can select one.
To include an action sheet, use the following code snippet:
UIActionSheet *action =
    [[UIActionSheet alloc] initWithTitle:@“Title of Action Sheet”
                                delegate:self
                       cancelButtonTitle:@“OK”
                  destructiveButtonTitle:@“Delete Message”
                       otherButtonTitles:@“Option 1”, @“Option 2”, nil];
[action showInView:self.view];
[action release];
To handle the event fired by the action sheet when one of the buttons is tapped, implement the UIActionSheetDelegate protocol in your View Controller, like this:
#import <UIKit/UIKit.h>

@interface UsingViewsViewController : UIViewController
<UIActionSheetDelegate>

@end
When a button is tapped, the actionSheet:clickedButtonAtIndex: event will be fired:
- (void) actionSheet:(UIActionSheet *)actionSheet
clickedButtonAtIndex:(NSInteger)buttonIndex{
    NSLog(@“%d”, buttonIndex);
}
Figure 3-10 shows the action sheet when it is displayed on the iPhone Simulator. Observe that the action sheet pops up from the bottom of the View window.
One important aspect of the action sheet is that when it is used on the iPad, you should not display an action sheet in the viewDidLoad method — doing so causes an exception to be raised during runtime. Instead, you can display it in, say, an IBAction method.
Figure 3-11 shows the action sheet when displayed on the iPad. Interestingly, on the iPad the OK button (set by the cancelButtonTitle: parameter) is not displayed.

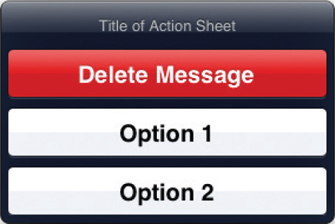
The value (buttonlndex) of each button when clicked is as follows:
- Delete Message — 0
- Option 1 — 1
- Option 2 — 2
- OK — 3
On the iPad, when the user taps on an area outside of the action sheet, the action sheet is dismissed and the value of buttonIndex becomes 3. Interestingly, if you specified nil for the cancelButtonTitle: part, the value of buttonIndex would be −1 when the action sheet is dismissed.

Page Control and Image View
Near the bottom of the iPhone's Home screen is a series of dots (see Figure 3-12). A lighted dot represents the currently selected page. As you swipe the page to the next page, the next dot lights, and the first one dims. In the figure, the dots indicate that the first page is the active page. In the iOS SDK, the series of dots is represented by the UIPageControl class.
In the following Try It Out, you learn to use the Page Control within your own application to switch between images displayed in the Image View.
TRY IT OUT: Using the Page Control and the Image View
- Using the UsingViews project created in the previous section, add five images to the Supporting Files folder by dragging and dropping them from the Finder. Figure 3-13 shows the five images added to the project.
- Select the UsingViewsViewController.xib file to edit it using Interface Builder.
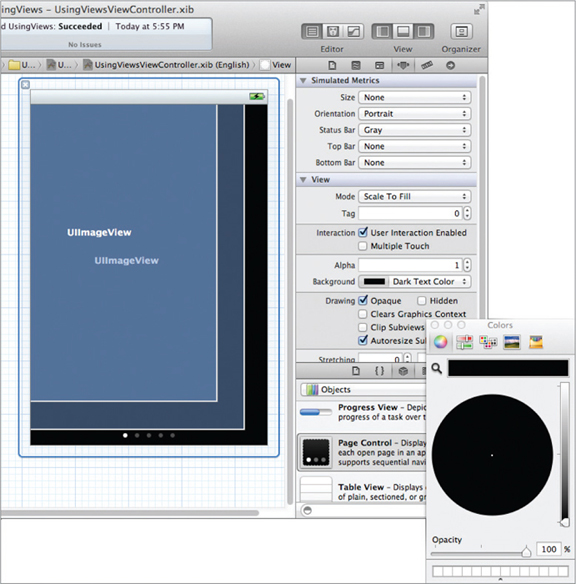
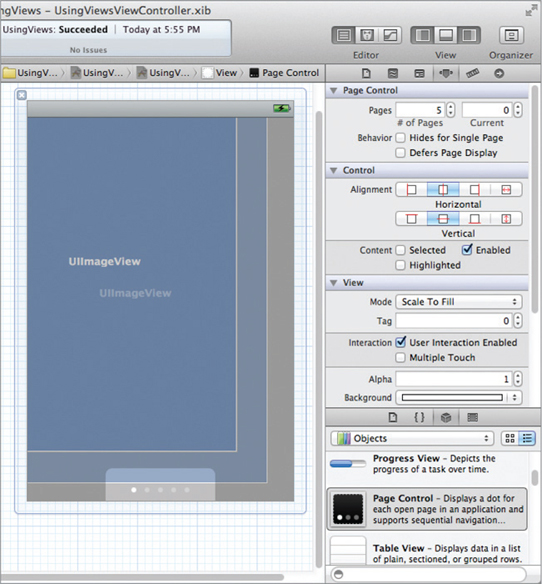
- Drag and drop two Image Views onto the View window (see Figure 3-14). At this point, overlap them (but not entirely) as shown in the figure.
- With the first Image View selected, open the Attributes Inspector window and set the Tag property to 0. Select the second Image View and set the Tag property to 1 (see Figure 3-15).
- Drag and drop the Page Control onto the View window and set its number of pages to 5(see Figure 3-16). Ensure that you increase the width of the Page Control so that all the dots are now visible.

- Set the Background color of the View window to black so that the dots inside the Page Control are clearly visible (see Figure 3-17).
- In Xcode, declare three outlets two UIImageView objects, and a variable in the UsingViewsViewController.h file:
#import  <UIKit/UIKit.h>

@interface UsingViewsViewController : UIViewController
    <UIAlertViewDelegate, UIActionSheetDelegate>
{
    IBOutlet UlPageControl *pageControl;
    IBOutlet UIImageView *imageView1;
    IBOutlet UIImageView *imageView2;
    UIImageView *tempImageView, *bgImageView;
    int prevPage;
}

@property (nonatomic, retain) UIPageControl *pageControl;
@property (nonatomic, retain) UIImageView *imageView1;
@property (nonatomic, retain) UIImageView *imageView2;

@end

- In Interface Builder, connect the three outlets to the views on the View window. Figure 3-18 shows the connections made for the imageView1, imageView2, and pageControl outlets.
-
You can now rearrange the Image Views on the View window so that they overlap each other. In articular, set the size of the Image View to be 320×420 (see Figure 3-19).


- In Xcode, add the following statements in bold to the UsingViewsViewController.m file:
#import “UsingViewsViewController.h”

@implementation UsingViewsViewController

@synthesize pageControl;
@synthesize imageViewi, imageView2;

- (void)viewDidLoad
{
    //---initialize the first imageview to display an image---
    [imageView1 setImage:[UIImage imageNamed:@“iMac_old.jpeg”]];
    tempImageView = imageView2;

    //---make the first imageview visible and hide the second---
    [imageView1 setHidden:NO];
    [imageView2 setHidden:YES];

    //---add the event handler for the page control---
    [pageControl addTarget:self
                    action:@selector(pageTurning:)
          forControlEvents:UIControlEventValueChanged];

    prevPage = 0;

    [super viewDidLoad];
}

//---when the page control's value is changed---
- (void) pageTurning: (UIPageControl *) pageController {
    //---get the page number you can turning to---
    NSInteger nextPage = [pageController currentPage];
    switch (nextPage) {
        case 0:
            [tempImageView setImage:
             [UIImage imageNamed:@“iMac_old.jpeg”]];
            break;
        case 1:
            [tempImageView setImage:
             [UIImage imageNamed:@“iMac.jpeg”]];
            break;
        case 2:
            [tempImageView setImage:
             [UIImage imageNamed:@“Mac8100.jpeg”]];
            break;
        case 3:
            [tempImageView setImage:
             [UIImage imageNamed:@“MacPlus.jpeg”]];
            break;
        case 4:
            [tempImageView setImage:
             [UIImage imageNamed:@“MacSE.jpeg”]];
            break;
default:
            break;
}

//---switch the two imageview views---
if (tempImageView.tag == 0) { //---imageView1---
    tempImageView = imageView2;
    bgImageView = imageView1;
}
else {                          //---imageView2---
    tempImageView = imageView1;
    bgImageView = imageView2;
}

UIViewAnimationOptions transitionOption;

if (nextPage > prevPage)
    //---if moving from left to right---
     transitionOption = UIViewAnimationOptionTransitionFlipFromLeft;
else
    //---if moving from right to left---
    transitionOption = UIViewAnimationOptionTransitionFlipFromRight;

//---animate by flipping the images---
[UIView transitionWithView:tempImageView
                  duration:2.5
                  options:transitionOption
                animations:^{
                     [tempImageView setHidden:YES];
                }
                completion:NULL];

[UIView transitionWithView:bgImageView
                  duration:2.5
                   options:transitionOption
                animations:^{
                   [bgImageView setHidden:NO];
                }
                completion:NULL];
    prevPage = nextPage;
}

- (void)dealloc {
    [pageControl release];
    [imageView1 release];
    [imageView2 release];
    [super dealloc];
}
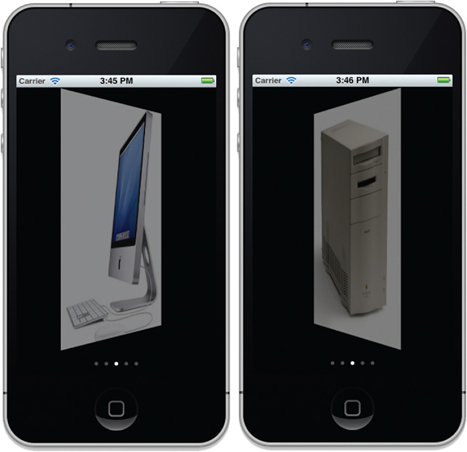
- Press Command-R to test the application on the iPhone Simulator. When you tap the Page Control located at the bottom of the screen, the Image View flips to display the next one. Figure 3-20 shows the transitioning of two images.
How It Works
When the View window is first loaded, you get one of the Image Views to display an image and then hide the other:
//---initialize the first imageview to display an image---
[imageViewl setImage:[UIImage imageNamed:@“iMac_old.jpeg”]];
tempImageView = imageView2;

//---make the first imageview visible and hide the second---
[imageViewl setHidden:NO];
[imageView2 setHidden:YES];
You then wire the Page Control so that when the user taps it, an event is fired and triggers a method. In this case, the pageTurning: method is called:
//---add the event handler for the page control---
[pageControl addTarget: self
                action:@selector(pageTurning:)
      forControlEvents:UIControlEventValueChanged];
In the pageTurning: method, you determine which image you should load based on the value of the Page Control:
//---when the page control's value is changed---
- (void) pageTurning: (UIPageControl *) pageController {

    //---get the page number you can turning to---
    NSInteger nextPage = [pageController currentPage];
    switch (nextPage) {
case 0:
            [tempImageView setImage:
             [UIImage imageNamed:@“iMac_old.jpeg”]];
            break;
        case l:
            [tempImageView setImage:
             [UIImage imageNamed:@“iMac.jpeg”]];
            break;
        case 2:
            [tempImageView setImage:
             [UIImage imageNamed:@“Mac8100.jpeg”]];
            break;
        case 3:
            [tempImageView setImage:
             [UIImage imageNamed:@“MacPlus.jpeg”]];
            break;
        case 4:
            [tempImageView setImage:
             [UIImage imageNamed:@“MacSE.jpeg”]];
            break;
        default:
            break;
   }
   //...
}
You then switch the two Image Views and animate them by using the various methods in the UIView class:
//---switch the two imageview views---
if (tempImageView.tag == 0) { //---imageViewl---
    tempImageView = imageView2;
    bgImageView = imageViewl;
}
else {                        //---imageView2---
    tempImageView = imageViewl;
    bgImageView = imageView2;
}

UIViewAnimationOptions transitionOption;

if (nextPage > prevPage)
    //---if moving from left to right---
    transitionOption = UIViewAnimationOptionTransitionFlipFromLeft;
else
    //---if moving from right to left---
    transitionOption = UIViewAnimationOptionTransitionFlipFromRight;

//---animate by flipping the images---
[UIView transitionWithView:tempImageView
                  duration:2.5
                   options:transitionOption
                animations:^{
                     [tempImageView setHidden:YES];
                }
completion:NULL];

[UIView transitionWithView:bgImageView
                  duration:2.5
                   options:transitionOption
                animations:^{
                    [bgImageView setHidden:NO];
                }
                completion:NULL];

prevPage = nextPage;
Specifically, you apply the flipping transitions to the Image Views using the transitionWithView:duration:options:animations:completion: method:
//---animate by flipping the images---
[UIView transitionWithView:tempImageView
                  duration:2.5
                   options:transitionOption
                animations:^{
                     [tempImageView setHidden:YES];
                }
                completion:NULL];
This method enables you to specify the animation that you want to perform on a specified view (transitionWithView:), the duration of the animation (duration:), the transition options (options:), the code that makes the changes to the view (animations:), and the code to execute when the animation ends. In this example, if the user is flipping the images from left to right, you will flip the images from left to right, and vice versa.
Using the Web View
To load web pages from within your application, you can embed a web browser in your application through the use of a Web View (UIWebView). Using the Web View, you can send a request to load web content, which is very useful if you want to convert an existing web application intoa native application (such as those written using Dashcode). All you need to do is embed all the HTML pages into your Supporting Files folder in your Xcode project and load the HTML pages into the Web View during runtime.
![]() NOTE Depending on how complex your web application is, you may have to do some additionalwork to port it to a native application if it involves server-side technologies such as CGI, PHP, or others.
NOTE Depending on how complex your web application is, you may have to do some additionalwork to port it to a native application if it involves server-side technologies such as CGI, PHP, or others.
The following Try It Out shows how to use the Web View to load a web page.
TRY IT OUT: Loading a Web Page Using the Web View
![]()
- Using Xcode, create a new Single View Application (iPhone) project and name it UsingViews2. You will also use the project name as the Class Prefix and ensure that you have the Use Automatic Reference Counting option unchecked.
- Select the UsingViews2ViewController.xib file to edit it using Interface Builder.
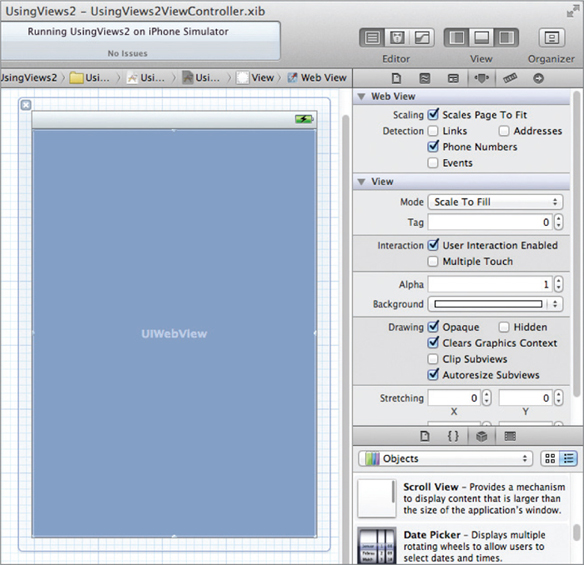
- From the Library, add a Web View to the View window (see Figure 3-21). In the Attributes Inspector window for the Web View, check the Scales Page to Fit property.
- In the UsingViews2ViewController.h file, declare an outlet for the Web View:
#import <UIKit/UIKit.h>

@interface UsingViews2ViewController : UIViewController
{
    IBOutlet UIWebView *webView;
}

@property (nonatomic, retain) UIWebView *webView;

@end
- In Interface Builder, connect the webView outlet to the Web View.
- In the UsingViews2ViewController.m file, add the following statements that appear in bold:
#import “UsingViews2ViewController.h”

@implementation UsingViews2ViewController

@synthesize webView;

- (void)viewDidLoad {
    NSURL *url = [NSURL URLWithString:@“http://www.apple.com”];
    NSURLRequest *req = [NSURLRequest requestWithURL:url];
    [webView loadRequest:req];
    [super viewDidLoad];
}

- (void)dealloc {
    [webView release];
    [super dealloc];
}
- Press Command-R to test the application on the iPhone Simulator. You should see the application loading the page from Apple.com (see Figure 3-22).

How It Works
To load the Web View with a URL, you first instantiate an NSURL object with a URL via the URLWithString method:
NSURL *url = [NSURL URLWithString:@“http://www.apple.com”];
You then create an NSURLRequest object by passing the NSURL object to its requestWithURL: method:
NSURLRequest *req = [NSURLRequest requestWithURL:url];
Finally, you load the Web View with the NSURLRequest object via the loadRequest: method:
[webView loadRequest:req];