
RESPONDING TO DEVICE ROTATIONS
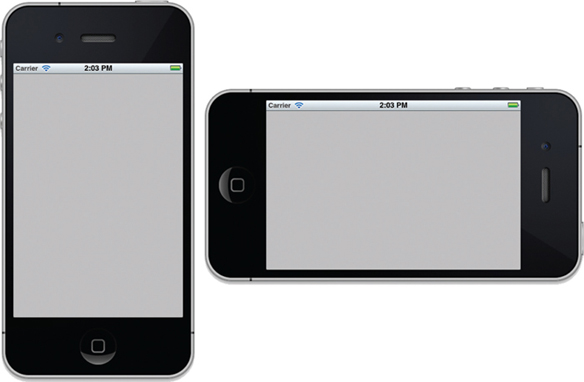
One of the features that modern mobile devices support is the capability to detect the current orientation — portrait or landscape — of the device. An application can take advantage of this to re-adjust the device's screen to maximize use of the new orientation. A good example is Safari on the iPhone. When you rotate the device to landscape orientation, Safari automatically rotates its view so that you have a wider screen to view the content of the page (see Figure 7-1).
The iOS SDK contains several events that you can handle to ensure that your application is aware of changes in orientation. Check them out in the following Try It Out.

TRY IT OUT: Supporting Different Screen Orientations
![]()
- Using Xcode, create a new Single View Application (iPhone) project and name it ScreenRotations. You will also use the project name as the Class Prefix and ensure that you have the Use Automatic Reference Counting option unchecked.
- Press Command-R to test the application on the iPhone 4 Simulator.
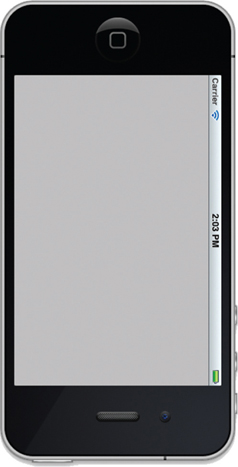
- Change the iPhone Simulator orientation by pressing either Command-→ (rotate it to the right) or Command-← (rotate it to the left) key combination. Observe that the application stays upright when the Simulator is either in portrait (upright) mode or in landscape mode (see Figure 7-2). However, if the Simulator is in the portrait upside down mode, the application's orientation stays in its previous orientation (before it was rotated).
By default, the iPhone Application project you created using Xcode supports three screen orientations: portrait and the two landscape modes (landscape left and landscape right). This is evident in the shouldAutorotateTolnterfaceOrientation: method defined in the View controller:
(BOOL)shouldAutorotateToInterfaceOrientation:(UIInterfaceOrientation)
 interfaceOrientation
{
    // Return YES for supported orientations
    return (interfaceOrientation != UIInterfaceOrientationPortraitUpsideDown);
}
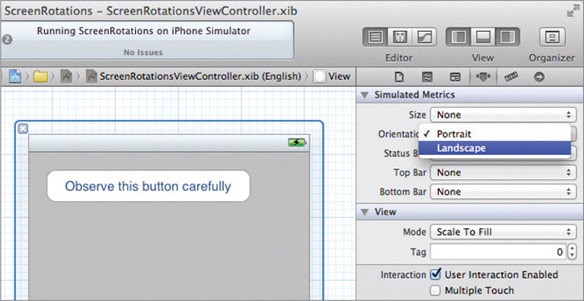
The shouldAutorotateToInterfaceOrientation: method is called when the View window is loaded and whenever orientation of the device changes. This method passes in a single parameter — the orientation to which the device has been changed. The returning value of this method determines whether the current orientation is supported. For a particular orientation to be supported, this method must return YES. In other words, the preceding states that the application should stay upright for all orientation modes, except when the device is in the portrait upside-down mode (see Figure 7-3).
![]() NOTE On the iPad, the default behavior of an application supports all orientations — portrait as well as landscape modes. While you can specify the specific orientations supported by your application, based on the UI guidelines provided by Apple, iPad applications should support all screen orientations.
NOTE On the iPad, the default behavior of an application supports all orientations — portrait as well as landscape modes. While you can specify the specific orientations supported by your application, based on the UI guidelines provided by Apple, iPad applications should support all screen orientations.
![]() NOTE On the iPhone and iPad, screen rotation is automatically handled by the OS. When the OS detects a change in screen orientation, it fires the shouldAutorotateToInterfaceOrientation: event; it is up to the developer to decide how the application should display in the target orientation.
NOTE On the iPhone and iPad, screen rotation is automatically handled by the OS. When the OS detects a change in screen orientation, it fires the shouldAutorotateToInterfaceOrientation: event; it is up to the developer to decide how the application should display in the target orientation.
To support all orientations, simply return a YES to allow your application to display upright for all orientations:
- (BOOL)shouldAutorotateToInterfaceOrientation:
(UIInterfaceOrientation)interfaceOrientation
{
    // Return YES for supported orientations
    //return (interfaceOrientation !=
      UIInterfaceOrientationPortraitUpsideDown);
    return YES;
}
![]() NOTE To easily differentiate between UIInterfaceOrientationLandscapeLeft and UIInterfaceOrientationLandscapeRight, just remember that UIInterfaceOrientationLandscapeLeft refers to the Home button positioned on the left, and UIInterfaceOrientationLandscapeRight refers to the Home button positioned on the right.
NOTE To easily differentiate between UIInterfaceOrientationLandscapeLeft and UIInterfaceOrientationLandscapeRight, just remember that UIInterfaceOrientationLandscapeLeft refers to the Home button positioned on the left, and UIInterfaceOrientationLandscapeRight refers to the Home button positioned on the right.
Rotating to a Different Screen Orientation
You have a total of four constants to use for specifying screen orientations:
- UIInterfaceOrientationPortrait — Displays the screen in portrait mode
- UIInterfaceOrientationPortraitUpsideDown — Displays the screen in portrait mode but with the Home button at the top of the screen
- UIInterfaceOrientationLandscapeLeft — Displays the screen in landscape mode with the Home button on the left
- UIInterfaceOrientationLandscapeRight — Displays the screen in landscape mode with the Home button on the right
If you want your application to support specific screen orientations, override the shouldAutorotateTo-InterfaceOrientation: method and then use the || (logical OR) operator to specify all the orientations it supports, like this:
- (BOOL)shouldAutorotateToInterfaceOrientation:
(UIInterfaceOrientation)interfaceOrientation {
    // Return YES for supported orientations
return (interfaceOrientation == UlInterfaceOrientationPortrait ||
            interfaceOrientation == UIInterfaceOrientationLandscapeLeft);
}
The preceding code snippet enables your application to support both the portrait and the landscape left modes.
Handling Rotations
The View Controller declares several methods that you can implement to handle the rotation of the screen. The ability to implement these methods is important because it enables you to reposition the views on the View window, or you can stop media playback while the screen is rotating. You can implement the following methods:
- willAnimateFirstHalfOfRotationToInterfaceOrientation:
- willAnimateSecondHalfOfRotationFromInterfaceOrientation:
- willRotateToInterfaceOrientation:
- willAnimateRotationToInterfaceOrientation:
The willAnimateFirstHalfOfRotationToInterfaceOrientation: method is called just before the rotation of the View window starts, whereas the willAnimateSecondHalfOfRotationFrom InterfaceOrientation: method is fired when the rotation is halfway through. In iOS 5, these two methods have been deprecated in favor of the smoother, single-stage animation using either the willRotateToInterfaceOrientation: or the willAnimateRotationToInterfaceOrientation: methods.
The next two sections take a more detailed look at the last two methods.
willRotateToInterfaceOrientation:
The first two methods mentioned in the previous section are called consecutively — first willAnimateFirstHalfOfRotationTo-InterfaceOrientation:, followed by willAnimateSecondHalfOfRotationFromInterface-Orientation. If you don't need two separate methods for handling rotation, you can use the simpler willRotateToInterfaceOrientation: method (recommended in iOS 5).
The willRotateToInterfaceOrientation: method is invoked before the orientation starts. In contrast to the previous two events, this is a one-stage process. Note that if you implement this method, the willAnimateFirstHalfOfRotationToInterfaceOrientation: and willAnimateSecondHalfOfRotationFromInterfaceOrientation: methods will still be called (if you implemented them).
The method looks like this:
- (void)willRotateToInterfaceOrientation:
(UIInterfaceOrientation) toInterfaceOrientation
    duration:(NSTimeInterval) duration {
}
The toInterfaceOrientation parameter indicates the orientation to which it is changing, and the duration parameter indicates the duration of the rotation, in seconds.
willAnimateRotationToInterfaceOrientation:
The willAnimateRotationToInterfaceOrientation: event is called before the animation of the rotation starts.
![]() NOTE If you handle both the willRotateToInterfaceOrientation: and the willAnimateRotationToInterfaceOrientation: methods, the former Will be called first, followed by the latter.
NOTE If you handle both the willRotateToInterfaceOrientation: and the willAnimateRotationToInterfaceOrientation: methods, the former Will be called first, followed by the latter.
The method looks like this:
- (void)willAnimateRotationToInterfaceOrientation:
(UIInterfaceOrientation)interfaceOrientation
    duration:(NSTimeInterval)duration {
}
The interfaceOrientation parameter specifies the target orientation to which it is rotating.
![]() NOTE If you implement this method, the willAnimateFirstHalfOfRotationTo-InterfaceOrientation: and willAnimateSecondHalfOfRotationFrom-InterfaceOrientation: events will not be called anymore (if you implemented them).
NOTE If you implement this method, the willAnimateFirstHalfOfRotationTo-InterfaceOrientation: and willAnimateSecondHalfOfRotationFrom-InterfaceOrientation: events will not be called anymore (if you implemented them).
In the following Try It Out, you will reposition the views on your user interface (UI) when the device changes orientation.
TRY IT OUT: Repositioning Views during Orientation Change
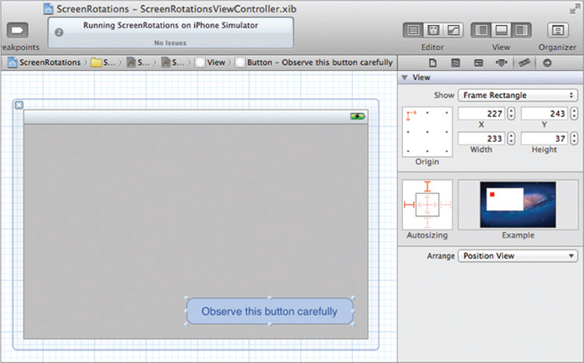
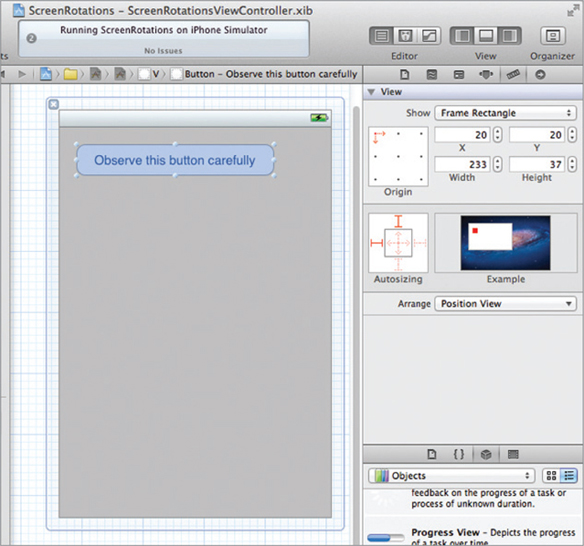
- Using the project created earlier, select the ScreenRotationsViewController.xib file and add a Round Rect Button to the View window (see Figure 7-4).
- Observe its size and positioning by viewing the Size Inspector window. Here, its position is (20,20) and its size is 233 by 37 points.
- Rotate the orientation of the View window from portrait to landscape mode by changing its Orientation attribute to Landscape in the Attributes Inspector window (see Figure 7-5).
- Reposition the Round Rect Button by relocating it to the bottom-right corner of the View window (see Figure 7-6). Also observe and take note of its new position.
- In the ScreenRotationsViewController.h file, add the following code shown in bold:
#import <UIKit/UIKit.h>

@interface ScreenRotationsViewController : UIViewController
{
    IBOutlet UIButton *btn;
}

@property (nonatomic, retain) UIButton *btn;

@end
- In Interface Builder, connect the outlet you have created by Control-clicking the File's Owner item and dragging over to the Round Rect Button. Select btn.
- In the ScreenRotationsViewController.m file, add the following bold code:
#import “ScreenRotationsViewController.h”

@implementation ScreenRotationsViewController

@synthesize btn;

-(void) positionViews {
    UIInterfaceOrientation destOrientation = self.interfaceOrientation;
    if (destOrientation == UIInterfaceOrientationPortrait ||
        destOrientation == UIInterfaceOrientationPortraitUpsideDown) {
        //--if rotating to portrait mode--
        btn.frame = CGRectMake(20, 20, 233, 37);
    } else {
//--if rotating to landscape mode--
        btn.frame = CGRectMake(227, 243, 233, 37);
    }
}

- (void)willRotateToInterfaceOrientation:
(UIInterfaceOrientation) toInterfaceOrientation
    duration:(NSTimeInterval) duration {
    [self positionViews];
}

- (BOOL)shouldAutorotateToInterfaceOrientation:
(UIInterfaceOrientation)interfaceOrientation
{
    // Return YES for supported orientations
    return YES;
}

- (void)viewDidLoad {
    [self positionViews];
    [super viewDidLoad];
}

- (void)dealloc {
    [btn release];
    [super dealloc];
}
- Press Command-R in Xcode to deploy the application onto the iPhone Simulator.
- Observe that when the iPhone Simulator is in portrait mode, the Round Rect Button is displayed in the top-left corner; but when you change the orientation to landscape mode, it is repositioned to the bottom-right corner (see Figure 7-7).

This project illustrated how you can reposition the views on your application when the device changes orientation. You first created an outlet and connected it to the Round Rect Button on the View window.
When the device is being rotated, the willRotateToInterfaceOrientation: method that you implemented is called so that you can reposition the Round Rect Button. When this method is called, you can obtain the destination orientation using the interfaceOrientation property of the current View window (self), like this:
UIInterfaceOrientation destOrientation = self.interfaceOrientation;
Using this information, you position the Round Rect Button according to the destination orientation by altering its frame property via the positionViews method, which you have defined:
-(void) positionViews {
    UIInterfaceOrientation destOrientation = self.interfaceOrientation;
    if (destOrientation == UIInterfaceOrientationPortrait ||
        destOrientation == UIInterfaceOrientationPortraitUpsideDown) {
        //--if rotating to portrait mode--
        btn.frame = CGRectMake(20, 20, 233, 37);
    } else {
        //--if rotating to landscape mode--
        btn.frame = CGRectMake(227, 243, 233, 37);
    }
}
You should also call the positionViews method in the viewDidLoad method so that the Round Rect Button can be displayed correctly when the View window is loaded:
- (void)viewDidLoad {
    [self positionViews];
    [super viewDidLoad];
}
PROPERTIES FOR DEALING WITH THE POSITIONING OF VIEWS
In the previous example, you used the frame property to change the position of a view during runtime. The frame property defines the rectangle occupied by the view, with respect to its superview (the view that contains it). Using the frame property enables you to set the positioning and size of a view. Besides using the frame property, you can also use the center property, which sets the center of the view, also with respect to its superview. You usually use the center property when you are performing some animation and just want to change the position of a view.