
As you learned back in Chapter 4, Flask is a Python microframework – but what does that mean? Essentially, Flask is a web application framework. It makes it easy for you to develop and run complex web applications. Using Flask, you can write Python and have it executed when someone visits your web page. The Flask project resides at https://flask.palletsprojects.com/. It’s open source and available on GitHub at https://github.com/pallets/flask. You can create a login and user registration system, web admin panel, student management system, COVID-19 tracker, basic CRUD (create, read, upload, delete) system, or almost anything else you can imagine.
Flask has no opinion. It won’t force you to use specific databases or code patterns – it leaves those choices up to you. If you’d like to avoid the decision-making process, Django (www.djangoproject.com/) is a Python framework with an opinion, but this book is based on Flask, and I’ll guide you through every step of the way.
Flask is maintained by an organization called Pallets (https://palletsprojects.com/), and if you visit their GitHub profile at https://github.com/pallets, you’ll see a vast number of exceedingly popular projects. I can personally attest to the usefulness and quality of Python code available from Pallets, and count myself fortunate to contribute to Flask-SQLAlchemy (https://github.com/pallets/flask-sqlalchemy). Anyway, I digress.
First Flask Config
By now you should be comfortable with Git and be able to format your code with Black. If you need a reminder, take a look at the Git cheat sheet at the end of Chapter 4. The rest of this book won’t explicitly remind you to format and commit your code – remember to do so on a regular basis! A good rule of thumb is any time you have a significant change or working state, or when you’re taking a break or have finished coding for the day, commit your work. It’s OK to commit broken or incomplete code to feature branches (rarely to master).
This config file is a Python file. You can write complex logic in here, but it’s best to avoid doing so. You can freely assign, create, delete, or otherwise modify these values. As you can see, there’s a mixture of Booleans, strings, and comments. There’s nothing special about this code, but it is used to modify the state of the application. Each variable is written in uppercase. This naming convention indicates that these variables are constants – they won’t (or should not) change during the execution of the code. On its own this config does nothing. It’s only when implemented by your code in other files that they begin to provide value. Here’s the breakdown of what each one does.
The Flask-specific values section contains configurations for Flask itself. These settings are read by Flask and used to change its behavior. The TESTING variable exists to make your life easier as a developer and make your application more secure (when not set). You may not want to use these on a production server, but on your Pi (for personal use), and while developing the code this is fine.
The APPLICATION_ROUTE informs Flask where your code lives relative to the folder Flask is running from. The PREFERRED_URL_SCHEME tells Flask to use a secure or insecure Hypertext Transfer Protocol – HTTP or HTTPS. Encrypting your application traffic and generating an SSL or TLS certificate is possible locally, but it’s not required unless you want to run your code on the Internet. You can learn more about all the possible Flask config options at https://flask.palletsprojects.com/en/1.1.x/config/, but these are enough for you to get started.
SSL and TLS exist to establish an encrypted connection between you and the server hosting the website you want to visit. They ensure that any data sent between you and a website is encrypted and not visible to anyone else. These protocols are used by your bank, or websites with a padlock in the URL bar, but a time is coming in the not-too-distant future whereby every website you visit will use some form of encryption. SSL stands for secure sockets layer, and TLS stands for transport layer security. TLS is the successor to SSL.
The custom values section is where you’ll find configurations specific to your application. These values won’t interfere with Flask itself, and you’ll need to explicitly write your code to handle these. LOGGER_LEVEL is used to increase or reduce the verbosity of the application logs – which you’ll learn about in the following pages. LOG_FILE_NAME defines the name of the file to record these logs to. You’ll expand on this config file as you develop more code.
Imports are Python’s way of reusing code. Files you want to import are called modules , but really they are just folders. You can import a whole module, or smaller sections, and from subfolders. You can import your own code, or code written by other people. All of these imports (so far) are using modules installed previously by Pipenv. If Python can’t find a module to import, it will complain by raising an error – otherwise known as throwing an error, or throwing an exception . You can write code to handle errors, but I’ll cover that when required.
The keyword def lets Python know you’d like to create a new function, and that everything following the keyword is the function. After def comes the function name – create_app in this case. Python naming convention for functions is all lowercase, with underscores between words.
Next up are your parameters. These let you pass data to functions when they are used. This data is accessible inside the function. Using parameters like this lets you change the data every time you use your code. If you don’t need to use different data, or your function can “figure out” what it needs, you don’t need to use parameters. This function has one parameter called config_file. It has a default value of config/local_config.py. If you don’t provide this parameter, the default value is used instead. Default values are optional – if you don’t specify one, your code will crash if you don’t supply the parameter. This config file is used inside this function to point your code to your config. It’s common to change configs depending on your environment – production, on your computer, on the Pi, and so on.
Finally, the colon indicates the end of the function configuration, and that everything that follows is the function’s code. Python uses indentation to assign code to different objects, so ensure everything inside the function lines up.
This creates a variable called app and instantiates it as a Flask object. You can see a comment following it – denoted by the hash sign at the start. Comments are ignored by the Python interpreter, and exist to help you and other developers in the future when revisiting code. Comments should be clean and clear – don’t just copy what the code does. The comments in these examples are more verbose than may typically be desirable, to really help you out in your understanding.
Before going any further, let’s really dig into what this line does. If you think back to Chapter 2 – the software development primer, you learned about object-oriented programming and how classes are really just recipes which define how a piece of code should work. Here, Flask is a class – and it follows the class naming guidelines of Pascal Case. Pascal Case is where the first letter of every word is uppercase, and the rest of the letters are lowercase. This Flask class defines how code should work and what it should do as designed by the Pallets team when creating Flask itself. Therefore, app is a new instance of the Flask class.
This import_name lets Flask know where the application is running, relative to your code base. It lets Flask figure out where to find all of its other code. In Python, __name__ is a special variable. This evaluates to the name of the current module – Pi-Car.Pi_Car.app in this file, which represents the file name, the folder name, and the parent directory name. Special variables in Python begin and end with dunder – double underscores for both the prefix and suffix.
Notice how the config_file variable is passed in here – you defined this in your function definition, and as of right now, it references the file in config/local_config.py. This helpful function loads all of your config variables into your Flask app. Any changes you make to the config will get automatically picked up by Flask whenever you restart the application. The silent parameter instructs Flask to raise errors if that file does not exist. As you only have one config file right now, it’s a good idea to leave this set to False. If you wanted to use an optional config file – one which may or may not exist, then setting silent to True is a good way to handle this. When true, Flask will happily keep working, even if it can’t find the config file.
The next chunk of code handles application logging. Before discussing this, let’s look at what logging is and why it’s so important.
Logs let you record information during the execution of an application. Essentially they are just messages to yourself, written to aid you during development and deployment. They are an essential metric and provide much-needed visibility into the state of your application.
Logs are often divided into logging levels. Each log is classified into a group depending on its relevance or severity. When looking at logs at a later stage, it’s possible to filter these so as to see only the most relevant results. It’s also possible to limit the creation of logs based on their level. This is defined in your config file as LOGGER_LEVEL.
Critical
Fatal
Error
Warning
Info
Debug
The critical level indicates there was a serious problem with the code – perhaps a config file or variable is not configured. This should be reserved for problems which prevent the application running at all, or very serious issues which need resolving right now. Fatal is very similar to critical (and in the Python core logging library, they are the same). Use fatal when you encounter a problem that cannot be corrected or recovered from in the code.
The error logging level is perhaps more common than most. Use this to indicate that a problem has occurred, but not one that prevents the whole application from working. This could be localized to a specific request or function or tied to a specific action. Other requests and functions may still work fine, just this one in particular may be impacted.
When working in a corporate environment, you may be fortunate enough to have an operations team, sometimes known as DevOps or ops. This team is responsible for running the infrastructure needed to execute your code. A good rule of thumb is that critical, fatal, or error levels should be serious enough to get your ops team out of bed, and will require some corrective action. Granted, this car project has far fewer people working on it, and an issue may not warrant immediate corrective action, but you can’t fix what you don’t know about, so use sensible logs and log levels at every opportunity.
The warning log level is much gentler, and often ignored. Use warning levels to indicate that something undesirable happened, or something is unavailable or inaccessible, but the application continues to operate just fine. Perhaps the code is designed to handle this bad condition – but you still want to know when it happens.
The info logging level is incredibly useful, but often one that is easy to abuse. This level should be used to inform about the state of the application. A good practice is to put info log statements at the start and end of every function execution. Info could perhaps be used by a nontechnical person to see that every step of a process is followed.
Finally, debug is a level that you can use for almost anything. If you want to know the state of a variable at a point in time, or if a particular code block is executed, use debug. Debug log levels exist to help you as a developer understand what is happening in your code, down to a very fine-grained level. You would not generally run applications at this level in production, as it can be too verbose. Occasionally is fine, when troubleshooting or deploying new systems, but when fully operational, a higher log level is often used. I once worked on a Python application where the server bill to store all the logs from running debug in production cost more than the whole application cost to run.
This rotating file handler records all your logs to a file. Once the file gets too large, it creates a new file. Once it reaches four new files, it goes back to the first file and starts again. The file name defines what to call the new files created for your logs. maxBytes is used to limit the maximum file size in bytes. 10MB is specified here. Finally, backupCount specifies the total number of log files to rotate around. Notice how these parameters are named using CamelCase – the first letter of every word is uppercase, apart from the first letter of the variable. This is not a Python convention, but as you’ll come to find out, software developers all write code in different styles, based on their preferences.
This reads the config variable LOG_FILE_NAME defined in your config file and then loaded into the Flask config object. This is your first introduction to defensive programming. Throughout this application, you should ask yourself, “What happens if this piece of code fails?” In this case, what will happen if LOG_FILE_NAME does not exist in your config? Config is a dictionary object, and dictionaries support the get function. This function safely retrieves data from dictionaries. If LOG_FILE_NAME is not present in the config, get returns None instead of crashing your application. Alternatively, you can specify a default value to use if the LOG_FILE_NAME is not found. In summary, if you don’t set LOG_FILE_NAME in your config, this code will fall back to using config/pi-car.log. This makes your code powerful and resilient to failure. It can error-correct itself to continue normal operation.
Try/catch statements are used liberally in Python (perhaps more so than other languages). This way of handling exceptions is fine in many cases, but in this particular case, it bloats the code when compared to using the get function.
A dictionary is an object used to store data in key/value pairs using curly braces. Here’s a basic example:
This will return you the value of “Apples”. As you learned about earlier, defensive programming with dictionaries is an excellent way to improve your code.
You can store any data in dictionaries, including complex objects or nested dictionaries.
Notice how this defensively retrieves the config value, or defaults to ERROR.
Notice how you access the info attribute of the logger object in your app object. Because your app is an instance of the Flask class, you have access to app.logger, because Flask defined it in the class definition. This is what makes object-oriented code so powerful. The ability to reuse code (built by other people in many cases) can really speed up your development time. You don’t need to defensively handle app.logger – you can almost always rely on functions being available – provided you are certain the object is what you think it is.
Later on you’ll learn how to log complex objects, but for now, play around with logging different messages to different log levels.
This defines a route accessible at “/”. The function is called hello_world, but this has no impact on the URL. Inside, you can see some basic logging to the info level, and then it returns a string. In Flask, you must return something inside your routes – this is what is shown when you load this page in your browser.
You may be wondering what the @ sign used for. In Python, this is a decorator. Decorators are ways of running functions, and are a common pattern in Python. This essentially provides hello_world as a parameter to the route function, which is defined in the Flask class, of which your app is an instance of. Decorators keep your code neat, but they can be difficult to write and get confusing when using multiple decorators on the same piece of code.
As this create_app function is an app factory, tasked with making Flask apps, it needs to return the newly built and configured app to whatever code requested it. Any code after this return statement will not run.
That’s it for the Flask code. It may be slightly larger than the very core Flask code you need to get started, but you now have an app factory, which implements some very important logging and route functionality. You’ve learned some core concepts that you can carry with you to any project, and you are now ready to run your app!
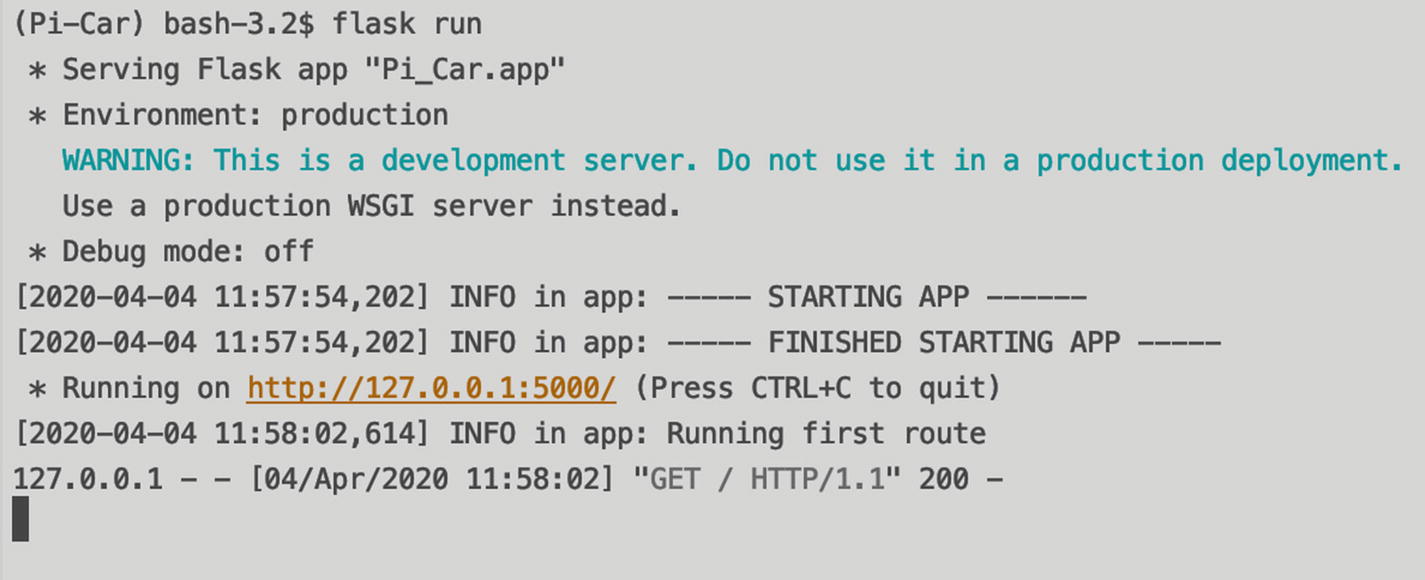
Output from running the Flask server
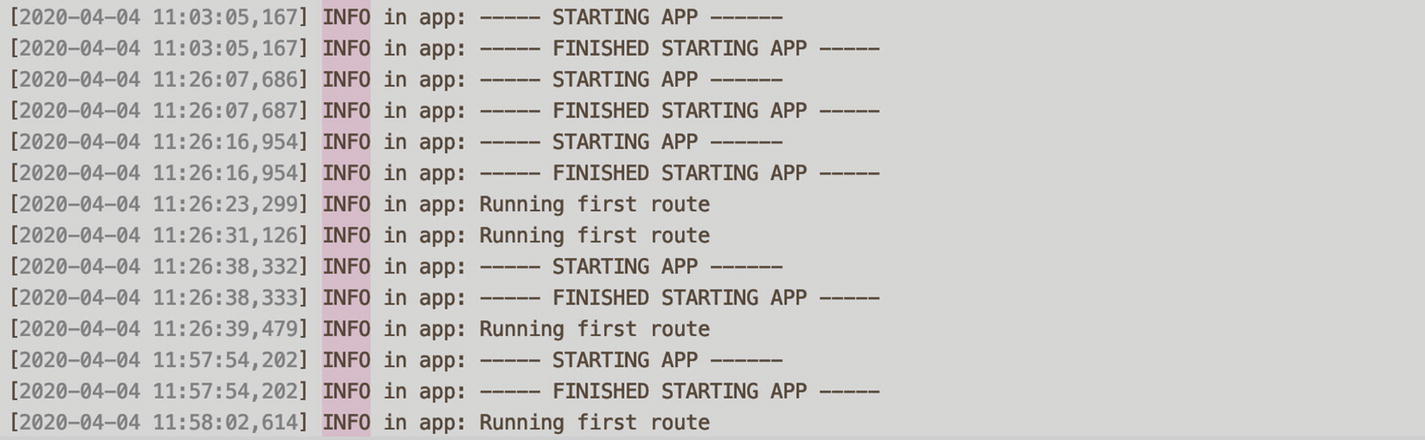
First application logs
Running Flask on the Pi

The Flask server running on the Pi
This 127.0.0.1 is known as your localhost address – sometimes called a loopback address . It is an almost universal standard IP address to refer to “this computer.” On your Pi, this address is the same. It’s the same address on my desktop computer, your laptop, my Pi, or almost any other computer. This is a reserved IP address, and it’s used to make developer’s lives easier. When running your applications, it doesn’t make sense to send packets out over the Internet, only to come back in to access your application. Localhost addresses are often only accessible to the computer that is running something on it – although you can expose them to the Internet via a public-facing IP address.
Herein lies the problem. This localhost address works fine on your computer – Flask runs on this address, and as you’re using the computer Flask is running on, you can access it just fine. As the Pi is a different computer to the one you are developing on, you need to tell Flask to run on a different internal IP address, so that you can access it remotely. When running inside your car, this localhost address works perfectly, but while you’re still developing this project, it’s much easier to access the Pi remotely.

Flask server running on port 0.0.0.0
Remember you can get your Pi’s IP address by running ifconfig on the Pi and looking under the inet section for wlan0. Now you can access the Flask application running on your Pi from your desktop computer. You can see the logs in real time through your SSH session. For all practical purposes, the Pi is acting as a remote web server, which you are administering over the network. It doesn’t matter that the Pi may be on your desk or tucked behind a cupboard – only the IP address changes for a device next to you or 1000 miles away.
power every device on the Internet or internal network. The Domain Name System (DNS) defines how servers convert memorable domain names such as google.com to hard to remember IP addresses such as 216.58.204.14. There’s nothing stopping you from entering IP addresses into your web browser, but letters and words are much easier to remember. When you enter your Pi’s IP address into your web browser, you’re skipping the domain name lookup process, as you already know the IP address you want.
Notice the 5000 at the end of your IP address? This is the port in use by Flask. Ports in networking are communication endpoints. Computers have a maximum of 65535 ports, and each one is associated with a service or application. Certain ports are associated with services by default. Insecure websites use port 80, for example, or TLS connections use port 443. When entering a website, by default, browsers use port 80 or 443 unless told otherwise. As Flask is running on port 5000, trying to connect over port 80 will not work. By using a colon, and specifying the port in the URL, you can connect over the correct port.
Why 65535 ports? Ports are stored as an unsigned 16-bit integer, which provides a maximum of 65535 digits. This means you can theoretically have 65535 applications running on your computer, all listening on a different port from 0 to 65535. Negative ports are not supported in TCP/IP applications.
You could configure Flask to run on port 80, but the Pi probably has something already running on that port, and you can’t share ports which are in use. For now, let’s stick with port 5000.
As for the IP address, you could bookmark this, or write it down, but in the words of Python core developer Raymond Hettinger, “there must be a better way!” By using a hosts file, you can create an easy-to-remember text-based entry, which will redirect you to the Pi’s IP address. This is a bit like running your own DNS server on your computer – you could even redirect google.com to your Pi. Remember though that it’s only you who will see this – it’s not that easy to hack servers.
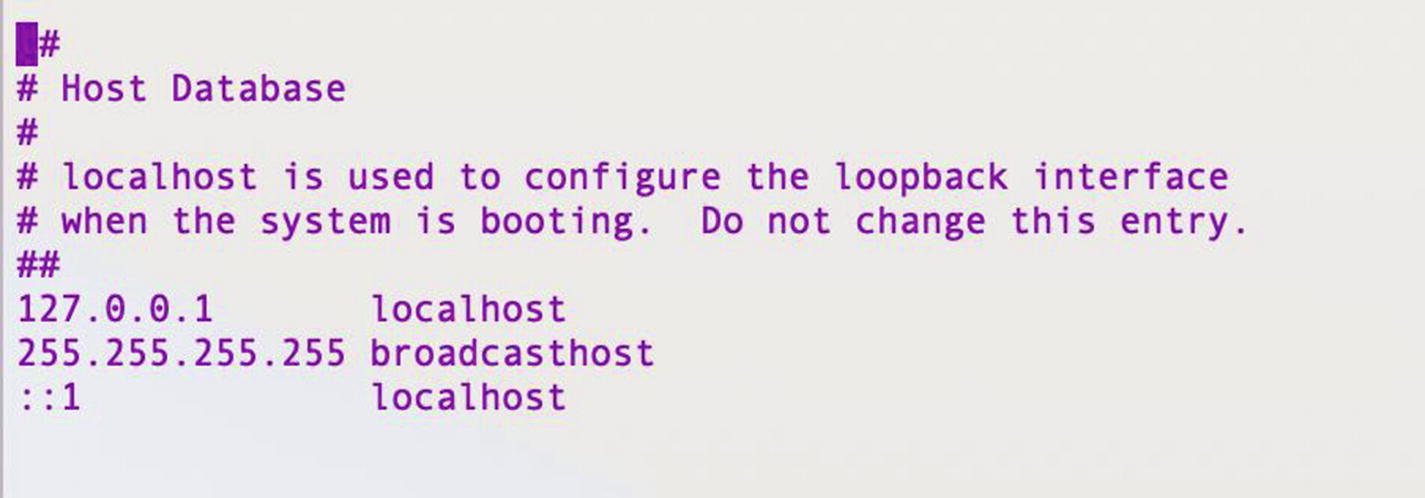
macOS default hosts file entries

macOS hosts file with pi-car entry

Nano file saving confirmation message
Back in your web browser, you can access the Pi via pi-car now, instead of 192.168.1.210. You’ll still need to use the port Flask is running on, along with the protocol, like this: http://pi-car:5000/. You may need to repeat this process if your Pi’s internal IP address changes – which is possible but unlikely.
Autostart Flask When the Pi Boots
Ensure the Pi can access your Python 3 interpreter
Configure the FLASK_APP environment variable
Pull the latest code from your GitHub repository
Create a virtual environment and install the dependencies
Run the Flask app
This stands for run control, and it exists to let you run commands automatically when the Pi starts up. Commands here get executed by the root user, without you having to log in to the Pi. This presents some challenges, as all of your Python installations and files are relative to your user, located in /home/pi/. As you’ll see shortly, it’s a simple process to point the root user to the files necessary to run the server. You can reference scripts here, but for this purpose, you can store your commands directly in the file.

Basic Pi rc.local configuration
This ensures that the Pi can access the Internet to clone your latest code. Without it, the Pi may not have finished configuring its network devices and would therefore mean any commands requiring Internet access (such as your Git clone) would fail.
This isn’t a typo. It runs your Flask server in “background mode” as it were. Without it, your server would run just fine, but this script would wait for it to finish execution (which it may never do). By including this special character, the Pi is free to go about any other business it needs to do.
This is a bash exit code, specifically, the success code. Again, this tells the Pi that everything executed successfully. It’s critically important that you retain this line at the bottom of the file. Without it, the Pi would not be able to determine if everything executed successfully, and may prematurely kill off your server.
Once the Pi starts up, point your web browser to the Pi’s domain and port (http://pi-car:5000/), and you’ll see your hello world welcome page. Well done, you have now completed possibly the hardest tasks of all. As you progress through these projects, everything else will seem like smooth sailing now that you have all your environments configured and a (mostly) fully automated deployment pipeline.
Chapter Summary
Throughout this chapter, you’ve installed and configured Flask and built your first application routes. You learned how to run a Flask application server on your local computer and how to do the same on the Pi. You’ve configured your application logging – both to the standard out and to a rotating log file handler. You configured the Pi to grab the latest code from the repo and start the Flask application when it boots. You can access this over your local network.
In the next chapter, you’ll connect a temperature sensor and modify your application to read data from it.