
In this section we’ll subclass NSView once again and create a class called PolygonView with some “holes” in it. It will draw a polygon with a specified number of sides (the range will be from 3 to 20 sides). We will use the ViewDemo project for a third time.
Back in IB with ViewDemo’s
MainMenu.nib, subclass NSView again by choosing IB’s Classes → Subclass NSView menu command.Change the name of the new subclass from “MyView” to “PolygonView”.
Select the BarView instance in the window titled “Window”, type Command-1, and change the class of the BarView to PolygonView in the NSView (Custom) Info window.
IB will alert you that “This operation will break existing connections” because the PolygonView does not respond to the takePercentageValue: message. Click OK.
Select the slider, type Command-1, and change the slider’s Minimum to 3, Maximum to 20, and Current to 3. Use the Tab key to jump from text field to text field.
In the Markers box, change the number of marks to 18 and click the Marker Values Only checkbox.
Select the PolygonView class in the
MainMenu.nibwindow, type Command-1, and then add the takeNumSidesFrom: action to the PolygonView class in the PolygonView Class Info panel.Connect the slider to the PolygonView instance so that it sends the takeNumSidesFrom: action message.
Select the PolygonView class in the
MainMenu.nibwindow and choose Classes → Create Files for PolygonView. Insert the class files into the ViewDemo project.Back in PB, insert the two lines shown here in bold into
PolygonView.h:#import <Cocoa/Cocoa.h> @interface PolygonView : NSView { int sides; } - (IBAction)takeNumSidesFrom:(id)sender;- (void)setNumSides:(int)val; @endInsert the lines shown here in bold into
PolygonView.m:#import "PolygonView.h" @implementation PolygonView - (IBAction)takeNumSidesFrom:sender { [self setNumSides:[sender intValue] ]; } - (id)initWithFrame:(NSRect)rect { [super initWithFrame:rect]; [self setBounds:NSMakeRect(-1,-1,2,2)]; [self setNumSides:3]; return self; } - (BOOL)isOpaque { return NO; }
The initFrame: method sets the coordinates for the drawing system to range from (-1,-1) to (1,1). It then sets the number of sides for the polygon to be 3 and returns the initialized object. The isOpaque method tells the superview that the PolygonView is not opaque.
Insert the following two methods into
PolygonView.m:- (void)setNumSides:(int)val { if (val>2 && sides!=val) { sides = val; [self setNeedsDisplay:YES]; } } -(void)drawRect:(NSRect)rect { NSBezierPath *shape = [NSBezierPath bezierPath]; float theta; [shape moveToPoint:NSMakePoint(sin(0.0),cos(0.0))]; // M_PI is a predefined value of PI. // M_PI*2.0 is number of radians in a circle. // The for( ) statement below sweeps through each // pie-section of the polygon for each side. for (theta=0.0; theta <= 2*M_PI; theta += (M_PI*2.0)/sides) { [shape lineToPoint:NSMakePoint(sin(theta),cos(theta)) ]; } [ [NSColor blackColor] set]; [shape fill]; }
The takeNumSidesFrom: and setNumSides: methods work together to react to slider manipulations and set the number of sides of the polygon to be displayed. The drawRect: method creates an NSBezierPath whose outline matches the sides of a polygon, then sets the current color to be black and fills the shape.
Notice that this view doesn’t paint the background. That is because the PolygonView is not opaque. It has holes around the edges of the polygon where you can see the views that are behind it. When the window displays this view it will notice that the view is not opaque, and the window will first draw the view that is behind our PolygonView so that the window looks correct.
Back in PB, build and run ViewDemo with PolygonView, saving all pertinent files when prompted.
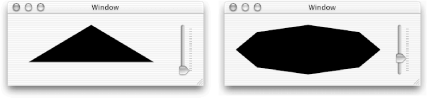
A triangle should appear first (as shown in the window on the left in Figure 15-7), because we set Current to 3 in IB. Drag the slider knob up and note that the number of sides of the displayed polygon should change, as shown in the window on the right in Figure 15-7.
Let’s add a second control (another slider) to PolygonView that lets the user change the size of the polygon. Well do this by changing the size of the PolygonView instance itself. This time we’ll insert code into the PolygonView class files first, then we’ll work in IB.
Insert the two new method declarations shown here into
PolygonView.h:- (void)setSize:(float)size; - (IBAction)takeFloatSize:(id)sender;
Insert the two new method implementations shown here into
PolygonView.m:- (void)setSize:(float)size { [self setFrameSize:NSMakeSize(size,size)]; [self setBounds:NSMakeRect(-1,-1,2,2)]; [self setNeedsDisplay:YES]; } - (void)takeFloatSize:(id)sender { [self setSize:[sender floatValue] ]; }
The setSize:
method is sublime. It takes the
floating-point parameter size and resizes the PolygonView to be this
size. Remember that this size is expressed in the coordinate system
of the containing NSView, rather than the PolygonView itself (which
is scaled from -1 to 1 in each dimension, for easy drawing).
That’s fine, but once the PolygonView is resized, it
is no longer scaled from -1 to 1 in each dimension, so we have to set
bounds again. Finally, we need to alert the view
mechanism that this view needs to be resized.
Note that the takeFloatSize: method is an action method, so it can be invoked from a slider.
Save the
PolygonView.handPolygonView.mclass files.Drag the
PolygonView.hfile icon from PB’s Groups & Files pane and drop it in theMainMenu.nibwindow in IB. (You can also do this step by choosing Classes → Create Files for PolygonView, but dragging and dropping is more fun).
Before dropping the file icon in the previous step, you should have seen a plus sign (+) appear next to the cursor, indicating that the class information was about to be added to PolygonView. The reason we did this was to inform IB about the new takeFloatSize: action method so we can use it in a new connection in IB.
Back in IB, make the window a little taller and then drag a horizontal slider from the Cocoa-Other palette and drop it in the window below PolygonView, as shown in the top-left window in Figure 15-8.

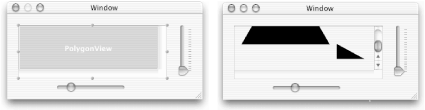
Figure 15-8. PolygonView class with horizontal slider for size in IB (top left); PolygonView instance draws outside frame (top right) and doesn’t properly erase old PolygonViews (bottom)
Select the horizontal slider, type Command-1, and set the slider’s Minimum to 0, Maximum to 600, and Current to 100.
Connect the horizontal slider to the PolygonView instance so that it sends the takeFloatSize: message.
Back in PB, build and run ViewDemo again. Save all files when prompted.
Drag the horizontal slider knob to the right and you’ll notice some peculiar behavior, as shown in the top-right window in Figure 15-8. Then drag the horizontal slider to the left and note even more peculiar behavior, shown in the window at the bottom of Figure 15-8.
The polygon gets larger and trespasses into territory where it shouldn’t! As it gets smaller, it doesn’t erase the old triangles, because they are now outside the view. This whole thing looks terrible and is not the correct way to handle such a situation. We’ll discuss a remedy right away.
Cocoa’s solution to the PolygonView drawing problem is to place it inside another NSView called an NSScrollView. We first experimented with NSScrollViews back in Chapter 10, with our MathPaper application. At that time, we used an NSTextView inside the NSScrollView. In this section we’ll learn how to put any NSView into an NSScrollView and how to set up a window so that it can be resized properly.
Back in IB, select the PolygonView instance and make it a little smaller by dragging its lower-right handle up and to the left.
Choose IB’s Layout → Make subviews of → Scroll View menu command. Your PolygonView instance will be surrounded by two scroller areas, as shown in the window on the left in Figure 15-9. (You may need to reposition the NSScrollView so that it still fits properly in the window.)
Back in PB, build and run ViewDemo again with PolygonView, saving all pertinent files when prompted.
Drag the knob on the horizontal scroller to the right and then to the left.
This time, as you make the PolygonView bigger, the NSScrollView will automatically scale the scroll knobs to accommodate the change in size, as shown in the window on the right in Figure 15-9. Notice that the scroll knobs and buttons automatically appear and disappear as needed; they are handled automatically for you by the Cocoa NSScrollView and NSScroller objects. When you make the PolygonView smaller, some of the background where the view existed is erased, but it’s still not perfect (see Section 15.9 for more). Best of all, the PolygonView object doesn’t know that it is being drawn inside an NSScrollView; we didn’t have to modify any of the code!
The NSScrollView automatically sets the Quartz clipping rectangle so that any attempts to draw outside the ScrollView are not permitted. This further simplifies the task of writing our own custom views.
Quit ViewDemo.