
The next step is to create MathPaper’s front end — the user interface and the program module that starts up the Evaluator subprocesses and sends them mathematical expressions to evaluate.
The MathPaper program will consist of two nibs:
- MainMenu.nib
The main nib that will control the menu, application initialization, and launching of new windows.
- PaperWindow.nib
The nib that will control a single MathPaper window. If we have several MathPaper windows, one copy of
PaperWindow.nibwill be loaded for each window.Because every MathPaper window has a separate nib, we can create new instances of a window simply by loading the same nib multiple times. We’ll see how this works later in this chapter.
Launch Project Builder and choose its File → New Project menu command.
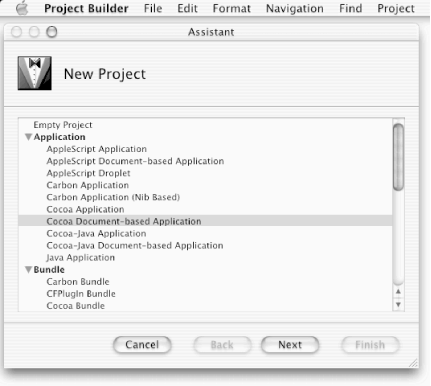
Select “Cocoa Document-based Application” in the New Project Assistant, as shown in Figure 10-3, and then click the Next button.
Give your new project the name “MathPaper” and click the Finish button.
Project Builder will create a folder called
MathPaper in your Home folder and will populate
it with files and folders, as shown in Figure 10-4.
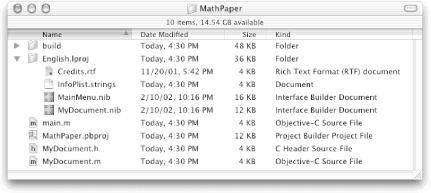
These files and folders are important for our MathPaper application; they are summarized in Table 10-1.
Table 10-1. Files and folders created by PB for MathPaper
|
Filename |
Purpose |
|---|---|
|
|
Folder for program builds |
|
|
Project folder for English-language nibs |
|
|
Information for default About panel |
|
|
Initial localized property list for the project |
|
|
Main menu nib for the application |
|
|
Initial window/document nib |
|
|
Contains Objective-C |
|
|
MathPaper PB project file |
|
|
Initial interface file for MyDocument class |
|
|
Initial implementation file for MyDocument class |
Project Builder automatically created the two folders and eight files listed in Table 10-1 for us when we used this tool to create a new Cocoa document-based application. In the next step, we’ll see how much functionality we already have.
In PB, run your MathPaper application by clicking the build and run button.
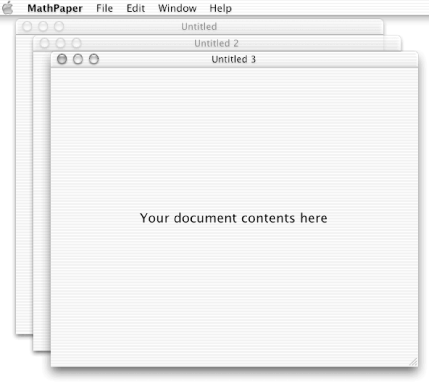
A “generic” MathPaper should now be running, with one document window that displays the text “Your document contents here”.
Choose MathPaper’s File → New menu command twice, and you should see two additional document windows, as shown in Figure 10-5.
Try some of the other menu commands, such as File → Close and Window → Minimize.
Note that several of these menu items already work and were therefore pre-connected for us as soon as we chose to create a new Cocoa document-based application. This built-in functionality saves Cocoa programmers a lot of work!
Rather than accepting the default names provided by PB, we will change the name of the nib from “MyDocument.nib” to “PaperWindow.nib”. We’ll also change the name of the class from “MyDocument” to “MathDocument”. If we don’t do this, we’ll be stuck with the same (MyDocument) generic names that you see for most Cocoa document-based applications. The name-changing will take a bit of effort, but not too much.
Open the Finder and browse to your
~/MathPaper/English.lprojfolder, as shown in Figure 10-4.Change the name “MyDocument.nib” to “PaperWindow.nib” in the Finder (single-click the filename and type the new name).
Next, change the name of the interface file in
~/MathPaperfrom “MyDocument.h” to “MathDocument.h” in the Finder.Also change the name of the implementation file in
~/MathPaperfrom “MyDocument.m"to “MathDocument.m” in the Finder.
Now we need to tell PB not to use the old nib and class filenames:
Back in PB, make sure that the Groups & Files pane is visible in PB’s main window.
Open the Classes group in the Groups & Files pane by clicking the disclosure triangle next to Classes. The two (former) class files,
MyDocument.handMyDocument.m, should both be displayed in red because the files no longer exist in the~/MathPaperfolder.Delete both MyDocument references by selecting each filename with your mouse and then pressing the Delete key on your keyboard.
Open the Resources group in the Groups & Files pane. The filenames
Credits.rtf,MainMenu.nib,MyDocument.nib, andInfoPList.stringsshould appear.Click the disclosure triangle to the left of
MyDocument.nibto see “English”, which is also colored red because the nib name has been changed.Select the red-colored “English” and press the Delete key on your keyboard. PB may prompt you with a drop-down sheet that contains “Remove: Some items are represented on disk. Also delete from disk?” If you see this sheet, click the Don’t Delete button.
Next, we need to inform PB about the new names we gave to the files in the Finder:
Choose PB’s Project → Add Files menu command to add the renamed files to the MathPaper project.
In the resulting sheet, click the
MathDocument.hfile and then Shift-click theMathDocument.mfile.Click the Open button in the drop-down sheet, and you’ll see another drop-down sheet with a checkbox item asking if you want to “Copy items into destination group’s folder”.
Because the MathDocument class files are already in the
~/MathPaperfolder, simply click Add.If the MathDocument files are not inserted into the Classes group in PB, drag them into it (drop the files after the disclosure triangle changes to whatever your highlight color is).
Again choose the Project → Add Files menu command. This time, add the
PaperWindow.nibfile that is inside theEnglish.lprojfolder and make sure it’s in the Resources group in the Groups & Files pane.
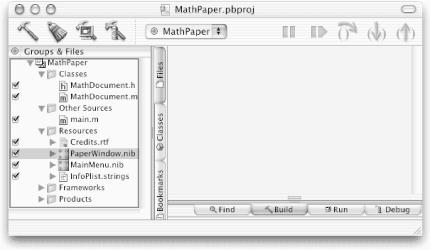
When you are finished, the Groups & Files pane in your MathPaper project window should look like the one in Figure 10-6.
Finally, let’s change the name representing the MathDocument class in Interface Builder:
Double-click the
PaperWindow.nibfilename in PB’s Groups & Files pane to open the file in IB.Select “MyDocument” under the Classes tab in the
PaperWindow.nibwindow (use the Search field in this window to find the class quickly; it’s a subclass of NSDocument).Change the name of this class from “MyDocument” to “MathDocument”.
In this section, we will set up the MathDocument class as a subclass of the NSDocument class.
Open the file
MathDocument.hin PB by double-clicking its name in the Groups & Files pane. You will see the following source code:// MyDocument.h #import <Cocoa/Cocoa.h> @interface MyDocument : NSDocument { } @endReplace the comment and
@interfacestatements inMathDocument.hwith the statements shown here in bold:// MathDocument.h #import <Cocoa/Cocoa.h>@interface MathDocument : NSDocument { } @end
Save
MathDocument.h.Open the file
MathDocument.min PB. You’ll see the following source code:[31]// MyDocument.m #import "MyDocument.h" @implementation MyDocument - (NSString *)windowNibName { // Override returning the nib filename of the document. // If you need to use a subclass of NSWindowController or if // your document supports multiple NSWindowControllers, // you should remove this method and override // -makeWindowControllers instead. return @"MyDocument"; } - (void)windowControllerDidLoadNib:(NSWindowController *) aController { [super windowControllerDidLoadNib:aController]; // Add any code here that needs to be executed once the // WindowController has loaded the document's window } - (NSData *)dataRepresentationOfType:(NSString *)aType { // Insert code here to write your document from the given data. // You can also choose to override // -fileWrapperRepresentationOfType: or // -writeToFile:ofType: instead. return nil; } - (BOOL)loadDataRepresentation:(NSData *)data ofType:(NSString *)aType { // Insert code here to read your document from the given data. // You can also choose to override // -loadFileWrapperRepresentation:ofType: or // -readFromFile:ofType: instead. return YES; } @endReplace the first three lines of
MathDocument.mwith the statements shown here in bold:// MathDocument.m #import "MathDocument.h" @implementation MathDocument
Replace the return value in the windowNibName method as follows:
- (NSString *)windowNibName
{    return @"PaperWindow";
    // The comments have been removed
}
All of the changes we made in the last several pages are necessary because we want our own names (not the default ones), to better describe our nib and class files (perhaps there’s an easier way to do this, but we don’t know it). In making these changes, we’ve also gotten a look at some of the code that is automatically generated for a Cocoa document-based architecture application.
In this section, we will customize the MathPaper menus that are
stored in the MainMenu.nib
file:
Back in PB, double-click the
MainMenu.nibfilename (under Resources) in PB’s Groups & Files pane. IB will automatically launch and display theMainMenu.nibinterface created by PB.Choose Interface Builder → Hide Others to simplify the screen.
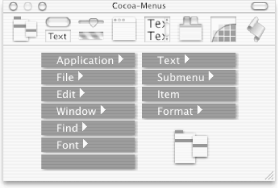
Select IB’s Cocoa-Menus palette by clicking the icon at the left of the Palettes window toolbar.
The Cocoa-Menus palette is shown in Figure 10-7. Many of the menu cells in IB’s Cocoa-Menus palette are preconnected (we saw such a preconnection previously with Calculator’s Edit → Cut menu item, which was connected to the First Responder object’s cut: method). We’ll soon see how the File menu commands are preconnected. Also, be careful to include the desired functionality when changing names of menus and items. For example, if you drag the Window submenu into your application and then run it, the NSApplication object will automatically update the Window submenu as you create and delete main windows within your application. (Isn’t object-oriented programming wonderful?!) You won’t get this behavior, though, if you simply drag out the submenu called Submenu and change its name to Window.
In Mac OS X Version 10.1, some of the menus in the Cocoa-Menus
palette differ slightly from the menus that are included in the
default MainMenu.nib menu. For example, the Edit
menu in the palette contains a Speech menu item, while
MainMenu.nib’s Edit menu does
not. This and other minor variations appear to be oversights and may
be changed in a future release.
You can cut and paste menus and submenus with IB’s Edit → Cut and Edit → Paste commands (what a concept!). If you want a particular submenu (like the extended Edit submenu) but you don’t want a particular submenu command (e.g., Edit → Paste As), simply select the menu command and cut it out of the submenu. (You can also delete entire menus by hitting the Delete key when a menu cell is highlighted, so be careful!)
Of course, each application program that you create is likely to have
its own specific collection of menus. Typically, you will initially
customize the menus in MainMenu.nib when you
first create your application. Then, as your application grows, you
will modify the menus.
Back in IB, double-click “NewApplication” in the main
MainMenu.nibmenu and change its name to “MathPaper”.Change the other three occurrences of “NewApplication” in the MathPaper menu to “MathPaper”, as shown in Figure 10-8.
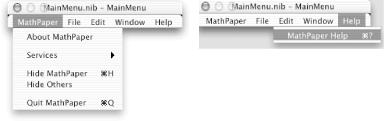
One by one, select and cut both the Preferences menu item and the space below it (we will not be creating a Preferences panel for this application). Your MathPaper application menu should now look exactly like the one in Figure 10-8.
Note that the Services submenu in Figure 10-8 is empty — it will be filled in automatically when your program runs (another free and tremendously powerful feature of Cocoa). Cocoa applications use the Services submenu to send messages to other applications.
Rename the Help submenu item so that “MyApp Help” becomes “MathPaper Help”, as shown in Figure 10-8.
In the
MainMenu.nibwindow, choose File → New.Type Command-2 to bring up the NSMenuItem Connections Info dialog.
Single-click the newDocument: method with the dimple next to it to display a premade connection to the First Responder (make sure you don’t double-click the method and break the connection!).
Your screen should now contain something like the screen shot in Figure 10-9. (The only reason we included the previous three steps was to show you a MathPaper preconnection — these steps do not change anything in the MathPaper program.)
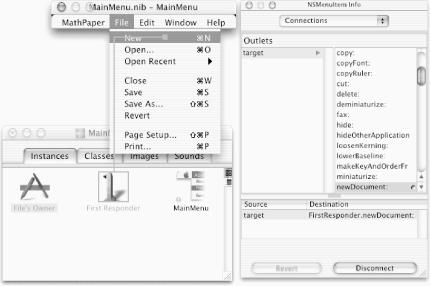
The File menu (see Figure 10-9) has commands for dealing with documents as a whole — creating new documents, saving them, and so on. The Cocoa document-based architecture provides methods for each of the menu items in the File menu, as indicated in Table 10-2.
Table 10-2. File menu items and their premade action messages
|
File menu item |
Action message |
|---|---|
|
File → New |
[FirstResponder newDocument:] |
|
File → Open . . . |
[FirstResponder openDocument:] |
|
File → Open Recent → Clear Menu |
[FirstResponder clearRecentDocuments:] |
|
File → Close |
[FirstResponder performClose:] |
|
File → Save |
[FirstResponder saveDocument:] |
|
File → Save As . . . |
[FirstResponder saveDocumentAs:] |
|
File → Revert |
[FirstResponder revertDocumentToSaved:] |
|
File → Page Setup . . . |
[FirstResponder runPageLayout:] |
|
File → Print . . . |
[FirstResponder print:] |
The First Responder will typically be the object that controls the document in the key window and thus will change as the end user changes the key window. Messages that are not handled by the key window will be passed up the responder chain; for example, the File → New command will be handled by the NSDocumentController object. The Window submenu will automatically be modified when your program is running to include additional menu cells for each document window (but not panel) that your program creates: this is done for you by the NSApplication object.
MainMenu.nib is now set up, so
let’s move on to customizing details about our
project.
We must tell PB about the kinds of documents that Cocoa’s document-based architecture will support. We will enter the information in the Application Settings pane under PB’s Targets tab, as you’ll see shortly.
For each document type, PB needs to know:
The name of the document type
Whether your application can edit files of this type, or merely display them
The extension used for files of this type
The Macintosh type and creator codes that are used when files of this type are saved
The icon that is used to display this file type
The subclass of the NSDocument class that should be used to read in this file type
The type and creator codes are 32-bit numbers that are stored in the file on any Macintosh HFS filesystem. These codes allow the Finder to automatically launch the appropriate application when you double-click the name of a file that stores a document associated with the application. For this reason, file extensions and creator types must be unique. To assure that they are unique across all applications, Apple maintains a registry of creator codes.
Tip
The future of type and creator codes is currently uncertain. All versions of Mac OS until Version 10 relied on them extensively. With Mac OS X, Apple has placed more emphasis on file extensions. In part, this appears to stem from a desire to be more compatible with the rest of the computer industry. Mac OS X Version 10.0 used extensions and creator codes interchangably. With Version 10.1, Apple has tried to deemphasize type and creator codes. Because it is not clear what the future holds, this chapter shows how to use extensions as well as type and creator codes.
In writing this book, we requested from Apple a creator code for the
MathPaper application. We were assigned the code
MATP. You should use this code for your copy of
the MathPaper application. To get creator codes for your own
applications, you must fill out Apple’s Creator Code
Registration form at
http://developer.apple.com/dev/cftype/.
In the following steps, we will tell PB about the creator code and the MathDocument class.
In PB’s main window, click on the Targets vertical tab.
Select the MathPaper target in the Targets pane at the upper-left corner of PB’s main window.
Select the horizontal tab labeled “Application Settings”.
Enter “MATP” in the Signature field of the Basic Information section.
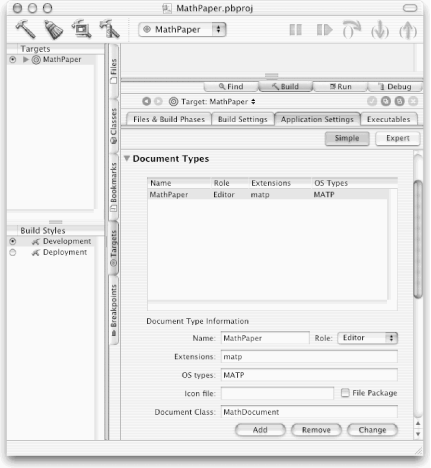
Scroll down to the Document Types setting at the bottom of the pane and select it.
Enter “MathPaper” in the Name field to change the document type.
Enter “com.oreilly.MathPaper” in the Identifier field. The application identifier is a globally unique name that you use to identify your application. It controls, among other things, the name of the file that will be used to store the application defaults. (We’ll talk more about this in Chapter 21.) You create the application identifier by reversing your Internet domain name and appending the application name.
Click the pop-up menu labeled “None” next to the Name field and change the Role from None to Editor.
Enter “matp” in the Extensions field.
Enter “MATP” in the OS types field.
Enter “MathDocument” in the Document Class field.
Click the Change button at the bottom of the Application Settings pane.
We’ll leave the icon file blank for now. When you are finished, the MathPaper application Document Types in PB’s main window should look like the window in Figure 10-10.
In addition to the nib for the main menu, we will use the second
(auxiliary) nib called PaperWindow.nib
to define the window that will be used by
each piece of math paper. The NSDocumentController class will load
this nib each time it needs to create a new document window.
Still in PB, click the Files vertical tab to display the files in the MathPaper project.
Double-click
PaperWindow.nibunder Resources in the Groups & Files pane. As we’ve seen before, this will openPaperWindow.nibin IB.Choose Interface Builder → Hide Others to simplify the screen.
In IB, double-click the icon labeled “Window” under the Instances tab in the
PaperWindow.nibwindow. If it’s not already displayed, this will display the generic-looking window with the text “Your document contents here” and bring it to the front of the screen.Select the text “Your documents contents here” by clicking it once, then hit the Delete key to remove this text.
Resize the new window so it’s about three inches wide by four inches tall.
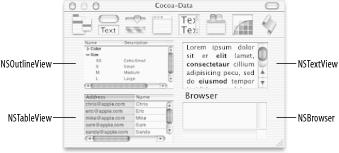
Click the Cocoa-Data button at the top of IB’s Palettes window to see the Cocoa-Data palette, shown in Figure 10-11.
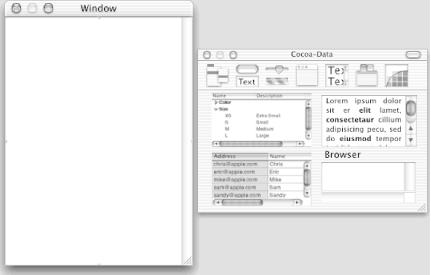
Drag an NSTextView object (see Figure 10-11) from IB’s Cocoa-Data palette and drop it in the window titled “Window”.
If you type Command-1 with the NSTextView selected, the object will appear to be of the NSTextView class. However, if you type Command-5, the true class (NSScrollView) of this object appears. The NSScrollView actually “contains” an NSTextView “inside” it. (It also has an NSClipView.) We’ll discuss NSTextView extensively in the next chapter.
Move and resize the NSTextView so it’s the same size as the window’s content area (use the blue guidelines). It should look like the window on the left in Figure 10-12.
Select the NSTextView by clicking it once, then drag to Size in the Inspector pop-up menu (or type Command-3) to bring up the NSTextView Size inspector.
As we saw with the Calculator application, the Size inspector lets you specify how an NSView object will change in size and location when its containing view, or superview, is resized. In our MathPaper interface, we will specify the resizing characteristics of the NSTextView when the window’s content view is resized (which occurs whenever the window is resized). In Figure 10-13, the large square labeled “Autosizing” represents the selected NSView’s superview (content view, in our case), while the inner square represents the selected NSView (NSTextView, in our case). The origin and size of the NSTextView are set in the box above the Autosizing box.
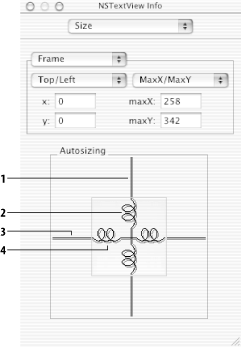
The outer and inner Autosizing boxes each contain a set of two vertical and two horizontal lines. You can click on any of these lines to change it from a straight line to a spring, and vice versa. The straight line labeled (1) in Figure 10-13 indicates that the NSTextView will remain the same distance from the top of the window, no matter how the containing window is resized. If we change this line to a spring, the NSTextView will move up or down inside the containing window when the window is stretched or shrunk vertically. Likewise, the straight line labeled (3) indicates that the NSTextView will remain the same distance from the lefthand side of the window, regardless of how the containing window is resized. If we change this line to a spring, the NSTextView will move left or right inside the containing window when the window is stretched or shrunk horizontally. The spring labeled (2) indicates that the NSTextView will stretch or shrink when the containing view is resized vertically; a straight line here would indicate that the NSTextView does not vertically resize. The spring labeled (4) indicates that the NSTextView will stretch or shrink when the containing view is resized horizontally; a straight line here would indicate that the NSTextView does not horizonally resize.
Click the lines inside the inner square in the Autosizing area of the Size inspector so that they become springs, as shown in Figure 10-13. This will cause the NSTextView to resize whenever its superview is horizontally or vertically stretched or shrunk, which is precisely what we want for an NSTextView that covers the content area (view) of a window.
At last, it’s time to test the skeletal MathPaper application, with some of our own features added:
Back in PB, click the build and debug button. Save all files when prompted.
Tip
MathPaper may run but
give you an alert panel that states “Can’t
create new document.” If this happens, try cleaning
out your ~/MathPaper/build folder by clicking
PB’s Clean Active Target button, and then build and debug MathPaper again.
PB will create a build folder (if necessary),
copy into this folder all of the files that it needs, compile your
classes, and start the application running within a copy of the
gdb debugger. When your application starts
running, a generic application icon should appear in the Cocoa Dock
(we’ve seen that before). A single blank MathPaper
window will be created automatically, because the application was
launched without asking it to open a file.
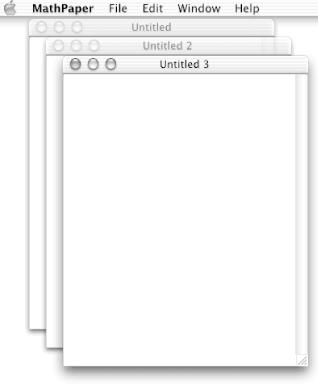
Type Command-N twice. Two more windows will be created, as shown in Figure 10-14.
Try resizing one or more of the windows to test your Autosizing settings. Note that you can type mathematical expressions in the windows, but they are not evaluated because we haven’t yet tied the Evaluator to MathPaper.
Quit MathPaper.
[31] We have taken the liberty of reformatting some of this source code so that it will fit better on these pages.