
In the remainder of this chapter, we’ll add color to our GraphPaper application. To do this, we’ll add a Preferences panel (users refer to it as a Preferences dialog) that will let the user choose three distinct colors for drawing the graph, the equation, and the axes.
To isolate the parts of the GraphView that deal solely with color, we’ll create a GraphView subclass called ColorGraphView. This way, we won’t need to make any changes to the GraphView class itself, yet we can use all of its functionality. This is called reusability of classes.
The user probably won’t want to change the
graph’s colors every time the GraphPaper application
is run, so we’ll put the Preferences panel in its
own nib file rather than in MainMenu.nib. That
way, the Preferences panel will be loaded and take up memory only
when the user chooses to see it. The ColorGraphView class will have
three NSColor instance variables, to keep track of the colors
currently being used.
We’ll also set up a new class called
PrefController to take care of modifying
these instance variables when the Preferences panel is displayed. If
the Preferences panel isn’t loaded, the
ColorGraphView class will use reasonable defaults for the color
instance variables. In Chapter 21,
we’ll see how to set the values for these colors
from the Mac OS X defaults database, application- defaults
information stored in every user’s
~/Library/Preferences folder. (The
application’s defaults database was introduced in
Chapter 2).
A Preferences panel is a panel that an application provides to let users change preferences and configuration options. It gives the user an easy way to read the contents of the defaults database for his particular application and to make modifications. Every configuration or installation option that your program supports should be settable via the Preferences panel.
Preferences panels can be simple or complex; usually, there is little correlation between the complexity of a program’s Preferences panel and the complexity of the program itself. However, you should try to keep the number of options in your application’s Preferences panel under control. When in doubt, let ease of use be your guide.
In the upcoming sections, we’ll make a simple Preferences panel for setting the colors of the graph, the axes, and the function in GraphPaper. This panel won’t be fully functional, though, because it will be missing the OK and Revert buttons for saving the Preferences information into the defaults database. We’ll add those in Chapter 21.
First we’ll create a Controller class for our application, which will act as a central coordinator of the activity of the GraphView object and the Preferences panel. Contrast this with the PrefController class, which will control only the preferences in GraphPaper.
As with most Cocoa applications, the purpose of GraphPaper’s Controller class will be to load nibs and provide a central means for finding the ids of important objects. It won’t be a very complicated class, but it will be very important.
We’ll set up the Controller object so that it is the
NSApp
delegate. The delegate outlet will make it
possible for any object in our application to get the id of the
GraphView instance (pointed to by graphView) by
evaluating the following message:
[ [NSApp delegate] graphView]
Putting accessor methods in classes when you design them is good programming practice. We’re just planning ahead.
To have the Preferences panel in its own nib, we will also need to arrange for the Controller class to load the nib on demand. We’ll use code similar to that we used in previous chapters to load the About box nib on demand.
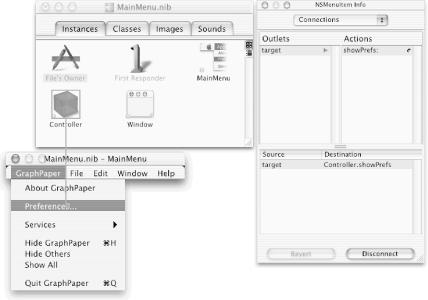
Open your GraphPaper project in Project Builder and the
MainMenu.nibfile in IB.Subclass the NSObject class in IB (Classes → Subclass NSObject) and rename the new class “Controller”.
Add an outlet called
graphViewto the Controller class in the Controller Info dialog.Add another outlet, called
prefController, to the Controller class.Add an action method called showPrefs: to the Controller class.
Create the files for the Controller class (Classes → Create Files for Controller) and insert the new class files to the GraphPaper project.
Instantiate the Controller class (Classes → Instantiate Controller). A new icon labeled “Controller” will show up in the Instances pane of the
MainMenu.nibwindow.Make the Controller the File’s Owner’s delegate by Control-dragging from the File’s Owner icon to the Controller icon and double-clicking
delegatein the File’s Owner Info dialog.Connect the Controller’s
graphViewoutlet to the on-screen GraphView instance in GraphPaper’s main window.Insert the
@classdirective and graphView method declaration shown here in bold intoController.h:#import <Cocoa/Cocoa.h> @class GraphView; @interface Controller : NSObject { IBOutlet id graphView; IBOutlet id prefController; } - (IBAction)showPrefs:(id)sender;- (GraphView *)graphView; @end
The
@classdirective allows the Controller class to declare that it returns an object of the GraphView type without including the whole GraphView class definition.Insert the lines shown here in bold into
Controller.m:#import "Controller.h"#import "GraphView.h" @implementation Controller - (GraphView *)graphView { return graphView; } - (IBAction)showPrefs:(id)sender { if (!prefController) { [NSBundle loadNibNamed:@"Preferences.nib" owner:self]; } [ [prefController window] makeKeyAndOrderFront:sender]; } @end
Controller may appear to be a gratuitous class — why not just make the GraphView instance the delegate of the NSApp object? The answer will become clear as we add more features to the GraphPaper application: having a separate Controller object will make it easier to add new functionality.
The prefController outlet will be initialized to
point to a PrefController object (which will control the Preferences
panel) that we’ll create in the next section. The
showPrefs: action will be invoked in
response to a user’s choosing GraphPaper
→ Preferences and will pass the request along to the
PrefController object through the prefController
outlet.
The first time the showPrefs:
action method is invoked, it will load
Preferences.nib. Every time the showPrefs: action method is invoked, it asks
the prefController for the id of its window and
then exposes the window with the makeKeyAndOrderFront: message.
Back in IB, Control-drag from the
MainMenu.nibapplication menu item GraphPaper → Preferences to the Controller instance (see Figure 17-4).Connect the GraphPaper → Preferences menu cell to the Controller instance so that it sends the showPrefs: action message, as shown in Figure 17-4.
Save
MainMenu.niband minimize theMainMenu.nibwindow by clicking its yellow minimize button (working with two on-screen nibs in IB can be confusing).
The Preferences panel will be loaded by a PrefController object in
response to the user’s choosing the GraphPaper
→ Preferences menu command. In this section
we’ll set up the nib and create the
PrefController class. These next few steps
all refer to the file
Preferences.nib
, not to MainMenu.nib.
Choose IB’s File → New command and then choose Cocoa → Empty from the resulting Starting Point panel.
Save the new nib module in the
Preferences.nibfile in GraphPaper’sEnglish.lprojfolder and add it to the GraphPaper target.Read (parse) the definition of the Controller class (Classes → Read Files) by reading the declarations in
Controller.h. The Controller class should appear as a subclass of the NSObject class, and thusPreferences.nibshould now know about the Controller class.Change the class of
Preferences.nib’s File’s Owner to the Controller class. To do this, select the File’s Owner icon under the Instances tab in thePreferences.nibwindow, type Command-1, and then change the class of the File’s Owner from NSObject to Controller.Subclass the NSObject class again (Classes → Subclass NSObject) and rename the new class “PrefController”.
Add these four outlets and two actions to the PrefController class:
                        Outlets                      Action Methods
graphColorWell               okay:
axesColorWell                revert:
labelColorWell
window
Don’t worry about the revert: and okay: actions now; we won’t use them until Chapter 21.
Create the files for the PrefController class (Classes → Create Files for PrefController) and insert the new class files to the GraphPaper project.
Instantiate the Controller class (Classes → Instantiate PrefController). A new icon labeled “PrefController” will show up in the Instances pane of the
Preferences.nibwindow.Connect the
prefControlleroutlet in the File’s Owner (Controller) object to the PrefController instance in thePreferences.nibwindow.Set up a Preferences panel in
Preferences.nibthat looks like the one in Figure 17-5. To do this, drag a Panel icon from IB’s Cocoa-Windows palette and drop it on the desktop. Rename it “Preferences”. Then drag three NSColorWells from the Cocoa-Other palette and three Message Text icons from the Cocoa-Views palette and drop them all in the new panel. Use IB’s blue guidelines and the Layout → Alignment menu command to align these objects. Then choose Layout → Group In → Box to get the boundary (Box) and rename it “Colors”, as shown in Figure 17-5.
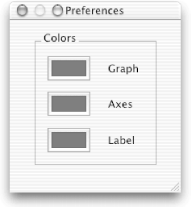
Set the tag of the NSColorWell labeled “Graph” to “1” (make sure you set the tag on the NSColorWell and not the text label).
Set the tag of the NSColorWell labeled “Axes” to “2”.
Set the tag of the NSColorWell labeled “Label” to “3”.
Connect each color-well outlet in PrefController to the appropriate NSColorWell object in the Preferences panel. Be sure that you are connecting to the NSColorWell object and not to the labels! See Figure 17-6 for the
labelColorWelloutlet connection.
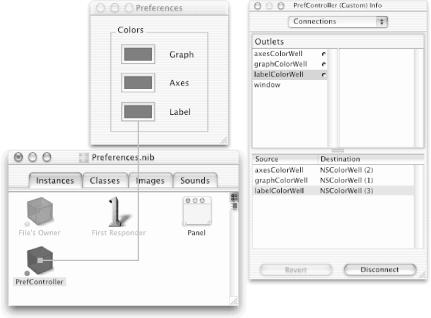
Connect PrefController’s
windowoutlet to the Preferences panel’s title bar.Save
Preferences.nib.
A PrefController object will manage the Preferences panel. Following is the implementation of the awakeFromNib method and the method that it invokes (setUpWell:) to set up each color well. In addition, the window accessor method is added so the Controller can send a window message to PrefController to get the id of the Preferences panel to send it the makeKeyAndOrderFront: message.
Back in PB, insert the three method declarations shown here in bold into
PrefController.h:#import <Cocoa/Cocoa.h> @interface PrefController : NSObject { IBOutlet id axesColorWell; IBOutlet id graphColorWell; IBOutlet id labelColorWell; IBOutlet id window; } - (IBAction)okay:(id)sender; - (IBAction)revert:(id)sender; - (NSWindow *)window; - (void)setUpWell:(NSColorWell *)well; - (NSColorWell *)colorWellForTag:(int)aTag; @endInsert these two
#importdirectives intoPrefController.m:#import "Controller.h" #import "ColorGraphView.h"
Insert the following two method implementations into
PrefController.m:- (NSWindow *)window { return window; } - (void)setUpWell:(NSColorWell *)well { id colorGraphView = [ [NSApp delegate] graphView] ; [well setTarget:colorGraphView]; [well setAction:@selector(setObjectsToColor:) ]; [well setColor:[colorGraphView colorForTag:[well tag]] ]; }
The setUpWell:
method arranges for the NSColorWell to
send the setObjectsToColor: action
message (described later) directly to the ColorGraphView target
object. It gets the ColorGraphView id (graphView)
by sending the graphView accessor
message to the Controller (NSApp’s delegate). This
allows us to overcome Cocoa’s apparent inability to
send messages between nibs. In fact, it’s easy to
send messages between objects that are in different nibs — you
just can’t wire it up graphically using IB.
After the NSColorWell’s action and target are set,
the setUpWell: method goes to the
colorGraphView, asks for the color that is
associated with the particular tag, and then sets the NSColorWell to
be this color. We’ll implement the colorForTag: method later in this chapter.
The Application Kit uses a single NSColorPanel object for each running application. The method [NSColorPanel sharedInstance:YES] returns the id of that shared instance; if the Colors panel hasn’t been created yet, it gets created.
PrefController’s awakeFromNib method first creates a shared
Colors panel, then sets the continuous flag for
the Colors panel. It is necessary to set the
continuous flags in both the color well and the
Colors panel if you want a color well to automatically send a message
to its target as the color on the Colors panel is changed. The
awakeFromNib method also invokes the
setUpWell: method for each of the
three color wells.
Finally, we will add a method that will allow other objects to obtain the id of an NSColorWell on the Preferences panel by specifying the tag. Because all of the color wells are subviews of the window’s content view, this is easy.
In this section we’ll create the ColorGraphView class, which knows how to draw a graph in color and how to change the colors of the objects in the display list. The ColorGraphView class will have two jobs: managing the drawing of the graph in color, and changing the colors of objects in the display list when requested.
Back in IB, open (or maximize) the
MainMenu.nibfile if it is not already open. (Make sure that you are no longer working inPreferences.nibby minimizing it.)Subclass the GraphView class (which itself is a subclass of NSView) in the
MainMenu.nibfile. Rename the new class “ColorGraphView”.Change the class of the on-screen GraphView instance in GraphPaper’s main window to ColorGraphView in the Info dialog (Command-1).
Changing the class of GraphView to ColorGraphView shouldn’t break any of the connections we made with GraphView. However, if you inadvertently changed the class to one that didn’t implement the graph: action (such as NSView), IB may have broken the Graph button’s connection. If this or any other connection was broken, reconnect it.
Add a new action called setObjectsToColor: to ColorGraphView.
Note that because GraphView is ColorGraphView’s superclass, its outlets and actions show up as dimmed, uneditable text in the Info dialog.
Create the files for the ColorGraphView class and insert the new class files to the GraphPaper project.
Insert the lines shown here in bold into
ColorGraphView.h:#import <Cocoa/Cocoa.h>#import "GraphView.h" @interface ColorGraphView : GraphView { NSColor *axesColor; NSColor *graphColor; NSColor *labelColor; }- (NSColor *)colorForTag:(int)aTag; - (void)setObjectsToColor:(NSColor *)theColor forTag:(int)aTag; - (void)addGraphElement:(id)element; - (IBAction)setObjectsToColor:(id)sender; @end
The axesColor, graphColor, and
labelColor instance variables will store the
current colors for the axes, graph, and label, respectively. The
color wells in the Preferences panel will send the setObjectsToColor: message to tell the
ColorGraphView when the user wants to change the color of the axes,
graph, or label (the setObjectsToColor method was referenced in
setUpWell: and will be implemented
later). This method, in turn, will invoke the setObjectsToColor:forTag:
method, which will cause ColorGraphView
to change the colors of all of the objects in the display list that
have a matching tag. The colorForTag:
method returns the color of the
particular NSColor that matches the provided tag.
The ColorGraphView implementation isn’t very complicated, because most of the work of actually drawing the graph is done in the GraphView class. The only thing the ColorGraphView class has to manage is the color of the newly drawn objects on the graph, as well as changing the colors of existing objects when the user changes a color in one of the color wells in the Colors panel.
The key definitions that we need for color are contained in
Cocoa’s
NSColorWell.h
and NSColorPanel.h
files. It’s a good idea to look briefly at these
files, as well as at NSColor.h, to learn the
basic structures, constants, and methods Cocoa provides for handling
color. All of these files can be viewed using PB’s
Find pane.
The first two methods in the following ColorGraphView class implementation provide for the basic mapping between tags and the three color-containing instance variables in ColorGraphView. The colorForTag: method takes a tag and returns the matching color instance variable. The setObjectsToColor:forTag: method sets the appropriate instance variable to be the passed-in color. It then goes through the entire display list, finds all of the elements with matching tags, and sets their colors as well.
Insert the following two method implementations into
ColorGraphView.m:- (NSColor *)colorForTag:(int)aTag { switch (aTag) { case AXES_TAG: return axesColor; case GRAPH_TAG: return graphColor; case LABEL_TAG: return labelColor; } return nil; // no color? } - (void)setObjectsToColor:(NSColor *)theColor forTag:(int)aTag { NSEnumerator *en; id obj=nil; // First set the correct instance variable switch (aTag) { case AXES_TAG: [axesColor release]; axesColor = [theColor retain]; break; case GRAPH_TAG: [graphColor release]; graphColor = [theColor retain]; break; case LABEL_TAG: [labelColor release]; labelColor = [theColor retain]; break; } // Now set the elements in the display list en = [displayList objectEnumerator]; while (obj = [en nextObject]) { if ([obj tag]==aTag) { [obj setColor:theColor]; [self setNeedsDisplayInRect:[obj bounds] ]; } } }
When new objects are added to the display list, their colors must be set in accordance with their tags. We can set the colors quite simply by overriding GraphView’s addGraphElement: method. Notice that our implementation of this method uses the colorForTag: method to find out what the color for the passed-in element should be.
As this example shows, part of a good class design is being able to easily change or enhance functionality by subclassing.[39]
These three methods are all that are necessary to display newly drawn graphs in the colors requested by the user. But if you want to respond to color-change requests from the user, we will need one more method.
When the user changes a color using an NSColorWell object, the
NSColorWell sends the setObjectsToColor: action to the
ColorGraphView object (the target and action were set up in
PrefController’s setUpWell: method). The setObjectsToColor: method in ColorGraphView
needs to change the value of the appropriate color instance variable
as well as the elements in the display list. We’ll
use the NSColorWell’s tag
instance variable to figure out which NSColorWell sent the message.
(Recall that we set each color well to have a different tag.)
There’s a problem with the code that we’ve written so far: if the user tries to make a graph without first invoking the Preferences panel, nothing will be drawn, because all of the NSColor instance variables for setting the graph, axes, and label colors will be zero. The logical way to set the initial values for these instance variables is by overriding the GraphView’s initWithFrame: method. For now, we’ll just hardcode in values. In Chapter 21, we’ll see how to set these values from the defaults database system.
Override GraphView’s initWithFrame: method implementation by inserting the following method into
ColorGraphView.m:- initWithFrame:(NSRect)frame { [super initWithFrame:frame]; axesColor = [ [NSColor lightGrayColor] retain]; graphColor = [ [NSColor blackColor] retain]; labelColor = [ [NSColor darkGrayColor] retain]; return self; }
We were very careful in the last chapter to build in flexibility when we designed the GraphView, Segment, and Label classes. Because these classes have proper abstractions, instance variables, and protocols, not a single line of code in them needs to be changed.
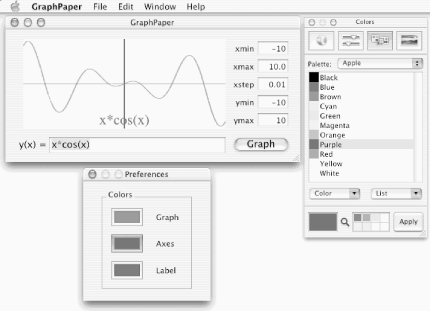
Click the Graph button to make a graph with axes and a function label appear.
Choose GraphPaper → Preferences to make the Preferences panel appear.
Click the border of the Graph color well to expose the Colors panel, which will be linked to the color well you clicked.
Try changing the color in the Colors panel. The color of the graph will change immediately (and continuously, if you drag the Colors panel sliders).
Now try changing the colors of the axes and function label. In Figure 17-7, we have changed the colors of all three items displayed for the function
x*cos(x).
Quit GraphPaper.
[39] An earlier version of the GraphView class that is not shown in this book didn’t have a separate method for adding graph elements to the display list. Instead, there was duplicate code throughout the GraphView class for manipulating the display list. Not only was this version of the program longer, but it also proved to be impossible to add color to that version of GraphView without making changes to the GraphView class itself (i.e., subclassing didn’t work). The new version of GraphView — the one we showed in the previous chapter — overcame those problems through better design.