
An accessory view is an NSView that you provide to the NSSavePanel object. The NSSavePanel object is then automatically incorporated into the Save sheet when it is displayed. Many applications use accessory views to let the user choose options when saving.
IB has direct support for creating accessory views. It allows you to create standalone views — views that aren’t displayed in a window, but that are designed to be placed into windows as the need arises. In the next step, we’ll create a simple NSView instance that will be used as a container. We will then place the desired controls in this NSView and group it in a box. Finally, we will take the id of this view and pass it to the NSSavePanel object.
We’ll start by making the necessary changes to
Controller.h. Then we’ll create
the accessory view and make connections in IB. Finally,
we’ll implement the necessary method in
Controller.m to allow us to specify the file
type.
Insert the
formatBoxandformatMatrixoutlets and thesavePanelinstance variable intoController.h:@interface Controller : NSObject { IBOutlet id graphView; IBOutlet id prefController; IBOutlet id formatBox; IBOutlet id formatMatrix; NSSavePanel *savePanel; }Insert the following setFormat: action method declaration into
Controller.h:- (IBAction)setFormat:(id)sender;Save
Controller.h.Activate IB and make sure that
MainMenu.nibis the active window.Read (parse) the updated Controller class definition into
MainMenu.nib.An easy way to do this is to drag the
Controller.hicon from PB’s Groups & Files pane into the MainMenu.nibwindow in IB. Check the Info dialog to make sure that the newly added action method and outlets are in the Controller class of MainMenu.nib.
Next, we’ll create the accessory NSView.
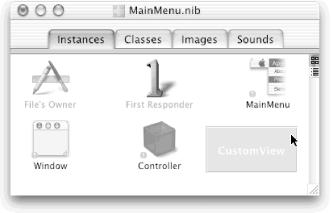
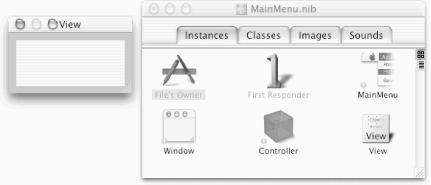
Drag a CustomView icon from IB’s Cocoa-Containers palette and drop it into the
MainMenu.nibwindow, as shown in Figure 19-14.A new NSView will be added to the file
MainMenu.niband a small window titled “View” will appear, as shown in Figure 19-15. This odd-looking window represents the accessory view. The icon titled “View” in the Nib File window represents the accessory view window.
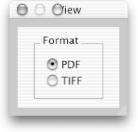
Drag a radio-button matrix from IB’s Cocoa-Views palette and drop it in the accessory view. Allow two radio-button choices, PDF and TIFF, with PDF the default. Change the font of the radio-button labels if you like.
Select the radio-button matrix and choose IB’s Layout → Make subviews of → Box menu command to group it in a box.
Change the title of the box to “Format” in the Info dialog. The window should now look very similar to the one in Figure 19-16.
Connect the Controller’s
formatBoxoutlet to the box titled “Format”.Connect the Controller’s
formatMatrixoutlet to the radio-button matrix, as shown in Figure 19-17. Refer to the text near the bottom of the Info dialog, and verify that each outlet was connected to the correct object.
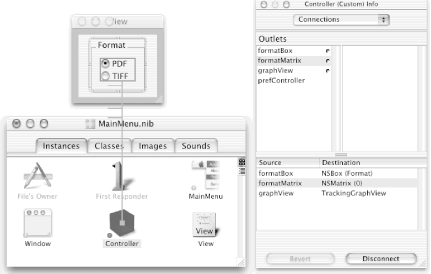
Connect the radio-button matrix to the Controller instance icon so that it sends the setFormat: action. Again, be sure to connect the NSMatrix and not the containing box (check the title of the Info dialog). Note that this connection is in the opposite direction of the one in the previous step.
In addition to the PDFForView: and TIFFForView: methods we discussed earlier, we’ll need to implement a setFormat: action method that is invoked when the user changes the file-format type in the Save panel. Cocoa provides only a single instance of the NSSavePanel object, so we can use the [SavePanel new] statement to get the panel’s id. We’ll do that later, in the saveDocumentTo method. The SavePanel object lets us change its required file types inside its modal loop, so when the user changes the format, the required file type is automatically changed.
It’s a complicated statement, but by now you should be able to figure it out on your own. Notice that we directly read the title of the selected cell in the matrix, so you can add new file types simply by adding their extensions to the control.
Now we need to modify thesaveDocumentTo: method to rip the box (and the subviews that it contains) out of the window we created earlier and put it into the Save panel as an accessory NSView. This is done with the NSSavePanel’s setAccessoryView: method. The NSSavePanel object automatically resizes the on-screen Save panel (sheet) to accommodate the accessory NSView. We need to modify the save: method to look at the title of the selected cell and choose the appropriate method to send output to the stream. And finally, we need to modify the savePanelDidEnd:returnCode:contextInfo: method so that it looks at the selected file type and picks the appropriate format. All of these modifications are presented in the following steps.
Replace the previous version of the savePanelDidEnd:returnCode:contextInfo: method in
Controller.mwith the following one:- (void)savePanelDidEnd:(NSSavePanel *)sheet returnCode:(int)returnCode contextInfo:(void *)contextInfo { NSData *image=0; NSString *filetype = [sheet requiredFileType]; if (returnCode==0) return; // User did not click OK if ([filetype isEqualToString:@"pdf"]) { image = [self PDFForView:graphView]; } if ([filetype isEqualToString:@"tiff"]) { image = [self TIFFForView:graphView]; } if (image==0) { NSRunAlertPanel(nil,@"Unknown file type '%@'", nil,nil,nil,filetype); return; } if ([image writeToFile:[sheet filename] atomically:NO]==NO) { NSRunAlertPanel(nil,@"Cannot save file '%@': %s",nil,nil,nil, [sheet filename],strerror(errno)); } }
Replace the previous version of the saveDocumentTo: method in
Controller.mwith the following one:- (IBAction)saveDocumentTo:(id)sender { NSString *type = [ [ [formatMatrix selectedCell] title] lowercaseString]; // Get a Save panel savePanel = [NSSavePanel savePanel]; [savePanel setTitle:@"Save Graph Image"]; // Set the initial file type [savePanel setRequiredFileType:type]; // Put the format box in the Save Panel [savePanel setAccessoryView:formatBox]; [formatBox retain]; // Keep a copy! // And run [savePanel beginSheetForDirectory:nil file:nil modalForWindow:[graphView window] modalDelegate:self didEndSelector:@selector(savePanelDidEnd:returnCode:contextInfo:) contextInfo:nil]; }
Note that this method retains the formatBox
instance variable. This is necessary because the savePanel
automatically releases its accessory view. If the Controller class
does not retain the formatBox, it will be freed,
and an error will be generated the next time the Save panel (sheet)
is displayed.
Build and run GraphPaper, saving all files first.
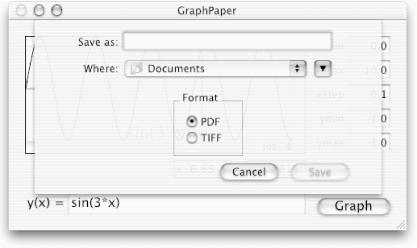
Click the Graph button, then choose the Save Graph menu command. You should see a Save panel with the accessory NSView containing the radio-button matrix, as shown in Figure 19-18.
Try saving the same graph as PDF and as TIFF. Then double-click the PDF and TIFF file icons in your Finder to see them in Preview. You might also try to import the files into a word processor or other application.
Quit GraphPaper.