
In this section,
we’re going to change the Preferences panel into a
multi-view panel, so that we can use it to change either the initial
colors or the initial graph parameters (e.g.,
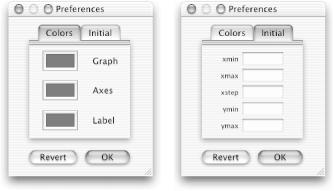
xmin, ymax). Figure 21-8 shows the pop-up menu and two NSViews that
will show up in our new Preferences panel. The particular view that
shows up depends on which tab (Colors or Initial) the user selects.
In the final section of this chapter (and the book!),
we’ll modify GraphView to read its initial graph
conditions out of the defaults database.
It’s quite easy to set up a tab view with Cocoa: just drag out the tab view and drop your GUI elements into place. Before we do this, however, we need to set up instance variables to hold the additional controls.
Insert the five outlet instance variables shown here in bold into
PrefController.h:#import <Cocoa/Cocoa.h> @interface PrefController : NSObject { // Colors tab IBOutlet id axesColorWell; IBOutlet id graphColorWell; IBOutlet id labelColorWell; // Initial tab IBOutlet id xminCell; IBOutlet id xmaxCell; IBOutlet id xstepCell; IBOutlet id yminCell; IBOutlet id ymaxCell; IBOutlet id window; } ... @endSave
PrefController.h.Open
Preferences.nibin IB.Drag the
PrefController.hicon from PB and drop it in thePreferences.nibwindow in IB.
The last step brought the five new outlet variables into IB. In the next few steps, we’ll put a tab view on the Preferences panel and set up the appropriate controls.
Select a color well in the Preferences panel in IB and then Shift-select the other two color wells and the labels. Then type Command-X to cut the six selected items (we’ll paste them back later).
Select the Colors box and hit the Delete key (we won’t need it anymore).
Drag a Tab/View icon from IB’s Cocoa-Containers palette and drop it in the Preferences panel.
Size the Tab/View to fit in the Preferences panel (see Figure 21-8).
Double-click inside the Tab/View to tell IB that you want to work within the container.
Type Command-V to paste in the three color wells and their labels.
Reconnect the PrefController’s
axesColorWell,graphColorWell, andlabelColorWelloutlets to their respective color wells (Control-drag from PrefController to each well).Double-click on the tab labeled “Tab” in the Tab/View and change the label to read “Colors”.
Click the tab labeled “View” in the Tab/View. Note that your controls disappear! (Don’t worry — they’re still there — you can make them reappear by clicking the Colors tab.)
Change the word “View” to “Initial”.
Drag out a Field1/Field2 NSForm from the Cocoa-Views palette and drop it in the Initial tab (pane).
Expand the NSForm to five cells. You may want (or need) to shrink the font size or change the intercell spacing. (You can change the intercell spacing by holding down the Command key while resizing the matrix.)
Connect the appropriate PrefController outlets (
xmaxCell,xminCell,xstepCell,yminCell, andymaxCell) to the appropriate cells in the form (Control-drag from PrefController to the fields).Save the
Preferences.nibfile.
Finally, we need to modify the revert: and okay: methods for the PrefController class so
that the xmin, xmax,
xstep, ymin, and
ymax values are read from the defaults database
when the Preferences window is displayed and saved back into the
defaults database when the OK button is pressed. (Recall that we have
already modified the GraphView class so that it initializes these
values from the defaults database.)
Insert the lines shown here in bold into the revert: method in the
PrefController.mclass file:- (IBAction)revert:(id)sender { NSUserDefaults *defs = [NSUserDefaults standardUserDefaults]; [self setUpWell:axesColorWell ]; [self setUpWell:labelColorWell ]; [self setUpWell:graphColorWell ]; [xminCell setObjectValue:[defs objectForKey:GP_xmin]]; [xmaxCell setObjectValue:[defs objectForKey:GP_xmax]]; [xstepCell setObjectValue:[defs objectForKey:GP_xstep]]; [yminCell setObjectValue:[defs objectForKey:GP_ymin]]; [ymaxCell setObjectValue:[defs objectForKey:GP_ymax]]; }Insert the five lines shown here in bold into the okay: method in
PrefController.m:- (IBAction)okay:(id)sender { NSUserDefaults *defs = [NSUserDefaults standardUserDefaults]; [defs setObject:DataForColor([axesColorWell color]) forKey:GP_AxesColor]; [defs setObject:DataForColor([labelColorWell color]) forKey:GP_LabelColor]; [defs setObject:DataForColor([graphColorWell color]) forKey:GP_GraphColor]; [defs setObject:[xminCell objectValue] forKey:GP_xmin]; [defs setObject:[xmaxCell objectValue] forKey:GP_xmax]; [defs setObject:[xstepCell objectValue] forKey:GP_xstep]; [defs setObject:[yminCell objectValue] forKey:GP_ymin]; [defs setObject:[ymaxCell objectValue] forKey:GP_ymax]; [window orderOut:nil]; }Build and run GraphPaper, saving all files first.
Choose GraphPaper → Preferences.
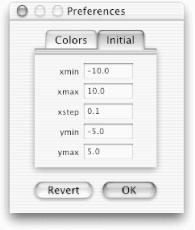
Select the Initial tab in the Preferences panel, and you should see the initial defaults, as shown in Figure 21-9.
Enter values for all of the initial parameters and click OK (or hit Return). The OK and Revert buttons work as before.
Quit GraphPaper.
Now run GraphPaper again, and the initial values should show up in both the GraphPaper window and the Preferences panel.
Quit GraphPaper.
Double-click the
~/Library/Preferences/com.nitroba.GraphPaper.plistfile in the Finder to view the GraphPaper defaults in PropertyListEditor, as shown in Figure 21-10.
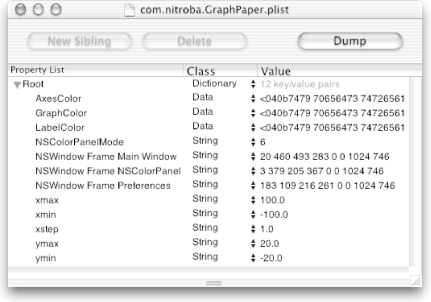
Figure 21-10. com.nitroba.GraphPaper.plist file after setting initial values in the Preferences panel
Quit GraphPaper.
Congratulate yourself for making it through this book! We salute you! We thank you! We honor you!