
Most windows that contain scrollers should be resizable. In Chapter 10, we showed how to set up an NSScrollView so that it would resize when its containing window was resized. Recall that we set the Autosizing attributes for the NSScrollView in IB’s Size Info dialog. That was easy to do for our MathPaper application because there was only one view — the NSScrollView — that covered the window’s content area. With the ViewDemo window, however, handling window resizing requires a little more thought because there are multiple view objects. Let’s first see what the current situation is.
Back in IB with PolygonView, choose the File → Test Interface menu command.
Resize the window up and to the left. Note that the view objects in the window don’t change size and thus become obscured when the window is small, as shown in the window on the left in Figure 15-11.

Now resize the window down and to the right, and note that the objects still don’t change size or position relative to the lower-left corner. The result is ugly, as shown in the window on the right in Figure 15-11.
Quit Test Interface mode by typing Command-Q.
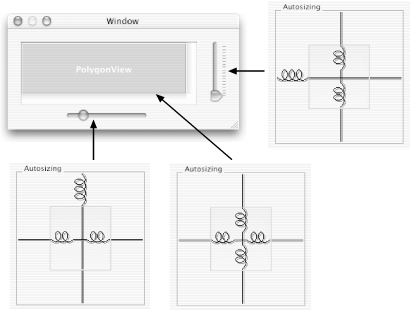
Select the NSScrollView/PolygonView instance and type Command-3 to bring up IB’s Size Info dialog with the Autosizing feature.
Click the lines in the inner Autosizing square so that the four springs appear, as shown on the bottom right in Figure 15-12.
Choose IB’s File → Test Interface menu command again and note that the NSScrollView resizes properly but eventually covers the vertical slider — obviously not what we want.
Quit Test Interface mode by typing Command-Q.
Note how wonderful IB is for testing interfaces! We’ll use Test Interface mode again shortly.
Clearly, the NSScrollView should stretch in two dimensions when the window is stretched — we have that working now. The vertical slider, on the other hand, should stick to the righthand side of the window and grow only when the window is resized vertically. The horizontal slider should stick to the bottom of the window and grow only when the window is stretched horizontally. If we were using other frameworks, implementing these various resizing operations would be a real pain. But with Cocoa, it’s easy: simply set Autosizing attributes in IB’s Size Info dialog. This is basic visual programming in Cocoa.
In the Autosizing square, the horizontal springs are for horizontal resizes while the vertical springs are for vertical ones. The inside square is for stretching, while the outside square is for anchoring. A spring in the inside box indicates that the selected object should stretch when it is resized, while a line indicates that it should stay a fixed size. A line on the outside box indicates that the distance between the object and the side of the window should remain fixed if possible; a spring indicates that it should be resizable.
Still in IB, select the horizontal slider and click the lines in the associated Autosizing square so that the springs appear, as shown on the bottom left in Figure 15-12.
Now select the vertical slider and click the lines in the associated Autosizing square so that the springs appear, as shown on the top right in Figure 15-12. Choose IB’s File → Test Interface menu command one more time and resize the window. Note that the views all resize properly (e.g., the sliders grow), as shown in Figure 15-13.

Quit Test Interface mode by typing Command-Q.
The one remaining problem with resizing has to do not with stretching, but with shrinking. If you make the window too small, you’ll end up with junk. To prevent this from happening, you can set a minimum size for the window in the Window’s Size inspector (see Section 15.9).