
In this section, we’ll cover the details of the Mac OS X Terminal application. Before getting into those details, though, we’ll take a step back to look briefly at the history of the video display terminal itself. That should give you some insight into why the Terminal application developed in the way it did.
Many years ago, long before personal computers were developed, computer systems were too big and too expensive to put on a single person’s desk. Instead, computers were put in special-purpose rooms (called “computer rooms”), where a staff of highly-trained professionals worked around the clock to keep the machines running. Many computer systems read their programs from decks of 80-column computer punch cards, each of which was punched with a series of holes that represented a single line of text. When a program was finished running the results were printed on a line printer. These systems were said to implement "batch mode processing” because programs were run in batches — there was no interactivity at all!
One of the first revolutions in computing was the development of interactive systems. In addition to being attached to a card reader and a line printer, the computer was equipped with a modified teletype printer. Every time a key on the teletype was pressed, a distinct code was sent to the computer. Every time the computer sent a code to the teletype, the teletype would literally print a letter onto a roll of paper. These interactive systems made the computer much easier to use. Over time, the teletype printers were replaced with special-purpose printing terminals that were designed specifically for interactive computing, rather than for sending telegrams and telexes.
The first video screens were connected to computers by the U.S. military in the late 1950s, and by universities and research labs in the 1960s. These computer-controlled video systems were incredibly expensive. The screens were also very specialized: usually, each video system was designed to run a specific application. Over time, however, the video systems became more general-purpose.
In the mid 1970s, there was a breakthrough: instead of having the computer directly control the video screen, a number of companies started to build special-purpose desktop boxes called glass teletypes or video display terminals (VDTs). To the computer, a VDT looked like a traditional printing terminal. But instead of having paper, it had a video display, a character generator, and a small amount of memory. By the late 1970s most of these systems had standardized on a display that was 80 columns wide and 24 lines high, but that’s about the only thing that was standardized: different VDTs from different manufacturers had different capabilities and used different codes to do things such as clear the screen or move around the cursor.
The Unix operating system (Darwin) that underlies the Mac OS X
operating system still shows much of this evolutionary history. Every
copy of Mac OS X comes with a program called ed,
a line-oriented editor designed to be used with printing terminals.
Likewise, there is a file called
termcap
in /usr/share/misc/ that contains the actual
control codes used by thousands of different kinds of printing and
video terminals. (You’ll even find
Simson’s name and email address in this file, with
the terminal definition of an emulator that used to run on the Atari
ST!) The termcap file allowed a single program,
such as vi or GNU Emacs, to run on many
different kinds of displays. Over the past 25 years, these programs
have become highly tuned by generations of programmers. They are now
ideal environments for writing and debugging programs.
Most of the terminals whose names appear in the
termcap file are long gone. If you wanted to,
you could hook your Mac OS X laptop up to a model 33 teletype and
start typing in all of the example programs in this book! But you
wouldn’t do that, of course. Aside from the fact
that you probably couldn’t find
a working ASR 33, most computers in use today are built around bitmap
displays, rather than character terminals.
Bitmap displays were invented along with VDTs in the 1970s, but they didn’t become popular until the 1980s. The reason was cost: because each pixel of a bitmap display is individually accessible, the displays required more memory and thus were more expensive to produce. Of course, today memory is cheap, so practically every computer (from simple handhelds to ten-thousand-dollar workstations) has a bitmap display. But in the early 1980s, some people were using computers that had bitmap displays while other people had character-oriented terminals. In some cases, single computers had both bitmap displays and terminals. Because of this ambiguity, the most popular application for the early bitmap displays was the "virtual terminal” program — a program that let a single bitmap display multiple rectangular “terminal” windows, each one simulating a VDT.
This, in a nutshell, is the history behind the Mac OS X Terminal application. Now let’s move on to see how today’s Terminal application operates.
Like
other
terminal emulators, Terminal displays rectangular windows on the
Macintosh bitmap display. This virtual terminal responds to the
escape sequences contained in the
/usr/share/misc/termcap
file. (If you want to look at this file, you can view it in the
Terminal or by using the Finder’s Go
→ Go to Folder command. The
termcap file doesn’t show up
automatically because the Finder hides system details such as the
/usr directory from users.)
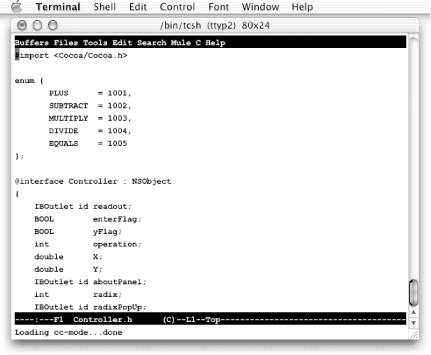
The Mac OS X Terminal actually emulates the escape sequences of the Digital Equipment Corporation VT100 terminal. As such, it provides a conventional interface for running standard Unix editors, debuggers, and other programs that do not have Mac OS X interfaces. Figure 2-9 shows a screen shot of a Terminal window running GNU Emacs, the popular editor available for every version of Unix.
The Terminal’s application menu contains the standard Mac OS X application menu commands. As required, there are About, Preferences, Services, Hide, Hide Others, Show All, and Quit commands (in the correct positions).
Next to the application menu in the
Terminal’s menu bar is
the Shell menu, which is located where the File menu usually sits.
The Shell menu makes sense in this position because the Shell
→ New command creates a new (Unix) shell window in
Terminal, just as File → New in a text editor
creates a new file or document in the editor application. (A
Unix shell is a command language
interpreter that provides an interface to the underlying Unix
operating system — Darwin, in Mac OS X. Users can change their
shells from the default tcsh to others, such as
csh, sh, or
zsh, via the shell pane in the Preferences
dialog.)
The Terminal’s menu bar also contains the standard Edit, Window, and Help menus, together with a Control menu and a (promoted) Font menu (there is no need for a Format menu). The uncommon Control menu contains commands to move around in a Terminal shell window.
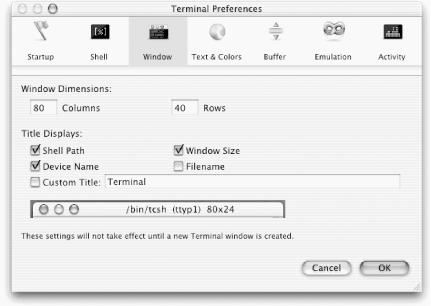
By choosing Terminal → Preferences you can bring up the Terminal Preferences dialog. The Preferences dialog, shown in Figure 2-10, displays the Window pane, which allows you to change the size and title-bar contents of your Terminal windows. There are many other preferences available to the user (click the icons in the toolbar to see them), and Unix aficionados will find that they can set preferences to emulate the type of Unix environment to which they are accustomed. We recommend that you take a few minutes to explore the various preferences available.
Terminal also has a related Terminal Inspector dialog (which you can open with the key equivalent Command-I) that allows items specific to a particular Terminal window to be modified. The panes in this dialog are similar to the panes in the Terminal Preferences dialog. These panes are not redundant — the panes in the Terminal Preferences dialog change preferences throughout the application, while the panes in the Terminal Inspector dialog change settings only for the specific Terminal window that is active (these settings will not be “remembered” as preferences).
If you try to print the contents of a Terminal window, you will be given the choice of printing all the text output (which is stored in a buffer) to the window, just the selected text, or just what’s visible in the window. You can also copy information from the Terminal window into other applications or paste information from other applications into a Terminal window, and you can drag a folder or an icon from the Finder into the Terminal window (which will result in the path for that folder being entered into the Terminal as if you had typed it on the keyboard).
Next we’ll run you through a few steps so you can
become familiar with Unix and Terminal. Since we’re
working with Unix, we will use the term
“directory” instead of
“folder” in this and the
gdb sections below.
Launch Terminal (from your Dock or from
/Applications/Utilities). A Unix shell window should open (if it doesn’t, choose Shell → New and check your Startup preferences).Change the directory by typing the Unix command
cd/Applicationsin this Terminal window and then hitting the Return (Enter) key. Make sure you include the space betweencdand the slash, and remember that Unix commands are case-sensitive, so the letterscdneed to be lowercase.[5]List all the files in the
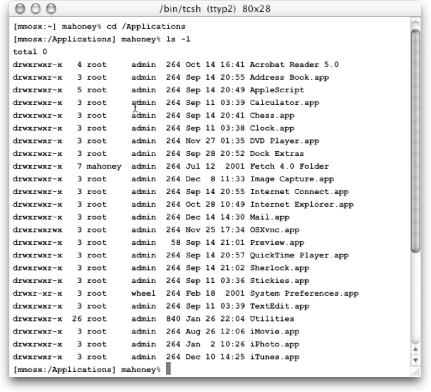
/Applicationsdirectory by enteringls-lin the Terminal window, as in Figure 2-11. (We use the term “enter” to indicate that the command should be followed by hitting the Return key.) Note that your system may have some different files in the/Applicationsdirectory from those shown in the screen shot.The programs in the
/Applicationsdirectory are actually directories themselves, not simple files as they appear to be in the Finder. (You can tell that they are directories because the first character on the left in the directory listing output forMail.appis the letterd, which stands for directory.)List all running processes by entering
psauxin the Terminal window (psis the Unix command that lists all of the processes currently running on the computer). To see the details of the process listing better, widen the window and enterps auxww; thewwwill force the output to be in wide format.List your user processes by entering
ps auxww|grepusername(whereusernameis your account username) in the Terminal window. The output should be similar to that of the ProcessViewer application’s listing of user processes. (The vertical bar character, |, is the pipe symbol that takes the output frompsauxwwand pipes it to input for thegrep, or search, utility. For more ongrep, entermangrepin a Terminal window.)Enter
topin a Terminal window to run thetopprogram, which will display a real-time view of system-usage statistics and the running processes, as shown in Figure 2-12. Yourtopoutput will definitely be different from that in Figure 2-12.

The top process list automatically updates every
second. The first line of the top display shows
the number of processes that are running. The second line displays
the load averages, or the number of processes that are currently in
the run queue — that is, the number of processes that are ready
to run at any given time. The three numbers that follow Load Avg
represent the load averaged over the last 5 seconds, the last 30
seconds, and the last 60 seconds. The next four lines contain
information about the shared libraries and virtual memory system.
Finally, there is a tabular display for each of the currently running
processes. For each process, the percentage of the CPU resources that
the process is using is displayed, along with the time that the
process has been running, the number of threads that the process has,
and other information.
With the
topprogram still running, activate the Finder and launch the ProcessViewer application in/Applications/Utilities. As we saw earlier in this chapter, ProcessViewer will display a list of user processes.Select a process (e.g., Clock) in ProcessViewer’s window, then click the small arrow next to the phrase “More Info” at the bottom left of the window to see more information about that process. Select the Process ID and Statistics tabs and compare the information with that in the
topoutput in the Terminal window.Now reactivate the Terminal window and type
qto terminate thetopprogram.To see the text that scrolled outside the Terminal window, drag the scroll knob upward. Try selecting some of the text in the window with your mouse. The standard Edit submenu commands Copy, Paste, and Select All work as you would expect (although Paste forces a scroll to the bottom, a user preference).
Next we will investigate the
defaults (database)
system
, which records user preferences and
other information that must be stored when applications
aren’t running. The stored information includes
default fonts, window positions and sizes, toggle settings, etc.,
most of which is accessible via an application’s
Preferences dialog but some of which is not. For example, the size
and position of the main Mail window is stored in the defaults system
when the application is terminated. This stored size and position
will be read by the Mail application when it next launches. Mail will
then use this information to place its new main window in the same
position with the same size as when Mail was last terminated. Note,
however, that the stored size and position are not preferences that
can be set in a Preferences dialog; rather, they are values that the
user implicitly set by moving or resizing a window using direct
manipulation. (For more information on the defaults system, enter
man
defaults in a Terminal
window.)
Enter
defaultsreadcom.apple.Terminalin a Terminal window, and you’ll see the current defaults for Terminal.
If you have not made any changes to the Terminal’s preferences, you will see very few lines of detailed output from this command. On the other hand, if you have been working with Terminal for a while and have changed your preferences, you may see as many as 50 lines of detailed information. Let’s look at part of the output (“localhost” is the name of the host computer — yours will be different):
localhost> defaults read com.apple.Terminal
{
    AlwaysPromptOnQuit = 1;
    Bell = 1;
    BlinkCursor = 0;
    Columns = 80;
    DockLaunchHide = 0;
    ...
    NSPreferencesContentSize = "{594, 399}";
    Rows = 30;
    SaveLines = 10000;
}
localhost>
These defaults mean that Terminal will prompt before quitting, “ring” the system bell (beep) when appropriate to alert the user, use the block (and not the blink) cursor, open new windows with 80 columns and 30 rows, open the Preferences dialog with a specified size, save up to 10,000 lines in the output buffer, and so on.
Back in the Finder, type Command-~ (tilde) or choose Go → Go to Folder to open the Go to Folder sheet.
Type “~/Library/Preferences” (use the Tab key for folder-name completion) in the sheet and hit Return to open the folder.
Terminal’s defaults information is stored in the
file com.apple.Terminal.plist in your
~/Library/Preferences folder. This folder
contains a variety of property lists that control the way that the
Mac OS X environment is customized for your account. Because this
information is stored under your Home folder, different users of the
same computer can have different environments.
Double-click the
com.apple.Terminal.plistfile, and the PropertyListEditor application will launch. Remember that PropertyListEditor is another developer-only application that allows you to view and edit the defaults stored in a property list (.plist) file for any application.Click the triangle next to Root in the PropertyListEditor window. You should see the same defaults that you saw in the Terminal window.
In later chapters, you’ll create your own property
list, which will be stored in your
~/Library/Preferences folder (the same place as
the property lists for Mac OS X bundled applications).
We’ll discuss the defaults database in more detail
in Chapter 21.
Warning
Do not edit the property lists for applications while they are running! If you do, the application may overwrite your changes. Exit the application first.
Open another application, such as
com.microsoft.explorer.plist, in PropertyListEditor.Quit the PropertyListEditor application.
Hide Terminal by choosing Terminal → Hide from its main menu or by typing Command-H. We’ll use Terminal again in the next section. (Clicking the red close button in the Terminal window closes only that window, not the actual application.)
[5] On most Unix systems, filenames are case-sensitive. However, Mac OS X uses the Hierarchical File System (HFS), which preserves the case of filenames that are entered but ignores case when files are opened, moved, copied, or deleted.