In this section, we’ll customize our new application’s main window, “Window”. It’s wonderful that IB automatically provides every new application with this window, but it’s rarely the right size. Sometimes it’s too small; usually it’s too big. Fortunately, we can easily resize the window as we would any Mac OS X window.
Resize the window titled “Window” to a height of about one inch and a width of about three inches.
Notice that you don’t need to know the exact height and width of this window to set its size; you simply resize it visually and you’re done (remember, you’re building an application here). This is a good example of the basic philosophy of IB — graphical things are best done graphically. This philosophy is at the heart of Cocoa’s ease of programming. (On the other hand, you can resize the window to precise dimensions using the NSWindow Info dialog, if necessary.)
The IB Palettes window near the upper-right corner of the screen contains seven (or more) palettes of objects that can be dragged into your application. By clicking one of the selector buttons in the toolbar near the top of the Palettes window, you can choose which palette is visible. The Palettes window is a multi-view window, in which one of several different views (panes) can be displayed depending on your selection of a tab, pop-up menu item, or other item. The Nib File window is also a multi-view window, but its different views are selected via tabs rather than via toolbar icons.
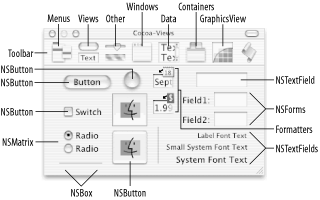
One of the most useful palettes in the Palettes window is the Cocoa-Views palette. The 14 objects in this palette are mainly Control objects (see Chapter 1) and are labeled in Figure 3-7. (Note that some objects are of the same type but have different attributes; also note that palettes may be different in future Mac OS releases.)
You can drag an object from the Cocoa-Views palette and drop it into any window or panel of the application you’re building. Let’s see how this works:
Make sure the Palettes window displays the Cocoa-Views palette by clicking the second icon from the left in the Palettes window toolbar. The window’s title bar should read “Cocoa-Views”, as shown in Figure 3-7.
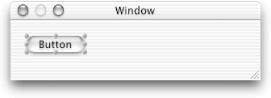
Add a button to your application by dragging the Button icon from the Cocoa-Views palette and dropping it into the window titled “Window”. The window should look something like the one in Figure 3-8.
You can resize this new button by dragging some of the little gray circles, or handles , around the button’s perimeter (the handles on your screen may be a different color, depending on your highlight color preference). You can move the button by pressing in the center of the button and dragging the button to the desired location within the window.
Resize the button so it’s a little wider by dragging the right-middle handle on the button.
Move the button so it’s in the same location as in the earlier screen shot. (Note that blue guidelines pop up as you move the button near a border of the window. These can be useful when you’re arranging the contents of a window.)
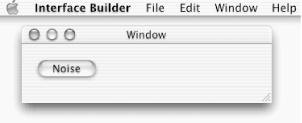
Change the name of the button to “Noise”. To do this, double-click the button’s title (“Button”) — the button’s text will highlight to indicate that it’s been selected. Then type “Noise” and hit Return.
Now you’ve got a simple window with a button. Let’s try it out!
Choose the File → Test Interface menu command (or type the keyboard equivalent, Command-R).
All of the standard IB windows will disappear (as shown in Figure 3-9), and you’ll be left with your new application’s main window and menu (except for the IB name on the left). It looks as though the new application is running, but in fact we’re only testing its interface within IB; there is no executable file.
Notice that the IB icon in your Dock has changed from its original Build mode to the “Frankenstein switch” icon. This new icon indicates that your program is now in Test Interface mode. You can move, resize, miniaturize, and even close the window titled “Window”. Several of the menu commands work, too! Try the File → Close menu command, for example (of course, the application doesn’t do much at this point). Press the Noise button and note that it turns blue, as if it had been pushed (clicked).
Quit the Test Interface mode by choosing Quit NewApplication from the IB menu (or by typing Command-Q).
Next, we’ll show how easy it is to add sound to a button:
Click the Sounds tab in the Nib File window to see the sounds available to the new application.
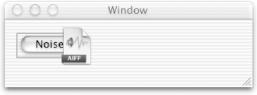
Drag one of the sound icons (e.g., Funk) and drop it on top of the Noise button in the window, as shown in Figure 3-10.
The button will highlight, indicating that it will accept the noise as an attribute. Also note that IB’s inspector (or Info) window opens at the lower right of the screen and shows the attributes of your Noise button.
Next, we’ll show how easy it is to change a button to act as if it has been clicked when the user hits the Return key:
Make sure the Noise button is selected (handles appear around its border) by clicking it once.
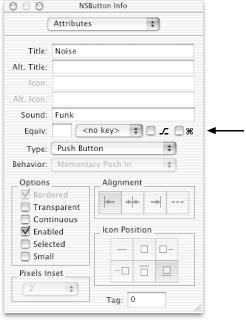
Choose Tools → Show Info to display the Info dialog (window), shown in Figure 3-11 (the Info dialog was probably already open). Select Attributes in the pop-up menu if it isn’t already selected.
The Info dialog contains information (attributes, etc.) about the selected button. Note that the title (Noise) and sound (Funk) associated with the button show up in this window.
Click the “<no key>” pop-up menu and choose the Return menu item from the list.
Note that the Noise button turns blue, indicating that it’s the default button. When a user hits the Return key, the default button acts as if it has been clicked.
Choose File → Test Interface again.
Click the Noise button, and you’ll hear the sound that you dropped on top of the button.
Hit the Return key, and you’ll hear the sound again (because you made the button the default).
Choose Quit NewApplication from IB’s main menu to return to IB’s Build mode.