
In the previous chapter, we created our simple four-function Calculator application. Although our Calculator works, it lacks the nifty presentation and many of the basic features of most Mac OS X applications. Some aspects were simply not implemented. In this and the following two chapters, we’ll use our simple Calculator as a starting point and slowly expand it, adding new features one by one.
In the first section of this chapter, we’ll configure the Interface Builder-supplied menus for the Calculator application and make some minor changes to the default About box (window) that is provided. Typically, the About box informs users about the version, author, and copyright of the application.
After seeing how the Cocoa-bundled About box works, we’ll create a new About box from scratch for our Calculator. We will use this new About box to demonstrate how to manage multiple nibs (interfaces) within a single application. In the last section of this chapter, we’ll see how Cocoa allows you to specify an icon for an application.
As we saw
in Chapter 5, Project Builder creates your
application (i.e., new project) from a stored template.
It’s up to you to customize this template to fit
your own needs. We’ve done a lot of that already,
but there are a lot more possibilities, as we’ll
soon see.
Perhaps the most obvious part of PB’s application
template interface (provided in MainMenu.nib)
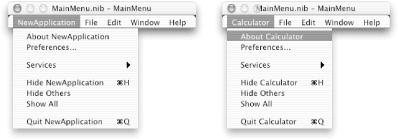
that needs customization is the menu bar. In Figure 6-1, on the left, we show the main application
menu as it is delivered to us in the PB template. The first thing
we’ll do is to change the application name and the
appropriate menu items.
Launch PB by double-clicking the file
Calculator.pbproj. (We recommend that you keep this file’s icon in the Finder’s toolbar or in the Dock.)Double-click
MainMenu.nibin the Resources section of PB’s Groups & Files browser to launch IB.Choose Interface Builder → Hide Others to simplify the screen.
If you don’t see a small menu titled “MainMenu.nib - MainMenu” on the screen, then double-click the MainMenu icon in the
MainMenu.nibNib File window.Double-click NewApplication in the menu bar titled “MainMenu.nib - MainMenu”. The word will highlight in your highlight color. Type Calculator and hit Return to change the application’s name in the main menu.
Single-click Calculator in the menu bar to open up the Calculator menu.
Double-click on the first menu item and change the title from “About NewApplication” to “About Calculator”.
Similarly, change the menu items “Hide NewApplication” to read “Hide Calculator” and “Quit NewApplication” to read “Quit Calculator”.
Your application menu should now look like the screen shot on the right in Figure 6-1.
Single-click the About Calculator menu item and then choose Tools → Show Info (or type Shift-Command-I) to see the NSMenuItem Info dialog.
If necessary, choose Connections in the pop-up menu to see the NSMenuItem Connections Info dialog (or type Command-2).
Note that there is a target/action connection indicated by the dimple (
) next to the orderFrontStandardAboutPanel: action method. This method causes the NSApplication object to display a standard About box. (Note how the programming environment uses the term panel , whereas the Aqua interface guidelines reject that term. In our discussion, we’ll use whatever term is appropriate in the given context.)
Single-click the orderFrontStandardAboutPanel: action method in the NSMenuItem Connections Info dialog to see a connection wire between the About Calculator menu item and the File’s Owner icon in the Nib File window, as shown in Figure 6-2.
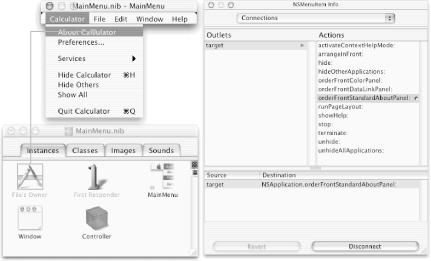
Recall that the File’s Owner icon represents the object of type NSApplication in charge of running your application and interfacing with the Mac’s hardware. Thus, when the Calculator application is running and the About Calculator menu item is clicked, this target/action connection means that the orderFrontStandardAboutPanel: action message will be sent to the NSApplication object. The orderFrontStandardAboutPanel: method does exactly as its name indicates — it displays the standard About box (panel) in front of all other on-screen windows.
Repeat Step 11 for the last four menu items in the Calculator menu, beginning with Hide Calculator, to find out about their preset connections and action methods.
Some of the menu items in other menus have additional preset connections. For example, the File → Close menu item sends a performClose: message to the FirstResponder object (probably the key window). You might take a few minutes to investigate these connections, but be sure not to disconnect any of them.
Note that there has been no change to the Calculator application in the last four steps — we’ve just been poking around. If you want, you can now build and run your application and see the new Calculator menu. We’ll do that in a later step, after we modify the About box to fit our application.
Every Mac OS X application should have an About box. The About box displays basic information about the application, such as who created it and what version is currently running. About boxes are so important that they are built into the Cocoa AppKit. An About box is occasionally referred to as an About panel, especially in the programming world.
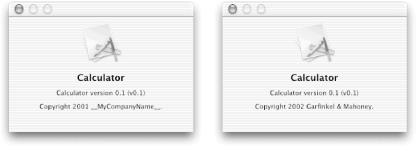
The left side of Figure 6-3 shows the Calculator application’s default About box (except the application’s name, which was changed to “Calculator” when we first named the project in PB). You can display this About box by running the Calculator application and choosing the Calculator → About Calculator menu item. As you can see in Figure 6-3, the About box displays the same application icon (currently the default one) that PB uses to identify the Calculator program in the Finder. It displays the name of the program and a version number. But what’s this “MyCompanyName” company? And where are these strings coming from in the first place?
Just as the Cocoa development environment allows you to store the
interface of your application in a resource called a nib, you can
also store string resources in special files called
plists
(short for property
lists), or string tables. When you create a new
project, PB creates a file called
InfoPlist.strings
that holds a series of name/value pairs
for textual information about your application. The built-in AppKit
About box uses this string table to determine what information should
be displayed inside the About box for your application.
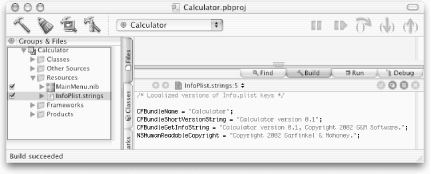
Back in PB, select the
InfoPlist.stringsfile in the Resources section of the Groups & Files pane. The contents of the file should be displayed in the lower-right pane of PB’s window.Change the copyright year from “2001” to “2002” and the company name from “MyCompanyName” to “Garfinkel & Mahoney” (or anything else you want!) in the NSHumanReadableCopyright string. See Figure 6-4.
Click PB’s build and run button.
Save the
InfoPlist.stringsfile (and any other file) when prompted.With the Calculator application running, choose Calculator → About Calculator. You should see the new About box shown on the right in Figure 6-3.