
In this section, we will create our initial PaperController class with the method that starts up Evaluator:
Double-click the
PaperWindow.nibfile in PB’s main window to open it up in IB.Select the Classes tab in the
PaperWindow.nibwindow.Select the NSWindowController class (under NSObject — use the Search field if necessary).
Choose the Classes → Subclass NSWindowController menu command, as shown in Figure 11-9.

Type Command-1 to display the myWindowController Class Info panel.
Change the name of your new subclass from “MyWindowController” to “PaperController”.
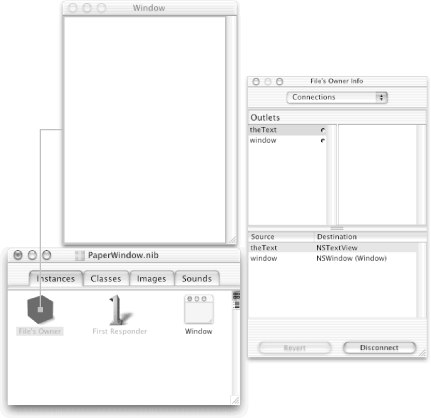
Add a new outlet named “theText” (note that there is already an outlet called “window”).
Select the File’s Owner under the Instances tab in the
PaperWindow.nibwindow.Type Command-5 and change the Custom Class of the File’s Owner to PaperController (because the PaperController will load the
PaperWindow.nibfile).Control-drag from the File’s Owner icon to the text area inside the window and double-click
theTextto make a connection, as shown in Figure 11-10.
Now select the PaperController class under the Classes tab in the
PaperWindow.nibwindow.Choose the Classes → Create Files for the PaperController menu command to create new
PaperController.handPaperController.mclass files in the MathPaper target.Click Choose at the bottom of the resulting sheet to create the class files in your
~/MathPaperfolder.Back in PB, check to see if the
PaperController.mandPaperController.hfiles were inserted in the Classes group in the Groups & Files pane. If not, drag them from the group in which they were inserted into the Classes group (after all, PaperController is a class!).
Next, we need to add five more instance variables to the PaperController
class. They will eventually be set to point to objects that we
described earlier in this chapter. We will also change the declared
type of the theText
instance variable so that it
exactly matches the NSTextView class type (theText
was the name of the PaperController outlet we set up in IB before we
created the class files). This second step is not strictly necessary,
but it enables the Objective-C compiler to do some additional
compile-time checking for us (and it’s good style!).
Note that this strong typing of an outlet can also be set in
IB’s Info dialog.
Still in PB, edit the
PaperController.hfile by adding or replacing the lines shown here in bold:#import <Cocoa/Cocoa.h> @interface PaperController : NSWindowController { NSTask *evaluator; NSPipe *toPipe; NSPipe *fromPipe; NSFileHandle *toEvaluator; NSFileHandle *fromEvaluator; IBOutlet NSTextView *theText; } @end
Next, we’ll work on the PaperController class
implementation. The first method that we will add is windowDidLoad
. This method is declared in
PaperController’s superclass, NSWindowController, so
we are actually overriding the method. ThewindowDidLoad method will automatically be invoked after
the PaperWindow.nib file is loaded and the
PaperController class is instantiated.
Insert the entire windowDidLoad method shown here into the
PaperController.mfile (which has only three statements in it so far). Make sure you put this method between the two@directives.- (void)windowDidLoad { NSString *path=0; [super windowDidLoad]; [ [self window] makeFirstResponder:theText]; path = [ [NSBundle mainBundle] pathForAuxiliaryExecutable:@"Evaluator"]; toPipe = [NSPipe pipe]; // NSTask below will retain fromPipe = [NSPipe pipe]; // NSTask below will retain toEvaluator = [toPipe fileHandleForWriting]; fromEvaluator = [fromPipe fileHandleForReading]; evaluator = [ [NSTask alloc] init]; [evaluator setLaunchPath:path]; [evaluator setStandardOutput:fromPipe]; [evaluator setStandardInput:toPipe]; [evaluator launch]; [ [NSNotificationCenter defaultCenter] addObserver:self selector:@selector(gotData:) name:NSFileHandleReadCompletionNotification object:fromEvaluator]; [fromEvaluator readInBackgroundAndNotify]; }
This method may look complicated, but it really isn’t. Let’s look at it piece by piece.
The first and third lines of the method create and initialize an
NSString object called path, which will contain
the file path of the Evaluator program. The next two lines invoke the
superclass (NSWindowController) method and make the
window’s text area the first responder.
The next four lines of the method create two pipes: one that will send data to the Evaluator process, and one that will receive data from the process. For each of these pipes, we obtain the particular file handle that the PaperController will need to use.
After the pipes are created, the method creates the NSTask object that will actually spawn and communicate with the Evaluator process. We tell the task the path of the Evaluator program and give it the two pipes that we will use for our bidirectional communications. We then send [evaluator launch], which starts the process.
After the task is launched, we need some way of finding out when it has data available for the PaperController. We could poll the fromEvaluator NSFileHandle class 10 or 20 times a second, but that would be incredibly wasteful. Instead, we ask the Cocoa notification system to watch the fromEvaluator object for us. When this object has data, it will emit a special message called NSFileHandleReadCompletionNotification to any object that happens to be observing. Our [NSNotificationCenter defaultCenter] message asks the default notification center to send our PaperController object a gotData: message whenever data is available. This notification request will remain until it is removed or our program exits.
The last line asks the fromEvaluator object to start watching for data from Evaluator. The NSFileHandle is checked for data as part of the application’s event loop.
Finally, we need to write the PaperController class cleanup code. Because the PaperController registered to receive notifications, it needs to unregister when it no longer wishes to receive them. Because we have alloc-ed Evaluator, we should be sure to release it when the PaperController object is no longer needed. The logical place for this cleanup code is in the dealloc method, which is called when the PaperController is about to be destroyed.
We’re getting closer! We have already arranged for the Evaluator program to be built automatically when the MathPaper application is built and for Evaluator to be placed automatically into the MathPaper bundle. We have created our NSWindowController subclass, PaperController, and arranged for MathDocument to instantiate PaperController automatically. The only things left to do are to write the code that will read each line of text entered when the user hits the Return key and send it to Evaluator, and then to write the code that will read the results from Evaluator and display them in the NSTextView. Before we can do that, however, we need to explain a lot more about how the NSTextView works.