
Now it’s time to finish the PaperController class. To do this, we need to make the following changes to PaperController:
Add a method that waits for the user to hit the Return key, gets the new formula that the user has typed, and then sends it to the appropriate Evaluator process.
Add a method that gets invoked when there is data from the Evaluator process ready to be displayed in the NSTextView.
Terminate the Evaluator process when a MathPaper window is closed.
There are many ways to find out when the user hits the Return key. One way is to subclass the NSTextView class and examine each event; another is to set up a delegate object that will be alerted each time the text inside the NSTextView changes. If the change results from a carriage return, our delegate can then grab the last line of the NSTextView object and send that line to Evaluator.
An NSTextView delegate can receive all sorts of special messages when things happen to the NSText object. The one that we care about here is the textDidChange: message, which is sent to the delegate object whenever the text changes. To find out if the text changed because the user hit the Return key, our delegate method asks the window for the current event; it then asks the current event for its characters and checks whether the resulting string is equal to a carriage return.
After the MathPaper user hits the Return key, our delegate method asks the NSTextView object for an NSString that contains all of the text that is currently stored inside the NSTextView. It then searches backward through this NSString object for the second-to-last carriage-return character and creates a substring containing the characters located between the last two carriage returns. This substring is then sent to the Evaluator process using NSFileHandle’s writeData: method. We also temporarily set the NSTextView in the MathPaper window to be “not editable”, because we don’t want to allow the user to type a new equation while Evaluator is calculating the results.
Although we could create a separate class for our NSTextView
delegate, instead we’ll make our PaperController
class the NSTextView’s delegate and implement the
textDidChange: delegate method in
PaperController.m.
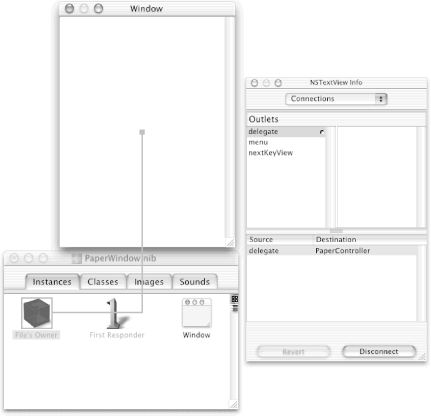
Back in IB, open
PaperWindow.nib.Double-click the NSTextView that’s “inside” the NSScrollView object to select it (you should see a blinking edit cursor). If you only single-click the NSScrollView/NSTextView combination, you’ll get the NSScrollView and not the desired NSTextView.
Control-drag from the center of the NSTextView object to the File’s Owner icon in the
PaperWindow.nibwindow.Double-click the
delegateoutlet in the NSTextView Connections inspector to set the File’s Owner as the delegate of the NSTextView, as shown in Figure 11-11.
Back in PB, insert the textDidChange: delegate method into the
PaperController.mfile, as follows:// NSTextView delegate method textDidChange: // If current event is a carriage return, do special processing - (void)textDidChange:(NSNotification *)notification { NSString *key = [[[self window] currentEvent] characters]; if ([key isEqualToString:@" "]) { // Get the last line of text from theText and process it NSString *str = [theText string]; int length = [str length]; int length = [str length]; int i; // Get the last line and send it to Evaluator if it has // anything on it for (i=length-1;i>=0;i--) { if (i==0 || [str characterAtIndex:i-1] == ' ') { NSRange llRange = NSMakeRange(i,length-i); NSString *lastLine = [str substringWithRange:llRange]; if ([lastLine length]>1) { NSData *sendData = [lastLine dataUsingEncoding:NSASCIIStringEncoding allowLossyConversion:YES]; [toEvaluator writeData:sendData]; // Do not allow any more changes to the text [theText setEditable:NO]; } return; } } } }
Our textDidChange: method uses NSString’s dataUsingEncoding:allowLossyConversion: method to create an NSData object, which is sent to the NSFileHandle object that connects to Evaluator. The NSData class is similar to the NSString class, except that NSData objects can represent any arbitrary block of binary data. Cocoa provides several methods for converting between NSString and NSData objects.
Earlier in this chapter, we asked the application’s default notification center to send the gotData: message to our PaperController object each time Evaluator has new data to be displayed, but we haven’t yet created the gotData: method to receive the data! We’ll do that now.
Still in PB, add the gotData: method that follows to the
PaperController.mfile:- (void)gotData:(NSNotification *)notification { NSData *data; NSString *str; data = [ [notification userInfo] objectForKey:NSFileHandleNotificationDataItem]; str = [ [NSString alloc] initWithData:data encoding:NSASCIIStringEncoding]; // Add the data to the end of the theText object [theText appendString:str]; [theText appendString:@"-------------------- "]; // Scroll to the bottom [theText scrollRangeToVisible: NSMakeRange([ [theText textStorage] length], 0)]; // Register to get the notification again [fromEvaluator readInBackgroundAndNotify]; // Allow the user to type additional math expressions [theText setEditable:YES]; // And release the string [str release]; }
This method is a little tricky because it interfaces with Cocoa’s notification system. According to the NSFileHandle documentation, when the NSFileHandle posts a notification that it has data, the data is placed inside an NSDictionary object under the key NSFileHandleNotificationDataItem.
The first executable statement in gotData: gets the NSData object that contains
the (raw) data from the file handle, and the second statement turns
the NSData object into an NSString object. The third statement sends
this string an autorelease message,
which assures that it will be released if it is not retained
elsewhere in our program (and it won’t be). The next
two statements append the string from Evaluator to the end of
theText, and then follow this with a line of
hyphens and a newline that will separate mathematical expressions
from one another in the window.
NSFileHandleReadCompletionNotifications are one-shot. To get the next
batch of data from the NSFileHandle, the PaperController class needs
to ask the NSFileHandle for the next notification. Finally, the
method makes theText editable, so that the user
can type in more data.
If you read the gotData: method and then closely read the documentation for the NSText and NSTextView classes, you’ll notice something odd: the NSTextView class does not implement an appendString: method! This is a useful method to have, but for some reason, Apple didn’t include it. Thus, we’ll have to create it ourselves.
Fortunately, there’s an easy way around this problem — we’ll add the method to Cocoa’s NSTextView class using an Objective-C category . Being able to add methods to existing classes without subclassing is one of the cooler things that you can do with Objective-C. We’ll do just that in the following two steps, adding the NSTextView(MathPaper) category that includes the appendString: method we need:
Insert the NSTextView(MathPaper) category interface shown here into the
PaperController.hfile, after the existing@enddirective:@interface NSTextView(MathPaper) - (void)appendString:(NSString *)str; @end
Now insert the category implementation shown here after the existing
@enddirective in thePaperController.mfile:@implementation NSTextView(MathPaper) - (void)appendString:(NSString *)str { int len = [ [self textStorage] length]; [self replaceCharactersInRange:NSMakeRange(len,0)withString:str]; } @end
This category adds the appendString:
method to the NSTextView class (not the PaperController
class, even though it’s located in
PaperController.m!). The method first finds out
how many characters are in the NSTextView’s
textStorage object. It then calls the
NSMakeRange( ) utility function to create an
NSRange object (location and length) to pass to
NSTextView’s replaceCharactersInRange:withString: method,
together with the appendString:
method’s string argument. The replaceCharactersInRange:withString: method
replaces the zero-length selection that exists at the end of the
textStorage object with the passed-in string.
Now press the pop-up menu button labeled Evaluator near the top of PB’s main window and drag to MathPaper. Note the target icon on this pop-up menu, indicating that we have just changed our (build) target from Evaluator to MathPaper.
Build and run the MathPaper application.
Type some mathematical expressions in MathPaper’s window and hit Return. The expressions should be evaluated and you should get results!
Choose File→ New (or type Command-N) three times to get a total of four MathPaper windows.
Type some additional mathematical expressions in the key MathPaper window, as shown in Figure 11-12.
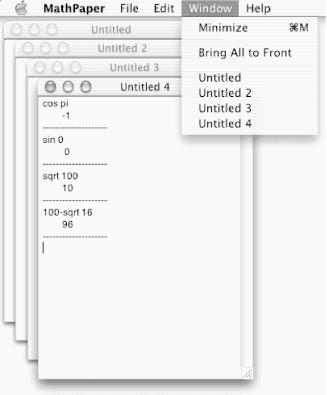
Choose the Window menu and note that the four MathPaper windows are listed, as shown in Figure 11-12. These menu commands work! The multiple-document architecture provides this functionality.
Choose the Services menu, and note that its commands work too.
Do not quit MathPaper yet.
Before we move on, it’s useful to see which Unix processes are running when MathPaper is running:
Open a Terminal window and type
psuxwwin it. (If you prefer, use ProcessViewer here.)
As we saw previously, the ps command displays
processes running on your Unix box. The u option
tells ps to display processes owned by the user
(i.e., you), the x option tells
ps to display processes without controlling
terminals, and the ww option tells
ps to display in the wide format (so you can see
the long file paths). Type man
ps in the Terminal window for all the gory
details.
The COMMAND column of the ps
uxww display contains one MathPaper process:
/Users/wsurfer/MathPaper/build/MathPaper.app/Contents/MacOS/MathPaper
The COMMAND column of the ps
uxww display also contains four Evaluator
processes that all look like this:
/Users/wsurfer/MathPaper/build/MathPaper.app/Contents/Resources/Evaluator
Each one of the Evaluator processes is tied to one of the four
MathPaper windows. If you find it’s too difficult to
read the output of the ps
uxww
command, try typing this instead:
ps uxww | grep EvaluatorThis will display only the processes that include the “Evaluator” string.
Now close all four of the MathPaper windows by clicking their red close buttons, but leave MathPaper running.
Type
psuxwwin the Terminal window again.
You would expect the four Evaluator processes to go away one by one as the windows are closed, but in fact they are all still running (with no useful purpose!). We will have to do something about that.
Quit MathPaper.
Type
psuxwwin the Terminal window a third time, and you’ll see that all five of the processes (one MathPaper and four Evaluator processes) have ceased running.
It’s clear that releasing the NSTask object associated with the Evaluator in the release method doesn’t kill the Evaluator process itself. As a result, Evaluator processes hang around until the MathPaper application itself is killed. To kill each Evaluator process properly, we need to send the associated NSTask a terminate message before releasing it. We’ll do that shortly.
Many programs that run on Mac OS, Windows, and Unix do not properly clean up after themselves: they rely on the operating system to do their housekeeping. You should not depend on the operating system this way with Cocoa, not because of any flaw in the Mac OS X operating system, but rather because of its stability. Cocoa applications frequently need to run for days or even weeks without being shut down. If you waste resources — even a little bit — it may become obvious (to the detriment of your application and to you as a developer!).
When each MathPaper window is closed, the PaperController object will be sent a release message. Because this PaperController had only one reference count, this will cause the PaperController object to be sent a dealloc message. When this message is received, the PaperController will first terminate and then release the Evaluator’s NSTask. (The NSTask will then release itself.)
Build and run MathPaper again. Type
psuxwwin a Terminal window to test whether the Evaluator processes are killed as the MathPaper windows are closed.Quit MathPaper.
Do you think it’s
somewhat unsettling that our MathPaper application simply says the
word “Untitled” in the title bar of
each window, rather than stating the name of the application? If so,
you can make a three-line addition to the
PaperController.m class implementation file to
change this. Let’s do it.
Add the following method, windowTitleForDocumentDisplayName: , to the
PaperController.mfile:- (NSString *)windowTitleForDocumentDisplayName: (NSString *)displayName { return [@"MathPaper: " stringByAppendingString:displayName]; }
Build and run MathPaper again and note the more appropriate window titles, as shown in Figure 11-13.
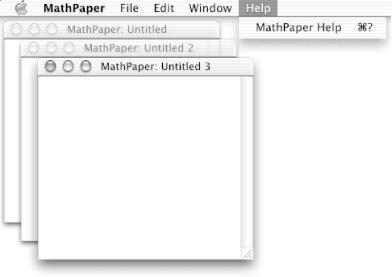
The NSWindowController class automatically invokes the windowTitleForDocumentDisplayName: method to determine the actual window title that is displayed. Our version of this method returns an NSString that has the title “MathPaper:” before the filename. (Recall that the NSString object is autorelease-d when the application returns to the main event loop.)
Tip
This situation with the title demonstrates why it is important to read the Cocoa developer documentation. Before we wrote this chapter, we didn’t know about the windowTitleForDocumentDisplayName: method (it wasn’t present in earlier versions of the Application Kit.) But we thought that the plain “Untitled” window was too barren, so we opened up the documentation for NSWindowController and searched for the word “title”. Within two minutes, we knew how to remedy the problem, and the code worked perfectly the first time.